
HW170LIK - Heating HOTPOINT - Free user manual and instructions
Find the device manual for free HW170LIK HOTPOINT in PDF.


| Product Type | 50cm Free-Standing Gas Cooker |
| Model | HW170LIK |
| Brand | Hotpoint |
| Fuel Type | Natural Gas (G20) or LPG (G30/G31), convertible |
| Number of Hob Burners | 4 (1 Fast, 1 Semi-Fast, 2 Auxiliary) |
| Oven Type | Gas oven with thermostat |
| Oven Capacity | 41 litres |
| Oven Dimensions (HxWxD) | 34 x 39 x 31 cm |
| Grill | Gas grill with safety device |
| Ignition | Battery-powered electronic ignition (1.5V AA alkaline battery) |
| Safety Features | Flame failure safety device on hob burners, oven, and grill; safety chain for gas hose |
| Adjustable Height | 900 mm - 915 mm via adjustable feet |
| Installation | Class 1 or Class 2 subclass 1; requires ventilation; not for bathrooms |
| Gas Connection | G 1/2 female threaded; flexible hose up to 1.5 m; bayonet fitting for recessed installation |
| Electrical Supply | 220-240 V ~ 50/60 Hz for ignition (battery backup) |
| Power Rating | Total gas consumption: 12.90 kW (or 938 g/h G30, 921 g/h G31) |
| Oven Temperature Control | Gas Mark 1 to 9 (approx. 110°C - 240°C) |
| Oven Shelves | 2 removable shelves with safety stops; dishwashers-safe shelf supports |
| Cleaning | Use mild cleaners; avoid abrasives on knobs and trims; oven and grill parts washable with steel wool soap pad |
| Battery Replacement | User-replaceable AA alkaline battery in plinth panel |
| Warranty | 12 months parts and labour; 5 years free replacement parts (subject to conditions) |
| Weight | Approximately 45 kg (estimated) |
Frequently Asked Questions - HW170LIK HOTPOINT
User questions about HW170LIK HOTPOINT
0 question about this device. Answer the ones you know or ask your own.
Ask a new question about this device
Download the instructions for your Heating in PDF format for free! Find your manual HW170LIK - HOTPOINT and take your electronic device back in hand. On this page are published all the documents necessary for the use of your device. HW170LIK by HOTPOINT.
USER MANUAL HW170LIK HOTPOINT
Instructions for Installation and Use
50cm Free Standing Gas Cooker
HW170GK
HW170GW
HW150GW
HW170GIK
HW170GIW
HW170LIK
HW170LIW
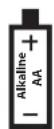
NOTE: This appliance is fitted with a battery powered ignition system (the battery provided). Sholud the ignition system start to spark slowly - or not at all, the battery will need replacing. See the section on battery replacement.
To the Installer
Before installation fill in the product details on the back cover this book.
The information can be found on the rating plate.
To the User
You must read the instructions prior to installing and using the appliance and then retain them for future reference.
Contents
| Introduction 3 | |
| Installation 4 | |
| Burner and Nozzle Specifications 8 | |
| Safety Information 9 | |
| Features 11 | |
| Control Panel 12 | |
| Use of hotplates 13 | |
| Grilling 14 | |
| Oven 15 | |
| Oven cooking charts 16 | |
| Care and Cleaning / Battery Replacement 17 | |
| Cooking Results Not Satisfactory? 18 | |
| Something Wrong With Your Cooker? | 19 |
| Technical Characteristics | 20 |
| After Sales Service | 22 |
| Hotpoint Guarantee | 23 |
| Key Contacts | Back Cover |
You must read these instructions prior to using your appliance and retain them for future use.
Introduction
Your new appliance is guaranteed* and will give lasting service. This guarantee is only applicable if the appliance has been installed in accordance with the installation instructions detailed in this booklet.
To help make best use of your cooking equipment, please read this booklet carefully.
The cooker is designed specifically for domestic use and responsibility will not be accepted for use in any other installation.
When the cooker is first used an odour may be emitted, this will cease after a period of use.
When first using the cooker ensure that the room is well ventilated (e.g. open a window or use an extractor fan) and that persons who may be sensitive to the odour avoid any fumes. It is suggested that any pets be removed from the room until the smell has ceased. This odour is due to temporary finish on oven liners and elements and also any moisture absorbed by the insulation.
* The guarantee is subject to the provisions that the appliance:
(a) Has been used solely in accordance with the Users Instruction Book.
(b) Has been properly connected to a suitable supply voltage as stated on the rating plate attached to this equipment.
(c) Has not been subjected to misuse or accident or been modified or repaired by any person other than the authorised employee or agent.
(d) Has been correctly installed.
1 This appliance is intended for nonprofessional use within the home.
2 These instructions are only for those countries whose symbols appear in the booklet and on the serial no. plate of the appliance.
3 This owner's manual is for a class 1 appliance (insulated) or class 2, subclass 1 appliances (installed between two cabinets.
Installation
The appliance must only be installed by a competent person. In the UK, CORGI registered installers undertake to work to safe and satisfactory standards.
Before moving your cooker check that it is cool, and switch off at the cooker control unit. Movement of your cooker is most easily achieved by lifting the front as follows:
Open the grill door sufficiently to allow a comfortable grip on the underside front edge of the oven roof, avoiding any grill elements.
Note: Take care in moving the cooker as it is heavy. Take care to ensure that any floor covering is not damaged. (FIG. C)
Splashplate optional, apply to Parts Department (see Back Cover for contact number.)
The following instructions should be read by a qualified technician to ensure that the appliance is installed, regulated and technically serviced correctly in compliance with current regulations.
Important: remember to unplug the appliance from the mains before regulating the appliance or carrying out any maintenance work.
Positioning
Important: this unit may be installed and used only in permanently ventilated rooms according to the British Standards Codes Of Practice: B.S. 6172/B.S. 5440, Par. 2 and B.S. 6891 Current Editions. The following requirements must be observed:
a) The cooker should not be installed in a bed sitting room with a volume of less than 20m3 . If it is installed in a room of volume less than 5m3 an air vent of effective area of 110cm2 is required, if it is installed in a room of volume between 5m3 and 10m3 a supplementary air vent area of 50cm2 is required, if the volume exceeds 11m3 no air vent is required. However, if the room has a door or a window which opens directly to the outside no air vent is required even when the volume is between 5m3 and 11m3 .
b) During prolonged use of the appliance you may consider it necessary to open a window to the outside to improve ventilation.
c) If there are other fuel burning appliances in the same room, B.S.5440 Part 2 Current Edition, should, be consulted to determine the requisite air vent requirements.
Installation of the cooker
For a correct installation of the cooker the following precautions must be followed:
The height of the cooker can be adjusted by means of adjustable feet in the plinth (900mm - 915mm). Adjust the feet by tilting the cooker from the side. Then install the product into position.
NOTE: This appliance must not be fitted on a platform.
The cooker is designed to fit between kitchen cabinets spaced 500mm apart. The space either side need only be sufficient to allow withdrawal of the cooker for servicing. It can be used with cabinets one side or both as well as in a corner setting. It can also be used free-standing.
Adjacent side walls which project above hob level, must not be nearer to the cooker than 150mm and should be protected by heat resistant material. Any overhanging surface or cooker hood should not be nearer than 650mm. (Fig.A)
a) The cooker may be located in a kitchen, a kitonen/diner or bed sitting room, but not in a bathroom or shower room.
b) The hoods must be installed according to the requirements in the hood handbook.
c) The wall in contact with the back of the cooker must be of flameproof material.
d) The cooker is fitted with a safety chain that must be attached to a hook, secured to the wall behind the appliance.
Note: some models can have their gas connection inverted. It is important to make sure the safety chain is always situated on the side which corresponds to the hose holder (Fig. B).

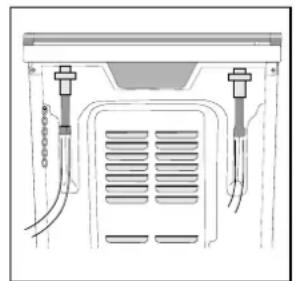

Fig. A Fig. B Fig. C
Gas connection
The cooker should be connected to the gas-supply by a corgi registered installer. During installation of this product it is essential to fit an approved gas tap to isolate the supply from the appliance for the convenience of any subsequent removal or servicing. Connection of the appliance to the gas mains or liquid gas must be carried out according to the prescribed regulation in force, and only after it is ascertained that it is adaptable to the type of gas to be used. If not, follow the instructions indicated in the paragraph headed “Adaptation to different gas types”. On some models the gas supply can be connected on the left or on the right, as necessary; to change the connection, reverse the position of the hose holder with that of the cap and replace the gasket (supplied with the appliance). In the case of connection to liquid gas, by tank, use pressure regulators that conform to the regulation in force. The gas supply must be connected to the left of the appliance. Be sure that the hose does not pass through the rear of the cooker touching hot parts.
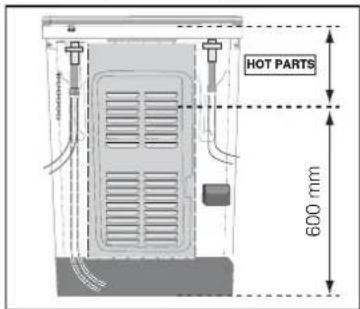
Important: make sure the supply pressure conforms with the values shown in the table entitled “Characteristics of the burners and nozzles”. When the cooker is installed between cabinets (recessed), the gas connection must be effected by an approved flexible hose with bayonet fitting (BS 669 Current Edition). The gas inlet for the cookers is a threaded G 1/2 gas female fitting.
Connecting the gas supply
To make the connection, a flexible hose should be used corresponding to the current gas regulations which are:
- the hose must never be at any point in its lenght in contact with the "hot" parts of the cooker;
• the hose must never be longer than 1,5 metre; - the hose must not be subject to any tension or torsional stress and it must not have any excessively narrow curves or bottlenecks;
• the hose must be easy to inspect along its entire length to check its condition;
•the hose must always be in good condition, never attempt to repair.
Important: the installation must comply with gas safety (installation and use) regulations 1984. In all cases for the above, by low, a qualified, corgi approved engineer must be called for installation.
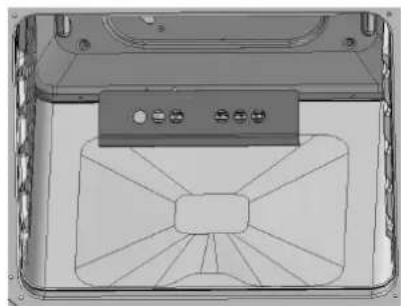
Important: Before using the oven, position the oven burner deflector "A" (provided with the appliance) in the correct place by inserting the lower tab into the support slot (see figure).

Disposing of the appliance
When disposing of the appliance please remove the plug by cutting the mains cable as close as possible to the plug body and dispose of it as described above.
Adapting the cooker to different types of gas
In order to adapt the cooker to a different type of gas with respect to the gas for which it was produced (indicated on the label attached to the lid), follow these steps:
a) replace the hose holder mounted on the appliance with that supplied in the bag of "cooker accessories".
b) Replacing the burner nozzles on the hob:
- remove the grids and slide the burners from their housings;
- unscrew the nozzles using a 7 mm socket spanner, and replace them with nozzles for the new type of gas (see table 1 "Burner and nozzle characteristics").
- replace all the components by repeating the steps in reverse order.
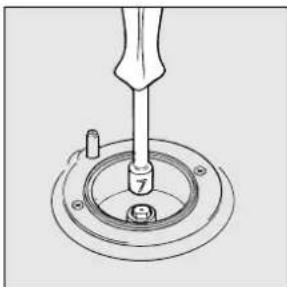
c) Minimum regulation of the hob burners:
• turn the tap to minimum;
- remove the knob and adjust the regulation screw, which is positioned in or next to the tap pin, until the flame is small but steady.
N.B.: in the case of liquid gas, the regulation screw must be screwed in to the bottom.
- check that the flame does not turn off when you turn the tap quickly from high to low.
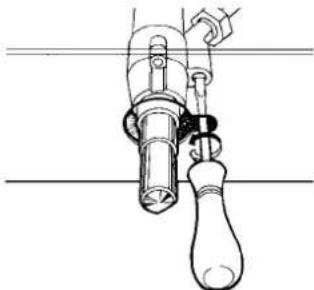
d) Regulating the primary air of the burners:
The primary air of the burners requires no regulation.
Adapting to different types of gas
In order to adapt the oven to a different type of gas with respect to the gas for which it was manufactured (indicated on the label), follow these simple steps:
a) Replacing the oven burner nozzle
- open the oven door fully
•pull out the sliding oven bottom
•unscrew the burner fastening screws

- remove screw "V" and then the oven burner:
- Unscrew the oven burner nozzle using the socket spanner for the nozzles "Z", or a 7 mm socket spanner, and replace it with a nozzle suited to the new type of gas (see Table 1).
Take particular care handling the spark plug wires and the thermocouple pipes.
-Replace all the parts, following the steps described above in the reverse order.
b) Minimum regulation of the gas oven burner with thermostat:
- light the burner as described in the paragraph "the oven knob" of the instruction booklet.
• turn the knob to Max for about 10 minutes and then turn the knob to the Min setting; - remove the knob:
- regulate the screw positioned outside the thermostat pin until the flame is small but steady. N.B.: in the case of liquid gas, the regulation screw must be screwed in to the bottom.
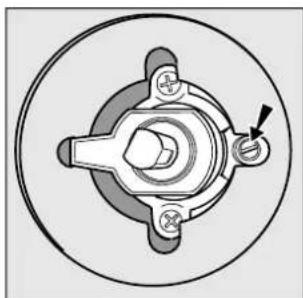
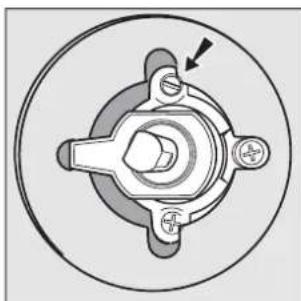
- check that the burner does not turn off when you turn the knob from Max to Min and and when you open and close the oven door quickly.
Adapting the gas grill to different types of gas
Replacing the nozzle of the grill burner:
- remove the screw and then slide out the grill burner "V" (see Fig. E):
- unscrew the grill burner nozzle using the special socket spanner for the nozzles (see Fig. F) or better still a 7 mm socket spanner; replace the nozzle with a nozzle for the new type of gas (see table 1).

Fig. E Fig. F

Important
On completion of the operation, replace the old rating sticker with one indicating the new type of gas used. This sticker is available from our Service Centres.
Note
Should the pressure of the gas used be different (or vary) from the recommended pressure, it is necessary to fit a suitable pressure regulator onto the inlet pipe in compliance with current National Regulations relative to "regulators for channelled gas".
Burner and Nozzle Specifications
Table 1 Liquid Gas Natural Gas
| Burner Diameter (mm) | PowerkW (p.c.s.*)Nominal Reduced (mm) | By-Pass1/100*** (mm) | Nozzle1/100 | Flow*g/h | Nozzle1/100 | Flow*l/h | ||||
| Fast(Large)(R) | 100 | 94 | 3,00 | 0,7 | 41 | 87 | 218 | 214 | 128 | 286 |
| Semi Fast(Medium)(S) | 75 | 69 | 1,90 | 0,4 | 30 | 70 | 138 | 136 | 104 | 181 |
| Auxiliary(Small)(A) | 51 | 46 | 1,00 | 0,4 | 30 | 52 | 73 | 71 | 76 | 95 |
| Oven | - | 2,60 | 0,6 | 36 | 75 | 189 | 186 | 123 | 248 | |
| Grill | - | 2,50 | 1,3 | 63 | 80 | 182 | 179 | 122 | 238 | |
| SupplyPressures | Nominal (mbar)Minimum (mbar)Maximum (mbar) | 28-302035 | 372545 | 201725 | ||||||
* At 15°C and 1013 mbar- dry gas
** Propane P.C.S. = 50,37 MJ/Kg
*** Butane P.C.S. = 49,47 MJ/Kg
Natural P.C.S. = 37,78 MJ/m 4

HW170GK
HW170GW
HW150GW
HW170GIK
HW170GIW
HW170LIK
HW170LIW
Safety Information
When used properly your appliance is completely safe but as with any electrical product there are certain precautions that must be observed. PLEASE READ THE PRECAUTIONS BELOW BEFORE USING YOUR APPLIANCE.
Always
- Remove all packing from inside the oven and grill compartments before switching on for the first time.
●Understand the controls prior to using the appliance. - Keep children away from the appliance when grilling as the surfaces will get extremely hot during and after use.
● Turn controls off when you have finished cooking and when not in use. - Stand back when opening an oven door to allow any build up of steam or heat to disperse.
- Use dry good quality oven gloves when removing items from the oven/grill.
- Place pans centrally over the hotplate making sure handles are kept away from the edge of the hob and cannot become heated by other hotplate/pans.
●Take care to avoid heat/steam burns when operating the controls.
● Turn off the electricity supply at the wall switch before cleaning and allow the appliance to cool.
●Make sure the shelves are in the correct position before switching on the oven. - Keep the oven and grill doors closed when the appliance is not in use.
● Take care when removing items from the grill when the lower oven is on as the contents will be hot. - Keep the appliance clean, as a build up of grease or fat from cooking can cause a fire.
- Follow the basic principles of food handling and hygiene to prevent the possibility of bacterial growth.
- Keep ventilation slots clear of obstructions.
●Refer servicing to a qualified appliance service engineer.
● Take care to avoid touching heating elements inside the oven, as during use the oven becomes hot.
● Before operating the product, remove all plastic film from the sides of the appliance.
Safety Information
Never
● Never line the interior of the oven with foil as this may cause the appliance to overheat.
- Never leave children unsupervised where a cooking appliance is installed as all surfaces will be hot during and after its use.
- Do not allow children or persons who are not familiar with the appliance to use it, without supervision.
●Never allow anyone to sit or stand on any part of the appliance.
●Never store items above the appliance that children may attempt to reach.
●Never leave anything on the hob surface when unattended and not in use.
●Never remove the oven shelves whilst the oven is hot.
● Never heat up unopened food containers as pressure can build up causing the container to burst.
- Never store chemicals/food stuffs, pressurised container in or on the appliance, or in cabinets immediately above or next to the appliance.
●Never place flammable or plastic items on or near the hob.
●Never fill a deep fat frying pan more than 1/3 full of oil, or use a lid. DO NOT LEAVE UNATTENDED WHILE COOKING.
● Never operate the grill with the grill door closed as this will cause the appliance to overheat.
●Never use the appliance as a room heater.
●Never use the grill to warm plates.
●Never dry any items on either the hob or oven doors.
●Never install the appliance next to curtains or other soft furnishings.
●Never use steam cleaners.
SAFETY ADVICE IN CASE OF A CHIP-PAN FIRE
In the event of a chip pan fire or any other pan fire.
- TURN OFF THE COOKER APPLIANCE AT THE WALL SWITCH.
- COVER THE PAN WITH A FIRE BLANKET OR DAMP CLOTH, this will smother the flames and extinguish the fire.
- LEAVE THE PAN TO COOL FOR AT LEAST 60 MINUTES BEFORE MOVING IT. Injuries are often caused by picking up a hot pan and rushing outside with it.
NEVER USE A FIRE EXTINGUISHER TO PUT OUT A PAN FIRE as the force
of the extinguisher is likely to tip the pan over. Never use water to extinguish oil or fat fires.
Features
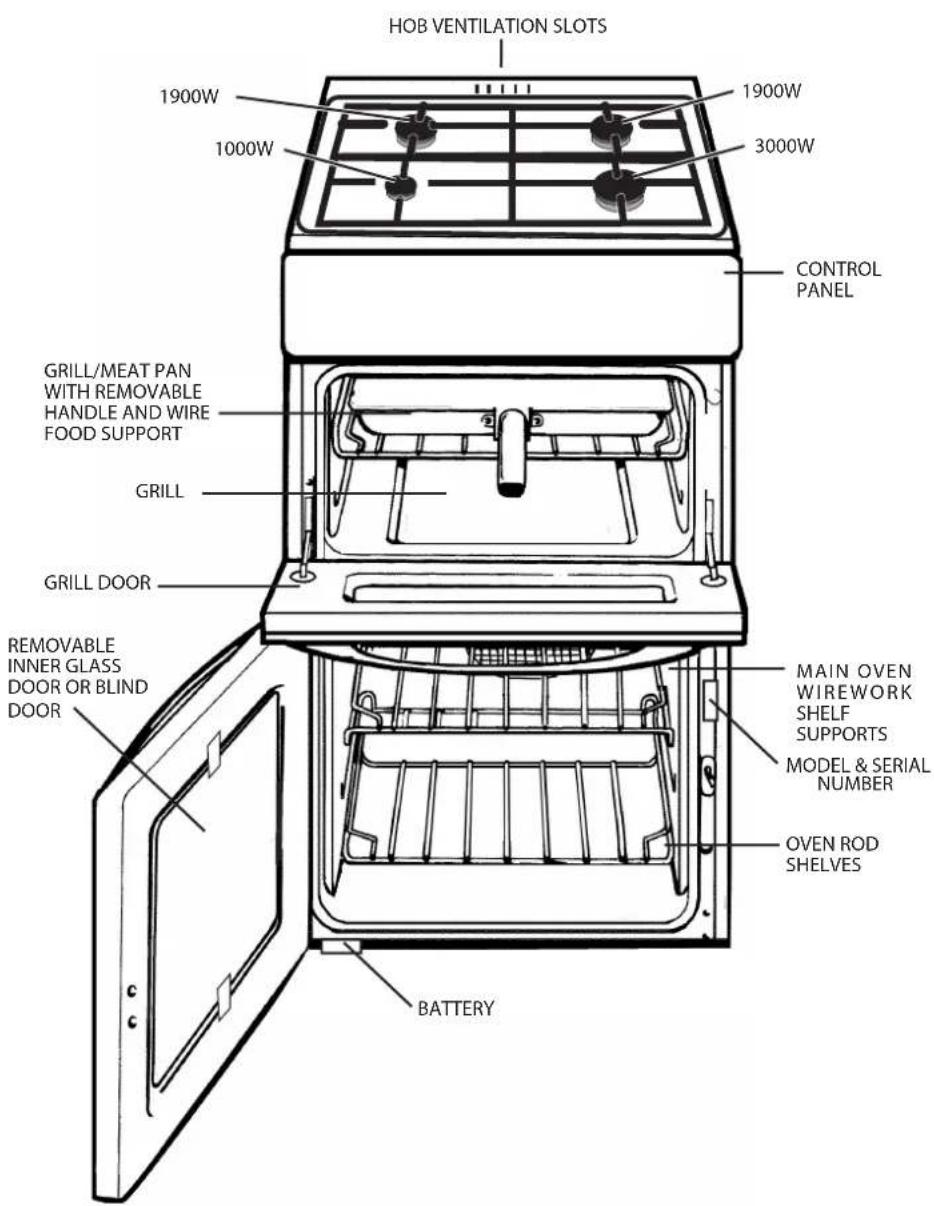
Control Panel
![graph LR A["MAIN OVEN"] --> B["GRILL"] B --> C["ELECTRONIC INJECTION BUTTON"] C --> D["LEFT FRONT BURNER"] D --> E["LEFT REAR BURNER"] E --> F["RIGHT REAR BURNER"] F --> G["FRONT RIGHT"] style A fill:#fff,stroke:#000 style B fill:#fff,stroke:#000 style C fill:#fff,stroke:#000 style D fill:#fff,strok…](/content/2026/05/1084226/images/b4638ae9bb64b256b6ac7de5f6010e8af0c824ed82d43a3fb506414227c7ae84.jpg)
Control Knobs for the gas burners
The position of the gas burner controlled by each one of the knobs is shown by a solid ring •. To light one of the burners, hold a lighted match or lighter near the burner and, at the same time, press down and turn the corresponding knob counter clockwise to the maximum setting. Each burner can be operated at its maximum, minimum or intermediate power. Shown on the knob are the different symbols for off • (the knob is on this setting when the symbol corresponds with the reference mark on the control panel), for maximum and minimum. To obtain these settings, turn the knob counter clockwise with respect to the off position. To turn off the burner, turn the knob clockwise until it stops (corresponding again with the symbol).
Electronic Ignition for the Gas Hob*
This device operates when a slight pressure is applied to the button marked with ☆ symbol. To light a specific burner just press the button ☆ while pushing the corresponding knob all the way in and turning it counter-clockwise until it lights. For immediate lighting, first press the button and then turn the knob. Important: Should the burner flames accidentally go out, turn off the control knob and wait at least 1 minute before trying to relight.
Models with Hob Gas Burner Safety Devices to Prevent Leaks *
These models can be identified by the presence of the device itself. Important: Since the hob burners are equipped with a safety device, you must hold the control knob in for about 3 seconds after the burner has been lighted to allow the gas to pass until the safety thermocouple has heated.
* (only available on certain models)
Use of Hotplates
Practical Advice on Using the Burners
To use the burners as efficiently as possible, some basic guidelines should be followed:
- Use cookware that is the right size for each burner (see table) in order to prevent the flame from spreading beyond the bottom of the cookware.
- Only use cookware with flat bottoms.
- As soon as the boiling point is reached, turn the knob to the lowest setting.
•Always use lids with pots and pans.
| Burner ø Cookware diameter (cm) | |
| Fast (R) 24 - 26 | |
| Semi Fast (S) 16 - 20 | |
| Auxiliary (A) 10 - 14 | |
N.B.: On models equipped with a reduction grid, the grid should only be used with the auxiliary burner when cookware with a diameter of less than 12 cm is used.
- Press the ignition button and then push in and turn the control knob of the chosen burner anti-clockwise to the large flame symbol. Continue to press the ignition button until the sparks light the gas.
- Turn the control knob anti-clockwise to the desired setting. Only turn the control knob between the large flame symbol and the small flame symbol for adjusting the setting.
- To turn off, turn the control knob fully clockwise to the symbol O.
DO NOT use the hotplate unless all pan supports are in position.
DO NOT use mis-shapen pans which may be unstable.
DO NOT use round base woks directly on the pan supports.
DO NOT use the glass lid (if fitted) as a working surface.
Each burner is fitted with a spark ignitor for lighting the gas. To ensure rapid lighting of the burners every time they are used, the ignitors must be kept clean and dry. Remove any food spillage or cleaning materials from the electrode using a small nylon brush such as a tooth brush. Access to the electrode can be achieved by lifting off the loose burner parts carefully when the burners are cool.
When the hotplate burner bodies and caps are removed for cleaning, be careful not to drop any food particles or cleaning materials into the burner bases, to avoid the possibility of blocking the gas jets.
If aluminium based pans are used, a silvery deposit may appear on the top edge of the pan support fingers. See 'Care and Cleaning' section for cleaning information.
SAFETY REQUIREMENTS FOR DEEP FAT FRYING
- Never fill chip pans more than one third full with oil or fat.
- Never leave oil or fat unattended during the heating or cooling period.
- Never heat fat or fry with a lid on the pan.
- Always dry food thoroughly before frying, and lower it slowly into the hot oil or fat. Frozen foods in particular will cause frothing and spitting if added too quickly.
- Always keep the outside of the pan clean and free from streaks of oil or fat.
HOW TO DEAL WITH A FAT FIRE
- Do not move the pan.
- Turn off the hotplate burners.
- Smother the flames with a fire blanket or damp cloth to extinguish the fire. Do not use water or a fire extinguisher as the force of it may spread the burning fat or oil over the edge of the pan.
- Leave the pan for at least 60 minutes before moving it.
GRILLING MUST BE DONE WITH THE GRILL DOOR OPEN.
CONTROL KNOBS MAY BECOME HOT DURING GRILLING.
CAUTION: ACCESSIBLE PARTS WILL BECOME HOT WHEN THE GRILL
IS USED - CHILDREN SHOULD BE KEPT AWAY.
To operate the grill proceed as follows:
- Open the grill door and remove the grill pan.
- Press the ignition button and then push in and turn the grill control knob anti-clockwise to the large flame symbol. Continue to press the ignition button until the spark lights the gas.
- Turn the control knob anti-clockwise to the desired setting. There is a delay of about six seconds whilst the safety device operates before the burner comes on full. Only turn the control knob between the large flame symbol and the small flame symbol when adjusting the setting.
- To turn off, turn the control knob fully clockwise to the symbol O Important (only on a few models): when using the grill, the oven door must be left open by positioning the deflector "B" between control panel and deflector "A" to prevent the cooker knobs from overheating.
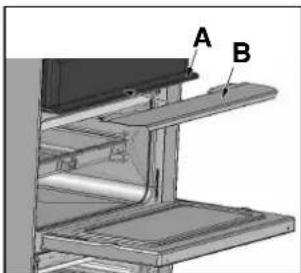
Slide the grill pan along the runner towards the rear of the grill compartment until it stops. An odour may be noticed when first using the grill - this should cease after a short period of use. Grill can be started from cold but for the best result preheat for approximately five minutes. Most cooking is done with the heat on full, but it may be necessary after sealing the food to reduce the heat as required.
For au gratin dishes eg. Macaroni Cheese and meringue toppings eg. Baked Alaska place the dish on the floor of the grill compartment. The base of the grill pan can be used for warming fruit garnishes on the reduced setting.
DO NOT cover the grill pan or grid with aluminium foil as this can hold fat, intensify the heat and create a fire hazard. Relighting In the event of the burner flames being accidentally extinguished, turn off the burner control and do not attempt to re-ignite the burner for at least one minute.
Fixing the Grill Pan The grill pan handle is detachable from the pan, to facilitate cleaning and storage. Fix the grill pan handle securely in position before use.
The handle fits onto the grill pan edge with the small recess, Fig.1.
Tilt the handle over the recess and slide it towards the centre, Fig.2.
Ensure the handle is fully located. Insert the washer and fixing screw and tighten fully to ensure handle is secured, Fig.3.
Always hold the dripping pan handle in the highlighted zone marked "OK" in figure 4.
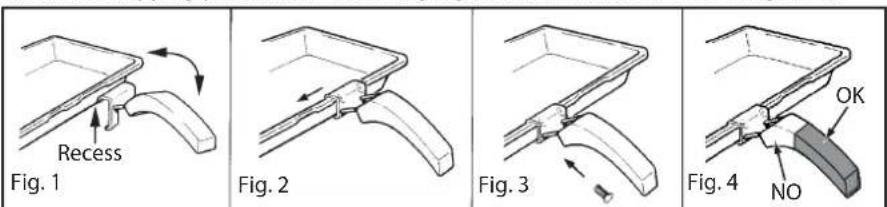
Always fit the screw prior to use.
The food to be cooked should be placed on the grill pan/grill pan food support.
Place the grill pan on the runners and push back to the stop position when the grill pan is correctly positioned beneath the grill element.
Plates and dishes placed on the floor of the grill compartment will be heated when the oven is in use.
Oven
The oven has different heat zones - the thermostat settings refer to the temperature on the middle shelf; above this shelf it is hotter and below it is cooler. Two shelves enable full use of the temperatures inside the oven.
Each shelf has a safety stop to prevent if from being pulled out too far when attending to food. Shelves are removed from the oven by pulling them out to the stop and then lifting them at the front to withdraw.
The grill pan without the handle can be used in the oven. The maximum size of baking tray that should be used is 300mm x 330mm (12" x 13").
TO USE THE OVEN
-
Place oven shelves in the chosen positions (refer to cooking charts).
-
Press the ignition button and then push in and turn the oven control knob fully anti-clockwise. Continue to press the ignition button until the spark lights the gas.
- Turn the control knob clockwise to the required setting (refer to cooking chart). There is a delay of about six seconds whilst the safety device operates before the burner comes on full.
- To turn off, turn the control knob fully clockwise the symbol 0.
Never place dishes on the oven base over the burner.
An odour may be noticed when first using the oven - this should cease after a short period of use.
5. The oven temperature control marking are gas marked 0 to 9.
The equivalent degrees Celsius (sometimes called Centigrade) and degrees Fahrenheit are shown below as a guide.
| Gas Mark | MAIN OVEN(Centre Oven Temperature) | |
| Celisus°C | Fahrenheit °F | |
| 1 | 1 | 2 |
| 2 | 1 | 5 |
| 3 | 1 | 7 |
| • | 195 385 | |
0
| Gas Mark | MAIN OVEN(Centre Oven Temperature) | |
| Cellsus°C | Fahrenheit °F | |
| 5 | 2 | 1 |
| • | 2 220 430 | 5 |
| 7 | 3 2 | 0 |
| • | 3 240 465 | 5 |
| 9 | 2 | 4 |
0
[Non-Text]
4
1
0
[Non-Text]
4
5
4
4
7
RELIGHTING THE BURNER
In the event of the burner flames being accidentally extinguished, turn off the burner control and do not attempt to re-ignite the burner for at least one minute
COLD START COOKING
Anything requiring long slow cooking such as casseroles and rich fruit cakes can be put into a cold oven. Satisfactory results can also be obtained with creamed mixture, rich pastries or yeast mixtures, but for perfection we recommend preheating the oven for about 15 minutes.
ROASTING OF LARGE POULTRY
The maximum weight of poultry that can be accommodated is 8kg (18 lbs) of suitable shape. It is important to check that the bird DOES NOT overhang the burner at the back of the oven.
STORAGE AND RE-HEATING OF FOOD
It is vitally important to strictly adhere to the basic principles of food handling and hygiene to prevent the possibility of bacterial growth.
- If food is to be frozen or not served immediately, cool it in a clean container as quickly as possible.
- Completely thaw frozen food in the refrigerator before reheating.
- Re-heat food thoroughly and quickly either on the hotplate or in a hot oven, Mk. 6, and then serve immediately.
- Only re-heat food once.
'COOK CHILL' DISHES
These should always be placed in a pre-heated oven ideally on the first or second shelf position. Follow the packet instructions for cooking time.
ALUMINIUM FOIL If using Aluminium Foil:
- Remember that it is important to increase the cooking time by one third.
- Never allow the foil to touch the sides of the oven.
- Never cover the oven interior with foil.
- Never cover the oven shelves with foil.
Oven Cooking Chart
The following times and setting are for guidance only. You may wish to alter the setting to give a result more to your satisfaction. When a different setting to that shown below is given in a recipe, the recipe instructions should be followed. Allow 15 minutes preheat for best results. Always turn the thermostat knob to Mark 9 before selecting the appropriate gas Mark. Shelf position 1 is the highest.
| Food Gas | Mark | Shelf Position | Approx. Cooking Time and Comments |
| Fish | |||
| Oily and white fish 3 or 4 4 25-60 mins. depending on recipe | |||
| Meat and Poultry | |||
| Beef 4 or 5 4 25-30 mins per 450g (1 lb) + Ham 5 4 | 25 mins. | extra | |
| 40 mins per 450g (1 lb) covered in foil plus 40 mins. extra | |||
| Lamb 5 4 30 mins per 450g (1 lb) + 30 mins extra | |||
| Pork 5 4 40 mins per 450g (1 lb) + 40 mins extra | |||
| Chicken 5 4 25 mins per 450g (1 lb) + 25 mins extra | |||
| Duckling & Goose 5 4 25 mins per 450g (1 lb) + 25 mins extra | |||
| Turkey 4 or 5 4 or 5 15-20 mins per 450g (1 lb) + 20 mins | |||
| Casseroles | 3 3or4 | 2-6 hrs | depending on cut of meat |
| Vegetables | |||
| Baked jacket potatoes | 4 or 5 3 | 11/2 -3 hrs. until soft, depending on size | |
| Puddings | |||
| Milk Puddings (500ml/1 pt) | 3 4 | 13/4-21/2 stand dish on baking tray and started with warm milk | |
| Baked Custard (500ml/1 pt) | 3 4 45-60 mins. bain-marie | ||
| Baked Sponge Puddings | 4 3 40-50 mins | ||
| Baked Apples | 3 3 30-45 mins depending on type and size of apples | ||
| Meringue Topped Puddings | 1 | 3or4 | 15 mins or until "tinged" with brown |
| Apple Tart ( 1 × 205mm/8'' ) | 6 2 45-60 mins | ||
| Fruit Crumble | 5 2 35 -45 mins | ||
| Cakes, Pastries & Biscuits | |||
| Small Cakes 2 trays | 5 | 2 and 4 | 15-25 mins. |
| 1 tray | 5 | 2 15-22mins. | |
| Victoria sandwich ( 2 × 7'' ) | 4 | 2 and 4 | 20-30 mins |
| Swiss Roll (3 egg quantity) | 5 | 2 15-20 mins. | |
| Meringues | 1 | 3 2-3 hrs | |
| Christmas cake ( 1 × 205mm / 8'' ) | 2 | 3 Time depending on recipe | |
| Madeira cake ( 1 × 180mm / 7'' ) | 4 | 41/4-11/2 hrs. | |
| Rich Fruit cake ( 1 × 180mm / 7'' ) | 2 | 4 Time depending on recipe | |
| Scones | 7 | 1 and 3 | 10-20 mins. |
| Shortbread ( 1 × 180mm / 7'' ) | 2 | 3 55 -65 mins. | |
| Biscuits | 4 | 1 and 3 | 10-20 mins. |
| Shortcrust Pastry | 6 | 2 15 - 60 mins depending on use. | |
| Rich Short Crust | 5 | 1 and 3 | 20-30 mins. |
| Flaky/Puff Pastry | 7 | 2 10-30 mins. | |
| Choux Pastry | 6 | 2 20-30mins. | |
| Yeast Mixtures | |||
| Bread - rolls | 7 | 2 and 4 | 20-30 mins. |
| Miscellaneous | |||
| Yorkshire Pudding:- large | 7 | 1 30-40 mins | |
| individual | 7 | 2 20-30mins | |
When baking with two trays or tins on two levels, the top tray is removed first and the lower tray moved up to the top position for a few minutes longer.
Soft Margarine -
Use the oven settings recommended by the margarine manufacturer and not those indicated on the cooking chart.
Care and Cleaning
| Grill | Remove the grill pan and the wire grid food support, it is best to wash these items immediately after use to prevent stains from being burnt on when used again. Wipe out the Grill compartment, use a fine steel wool soap pad to remove stubborn stains from the grill runners and the floor of the compartment. Wipe over the control panel with a damp cloth and polish with a dry cloth. |
| Control Panel | Do not use cream cleaners, oven cleaners or aerosols, scouring pads or abrasive powder for cleaning the plastic knobs as damage will occur. |
| Decorative Trims | It is advisable to clean the decorative trims regularly to prevent any build up of soiling. The recommended method of cleaning is to wipe over the trims with a soft cloth wrung out in warm water or mild non-abrasive cleaner. (If in doubt try the cleaner on a small area of trim which is not noticeable in normal use). Then, after wiping with a cloth wrung out in clear water, dry with a soft clean cloth. |
| Doors | Wipe over the outer door glass panels with a cloth wrung out in warm soapy water, then after wiping with a cloth wrung out in clear water, dry with a soft clean cloth.Ensure that glass doors are not subjected to any sharp mechanical blows.Glass Inner Door Panel (where fitted) * - open the door fully and unscrew the two screws securing the glass panel, taking care not to allow the glass to fall. The glass panel may now be washed at the sink. Stubborn stains can be removed by using a fine steel wool soap pad.Ensure the glass panel is not subjected to any sharp mechanical blows.Take particular care not to damage the inner surface which is coated with a heat reflective layer. After cleaning, rinse and dry with a soft cloth. For slight soiling the inner glass panel may be cleaned, while still warm, without removing it from the door. Warning: Oven must not be operated with inner door glass removed.Take care during cleaning not to damage or distort the door seals. Do not lift the door seal from the oven chassis, if necessary remove the seal by carefully unhooking the corner clips.Take care that the rating label edges are not lifted during cleaning, and furthermore that the lettering is not blurred or removed. |
| Ovens | Remove the rod shelves and grill pan. Use a fine steel wool soap pad to remove stubborn stains from the rod shelves, grill pan and the floor of the oven. Clean the glass part of the oven door using a sponge and a non-abrasive cleaning product, then dry thoroughly with a soft cloth. Do not use rough abrasive material or sharp metal scrapers as these could scratch the surface and cause the glass to crack. |
| Oven Shelf Supports | The shelf supports are removable and dishwasher safe.To remove hold the support at the front and pull away from the oven side, this can then be cleaned in a sink or a dishwasher. When removed it allows access to the oven side, which can be cleaned with warm soapy water.To refit the support, insert the longer leg into the rear fixing hole and push in the front leg. |
| Replacing the Battery | The battery is not covered bye the guarantee. Use an alkaline AA battery. The battery holder is located in the plinth panel below the oven door. Open the oven door fully. Press the tag on the left hand side of the battery holder/cover and withdraw it just enough to get access to the battery. Fit the new battery with the end marked “+” on the same side of the battery holder as the red lead. Replace the battery holder by pushing it firmly into the hole in the plinth. |
* (only available on certain models)
Cooking Results Not Satisfactory?
| Problem Check | |
| GrillingUneven cooking front to back | Ensure that the grill pan is positioned centrally below the grill element. |
| Fat splattering Ensure that the grill is not set to too high a temperature. | |
| Oven BakingUneven rising of cake | Ensure that the oven shelves are level by using a spirit level on the rod shelf and adjusting, using suitable packing e.g. wood, under the feet of the appliance. This should be checked both left to right and front to back. Ensure that the food is positioned centrally in the oven. |
| Sinking of cakes The following may cause cakes to sink:1. Cooking at too high a temperature.2. Using normal creaming method with soft margarine. | |
| Over/Under cooking Fast/Slow cooking | Refer to the cooking times and temperatures given in the oven temperature charts, however, it may be necessary to increase or decrease temperatures by 10°C to suit personal taste.Do not use utensils greater than 2 1/4 ins in height. |
| Uneven cooking of cakes | 1. Too large baking sheet used. (See 'Cookery Notes')2. Over loading of oven and always ensure even air gaps around baking tins. |
| Uneven rising of cake Ensure that the shelf is level (see above) and that the food is positioned centrally in the oven. | |
| Food is taking too long to cook | Only cook one item at a time to avoid overloading the oven. |
Something Wrong with your Cooker?
Before contacting your nearest Service Centre/Installer, check the problem guide below; there may be nothing wrong with your cooker.
| Problem Check | ||
Ignition does not workOven Cavity Oven Burner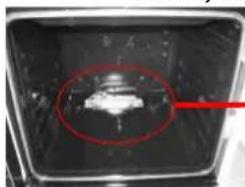  Top Cavity Grill Burner Top Cavity Grill Burner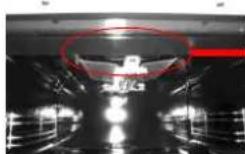  Hob Top Hob Top  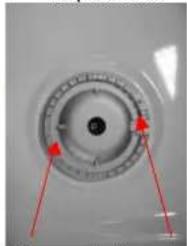 Burner Ports Ignitor Burner Ports Ignitor | If all burners fail to ignite:Check k that spark s appear at the burners;A cl ckng noi se shoul d be heard.If notCheck k that the plug is plugged in to a13am p Elctr ic socket and the suppl yis switched on.If all burners still fail to igniteCheck and replace if necessary the 13amp fuseIt only one burner fails to igniteCheck that the burner is dry and that spillage of food ord earing fl uld remal ns are not affecting the ignitor or bumerports.Cl aan away any debris with a dry nyl on brush such as anold dry toothbrus h.If a wire wool pad has been used for cleaning around thebumer ensure the ignit or is free from any stray strands.Any water on the burner should be dried with a cloth orkitchen towel.On the hotplate make sure that all bumerparts are c or rect ty seated | |
Oven or Grill will not stay litwhen t he contr ol knob is releasedControl Panel Control Knobs  Oven Control Grill Control Oven Control Grill Control | For correct ignition of oven/grill burners press the ignition buttonand then push i n and turn control k nobs anti -d oc kwise.Continue to press the ignition button until the spark lights the gas.Once al ght release the igniti on button and continue to hold thecontrol knob in for a further 6 to 10 seconds.Then release the control knob and set to the required temperature.The flame shoul d now stay alight.If the flame does not hold and goes out wait 30 seconds and tryagain | |
| Oven Temperatur e seems toohigh or too low | Check k that the temperature has been set i n accordance withthe temper ature charts . It may be nec es say to i increase ordecrease the recomm ended temperatu re by 10 C to suit y ourtaste | |
| Oven does not cook evenly. | Check k the temperature and shelf position are as recommendedin the temperatu ro chartsCheck k that the Utensil being used in the oven allow suffici antair ll ow around them.Check k that the cooker is l evel. | |
| Hotplates are slow to boll or willnot simmer | Check k that your pans confor m to the recommendati ons inthese instructions. | |
| Odour or smoke when using your new cooker | This is nor mal and shoul d cease after a short period. | |
| Condensation / Steam in t he Oven After Use | Condensali on and steam is a by product of cooking foodwith a water content.To help minimise always:A) Try to avoid d leaving food in the oven to cool after bel ng cookedB) Use a coved Utensil wherev er possi ble | |
| Condensation on the Wall at the Rear of the Cooker | Steam and/or condens ati on may appear from the vent at the rear ofthe appli ance when using an oven, parti cul ary when c ooking foodswi th a hi gh water content (S uch as Ovon Chi ps or Chic ken).This is nor mal and any excess shoul d be wiped off | |
Technical Characteristics
Main Oven
Dimensions (HxWxD): 34x39x31 cm
Volume: 41 Litres
Battery
1.5V Alkaline AA
Burners:
Adaptable for use with all the types of gas indicated on the data plate.

This appliance conforms with the following European Economic Community directives:
- 90/396/EEC of 29/06/90 (Gas) and subsequent modifications (only for models which use gas);
- 93/68/EEC of 22/07/93 and subsequent modifications.
- 2002/96/EC
The European Directive 2002/96/EC on Waste Electrical and Electronic Equipment (WEEE), requires that old household electrical appliances must not be disposed of in the normal unsorted municipal waste stream. Old appliances must be collected separately in order to optimise the recovery and recycling of the materials they contain and reduce the impact on human health and the environment. The crossed out “wheeled bin” symbol on the product reminds you of your obligation, that when you dispose of the appliance it must be separately collected.
Consumers should contact their local authority or retailer for information concerning the correct disposal of their old appliance.
Mains frequency and voltage of the electric section and characteristics of the gas section
| Model Gas section | ||
| Class | Rated power kW (1) | |
| HW170GW | II2H3+ | 12,90 (938 g/h - G30)(921 g/h - G31) |
| HW170GK | ||
| HW150GW | ||
| HW170LIK | ||
| HW170LIW | ||
| HW170GIK | ||
| HW170GIW | ||
(1) The values in g/h refer to the capacities with liquid gas (Butane, Propane).
Hotpoint
After Sales Service
"No company is better positioned to offer an after sales service on a Hotpoint appliance than us - the manufacturer"
As part of our commitment to you, all Hotpoint appliances have the added benefit of a fully inclusive parts and labour guarantee for the first 12 months. In addition to this you also have the advantage of free replacement parts for the first 5 years when fitted by a Hotpoint engineer. When the 12 months parts and labour guarantee expires we offer the following after sales service options:
Repair Service and Information Help Desk
UK: 08709 066066
www.theservicecentre.co.uk
Republic of Ireland: 1850 302 200
Note: Our operators will require the Model number and the Serial number of your appliance
Available 364 days a year with a fast, effective and value for money service. We have the largest white goods repair service in the UK with over 1200 of our own fully trained engineers. All repairs include a parts and labour guarantee for 12 months from the date of the repair.
If you require any information or have any questions about your appliance, our operators are on hand with help and advice.
All this ensures that you will receive the best available after sales service possible.
Extended Warranties
UK: 08709 088 088
www.theservicecentre.co.uk
Republic of Ireland: 1850 502 200
Whether you have just one or a number of Hotpoint appliances in your kitchen, we offer two service cover plans to give you total peace of mind.
● Repair Protection Plan - FREE service repairs for a single Hotpoint appliance during the period of cover.
- Kitchen Cover - FREE service repairs for all your Hotpoint appliances less than 8 years old.
Genuine Parts and AccessoriesUK: 08709 077 077
www.theservicecentre.co.uk
Republic of Ireland: (01) 842 6836
A wide range of genuine parts and accessories are available from our hotline or through our web site.
Genuine parts and accessories, extended warranties and service repairs are all available on our web-site at:

www.theservicecentre.co.uk
Hotpoint
Guarantee
"Satisfaction guaranteed or your money back"
We give you a unique 'satisfaction guaranteed' promise - valid for 90 days - after you have purchased your Hotpoint appliance. If there is a technical problem simply call Hotpoint Repair service or visit our web-site at www.theservicecentre.co.uk and where necessary, we will arrange for an engineer to call. If the technical problem is not resolved under this guarantee, we will replace your machine or, if you prefer, give you your money back.
All Hotpoint appliances carry a fully inclusive 12 month parts and labour guarantee as well as free replacement parts for the first 5 years (except microwaves, selected integrated appliances and cooker hoods, which have a one year guarantee) provided that they are fitted by a Hotpoint engineer.
Guarantee terms and conditions
Your guarantee is only applicable in the United Kingdom or Republic of Ireland and is subject to the following provisions that your appliance:
●Has been installed and used correctly in accordance with this instruction booklet.
- Has been used solely for domestic purposes and is located on domestic premises (ie. not for commercial or trade use).
- Has been properly connected to a suitable electrical supply voltage as stated on the appliance rating plate.
- Has not been subject to misuse, accident, modified or repaired by anyone other than one of our own service engineers.
For pre purchase information on any other Hotpoint product call: 08701 50 60 70 or visit: www.hotpoint.co.uk

Recycling & Disposal Information
As part of Hotpoint's continued commitment to helping the environment, Hotpoint reserves the right to use quality recycled components to keep down customer costs and minimise material wastage. Please dispose of packaging and old appliances carefully.
To minimise risk of injury to children, remove the plug and cut mains cable off flush with the appliance. Dispose of these parts separately to ensure that the appliance can no longer be plugged into a mains socket.

Hotpoint
Key Contacts
After Sales Service
Over 1200 trained specialists, directly employed by us, ensure that you can have complete confidence in both the appliances and services we offer.

Repair Service and Information Desk
UK: 08709 066 066
(Open 8 to 8 Mon - Fri, 8 to 6 Sat, 10 to 4 Sun & Bank Holidays)
www.theservicecentre.co.uk
Republic of Ireland: 1850 302 200
Note: Our operators will require the following information:
Model number:
Serial number:
Extended Warranties
UK: 08709 088 088
(Open 8 to 8 Mon - Sun)
www.theservicecentre.co.uk
Republic of Ireland: 1850 502 200
Genuine Parts and Accessories
UK: 08709 077 077
(Open 8-30 to 5-30 Mon - Fri & 9 to 12 Sat)
www.theservicecentre.co.uk
Republic of Ireland: (01) 842 6836
Indesit Company UK LTD, Morley Way, Peterborough, PE2 9JB.
- INSTRUCTIONS FOR INSTALLATION AND USE
- CONTENTS
- INTRODUCTION
- WHEN THE COOKER IS FIRST USED AN ODOUR MAY BE EMITTED, THIS WILL CEASE AFTER A PERIOD OF USE
- INSTALLATION
- POSITIONING
- INSTALLATION OF THE COOKER
- NOTE: THIS APPLIANCE MUST NOT BE FITTED ON A PLATFORM
- GAS CONNECTION
- CONNECTING THE GAS SUPPLY
- DISPOSING OF THE APPLIANCE
- ADAPTING THE COOKER TO DIFFERENT TYPES OF GAS
- ADAPTING TO DIFFERENT TYPES OF GAS
- ADAPTING THE GAS GRILL TO DIFFERENT TYPES OF GAS
- IMPORTANT
- NOTE
- BURNER AND NOZZLE SPECIFICATIONS
- SAFETY INFORMATION
- ALWAYS
- NEVER
- SAFETY ADVICE IN CASE OF A CHIP-PAN FIRE
- FEATURES
- CONTROL PANEL
- USE OF HOTPLATES
- PRACTICAL ADVICE ON USING THE BURNERS
- SAFETY REQUIREMENTS FOR DEEP FAT FRYING
- HOW TO DEAL WITH A FAT FIRE
- GRILLING MUST BE DONE WITH THE GRILL DOOR OPEN
- CONTROL KNOBS MAY BECOME HOT DURING GRILLING
- CAUTION: ACCESSIBLE PARTS WILL BECOME HOT WHEN THE GRILL
- IS USED - CHILDREN SHOULD BE KEPT AWAY
- OVEN
- TO USE THE OVEN
- RELIGHTING THE BURNER
- COLD START COOKING
- ROASTING OF LARGE POULTRY
- STORAGE AND RE-HEATING OF FOOD
- COOK CHILL' DISHES
- ALUMINIUM FOIL IF USING ALUMINIUM FOIL
- OVEN COOKING CHART
- SOFT MARGARINE
- CARE AND CLEANING
- COOKING RESULTS NOT SATISFACTORY
- SOMETHING WRONG WITH YOUR COOKER
- TECHNICAL CHARACTERISTICS
- THIS APPLIANCE CONFORMS WITH THE FOLLOWING EUROPEAN ECONOMIC COMMUNITY DIRECTIVES
- HOTPOINT
- AFTER SALES SERVICE
- GUARANTEE
- GUARANTEE TERMS AND CONDITIONS
- RECYCLING & DISPOSAL INFORMATION
- KEY CONTACTS
- REPAIR SERVICE AND INFORMATION DESK
- EXTENDED WARRANTIES
- GENUINE PARTS AND ACCESSORIES
Brand : HOTPOINT
Model : HW170LIK
Category : Heating