920-377 - Alarm Clock Jula - Free user manual and instructions
Find the device manual for free 920-377 Jula in PDF.


| Product Type | Alarm Clock Radio |
| Brand | Jula |
| Model | 920-377 |
| Dimensions (approx.) | 15 cm x 10 cm x 8 cm |
| Weight (approx.) | 0.3 kg |
| Power Source | AC 230V, 50Hz; battery backup (2 x AAA) |
| Display Type | LED digital display with adjustable brightness |
| Alarm Functions | Dual alarm with radio or buzzer, snooze (9 min) |
| Radio Band | FM 87.5-108 MHz |
| Radio Memory Presets | 10 stations |
| Clock Display | 12/24 hour format, with time setting buttons |
| Sleep Timer | 60 minutes max, auto shut-off |
| Volume Control | Rotary knob for radio and alarm volume |
| Additional Features | Gradual wake-up (ascending alarm tone), battery backup maintains time |
| Cleaning Instructions | Wipe with a soft, dry cloth; do not use liquid cleaners |
| Safety Precautions | Keep away from water, do not expose to moisture, unplug during cleaning |
| Spare Parts Availability | Contact Jula customer service for replacement adapters or batteries |
| Reparability | No user-serviceable parts; refer to authorized service center |
| Manual Languages | EN, NO, PL, SV (others available upon request) |
Frequently Asked Questions - 920-377 Jula
User questions about 920-377 Jula
0 question about this device. Answer the ones you know or ask your own.
Ask a new question about this device
Download the instructions for your Alarm Clock in PDF format for free! Find your manual 920-377 - Jula and take your electronic device back in hand. On this page are published all the documents necessary for the use of your device. 920-377 by Jula.
USER MANUAL 920-377 Jula
Operating Instructions for Clock Radio AM/FM with Alarm
920-377

SV Bruksanvisning i original
NO Bruksanvisning i original
EN Operating instructions in original
SÄKERHETSANVISNINGAR
Read these instructions carefully before use!
IMPORTANT! Do not remove the cover on the back of the appliance – risk of electric shock. No components in this appliance can be repaired by the user. Service must only be carried out by qualified personnel.
An exclamation mark in a triangle indicates important instructions for use and maintenance in the instructions included with the product.
WARNING!
- Do not expose the appliance to rain or damp conditions—risk of electric shock.
- Do not expose the appliance to splashing or dripping water, or other liquids.
- Do not connect the aerial on the back of the appliance to an outdoor aerial.
• The appliance does not have a power switch. Unplug the cord to switch off the appliance.
Symbols

The thunderbolt and arrowhead within the triangle are a warning sign alerting you to “dangerous voltage” inside the product.
CAUTION
RISK OF ELECTRIC SHOCK DO NOT OPEN
CAUTION! To reduce the risk of electric shock. Do not remove cover (on back). No user-serviceable parts inside. Refer servicing to qualified service personnel.
TECHNICAL DATA
Rated voltage 230 V \~ 50 Hz
Battery (not included) 9V
Radio frequency AM 530 - 1600 kHz
FM 88 - 108 MHz
Power consumption 3W
DESCRIPTION
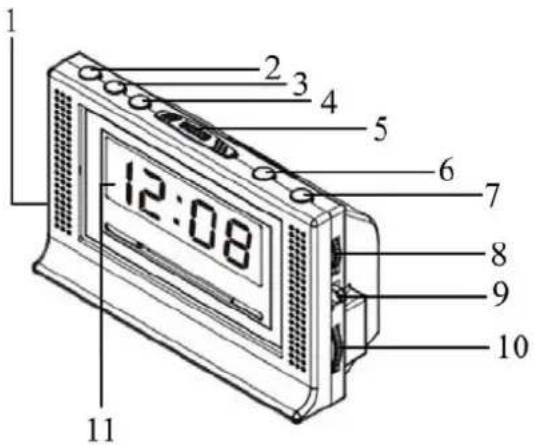
- On/Off/Auto
- Setting the time
- Setting/switching off the alarm
- Sleep function
- Snooze button
- Hour
- Minutes
- Volume knob/buzzer
- Band selector (AM/FM)
- Radio setting
- Status lamp AUTO
Bottom: Battery compartment for 9V back-up battery (6F22/6LR61) (not included) for memory.
OPERATION
- Plug in the power cord. The appliance must only be connected to a 230 VAC power outlet.
- The digits flash.
- Set the time by pressing the button to set the time (2) and the hour button (6) at the same time. Release the buttons just before the correct hour is shown. Press the button to set the time (2) and the minutes button (6) at the same time to set the correct time.
Radio function
- Move the power switch (ON/OFF/AUTO) (1) to ON.
- Set the band selector (9) to FM or AM.
- Turn the volume knob (8) to the required volume.
- Turn the radio knob (10) to the required station.
- Aerial
The appliance has a sensitive rod aerial with ferrite core for AM reception and a cable aerial for FM reception. Fully extend the cable aerial for best reception.
Radio alarm
Follow the instructions below to set the radio alarm.
- Move the power switch (ON/OFF/AUTO) (1) to AUTO.
- Press the alarm setting button (3) down, then press the hour button (6) and then the minutes button (7) to set the required alarm time. The alarm time is saved in the memory. You can show the set alarm time by pressing the alarm button (3). The radio will start playing every day at the set time. Switch off the radio by pressing the alarm button (3).
Buzzer alarm
Set the alarm selector (8) to BUZZER. When the buzzer goes off at the set time, you can switch it off with the alarm button (3) or switch to radio by moving the power switch (1) to ON.
Falling asleep to the radio
You can set the sleep function so that the radio plays from 1 minute to 1 hour and 59 minutes. Select the position for radio alarm, press and hold the button for sleep mode (4) and then press the minutes button (7) to set the required sleep time. You can switch off the radio before the set time has run out by pressing the snooze button (5).
Snooze
The snooze button (5) switches off the radio or buzzer alarm in about 9 minutes.
Back-up battery (only for saving set time)
This function means you won't have to reset the clock if you move it to another power outlet, for example. The stand-by battery is only intended to save the settings during short power cuts. During longer power cuts the battery can be discharged and/or the time settings can become incorrect. Remove discharged batteries from the appliance to prevent leakage. The stand-by battery is not necessary for operation, but without a battery you will need to reset the clock after every power cut.
- Connect a 9V battery (6F22/6LR61) (not included) to the terminals in the battery compartment.
- Pull out the plug when inserting and replacing the battery.
MAINTENANCE
- Unplug the power cord before cleaning. Clean the casing with a damp cloth.
- Do not expose to direct sunlight and do not use in hot, dusty or damp conditions.
- Keep the device away from heat sources and devices that generate radio frequency noise, such as fluorescent lamps and motors.
Subject to printing errors and design changes over which we have no control. In the event of problems, please contact our service department.
www.jula.com
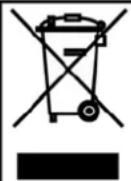
Care for the environment!
Must not be discarded with household waste! This product contains electrical or electronic components that should be recycled.
Leave the product for recycling at the designated station e.g. the local authority's recycling station.
- OPERATING INSTRUCTIONS FOR CLOCK RADIO AM/FM WITH ALARM
- SÄKERHETSANVISNINGAR
- READ THESE INSTRUCTIONS CAREFULLY BEFORE USE
- WARNING
- SYMBOLS
- CAUTION
- RISK OF ELECTRIC SHOCK DO NOT OPEN
- TECHNICAL DATA
- DESCRIPTION
- OPERATION
- RADIO FUNCTION
- RADIO ALARM
- BUZZER ALARM
- FALLING ASLEEP TO THE RADIO
- SNOOZE
- BACK-UP BATTERY (ONLY FOR SAVING SET TIME)
- MAINTENANCE
- CARE FOR THE ENVIRONMENT
Brand : Jula
Model : 920-377
Category : Alarm Clock