Quantum LS 19 - Thermal Goggles PULSAR - Free user manual and instructions
Find the device manual for free Quantum LS 19 PULSAR in PDF.


| Product Type | Thermal Imaging Scope |
| Detection Range | Up to 800 meters |
| Sensor Resolution | 320x240 pixels |
| Refresh Rate | 50 Hz |
| Magnification | 2.5x - 10x digital zoom |
| Field of View | 12.4° x 9.4° |
| Dimensions | 200 x 65 x 70 mm |
| Weight | 400 g |
| Power Supply | Internal rechargeable Li-ion battery, USB-C charging |
| Battery Life | Up to 6 hours continuous use |
| Display | OLED 1024x768 pixels |
| Color Palettes | White hot, Black hot, Rainbow, Red hot, etc. |
| Video Recording | Yes, internal memory up to 8 GB |
| Waterproof Rating | IPX7 (submersible up to 1 m for 30 min) |
| Operating Temperature | -25°C to +50°C |
| Mounting | Picatinny rail / Weaver rail compatible |
| Care & Cleaning | Clean lens with soft microfiber cloth; store in dry case |
| Safety | Do not look directly at bright light sources; use protective cover when not in use |
| Spare Parts Available | Replacement battery, lens cap, USB cable, carrying case |
| Reparability | Service center recommended for internal repairs; user-replaceable battery |
Frequently Asked Questions - Quantum LS 19 PULSAR
User questions about Quantum LS 19 PULSAR
0 question about this device. Answer the ones you know or ask your own.
Ask a new question about this device
Download the instructions for your Thermal Goggles in PDF format for free! Find your manual Quantum LS 19 - PULSAR and take your electronic device back in hand. On this page are published all the documents necessary for the use of your device. Quantum LS 19 by PULSAR.
USER MANUAL Quantum LS 19 PULSAR
natural_image
Close-up of a black optical device with lens and aperture (no visible text or symbols)QUANTUM
THERMAL IMAGING SCOPE
INSTRUCTION
ENGLISH / FRANÇAIS / DEUTSCH / ESPAÑOL / ITALIANO / PYCCKIЙ
| SKU | 77301 | 77302 | 77307 | 77308 |
| MODEL | Quantum HD 38 | Quantum LD 38 | Quantum HS 19 | Quantum LS 19 |
| Optical characteristics | ||||
| Detector type | UL 03 16 2Uncooled microbolometer | UL 03 16 2 | UL 02 15 2Uncooled microbolometer | UL 02 15 2 |
| Refresh rate | 30 Hz | 9 Hz | 30 Hz | 9 Hz |
| Magnification, x | 2,1 | 2.1 | 2.5 | 2.5 |
| Digital zoom, x | 2 | 2 | n/a | n/a |
| Resolution, pixels | 384x288 | 384x288 | 160x120 | 160x120 |
| OLED Display size | 0.31" | 0.31" | 0.31" | 0.31" |
| Close-up range, m | 2 | 2 | 2 | 2 |
| Exit pupil, mm | 8 | 8 | 8 | 8 |
| Spectral range, μm | 7.7-13.2 | 7.7-13.2 | 8.3-13.6 | 8.3-13.6 |
| Field of view, degree | ||||
| - horizontal | 14.4 | 14.4 | 12 | 12 |
| - vertical | 10.8 | 10.8 | 9 | 9 |
| Diopter adjustment, D | +5/-5 | +5/-5 | +5/-5 | +5/-5 |
| Max. detection range,m/ yd* | 900 / 985 | 900 / 985 | 450 / 490 | 450 / 490 |
| Operationalcharacteristics | ||||
| Start-up time (approx.), sec | 10 | 10 | 10 | 10 |
| Power supply | 4+6 V | 4+6 V | 4+6 V | 4+6 V |
| Battery type | 4xAA | 4xAA | 4xAA | 4xAA |
| External power supply | 8,4-15 V | 8,4-15 V | 8,4-15 V | 8,4-15 V |
| Operating time on batterypack EPS3 / EPS5) | 9/20 | 9/20 | 9/20 | 9/20 |
| Operating time on a batterieset, approx. | At least two hours | At least two hours | ||
| Degree of protection, IPcode (IEC60529) | IPX4 | IPX4 | IPX4 | IPX4 |
| Video output | PAL/NTSC | PAL/NTSC | PAL/NTSC | PAL/NTSC |
| Operating temperature | from -20 °C to +50 °C, humidity up to 90% | |||
| Dimensions, mm | 200x86x59 | 200x86x59 | 177x86x58 | 177x86x58 |
| inch | 7.9x3.4x2.3 | 7.9x3.4x2.3 | 7x3.4x2.3 | 7x3.4x2.3 |
| Weight (without/with batteries),g // oz | 470/560//16.6/19.7 | 470/560//16.6/19.7 | 400/490//14.1/17.3 | 400/490//14.1/17.3 |
• Max. detection range of an object measuring 1.7x0.5 m
PRODUCT NAME LEGEND:
Example: Quantum HD 38
First letter:
"H" – refresh rate 30 Hz;
"L" – refresh rate 9 Hz.
Second letter
"D" - detector size 384x288;
“S” - detector size 160x120
Figure "38" or "19" stands for lens focal length - 38 mm or 19 mm
• Thermal Imaging Scope
- Carrying case
- User manual
- Video cable
- Hand strap
• Automotive cigarette lighter adapter
- Spare battery container
- Cleaning cloth
Warranty card
For improvement purposes, design of this product is subject to change.

natural_image
Close-up of a black cylindrical optical device with visible lens and screen (no text or symbols)
DESCRIPTION
Digital thermal imaging scopes Quantum based on IR sensor (uncooled microbolometer) are represented by a number of models featuring various resolution, magnification and lens diameter. The scopes are designed for the use both in the nighttime and in the daylight in inclement weather conditions (fog, smog, rain) to see through obstacles hindering detection of targets (branches, tallgrass, thick bushes etc.). Unlike the image intensifier tube based night vision devices, thermal imaging scopes Quantum do not require an external source of light and are not affected by bright light exposure.
Thermal imaging scopes Quantum have a wide range application including night hunting, observation and terrain orientation, search and rescue operations.

FEATURES
• Detector size 384x288 or 160x120 pixels
• Quality OLED display (640x480 pixels)
• Magnification 2,1x/2,5x
• 2x digital zoom (384x288 models only)
• High-aperture lens
- Wide field of view
• External power supply
• Video output enabling recording
- Modes "White hot" and "Black hot"
- Ergonomic body
- Two 1/4" tripod mounts

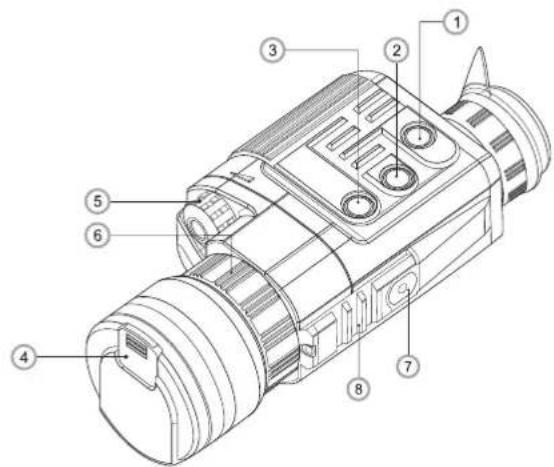
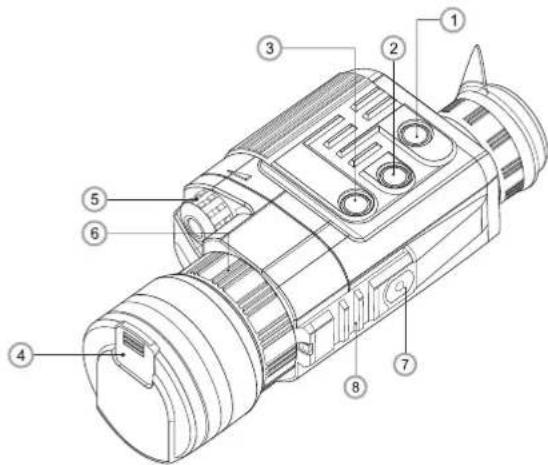
COMPONENTS AND CONTROL ELEMENTS
① "ON" button
② "CAL" button
③ "ZOOM/INVERT" button
④ Lens cap
⑤ Encoder
⑥ Ring for lens internal focusing
⑦ 14 " tripod mount
⑧ Weaver mounting rail
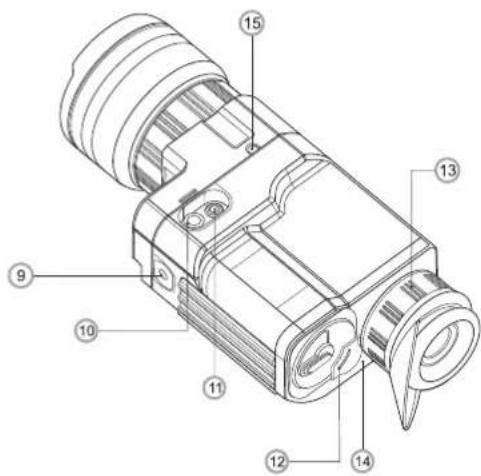
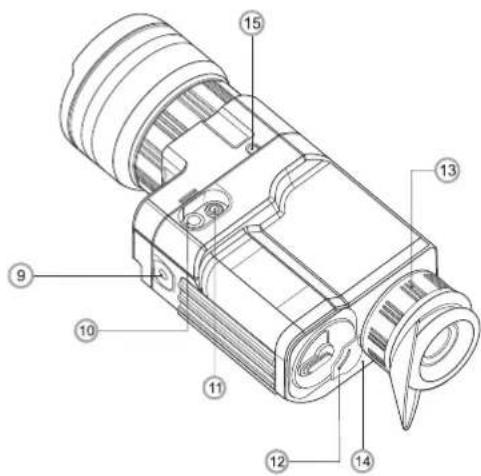
⑨ Second 14 " tripod mount
⑩ External power supply jack
⑪ Video out
⑫ Battery compartment
⑬ Eyepiece
⑭ LED indicator
15 Lens cap storage hole

DATA PANEL ICONS
A Clock setup
B Video output signal selection
© 2x digital zoom
D Clock
E Low battery indicator
F Indication for external power supply
G Brightness and contrast adjustment
H White hot / Black hot modes

natural_image
Blank white image with no visible content, text, or symbols


natural_image
Blank white image with no visible content, text, or symbols


INSTALLATION OF BATTERIES
- Turn the lever of the battery compartment (12) 90 degrees in "Open" position and, pulling by the lug of the cover, remove the battery container.
• Install four AA batteries (or rechargeable batteries) observing polarity shown on the battery container. - Insert the battery container into the battery compartment and turn the lever 90 degrees clockwise.
Note: to ensure long and reliable operation it is recommended that you use quality rechargeable batteries with a capacity of at least 2500 mAh. Please do not use batteries of different types or batteries with various charge levels.

EXTERNAL POWER SUPPLY
The scope can be powered with an external DC power supply (2.1mm pin) with stabilised voltage ranging from 8.4V to 15V (max. consumption power 3W) or a 12V vehicle socket.
- External power supply (AC/DC) is to be connected to "Power" (10) jack located on the bottom side of the device.
- Please note that the central pin of the power supply that you connect to the "power" jack of the riflescope, must have marking "+". The power supply may have marking - -@ +
Connection of an external power supply (icon -o- shows up on the data panel) automatically cuts off power supply from batteries.
External power supply DOES NOT charge the rechargeable batteries in the unit.
Attention! We suggest that you use battery packs EPS3 or EPS5 ensuring from 9 to 20 hours of operation.

OPERATION
Switching on and calibration
- Press "ON" (1) to switch on the unit. Green LED indicator (14) will light up. In case of low battery the LED will turn red and battery icon will start flashing.
- Do the calibration of image. Calibration levels background temperature of the microbolometer and eliminates image flaws. To calibrate, press "CAL" (2) without opening the lens cap. Image will freeze for 1-2 seconds, message "CALIBRATION" will show up on the data panel, when the message disappears, calibration is completed.

КОМПЛЕКТ ПОСТАВКИ
natural_image
Black optical lens device with visible internal components (no text or symbols)
ОПИСАНИЕ
Focusing and image adjustment
- Open the lens cap (4) and fix it in the hole (15) in the bottom part of the unit. Adjust the sharpness of the display icons by turning the eyepiece ring (13).
- To adjust display brightness, rotate the encoder (5). Brightness level (from 1 to 20) will show up next to the brightness icon ⚙ on the data panel.
- To adjust display contrast press the encoder (5) (icon Ⓞ will show up) and rotate it. Contrast level (from 1 to 20) will show up next to the contrast icon on the data panel.
- Point the unit at a warm object located at a certain distance, 100 meters, for example.
- Adjust the focus by turning the ring for lens internal focusing (6).
• After this adjustment no further dioptre adjustment should be required, regardless of distance or other factors. Adjust image quality only with the ring for lens internal focusing.
Other functions
- Press "ZOOM/INVERT"(3) to activate digital zoom (only in models 384x288).
- Keep "ZOOM/INVERT"(3) pressed for two seconds (in 160x120 models no waiting is needed) to activate colour inversion (functions "Hot white" and "Hot black").
When function "White hot" is used, warm objects are represented in shades of bright colour;
"Black hot" represents objects in shades of dark colour.
Press "ON" (1) to switch off the unit.

MENU
The menu includes two functions:
- Clock;
- Video output signal selection.
Function "Clock":
- To enter the menu, keep the encoder (5) pressed until icon 📊 shows up. Press the encoder shortly to confirm the function selected.
- Rotate the encoder (5) to select time format ("24" or "AM/PM") (editable parameter is flashing).
- To pass to minute/hour setup press the encoder (5). Rotate the encoder to adjust minute/hour parameter.
• To exit the menu, keep the encoder (5) pressed for two seconds.
Function "Video output signal selection":
- Rotate the encoder (5) to select icon ☐ and press the encoder to confirm.
- Rotate the encoder (5) to select the required video output signal (PAL or NTSC).
- Press the encoder shortly to confirm.
- To exit the menu, keep the encoder (5) pressed for two seconds or wait 10 seconds to enable automatic exit.

"Video out" jack (11) is designed to connect external recording devices and to transmit video signal to monitors, TV sets etc.
- Select a suitable video output standard - PAL or NTSC (refer to section 9 "MENU").
- Use the included video cable to connect a peripheral device to the "Video out" jack (11).
- Switch on your thermal imaging scope – a peripheral device will show the image seen through the scope.

ACCESSORIES
Using the Weaver mounting rail (8), you can attach various accessories to the Quantum scopes, such as:
• Battery packs EPS3/EPS5 (SKU#79111/79112)
• CVR640 video recorder (SKU#17044) and others.
The 14 " tripod mounts from both sides of the scope are designed to have the scope installed on a tripod or have a hand strap (included) attached.

CARE AND MAINTENANCE
-
Il termovisore ha un grado di protezione IPX4 (protezione contro gli spruzzi d'acqua) non è destinato per l'immersione nell'acqua.
• La garanzia si perde se lo strumento viene riparato oppure smontato. -
Clean the scope's optical surfaces only if necessary, and use caution. First, remove (by blowing with a blower brush or canned air) any dust or sand particles. Then proceed to clean by using camera/lens cleaning equipment approved for use with multicoated lenses. Do not pour the solution directly onto the lens!
- The scope can be used in operating temperatures ranging from -20 °C to +50 °C. However, if it has been brought indoors from cold temperatures, do not turn it on for three to four hours. This will prevent external optical surfaces from fogging.
- Always store the unit in its carrying case in a dry, well-ventilated space.
- Remove the batteries if the scope is not going to be used for an extended period (longer than one month).
- Batteries shall not be exposed to excessive heat such as sunshine, fire or the like.

TROUBLESHOOTING
Listed below are some potential problems that may occur when using the scope. Carry out the recommended checks and troubleshooting steps in the order listed. Please note that the table does not list all of the possible problems. If the problem experienced with the scope is not listed, or if the suggested action meant to correct it does not resolve the problem, please contact the manufacturer.
| problem | possible cause | corrective action |
| The unit will not turn on. | Batteries have been wrongly installed. | Reinstall the batteries observing polarity. |
| Oxidized contact points in the battery compartment due to "leaky" batteries or contact points becoming exposed to a chemically reactive solution. | Clean the battery compartment, focusing on the contacts. | |
| The batteries are fully exhausted. | Install fresh batteries. | |
| The image is blurry, with vertical stripes and uneven background. | Calibration is to be done. | Do the calibration according to section 8 "OPERATION" |
| The image is too dark. | The lowest brightness level is set. | Adjust brightness by rotating the encoder (5). |
FRANÇAIS
SPECIFICATIONS
natural_image
Black optical device with lens and aperture (no visible text or symbols)
DESCRIPTION
natural_image
Blank white image with no visible content, text, or symbols


COMPONENTI ED ELEMENTI DI CONTROLLO
natural_image
Blank white image with no visible content, text, or symbols


MISE EN PLACE DES BATTERIES
natural_image
Black cylindrical optical device with lens and screen (no visible text or symbols)
DESCRIZIONE
REVELATION DES DEFAULTS
natural_image
Close-up of a black cylindrical optical device with textured surface (no visible text or symbols)
BESCHREIBUNG
natural_image
Blank white image with no visible content, text, or symbols



EINLEGEN DER BATTERIE
natural_image
Close-up of a black cylindrical optical device with textured surface (no visible text or symbols)- QUANTUM
- THERMAL IMAGING SCOPE
- PRODUCT NAME LEGEND:
- DESCRIPTION
- FEATURES
- COMPONENTS AND CONTROL ELEMENTS
- DATA PANEL ICONS
- INSTALLATION OF BATTERIES
- EXTERNAL POWER SUPPLY
- OPERATION
- Switching on and calibration
- КОМПЛЕКТ ПОСТАВКИ
- ОПИСАНИЕ
- Focusing and image adjustment
- Other functions
- MENU
- Function "Clock":
- Function "Video output signal selection":
- ACCESSORIES
- CARE AND MAINTENANCE
- TROUBLESHOOTING
- FRANÇAIS
- COMPONENTI ED ELEMENTI DI CONTROLLO
- MISE EN PLACE DES BATTERIES
- DESCRIZIONE
- REVELATION DES DEFAULTS
- BESCHREIBUNG
- EINLEGEN DER BATTERIE
Brand : PULSAR
Model : Quantum LS 19
Category : Thermal Goggles