
JGAS02SENSS - Frying Pan GE - Free user manual and instructions
Find the device manual for free JGAS02SENSS GE in PDF.


| Product Type | Freestanding Gas Range |
| Brand | GE |
| Model | JGAS02SENSS |
| Width | 30 inches (76.2 cm) |
| Depth | 26 inches (66 cm) (typical) |
| Height | 36 inches (91.4 cm) to cooktop (typical) |
| Weight | Approximately 150 lbs (68 kg) |
| Fuel Type | Natural Gas (factory set), convertible to LP |
| Electrical Requirements | 120 V, 60 Hz, 15 or 20 A circuit |
| Number of Surface Burners | 4 |
| Oven Type | Gas oven with bake burner |
| Oven Capacity | 5.0 cu ft (estimated) |
| Control Type | Knobs |
| Ignition | Electronic spark |
| Anti-Tip Device | Included (bracket) |
| Grate Material | Cast iron |
| Cleaning | Manual (self-cleaning not specified) |
| Gas Connection | 1/2" NPT |
| LP Conversion Kit | Included (orifices and instructions) |
| Certification | CSA International (ANSI Z21.1) |
| Warranty | Limited warranty (contact manufacturer) |
Frequently Asked Questions - JGAS02SENSS GE
User questions about JGAS02SENSS GE
0 question about this device. Answer the ones you know or ask your own.
Ask a new question about this device
Download the instructions for your Frying Pan in PDF format for free! Find your manual JGAS02SENSS - GE and take your electronic device back in hand. On this page are published all the documents necessary for the use of your device. JGAS02SENSS by GE.
USER MANUAL JGAS02SENSS GE
Installation Instructions Range
Questions? Call 1.800.GE.CARES (1.800.432.2737) or visit www.GEAppliances.com
IN THE COMMONWEALTH OF MASSACHUSETTS
■ This product must be installed by a licensed plumber or gas fitter.
■ When using ball type gas shut-off valves, they shall be the T-handle type.
■ A flexible gas connector, when used, must not exceed 3 feet.
WARNING
FIRE OR EXPLOSION HAZARD
If the information in this manual is not followed exactly, a fire or explosion may result causing property damage, personal injury or death. Installation must be performed by a qualified installer.
Read these instructions completely and carefully. Installation of this range must conform with local codes, or in the absence of local codes, with the National Fuel Gas Code. ANSI Z223.1/NFPA.54, latest edition. In Canada, installation must conform with the current Natural Gas Installation Code, CAN/CGA-B149.1 or the current Propane Installation Code, CAN/CGA-B149.2, and with local codes where applicable. This range has been design-certified by CSA International according to ANSI Z21.1, latest edition and Canadian Gas Association according to CAN/CGA-1.1 latest edition.
When installing a gas appliance the use of old flexible connectors can cause gas leaks and personal injury. Always use a NEW flexible connector.
Leak testing of the appliance shall be conducted according to the manufacturer instructions.
The range must be electrically grounded in accordance with local codes or, in the absence of local codes, in accordance with the National Electrical Code (ANSI/NFPA 70, latest edition). In Canada, electrical grounding must be in accordance with the current CSA C22.1 Canadian Electrical Code Part 1 and/or local codes. See Electrical Connections in this section.
Do not install this product with an air curtain hood or other range hood that operates by blowing air down on the cooktop. This airflow may interfere with operation of the gas burners resulting in fire or explosion hazard.
FOR YOUR SAFETY:

WARNING
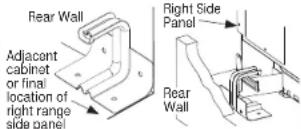
• A child or adult can tip the range and be killed.
• Install the anti-tip bracket to the wall or floor.
- Engage the range to the anti-tip bracket by sliding the range back such that the foot is engaged.
- Re-engage the anti-tip bracket if the range is moved.
- Failure to do so can result in death or serious burns to children or adults.
If you did not receive an anti-tip bracket with your purchase, call 1.800.626.8774 to receive one at no cost. (In Canada, call 1.800.561.3344.) For installation instructions of the bracket, visit: www.GEAppliances.com. (In Canada, www.GEAppliances.ca.)
WARNING
Before beginning
the installation, switch power off at service panel and lock the service disconnecting means to prevent power from being switched on accidentally. When the service disconnecting means cannot be locked, securely fasten a prominent warning device, such as a tag, to the service panel.
TOOLS YOU WILL NEED MATERIALS YOU MAY NEED

Pipe wrenches (2) [one for backup]
■ Gas line shut-off valve
■ Pipe joint sealant or UL-approved pipe thread tape with Teflon ^* that resists action of natural and LP gases
■ Flexible metal appliance connector (1/2" I.D.). A 5-foot length is recommended for ease of installation but other lengths are acceptable. Never use an old connector when installing a new range.
■ Flare union adapter for connection to gas supply line (3/4" or 1/2" NPT x 1/2" I.D.)
■ Flare union adapter for connection to pressure regulator on range (1/2" NPT x 1/2" I.D.)
■ Liquid leak detector or soapy water.
^Teflon: Registered trademark of DuPont
BEFORE YOU BEGIN
IMPORTANT — Save these instructions for local inspector's use.
IMPORTANT — Observe all governing codes and ordinances.
IMPORTANT — Remove all packing material and literature from oven before connecting gas and electrical supply to range.
IMPORTANT — To avoid damage to your cabinets, check with your builder or cabinet supplier to make sure that the materials used will not discolor, delaminate or sustain other damage. This oven has been designed in accordance with the requirements of UL and CSA International and complies with the maximum allowable wood cabinet temperatures of 194°F (90°C).
Note to Installer – Be sure to leave these instructions with consumer.
Note to consumer – Keep these instructions for future reference.
Servicer - The electrical diagram is in an envelope attached to the back of the range.
Proper installation is the responsibility of the installer.
Product failure due to improper installation is not covered under warranty.
Before installing your range on linoleum or any other synthetic floor covering, make sure the floor covering can withstand 180°F without shrinking, warping or discoloring. Do not install the range over carpeting unless a sheet of 1/4" thick plywood or similar insulator is placed between the range and carpeting.
Mobile Home - Additional Installation Requirements
The installation of this range must conform to the Manufactured Home Construction and Safety Standard, Title 24 CFR. Part 3280 (formerly the Federal Standard for Mobile Home Construction and Saftey, Title 24, HUD Part 280). When such standard is not applicable, use the Standard for Manufactured Home Installations, ANSI A225.1/NFPA 501A or with local codes.
In Canada, the installation of this range must conform with the current standards CAN/CSA-A240-latest edition, or with local codes.
When this range is installed in a mobile home, it must be secured to the floor during transit. Any method of securing the range is adequate as long as it conforms to the standards listed above.
DIMENSIONS AND CLEARANCES
Provide adequate clearances between the range and adjacent combustible surfaces. These dimensions must be met for safe use of your range.
Allow 30" (76.2 cm) minimum clearance between burners and bottom of unprotected wood or metal cabinet, or allow a 24" (61 cm) minimum when bottom of wood or metal cabinet is protected by no less than 1/4" (6.4 mm) thick flame-retardant millboard covered with no less
than No. 28 MSG sheet metal (.015" [.38 mm] thick), .015" (.38 mm) thick stainless steel, .025" (.64 mm) aluminum or .020" (.0.5 mm) copper.
Installation of a listed microwave oven or cooking appliance over the cooktop shall conform to the installation instructions packed with that appliance.
For island installation, maintain 2-1/2" minimum from cutout to back edge of countertop and 3" minimum from cutout to side edges of countertop.

DIMENSIONS AND CLEARANCES (CONT.)
GAS PIPE AND ELECTRICAL OUTLET LOCATIONS

This range leaves the factory set for use with natural gas. If you want to convert to LP gas, the conversion must be performed by a qualified LP gas installer.
The conversion orifices and instructions can be found on back of the range.
Keep these instructions and all orifices in case you want to convert back to natural gas.
Rear of Range


GAS SUPPLY
AWARNING Fire Hazard: Do not use a flame to check for gas leaks.
WARNING Explosion Hazard: Do not exceed 25 ft-lbs of torque when making gas line connections. Overtightening may crack the pressure regulator resulting in fire or explosion hazard.
Gas Pressure Regulator
You must use the gas pressure regulator supplied with this range. For proper operations the inlet pressure to the regulator should be as follows:
Natural Gas:
Minimum pressure: 6" of Water Column Maximum pressure: 13" of Water Column
LP Gas:
Minimum pressure: 11" of Water Column Maximum pressure: 13" of Water Column If you are not sure about the inlet pressure contact local gas supplier.
Shut off the main gas supply valve before disconnecting the old range and leave it off until the new hook-up has been completed. Don't forget to relight the pilot on other gas appliances when you turn the gas back on.
Because hard piping restricts movement of the range, the use of a CSA International-certified flexible metal appliance connector is recommended unless local codes require a hard-piped connection.
If the hard piping method is used, you must carefully align the pipe; the range cannot be moved after the connection is made.
To prevent gas leaks, put pipe joint compound on, or wrap pipe thread tape with Teflon* around, all male (external) pipe threads.
A. Install a manual shut-off valve in the gas line in an easily accessed location outside of the range. Make sure everyone operating the range knows where and how to shut off the gas supply to the range.
B. Install male 1/2" flare union adapter to the 1/2" NPT internal thread at inlet of regulator. Use a backup wrench on the regulator fitting to avoid damage.
C. Install male 1/2" or 3/4" flare union adapter to the NPT internal thread of the manual shut-off valve, taking care to back-up the shut-off valve to keep it from turning.
D. Connect flexible metal appliance connector to the adapter on the range. Position range to permit connection at the shut-off valve.
E. When all connections have been made, make sure all range controls are in the off position and turn on the main gas supply valve. Use a liquid leak detector at all joints and connections to check for leaks in the system.
When using pressures greater than 1/2 psig to pressure test the gas supply system of the residence, disconnect the range and individual shut-off valve from the gas supply piping. When using pressures of 1/2 psig or less to pressure test the gas supply system, simply isolate the range from the gas supply system by closing the individual shut-off valve.
When checking for proper operation of the regulator, the inlet pressure must be at least 1" greater than the operating (manifold) pressure as given on rating label of product.
*Teflon: Registered trademark of DuPont
CONNECTOR HOOKUP

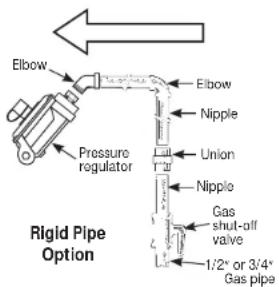
Installer: Inform the consumer of the location of the gas shut-off valve.

ELECTRICAL CONNECTIONS
WARNING
appliance must be properly grounded. Failure to do so can result in electric shock.
Electrical Requirements - 120-volt, 60 Hertz, properly grounded circuit protected by a 15-amp or 20-amp circuit breaker or time delay fuse. It is recommended that a separate circuit serving only this range be provided.
Note: Use of automatic, wireless, or wired external switches that shut off power to the appliance are not recommended for this product.
Grounding
The power cord of this appliance is equipped with a three-prong (grounding) plug which plugs into a standard three-prong grounding wall receptacle to minimize the possibility of electric shock hazard from this appliance.
The customer should have the wall receptacle and circuit checked by a qualified electrician to make sure the receptacle is properly grounded.
Where a standard two-prong wall receptacle is encountered, it is the personal responsibility and obligation of the customer to have it replaced with a properly grounded three-prong wall receptacle. DO NOT, UNDER ANY CIRCUMSTANCES, CUT OR REMOVE THE THIRD (GROUND) PRONG FROM THE POWER CORD. DO NOT USE AN ADAPTER. DO NOT USE AN EXTENSION CORD.
Ground Fault Circuit Interrupters (GFCI's) are not required or recommended for gas range receptacles. Performance of the range will not be affected if operated on a GFCI-protected circuit but occasional nuisance tripping of the GFCI breaker is possible.


SURFACE BURNERS
WARNING
Do not operate the burner without all burner parts in place.
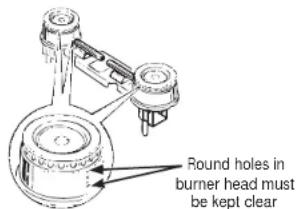
On models with standard twin burners, the cooktop lifts up for easy access.
Place burners on the range, making sure they are properly seated and level.

Burner Grates
4 CHECK SURFACE BURNERS
Push and turn knob to LITE position. You will hear a clicking sound indicating proper operation of the spark module. Once the air has been purged from the supply lines, burners should light within 4 seconds. After burner lights, rotate knob out of the LITE position. Try each burner in succession until all burners have been checked.
Quality of Flames
The flame quality of the burners needs to be determined visually.
If burner flames look like (A), call for service. Normal burner flames should look like (B) or (C), depending on the type of gas you use
With LP gas, some yellow tipping on outer cones is normal.

(A) Yellow flames—
Call for service
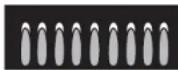
(B) Yellow tips on
outer cones—
Normal for LP gas

(C) Soft blue flames—
Normal for natural gas
5 CHECK BAKE BURNER
■ To remove the oven bottom:
A. Remove the screws holding down rear of the oven bottom.
B. Grasp the oven bottom at rear slots on each side.
C. Lift the rear of the oven bottom and slide it back until it clears the lip of the range frame at the front. Then lift bottom up and out.

■ Set Bake function to 350°F. Burner should light in 30 to 90 seconds.
■ Check Flame Quality.
- Flames should have approximately 1" blue cones.
• Natural gas should burn with no yellow flames.
• LP gas flames have slight yellow tips
• After warming up, the flame should not lift off the burner.
6 ADJUST BAKE AIR SHUTTER IF NECESSARY
To adjust the flow of air to bake burner, loosen the Phillips head screw and rotate the shutter as needed.
A. If the flames are yellow, open shutter more than the original setting.
B. If the flames lift off the burner, close the air shutter more than the original setting.
Check flames again and adjust further if necessary. Replace oven bottom.

Bake Burner
7 INSTALL AND CHECK ANTI-TIP DEVICE
WARNING Never completely remove the leveling leg as the range will not be secured to the anti-tip device properly.
Follow instructions supplied with ANTI-TIP bracket

8 LEVEL THE RANGE
WARNING Never completely remove the leveling leg as the range will not be secured to the anti-tip device properly.
A. Plug in the unit.
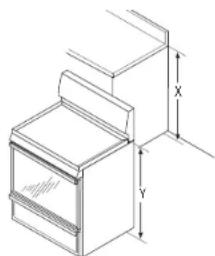
B. Measure the height of your countertop at the rear of the opening (X).
C. Adjust two rear leveling legs so that the rear of cooktop is at the same height as the counter (Y).
D. Slide unit into place.
E. Install oven shelves in the oven and position the range where it will be installed.
F. Check for levelness by placing a spirit level on one of the oven shelves. Take two readings—with the level placed diagonally first in one direction and then the other.
G. Adjust front leveling legs until the range is level.
H. Look under the unit and verify that the rear leg is fully engaged with the anti-tip device. If not, remove the unit and adjust the height of the rear leg so that it is properly engaged.
natural_image
Isometric line drawing of a cabinet or storage unit with labeled X and Y axes (no text or symbols on the diagram itself)
WHEN ALL HOOKUPS ARE COMPLETED
Make sure all controls are left in the off position. Make sure the flow of combustion and ventilation air to the range is unobstructed.
Check that all packing materials and tape have been removed. This will include tape on metal panel under control knobs (if applicable), adhesive tape, wire ties, cardboard and protective plastic. Failure to remove these materials could result in damage to the appliance once the appliance has been turned on and surfaces have heated.

natural_image
Isometric line drawing of a cabinet or rack unit with labeled dimensions X and Y (no text or symbols beyond labels)
- Installation Instructions Range
- IN THE COMMONWEALTH OF MASSACHUSETTS
- WARNING
- FIRE OR EXPLOSION HAZARD
- FOR YOUR SAFETY:
- TOOLS YOU WILL NEED MATERIALS YOU MAY NEED
- BEFORE YOU BEGIN
- Mobile Home - Additional Installation Requirements
- DIMENSIONS AND CLEARANCES
- DIMENSIONS AND CLEARANCES (CONT.)
- GAS SUPPLY
- Gas Pressure Regulator
- Natural Gas:
- LP Gas:
- ELECTRICAL CONNECTIONS
- Grounding
- SURFACE BURNERS
- CHECK SURFACE BURNERS
- Quality of Flames
- CHECK BAKE BURNER
- ■ To remove the oven bottom:
- ■ Check Flame Quality.
- ADJUST BAKE AIR SHUTTER IF NECESSARY
- INSTALL AND CHECK ANTI-TIP DEVICE
- LEVEL THE RANGE
- WHEN ALL HOOKUPS ARE COMPLETED
Brand : GE
Model : JGAS02SENSS
Category : Frying Pan