LTV37DA - Television V7 - Free user manual and instructions
Find the device manual for free LTV37DA V7 in PDF.


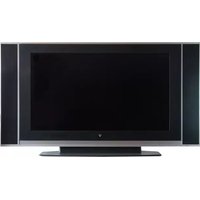
| Product Type | LCD Television |
| Brand | V7 |
| Model | LTV37DA |
| Screen Size | 37 inches (94 cm) |
| Display Resolution | 1920 x 1080 pixels (Full HD) |
| Display Type | LED-backlit LCD |
| Aspect Ratio | 16:9 |
| Refresh Rate | 60 Hz |
| Contrast Ratio | 3000:1 (dynamic) |
| Viewing Angle | 178° / 178° |
| Power Consumption | 100 W (typical) |
| Standby Power | < 1 W |
| Input Voltage | 100-240 V AC, 50/60 Hz |
| Dimensions (with stand) | 34.6 x 24.4 x 9.8 inches (880 x 620 x 250 mm) |
| Weight (with stand) | 24.2 lbs (11 kg) |
| Connectivity | HDMI (2), VGA, USB, Composite, Component, RF, Audio Out |
| Built-in Tuner | ATSC (North America) / DVB-T (Europe) depending on region |
| Speakers | 2 x 8 W |
| Wall Mount | VESA 200 x 200 mm |
| Operating Temperature | 5°C to 35°C |
| Remote Control | Includes IR remote (batteries not included) |
| Accessories | Power cord, user manual, remote control, stand |
| Energy Class | A+ (EU) / Energy Star (US) |
| Maintenance | Clean with soft dry cloth; avoid liquids and abrasive cleaners |
Frequently Asked Questions - LTV37DA V7
User questions about LTV37DA V7
0 question about this device. Answer the ones you know or ask your own.
Ask a new question about this device
Download the instructions for your Television in PDF format for free! Find your manual LTV37DA - V7 and take your electronic device back in hand. On this page are published all the documents necessary for the use of your device. LTV37DA by V7.
USER MANUAL LTV37DA V7
Important Safety Instructions....02
Cautions....03
Descriptions and accessories....05
LCD TV installation method & operation
The connectors and sockets....06
Control panel keys.... 10
Remote control....11
Displa y Menu
Display modes.... 13
Using the advanced menu 14
Other information
Trouble-shooting 21
Specifications....22
TV signal system.... 23
Important Safety Instructions
- Read these instructions.
- Keep these instructions.
- Heed all warnings.
- Follow all instructions.
-
Do not use this apparatus near water.
-
Clean only with dry cloth.
-
Do not block any ventilation openings. Install in accordance with the manufacturer's instructions.
-
Do not install near any heat sources such as radiators, heat registers, stoves, or other apparatus (including amplifiers) that produce heat.
-
Do not defeat the safety purpose of the polarized or grounding type plug. A polarized plug has two blades with one wider than the other. A grounding type plug has two blades and a third grounding prong. The wide blade or the third prong are provided for your safety. If the provided plug does not fit into your outlet, consult an electrician for replacement of the obsolete outlet.
-
Protect the power cord from being walked on or pinched particularly at plugs, convenience receptacles, and the point where they exit from the apparatus.
-
Only use attachments/accessories specified by the manufacturer.
-
Use only with the cart, stand, tripod, bracket, or table specified by the manufacturer, or sold with the apparatus. When a cart is used, use caution when moving the cart/ apparatus combination to avoid injury from tip-over.
-
Unplug this apparatus during lightning storms or when unused for long periods of time.

-
Refer all servicing to qualified service personnel. Servicing is required when the apparatus has been damaged in any way, such as power-supply cord or plug is damaged, liquid has been spilled or objects have fallen into the apparatus, the apparatus has been exposed to rain or moisture, does not operate normally, or has been dropped.
-
Apparatus shall not be exposed to dripping or splashing and no objects fill with liquids, such as vases, shall be placed on the apparatus.
-
To reduce the risk of electric shock, do not remove cover (or back). No user-serviceable parts inside. Refer servicing to qualified service personnel.
-
The readily operable appliance coupler will serve as the disconnect device of this apparatus.
-
The apparatus must be connected to a mains socket outlet with a protected earthing connection.
-
Keep 10cm minimum distance around the apparatus for sufficient ventilation.
-
Spent or discharged batteries must be recycled or disposed of properly in compliance with all applicable laws.
For detailed information, contact your local county solid waste authority.
- Please change to appropriate power cord complied with local regulation when the LCD TV purchased and utilized at different nations.
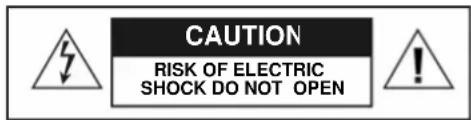


The lightning flash with arrow head symbol, within an equilateral triangle, is intended to alert the user to the presence of uninsulated "dangerous voltage" within the product's enclosure that may be of sufficient magnitude to constitute a risk of electric shock to persons.

The exclamation point within an equilateral triangle is intended to alert the user to the presence of important operating and maintenance (servicing) instructions in the literature accompanying the appliance.
"CAUTION"
These servicing instructions are for use by qualified service personnel only. To reduce the risk of electric shock do not perform any servicing other than that contained in the operating instructions unless you are qualified to do so.
Cautions

[Caution]
To protect your device from electrical damage, be sure to plug the cord into socket securely.
![V7 LTV37DA - [Caution] - 1](/content/2026/05/1081372/images/03598587dfaa34c14c4017155fa15315d6a4479e263812e16ce9653871a9e99e.jpg)
[Caution]
If you use the LCD TV with video games, computers, or similar products, keep brightness and contrast at a low level. Images with a high levels of brightness or contrast the may "burn on" the screen permanently.
[Tips for cleaning the LCD TV]
- Wipe the LCD TV with soft or dry cloth.
- DO NOT use solvent or methyl benzene. Harsh chemicals may damage your LCD TV.
- Make sure the LCD TV is unplugged before you clean it.
- This equipment is for entertainment use only.
- Visual Display tasks are exclude.
[CATV]
Be sure to acquire due authorization from the broadcaster/CATV service provider/program owner before using the TV receiver to watch programs through UHF, VHF, or CATV.
[Installation and use of LCD TV]
- Check the LCD TV power specification shown on the serial No./model tag. Be sure to use the power according to the specification. If you are unsure about the power requirement, please contact your distributor or local power company.
- Make sure to plug into the poser cable into the socket securely. If you have problems plugging in, please contact your distributor.
![V7 LTV37DA - [Installation and use of LCD TV] - 1](/content/2026/05/1081372/images/b2088936f0114cd8d93ae46985ec98fb34b228b21ca34f518187eb655ecbc831.jpg)
The plug is designed in such a manner that you can plug into a socket in a certain direction. If you have problems with the plug, contact with your distributor.
- DO NOT overload powers sockets or extension cords. Overloading poses a risk of electric shock or fire.
- DO NOT place any objects on the power cord. Keep your LCD TV away from any place that might cause damage to the LCD TV. Use only the correct power cord.
- Be sure to turn off your LCD TV when not in use. If the LCD TV will not be in use for a long time, unplug it to prevent risk of fire.
- The vent on the rear of the LCD TV is designed for ventilation and heat dissipation. Keep the vent clear.
- DO NOT place the LCD TV on beds, sofas, or carpet, as this may block the vent.
- DO NOT use the LCD TV in enclosed spaces, such as a bookshelf or TV cabinet as this may block the vent.
- Keep the LCD TV away from high-temperature objects or any heat-generating object.
- Keep the LCD TV away from direct unlight.
- DO NOT place the LCD TV on an unstable shelf or desk. Failing to do so may result in injury.
- DO NOT allow foreign objects inside the LCD TV, as this poses a risk of electric shock or damage to the internal components.
- When transporting the TV, never carry it by holding onto the speakers. Be sure to always carry the TV by two people holding it with two hands.
Cautions
[Maintenance]
If any of following occurs, unplug the LCD TV and contact your distributor or qualified technician to repair the LCD TV:
- The power cord or plug is damaged.
- Liquid enters the LCD TV.
- LCD TV is damp or wet.
- LCD TV is damaged.
- LCD TV malfunctions.
![V7 LTV37DA - [Maintenance] - 1](/content/2026/05/1081372/images/5db867b7e4c01c86b96c708684c24a4ada96138fd8b9a555ab418de0dd007fab.jpg)
DO NOT attempt to repair the LCD TV by yourself. There are high voltages inside the cabinet which poses a risk of electric shock.
Changing parts
If the LCD TV requires new parts, ask the technician for written proof the new parts are specified by the manufacturer and function are the same as the original parts.
Safety inspection
After the LCD TV is repaired, be sure to ask the technician (in accordance with the manufacturer's requirements) to conduct a routine safety inspection to make sure the LCD TV is safe.
If the LCD TV has been used longer than its life, please contact qualified technician for repair.
[User's record]
You can find the serial number and model on the back of the LCD TV. Be sure to provide the model and serial number when you contact your distributor.
![V7 LTV37DA - [User's record] - 1](/content/2026/05/1081372/images/c19541ad466bec03355060198282c81d837843ef5f69d3980438e55568ade900.jpg)
Please read and comply with all warnings, cautions, and instructions in the manual thoroughly. Failing to do so may void your warranty. Modifying the LCD TV in such a manner not approved by this manual will also void your warranty.
FCC Compliance Statement
This device complies with Part 15 of the FCC Rules. Operation is subject to the following two conditions:
(1) this device may not cause harmful interference, and (2) this device must accept any interference received, including interference that may cause undesired operation.
Note: This equipment has been tested and found to comply with the limits for a Class B digital device, pursuant to part 15 of the FCC Rules. These limits are designed to provide reasonable protection against harmful interference in a residential installation. This equipment generates uses and can radiate radio frequency energy and, if not installed and used in accordance with the instructions, may cause harmful interference to radio communications. However, there is no guarantee that interference will not occur in a particular installation. If this equipment does cause harmful interference to radio or television reception, which can be determined by turning the equipment off and on, the user is encouraged to try to correct the interference by one or more of the following measures:
* Reorient or relocate the receiving antenna
* Increase the separation between the equipment and receiver
* Connect the equipment into an outlet on a circuit different from that to which the receiver is connected
Caution: To comply with the limits for an FCC Class B computing device, always use the signal cord and power cord supplied with this unit. The Federal Communications Commission warns that changes or modifications to the unit not expressly approved by the party responsible for compliance could void the user's authority to operate the equipment.
European Notice
Products with the CE Marking comply with both the EMC Directive (89/336/EEC), (93/68/EEC) and the Low Voltage Directive (73/23/EEC) issued by the Commission of the European Community.
Descriptions and accessories
![Top View Control panel Side View Front view LCD Panel Speakers Power LEC IR Remote receiver Video & Antenna Connectors Front I/C Video Connectors Power Connector PC Connectors [Caution] Please attach I/O cover in normal use condition](/content/2026/05/1081372/images/0eac8aafa92758bb98f1a0d3d0e3082bd3e2b4ee3eb5110f3022faad1a6b2761.jpg)
Accessories
- Power cord (USA, England or Europe)
For Europe: A VDE certified power supply cord has to be used with this equipment for Germany. The power cord rated 250V, 10A minimum, according to IEC 60227, H05VV-F or VW-1, 0.75 mm² x 3G should be used.
For USA: NEMA 5-15P, Type SVT or SPT-2, 18 AWG, min. 7A/125V, 3G.
- Remote control
- AAA battery X 2
Installation of batteries
- Insert two AAA batteries into the Remote control. Make sure + and - are facing the proper direction.
- Replace the cover.

If the remote control is not to be used for a long time, remove the batteries.
Use the remote control carefully. DO NOT drop the remote control on the ground.
Keep the remote control away from moisture, sunlight, and high temperatures.

AV and Antenna Connection (for PAL)
SET-TOP-BOX
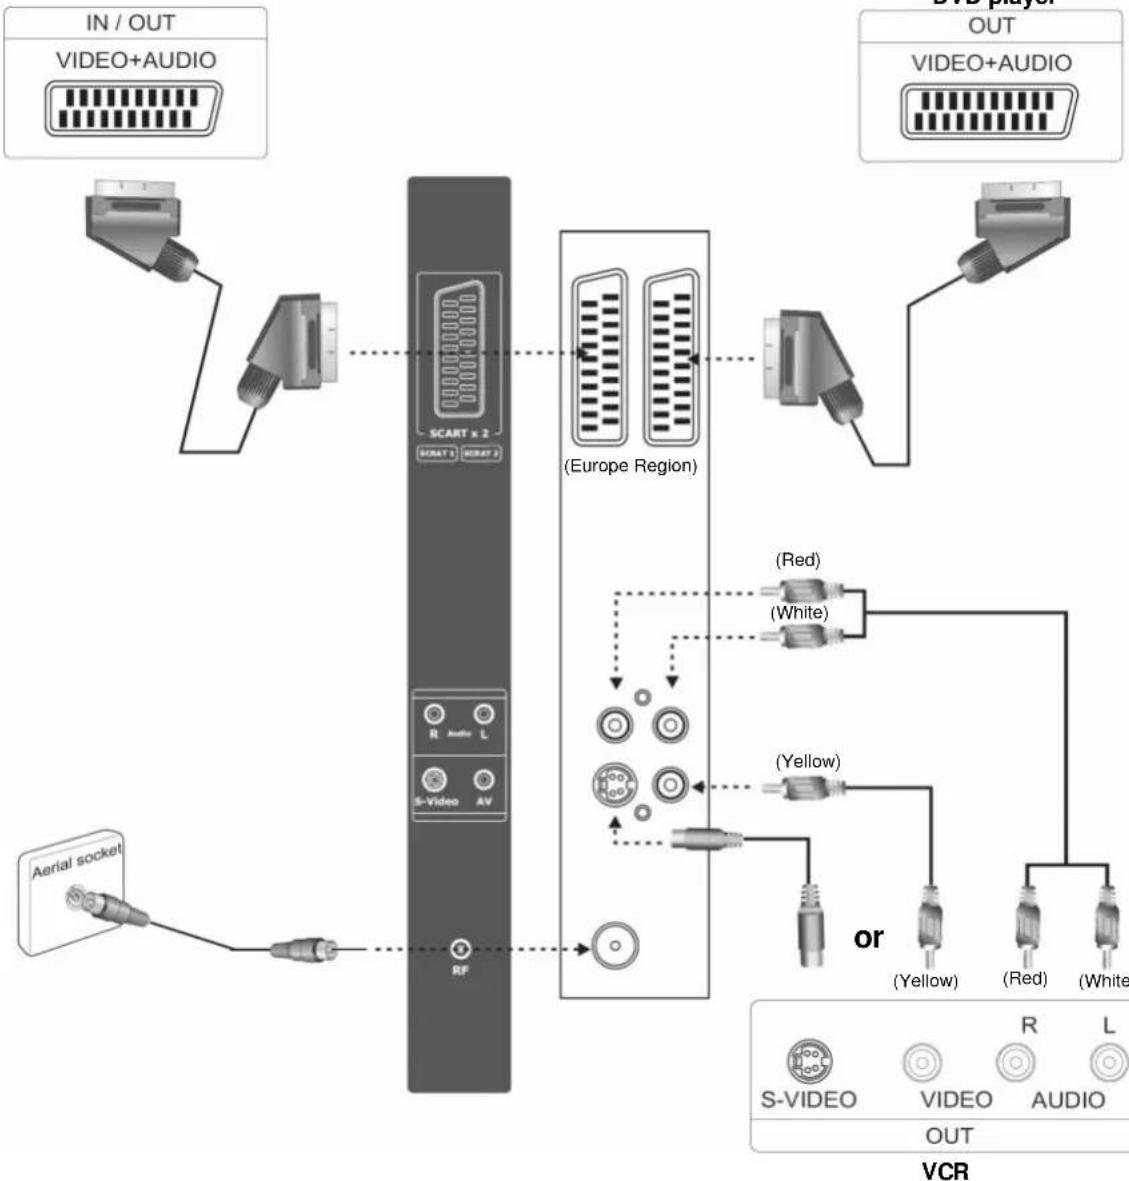
flowchart
graph TD
    A["IN / OUT"] --> B["VIDEO+AUDIO"]
    C["Aerial socket"] --> D["RF"]
    E["SCART x 2"] --> F["(Europe Region)"]
    G["S-Video"] --> H["(Red)"]
    G --> I["(White)"]
    J["RF"] --> K["(Yellow)"]
    L["VCR"] --> M["(Yellow)"]
    L --> N["(Red)"]
    L --> O["(White)"]
| Port Functions | |
| Scart 1 | A connector for Europe which uses the same connector to transmit AV; SRC and Audio input signals; TV and Audio out signals. |
| Scart 2 & Scart 2-S | A connector for Europe, which uses the same connector to transmit AV, SRGB, Audio and S(Y/C) input signals; by main screen(TV, AV, Scart1/AV) and Audio out signals. |
| S-Video and R/L Audio Input | S-Video (Y/C) or composite video and sound audio signal (R/L) connectors. If you connect S-Video & Composite video at the same time, S-Video has priority.If you want to use composite video, you must un-plug S-Video cable. |
| Tuner Input TV RF | signals input (antenna/CATV). |
Front I/O
Video Connectors

flowchart
graph TD
    A["VCR OUT"] --> B["S-VIDEO"]
    A --> C["VIDEO"]
    A --> D["AUDIO"]
    A --> E["Audio"]
    B --> F["or"]
    C --> F
    D --> F
    E --> F
    F --> G["[S-VIDEO"]]
    F --> H["[VIDEO"]]
    F --> I["[AV IN"]]
    F --> J["[L"]—Audio—[R]]
    F --> K["[Earphone"]]
| Port Functions | |
| S-Video and R/L Audio Input | S-Video (Y/C) or composite video and sound audio signal (R/L) connectors. If you connect S-Video & Composite video at the same time, S-Video has priority. If you want to use composite video, you must un-plug S-Video cable. |
| Earphone Output | Connects to headphones (16Ω or 32Ω). |
PC & Audio Output Connection (for PAL)
HDTV decoder

flowchart
graph TD
    subgraph OUT
        A["Pr"] --> B["(Red)"]
        C["Pb"] --> D["(Blue)"]
        E["Y"] --> F["(Green)"]
        G["L"] --> H["(White)"]
        I["R"] --> J["(Red)"]
    end

    subgraph OUT
        K["AUDIO"]
    end

    subgraph PC
        L["PC"] --> M["Switch"]
        M --> N["Switch"]
        N --> O["Switch"]
    end

    subgraph OUT
        P["Optional"]
    end

    style OUT fill:#f9f,stroke:#333
    style OUT fill:#ccf,stroke:#333
    style OUT fill:#cfc,stroke:#333
    style OUT fill:#fcc,stroke:#333
    style OUT fill:#ffc,stroke:#333
    style OUT fill:#cff,stroke:#333
    style OUT fill:#ffc,stroke:#333
    style OUT fill:#cfc,stroke:#333
    style OUT fill:#fcc,stroke:#333
    style OUT fill:#ffc,stroke:#333
    style OUT fill:#cfc,stroke:#333
    style OUT fill:#ffc,stroke:#333
    style OUT fill:#cfc,stroke:#333
    style OUT fill:#ffc,stroke:#333
    style OUT fill:#cfc,stroke:#333
    style OUT fill:#ffc,stroke:#333
    style OUT fill:#cfc,stroke:#333
    style OUT fill:#ffc,stroke:#334
| Port Functions | |
| Component and R/L Audio Input | Connects to devices which support YPbPr(R/L), for example, DVD (Progressive support) players and hi-HDTV decoders or satellite receiver to give picture with maximum resolution and the sound signal quality (R/L connector). |
| PC & HDTV Audio Input | When LCD TV is in VGA/DVI mode, this connects to the audio output from the PC. When the DVI port is used with an HDTV source, this can be used for audio input by using a cable with RCA plugs converted to stereo mini jack plug. |
| VGA Input (analog) | Connects to VGA analog signal sources; for use with a PC. |
| HDMI Input (digital) | High Definition Multimedia InterfaceConnects to devices compatible with digital input signals and can be used with PC or HDTV video signals. HDTV support timing: 1080i, 720P, 576i, 576P, 480i and 480P; PC mode support timing: 480P (640x480). |
! * denotes optional item
Power Connection
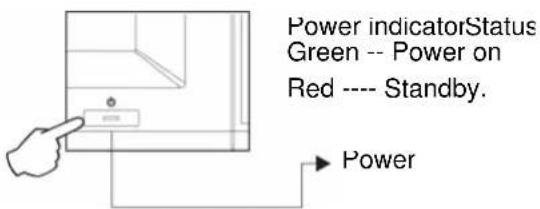
Attach the AC power cord to the LCD-TV and plug into an appropriate wall outlet.
Turn the power on at the main switch (Next to the power
socket) to put the LCD TV into standby mode. The
standby indicator on the front will light up in red.
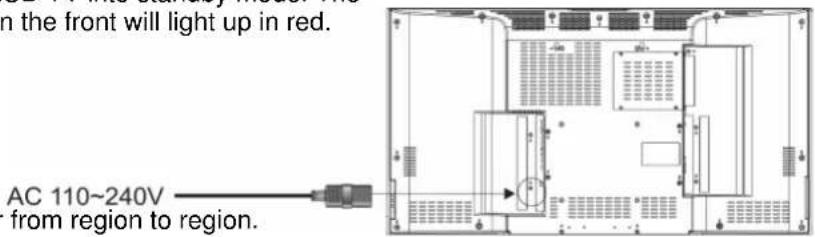
Power outlets differ from region to region.
Turning the LCD TV on
Press the POWER button on the front lower right of the TV to turn on the power or enter standby mode.

Due to unstable local voltage, there will occasionally be a delay in POWER ON when the LGD TV is switched on.
Programming TV channels
- Press the SOURCE button on the remote control or on the control panel of LCD TV to select TV mode.
- Press the MENU button on the remote control to display the OSD menu.
- Press the ▼ button on the remote to highlight TV Setup and press the ▶ button to select TV Setup
- Press the ▼ button on your remote to highlight Auto Program Sort (APS) and press the ▶ button to select Auto Program Sort (APS)
- Press the ◀▶ buttons to select your country.
- Press the ◆ buttons to select Start APS, and press the ▶ button to start the tuning process. (This will take a few minutes. The tuning process will find all available channels.)
- You can watch TV now. Change channels by pressing the P and P buttons.

flowchart
graph LR
    A["MENU"] --> B["Program: Save, Power Right DATA, AutoImage, None"]
    B --> C["Program: Click, Power Right DATA, AutoImage, None"]
    C --> D["Program: Select, Power Right DATA, AutoImage, None"]
    D --> E["Program: Select, Power Right DATA, AutoImage, None"]
    E --> F["Program: Select, Power Right DATA, AutoImage, None"]
    F --> G["Program: Select, Power Right DATA, AutoImage, None"]
    G --> H["Program: Select, Power Right DATA, AutoImage, None"]
    H --> I["Program: Select, Power Right DATA, AutoImage, None"]
    I --> J["Program: Select, Power Right DATA, AutoImage, None"]
    J --> K["Program: Select, Power Right DATA, AutoImage, None"]
    K --> L["Program: Select, Power Right DATA, AutoImage, None"]
    L --> M["Program: Select, Power Right DATA, AutoImage, None"]
    M --> N["Program: Select, Power Right DATA, AutoImage, None"]
    N --> O["Program: Select, Power Right DATA, AutoImage, None"]
    O --> P["Program: Select, Power Right DATA, AutoImage, None"]
    P --> Q["Program: Select, Power Right DATA, AutoImage, None"]
    Q --> R["Program: Select, Power Right DATA, AutoImage, None"]
    R --> S["Program: Select, Power Right DATA, AutoImage, None"]
    S --> T["Program: Select, Power Right DATA, AutoImage, None"]
    T --> U["Program: Select, Power Right DATA, AutoImage, None"]
    U --> V["Program: Select, Power Right DATA, AutoImage, None"]
    V --> W["Program: Select, Power Right DATA, AutoImage, None"]
    W --> X["Program: Select, Power Right DATA, AutoImage, None"]
    X --> Y["Program: Select, Power Right DATA, AutoImage, None"]
    Y --> Z["Program: Select, Power Right DATA, AutoImage, None"]
    Z --> AA["Program: Select, Power Right DATA, AutoImage, None"]
    AA --> AB["Program: Select, Power Right DATA, AutoImage, None"]
    AB --> AC["Program: Select, Power Right DATA, AutoImage, None"]
    AC --> AD["Program: Select, Power Right DATA, AutoImage, None"]
    AD --> AE["Program: Select, Power Right DATA, AutoImage, None"]
    AE --> AF["Program: Select, Power Right DATA, AutoImage, None"]
    AF --> AG["Program: Select, Power Right DATA, AutoImage, None"]
    AG --> AH["Program: Select, Power Right DATA, AutoImage, None"]
    AH --> AI["Program: Select, Power Right DATA, AutoImage, None"]
    AI --> AJ["Program: Select, Power Right DATA, AutoImage, None"]
    AJ --> AK["Program: Select, Power Right DATA, AutoImage, None"]
    AK --> AL["Program: Select, Power Right DATA, AutoImage, None"]
    AL --> AM["Program: Select, Power Right DATA, AutoImage, None"]
    AM --> AN["Program: Select, Power Right DATA, AutoImage, None"]
    AN --> AO["Program: Select, Power Right DATA, AutoImage, None"]
    AO --> AP["Program: Select, Power Right DATA, AutoImage, None"]
    AP --> AQ["Program: Select, Power Right DATA, AutoImage, None"]
    AQ --> AR["Program: Select, Power Right DATA, AutoImage, None"]
    AR --> AS["Program: Select, Power Right DATA, AutoImage, None"]
    AS --> AT["Program: Select, Power Right DATA, AutoImage, None"]
    AT --> AU["Program: Select, Power Right DATA, AutoImage, None"]
    AU --> AV["Program: Select, Power Right DATA, AutoImage, None"]
    AV --> AW["Program: Select, Power Right DATA, AutoImage, None"]
    AW --> AX["Program: Select, Power Right DATA, AutoImage, None"]
    AX --> AY["Program: Select, Power Right DATA, AutoImage, None"]
    AY --> AZ["Program: Select, Power Right DATA, AutoImage, None"]
    AZ --> BA["Program: Select, Power Right DATA, AutoImage, None"]
    BA --> BB["Program: Select, Power Right DATA, AutoImage, None"]
    BB --> BC["Program: Select, Power Right DATA, AutoImage, None"]
    BC --> BD["Program: Select, Power Right DATA, AutoImage, None"]
    BD --> BE["Program: Select, Power Right DATA, AutoImage, None"]
    BE --> BF["Program: Select, Power Right DATA, AutoImage, None"]
    BF --> BG["Program: Select, Power Right DATA, AutoImage, None"]
    BG --> BH["Program: Select, Power Right DATA, AutoImage, None"]
    BH --> BI["Program: Select, Power Right DATA, AutoImage, None"]
    BI --> BJ["Program: Select, Power Right DATA, AutoImage, None"]
    BJ --> BK["Program: Select, Power Right DATA, AutoImage, None"]
    BK --> BL["Program: Select, Power Right DATA, AutoImage, None"]
    BL --> BM["Program: Select, Power Right DATA, AutoImage, None"]
    BM --> BN["Program: Select, Power Right DATA, AutoImage,<br>        53MHz 15"]

| Button Description | |
| MENU | Use this button to display and adjust the features in the On-Screen Display.Use the four arrow keys (channel and volume adjustments) to navigate the menu options. |
| CHANNEL ^/√FUNCTION ▲/▼ | Use these buttons to switch between preprogrammed channels.Use these buttons to move between functions in the OSD. |
| VOLUME +/ -ADJUST ◀/▶ | Use these two buttons to adjust the volume.Use these buttons to adjust the values of a function. |
| SOURCE | Use this button to change between video input signals.Press the SOURCE button repeatedly to scroll through the following list of inputs:PAL&SECAM (for Europe): TV/SAV 1/SAV 2/SCART 1/SCART 2/SCART2-YPbPr/HDMI/VGA(PC) mode. |

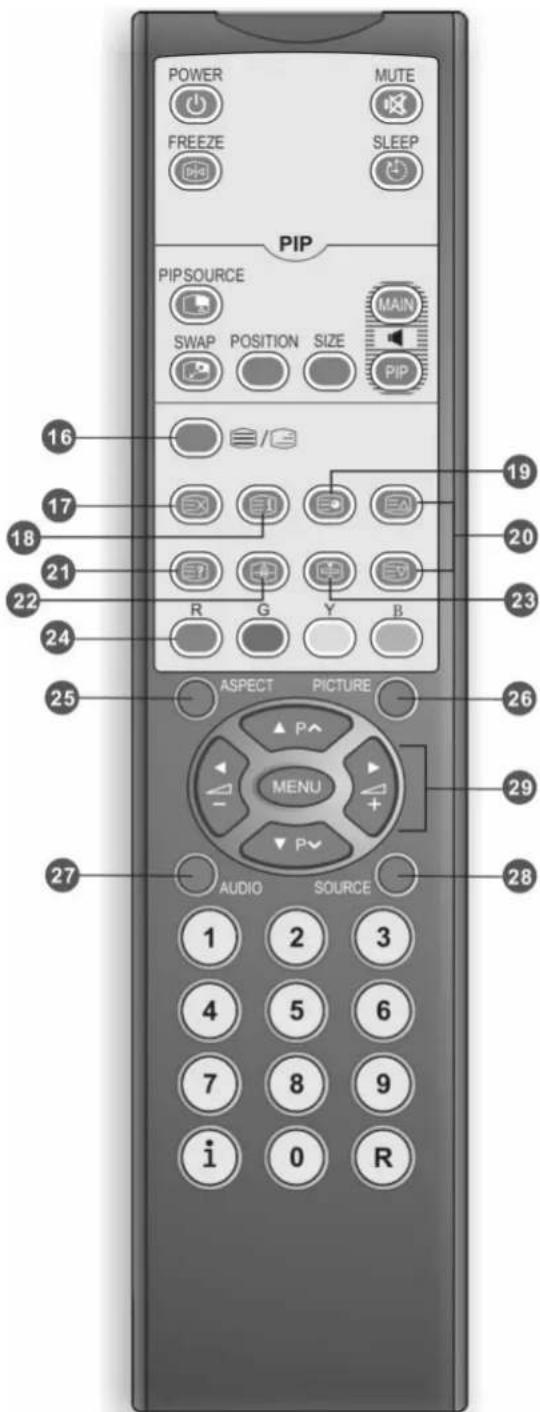
- POWER Press to turn on the LCD TV or enter standby mode.
- MUTE Press to toggle audio on and off. You can also press volume +/- to restore the previous volume level.
- FREEZE Press to freeze the picture. Press again to revert to live viewing
- SLEEP Press repeatedly to set the sleep timer. The timer has intervals of OFF/30/60/90/120 minutes.
PIP (Picture in picture)..... Please refer to P12 for details
- PIP SOURCE Press to select the sub picture's signal source.
- SWAP Switches between the main picture and the sub picture in PIP mode.
- PIP-POSITION (position of sub picture) Changes the position of the sub picture under PIP mode.
- PIP-SIZE (size of sub picture) Press to activate Picture In Picture (PIP) mode. Press again to changes the size of sub picture under PIP mode. Two screen sizes are available. Press again to close PIP mode.
- MAIN AUDIO Selects MAIN (main picture) audio in PIP mode.
- PIP AUDIO Select PIP (sub picture) audio in PIP mode.
- VOLUME +/- Adjusts the LCD TV volume.
- Program^^Selects the Channel
- 0\~9 Press 0\~9 to select channels directly
- RETURN Returns to the previous channel.
- INFORMATION (i) Press the INFORMATION button to display the current signal status, including input source/channel/audio mode.
TELETEXT (Designed for Europe PAL/SECAM
system only).
16. TEXT/MIX
Press this button to activate Teletext. Press again to activate Teletext with TV Press again to turn off Teletext.
17. UPDATE
Enter the page number then press the (UPDATE) button and the teletext will display the page you selected after searching. The page number is displayed at the top side of screen.
18. INDEX
Press this button to return to page 100 or the index page; and then press 0 to 9. The teletext page will be numbered and added to the page you select or the secondary item.
19. SUB
Displays the sub page (when available).
20. PAGE UP& DOWN
Press this button then the number keys to select the page you want view.
21. REVEAL
Reveals hidden information such as answers to a quiz.
22. SIZE
Press this button to change the font size: Full screen, Top half and Bottom half.
- FULL(full screen) standard full-screen text
- TOP(top half) top half of page appears on the full screen
- BOTTOM(bottom half) bottom half of page appears on the full screen.
23. HOLD
Press this button to stop the scrolling of pages. The text decoder stops receiving data.
24. R/G/Y/B
Press this button to select the pictures with various colors of text. Different channels display different functions.
25. ASPECT (screen scaling)
Changes the aspect ratio. Choose from
Auto 16:9 4:3 Movie Exp. Char Exp.

flowchart
graph LR
    A["Circle shape"] --> B["Rectangular shape"]
    B --> C["Square shape with inner circle"]
    C --> D["Rectangular shape with outer circle"]
26. PICTURE
Selects advanced picture settings. User 1/User 2/Fantastic/Standard/Movie
27. AUDIO
Selects STEREO, MONO, DUAL 1 and DUAL 2. If there is no second language available for the signal received, LCD TV will audio output by mono.
28. SOURCE
Switches between signal sources.
29. MENU
Press MENU to activate the LCD TV OSD. Press again to close the OSD. Press ▲▼ ◀ to navigate and confirm your selection.
Main picture mode
- You can select the signal source of the main picture using the remote control.
PAL&SECAM(for European region): TV/SAV 1/SAV 2/SCART 1/SCART 2/SCART2-S/YPbPr/HDMI/ PC(VGA) mode. - The selected signal source appears on the upper right corner of the screen (Diagram 1).
- You can set options for different modes in the OSD MENU.
PIP mode
- The LCD TV can display the main signal and secondary input signals simultaneously. The secondary signal (or input source) appears in a frame in the main picture. This is known as PIP sub picture (diagram 1). To activate PIP mode, press the SIZE button on the Remote control.
- Select the PIP input source from the PIP Source button on the Remote control. (There is no PIP button on the LCD TV control panel.)
- The secondary signal options change as the main signal source changes. (Diagram 2)

- Use the SOURCE button on the remote control to select the required mode.
Once the signal source is detected, the selected system mode appears in the upper right corner of the screen.
- After the system mode is selected, press the MENU buttons to perform the following functions:
 | DISPLAYShows more picture modes and functions based on your favorite channels and enables you to adjust the color and brightness setup.Enables you to configure advanced picture settings. |
 | AUDIOProvides more audio selections. You can also set the audio environment of the LCD TV. |
 | GEOMETRIC (for use in PC mode)Enables you to adjust the position and sharpness of the picture. |
 | TV SETUP(for use with TV mode)Enables you to adjust cable or antenna signal settings. |
 | SYSTEMEnables you to set the OSD language and OSD background. |
DISPLAY

- Press the MENU button on the remote control to display the main menu.
- Press the ▲▼ buttons on the remote control to select the DISPLAY.
- Press the ▶ button on the remote control to enter the submenu.
- Press the ▲▼ buttons on the remote control to select the item to be adjusted.
- Press the ▶ button on the remote control to confirm your choice.
- Press ◀▶ buttons on the remote control to adjust the setting.
- Press the MENU again to quit the picture.
| Menu Descriptions | |
| Picture Mode | Press ◀ to select the advanced picture setting.User1 /User2/ Fantastic /Standard /Movie (Video Mode)User1 /User2 (VGA Mode) |
| Brightness | Press ◀ to make the picture brighter or darker.The adjustment range is 0~100 |
| Contrast | Press ◀ to increase or decrease the picture contrast.The adjustment range is 0~100 |
| Saturation | Press ◀ to adjust color saturation.The adjustment range is 0~100 |
| Hue | Press ◀ to change the hue to make it redder or greener.The adjustment range is -50 ~ 0 ~ 50 |
| Sharpness | Press ◀ to make the picture sharper or softer.The adjustment range is 0~100 |
| Color Temp. | Press ◀ to adjust the color temperature.Cool / Default / Warm |
| Advanced Press | to select the advanced picture setting. |
| Noise Reduction | Press ◀ to select a level of noise reduction.Strong /Weak / OFF |
| Film Mode | Press ◀ to display 3:2 or 2:2 movie picture size when source signal is received.Auto / OFF |
| Black White Exp. | Press ◀ to advance the color depth for the picture.Weak / Strong / OFF |
| Vertical Sharpness | Press ◀ to advance the image sharpness.Weak / Strong / OFF |
| Default | Press ▶ to restore all Display parameters to their default settings. |
AUDIO

- Press the MENU button on the remote control to display the main menu.
- Press the ▲▼ buttons on the remote control to select the AUDIO.
- Press the ▶ button on the remote control to enter the submenu.
- Press the ▲▼ buttons on the remote control to select the item to be adjusted.
- Press the ▶ button on the remote control to confirm your choice.
- Press ◀▶ buttons on the remote control to adjust the setting.
- Press the MENU again to quit the picture.
| Menu Descriptions | |
| Sound Mode | Press the ◀▶ buttons to select the sound mode.User1 / User2 / Fantastic /Standard / Movie (Video Mode)User1 / User2 (VGA Mode) |
| Balance | Press the ◀▶ buttons to adjust the balance between right and left speakers. he adjustment range is -50~ 0 ~50 |
| Treble | Press the ◀▶ buttons to increase or decrease the audio treble level.The adjustment range is 0~100 |
| Bass | Press the ◀▶ buttons to increase or decrease the audio bass level.The adjustment range is 0~100 |
| Surround | Select ON or OFF to activate or inactivate the surround sound function. |
| Ear Phone | Press ▶ to adjust earphone settings. |
| Balance : Between right and left speakers. The adjustment range is -50~0~5 | |
| Treble : The adjustment range is 0~100 | |
| Bass : The adjustment range is 0~100 | |
| HDMI Audio In | Press the ◀▶ buttons to select the HDMI Audio In. (Only for HDMI Mode)HDMI Audio In / PC Audio In |
| Default | Press ▶ to return all audio parameters to their default settings. |
GEOMETRY (for VGA)
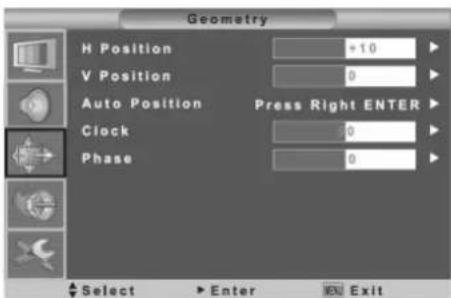
- Press the MENU button on the remote control to display the main menu.
- Press the ▲▼ buttons on the remote control to select the DEOMETRIC.
- Press the ▶ button on the remote control to enter the submenu.
- Press the ▲▼ buttons on the remote control to select the item to be adjusted.
- Press the ▶ button on the remote control to confirm your choice.
- Press ◀▶ buttons on the remote control to adjust the setting.
- Press the MENU again to quit the picture.
| Menu Descriptions | |
| H-Position | Press the ◀▶ buttons to adjust the horizontal VGA position.The adjustment range is -10~0~10 |
| V-Position | Press the ◀▶ buttons to adjust the vertical VGA position.The adjustment range is -10~0~10 |
| Auto Position | Automatic adjustmentPress the ▶ buttons to automatically adjust the picture setup. |
| Clock | Press the ◀▶ buttons to adjust the VGA alignment for stable VGA display.The adjustment range is 0~100 |
| Phase | Press the ◀▶ buttons to adjust the focus and sharpness of VGA.The adjustment range is 0~100.In PC model, if the picture quality fails to meet your maximum expectation wh “Auto” is pressed, please adjust the “Phase” function to do manual calibration refining picture quality. |
| Recall Press this | button to restore all Geometric parameters to their default settings. |
TV Setup (for TV)

- Press the MENU button on the remote control to display the main menu.
- Press the ▲▼ buttons on the remote control to select the TV SETUP.
- Press the ▶ button on the remote control to enter the submenu.
- Press the ▲▼ buttons on the remote control to select the item to be adjusted.
- Press the ▶ button on the remote control to confirm your choice.
- Press ◀▶ buttons on the remote control to adjust the setting.
- Press the MENU again to quit the picture.
| Menu Descriptions | |
| Program Table | This option provides channel edition on sequence, channel skip and frequency fine tuning in the range of 3MHz. (Refer to next page for details) |
Auto Program (APS) | |
| Country | Press the ◀▶ buttons to select your country. |
| Start APS | Automatic channel scanningPress the ▶ button to execute automatic channel scanning. Automatic channel scanning must be executed when you install your LCD TV for the first time. |
TV SETUP (for TV)
Program Table:

Use the ▲▼ buttons on the remote control to highlight the button to edit in yellow, and then press the ▶ button on the remote control to enter the Tuning table. (Next Figure)

After entering the Tuning Table, use the ▲▼ button to edit the program.
Refer to the following for description.
Swap program No : Use the ◀▶ buttons to choose which channel to change from channel 0 to 99.
Edit Name : Use the 0\~9 number keys to edit name.
Press the "MENU" button to confirm the name setting.
Press the number buttons to select your required letters:
Press 2 to cycle through "2, A, B, C, @".
Press 3, for "3, D, E, F, #", etc.
(refer the table on the right hand side)

Color Norm & Audio Norm :
Use the ◀▶ buttons to choose which TV system to represent the screen.
If you live in an area which can receive different TV
systems you may choose to change the default system to the system used in your area.
Color Norm: PAL -> SECAM
Audio Norm: D/K -> I -> B/G -> L -> LP
Skip : "ON" means (skip on) and "OFF" means (skip off).
Fine Tuning : Manually adjust the frequency for variation of each channels to get a better image quality, but it will be fixed the frequency after adjustment unless re-update scan.
SYSTEM
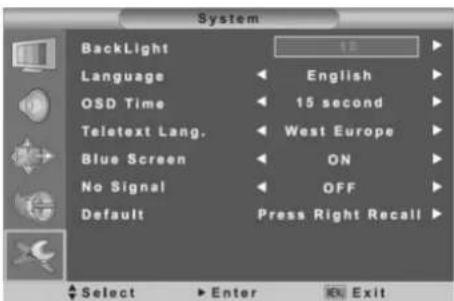
- Press the MENU button on the remote control to display the main menu.
- Press the ▲▼ buttons on the remote control to select the SYSTEM.
- Press the ▶ button on the remote control to enter the submenu.
- Press the ▲▼ buttons on the remote control to select the item to be adjusted.
- Press the ▶ button on the remote control to confirm your choice.
- Press ◀▶ buttons on the remote control to adjust the setting.
- Press the MENU again to quit the picture.
| Menu Descriptions | |
| BackLight | Press the ◀▶ buttons to make the BackLight brighter or darker.The adjustment range is 0~10 |
| Language | Press the ◀▶ buttons to select language.English / Deutsch(German) / Francais(French) / Polski (Polish)/ Italiano(Italian) /Espanol(Spanish) / Nederlands(Dutch) / rónn. (Russian). |
| OSD Timeout | Press the ◀▶ buttons to select the time to be shown on OSD Timeout.15 / 20 / 25 seconds |
| Teletext Lang. | Press the ◀▶ buttons to select the Teletext Lang.West Europe / East Europe / Cyrillic / Greek / Arabic. |
| Blue Screen | Press the ◀▶ buttons to select the screen background color.ON / OFF |
| No Signal | Press the ◀▶ buttons to select the time to be to shut off when no any signal input.OFF / 30 / 60 minutes |
| Default | Press ▶ to return all system parameters to their default settings. |
The following table contains the common problems and the solutions to these problems. Please check this list before you contact technicians.
| Problems Reasons | Solutions | |
| No picture 1. Did you | connect the power cord ?2. Did you turn on the power ?3. Is the signal cable connected correctly ?4. Is the screen in energy-saving mode ? | 1. Connect power cord correctly.2. Turn on power.3. Connect signal cable correctly4. Press any button on the computer |
| Abnormal colors 1. Is | signal cable connected correctly ? | 1. Connect signal cable correctly. |
| Twisted picture 1. Is | the signal cable connected correctly ?2. Is input signal of compatible frequency ? | 1. Connect signal cable correctly.2. Please use compatible signal. |
| Picture too dark 1. Are brightness and contrast set at the lowest level ? | 1. Adjust brightness and contrast. | |
| Audio only, no images | Is input signal connected correctly ?2. Is TV signal too weak ? | Please check if input signal is connected correctly.TV-RF signal must not be lower than 50dB. |
| Picture only, no audio | Is signal cable connected correctly ?2. Is volume at the minimum level ?3. Is audio signal cable not connected ?4. Is TV signal too weak ? | Connect signal cable correctly.Adjust volume to proper level.Connect audio signal cable correctly.TV-RF signal must not be lower than 50dB. |
| Cannot use remote control | Is the battery dead?2. Is there any disturbance from static or thunder ? | Please change battery.Turn off power for 10 seconds;and then restart power. |
The following table contains common problems and solutions to these problems.
| Problems Possible solutions | |
| Cannot receive sufficient channels through antenna | Please use the automatic scanning function to increase the number of channels not included in memory (Please refer to page 18~19) |
| No colors Please adjust the color setup | |
| Blinking picture accompanied by ghost image | Check the connection of antenna/signal cable.Check if channel is in play modePress signal source and change input mode |
| Broken lines or segments Adjust antennaKeep the TV away from noise sources, such as automobiles, neon lights, and hair dryers | |
| Certain TV channels are blocked (Hope to acquire some channels) | Please use the automatic scanning method to add the channels not included in memory (Please check page 18~19) |
| Overlapping images or ghost images | Please use multi-directional outdoor antenna(If your TV is subject to the influence of nearby mountains or buildings) |
| Cannot use a function | If the item you choose turns gray, that item cannot be selected. |
| Cannot receive programs | Please use the automatic scanning method to add the channels not included in memory (Please check page 18~19) |
If you have further questions after reading the above descriptions, please contact your distributor.
| Display panel | Active Area / Screen Size 37" TFT | LCD |
| Aspect Ratio Widescreen 16:9 | ||
| Max. of Pixels 1366(H) X 768(V) | ||
| Lamp Life of Bac klight >50,000 hrs | ||
| Mode IPS | ||
| Compatibility | PC 1360x768@ 60Hz | 1024x768 @ 60; 70; 75;85Hz800x600 @ 60; 72;75;85Hz640x480 @ 60; 72; 75;85Hz |
| SDTV/HDTV scanning for mat | 1080i, 720p, 576p, 576i, 480p, 480i | |
| Power | Input Voltage | AC100-240V, 2A, 50/60Hz |
| Operation | ≤ 200 W | |
| Standby | <1 W | |
| Environment | Operating | 5~35°C (41~95°F) / 10%~90% (no condensation) |
| Storage temperature | -20~50°C (-4~122°F) / 10%~90% (no condensation) | |
| Other | Built-in speaker | 8Ω, 7W, x2 |
Color and Broadcasting System by Country
| Country TV Colour Stereo Subtitles | ||||
| Albania B/G PAL | ||||
| Argentina N PAL-N | ||||
| Australia B/G PAL FM-FM Teletext | ||||
| Austria B/G PAL FM-FM Teletext | ||||
| Azores(Portugal) B | PAL | |||
| Bahamas M | NTSC | |||
| Bahrain B PAL | ||||
| Barbados M | NTSC | |||
| Belgium B/G PAL NICAM Teletext | ||||
| Bermuda M | NTSC | |||
| Brazil M | PAL-M | MTS | ||
| Bulgaria D | SECAM | |||
| Canada M | NTSC | MTS | CC | |
| Canary Is B | PAL | |||
| China D | PAL | |||
| Colombia M | NTSC | |||
| Cyprus B PAL | ||||
| Czechsolvakia D/K | SECAM/PAL | |||
| Kia Denmark B | PAL | NICAM | Teletext | |
| Egypt B | SECAM | |||
| Faroe Islands (DK) B | PAL | |||
| Finland B/G PAL NICAM Teletext | ||||
| France E/L | SECAM | Teletext | ||
| Gambia I PAL | ||||
| Germany B/G | PAL | FM-FM | Teletext | |
| Germany(prev East) B/G | SECAM/PAL | |||
| Gibraltar B | PAL | |||
| Greece B/G | PAL (was SECAM) | |||
| Hong Kong I | PAL | NICAM | ||
| Hungary B/G & D/KIceland B PAL | PAL (was SECAM) | NICAM(Budapest only) | ||
| India B PAL | ||||
| Indonesia B PAL | ||||
| Iran H | SECAM | |||
| Ireland | I | PAL | NICAM | Teletext |
| Israel | B/G | PAL | NICAM | Teletext |
| Italy | B/G PAL FM-FM Teletext | |||
| Jamaica | N | SECAM | ||
| Japan | M | NTSC | MATRIX | |
| Jordan B PAL | ||||
| Kenya | B PAL | |||
| Korea | M | NTSC | ||
| Luxembourg | B/G | PAL | NICAM | Teletext |
| Madeira | B PAL | |||
| Madagascar | B | SECAM | ||
| Malaysia | B PAL | |||
| Malta | B/G PAL | |||
| Mauritius | B | SECAM | ||
| Mexico | M | NTSC | MTS | CC |
| Monaco | L/G | SECAM/PAL | ||
| Morocco | B | SECAM | ||
| Netherlands | B/G | PAL | FM-FM | Teletext |
| New Zealand B/G PAL NICAM Teletext | ||||
| North Korea | D/K | SECAM | ||
| Norway B/G PAL NICAM | ||||
| Pakistan | B PAL | |||
| Paraguay | N PAL | |||
| Peru | M | NTSC | ||
| Philippines M | NTSC | |||
| Poland | D/K | PA | Teletext | |
| Portugal B/G | PAL NICAM Teletext | |||
| Romania G PAL | ||||
| Russia D/K | SECAM | |||
| Saudi Arabia | B SECAM | |||
| Seychelles | I | PAL | ||
| Singapore | B PAL | |||
| South Africa | I | PAL | ||
| South Korea | M | NTSC | ||
| Spain | B/G PAL NICAM Teletext | |||
| Sri Lanka | B/G PAL | |||
| Sweden | B/G PAL NICAM Teletext | |||
| Switzerland | B/G PAL FM-FM Teletext | |||
| Tahiti | KI | SECAM | ||
| Taiwan M | NTSC | |||
| Thailand | B PAL | |||
| Trinidad | M | NTSC | ||
| Tunisia B SECAM | ||||
| Turkey | B PAL - Teletext | |||
| United Arab Emirates | B/G PAL | |||
| United Kingdom | I | PAL NICAM Teletext | ||
| Uruguay | N PAL MTS | |||
| USA M | NTSC MTS | CC | ||
| Venezuela M | NTSC | |||
| Yugoslavia | B/H PAL | |||
| Zimbabwe | B PAL | |||
- LCD TV installation method & operation
- Displa y Menu
- Other information
- Important Safety Instructions
- "CAUTION"
- Cautions
- [Caution]
- [Tips for cleaning the LCD TV]
- [CATV]
- [Installation and use of LCD TV]
- [Maintenance]
- Changing parts
- Safety inspection
- [User's record]
- FCC Compliance Statement
- European Notice
- Descriptions and accessories
- Accessories
- Installation of batteries
- PC & Audio Output Connection (for PAL)
- Power Connection
- Turning the LCD TV on
- Programming TV channels
- TELETEXT (Designed for Europe PAL/SECAM
- system only).
- TEXT/MIX
- UPDATE
- INDEX
- SUB
- PAGE UP& DOWN
- REVEAL
- SIZE
- HOLD
- R/G/Y/B
- ASPECT (screen scaling)
- PICTURE
- AUDIO
- SOURCE
- MENU
- Main picture mode
- PIP mode
- DISPLAY
- AUDIO
- GEOMETRY (for VGA)
- TV Setup (for TV)
- Program Table:
- SYSTEM
Brand : V7
Model : LTV37DA
Category : Television