
R300WN22OP5 - Access Point StarTech.com - Free user manual and instructions
Find the device manual for free R300WN22OP5 StarTech.com in PDF.


| Product Type | Wireless Access Point |
| Brand | StarTech.com |
| Model | R300WN22OP5 |
| Wireless Standard | IEEE 802.11b/g/n |
| Frequency Band | 2.4 GHz |
| Maximum Data Rate | 300 Mbps |
| Interfaces | 1x 10/100 Fast Ethernet (PoE) |
| Power Input | 12V DC 1A or PoE 802.3af |
| Dimensions (LxWxH) | 140 x 100 x 30 mm |
| Weight | 200 g |
| Security Encryption | WEP, WPA, WPA2 (PSK/Enterprise) |
| Mounting Options | Wall/ceiling mountable (bracket included) |
| Operating Temperature | 0°C to 40°C |
| Certifications | FCC, CE, RoHS |
| LED Indicators | Power, LAN, WLAN |
| Antenna Type | Internal dual-band omni-directional |
| Maximum Clients | Up to 30 concurrent connections |
| Management | Web-based GUI, SNMP |
Frequently Asked Questions - R300WN22OP5 StarTech.com
User questions about R300WN22OP5 StarTech.com
0 question about this device. Answer the ones you know or ask your own.
Ask a new question about this device
Download the instructions for your Access Point in PDF format for free! Find your manual R300WN22OP5 - StarTech.com and take your electronic device back in hand. On this page are published all the documents necessary for the use of your device. R300WN22OP5 by StarTech.com.
USER MANUAL R300WN22OP5 StarTech.com
Outdoor 300Mbps Wireless N Access Point - 2T2R 5GHz
R300WN22OP5 / R300WN22OP5G / R300WN22OP5E

natural_image
White rectangular device with a gray handle and 'StarTech.com' logo on its side (no additional text or symbols visible)*actual product may vary from photos
For the most up-to-date information, please visit: www.startech.com
FCC Compliance Statement
This equipment has been tested and found to comply with the limits for a Class B digital device, pursuant to part 15 of the FCC Rules. These limits are designed to provide reasonable protection against harmful interference in a residential installation. This equipment generates, uses and can radiate radio frequency energy and, if not installed and used in accordance with the instructions, may cause harmful interference to radio communications. However, there is no guarantee that interference will not occur in a particular installation. If this equipment does cause harmful interference to radio or television reception, which can be determined by turning the equipment off and on, the user is encouraged to try to correct the interference by one or more of the following measures:
- Reorient or relocate the receiving antenna.
- Increase the separation between the equipment and receiver.
- Connect the equipment into an outlet on a circuit different from that to which the receiver is connected.
- Consult the dealer or an experienced radio/TV technician for help.
This Class [B] digital apparatus complies with Canadian ICES-003.
This Class B digital apparatus complies with Canadian ICES-003.
This device complies with Industry Canada licence-exempt RSS standard(s).
Operation is subject to the following two conditions:
(1) This device may not cause interference, and
(2) This device must accept any interference, including interference that may cause undesired operation of the device.
IC Radiation Exposure Statement:
This equipment complies with IC RSS-102 radiation exposure limit set forth for an uncontrolled environment. This equipment should be installed and operated with minimum distance 20cm between the radiator and your body.
Use of Trademarks, Registered Trademarks, and other Protected Names and Symbols
This manual may make reference to trademarks, registered trademarks, and other protected names and/or symbols of third-party companies not related in any way to StarTech.com. Where they occur these references are for illustrative purposes only and do not represent an endorsement of a product or service by StarTech.com, or an endorsement of the product(s) to which this manual applies by the third-party company in question. Regardless of any direct acknowledgement elsewhere in the body of this document, StarTech.com hereby acknowledges that all trademarks, registered trademarks, service marks, and other protected names and/or symbols contained in this manual and related documents are the property of their respective holders.
Important Notice
This product MUST be installed by a professional installer who is familiar with local building and safety regulations, where appropriate, and is licensed by applicable authorities. The professional installer is responsible for making sure grounding is available and that it meets the relevant local and national electrical codes. Failure to employ a professional installer may render the product warranty void and it may also expose the end user or service provider to legal and financial liabilities. StarTech.com expressly disclaims any and all liabilities for injury, damage, or violation of regulations due to improper installation of outdoor units or antennas.
Always remember to protect the AP by installing grounding lines as it is necessary to protect your outdoor installations from lightning strikes and the build-up of static electricity. The AP must be grounded properly before powering up, as direct grounding of an outdoor AP is critical and must be done correctly to protect your networks from harsh outdoor environments and destructive ESD surge.
CAUTION: Be sure that earth grounding is available and that it meets local and national electrical codes. If in doubt always consult with a qualified electrician to make sure the outdoor installation is properly grounded. For additional lightning protection, lightning rods, lightning arrestors or RJ45 surge protectors may be used to compliment the installation.
Table of Contents
Introduction......2
Packaging Contents 2
System Requirements....2
Product Overview ....3
Rear View....3
Connection Ports....4
LED Indicators....5
Installation 5
Hardware Installation 6
Operation 6
Available Network / IP Modes....7
Specifications....10
Technical Support 11
Warranty Information......11
Introduction
Packaging Contents
• 1 x Outdoor Access Point
- 1 x PoE Injector
- 1 x Metal Hose Clamp
- 1 x Power Adapter
• 1 x Instruction Manual
System Requirements
- A networked computer system with a Java-enabled web browser (for configuration)
- Cat 5 (or better) network cabling from PoE Injector to Wireless AP and PoE Injector to LAN Switch/router (no more than 100m total)
- Mounting screws / anchors for wall mounting PoE Injector and/or Wireless AP
Product Overview
Rear View
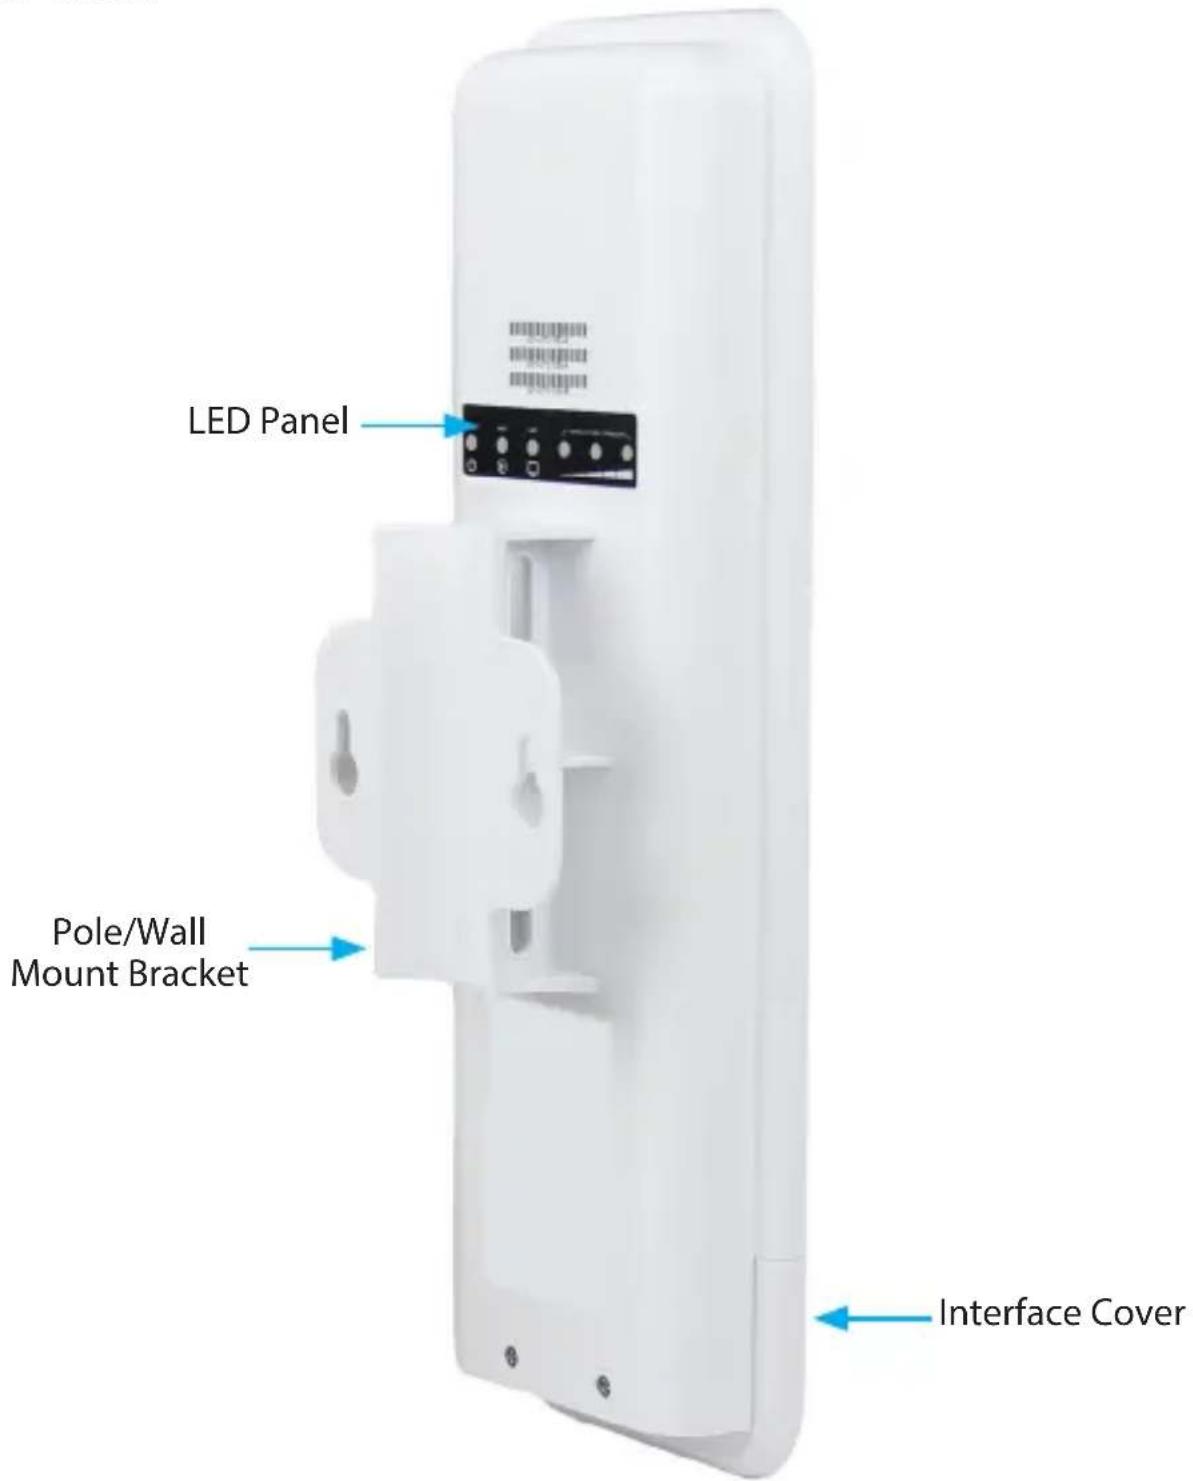
Connection Ports

| Interface Description | |
| Reset Button Press continually for 5 ~ 10 seconds to reset the device to factory defaults | |
| LAN 1 Allows LAN connection through a Category 5 (or better) cable. Supports auto-sensing for 10/100Mbps speeds and half/ full duplex | |
| LAN 2 Allows LAN connection through a Category 5 (or better) cable. Supports auto-sensing for 10/100Mbps speeds and half/ full duplex |
Note: The reset button on the PoE injector will only work if plugged into the LAN 1 port.
LED Indicators
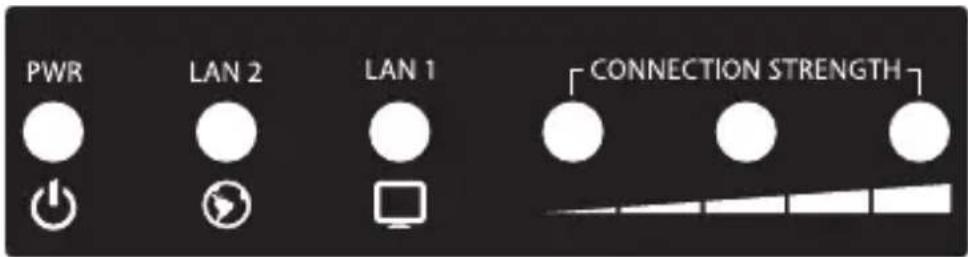
Indicator State Description
| PWR | ON The device is powered on | |
| OFF The device is powered off | ||
| WAN | ON Link detected | |
| OFF No link detected | ||
| Flashing Data is being transmitted / received on the WAN interface | ||
| LAN | ON Link detected | |
| OFF No link detected | ||
| Flashing Data is being transmitted / received on the LAN interface | ||
| Wifi Activity Indicators | ON Wireless client(s) are connected. Shows signal strength for best connected client/AP | |
| OFF No connected wireless client(s) | ||
Installation
Preparing Your Site
- Determine the location for the included PoE injector and mount using the appropriate screws/anchors for the material you are mounting to (not included).
- Determine the location for the Wireless AP. If you are pole-mounting the AP, use the included clamp to secure the device. If you are wall mounting the AP, use the appropriate screws/anchors for the material you are mounting to (not included).
- Prepare/purchase the required length of Ethernet cabling to go from the PoE Injector to your LAN Switch or router, and from PoE Injector to the AP.
Note: The total length of Ethernet cabling from the Wireless AP to your LAN switch or router should not exceed 100m
Hardware Installation
- Connect the included power adapter to an available wall outlet and the DC jack on the PoE injector.
- Connect an Ethernet cable from the LAN port of the PoE Injector to your LAN switch or router.
- Connect a second Ethernet cable from the PoE port of the PoE Injector, the other end of this cable will connect to the AP as instructed in the following steps.
- Slide the bottom cover of the unit down to remove it and expose the ports.
- Connect the Ethernet cable from the PoE port of the PoE Injector, to the LAN port on the AP (farthest from the reset button).
- Slide the cover back on as shown.

natural_image
White electronic device with a black cable inserted at the bottom (no visible text or symbols)Note that the AP may take approximately 50 seconds to complete the power on sequence.
Operation
Default Settings
Default IP Address: 192.168.1.200
Default subnet mask: 255.255.255.0
Web / Telnet User Name: admin
Web / Telnet Password: admin
- Configure a system to be on the same LAN as the AP (192.168.1.xxx, where xxx is 1 - 254, except 200).
- Open a web browser and enter the IP address 192.168.1.200 into the address bar, then press Enter.
-
Enter the default username / password (admin / admin) and press Enter.
-
Select your desired Operation Mode and click the Change Mode button to apply the change.
Note: The Change Mode button will automatically jump you to the Operating Mode Settings page for the mode you have selected. In future visits to the web interface, use the Setup button located next to the mode to open that mode's configuration page.
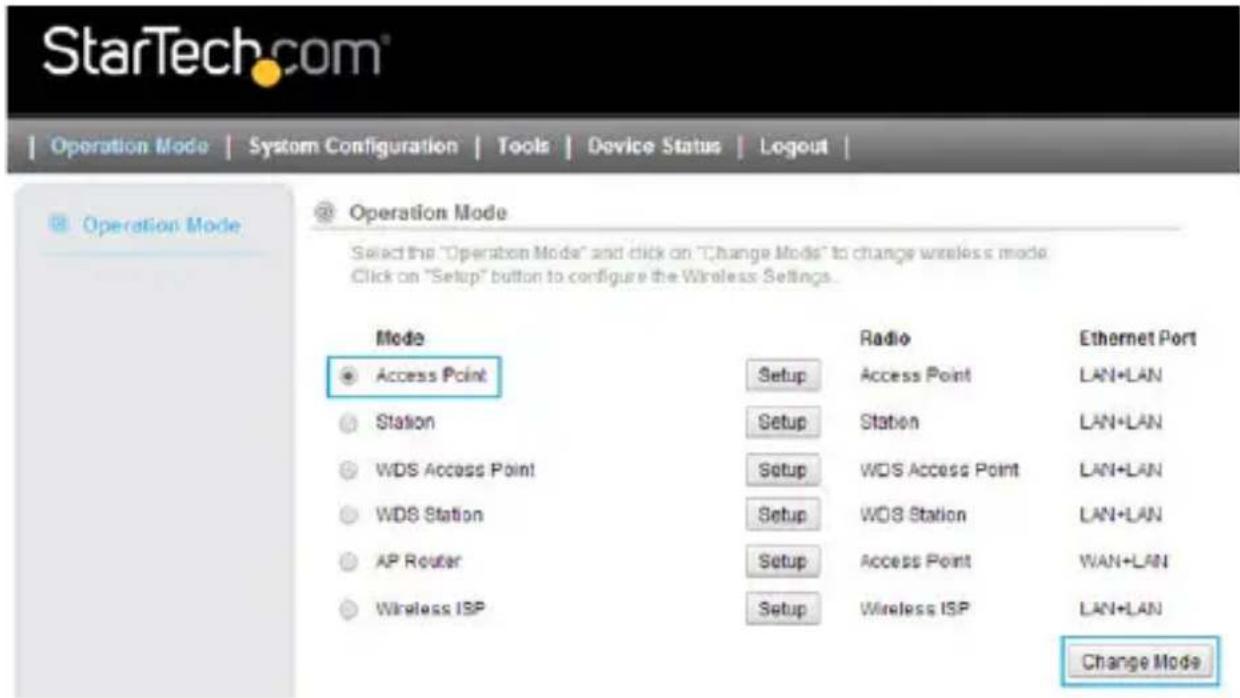
Available Network / IP Modes
Network Mode Description
| Access Point | Connects to an internal network (LAN) and broadcasts a wireless network connection (WLAN) |
| Station | Acts as a wireless client, to connect a remote segment to an existing WLAN |
| WDS Access Point | Acts as the main base station for a Wireless Distribution System mesh network |
| WDS Station | Acts as a remote base station in a Wireless Distribution System mesh network |
| AP Router | Connects an external network (WAN) with an internal network (LAN/WLAN), to allow cross-communication |
| Wireless ISP | Connects to an external wireless network (Wireless ISP) and rebroadcasts as an internal wireless network (WLAN). |
Note: Depending on the mode you choose, applicable settings will be enabled/disabled automatically.
- From the Settings menu for each mode, you can access the applicable Wireless and Security settings. To configure wireless security, click the Setup button beside the Security option.
Note: It is strongly recommended to configure security, to avoid unwanted access to your wireless network.

- Click the Save & Restart button once you have finished configuring the device to apply the settings.

- Select the System Configuration menu from the top of your screen to access IP, System Time, Password and other settings / tools.
- To restrict access to the web interface of your AP, it is also recommended to configure a password, which can be done by selecting Password Settings from the left column of the web interface. Click the Save & Change button to apply your changes.
StarTech.com
Operation Mode
System Configuration
Tools
Device Status
Logout
Device IP Settings
Time Settings
Password Settings
System Management
Ping Watchdog
Firmware Upgrade
Configuration Save and Restore
⑧ Factory Default
Reboot System
Password Settings
Change Password
To change your administrative password, enter your current password and then the new password twice.
Current Password
New Password
Re-enter New Password
Save & Change
Specifications
Supported Wireless Standards IEEE802.11 a/n
Chipset Atheros - AR9344
Connectors 2 x RJ45 Ethernet Female
Antenna Configuration 2x2:2 (TxR:s)
Antenna Type 14dBi Dual Polarization Directional Antenna
Wireless Frequency Range 5.150GHz \~ 5.850GHz
Wireless Bandwidth 20/40MHz
Wireless Encryption Supported
64/128 bit WEP
WPA(TKIP with IEEE 802.1x)
WPA2(AES with IEEE 802.1x)
WPA -PSK
Maximum Wireless Distance 3km*
Maximum Data Transfer Rate
802.11n : (40MHz) : up to 300Mbps
802.11n : (20MHz) : up to 144Mbps
RJ45 Ethernet: 10/100 Mbps
Enclosure Material Plastic
Operating Temperature 0ircC to 70ircC (32°F to 122°F)
Storage Temperature -20°C to 70°C (-4°F to 158°F)
Humidity 95% @ 55°C
Dimensions 282 x 80 x 55 mm
Note: The effective distance will vary based on the transmitting power of the connecting wireless device(s).
Technical Support
StarTech.com's lifetime technical support is an integral part of our commitment to provide industry-leading solutions. If you ever need help with your product, visit www.startech.com/support and access our comprehensive selection of online tools, documentation, and downloads.
For the latest drivers/software, please visit www.startech.com/downloads
Warranty Information
This product is backed by a two year warranty.
In addition, StarTech.com warrants its products against defects in materials and workmanship for the periods noted, following the initial date of purchase. During this period, the products may be returned for repair, or replacement with equivalent products at our discretion. The warranty covers parts and labor costs only. StarTech.com does not warrant its products from defects or damages arising from misuse, abuse, alteration, or normal wear and tear.
Limitation of Liability
In no event shall the liability of StarTech.com Ltd. and StarTech.com USA LLP (or their officers, directors, employees or agents) for any damages (whether direct or indirect, special, punitive, incidental, consequential, or otherwise), loss of profits, loss of business, or any pecuniary loss, arising out of or related to the use of the product exceed the actual price paid for the product. Some states do not allow the exclusion or limitation of incidental or consequential damages. If such laws apply, the limitations or exclusions contained in this statement may not apply to you.
Hard-to-find made easy. At StarTech.com, that isn't a slogan. It's a promise.
StarTech.com is your one-stop source for every connectivity part you need. From the latest technology to legacy products — and all the parts that bridge the old and new — we can help you find the parts that connect your solutions.
We make it easy to locate the parts, and we quickly deliver them wherever they need to go. Just talk to one of our tech advisors or visit our website. You'll be connected to the products you need in no time.
Visit www.startech.com for complete information on all StarTech.com products and to access exclusive resources and time-saving tools.
StarTech.com is an ISO 9001 Registered manufacturer of connectivity and technology parts. StarTech.com was founded in 1985 and has operations in the United States, Canada, the United Kingdom and Taiwan servicing a worldwide market.


- Outdoor 300Mbps Wireless N Access Point - 2T2R 5GHz
- FCC Compliance Statement
- IC Radiation Exposure Statement:
- Use of Trademarks, Registered Trademarks, and other Protected Names and Symbols
- Important Notice
- Table of Contents
- Introduction......2
- Product Overview ....3
- Installation 5
- Operation 6
- Specifications....10
- Technical Support 11
- Warranty Information......11
- Introduction
- Packaging Contents
- System Requirements
- Product Overview
- Connection Ports
- LED Indicators
- Installation
- Preparing Your Site
- Hardware Installation
- Operation
- Default Settings
- Available Network / IP Modes
- StarTech.com
- Change Password
- Specifications
- Technical Support
- Warranty Information
- Limitation of Liability
Brand : StarTech.com
Model : R300WN22OP5
Category : Access Point