
V-AVD55 - Car Radio VARTA - Free user manual and instructions
Find the device manual for free V-AVD55 VARTA in PDF.


| Product Type | Car Radio |
| Brand | Varta |
| Model | V-AVD55 |
| Form Factor | Single DIN |
| Dimensions | Approx. 180 x 50 x 160 mm (Width x Height x Depth) |
| Weight | Approx. 0.8 kg |
| Power Supply | 12V DC (car battery) |
| Power Output | 4 x 50 Watts max |
| Radio Bands | FM, AM |
| Preset Stations | 30 (18 FM + 12 AM) |
| Playback Media | CD, CD-R, CD-RW |
| Audio Inputs | AUX front, USB front |
| Audio Outputs | Front and rear speaker outputs, subwoofer pre-out |
| Bluetooth | Yes, for hands-free calling and audio streaming |
| Display | LCD with white backlight |
| Remote Control | Included |
| Equalizer | 3-band EQ (Bass, Mid, Treble) |
| Clock | Yes, with 12/24 hour format |
| Maintenance | Clean with soft dry cloth; do not use liquids |
| Safety | Disconnect battery before installation; do not expose to moisture |
| Spare Parts & Repairability | Contact Varta service center; use only specified fuses |
| General Information | Designed for 12V negative ground vehicles; ISO connector |
Frequently Asked Questions - V-AVD55 VARTA
User questions about V-AVD55 VARTA
0 question about this device. Answer the ones you know or ask your own.
Ask a new question about this device
Download the instructions for your Car Radio in PDF format for free! Find your manual V-AVD55 - VARTA and take your electronic device back in hand. On this page are published all the documents necessary for the use of your device. V-AVD55 by VARTA.
USER MANUAL V-AVD55 VARTA
Thank you for purchasing our product. For safety, it is strongly recommended to read this manual carefully before connecting, operating and/or adjusting the product and keep the manual for reference in the future.
Table of contents
Table of contents 2
Important safeguards ....3
Accessories....4
Installation/Connection....5
Panel controls....11
General operation....14
Radio operation....18
USB/SD/MMC cards/Disc operations....21
MP3 overview 29
AUX touch screen operations 31
Audio/video settings 32
System setup menu....33
TV Operation....36
Bluetooth mode 38
Rear view camera 39
Handling discs....40
Cleaning 40
Troubleshooting guide 41
Specification....42
V-AVD55
Important safeguards
VARTA
- Using the device at temperature below -10^ may cause the breakage of the device. Before using please heat up the passenger compartment to the recommended temperature!
- Disconnect the vehicle's negative battery terminal while mounting and connecting the unit.
- When replacing the fuse, be sure to use one with an identical amperage rating. Using a fuse with a higher amperage rating may cause serious damage to the unit.
- Do not attempt to disassemble the unit. Laser beams from the optical pickup are dangerous to the eyes.
- Do not use the unit in places where it can be exposed to water, moisture and dust.
- Make sure that pins or other foreign objects do not get inside the unit; they may cause malfunctions, or create safety hazards such as electrical shock or laser beam exposure.
- If you have parked the car for a long time in hot or cold weather, wait until the temperature in the car becomes normal before operating the unit.
- Do not open covers and do not repair yourself. Consult the dealer or an experienced technician for help.
- Make sure you disconnect the power supply and aerial if you will not be using the system for a long period or during a thunderstorm.
- Make sure you disconnect the power supply if the system appears to be working incorrectly, is making an unusual sound, has a strange smell, has smoke emitting from it or liquids have got inside it. Have a qualified technician check the system.
- The unit is designed for negative terminal of the battery, which is connected to the vehicle metal. Please confirm it before installation.
- Do not allow the speaker wires to be shorted together when the unit is switched on. Otherwise it may overload or burn out the power amplifier.
V-AVD55
Accessories

Remote control
ISO connector
USB cable
Mounting parts:
- Keys 2 pcs.
• Rubber protector 1 pc.
• Rear mounting bolt 1pc.
Instruction manual
Consumer information
Warranty card
Black front panel case
Receiver
Installation method

Disassembly of the control panel

natural_image
Technical line drawing of a mechanical component or housing (no text or symbols visible)Before disassembly of the control panel, power disconnection is required. Then press EJECT button. The panel will fall down to horizontal position. Push the panel leftwards. Meanwhile put the panel towards yourself to the right.
Attaching of the front panel

natural_image
Technical line drawing of a mechanical component or housing (no visible text or symbols)Firstly insert the left part of the front panel into the left part of the main unit, have the concave part of the panel hold the protruding point of the main unit. Insert the right side of the front panel into the main unit and fix it secure the time, it is required to hold the protruding point on the main unit with the concave part on the right side of the panel.
Precautions
Do not touch the contacts on the front panel or on the unit body, since this may result in poor electrical contact. If dirt or dust gets on the contacts, wipe them with a clean, dry cloth.
Remove the unit
- Remove the panel and the trim plate.
- Insert both T-Keys into hole on the front of the set until they lock.
- Pull out the unit.

V-AVD55
VARTA
Electrical connection

Notes:
- The user can connect the 4 RCA to the external amplifier; please connect "backstage (rear) out" to the "rear input" of the external amplifier. When you use the Dual zone play function for Radio/DVD/SD/MMC/USB, the Front out should be connected with the front speaker (L/R) for the
V-AVD55
VARTA
Radio function, and the Backstage out should be connected with the rear monitor for the DVD audio output.
- Note: The parking wire is connected with brake signal; for safety, the programs can be seen on the monitor after braking the car.

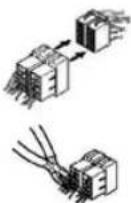
Using the ISO Connector
-
If your car is equipped with the ISO connector, then connect the ISO connectors as illustrated.
-
For connections without the ISO connectors, check the wiring in the vehicle carefully before connecting, incorrect connection may cause serious damage to this unit.
V-AVD55
VARTA
Output connection chart
Note: Before connecting the front/rear monitors with the unit, the total electric current of the rear monitor cannot be bigger than 2A, and the cathode must be connected with the "P. GND" derivation cable of the unit, otherwise the image of the monitor will be disturbed by the volume of the unit.

flowchart
graph TD
    subgraph_Monitor_Rear_2["Monitor Rear video out 2"]
        A1["REAR VIDEO OUT 2"] --> B1["BACKSTAGE OUT/R"]
        A2["REAR VIDEO OUT 2"] --> B2["BACKSTAGE OUT/R"]
        A3["REAR VIDEO OUT 2"] --> B3["BACKSTAGE OUT/R"]
        A4["REAR VIDEO OUT 2"] --> B4["BACKSTAGE OUT/R"]
        A5["REAR VIDEO OUT 2"] --> B5["BACKSTAGE OUT/R"]
        A6["REAR VIDEO OUT 2"] --> B6["BACKSTAGE OUT/R"]
        A7["REAR VIDEO OUT 2"] --> B7["BACKSTAGE OUT/R"]
        A8["REAR VIDEO OUT 2"] --> B8["BACKSTAGE OUT/R"]
        A9["REAR VIDEO OUT 2"] --> B9["BACKSTAGE OUT/R"]
        A10["REAR VIDEO OUT 2"] --> B10["BACKSTAGE OUT/R"]
        A11["REAR VIDEO OUT 2"] --> B11["BACKSTAGE OUT/R"]
        A12["REAR VIDEO OUT 2"] --> B12["BACKSTAGE OUT/R"]
        A13["REAR VIDEO OUT 2"] --> B13["BACKSTAGE OUT/R"]
        A14["REAR VIDEO OUT 2"] --> B14["BACKSTAGE OUT/R"]
        A15["REAR VIDEO OUT 2"] --> B15["BACKSTAGE OUT/R"]
        A16["REAR VIDEO OUT 2"] --> B16["BACKSTAGE OUT/R"]
        A17["REAR VIDEO OUT 2"] --> B17["BACKSTAGE OUT/R"]
        A18["REAR VIDEO OUT 2"] --> B18["BACKSTAGE OUT/R"]
        A19["REAR VIDEO OUT 2"] --> B19["BACKSTAGE OUT/R"]
        A20["REAR VIDEO OUT 2"] --> B20["BACKSTAGE OUT/R"]
        A21["REAR VIDEO OUT 2"] --> B21["BACKSTAGE OUT/R"]
        A22["REAR VIDEO OUT 2"] --> B22["BACKSTAGE OUT/R"]
        A23["REAR VIDEO OUT 2"] --> B23["BACKSTAGE OUT/R"]
        A24["REAR VIDEO OUT 2"] --> B24["BACKSTAGE OUT/R"]
        A25["REAR VIDEO OUT 2"] --> B25["BACKSTAGE OUT/R"]
        A26["REAR VIDEO OUT 2"] --> B26["BACKSTAGE OUT/R"]
        A27["REAR VIDEO OUT 2"] --> B27["BACKSTAGE OUT/R"]
        A28["REAR VIDEO OUT 2"] --> B28["BACKSTAGE OUT/R"]
        A29["REAR VIDEO OUT 2"] --> B29["BACKSTAGE OUT/R"]
        A30["REAR VIDEO OUT 2"] --> B30["BACKSTAGE OUT/R"]
        A31["REAR VIDEO OUT 2"] --> B31["BACKSTAGE OUT/R"]
        A32["REAR VIDEO OUT 2"] --> B32["BACKSTAGE OUT/R"]
        A33["REAR VIDEO OUT 2"] --> B33["BACKSTAGE OUT/R"]
        A34["REAR VIDEO OUT 2"] --> B34["BACKSTAGE OUT/R"]
        A35["REAR VIDEO OUT 2"] --> B35["BACKSTAGE OUT/R"]
        A36["REAR VIDEO OUT 2"] --> B36["BACKSTAGE OUT/R"]
        A37["REAR VIDEO OUT 2"] --> B37["BACKSTAGE OUT/R"]
        A38["REAR VIDEO OUT 2"] --> B38["BACKSTAGE OUT/R"]
        A39["REAR VIDEO OUT 2"] --> B39["BACKSTAGE OUT/R"]
        A40["REAR VIDEO OUT 2"] --> B40["BACKSTAGE OUT/R"]
        A41["REAR VIDEO OUT 2"] --> B41["BACKSTAGE OUT/R"]
        A42["REAR VIDEO OUT 2"] --> B42["BACKSTAGE OUT/R"]
        A43["REAR VIDEO OUT 2"] --> B43["BACKSTAGE OUT/R"]
        A44["REAR VIDEO OUT 2"] --> B44["BACKSTAGE OUT/R"]
        A45["REAR VIDEO OUT 2"] --> B45["BACKSTAGE OUT/R"]
        A46["REAR VIDEO OUT 2"] --> B46["BACKSTAGE OUT/R"]
        A47["REAR VIDEO OUT 2"] --> B47["BACKSTAGE OUT/R"]
        A48["REAR VIDEO OUT 2"] --> B48["BACKSTAGE OUT/R"]
        A49["REAR VIDEO OUT 2"] --> B49["BACKSTAGE OUT/R"]
        A50["REAR VIDEO OUT 2"] --> B50["BACKSTAGE OUT/R"]
        A51["REAR VIDEO OUT 2"] --> B51["BACKSTAGE OUT/R"]
        A52["REAR VIDEO OUT 2"] --> B52["BACKSTAGE OUT/R"]
        A53["REAR VIDEO OUT 2"] --> B53["BACKSTAGE OUT/R"]
        A54["REAR VIDEO OUT 2"] --> B54["BACKSTAGE OUT/R"]
        A55["REAR VIDEO OUT 2"] --> B55["BACKSTAGE OUT/R"]
        A56["REAR VIDEO OUT 2"] --> B56["BACKSTAGE OUT/R"]
        A57["REAR VIDEO OUT 2"] --> B57["BACKSTAGE OUT/R"]
        A58["REAR VIDEO OUT 2"] --> B58["BACKSTAGE OUT/R"]
        A59["REAR VIDEO OUT 2"] --> B59["BACKSTAGE OUT/R"]
        A60["AUX-IN/R"] --> B60["VIDEO IN"]
        A61["AUX-IN/L"] --> B61["VIDEO IN"]
    end

    subgraph Sub-Panel
        C1["Circuit Breakdown Section: Top Section (P. GND Black)"]
        D1["Circuit Breakdown Section: Top Section (P. GND Black)"]
    end

    sub-Panel_Script
    C1
    D1
    D1
    C1
    D1
    C1
    D1
    C1
    D1
    C1
    D1
    C1
    D1
    C1
    D1
    C1
    D1
    C1
    D1
    C1
    D1
    C1
    D1
    C1
    D1
    C1
    D1
    C1
    C1
    D1
    C1
    D1
    C1
    D1
    C1
    D1
    C1
    D1
    C1
    D1
    C1
    D1
    C1
    D1
    C1
    D1
    C1
    D1
    C1
    D1
    C1
    D1
    D1
    D1
    D1
    D1
    D1
    D1
    D1
    D1
    D1
    D1
    D1
    D1
    D1
    D1
    D1
    D1
    D1
    D1
    D1
    D1
    D1
    D1
    D1
    D1
    F["Multipliering Panel: Sub-woofer, Input, RR, RL, FR, FL, Sub-In, INPUT, Power Off On, Orange, P. I2V Out"]
Rear camera and amplifier output connections

For your driving safety, please link your brake detecting wire with low power level, and keep it controlled by manual brake switch. Wire should be high power level and the unit cannot play DVD or VCD disc. And this caution displays on the screen: "Warning. Please stop watch video player".
Panel controls
- POWER/SRC button
- VOL knob/SEL button
- Microphone
- Touchable TFT screen
- RESET button
- EJECT button
- UP/DOWN buttons
- OPEN button
- BAND button
- RC sensor
- USB jack
- A in
- V in
- MUTE button
Front panel

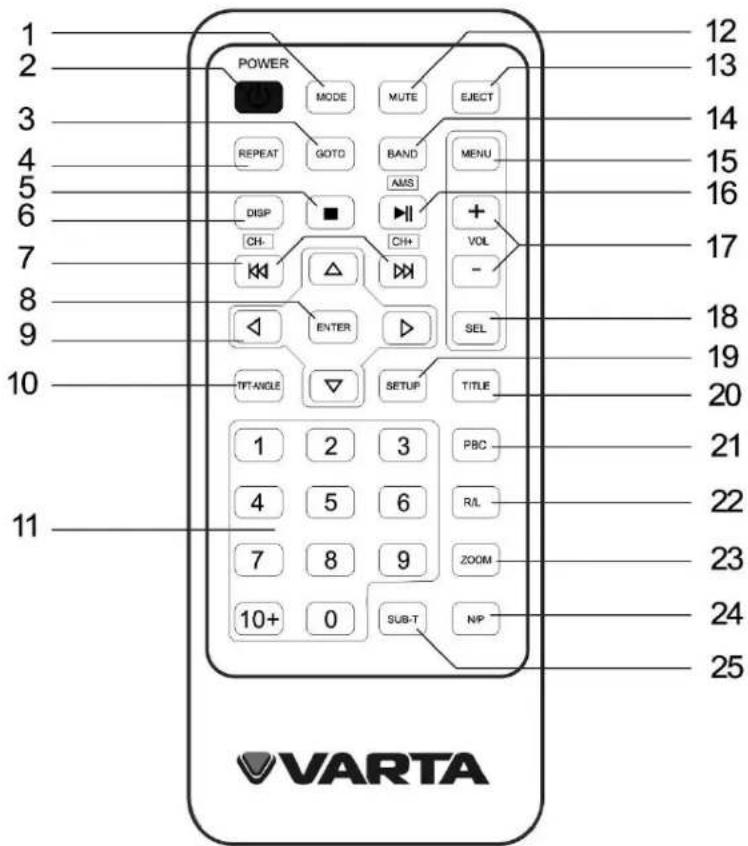
Remote control
- MODE button
- POWER button
- GOTO button
- REPEAT button
- STOP button
- DISP button
- PREVIOUS/CH-/NEXT/CH+ button
- ENTER button
- Cursor buttons (LEFT/RIGHT/UP/DOWN)
- TFT-ANGLE button
- Digit buttons
- MUTE button
- EJECT button
- BAND button
- MENU button
- PLAY/PAUSE/AMS button
- VOL+/VOL- button
- SEL button
- SETUP button
- TITLE button
- PBC button
- R/L button
- ZOOM button
- N/P button 25. SUB-T button
V-AVD55
VARTA
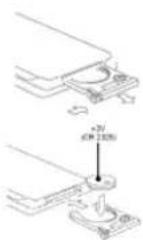
Changing the battery
-
Press the catch and at the same time pull out the battery tray.
-
Insert the 1 x lithium battery, type CR 2025 3V battery with the stamped (+) mark facing upward. Insert the battery tray into the remote control.
Warning:
- Store the battery where children cannot reach. If a child accidentally swallows the battery, consult a doctor immediately.
- Do not recharge, short, disassemble or heat the battery or dispose it in a fire.
- Do not expose or bring into contact the battery with other metallic materials. Doing this may cause the battery to give off heat, crack or start a fire.
- When throwing away or saving the battery, wrap it in tape and insulate; otherwise, the battery may give off heat, crack or start a fire.
General operation
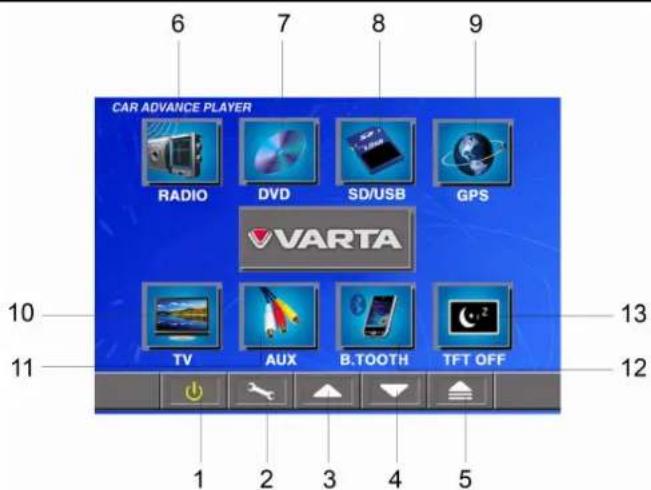
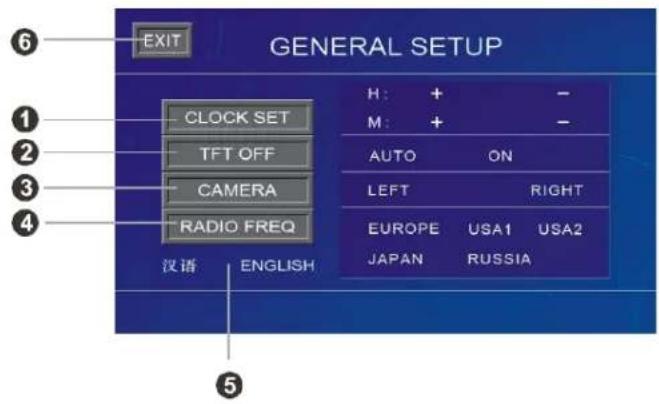
In any mode (except for VIDEO) touch the screen once, and then press EXIT on the top left-hand corner to enter the source menu.
- POWER button, press to turn off the unit;
- SETTING button, press to enter setting mode;
V-AVD55
VARTA
- You can set: clock (press +/- icons near H (hour) and M (minute))
- TFT on/off/auto (automatic screen off) mode
- Camera view (left (normal) or right (mirror)), if the rear view camera is connected
- Radio frequency (Europe, USA1, USA2, Japan, Russia). Choose “Russia” to enable enhanced frequency range
- Choose the language (option)
- Press EXIT to exit General setup menu
Note: The operations in this menu are available via touch screen. Press the item you want to adjust on the left column and adjust it in the right column.
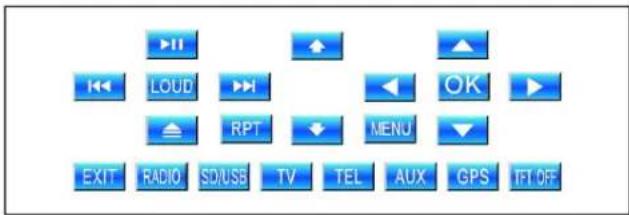
- TFT UP button, press to change the angle of the panel upwards;
- TFT DOWN button, press to change the angle of the panel downwards;
- EJECT button, press to eject the disc;
- RADIO button, press to choose radio mode;
- DVD button, press to choose DVD mode;
- SD/USB button, press to choose SD or USB mode;
- GPS button ^* ;
- TV button, press to choose TV mode;
- AUX button, press to choose AUX mode;
- B.TOOTH button (option);
- TFT ON/OFF button, press to turn on or off TFT screen.
Reset the unit
Operating the unit for the first time or after replacing the car battery, you must press RESET button with a pointed object to restore the unit to the original factory settings.
Note: Resetting the unit will erase the time setting and some memorized functions.
Power on/off
Press POWER button on the panel or on the RC to turn the unit on. Press and hold POWER button on the front panel or press POWER button on the RC to turn the unit off.
Note: After the unit is off, the volume level will be memorized, and when you turn the unit on it will resume the stored status, which you set (if the volume is lower than 20).
V-AVD55
VARTA
Volume control
Press VOL+/- buttons on the RC or rotate VOL knob on the unit to adjust the volume level.
Mute function
Press MUTE button on the panel or on the RC or MUTE button on the touchable screen to disable the sound. "MUTE" will appear on the display. Press these buttons again or press VOL+/- buttons on the RC or rotate VOL knob to resume the volume.
Blank screen
Press and hold MUTE button on the unit to disable the picture and have the blank screen. To resume the picture, press MUTE button on the unit again.
Audio adjustment
Press SEL button to select a parameter: VOL (volume) => BAS (bass) => TRE (treble) => BAL (balance) => FAD (fader). Press VOL+/- buttons on the RC or rotate VOL knob to adjust each parameter.
Notes:
• If you turn on EQ function, Bass and Treble cannot be adjusted.
- If you don't perform any operations within 5 seconds after selecting a parameter, the unit will automatically return to the current mode.
Mode control
Press SRC button on the panel or MODE button on the RC to select different source modes: RADIO => DVD (if a disc is inserted into the unit) => SD (if a memory card is inserted) => AUX IN => TV.
Screen angle adjustment
Press UP/DOWN buttons on the unit or TFT-ANGLE button on the RC to adjust the angle of the screen downwards or upwards.
V-AVD55
Radio operation

This unit is equipped with a touch screen. To perform various operations you can use buttons on the RC, on the front panel as well as screen touchable buttons.

Band selection
Press BAND button repeatedly to select FM1, FM2, FM3, AM1, AM2. Display will show the wave band, frequency and preset station number if already stored. To select a band you can also press BND button on the touchable screen.
Note: Please don't switch the band quickly, otherwise, you will see there is a mixing FM and AM frequency.
Manual/Automatic tuning
- Manual tuning: Press CH+/- buttons on the RC or correspondent buttons on the screen to select a station upward or downward step by step.
- Automatic tuning: Press and hold for 3 seconds CH+/- buttons on the RC or correspondent buttons on the screen, the automatic search will start. It will play when finds the station.
V-AVD55
VARTA
Store function
You can store up to a total of 30 radio stations in the memory (18 FM, 12 AM).
• To store a station
- Select a band (if needed)
- Select a station with CH+/- buttons on the RC.
- Press and hold for 3 seconds a number button (1-6) on the RC or press the corresponding station button on the touchable screen, under which you want to store the station.
• To recall a station:
- Select a band (if needed)
- Press a number button (1-6) briefly to recall the stored station or press the corresponding station button on the touchable screen.
Preset scan function
Press PLAY/PAUSE/AMS button on the RC or AMS button on the touchable screen to scan for several seconds each preset station in the memory of the current band. To stop preset scan, press this button again.
Auto memory store function
Press and hold PLAY/PAUSE/AMS button on the RC or AMS button on the touchable screen to enter auto store mode. The radio will automatically store the strongest available stations to the preset memories. To stop auto store, press AMS button.
RDS function
RDS (Radio Data System) service availability varies with areas. Please understand if RDS service is not available in you area, the following service is not available, either.
V-AVD55
VARTA
PTY (Program Type) function
Press PTY button on the touchable screen to turn the PTY function on. Press these buttons to select a program type. 2 seconds later the unit will automatically search a broadcasting station of such program type.
Notes:
- When PTY is selected, the radio starts to search corresponding PTY information and stops of the corresponding PTY information is detected.
• If corresponding PTY information is not found, normal radio reception is resumed.
AF (Alternative Frequencies) function
Press AF button on the touchable screen to switch on/off the AF function. The function is active by default. The tuner will return to Alternative Frequencies whenever the reception signals getting worse.
TA (Traffic Announcement) function
Press TA button on the touchable screen to select the TA mode on/off. Traffic announcement interrupts CD play or radio listening when being broadcasted.
USB/SD/MMC cards/Disc operations
USB/SD/MMC notes
USB functions (flash memory type) MP3 music play.
- SD/MMC card support, 2in1 (SD/MMC) support.
- USB flash memory.
- FAT 12/ FAT 16/ FAT 32 is possible
- FAT 12/16 (dir: 200 support, file: 500 support),
-
FAT 32 (dir: 200 support, file: 500 support).
-
Filename: 32 byte/ Dir name: 32 byte.
-
Tag (id3tag ver2.0)
-
Title/Artist/Album: 32 byte support.
-
Multi card reader not support.
-
USB 2.0 support.
Notes:
USB format supports 2.0.
Capacity: 8 Mb \~ 2 Gb.
SD cards brands: Cannon, Fuji film, Palm, Motorola, Microsoft, IBM, HP, Compaq, Sharp, Samsung, etc. Capacity: 8 Mb \~ 2 Gb.
MMC cards brands: Ericsson, Nokia, Motorola, HP, Palm, Sanyo, Microsystems, etc. Capacity: 16 Mb \~ 2 Gb.
Disc glossary
PBC (Play Back Control)
PBC is a menu recorded on the disc with SVCD or VCD2.0 format. For the discs contained PBC, it can playback interactive software with the menu displayed on TV. And if the disc contains still images, it can playback high definition of still image.
Title
The title is the important part of DVD disc. The memory volume of the disc is rather big, that makes possible to record several films on one disc. For example, if a disc contains three films, they may be divided into Title 1, Title 2 and Title 3. You can easy use the functions of looking-for.
Chapter
A title can be divided into several blocks, so that every block can be operated as a unit, the unit is called chapter. The chapter contains a unit at least.
Track
It is the biggest component of VCD. Generally, every song of karaoke disc is a track.
Loading a disc
Press EJECT button on the panel to flip it down. Insert the disc with the printed side facing upward into the slot. Close the panel. The disc will be loaded and played automatically. If the unit is in another mode, press MODE button on the RC or SRC button on the unit to select DISC mode.
Press EJECT button on the panel to eject the disc.
Inserting a SD/MMC card/USB device
Insert the MMC/SD card into the corresponding slot on the top of the panel and insert USB device into the USB jack on the panel. The unit will automatically switch to the needed mode.
If a USB driver is connected to the unit, the unit cannot switch to SD/MMC reading mode automatically when you insert a SD/MMC card, except after taking out the USB. If the unit is reading the files i card, the unit cannot switch to USB reading mode automatically when you connect a USB driver, except after taking out the SD/MMC card.
Note: Some USB driver models cannot be supported by this unit.
Playing/pausing
When the disc/card/USB has been loaded, the playback of the first track starts automatically. To ensure good system performance, wait until the unit finishes reading the disc information before proceeding. Or press the PLAY/PAUSE/AMS button on the RC to start playback. Press it again to pause the playback. Pr resume the playback.
Stop playback
During playback, press STOP button on the RC. Playback will be stopped.
For DVD discs: If PLAY/PAUSE/AMS button is pressed, playback will start from the position at which it was stopped. If the disc is removed, the resume function is cancelled. Press STOP button on the RC again to finally stop the playback.
V-AVD55
VARTA
Playing the previous/next track
During playback press CH+/- buttons on the RC (or corresponding buttons on the screen) to select the next or previous track to play.
Fast forward and backward playback
Press and hold for 2 seconds CH+/- buttons on the RC to select the speed of fast playing in forward or backward direction: X2 => X4 => X8 => X16. Press PLAY/PAUSE/AMS button on the RC to return to normal playback.
Repeat playback
Press REPEAT button on the RC to select a repeat playback mode:
• For VCD/CD: display appears Repeat Single => Repeat All=>.
• For DVD: display appears Repeat Chapter => Repeat Title =>.
- For MP3 disc: display appears Repeat Single => Repeat Folder=>.
Menu navigation (for DVD only)
- Press TITLE button on the RC to activate the disc title list on the screen.
- Press the cursor buttons to select the desired title. Then press ENTER button or PLAY/PAUSE/AMS button to open the root menu of the selected title.
- Press the cursor buttons to select desired track, then press ENTER or PLAY/PAUSE/AMS button to play the selected track.
PBC (Playback Control) function (for VCD only)
If you insert a VCD with PBC, playback starts from the beginning of the 1st track automatically.
- Press PBC button on the RC to activate PBC menu on screen during playback.
- If the menu consists of a list of titles, you can select a desired one using the number buttons on the RC to play.
Info
In DVD mode, press DISP button on the RC to show the disc information.
Subtitles
Press SUB-T button to choose subtitle language (if available).
Audio channel
In DVD mode press R/L button on the RC to change the audio language. In VCD and CD mode press this button to choose Left => Right => Mix => Stereo.
Changing size (for DVD/VCD)
During playback press ZOOM button on the RC continuously to change the size of the picture on the screen: Zoom 1 => Zoom 2 => Zoom 3 => ZOOM OFF. Using cursor buttons you can move the enlarged picture.
TV type select (for DVD/VCD)
Press N/P button on the RC to select the TV type: NTSC => PAL => AUTO.
GOTO function
During playback press GOTO button, the goto menu will appear on the display. Use UP/DOWN cursor buttons to move to the needed menu item; use number buttons to input the needed number of chapter/title and the needed time. The unit will go to playback the disc according to the input data.
Root menu
During DVD or VCD playback press MENU button to enter the root menu.
V-AVD55
VARTA
Rear-Play mode
In USB/SD/MP4/CD/VCD/DVD mode press and hold SEL button on the panel to activate rear-play mode. The below menu will appear.

- Current time display
- Current radio frequency. Touch FM1 position to switchover waveband, and same panel band.
- Pre-stored station number. Touch station number 1-6 to listen to the desired station.
- Function display area for Volume, Mute and other functions.
Press:
- MUT button to turn mute on/off.
• AMS to preview 6 radio stations. Long press to search radio station. - |◀/▶| button to search the stations manually. Press and hold this button to search the stations automatically.
• TA, AF for RDS station search; if no RDS function available, they are LOUD and BAND function. - REAR DVD to directly turn back to the current play mode.
Touch screen menu
MP4/VCD/DVD operations
This touch screen menu will appear after touching the screen. Press the needed button to choose setting, mode or navigate in playing mode. (TEL and GPS are optional).
SD/USB/CD/MP3/JPG operations
Press STOP button during playing video or photo to enter the menu.

This touch screen menu will appear after touching the screen. Press the needed button to choose:
V-AVD55
VARTA
repeat mode (RPT button), loud mode (LOUD button), equalizer setting (EQ button) modes (RADIO, DVD, TV, TEL (option), AUX, GPS (option), SD/USB) or navigate in playing mode (PLAY/PAUSE, NEXT, PREVIOUS buttons), to adjust the monitor angle (Arrow buttons), TFT on or off.
Note:
• You can launch the file directly touching it on the screen.
- If the storage has folders, step on it using cursor buttons and enter the folder by pressing ENTER button on the RC or just press the folder
V-AVD55
MP3 overview
VARTA
Notes on MP3:
• MP3 is short for MPEG Audio Layer 3 and refers to an audio compression technology standard.
• This product allows playback of MP3 files on CD-ROM, CD-R or CD-RW discs.
- The unit can read MP3 files written in the format compliant with ISO 9660. However it does not support the MP3 data written by the method of packet write.
- The unit can not read an MP3 file that has a file extension other than ".mp3".
- If you play a non-MP3 file that has the ".mp3" extension, you may hear some noise.
- In this manual, we refer to what are called "MP3 file" and "folder" in PC terminology as "track" and "album", respectively.
- Maximum number of directory level is 8, including the root directory. Maximum number of files and folders per disc is 448.
• The unit may not play tracks in the order of Track numbers.
• The unit plays only the audio tracks if a disc contains both audio tracks and MP3 files.
- When playing a disc of 8 kbps or "VBR", the elapsed playing time in the display window will not be correct and also the intro play may not function properly. "VBR": Variable Bit Rate.
Notes on creating your own CD-R or CD-RW containing MP3 files:
- To enjoy high quality sound, we recommend converting to MP3 files with a sampling frequency of 44.1 kHz and a fixed bit rate of 128 kbps.
• Do not store more than 448 MP3 files per disc. - For ISO 9660 - compliant format, the maximum allowable depth of nested folders is 8, including the root directory (folder).
- When CD-R disc is used, playback is possible only for discs, which have been finalized.
V-AVD55
VARTA
- Make sure that when MP3 CD-R or CD-RW is burned that it is formatted as a data disc and NOT as an audio disc.
- You should not write non-MP3 files or unneeded folders along with MP3 files on the disc otherwise it takes a long time until the unit starts to play MP3 files.
- With some CD-R or CD-RW media, data may not be properly written depending on its manufacturing quality. In this case, data may not be reproduced correctly. High quality CD-R or CD-RW disc is recommended.
- Up to 16 characters are displayed for the name of an Album or a Track. ID3TAG version 1.x is required.
• Note that the unit may not play Tracks in the order that you wrote them to the disc.
In AUX mode touch the screen once, the below menu will appear.
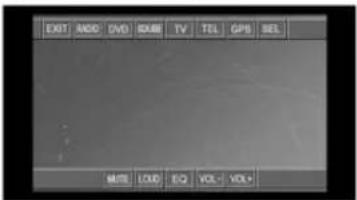
- Mute operation: press to turn off/on the sound.
- Loud operation: press to turn LOUD off/on.
• EQ: Press to select equalizer mode: POP->ROCK->CLASS->EQ OFF.
• Volume level: press to select volume level form 0 to 39. - Exit: press to enter the main menu.
• RADIO, DVD, SD/USB, TV, TEL (option), GPS (option): press to choose the corresponding mode. - SEL: press to enter audio adjustment mode. See the picture below.
Note: The unit cannot use two Aux sources at the same time.
Audio/video settings

- Exit: press exit to enter the main menu.
- Volume Adjustment. Press "-"+" + " button under volume.
- Treble Adjustment. Press "-" + " button to set up treble.
- Bass Adjustment. Press "-"+" + " button to set up bass.
- Front and rear output adjustment. Click R (Rear), F (Front) button to adjust fader.
- Left Right Balance Adjustment. Click BL, BR button under the output to adjust the rear balance.
- Brightness Adjustment. Press "-" + " button to adjust brightness of the screen.
- Contrast Adjustment. Press "-" + " button to adjust contrast of the screen.
- Chrominance Adjustment. Press "-"+" +" button to adjust chrominance of the screen.
- Sharpness Adjustment. Press "-" + " button to adjust sharpness of the screen.
- EQ. Press to select equalizer mode: POP->ROCK->CLASS->EQ OFF.
- Loud operation. Press to turn LOUD off/on.
- Standard Adjustment. Press to resume the image modes to the standard display mode.
- BACK. Press to return to the previous mode.
V-AVD55
System setup menu

Press the SETUP on the RC to enter the setup menu. Press it again to leave setup menu.
• Use UP/DOWN buttons to select the category.
- Press RIGHT button to enter submenu.
• Use UP/DOWN buttons to select the setting you need to change.
- Press ENTER button to confirm changes.
- Press LEFT button until you reach the main menu window.
Language
Choose OSD menu language, subtitle language, DivX subtitle language, audio language, DVD menu language.
Note: Some DVDs may not include the pre-selected language. In this case, the unit will automatically display menus in the disc's initial language setting.

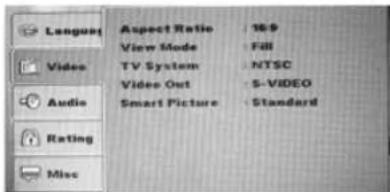
Video
Aspect Ratio
Selecting the TV Aspect setting allows the user to select the aspect ratio of the TV (DVD and VCD only). The following options are available:
• 4:3 = Aspect ratio of TV is 4:3.
• 16:9 = Aspect ratio of TV is 16:9.
Notes:
V-AVD55
VARTA
- Most widescreen DVDs will not allow pan and scan conversion. If 4:3 PS is selected on these DVDs, letterboxing will be used instead.
- If 16:9 is selected and a 4:3 TV is connected, 16:9 content will appear distorted during playback (objects look thin).
View mode
Choose fill, original, auto fit or pan scan view mode.
TV system
Multi: the TV system is auto switched according to the disc system.
NTSC: this system is used in USA, Taiwan, Japan etc.
PAL: this system is used in China, Europe, Hong Kong etc.
Video out
S-video is default setting and cannot be changed.
Smart picture
Chose Standard, Vivid, Cool, Personal mode of color of background.
Audio
Digital output
Choose Digital output: off, PCM or ALL.
Night mode
Choose night mode on or off.
Down Sampling
Choose down sampling on or off.

Rating
Parental Control
The Rating allows the user to have parental control feature of the player. Press ENTER button the window will pop up where you need to enter a password (the factory default password is 8888).
Set password
User can set new password in the Set password setting. Press ENTER to pop up the "Enter Password" windo enter the old password. Press ENTER button twice, then the "Enter New Password" window will pop up, enter the new password, press ENTER button to confirm.
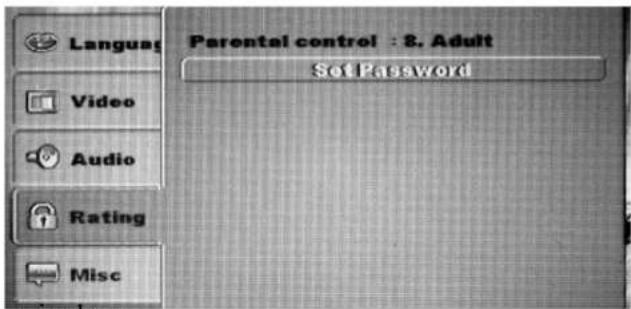
window,
Misc
Use default settings
Select “use default settings” and confirm to restore factory settings.
Screen saver
Choose screen saver on or off.

Sound mode selection
Press BAND button to select the needed sound mode: PAL I/PAL DK/PAL BG/SECAM BG/SECAM DK/NTSC MN.
Scanning /Automatically memorizing channels
Press AMS button. SCAN ALL will displayed on the screen. It will search and memorize all channels. (Maximum 95 stations can be programmed).
Note: Also you can press and hold NEXT or PREVIOUS buttons to search the station.
Select the needed program by number button or press NEXT or PREVIOUS button to choose the channel.
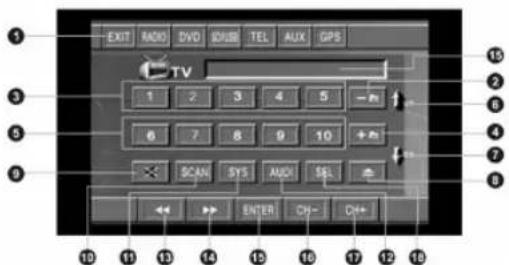
• Pre-set frequency selection
V-AVD55
VARTA
There are 99 pre-set channels. Press any button of 3 or 5, then 15 (ENTER), the player will play the corresponding broadcasting station. Press 4 button, next 10 preset frequencies will be displayed in 3 and 5 lines; press 2 button - previous 10 preset frequencies will be displayed.
• TFT Box Up/Down-arrow Operation
Press UP button (6) to change the angle of the panel upwards.
Press DN button (7) to change the angle of the panel downwards.
- Mute Operations
Press 9 button to turn off/on the sound.
- Scan Operations
Press 10 button to scan the channels, the player automatically adjusts and searches the channels and save the searched broadcasting stations automatically and then plays the first broadcasting station.
• Television system switchover/Sound system switchover
Press 11 (SYS) button to choose the TV system.
Press 12 (AUDI) button to choose the sound system.
• Manual Channel Search
Press 13 button the player will search for programs upward, when it finds the first broadcasting station, it will stop and start to play this broadcasting station. Press 14 button the player will search for programs downward, when it finds the first broadcasting station, it will stop and start to play this broadcasting station.
Note: Upon the first use, please set up the television system and sound system.
• Channel Selection
Press 17 button, the player will select broadcasting stations upward. Press 16 button, the player will select broadcasting stations downward.
- Eject disc
Press 8 (EJECT) button to eject the disc.
- SEL
Press 18 (SEL) button to enter audio and video adjustment mode.
V-AVD55
Bluetooth mode
VARTA
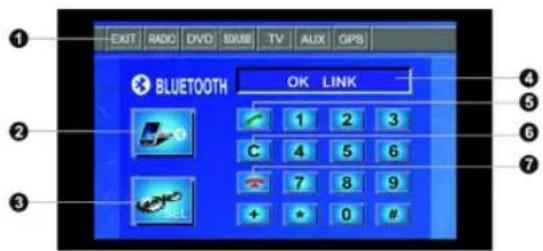
Connecting
Firstly turn on the Bluetooth function of the mobile phone, and then search the audio equipment. When "CAR KIT" is displayed on the mobile phone, it is to input the coupling password of "0000" for connection. When 4 displays "OK LINK", it means that the mobile phone connects ready with the audio equipment.
- Press 3 (SEL) button to enter settings mode.
- Bluetooth Switchover 2. Press this button for communication switchover between mobile phone and the unit.
- Dial/Redial
- Dial. Directly press numeric buttons to display the number you dialed. Press 5 button to finish dialing and call. To redial the number, press 5 button.
- Deletion function
If you have inputted an incorrect telephone number, just press 6 (C) button to delete the wrong number. - Hang-up
V-AVD55
VARTA
After end of communications, press 7 button to hang up and exit from the Bluetooth interface.
- When there is an incoming call, it will be shown on display (4), press 5 button to listen or 7 to hang up.
- Press 1 button to exit from the Bluetooth interface and return to the main interface.
Note: BAND and MUTE button on the panel can be used as 5 and 7 correspondingly.
Note: When you paired the bluetooth of unit with your bluetooth mobile phone, you can use the A2DP function to listen the music, after finish of translate the music, the unit is keeping connection with the bluetooth mobile phone except you disconnect the pairing, then you can still dial or receive calls with the unit.
Note: During TA signal coming, you cannot use the Bluetooth function.
Rear view camera
This unit is equipped with back view camera output. The camera is used to observe the situation behind the vehicle when you are backing the car.
Please connect your back view camera with the back car video input. And connect the detecting wire for back a car with the rear gear light. Rear view camera picture will be enabled when you are backing the car.
V-AVD55
VARTA
Handling discs
- Dirty, scratched or warped discs may cause skip ping or noise.
- Handle the disc only by the edges. To keep clean do not touch its surface.
• Discs should be stored in their cases after use to avoid scratches. - Do not expose discs to direct sunlight, high humidity, high temperature or dust.
- Prolonged exposure to extreme temperature can wrap the disc (such as leaving the discs in your car during summertime).
- Do not stick or write anything on either side of disc. Sharp writing instruments, or the inks used in some felt-tip pens, may damage its surface.
- Do not touch the unlabeled side. Do not attach any seal, label or data protection sheet to either side of a disc.

Cleaning
Cleaning the cabinet
Wipe with a soft cloth. If the cabinet is very dampen (not dropping wet) the cloth with a weak solution of soapy water, and then wipe clean.
Cleaning discs
Fingerprints should be carefully wiped from the surface of disc with a soft cloth. Unlike conventional records, compact discs have no grooves to collect dust and macroscopic dirt, so gently wiping them with a soft cloth should remove must panicles. Wipe in a straight motion from the center to the edge.
Never use thinner benzine, record cleaner or anti static spray on a compact disc. Such chemicals can damage its plastic surface.

Troubleshooting guide
| Symptom Cause Solution | ||
| No power | The car ignition is not on.The fuse is blown. | If the power supply is properly connected to the car accessory switch the ignition key to “ACC”.Replace the fuse. |
| Disc cannot be loaded. | Presence of disc inside the player. | Remove the disc in the player then put a new upward. |
| Disc cannot be read. Inserting the disc in upside down.Compact disc is extremely dirty or defective.Temperature inside the car is too high. | Insert the compact disc with the label facing upward.Clean the disc or try to play a new one.Cool off until the ambient temperature returns to normal. | |
| No sound Volume is in minimum.Wiring is not properly connected. | Adjust volume to a desired level.Check wiring connection. | |
| The operation keys do not work. | The built-in microcomputer is not operating properly due to noise.Front panel is not properly fix into its place. | Press RESET button.Reinstall the front panel. |
| Sound skips. The installation angle is more than 30 degrees.The disc is extremely dirty or defective. | Adjust the installation angle to less than 30 degrees.Clean the compact disc/try to play a new one. | |
| The radio does not work, the radio station automatic selection does not work. | The antenna cable is not connected the signals are too weak. | Insert the antenna cable firmly select a station manually. |
V-AVD55
Specification
VARTA
| General | |
| Power supply: | 12 V DC |
| Maximum power output: | 50 W x 4 channels |
| Compatible formats: | DVD/SVCD/VCD/DVCD/HDCD/MP3/WMA/CDDA/DVD Audio/Super Audio CD/Picture-CD/JPEG /MPEG4 (DivX) |
| Supported disc types: | DVD/DVD±R/DVD±RW/CD/CD-R/CD-RW/USB/SD/MMC card |
| Dimensions (D x W x H)With metal frame:Without metal frame: | 185 x 182 x 53 mm (H size of front panel 74 mm)185 x 178 x 50 mm |
| ESP function: | 40 sec. for Audio CD, 120 sec. for MP3 |
| TFT display | |
| Screen size: | 4.3" TFT |
| Resolution: | 480 x 272 |
| Aspect ratio: | 16:9 |
| Contrast ratio: | 300:1 |
| Brightness: | 400 cd/m2 |
| View angle: | V: 120°, H: 120° |
| FM Stereo Radio | |
| Frequency range: | 65.0 - 74.0/87.5 - 108.0 MHz |
| Preset memory stations: | 18 |
| AM section | |
| Frequency range: | 522 kHz - 1620 kHz |
| Preset memory stations: | 12 |
| Audio specification | |
| S/N ratio: | 65 dB |
| Separation | 60 dB (1 kHz) |
| Bluetooth | |
V-AVD55
VARTA
| Bluetooth version 2.0 | |
| Supported profiles AVRCP | |
| Line out | |
| Output: 4 channel RCA line-out (2V) | |
Specifications are subject to change without notice. Dimensions are approximate.
V-AVD55
VARTA
69
V-AVD55
VARTA


- Table of contents
- V-AVD55
- Important safeguards
- VARTA
- Accessories
- Installation method
- Disassembly of the control panel
- Attaching of the front panel
- Precautions
- Remove the unit
- Electrical connection
- Notes:
- Using the ISO Connector
- Output connection chart
- Rear camera and amplifier output connections
- Panel controls
- Remote control
- Changing the battery
- Warning:
- General operation
- Reset the unit
- Power on/off
- Volume control
- Mute function
- Blank screen
- Audio adjustment
- Mode control
- Screen angle adjustment
- Radio operation
- Band selection
- Manual/Automatic tuning
- Store function
- Preset scan function
- Auto memory store function
- RDS function
- PTY (Program Type) function
- AF (Alternative Frequencies) function
- TA (Traffic Announcement) function
- USB/SD/MMC cards/Disc operations
- USB/SD/MMC notes
- Disc glossary
- PBC (Play Back Control)
- Title
- Chapter
- Track
- Loading a disc
- Inserting a SD/MMC card/USB device
- Playing/pausing
- Stop playback
- Playing the previous/next track
- Fast forward and backward playback
- Repeat playback
- Menu navigation (for DVD only)
- PBC (Playback Control) function (for VCD only)
- Info
- Subtitles
- Audio channel
- Changing size (for DVD/VCD)
- TV type select (for DVD/VCD)
- GOTO function
- Root menu
- Rear-Play mode
- Touch screen menu
- MP4/VCD/DVD operations
- SD/USB/CD/MP3/JPG operations
- Note:
- MP3 overview
- Notes on MP3:
- Notes on creating your own CD-R or CD-RW containing MP3 files:
- Audio/video settings
- System setup menu
- Language
- Video
- Aspect Ratio
- Audio
- Rating
- Misc
- Sound mode selection
- Scanning /Automatically memorizing channels
- Bluetooth mode
- Connecting
- Rear view camera
- Handling discs
- Cleaning
- Cleaning the cabinet
- Cleaning discs
Brand : VARTA
Model : V-AVD55
Category : Car Radio