
AWM-1220P - Waffle Maker Aroma - Free user manual and instructions
Find the device manual for free AWM-1220P Aroma in PDF.


| Product Type | Waffle Maker |
| Brand | Aroma |
| Model | AWM-1220P |
| Dimensions (Approx.) | 10.5 x 10.5 x 4.5 inches |
| Weight (Approx.) | 3.5 lbs |
| Power Supply | 120V, 60Hz, 800W |
| Plate Material | Non-stick coating |
| Indicator Lights | Power and Ready lights |
| Temperature Control | Adjustable browning control |
| Cooking Surface | Round, 7-inch diameter waffle |
| Safety Features | Auto shut-off when opens; cool-touch handle |
| Cleaning | Wipe with damp cloth; do not immerse |
| Storage | Upright storage with cord wrap |
| Warranty | Limited 1-year warranty |
Frequently Asked Questions - AWM-1220P Aroma
User questions about AWM-1220P Aroma
0 question about this device. Answer the ones you know or ask your own.
Ask a new question about this device
Download the instructions for your Waffle Maker in PDF format for free! Find your manual AWM-1220P - Aroma and take your electronic device back in hand. On this page are published all the documents necessary for the use of your device. AWM-1220P by Aroma.
USER MANUAL AWM-1220P Aroma
natural_image
Exterior view of a light green waffle grater with open lid and black tray (no text or symbols visible)instruction manual
AWM-1220BL/AWM-1220G/AWM-1220P
Waffle Maker

natural_image
A silver rice cooker with black control panel and 'AROMA' display (no visible text or symbols on body)Digital Rice & Grain Multicookers

natural_image
White Aroma rice cooker with black lid and side-mounted control panel (no visible text or symbols)Rice & Grain Cookers

natural_image
Exterior view of a modern stainless steel water heater with black handle (no visible text or symbols)Electric Kettles
natural_image
Black circular appliance with lid and side arm, no visible text or symbolsIndoor Grills
natural_image
Black wok with lid and side handles, no visible text or symbols...and More!
AROMA®
To Enhance and Enrich Lives.
Here at Aroma we strive to make a difference —to design and distribute products that enhance and enrich people's lives.
Aroma offers an array of exceptional products to make cooking simple and satisfying. Discover other countertop appliances and cookware from our current product lineup to complement your kitchen.
REGISTER YOUR PRODUCT

Registration is quick and easy.
Be notified of:
- new product releases
- new test kitchen recipes
• sales and promotions ...and more!
SCAN TO REGISTER
AromaCo.com/registration

/AromaHousewares
Basic safety precautions should always be followed when using electrical appliances, including the following:
- Important: Read all instructions carefully before first use.
- Do not touch hot surfaces. Never touch the cooking surface while appliance is in use. Always use handles.
- To protect against electrical shock, do not immerse the power cord, plug or appliance in water or any other liquid. See instructions for cleaning.
- This appliance is not intended to be used by children. Close supervision is necessary when the appliance is used near children.
- Do not leave the appliance unattended while in use.
- Unplug from the wall outlet when not in use and before cleaning. Allow the appliance to cool completely before putting on or removing parts, and before cleaning the appliance.
- Do not operate any appliance with a damaged power cord or plug or after the appliance malfunctions or has been damaged in any manner. Contact Aroma® customer service for examination, repair or electrical/mechanical adjustment.
- The use of accessory attachments not recommended by Aroma® Housewares may result in fire, electrical shock or injury.
- Do not use outdoors.
- Do not allow the power cord to hang over the edge of the counter or table, or touch hot surfaces.
- Do not place the appliance on or near a hot gas or electric burner, or in a heated oven.
- A fire may occur if waffle maker is covered or touching flammable materials including curtains, draperies, walls, and the like, when in operation.
-
Use only with a 120V AC power outlet.
-
Extreme caution must be used when using or moving an appliance containing hot oil or any other hot foods.
- To disconnect, remove the plug from the wall outlet.
- Always unplug the power cord from the plug gripping area. Never pull on the cord.
- Do not use the appliance for other than its intended use.
- Always use appliance on a sturdy, flat and heat-resistant surface.
- Only use the appliance on a stable, dry surface.
- CAUTION: For countertop use only.
- DO NOT remove the swappable plates until the appliance has completely cooled. Failure to do so may result in injury.
- DO NOT use metal utensils on the cooking surface as this will damage the nonstick surface.
- Do not attempt to remove food when waffle maker is plugged in.
- Unplug unit when finished baking waffles.
- The waffle maker should be operated on a separated electrical circuit from other operating appliances. If the electrical circuit is overloaded with other appliances, the appliance may not operate properly.
- WARNING: The appliance will still heat up if plugged in without any swappable plates in place. Always have your swappable plates properly in place in the appliance before plugging it in.
- Do not pour oil or grease in the plate for deep fry food because it will cause fire damage. Do not use for deep frying.
SAVE THESE INSTRUCTIONS
Short Cord Instructions
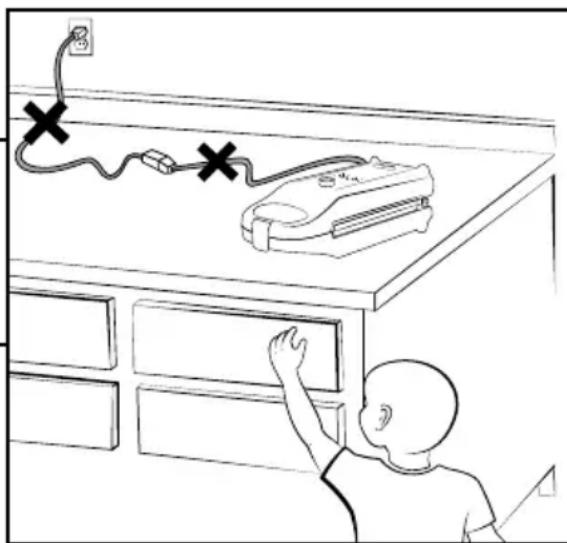
- A short power-supply cord is provided to reduce the risks resulting from it being grabbed by children, and becoming entangled in or tripping over a longer cord.
- Longer extension cords are available and may be used if care is exercised in their use.
- If a longer extension cord is used:
a.) The marked electrical rating of the extension cord should be at least as great as the electrical rating of the appliance.
b.) The longer cord should be arranged so that it will not drape over the countertop or tabletop where it can be pulled by children or tripped over unintentionally.
DO NOT DRAPE CORD!
KEEP AWAY FROM CHILDREN!
natural_image
Line drawing of a person reaching for a wall-mounted device with three black X marks, no text or symbols presentPolarized Plug
This appliance has a polarized plug (one blade is wider than the other); follow the instructions below:
To reduce the risk of electric shock, this plug is intended to fit into a polarized outlet only one way. If it still does not fit, contact a qualified electrician. Do not attempt to modify the plug in any way.
If the supply cord is damaged, it must be replaced by the manufacturer, its service agent or a similarly qualified person in order to avoid a hazard.
THIS APPLIANCE IS FOR HOUSEHOLD USE ONLY.
Parts Identification
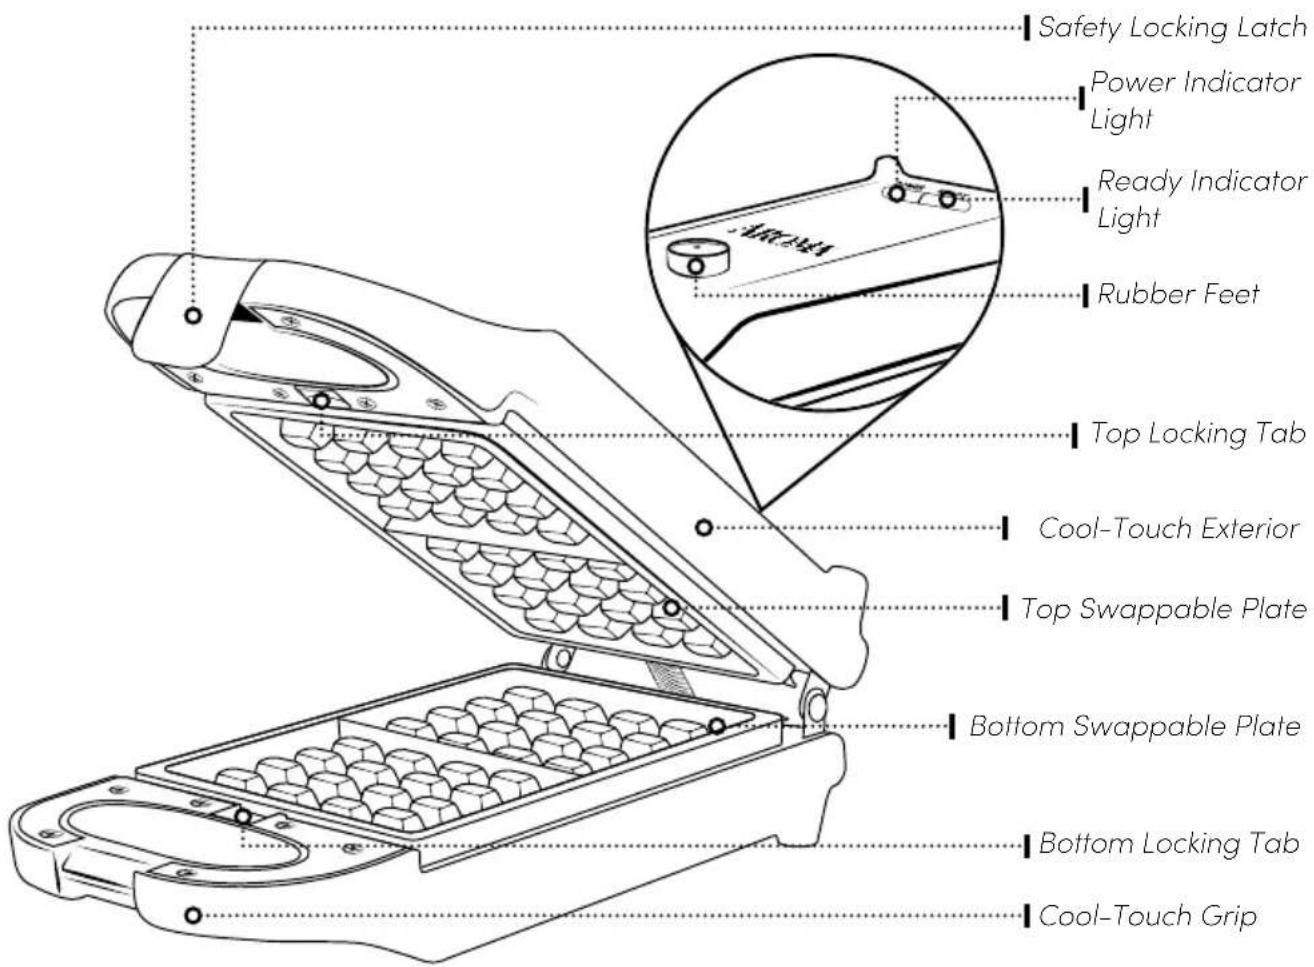
Swappable Plates:

natural_image
Simple line drawing of a rectangular frame with two small dots at the bottom (no text or symbols)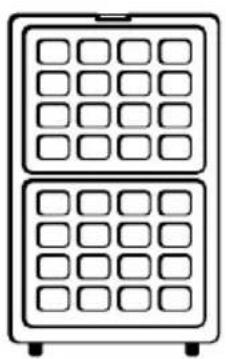
natural_image
Simple line drawing of a two-tiered refrigerator with no text or symbols
natural_image
Diagram of six identical circles arranged in a 2x2 grid within a rectangular frame (no text or symbols)Griddle Plate (x2) Waffle Plate (x2) Donut Plate (x2)
BEFORE FIRST USE

- Read all instructions and important safeguards.
- Remove all packaging materials and check that all items have been received in good condition.
- Tear up all plastic bags and dispose of them properly as they can pose a risk to children.
- Wipe the unit's exterior clean with a damp cloth.
- Remove the top and bottom waffle plates and wash in warm, soapy water together with the additional swappable plates.
- Rinse and dry thoroughly before replacing them onto the waffle maker.
TO CLEAN
- Allow the waffle maker to cool completely before cleaning.
- Use a dry paper towel or damp cloth to wipe away crumbs and soak up excess oil drips on the used swappable plates.
- Wipe the waffle maker's exterior clean with a damp cloth.
- Remove the used top and bottom swappable plates and wash in warm, soapy water.
- Rinse and dry thoroughly before replacing them onto the waffle maker.
TO STORE
- Lock the safety locking latch.
- Wrap cord around securely around base.
- For compact storage, rotate the handle so that the appliance is turned on its side.
- The appliance has a flat surface that allows it to be stored vertically.

Caution:
Allow swappable plate to cool completely before removing.
Note:
- The first time you use your waffle maker, it may have a slight odor and may smoke a bit. This is normal and common to appliances with a nonstick surface.
Note:
- Do not use harsh abrasive cleaners or scouring pads to clean this appliance.
- The swappable plates are dishwasher-safe, but hand washing is recommended to preserve the nonstick cooking surface.
- To remove stubborn, baked-on batter drips, pour a few drops of cooking oil onto the waffle plates and let sit for a few hours, then wipe away with a damp cloth or paper towel.
TROUBLESHOOTING
The waffle maker is not cooking properly.
- Make sure the green ready indicator light is on, this light indicates the unit has reached the appropriate cooking temperature.
- Flip the waffle maker after pouring batter and closing unit to allow the batter to spread throughout the unit and cook evenly.
- Follow your waffle mix instructions carefully to ensure best results.
Food is sticking to the swappable plate.
- Make sure to lightly spray the plates being used with cooking oil before pouring cooking.
SWITCHING PLATES
- Make sure the unit is cool completely before removing plates.
- Press bottom locking tab outward allowing the plate to be released.
- Press top locking tab upward while holding top base. Tab will release top plate.
- Select new plates to be used.
- Place bottom tray into bottom slot and press until bottom locking tab clicks.
- Place top tray into top slot while holding top base. Press until top locking tab clicks.
Note:
- Any other servicing should be performed by Aroma® Housewares.
- Not satisfied with your Aroma® purchase? Our product experts can help! Before returning, please contact Customer Service at 1-800-276-6286 for product support, helpful tips and more!
Helpful Hints:
For waffles, add the appropriate amount of batter to the waffle maker indicated by your waffle mix.

Caution:
Always allow plates to completely cool before replacing. Removing when hot could cause harm.
MAKING WAFFLES
- Place the unit on a sturdy, level and dry surface.
- Place the waffle plates into unit.
- Plug the power cord into an available 120V AC wall outlet. The red POWER indicator light will illuminate and the waffle maker will begin heating.
- Allow the unit to preheat, keeping it closed to efficiently retain heat.
- When the green READY indicator light illuminates, carefully open the unit, brush the waffle plates with a cooking oil or grease lightly with butter and pour batter into the bottom waffle plate.
- Close the waffle maker securely by pressing the safety locking latch into place. The green READY indicator light will turn off while the waffle is cooking and will come back on when the waffle is done.
- After 60 seconds, use the cool-touch grip to carefully flip the waffle maker. Allow it to cook for an additional 2 minutes, then gently flip it back. Exercise caution when flipping the waffle maker, as its surface becomes extremely hot during operation.
- Ensure that the waffle maker remains parallel to the table or countertop during cooking. Avoid leaving it in a perpendicular position to prevent batter leakage.
- When the green READY indicator light illuminates again, gently open the waffle maker. Use a heat-resistant cooking utensils to safely remove the waffles. For crispier, darker waffles, allow the waffle to cook for a longer period before opening the unit.
- Before preparing additional waffles, brush away any remaining crumbs or bits left in the plates of the waffle maker. Close the lid and allow the unit to reheat until the green READY indicator light illuminates, indicating it's ready for more batter. Note: it is not necessary to oil or grease the waffle grids before each new waffle unless needed.
- When finished cooking, unplug the power cord and allow it to cool before moving, cleaning or ejecting swappable plates.

Caution:
The outside area of the unit will become hot during use and remain hot for sometime after. Do not touch the outside body until the unit has cooled completely.
To close while the unit is hot, use the cool-touch grip.
When opening the lid, watch out for the escaping hot steam.
Note:
- Do not use metal utensils as they can scratch the nonstick surface.
The indicator lights do not signify when the waffles are completed cooking. The red POWER indicator light signifies the waffle maker is powered on and the green READY indicator light signifies the unit has reached the appropriate cooking temperature. - For best results, use 3/4 cup of batter.
MAKING DONUTS
- Place the unit on a sturdy, level and dry surface.
- Place the donut plates into the unit.
- Plug the power cord into an available 120V AC wall outlet. The red POWER indicator light will illuminate and the waffle maker will begin heating.
- Allow the unit to preheat, keeping it closed to efficiently retain heat.
- When the green READY indicator light illuminates, carefully open the unit, brush the donut plates with a cooking oil or grease lightly with butter and pour donut batter into the bottom donut plate.
- Close the appliance securely by pressing the safety locking latch into place. The green READY indicator light will turn off while the donuts are cooking and will come back on when the donuts are done.
- After 60 seconds, use the cool-touch grip to carefully flip the appliance. Allow it to cook for an additional 2 minutes, then gently flip it back. Exercise caution when flipping the appliance, as its surface becomes extremely hot during operation.
- Ensure that the appliance remains parallel to the table or countertop during cooking. Avoid leaving it in a perpendicular position to prevent batter leakage.
- When the green READY indicator light illuminates again, gently open the appliance. Use a heat-resistant cooking utensils to safely remove the donuts.
- When finished cooking, unplug the power cord and allow it to cool before moving, cleaning or ejecting swappable plates.
Helpful Hints:
Aerosol cooking sprays with soy lecithin should not be used on nonstick surfaces as it damages the coating and is difficult to remove. To ensure the longevity of your product, use a spray bottle and a neutral oil (vegetable, canola, etc.) to lubricate cooking surfaces.
USING GRIDDLE
-
Place the unit on a sturdy, level and dry surface.
-
Place the griddle plates into unit.
-
Plug the power cord into an available 120V AC wall outlet. The red POWER indicator light will illuminate and the waffle maker will begin heating.
-
Allow the unit to preheat, keeping it closed to efficiently retain heat.
-
When the green READY indicator light illuminates, carefully open the unit, brush the plates with a cooking oil or grease lightly with butter and add desired ingredients to bottom griddle plate.
-
Close the unit after adding your ingredients. Monitor your food's cooking progress manually. Check periodically to ensure your food is cooked to your preference.
-
Use a heat-resistant cooking utensils to safely remove food.
-
When finished cooking, unplug the power cord and allow it to cool before moving, cleaning or ejecting swappable plates.
Classic Belgian Waffles
| 1 cup | all-purpose flour |
| 3 tbsp | granulated sugar |
| 12 tbsp | baking powder |
| 14 tsp | salt |
| 1 cup | milk |
| 14 cup | melted unsalted butter |
| 1 | large egg |
| 1 tsp | vanilla extract |
Sift together flour, sugar, baking powder, and salt in a medium bowl and set aside. In a separate small mixing bowl, whisk together egg, milk, and melted butter or oil until well combined. Blend the wet ingredients into the dry mixture, stirring just until combined. Insert the waffle plates and preheat the waffle maker until READY light is on. Grease the waffle maker with melted butter, then pour 23 cup of batter into it, cooking until READY light is on. Repeat with the remaining batter until all is gone. Serve your waffles with a delightful drizzle of maple syrup!
MAKES 6 WAFFLES.
Blueberry Waffles
| 1 cup | all-purpose flour |
| 3 tbsp | granulated sugar |
| 12 tbsp | baking powder |
| 14 tsp | salt |
| 1 cup | milk |
| 14 cup | melted unsalted butte |
| 1 | large egg |
| 1 tsp | vanilla extract |
| 12 cup | fresh blueberries |
Sift together flour, sugar, baking powder, and salt in a medium bowl, setting it aside. In a separate small mixing bowl, whisk together an egg, milk, and melted butter or oil until well combined. Blend the wet ingredients into the dry mixture, stirring just until combined. Mix fresh blueberries into the batter. Insert the waffle plates and preheat the waffle maker until READY light is on. Grease the waffle maker with melted butter, then pour 23 cup of batter into it, cooking until READY light is on. Repeat with the remaining batter until all is gone. Serve your waffles with a delightful drizzle of maple syrup!
MAKES 6 WAFFLES.
Chocolate Chip Waffles
| 1 cup | all-purpose flour |
| 3 tbsp | granulated sugar |
| 12 tbsp | baking powder |
| 14 tsp | salt |
| 1 cup | milk |
| 14 cup | unsalted butter (melted) |
| 1 | large egg |
| 1 tsp | vanilla extract |
| 14 cup | chocolate chips |
Sift together flour, sugar, baking powder, and salt in a medium bowl, setting it aside. In a separate small mixing bowl, whisk together an egg, milk, and melted butter or oil until well combined. Blend the wet ingredients into the dry mixture, stirring just until combined. Mix chocolate chips into the batter. Insert the waffle plates and preheat the waffle maker until READY light is on. Grease the waffle maker with melted butter, then pour 23 cup of batter into it, cooking until READY light is on. Repeat with the remaining batter until all is gone. Serve your waffles with a delightful drizzle of maple syrup!
MAKES 6 WAFFLES.
Classic Mini Donuts
| 1 cup | all-purpose flour |
| 13 cup | sugar |
| 1 tbsp | baking powder |
| 12 tsp | salt |
| 1 cup | milk |
| 2 tbsp | oil |
| 1 | medium egg |
| 1 tsp | vanilla extract |
Mix flour, baking powder, sugar, and salt in a medium bowl. Whisk the egg, milk, vanilla extract, and butter in a separate bowl. Mix dry ingredients into the wet ingredients until well combined. Scoop batter into 1-gallon plastic bag and seal partway. Snip off 18 from the corner of the bag. Insert the mini donut plates and preheat until READY light is on. Grease the mini donut plate with melted butter. Add batter to donut molds until about 34 full. Bake for 6 minutes.
MAKES 30 DONUTS.
Chocolate Mini Donuts
| 1 cup | all-purpose flour |
| 13 cup | sugar |
| 1 tbsp | baking powder |
| 12 tsp | salt |
| 1 cup | milk |
| 2 tbsp | oil |
| 1 | medium egg |
| 1 tsp | vanilla extract |
| 3 tbsp | cocoa powder |
Mix flour, cocoa powder, baking powder, sugar, and salt in a medium bowl. Whisk the egg, milk, vanilla extract, and butter in a separate bowl. Mix dry ingredients into the wet ingredients until well combined. Scoop batter into 1-gallon plastic bag and seal partway. Snip off 18 from the corner of the bag. Insert the mini donut plates and preheat until READY light is on. Grease the mini donut plate with melted butter. Add batter to donut molds until about 34 full. Bake for 6 minutes.
MAKES 30 DONUTS.
Turkey & Swiss Grilled Sandwich
| 2 slices | whole wheat bread |
| 2 slices | smoked turkey |
| 1 slice | Swiss cheese |
| -- | dijon mustard |
| -- | butter |
Lay out one slice of whole wheat bread. Layer smoked turkey and Swiss cheese. Spread Dijon mustard on the remaining slice of bread and place it on top to form a sandwich. Insert the griddle plates, and preheat until READY light is on. Grease the griddle with melted butter. Grill on the griddle until the bread is golden brown and the cheese is melted, about 5 minutes. Slice and serve hot.
SERVES 1.
Grilled Caprese Panini
| 2 slices | sourdough bread |
| 2 slices | tomato |
| 1 slice | fresh mozzarella |
| 1/2 tbsp | pesto sauce |
| -- | fresh basil leaves |
| -- | olive oil |
Lay out a slice of sourdough bread and spread a layer of pesto sauce. Layer tomato slices, fresh mozzarella, and basil leaves on the pesto-covered slices. Top with the remaining slice of bread to form a sandwich. Insert the griddle plates and preheat until READY light is on. Grease the griddle with melted butter. Place sandwich in and grill on the griddle until the bread is golden brown and the cheese is melted, about 5 minutes. Slice and serve immediately.
SERVES 1.
LIMITED WARRANTY
Aroma Housewares Company warrants its products against defects in material and workmanship for one year from the provable date of purchase in the United States.
Within this warranty period, Aroma Housewares Company will repair or replace, at its discretion, defective parts at no charge. Proof of the date of purchase, such as the original dated sales receipt, will be required with any request for warranty repair or replacement. All liability is limited to the amount of the purchase price.
This warranty does not apply if the warranty period expired; the product has been modified by any unauthorized service center or personnel; the defect was subject to abuse, improper use not conforming to product manual instructions, or environmental conditions more severe than those specified in the manual and specification, neglect of the owner or improper installation; the defect was subject to Force Majeure such as flood, fire, lightning, earthquake, other natural calamities, war. The warranty excludes accessories and replacement parts. This warranty is void if the product is used for other than single-family household use or subjected to any voltage and waveform other than as specified on the rating label (e.g., 120V \~ 60Hz).
Aroma's sole obligation under the warranty shall be to replace the defective product with a working one or a similar model of equivalent value, if the same model is not available, in the occurrence of any failure or defect covered under the warranty during the warranty period. Refurbished items or items not purchased through an authorized retailer are not eligible for warranty claims. Transportation charges on parts, or products in whole, submitted for repair or replacement, under this warranty, must be borne by the purchaser.
This warranty gives you specific legal rights, which may vary from state to state, and does not cover areas outside the United States.
SERVICE & SUPPORT
In the event of a warranty claim, or if service is required for this product, please contact Aroma ^® customer service toll-free at:
1-800-276-6286 | CustomerService@AromaCo.com
M-F, 8:30am-4:30pm, Pacific Time
www.AromaCo.com
Aroma Housewares Company
6469 Flanders Drive, San Diego, CA 92121, U.S.A.
Note:
- Proof of purchase is required for all warranty claims.
- Failure to register your product will not diminish your warranty rights.
- Not satisfied with your Aroma® purchase? Our product experts can help! Before returning, please contact
Customer Service at 1-800-276-6286 for product support, helpful tips and more!

natural_image
Exterior view of a flip mobile phone with black keypad and open case (no visible text or symbols)To Enhance and Enrich Lives.

natural_image
Line drawings of various fork shapes arranged in two rows (no text or symbols)www.AromaCo.com
- instruction manual
- AROMA®
- REGISTER YOUR PRODUCT
- SAVE THESE INSTRUCTIONS
- Short Cord Instructions
- DO NOT DRAPE CORD!
- KEEP AWAY FROM CHILDREN!
- Polarized Plug
- THIS APPLIANCE IS FOR HOUSEHOLD USE ONLY.
- Parts Identification
- BEFORE FIRST USE
- TO CLEAN
- TO STORE
- Caution:
- Note:
- TROUBLESHOOTING
- The waffle maker is not cooking properly.
- Food is sticking to the swappable plate.
- SWITCHING PLATES
- Helpful Hints:
- MAKING WAFFLES
- MAKING DONUTS
- USING GRIDDLE
- Classic Belgian Waffles
- Blueberry Waffles
- Chocolate Chip Waffles
- Classic Mini Donuts
- Chocolate Mini Donuts
- Turkey & Swiss Grilled Sandwich
- Grilled Caprese Panini
- LIMITED WARRANTY
- SERVICE & SUPPORT
Brand : Aroma
Model : AWM-1220P
Category : Waffle Maker