
IFP8602 - Whiteboard V7 - Free user manual and instructions
Find the device manual for free IFP8602 V7 in PDF.


| Product Type | Interactive Whiteboard |
| Brand | V7 |
| Model | IFP8602 |
| Display Size | 86 inches (218 cm diagonal) |
| Resolution | 3840 x 2160 (4K UHD) |
| Touch Technology | Infrared (IR) touch |
| Touch Points | 20 points (multi-touch) |
| Brightness | 350 cd/m² |
| Contrast Ratio | 4000:1 |
| Viewing Angle | 178° horizontal and vertical |
| Response Time | 8 ms |
| Connectivity Inputs | HDMI (3), USB (2), VGA, Audio, LAN (RJ45), RS232 |
| Connectivity Outputs | HDMI, USB, Audio out |
| Built-in Speakers | 2 x 15W |
| Operating System | Android 8.0 or higher |
| Storage | 4 GB RAM, 32 GB ROM |
| Power Supply | 100-240V AC, 50/60Hz |
| Power Consumption | Max 300W, Standby <0.5W |
| Weight | Approx. 62 kg (without stand) |
| Dimensions (W x H x D) | 1957 x 1180 x 89 mm |
| VESA Mounting | 800 x 600 mm |
| Accessories Included | 2 stylus pens, power cable, USB cable, remote control, wall mount kit |
| Cleaning Instructions | Use a soft, dry cloth. Avoid abrasive cleaners. |
| Safety | CE, FCC, RoHS certified |
Frequently Asked Questions - IFP8602 V7
User questions about IFP8602 V7
0 question about this device. Answer the ones you know or ask your own.
Ask a new question about this device
Download the instructions for your Whiteboard in PDF format for free! Find your manual IFP8602 - V7 and take your electronic device back in hand. On this page are published all the documents necessary for the use of your device. IFP8602 by V7.
USER MANUAL IFP8602 V7
NOTE: ALL THE PICTURES IN THIS MANUAL ARE FOR REFERENCE ONLY, YOUR PRODUCT MAY LOOK SLIGHTLY DIFFERENT


natural_image
Abstract water reflection with vibrant pink and blue hues, no text or symbols presentCONTENTS
Safety Warning......2
Control Panel....3
Connection and Setting......7
Simple Troubleshooting......9
Maintenance....10
Important:
Check www.v7world.com for the latest documentation and downloads
Safety Warnings
- Do not place heavy objects on top of the unit.
- Do not put the unit near appliances that generate magnetic fields
- Do not expose the unit to direct sunlight and other sources of heat
- Do not place the unit on an unstable cart, stand, tripod, bracket, table, or shelf
- Do not put any liquid near or on the unit
- Do not spill any liquid inside the unit
- Check and ensure AC source is grounded
- Only use the power cord that came with this product
- Do not use extension cords
- Unplug power during thunderstorm or lightning
- Make sure the unit's operating voltage is compatible with the plug you will use
- Unplug the power cable if the unit will be idle for a long period of time
- Unplug the power cable before cleaning
- Clean the screen with a soft, dustless, dry cloth
- Never use water or spray type detergent to clean
- Never use any hard or sharp objects to replace the touch pen
- To ensure long life and display performance, do not keep brightness on high setting for long periods of time
- Do not place the unit near or over a radiator or a heater
- If your unit is suddenly moved from a cold to a warm location, please unplug the power cable and do not turn it on for at least 2 hours to be sure the moisture inside the unit has been evaporated
- Do not expose the unit to rain, or places of high humidity
- Make sure environment is dry, cool and well ventilated
- Check that you are following the environmental specifications for temperature and humidity
- Do not turn off the unit after the unit enters standby mode
- Make sure the remote control batteries are properly disposed or recycled after changing
• This machine should only be maintained by certified engineer
Having trouble?
contact our technical support team at www.v7world.com
Control Panel
- Prepare to Install

| Number Items | |
| 1 Magnetic zone: | Area for placing the magnetic pen |
| 2 :Tap to enter energy-saving, press at least 2 seconds for standby mode | |
| 3 Remote control signal receiver | |
| 4 Identify the brightness of ambient light | |
| 5 USB: connect USB device | |
| 6 Bottom loudspeaker | |
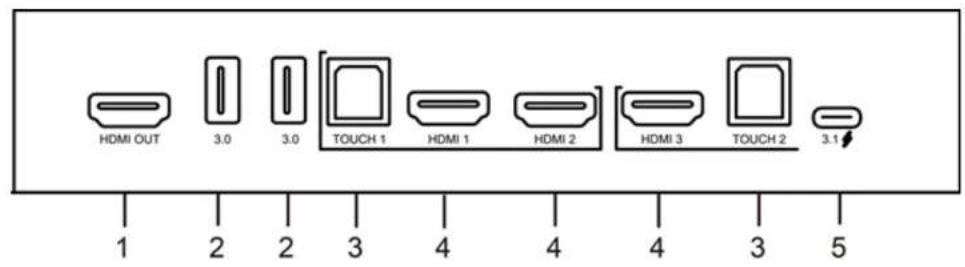


| Number Items Function description | ||
| 1 HDMI OUT Connect to devices with HDMI input | ||
| 2 3.0 USB 3.0, connect USB devices (mobile disk drives, USB keyboard and mouse, etc.) | ||
| 3 TOUCH USB Touch signal output to the external computer | ||
| 4 HDMI IN | High-Definition Multimedia Interface signal input, connect to devices with HDMI output interface (personal computer with HDMI output, set-top box, or other video devices). | |
| 5 3.1 | ⚡ | USB-C PD (Power Delivery) up to 65 Watts charging, reverse touch control, data transmission, and extension for audio and video (DP 1.4) interface |
| 6 SPDIF Multi-channel digital audio via optical signals | ||
| 7 2.0 USB 2.0, connect USB devices such as mobile disk drives, USB keyboard and mouse, etc. | ||
| 8 | VGA | External device display input |
| 9 | AUDIO IN | 3.5mm audio input |
| 10 | LAN | 10/100/1000MBPS RJ45 LAN IN & OUT (PASS THROUGH) Auto Switch |
| 11 | RS232 | DB9 Serial interface |
| 12 | AUDIO OUT | 3.5mm audio output to external speakers |
| 13 | AC SWITCH | “I”= power on, “O” = power off. |
| 14 | AC IN | AC power input, connect AC power supply. |
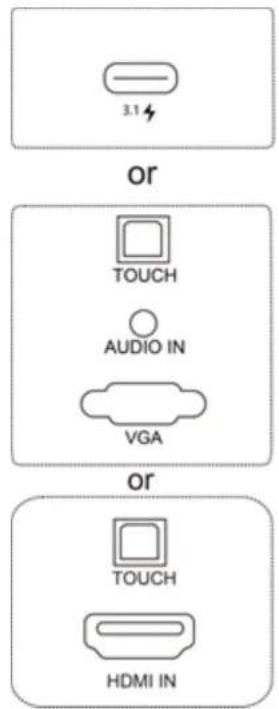
Note: HDMI IN/VGA needs to be connected with the designated TOUCH terminal to achieve the touch function.
1) Use HDMI IN 1 with TOUCH 1
2) Use HDMI IN 2 with TOUCH 1
3) Use HDMI IN 3 with TOUCH 2
4) Use VGA with TOUCH 2
3. Remote Control
(1) Remote Control Button Instruction
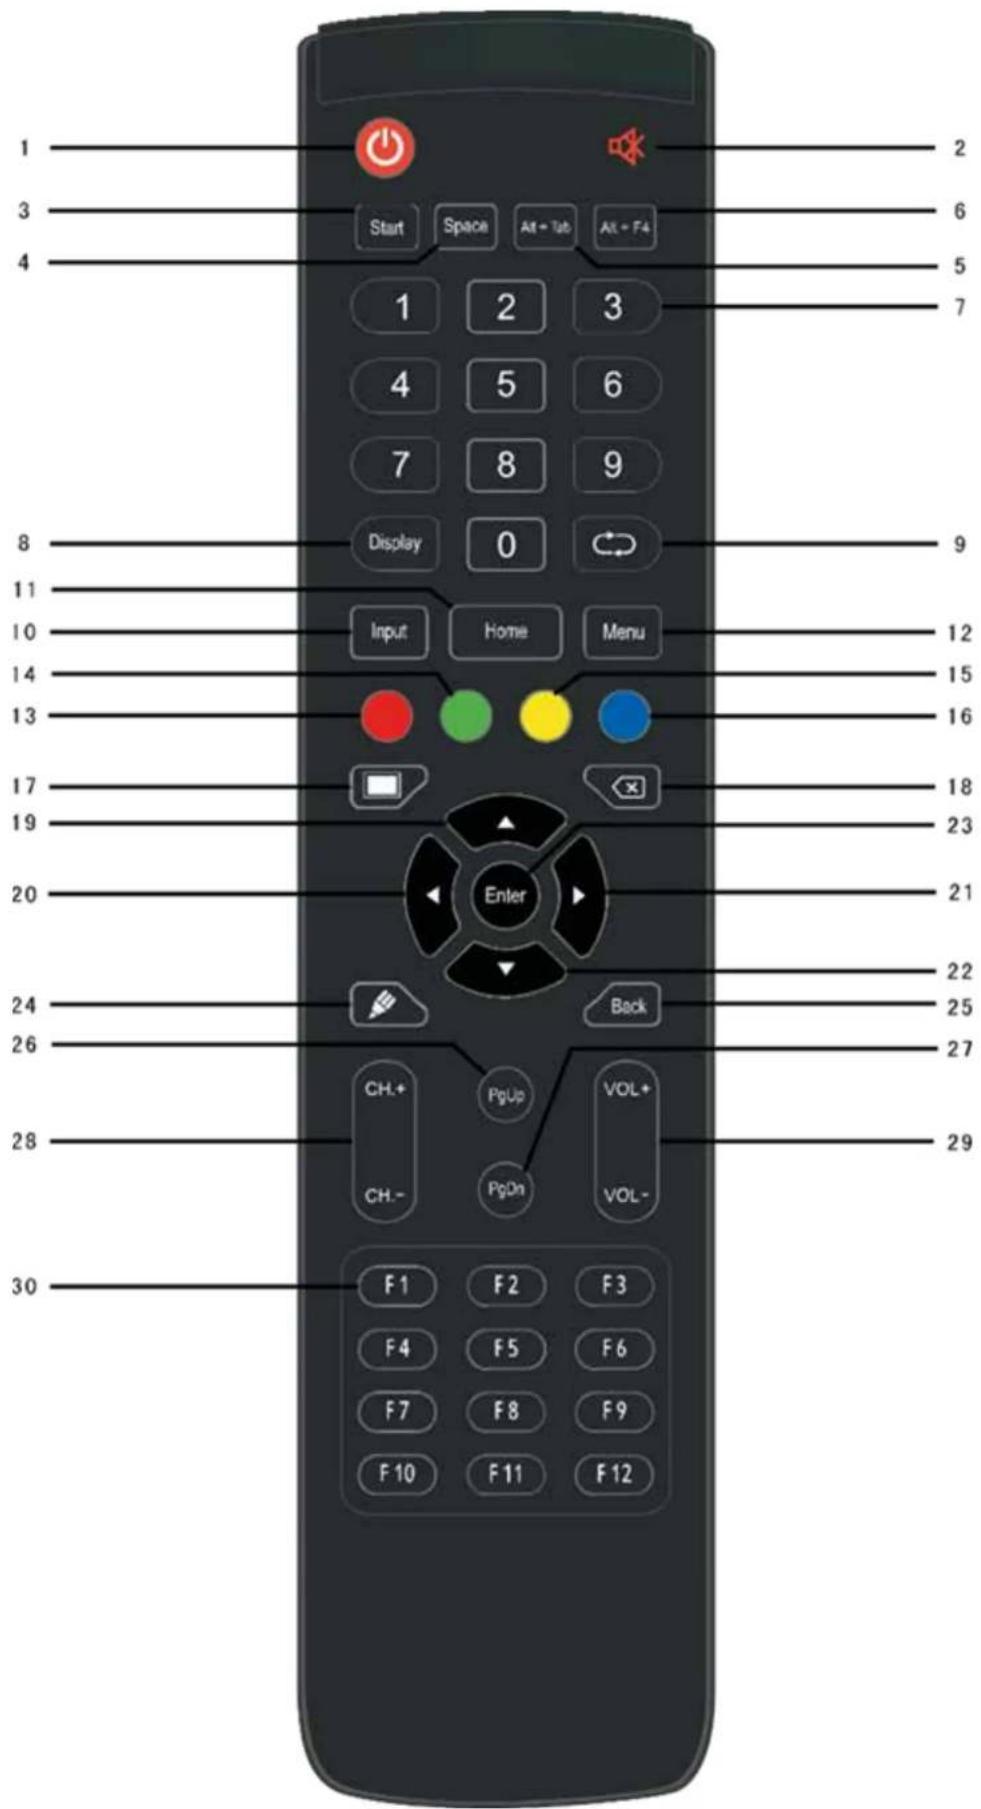
(2) Detailed Function Description
| Number Items Function description | ||
| 1 Power on/off. | ||
| 2 Enter or exit mute mode. | ||
| 3 Start PC's Windows key. | ||
| 4 Space PC's Space key. | ||
| 5 Alt+Tab PC's Alt+Tab key. | ||
| 6 Alt+F4 | PC's Alt+F4 key. | |
| 7 Numeric keys | Numeric input keys. | |
| 8 | Display | Display channel information. |
| 9 | / | |
| 10 Input | Pop up TouchMenu-General Setting. | |
| 11 | Home | Return to android system main screen key. |
| 12 | Menu | Pop up TouchMenu-Audio. |
| 13 | Red | Enable or disable Front keyboard and Touch. |
| 14 | Green | Enable or disable Front keyboard. |
| 15 Yellow | Enable or disable Touch. | |
| 16 | Blue | Pop out or close the screen freezing tools. |
| 17 | Turn off or turn on the screen backlight. | |
| 18 | PC's Backspace key. | |
| 19 | Press to scroll up. | |
| 20 | Press to scroll left. | |
| 21 | Press to scroll right. | |
| 22 | Press to scroll down. | |
| 23 | Enter | Confirmation key, press it to confirm selection state. |
| 24 | Start writing software. | |
| 25 Back | Return to the last operating interface. | |
| 26 PgUp | Page Up. | |
| 27 PgDn | Page Down. | |
| 28 | CH.+/CH.- | / |
| 29 | VOL+/VOL- | Increase/reduce the volume. |
| 30 | F1-F12 | PC's F1 - F12 function keys. |
Note: All computer related function keys are not available without a built-in OPS Computer.
(3) Remote Control Instruction
Install Batteries
1) Open back cover of battery component on the back of remote control.
2) Install AAA type batteries, make sure battery positive and negative pole are correct (" + " to "+", "- " to "-"), please do not mix using old and new batteries.
3) After batteries are installed, close the back cover, and make sure the clip is buckled to the bottom.
Range of remote control
Remote control can normally operate within 8 meters, 30 degrees left and right from the remote-control receiver; in order to protect environment, please dispose waste battery into recycling box.

If the battery is replaced by an incorrect type, it may lead to explosion.
Connection and Setting
For the safety of you and the machine, please do not connect any power plug before connection.
1. External Computer and Touch Connection


natural_image
Illustration of a laptop with the word 'Computer' below it, no other text or symbols present.1) Use VGA cable to connect to VGA output port of external computer, and meanwhile use headphone audio cable to connect to external computer audio output interface. (Or use HDMI cable to connect to HDMI output port of external computer).
2) Use USB cable to connect to external computer USB port.
3) After cable connection, plug in power cord, and switch power on.
4) Start external computer.
5) Press ⏻ key, and the equipment is power on.
6) Switch the input source to the VGA/HDMI channel in the main menu.

NOTE:
External computer input, equipment's highest resolution is 3840 x 2160 px.
Recommended computer configuration:
1GB Available Hard Drive
2.0GHz Processor, 1GB Memory
More than 256 color display cards
VGA OUT / HDMI OUT, Audio-OUT, USB Interface
Supported Resolutions: 800x600,1024x768,1920x1080,3840x2160
2. Audio and Video Equipment

1) Use HDMI cable to connect audio and video equipment with HDMI output.
2) After cable connection, plug in power cord, and switch power on.
3) Press to turn equipment on.
4) Switch the input source to the HDMI channel in the main menu.
3. Audio and Video Equipment

1) Use HDMI cable to connect audio and video equipment with HDMI input.
2) After cable connection, plug in power cord, and switch power on
3) Press to turn equipment on
4. RS232 Connection

By using a serial port cable to a connect central control equipment with the IFP, it can be controlled with dfu such as: machine ON/OFF, and adjustment of sound volume, etc.
5. LAN Connection

7. USB Connection

Simple Troubleshooting
1. IFP Fails to Work Normally
| Remote control failure | Check whether there are other objects between remote control and equipment control receiving window, thus leading to failure of remote control. |
| Check whether the battery in the remote control is correctly positioned. | |
| Check whether remote control needs to replace battery. | |
| Machine automatically | Check if the sleep mode is set. |
| shut down | |
| The system will automatically shut down if the IFP's external channel loses signal for 5 minutes. Please check the input and connection of the signal. |
2. PC Mode
| Signal out of range | Check if the display is set correctly. |
| Check if the resolution is configured properly between the computer and display. | |
| Adjust the line and field synchronization in the menu. | |
| Background has vertical lines or streaks | Select automatic correction in menu. |
| Adjust clock and phase position in menu. | |
| Image lack of color, color is incorrect | Check to make sure the video cable is properly connected or and works correctly. |
| Adjust chromatic and brightness or contrast in menu. | |
| Display format that is not supported | Select automatic correction in menu. |
| Adjust clock and phase position in menu. |
3. Touch Function
| Touch function invalid | Check that the size of article touched is comparable with finger. |
| Touch positioning not correct | Check that the touch pen is facing the screen. |
- Video Function Can't Work Normall
| No picture and no sound | Check that the IFP is started state. |
| Check that cable is well connected, and that the correct INPUT is corresponding to it. | |
| With horizontal or vertical stripes or image dithering | Check that signal wire is well connected. |
| Make sure that electronic equipment or power tools are not placed around the IFP. | |
| No color, color is weak, or image is weak | Adjust chromatic and brightness or contrast in menu. |
| Check whether signal wire is well connected. |
- Audio Function Can't Work Normally
| With image but without sound | Check whether mute button is pressed. |
| Press VOL + / - to adjust volume. | |
| Check whether audio line is connected correctly. | |
| Only one speaker has sound | Adjust sound balance in menu. |
| Check the computer sound control panel settings to make sure they are configured properly. | |
| Check that the audio cable is connected correctly. | |
| HDMI output without sound | Check the external connect device. |
Maintenance
Proper maintenance and regular careful cleaning can help to ensure the IFP stays in good working condition. Please unplug power before cleaning and maintenance to prevent electric shock or other issues.
Clean Screen
Mix and stir a small amount of fabric softener or tableware detergent with alcohol. Use a soft cloth to be completely soaked in the mixture.
Take out cloth and twist to half dry state to wipe the machine screen.
Repeat several times, pay attention not to squeeze water into the IFP when wiping.
Clean Face Frame
Please use a dry, soft, lint-free cloth to wipe the front frame.
No Use of IFP for a Long Time
In cases where the IFP won't be used for a long time, please make sure to unplug the power to prevent any electrical issues.
- CONTENTS
- Important:
- Safety Warnings
- Having trouble?
- Control Panel
- Remote Control
- Remote Control Instruction
- Install Batteries
- Range of remote control
- Connection and Setting
- External Computer and Touch Connection
- NOTE:
- Recommended computer configuration:
- Audio and Video Equipment
- Audio and Video Equipment
- RS232 Connection
- LAN Connection
- USB Connection
- Simple Troubleshooting
- IFP Fails to Work Normally
- PC Mode
- Touch Function
- Maintenance
- Clean Screen
- Clean Face Frame
- No Use of IFP for a Long Time
Brand : V7
Model : IFP8602
Category : Whiteboard