
iPAQ MP4800 - Projector COMPAQ - Free user manual and instructions
Find the device manual for free iPAQ MP4800 COMPAQ in PDF.


| Product Type | Portable DLP Projector |
| Brand | Compaq |
| Model | iPAQ MP4800 |
| Display Technology | DLP |
| Native Resolution | 1024 x 768 (XGA) |
| Brightness | 2000 ANSI Lumens |
| Contrast Ratio | 2000:1 |
| Lamp Type | 200W UHP Lamp |
| Lamp Life | Up to 2000 hours (normal mode) |
| Weight | 2.7 kg (5.95 lbs) |
| Dimensions (W x D x H) | 285 x 220 x 90 mm (11.2 x 8.7 x 3.5 in) |
| Power Consumption | 250W (maximum) |
| Keystone Correction | ±20° vertical |
| Zoom Lens | Manual, 1.2x |
| Inputs | VGA, S-Video, Composite Video |
| Control | IR Remote Control |
| Security | Kensington Lock slot |
| Maintenance | Clean air filter every 100 hours; replace lamp when needed |
| Spare Parts | Replacement lamp (part number: 999-xxxx), air filter |
| Repairability | User-replaceable lamp and filter; other repairs by qualified technician |
Frequently Asked Questions - iPAQ MP4800 COMPAQ
User questions about iPAQ MP4800 COMPAQ
0 question about this device. Answer the ones you know or ask your own.
Ask a new question about this device
Download the instructions for your Projector in PDF format for free! Find your manual iPAQ MP4800 - COMPAQ and take your electronic device back in hand. On this page are published all the documents necessary for the use of your device. iPAQ MP4800 by COMPAQ.
USER MANUAL iPAQ MP4800 COMPAQ
© 2002 Compaq Information Technologies Group, L.P.
Compaq, the Compaq logo, and iPAQ are trademarks of Compaq Information Technologies Group, L.P. in the United States and/or other countries.
Microsoft, MS-DOS, Windows, Windows NT are trademarks of Microsoft Corporation in the United States and other countries.
All other product names mentioned herein may be trademarks of their respective companies.
Compaq shall not be liable for technical or editorial errors or omissions contained herein. The information in this document is provided “as is” without warranty of any kind and is subject to change without notice. The warranties for Compaq products are set forth in the express limited warranty statements accompanying such products. Nothing herein should be construed as constituting an additional warranty.
Compaq service tool software, including associated documentation, is the property of and contains confidential technology of Compaq Computer Corporation. Service customer is hereby licensed to use the software only for activities directly relating to the delivery of, and only during the term of, the applicable services delivered by Compaq or its authorized service provider. Customer may not modify or reverse engineer, remove, or transfer the software or make the software or any resultant diagnosis or system management data available to other parties without Compaq's or its authorized service provider's consent. Upon termination of the services, customer will, at Compaq's or its service provider's option, destroy or return the software and associated documentation in its possession.

WARNING: Text set off in this manner indicates that failure to follow directions could result in bodily harm or loss of life.

CAUTION: Text set off in this manner indicates that failure to follow directions could result in damage to equipment or loss of information.
Compaq iPAQ Microportable Projector MP4800 User's Guide First Edition March 2002
Document Part Number: 261794-001
Product Features
The Compaq iPAQ Microportable Projector MP4800 generates crisp, clear images onto a projection screen by using Digital Light Processing (DLP) technology. The microportable projector offers the latest in portable projection technology, including:
■ 1024 x 768 native XGA resolution
■ Maximum resolution: 1280 x 1024 (SXGA)
■ Lumen output: 2000 lumens (1600 in lamp saver mode)
■ High Definition Television (HDTV) capable 720p, 1080i, 480p, and 480i via VGA port
■ User replaceable 200 watt high-efficiency, long-life lamp
■ Zoom lens
■ Lamp saver mode for longer lamp life
■ 3.5 watt stereo speakers
■ Tripod and ceiling mount capabilities
■ Electronic scaling to 32X
■ Weight of 5.8 pounds (2.6 kg)
■ Convenient resync capability
■ 16.7 million displayable colors
■ Connector options:
Standard analog VGA
DVI
☐ S-video/composite video
Component/HDTV
Audio
■ Full-featured remote control with remote mouse capabilities and laser pointer via USB port
■ Home Theater Kit [optional use]
S-video cable
□ Composite video cable
☐ VGA-to-HDTV/Component video cable
Home Theater stereo audio cable
☐ PC stereo audio cable
■ Multilingual on-screen adjustment menu
■ Plug and Play capability
■ Security lock slot
Introduction
Before setting up your Compaq Microportable Projector, be sure your shipping box includes the following items:

① Projector and lens cap
② 10-foot power cable
③ VGA signal cable for use with computers, notebooks, and some handheld products
4 USB cable
⑤ Remote control
⑥ Two AAA batteries for use in the remote control
(Continued)
⑦ Documentation kit:
■ Quick Setup card
■ CD-ROM containing the User's Guide in eight languages
■ Important Safety Information booklet
■ Worldwide Limited Warranty and Technical Support booklet
■ Worldwide Telephone Numbers booklet
■ Program License Agreement
If your shipping box does not contain all of the listed items, please contact your Compaq authorized dealer, reseller, or service provider.
Identifying the Projector Buttons
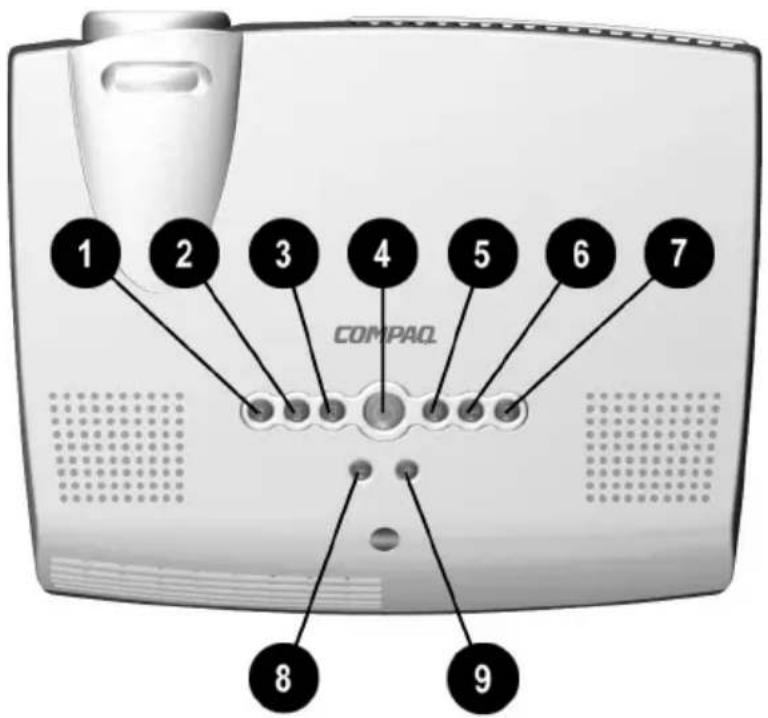
Identifying the Projector Buttons
| Symbol Control Function | ||
| 1 | Lamp Saver button Turns the Lamp Saver feature on and off. If the LED is not lit (default), lamp saver is off. If the LED is green, lamp saver is on. Turn lamp saver off for maximum brightness. Turn lamp saver on to extend lamp life at a reduced brightness level. | |
| 2 | Mute button Mutes or silences the speakers on the projector. | |
| 3 | Resync button Automatically synchronizes the projector to track the input source. | |
| 4 | Standby button Powers the projector lamp on and off. The Standby LED changes color modes to indicate the following operating modes:1. Flashing green indicates the projector is going into standby mode and cannot be restarted until the LED glows green steadily.2. The LED button rapidly flashing green indicates the lamp has automatically shut down. | |
| 5 | Menu button Press this button once to start the on-screen display menu. Press it again to save any changes and exit the menu. | |
| 6 | Enter/Accept button | When the on-screen display menu is open, performs the following functions:1. Displays any sub-menus below the main menu.2. If pressed after selecting “yes” or “no” to a question, the request will be processed and the menu will go one level higher.3. If pressed after changing an adjustment scale, the new information will be saved and the menu will go one level higher. |
| Identifying the Projector Buttons (Continued) | |
| Symbol Control Function | |
| 7 | Source button Selects the input source. |
| 8 | Minus button Selects and adjusts the on-screen scroll-down menu functions. |
| 9 | Plus button Selects and adjusts the on-screen scroll-up menu functions. |
To use standby mode, press the Standby button and, after a six to ten second delay, the unit enters Standby mode and the projector lamp turns off. A “Going to Standby” message appears on the screen for the duration of the six to ten second delay. When the message disappears from the screen, there is a 45 second delay before the lamp can be turned back on. Wait 45 seconds to allow the lamp to cool before pressing the Standby button again. To avoid going to Standby, press the Standby button again within the first five seconds.
Identifying the Input/Output Panel Components
A variety of cables can be connected to the Input/Output Panel on the projector, allowing the projector to use various audio and video sources.

Identifying the Input/Output Panel Components
| Item Component Function | |
| 1 | USB connector Connects back to the computerallowing remote mouse functionality |
| 2 | Audio-in connector Connects audio equipment,videocassette recorders, DVD players,personal computers, etc., allowingsound to be played through theprojector stereo speakers |
| 3 | S-Video connector Connects camcorders or DVDs |
| 4 | Composite Videoconnector Connects VCRs |
| Identifying the Input/Output Panel Components (Continued) | |
| Item Component Function | |
| 5 | DVI connector Connects digital equipment |
| 6 | VGA Connector Connects HDV devices, desktop or notebook computers, or pocket PCs |
| 7 | Power connector Connects the power cable |
Using the Projector
Setting Up the Projector
Follow the instructions below and on the following pages to set up the projector. Separate setup instructions are described for the following products:
■ Notebook computers
■ Desktop computers
■ Compaq iPAQ Pocket PC with VGA capability
■ DVD or camcorder (requires optional Home Theater Kit)
■ Videocassette Recorder (VCR) (requires optional Home Theater Kit)

The projector is hot pluggable and can be connected to any input source while the source is in use.
Place the projector on a stable desk, table, tripod, or ceiling mount at a distance not less than 3.7 feet (1.1 meter) and not greater than 40.7 feet (12.4 meters) from the projection screen.

WARNING: To reduce the risk of electric shock or damage to your equipment:
■Do not disable the power cord grounding plug. The grounding plug is an important safety feature.
- Plug the power cord into a grounded (earthed) electrical outlet that is easily accessible at all times.
■Disconnect power from the projector by unplugging the power cord from the electrical outlet.
■Do not place anything on power cords or cables. Arrange them so that no one may accidentally step on or trip over them. Do not pull on a cord or cable. When unplugging from the electrical outlet, grasp the cord by the plug.
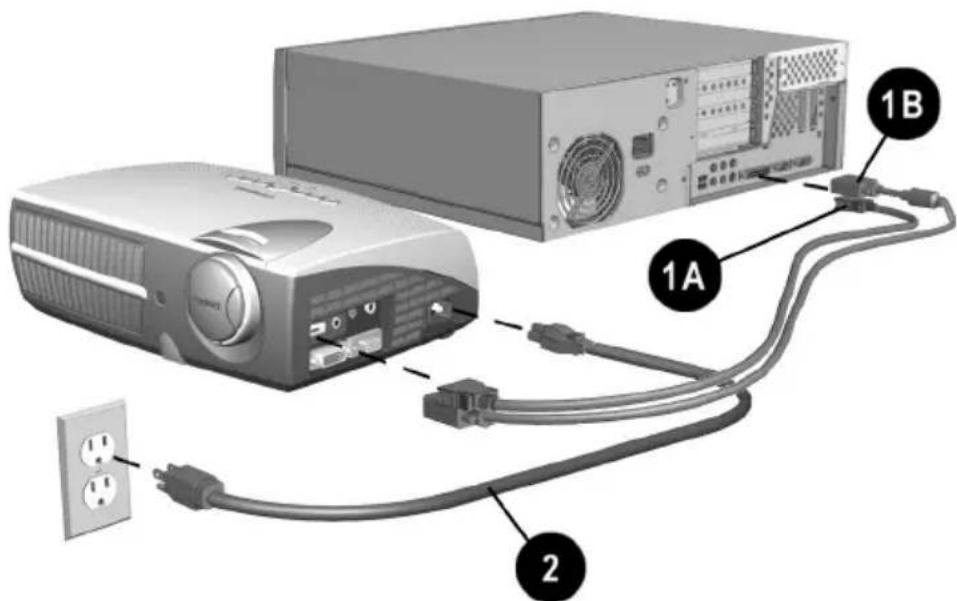
Connecting the Projector to a Notebook Computer
- Connect one end of the projector signal cable into the side of the projector and the other end to the DVI connector ①A or the VGA connector ①B on the notebook computer and tighten the screws.

Be sure the signal cable aligns with the connector. Do not force the cable onto the connector or you may damage the signal cable or the projector.
- Connect one end of the power cord ② into the side of the projector, and the other end to an electrical outlet that is easily accessible and close to the projector.

Connecting the Projector to a Desktop Computer
- Connect one end of the projector signal cable into the side of the projector and the other end to the DVI connector ①A or the VGA connector ①B on the desktop computer and tighten the screws.

Be sure the signal cable aligns with the connector. Do not force the cable onto the connector or you may damage the signal cable or the projector.
- Connect one end of the power cord ② into the side of the projector, and the other end to an electrical outlet that is easily accessible and close to the projector.
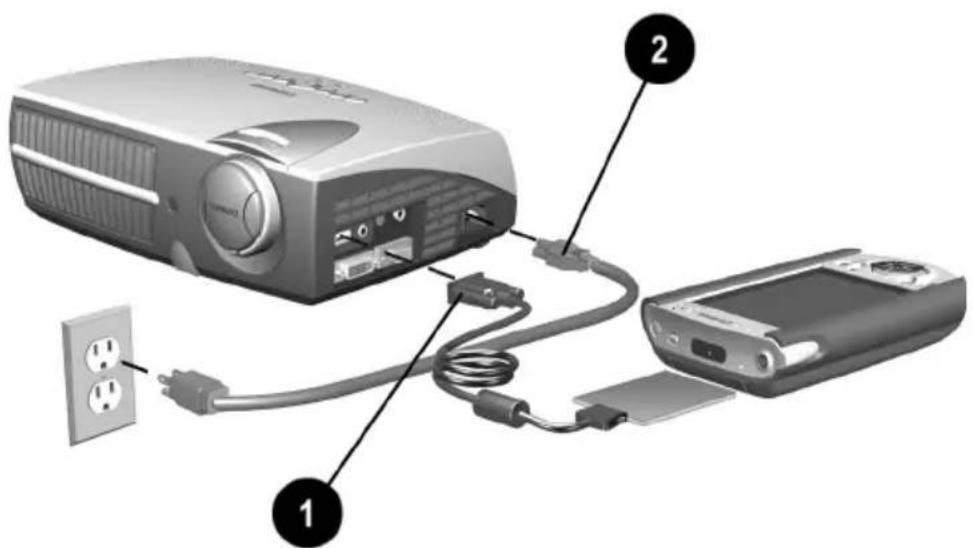
Connecting the Projector to a Compaq iPAQ Pocket PC
To connect the projector to a Compaq iPAQ Pocket PC, the Pocket PC must have a male connector adapter and a VGA-out PC Card with a 15-pin connector.

The VGA-out PC Card with the 15-pin connector is not included with the Compaq iPAQ Pocket PC. For information on purchasing the optional VGA-out PC Card, contact your Compaq authorized dealer or reseller. To locate a reseller near you, refer to the Worldwide Telephone Numbers booklet that came with your projector or, to purchase directly from Compaq, refer to the Compaq website at http://www.compaq.com/products/iPAQ.
- Connect one end of the signal cable ① into the side of the projector and connect the other end to the VGA-out PC Card. The VGA-out PC Card may be inserted into the PC slot on the Compaq Pocket PC before or after connecting the signal cable.

Be sure the signal cable aligns with the connector. Do not force the cable onto the connector or you may damage the signal cable or the projector.
- Connect one end of the power cord ② into the side of the projector, and the other end to an electrical outlet that is easily accessible and close to the projector.
Powering On the Projector
- Make sure the power cord and signal cable are securely connected.

Make sure the projector is perpendicular to the projection screen.
-
Remove the lens cap ① from the projector by pressing in on the tabs on either side of the lens cap and pulling it straight out.
-
Press the main power switch ② on the side of the projector and allow the projector to warm up for one to two minutes.
When the projector has warmed up, the Compaq startup screen displays and the LED on the Standby button ③ turns green.

- Power on your source (computer, Pocket PC, VCR, etc.) and launch the software application being used to display images on the projection screen. If applicable, press the Function key on the computer designated for external display.

If there is a long delay between the time the startup screen displays and the time the software application is launched, the lamp may shut off and the projector will automatically go into standby mode. If this happens, press the Standby button ③ to power on the lamp.

When the startup screen disappears, the video from the attached computer displays. If there is no incoming video, the “No Source Found. Please Check Signal Cable” message will display on the projection screen.
Powering Off the Projector
- Press the Standby button ① to turn off the projector lamp.
The message “Going to Standby” displays and the LED on the Standby button blinks amber.

Allow the projector to cool down for about five to ten minutes before turning it off.
- Turn off the main power switch ② on the side of the projector.

CAUTION: After the projector is turned off, wait at least 45 seconds before turning the projector back on. Failure to follow this caution can result in damage to the projector.
- Disconnect the power cord from the electrical outlet and the projector ③.

Adjusting the Projected Image
There are three ways to adjust the projected image:
■ Adjusting the projector height
■ Adjusting the image size
■ Adjusting the projector focus
Adjusting the Projector Height
The projector has a built-in elevator foot that can raise the projector approximately 1 inch (2.54 cm).

CAUTION: If the projector is mounted to a tripod, do not use the elevator foot.
To adjust the height:
- Raise the projector to the desired display angle, then press the elevator button ① to release the elevator foot ②.

- To lower the display angle, press the elevator button again and press down on the projector to lower it.

CAUTION: Failure to press the elevator button before adjusting the elevator foot can result in damage to the elevator mechanism.
The projector is capable of correcting for keystone (trapezoidal) distortion caused when the projector is tilted upward or downward from its normal horizontal position. This feature corrects keystoning by making the width of the top and bottom of the screen the same. Access this feature using the Image Control selection of the on-screen display (OSD) menu. Refer to Chapter 3, “Using the On-Screen Display Menu” for more information. The keystone effect can be corrected when the projector is tilted upward up to 30 degrees or downward up to 40 degrees.
Adjusting the Image Size
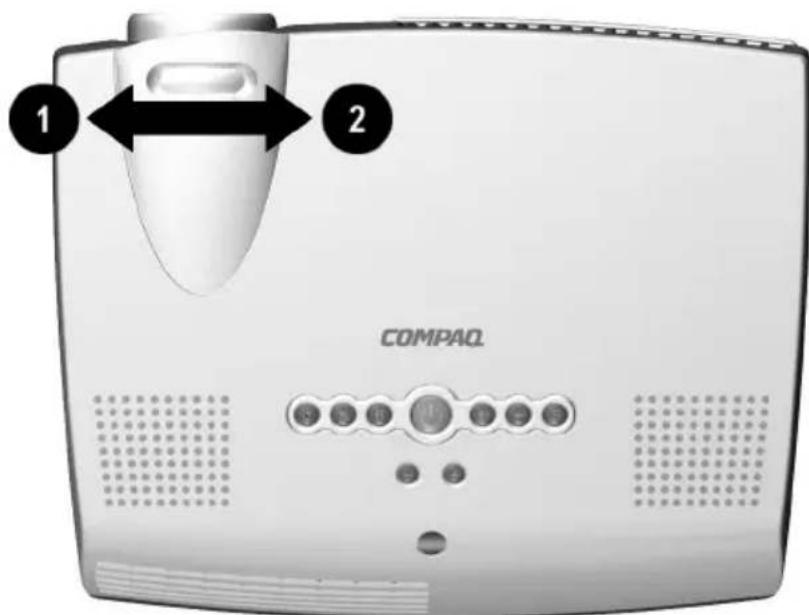
The projector zoom feature is capable of increasing the image size up to 20%. To increase the image size, turn the projector zoom ring toward the left ①. To decrease the image size, turn the projector zoom ring toward the right ②.
Adjusting the Projector Focus
To focus the projected image, rotate the focus ring ① until the image is clear. The projector will focus at distances from 3.7 feet (1.1 meters) to 40.7 feet (12.4 meters).
If vertical bars appear on the display after adjusting the focus, press the Resync button ② to automatically synchronize and track the display. If the button does not correct the display, use the Digital Conversion feature in the on-screen display menu to manually adjust the synchronization and tracking. Refer to Chapter 3, “Using the On-Screen Display Menu” for more information.

Image Size Adjustment
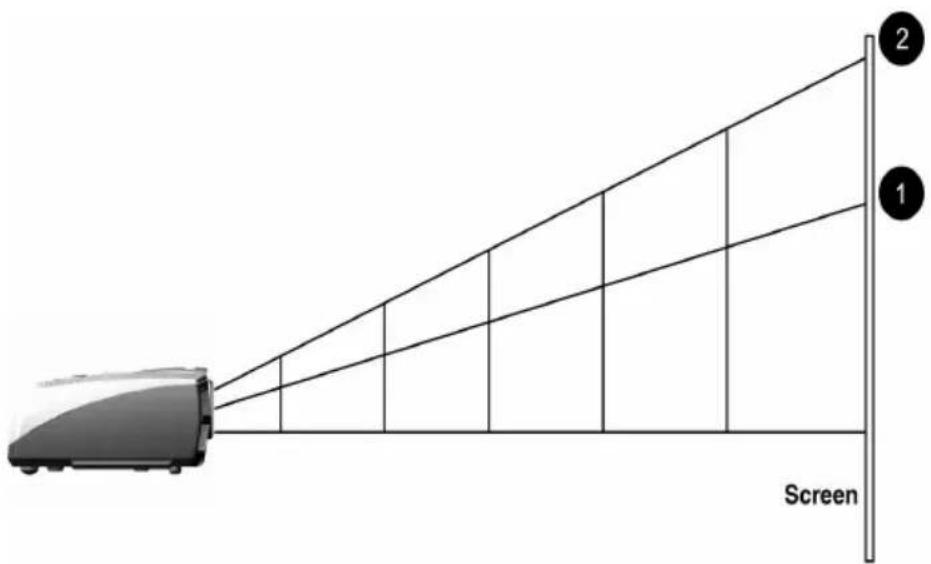
Projected Image Sizes at Minimum Zoom ①
| Screen Diagonal | 1.9' 0.6 m | 3.3' 1.0 m | 6.5' 2.0 m | 9.8' 3.0 m | 13.1' 4.0 m | 16.4' 5.0 m | 20.3' 6.2 m |
| Screen Width | 1.5' 0.5 m | 2.6' 0.8 m | 5.3' 1.6 m | 7.9' 2.4 m | 10.5' 3.2 m | 13.1' 4.0 m | 16.3' 5.0 m |
| Screen Height | 1.1' 0.3 m | 2.0' 0.6 m | 3.9' 1.2 m | 5.9' 1.8m | 7.9' 2.4 m | 9.8' 3.0 m | 12.2' 3.7 m |
| Projection Distance | 3.74' 1.1 m | 6.6' 2.0 m | 13.1' 4.0 m | 19.7' 6.0 m | 26.3' 8.0 m | 32.8' 10.0 m | 40.7' 12.4 m |
Projected Image Sizes at Maximum Zoom ②
| Screen Diagonal | 2.3' 0.7 m | 4.1' 1.3 m | 8.2' 2.5 m | 12.3' 3.8 m | 16.4' 6.0 m | 20.5' 6.3 m | 25.4' 7.8 m |
| Screen Width | 1.9' 0.6 m | 3.3' 1.0 m | 6.6' 2.0 m | 9.8' 3.0 m | 13.1' 4.0 m | 16.4' 5.0 m | 20.3' 6.2 m |
| Screen Height | 1.4' 0.4 m | 2.5' 0.8m | 4.9' 1.5 m | 7.4' 2.6 m | 9.8' 3.0 m | 12.3' 3.8 m | 15.3' 4.7 m |
| Projection Distance | 3.74' 1.1 m | 6.6' 2.0 m | 13.1' 4.0 m | 19.7' 6.0 m | 26.3' 8.0 m | 32.8' 10.0 m | 40.7' 12.4 m |

If the projector is used at the maximum distance in this chart, the display may appear to be dimmer than usual.
Using the On-Screen Display Menu
Introducing the On-Screen Display Menu
The adjustments for screen settings are located in the on-screen display (OSD) menu and can be viewed in one of the available languages.
Adjusting the On-Screen Display Menu
To launch and make adjustments to the OSD menu:
-
Press the Menu button ① on the projector or the remote control. The Main menu will display on the projection screen.
-
To select a function, press the Minus (-) button ② to scroll down the OSD menu. To reverse the scroll direction, press the Plus (+) button ③.
-
Highlight the function to be adjusted and press the Enter/Accept button ④.


There is no Enter/Accept button on the remote control. If you are using the remote control to operate the on-screen display menu, press the Menu button again to accept changes.

The bar on the bottom of the on-screen display menu shows the current operating resolution as well as horizontal and vertical frequency.
Sample On-Screen Display Menu Adjustment
Below is an example of how to operate the on-screen display menu.
- To select the Image Control function, press the Minus (-) button until Image Control is highlighted, then press the Enter/Accept button on the projector to display the level 2 menu for Image Control. The level 2 menu displays expanded menu items.
- To make a selection from the level 2 menu, press the Minus (-) button to scroll down the level 2 menu, or press the Plus (+) button to reverse the scroll direction.
- Highlight the selection and press the Enter/Accept button to confirm the selection. The level 3 menu displays.

There is no Enter/Accept button on the remote control. If you are using the remote control to operate the on-screen display menu, press the Menu button again to accept changes.
- Level 3 for Image Control functions display the adjustment scales. Use the Minus (-) button to decrease and the Plus (+) button to increase the screen Horizontal and Vertical positions.

Some menu functions display adjustment scales in the level 2 menu, while others display adjustment scales in the level 3 or level 4 menus.
-
After making the adjustment, select Save and Return. To void any changes made, select Cancel instead of Save and Return.
-
To save all current settings and immediately exit, press the Menu button on top of the projector.
or
To make changes before exiting, select Exit from the Main menu. If the display is a second-, third-, or fourth-level menu, select Save and Return or Cancel, then select Exit from the Main menu.

If the buttons remain untouched for 5 seconds, all current settings will be displayed and the on-screen display menu will exit.
On-Screen Display Menu Adjustments
| Main Menu Level 2 Menu Level 3 | ||
| Brightness Adjustment Scale | ||
| Contrast Adjustment Scale | ||
| Image Control Horizontal Position | Adjustment Scale | |
| Vertical Position | Adjustment Scale | |
| Clock | Adjustment Scale | |
| Clock Phase | Adjustment Scale | |
| Zoom | Zoom | |
| Panning Left-Right | ||
| Panning Up-Down | ||
| Save and Return | ||
| Cancel | ||
| Vertical Keystone | Adjustment Scale | |
| Flip Image | Horizontal | |
| Vertical | ||
| Both | ||
| Save and Return | ||
| Cancel | ||
| Save and Return | ||
| Cancel | ||
| Main Menu Menu Level 2 Menu Level 3 | ||
| Color 7100 K (default) | ||
| Custom Color | Red | |
| Green | ||
| Blue | ||
| Sharpness | ||
| Save and Return | ||
| Cancel | ||
| Video Adjustments | Saturation | |
| Sharpness | ||
| Tint | ||
| Save and Return | ||
| Cancel | ||
| Save and Return | ||
| Cancel | ||
| Language Deutsche | ||
| English | ||
| Español | ||
| Français | ||
| Italiano | ||
| Nederlands | ||
| Japanese | ||
| Chinese | ||
| Save and Return | ||
| Cancel | ||
On-Screen Display Menu Adjustments (Continued)
| Main Menu Level 2 Menu Level 3 | |
| Management Lamp Saver | On-Off |
| Lamp Hours | Display lamp hours |
| Horizontal OSD Position | Adjustment Scale |
| Vertical OSD Position | Adjustment Scale |
| OSD Timeout | Adjustment Scale |
| OSD Transparency | Adjustment Scale |
| Save and Return | |
| Cancel | |
| A/V & HDTV Control HDTV/Video | Fill to Screen |
| Fill to Aspect Ratio | |
| Center Image | |
| Color Space | RGB |
| Y Pb Pr | |
| Y Cb Cr | |
| Audio | Mute |
| Volume | |
| Bass | |
| Treble | |
| Save and Return | |
| Cancel | |
| Gamma | Adjustment Scale |
| Save and Return | |
| Cancel | |
| Input Source Select Analog RGB (VGA) | |
| Composite Video | |
| Super Video | |
| Component Video 480i | |
| HDTV 480p 720p 1080i | |
| Digital RGB (DVI) | |
On-Screen Display Menu Adjustments (Continued)
Main Menu Menu Level 2 Menu Level 3
Factory Reset Yes
No
Exit
Explaining Functions in the On-Screen Display Menu
■ Brightness—Adjusts the displayed image brightness. The default brightness value is 50%, and the settings range from 0 to 100. Press the Minus (-) button to darken the image. Press the Plus (+) button to lighten the image.
■ Contrast—Adjusts the displayed image contrast by changing the amount of black and white in the image. The default contrast value is 50%, and the settings range from 0 to 100. Press the Minus (-) button to decrease the contrast. Press the Plus (+) button to increase the contrast.
■ Image Control—Improves picture stability of user modes by adjusting:
☐ Horizontal and Vertical Position—Fine-tunes the horizontal and vertical positions of the display.
☐ Clock—Increases/decreases the value to stretch or shrink the image on the screen. This selection is not available when a source is connected to the DVI connector.
☐ Clock Phase—Increases/decreases the value to minimize video distortion or video jitter. This selection is not available when a source is connected to the DVI connector.

If the projector image becomes distorted when adjusting the Clock and Clock Phase values, continue adjusting the values until the distortion disappears. To restore the factory settings, select Factory Reset in the on-screen display menu, or press the Resync button.
☐ Zoom—Magnifies an image up to a factor of 32 on the projection screen (zooms in to a specific area on the screen, and pans left, right, up, and down).
☐ Vertical Keystone—Adjusts image distortion at the top and bottom widths of the screen caused by tilting the projector.
☐ Flip Image—Allows the projected image to be rotated.
■ Color—Adjusts color balance to compensate for ambient conditions using three submenus:
☐ 7100 K—Factory default
☐ Custom Color—Modifies the color temperature balance. Displayed only when VGA sources are displayed. You can independently adjust the red, green, and blue colors using this selection.

If Custom Color is modified and saved, this selection will not be reset if the Factory Reset selection is later used. To restore factory color settings, select 7100 K.
☐ Video Adjustments—Modifies the color intensity. Displayed only when video sources are displayed.
■ Language—Allows you to change the on-screen display to one of the languages in their native spelling. The current language is highlighted. Select another language to display all menu functions in that language.
■ Management—Allows you to control lamp saver characteristics of the display, view the cumulative lamp hours, or set the OSD horizontal and vertical position, timeout, and transparency.

By default, the OSD menu is on top of the displayed image. Selecting OSD Transparency from the Management menu allows you to adjust this setting so the displayed image can be seen behind the OSD menu. Changes can be seen as they are being made.
■ A/V & HDTV Control—Allows you to stretch the format to fill the screen or to use the original aspect ratio and fill the screen, using HDTV (High Definition Television) format. Refer to the “HDTV Modes” section of Chapter 6 for more information. Also allows color space selection, audio preference selection, and Gamma adjustment.
■ Input Source Select—Allows you to select which source to display. If the selected source is not available, the original source will be displayed again. You may also cycle through available sources by pressing the Source button on the projector or the remote control.
■ Factory Reset—Resets all previously saved user settings to the original factory settings.
Special On-Screen Messages
Special on-screen messages will appear on the projection display to identify the following conditions:
■ No Source Found. Please Check Signal Cable—Indicates the video cable may not be plugged into the projector or the selected video input is not accurate.
■ Input Signal Out of Range. Please Change Display Mode—Indicates the projector is unable to access the appropriate input signal.
■ Going to Standby—Indicates the projector is entering a sleep mode or is powering off the lamp.
■ Adjusting—Indicates the Resync button has been pressed or the Factory Reset option has been selected from the OSD menu. The message will disappear when the appropriate mode is detected and displayed by the projector.
■ Multiple inputs are active. Use the OSD to select the alternate sources—The projector has detected multiple inputs. This message may appear when powering up, returning from Standby, or when the Source button is pressed on the projector or remote control. If no selection is made within 10 seconds, the currently displayed source will remain as the active source. Press the Source button on top of the projector or on the remote control to review and select from the active video sources.
Lamp May Fail Soon. Replacement Suggested—Indicates the lamp is approaching failure. The message will remain on the screen for 10 seconds or until the on-screen menu Enter/Accept button is pressed. This message appears once when powering up or returning from Standby until the lamp is replaced. After the lamp is changed, access the Service menu to reset the lamp hours counter. Refer to the “Replacing the Lamp Module” section of Chapter 7 for information on resetting the lamp hours counter.

The 10-second timeout is the default value. To change the timeout value, select the Management menu, select the OSD Timeout menu, and change the timeout from 1 to 40 seconds.
Using the Tripod Mount and Ceiling Mount
Using the Tripod Mount
The Compaq Microportable Projector includes standard tripod mount capability on the bottom of the projector. This allows the projector to be mounted on tripods readily available at camera and other electronic stores.

WARNING: The tripod should be capable of supporting a weight of at least seven pounds. Refer to the owner's manual that came with your tripod for more information.

CAUTION: Do not overtighten the tripod mount screw. Doing so could strip the screw and cause the projector to fall off the tripod.
To connect the projector to the tripod:
-
If necessary, remove the tripod mounting block from the tripod.
-
If there is a guide pin on the tripod mounting block, align it with the guide pin hole ① on the bottom of the projector.
-
Attach the tripod mounting block to the tripod mount hole ② on the bottom of the projector.

- Attach the projector and tripod mounting block to the tripod according to the tripod manufacturer's instructions.

natural_image
Illustration of a projector mounted on a tripod stand (no text or symbols visible)Using the Ceiling Mount
The projector also includes ceiling mount capability on the bottom of the projector. This allows the projector to be mounted from the ceiling using any ceiling mount bracket that matches the screw hole configuration on the projector.

An optional ceiling mount bracket with the correct screw hole configuration is available from Compaq. The kit also includes 20 foot cables. For information on purchasing the optional ceiling mount bracket kit, call your Compaq authorized dealer or reseller. To locate a reseller near you, refer to the Worldwide Telephone Numbers booklet that came with your projector or, to purchase directly from Compaq, refer to the Compaq website at http://www.compaq.com/products/projectors.

WARNING: The ceiling mount bracket should be capable of supporting a weight of at least seven pounds. Refer to the owner's manual that came with your ceiling mount bracket for more information.

CAUTION: Do not overtighten the ceiling mount screws. Doing so could strip the screws and cause the projector to fall off the ceiling mount bracket.
To use the projector with a ceiling mount bracket:
- Carefully turn the projector upside down.
- Line up the screw holes on the projector ① with the screw holes on the ceiling mount bracket.
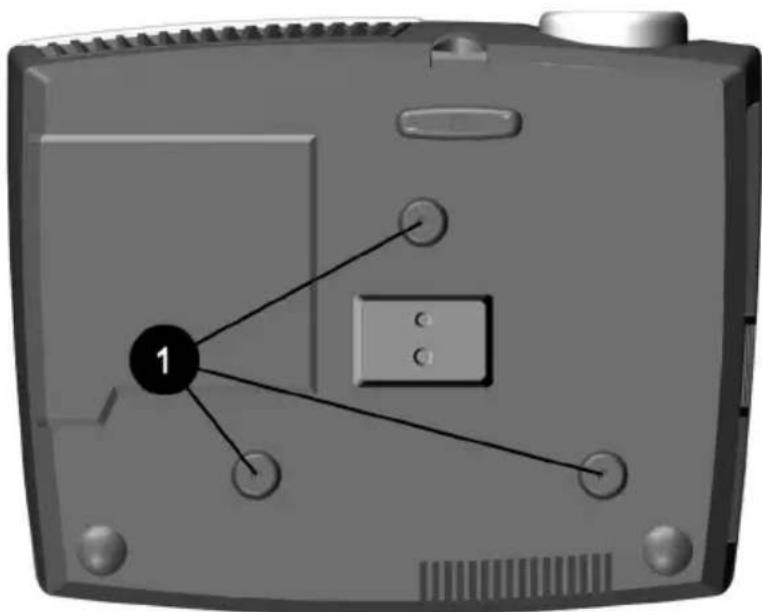
- Tighten the screws.
- Connect any necessary cables.
- Access the on-screen display menu and select Image Control. Then select Flip Image.

Refer to Chapter 3, “Using the On-Screen Display Menu” for more information.
- Select Save and Return.

natural_image
3D rendering of a mechanical device with a mounted component and cylindrical base (no visible text or symbols)Using the Remote Control
The optional remote control has many convenient features. It combines the functions of the projector buttons with some of the most widely used functions of the computer mouse.
Before using the remote control, be sure steps 1 through 3 have been completed under “Powering On the Projector” in Chapter 2.

WARNING: To reduce the risk of injury to the eyes, do not look directly into the remote control laser light and do not point the laser light into anyone's eyes. The remote control is equipped with a Class II laser that emits radiation.
Identifying the Remote Control Components

Identifying the Remote Control Components
| Item Component Function | |
| 1 | LED Glows green when the remote control is operating |
| 2 | Mouse Ball Controls the on-screen cursor and alternate left-mouse functions |
| 3 | System on/Standby buttonTurns the projector on and off OR powers the projector into and out of Standby mode |
| 4 | Source button Selects the input source |
| Identifying the Remote Control Components (Continued) | |
| Item Component | Function |
| 5 Page up button Scrolls projected image up | |
| 6 Laser pointer Allows laser pointer functionality | |
| 7 Zoom in button Zooms in to a specific area on the screen | |
| 8 Zoom out button Zooms out to include a larger screen area | |
| 9 On-screen Menu button Launches the on-screen display menu | |
| 10 Right mouse button Controls right mouse functions | |
| 11 Page down button Scrolls projected image down | |
| 12 Mute button Mutes or silences the speaker on the projector | |
| 13 Volume + Increases speaker volume | |
| 14 Volume - Decreases speaker volume | |
| 15 Resync button Re-synchronizes the projector with the input source | |
| 16 On-screen menu adjustments + | Adjusts the on-screen display menu up |
| 17 On-screen menu adjustments - | Adjusts the on-screen display menu down |
| 18 Left mouse trigger Controls left mouse functions | |
| 19 Battery compartment | Holds batteries needed for remote control operation |

The Mouse ball, Page Up, Page Down, Right Mouse, and Left Mouse functions of the remote control will not work unless a desktop or notebook computer is connected to the projector with the USB cable. These functions are not available when a Compaq iPAQ Pocket PC is connected to the projector.

Follow the instructions in the “Adjusting the On-Screen Display Menu” section of Chapter 3 to make adjustments to the on-screen display menu.
Remote Control Functions
The remote control performs the following functions:
■ Duplicates the functions of the projector buttons including adjusting the on-screen buttons.
■ Controls the computer connected to the projector by navigating through the computer directories and opening and closing files.
The remote control will work up to 21.0 feet (6.4 meters) from the projector when pointed at the sensor.
To operate a computer using the remote control, the USB cable (included with the projector) must be used. Connect one end of the USB cable to the USB connector on the projector and the other end to the USB connector on the computer.

natural_image
Two devices connected by a cable, one showing a laptop and the other a projector (no text or symbols visible)
Microsoft Windows XP, Windows ME, Windows 2000, and Windows 98 support USB connection. Microsoft Windows NT does not support USB connection.
Using the Home Theater Kit
The Compaq Microportable Projector has been designed to integrate the video decoding functionality into the projector itself. The optional Home Theater kit uses this video decoding functionality to offer a complete home theater solution.
The optional Home Theater Kit is not included with the Compaq Microportable Projector. For information on purchasing the optional Home Theater Kit, call your Compaq authorized dealer or reseller. To locate a dealer or reseller near you, refer to the Worldwide Telephone Numbers booklet that came with your projector or, to purchase directly from Compaq, refer to the Compaq website at http://www.compaq.com/products/projectors.
Contents of the Home Theater Kit
The home theater kit contains five cables:
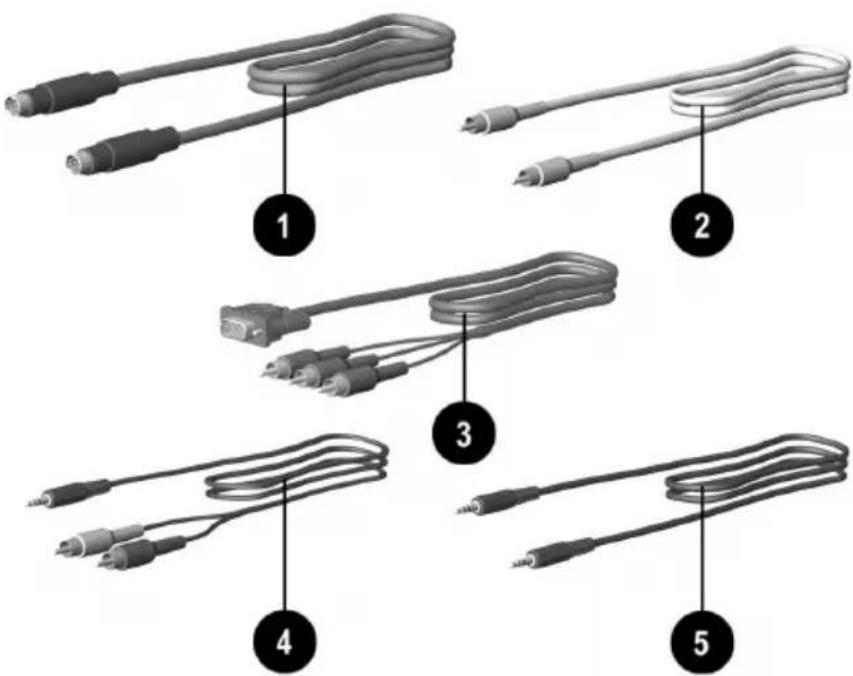
① S-video cable—connects the projector to a video source with super video capabilities (e.g., DVD player, video cassette recorder, laser disc player, camcorder, satellite dish receiver, etc.) using an S-video connector.
② Composite video cable—connects the projector to a video source without super video capabilities (e.g., videocassette recorder) using a composite video connector.
③ VGA-to-HDTV/Component video cable—connects the projector to a video source for high quality video playback. The component video cable connects directly to a standard VGA connector. In addition, this cable can be used to connect the projector to a High Definition TV (HDTV) source. For details on HDTV support, refer to “HDTV Modes” later in this chapter.
4 Home Theater audio cable—connects a home theater device with stereo speakers to the projector.
⑤ PC audio cable—connects a personal computer with a single audio input connector to the projector.
Connecting a DVD Player
-
Connect one end of the S-video cable ① to the DVD player.
-
Connect the other end of the S-video cable to the S-video connector on the Input/Output Panel on the projector ②.

- Connect one end of the power cord into the side of the projector and the other end to an electrical outlet that is easily accessible and close to the projector.
Connecting a Videocassette Recorder (VCR)
-
Connect one end of the composite video cable ① to the VCR
-
Connect the other end of the composite video cable to the composite video connector on the Input/Output Panel on the projector ②.

- Connect one end of the power cord into the side of the projector and the other end to an electrical outlet that is easily accessible and close to the projector.
Connecting a Camcorder
-
Connect one end of the S-video cable ① to the camcorder.
-
Connect the other end of the S-video cable to the Input/Output Panel on the projector ②.

- Connect one end of the power cord into the side of the projector and the other end to an electrical outlet that is easily accessible and close to the projector.
Connecting an HDTV Device
-
Connect one end of the VGA-to-HDTV/component video cable ① to the HDTV device.
-
Connect the other end of the VGA-to-HDTV/component video cable to the VGA connector ② on the Input/Output Panel on the projector.
-
Connect the dual end of the Home Theater audio cable to the HDTV device ③.
-
Connect the single end of the Home Theater audio cable to the audio connector on the Input/Output Panel on the projector ④.
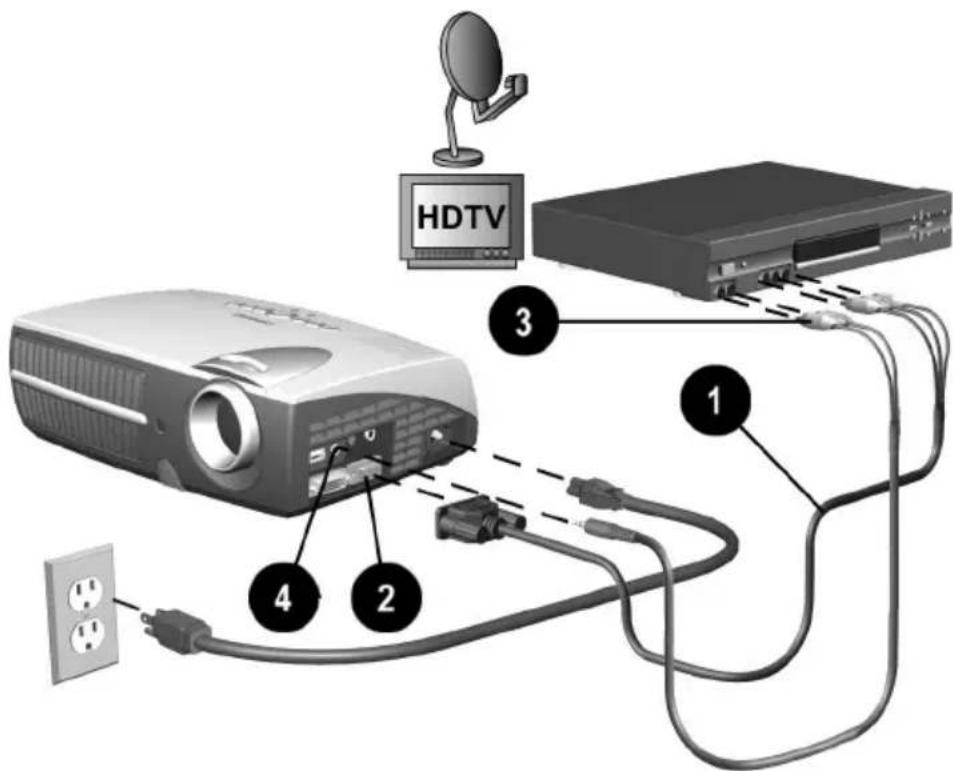
- Connect one end of the power cord into the side of the projector and the other end to an electrical outlet that is easily accessible and close to the projector.
Connecting a Personal Computer (PC)
-
Connect one end of the VGA cable that came with the projector to the VGA connector ① on the Input/Output Panel on the projector.
-
Connect the other end of the VGA cable to the PC ②.
-
Connect one end of the PC audio cable to the PC ③.
-
Connect the other end of the PC audio cable to the audio connector on the Input/Output Panel on the projector ④.
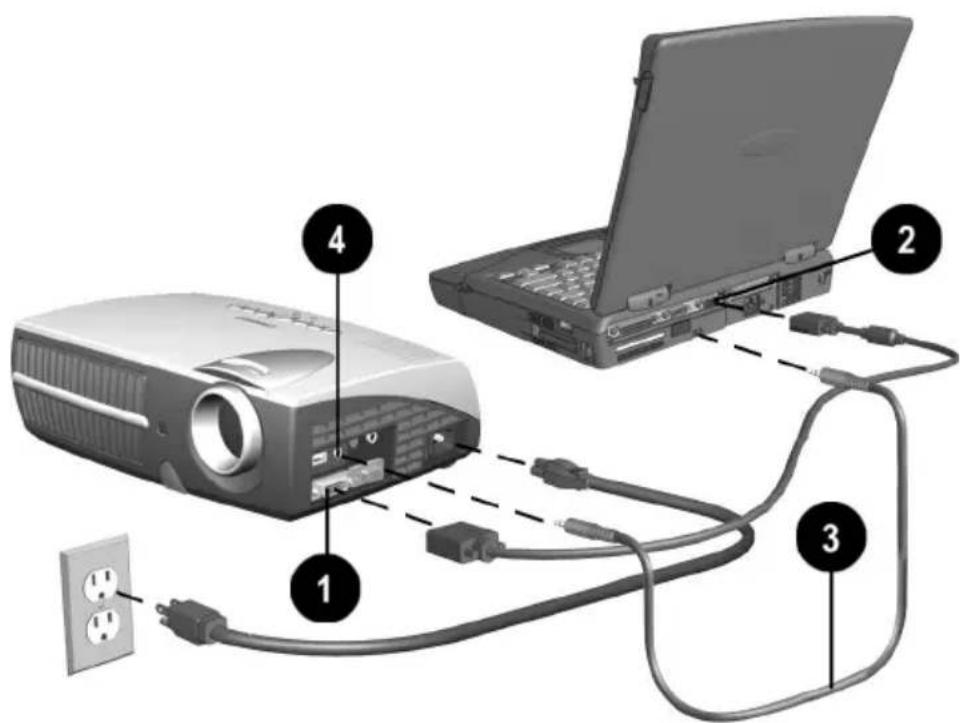
- Connect one end of the power cord into the side of the projector and the other end to an electrical outlet that is easily accessible and close to the projector.
HDTV Modes
The Compaq Microportable Projector is capable of displaying various High Definition TV (HDTV) display modes. A variety of sources can be used to provide HDTV data to the projector for display. Some of these sources are:
■ Digital-VHS (D-VHS) player
■ HDTV-DVD player
■ Satellite Dish HDTV receiver
■ A variety of DTV tuners (to receive programming over the airwaves)
■ Game stations
Most of these sources will provide an analog component video output, a standard VGA output, or a standard digital DVI output. The color information can be either in YPrPb (default) format or RGB format. The user can switch between these using the on-screen display menu adjustments by selecting “A/V & HDTV Control.” Refer to “Introducing the On-Screen Display Menu” in Chapter 3 for more information.
The projector is capable of processing HDTV data provided either on the standard VGA connector or the DVI interface. Use the VGA-to-HDTV/Component video cable that comes with the optional Home Theater Kit to feed the component outputs to the VGA input connector.
The following modes are supported on the DVI interface:
HD0
640 x 480p
□ 1280 x 720p
■ HD1—1920 x 1080i
When displaying HDTV content, it is recommended that you display it in its native 16:9 widescreen mode. For this, you may need to select the HDTV Fill to Aspect Ratio mode on the projector to preserve the height-to-width relationship of the material. Note that in this mode, you will have black stripes on top and bottom of the projected image, just as you see on a standard TV set when viewing widescreen content.
A desktop or notebook computer can also be used to generate a HDTV video stream. Capable computers should be able to read/acquire the HDTV data and blend it into the desktop graphics. The composite image is then sent to the projector for display. In this case, the projector displays the image at the standard 4:3 aspect ratio, just as it would any other computer graphics mode. The projector processes the data as it comes from the computer.
When displaying HDTV content in a window as part of your desktop environment, it is recommended to project it in the computer's native 4:3 mode since the computer has already embedded the HDTV video stream in widescreen format within the window. To do so, you may need to select the Fill to Screen mode on your projector to preserve the height-to-width relationship of the material.
Regardless of the source, the HDTV formats are generally of higher resolution than that of the projector (XGA, or 1024 x 768). Therefore, the projector will normally downscale the HDTV data to fit the complete image within the displayable 1024 x 768 resolution.
Care and Maintenance
This section explains how to care for and maintain your Compaq projector during normal everyday use.
Protecting the Projector
To protect your projector from overheating and other types of damage, follow these suggestions:
■ Use only a power source and connection appropriate for this projector as indicated on the product label located on the bottom of the projector on the elevator foot.
- Do not overload an electrical outlet, power strip, or convenience receptacle. The overall system load must not exceed 80 percent of the branch circuit rating. If an extension cord or power strip is used, make sure that the cord or strip is rated for the product and that the total ampere ratings of all products plugged into the extension cord or power strip do not exceed 80 percent of the extension cord or strip ampere ratings limit. Refer to the product label located on the bottom of the projector on the elevator foot.
■ Install the projector near an outlet that you can easily reach. Disconnect the power cord by grasping the plug firmly and pulling it from the electrical outlet.
■ Unplug the projector from the wall outlet before cleaning. Do not use liquid cleaners or aerosol cleaners.
■ Slots and openings in the cabinet are provided for ventilation. These openings must not be blocked or covered. Never push objects of any kind into cabinet slots or other openings.
■ Do not drop the projector or place it on an unstable surface.
■ Do not expose the projector to rain or moisture.
■ Do not allow anything to rest on the power cord. Do not walk on the cord.
■ Do not allow the projector to be exposed to high temperatures.
- Do not open the projector or attempt to service this product for any reason other than to replace the lamp module. Adjust only those controls that are covered by the operating instructions. If the projector is not operating properly or has been dropped or damaged, contact your Compaq authorized dealer, reseller, or service provider.
Cleaning the Lens
To minimize the risk of damaging or scratching the lens surface, follow this cleaning procedure. First, remove any dust particles from the lens by blowing them off with clean, dry, deionized air. However, this may not be a convenient method, and an alternate method is described below.
To clean the lens, use only a clean cloth and follow these steps:

CAUTION: Do not spray any type of fluid or cleaner directly on the lens surface. Do not use liquid cleaners.
-
Wipe the lens in a single direction with a clean, dry cloth. Do not wipe back and forth across the lens surface.
-
If the cloth is dirty or smears the lens, wash the cloth. If the cloth is still dirty after washing it or the fabric is damaged, replace it.

Do not use fabric softener when washing a cleaning cloth or softener sheets when drying the cloth.

CAUTION: Do not store a cleaning cloth in contact with the lens for a long time as doing so may contaminate the lens with dye from the cloth. The cloth can be contaminated if left in the open air.
Replacing the Projector Lamp Module

WARNING: When the lamp reaches its end of life, it may pop or rupture. To reduce the risk of personal injury, be careful when removing the lamp cover as broken glass may be present. Never open the lamp cover while the projector is operating or when the lamp is hot.
The projector will alert you when the lamp approaches its failure mode or end of life. When the message “Lamp May Fail Soon. Replacement Suggested” displays on the projection screen, you should change the lamp as soon as possible. Contact your local Compaq authorized dealer, seller, or reseller to purchase a spare lamp or have the lamp changed. To locate a reseller near you, refer to the Worldwide Telephone Numbers booklet that came with your projector. You can also purchase a lamp directly through http://www.compaq.com/products/projectors.
Follow these steps to replace the projector lamp module:
- Turn off the main power switch on the side of the projector.
- Allow the projector to cool down for at least 30 minutes.

WARNING: The lamp assembly operates at a very high temperature. To reduce the risk of personal injury, allow the projector to cool down for at least 30 minutes before opening the lamp cover. Never open the lamp cover while the projector is operating or when the lamp is hot.
- Disconnect the power cord.
- Turn the projector upside down.
-
Remove the cover ②.
-
Use a Phillips screwdriver to remove the two screws ① from the lamp cover.
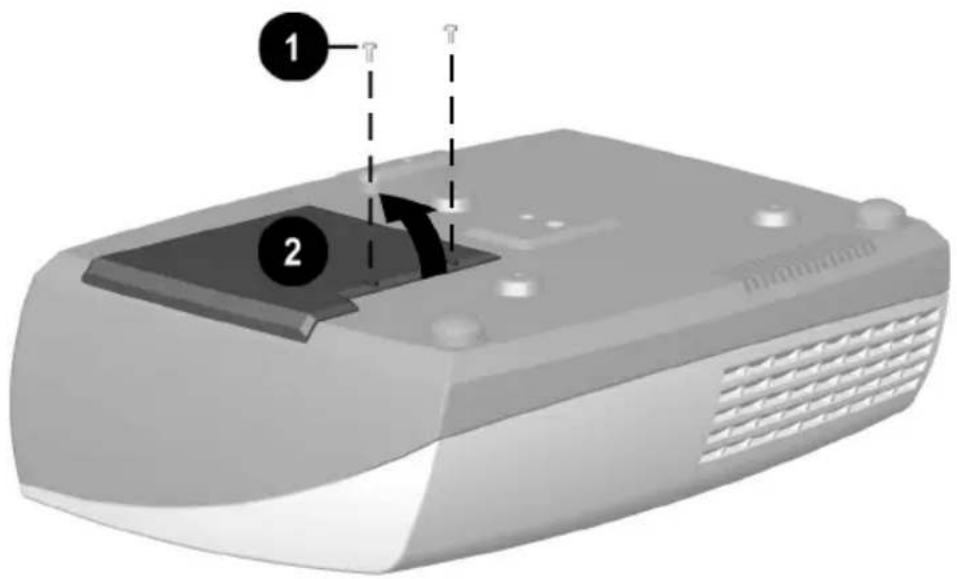
-
Remove the three screws from the lamp module ③.
-
Pull the lever up ④ and pull the lamp module straight out of the projector ⑤.


WARNING: To reduce the risk of personal injury, do not drop the lamp module or touch the glass bulb. The glass may shatter and cause an injury if it is dropped.
Reverse the previous steps to replace the lamp module.

WARNING: The lamp contains < 0.125 percent mercury by weight. If the projection lamp breaks, the mercury may be released into the atmosphere. Please follow applicable federal, state, and local regulations for disposal and/or recycling.
After the lamp module has been replaced, reset the lamp hours in the on-screen display menu to prevent the “Lamp May Fail Soon. Replacement Suggested” message from appearing again. To reset the lamp hours:
- Be sure the projector is turned off.
- Make sure all connections except the power cable are disconnected.
- Press and hold the Menu button on top of the projector while turning the projector on. "Service" will now be displayed as an option in the Main menu.
- Select Service and press the Enter/Accept button on the top of the projector.
- Select Reset Lamp Hours from the Service menu and press the Enter/Accept button.
- Select Yes from the Confirm Reset menu and press the Enter/Accept button.
- Select Save and Return.
Troubleshooting
Troubleshooting
| Problem Solutions | |
| Image does not appear on the projection screen | 1. Make sure the projector is powered on.2. Ensure the lens cap has been removed.3. Press the Standby button again.4. Ensure that the power cable is securely connected.5. Ensure the pins on the connectors are not crooked or broken.6. Turn off or disable the notebook or desktop computer screen saver function.7. Ensure the projector lamp has been securely installed.8. Ensure your notebook computer's external video port is turned on. Toggle the Fn + F4 function keys.Activate CRT/LCD “ON” at the same time. To identify any alternate function keys to be used, refer to your notebook computer's user manual. |
| Scrolling, cut-off, or incorrect image displayed | 1. Press the Resync button.2. Turn everything off, then power on the projector first and power on the notebook or desktop computer second.3. If the above steps do not correct the display image, adjust the resolution of the notebook or desktop computer to 1024 x 768.4. Access the OSD and ensure the Zoom mode is set to 1. For more information on using the OSD, refer to Chapter 3, “Using the On-Screen Display Menu.” |
| Image is flickering or unstable Press the Resync button on the projector panel to adjust the tracking. If that does not stop the flickering, adjust the Clock Phase function in the Image Control menu. | |
Troubleshooting (Continued)
| Problem Solutions | |
| Notebook computer or iPAQPocket PC screen is not displaying the presentation | Notebook computer:Most notebook computers have a monitor loop-through or simultaneous viewing function. Press the Fn + F4function keys on the notebook computer to switch the image from the notebook screen to the projection screen or to toggle through the following three options:1. LCD: Output displays only on the notebook screen.2. CRT: Output displays only on the projection screen.3. CRT/LCD: Output displays on the notebook screen and the projection screen.Activate CRT/LCD “ON” at the same time. To identify any alternate function keys to be used, refer to your notebook computer’s user manual.Mac PowerBooks:1. To control video mirroring, click Control Panel > Display, then set Video Mirroring to ON for both internal and external viewing.2. Set Video Mirroring OFF for image on external monitor only or internal only, depending on monitor selection in Monitors. |
| Image is out of focus 1. Adjust the Focus Ring on the projection lens.2. Make sure the projection screen is within the required distance (3.7 to 40.7 feet, 1.1 to 12.4 meters) from the projector.3. Check the projection lens to see if it needs cleaning. Follow the “Cleaning the Lens” procedures in Chapter 7 to clean the lens. | |
| Projected colors do not match computer or camcorder color | 1. Adjust the Brightness, Contrast, or Color functions in the on-screen display menu. Refer to Chapter 3, “Using the On-Screen Display Menu” for more information.2. Make sure the pins on the cable connectors are not bent or broken. |
| Black or gray border visible outside the usable area of the projection screen | The black border surrounding the active area of the projection screen is part of the total projected image; however, it is an inactive area and cannot display any part of the image. This black border reduces the amount of extraneous light, producing a cleaner, sharper image. |
| When the projector is in HDTV mode, the colors are incorrect | Access the on-screen display menu, select A/V & HDTV Control, select Color Space, then change to the correct color space. Refer to Chapter 3, “Using the On-Screen Display Menu” for more information. |
| Only the Compaq startup screen displays | 1. Check that the cables are connected securely.2. Verify that the proper input source is connected.3. Make sure your notebook computer's external video port is activated. |
| A blue screen displays on the projection screen when a videocassette recorder, DVD player, or other video source is connected to the projector | 1. Check the Play or TV/Video buttons on the video source.2. If that does not work, refer to the owner's manual that came with the video source. |
| Screen is dimmer than normal The projector is in lamp saver mode.Press the lamp saver button on the top of the projector to turn lamp saver on or off. If the LED is green, lamp saver is on.If the LED is not lit, lamp saver is off. | |
| Lamp shuts off 1. If the Standby LED flashes green,the projector has overheated and will automatically shut down. Wait five to ten minutes until the LED stops flashing and theStandbybutton turns amber before restarting the projector again.2. A minor power surge may cause the lamp to shut off. Wait a few minutes, then turn it back on.3. When the lamp has reached the end of its life, the system will automatically turn off to prevent possible lamp rupture. Replace the lamp as described in the “Replacing the Lamp Module” section of Chapter 7. | |
| Lamp burns out or makes a popping sound | When the lamp reaches its end of life, it will burn out and may make a loud popping sound. If this happens, the projector will not turn back on until the lamp module has been replaced.Contact your local Compaq authorized dealer, seller, or reseller to purchase a replacement lamp module. To replace the lamp, follow the procedures in the “Replacing the Projector Lamp Module” section of Chapter 7. |
| Projector suddenly shuts down and the power button LED blinks rapidly | An over-temperature event has been detected. This usually occurs when either the airflow to the unit has been obstructed or a fan has failed. If airflow is obstructed, remove the obstruction, unplug the projector, re-plug the projector, and restart. If a fan has failed or an over-temperature event occurs a second time, have the projector serviced or repaired. |
| Speaker does not operate 1. Make sure the audio cable is correctly connected to the projector and the audio source.2. Make sure the audio source is operating properly.3. Make sure theMutebutton on both the remote control and the audio source is off. | |
| Remote control does not operate 1. Ensure the remote control is pointed at the sensor and is within 21.0 feet (6.4 meters) of the projector.2. The two AAA batteries may need to be replaced.3. Verify that the batteries are installed properly. | |
| Remote mouse does not operate computer | Make sure the USB cable is connected to both the computer and the projector. |
| Compatibility issues with equipment attached to the projector | Contact your Compaq authorized service provider or call Compaq Customer Support for help. Refer to the Worldwide Telephone Numbers booklet included in the projector documentation kit for a complete list of customer support numbers to call. |
| Image size is too small or too large 1. Adjust the digital zoom or move the camera until the image is the desired size.2. The projector may be set to display in the center of the display area without any expansion. To change the setting, access the on-screen display menu, select A/V & HDTV Control, select HDTV/Video, then select how the image should be shown in the display area. Refer to Chapter 3, “Using the On-Screen Display Menu” for more information. | |
| The image is upside down or a mirror image is displayed | The projector has been set for operation in rear screen mode or ceiling mount mode. To display the image properly, access the on-screen display menu, select Image Control, select Flip Image, then restore the displayed image to the correct setting. Refer to Chapter 3, “Using the On-Screen Display Menu” for more information. |
| The desired source is not displayed | Press the Source button on top of the projector to review and select from the active video sources. |
Agency Regulatory Notices
Federal Communications Commission Notice
This equipment has been tested and found to comply with the limits for a Class B digital device, pursuant to Part 15 of the FCC Rules. These limits are designed to provide reasonable protection against harmful interference in a residential installation. This equipment generates, uses, and can radiate radio frequency energy and, if not installed and used in accordance with the instructions, may cause harmful interference to radio communications. However, there is no guarantee that interference will not occur in a particular installation. If this equipment does cause harmful interference to radio or television reception, which can be determined by turning the equipment off and on, the user is encouraged to try to correct the interference by one or more of the following measures:
■ Reorient or relocate the receiving antenna.
■ Increase the separation between the equipment and the receiver.
■ Connect the equipment into an outlet on a circuit different from the circuit that the receiver is connected.
- Consult the dealer or an experienced radio or television technician for help.
Modifications
The FCC requires the user to be notified that if any changes or modifications are made to this device, not expressly approved by Compaq Computer Corporation, this may void the user's authority to operate the equipment.
Cables
Connections to this device must be made with shielded cables with metallic RFI/EMI connector hoods to maintain compliance with FCC Rules and Regulations.
Declaration of Conformity for Products Marked with the FCC Logo-United States Only
This device complies with Part 15 of the FCC Rules. Operation is subject to the following two conditions: (1) this device may not cause harmful interference, and (2) this device must accept any interference received, including interference that may cause undesired operation.
For questions regarding your product, contact:
Compaq Computer Corporation
P.O. Box 692000, Mail Stop 530113
Houston, Texas 77269-2000
Or, call 1-800-652-6672 (1-800-OK COMPAQ)
For questions regarding this FCC declaration, contact:
Compaq Computer Corporation
P.O. Box 692000, Mail Stop 510101
Houston, Texas 77269-2000
Or, call (281) 514-3333
To identify this product, refer to the Part, Series, or Model number found on the product.
Canadian Notice
This Class B digital apparatus meets all requirements of the Canadian Interference-Causing Equipment Regulations.
Avis Canadien
Products bearing the CE Marking comply with the EMC Directive (89/336/EEC) and the Low Voltage Directive (73/23/EEC) issued by the Commission of the European Community and if this product has telecommunication functionality, the R&TTE Directive (1999/5/EC).
Compliance with these directives implies conformity to the following European norms (in parentheses are the equivalent international standards and regulations):
■ EN 55022 (CISPR 22)—Electromagnetic Interference
■ EN55024 (IEC6100-4-2, 3, 4, 5, 6, 8, 11)—Electromagnetic Immunity
■ EN61000-3-2 (IEC6100-3-2)—Power Line Harmonics
■ EN61000-3-3 (IEC61000-3-3)—Power Line Flicker
■ EN 60950 (IEC 60950)—Product Safety
Japanese Notice
The projector power supply is provided with Automatic Line Switching (ALS). This feature allows the projector to operate on input voltages between 100–120V or 200–240V.
The power cord set (flexible cord or wall plug) received with the projector meets the requirements for use in the country where you purchased the equipment.
If you need to obtain a power cord for a different country, you should purchase a power cord that is approved for use in that country.
The power cord must be rated for the product and for the voltage and current marked on the product electrical ratings label. The voltage and current rating of the cord should be greater than the voltage and current rating marked on the product. In addition, the diameter of the wire must be a minimum of 0.75 mm2 or 18AWG, and the length of the cord must be between 6 feet (1.8m) and 12 feet (3.6m). If you have questions about the type of power cord to use, contact your Compaq authorized service provider.
A power cord should be routed so that it is not likely to be walked on or pinched by items placed upon it or against it. Particular attention should be paid to the plug, electrical outlet, and the point where the cord exits from the product.
Specifications
Compaq iPAQ Microportable Projector
| Projection Resolution XGA 1024 x 768 x 1 | |
| Maximum Graphics Resolution SXGA 1280 x 1024 at 75 Hz | |
| Lumen Output 2,000 lumens (1,600 in lamp saver mode) | |
| Lamp Type 200 watt High Brightness Lamp | |
| Image Size See the Image Size Adjustment table in Chapter 2. | |
| Avg. Lamp Life in Hours 1,000 hours (maximum brightness) 1,500 hours (lamp saver mode) | |
| Projection Distance 3.7 to 40.7 feet (1.1 to 12.4 meters) | |
| Maximum Weight (unpacked) 5.8 lb. (2.6 kg) (without cables) | |
| Maximum Dimensions 10.9 in (w) x 8.9 in (h) x 3.3 in (d) 277 mm (w) x 225 mm (h) x 85 mm (d) | |
| Noise Level 36 dB (34 dB in lamp saver mode) | |
| Displayable Colors 16.7 million colors | |
| Horizontal Frequencies 15–100 kHz | |
| Vertical Frequencies | 30–100 Hz |
| Power Source | 90-265 VAC, 50-60 Hz |
| Power Consumption < 250 watts | |
| Input Terminal | One 15-pin D-type VGA connector with one cable included One DVI connector |
| Compaq iPAQ Microportable Projector | ||
| Humidity (Non-Condensing) | ||
| Operating | 20 to 80% | 5 to 95% |
| Non-Operating | 20 to 80% | 5 to 95% |
| Required Environmental Temperatures for the Following Altitudes: | ||
| Sea Level | ||
| Operating Temperature | 32 to 104irc F | 0 to 40irc C |
| Storage Temperature | 14 to 140irc F | -10 to 60irc C |
| 2,500–5,000 Feet | ||
| Operating Temperature | 50 to 95irc F | 10 to 35irc C |
| Storage Temperature | -22 to 149irc F | -40 to 65irc C |
| 5,000–10,000 Feet | ||
| Operating Temperature | 50 to 82irc F | 10 to 28irc C |
| Storage Temperature | -22 to 149irc F | -40 to 65irc C |
Preset Display Resolutions Table
The projector automatically recognizes the preset display resolutions listed in the following table.
Display Resolutions
| Preset Modes Resolutions | |
| 1. Industry Standard 640 x 350 at 31.5 kHz/70 Hz | |
| 2. VESA Standard 640 x 350 at 37.8 kHz/85 Hz | |
| 3. Industry Standard 640 x 480 at 37.8 kHz/72 Hz | |
| 4. VESA Standard 640 x 480 at 37.5 kHz/75 Hz | |
| 5. VESA Standard 640 x 480 at 43.3 kHz/85 Hz | |
| 6. Industry Standard 720 x 400 at 31.5 kHz/70 Hz | |
| 7. VESA Standard 720 x 400 at 37.9 kHz/85 Hz | |
| 8. VESA Standard 800 x 600 at 35.1 kHz/56 Hz | |
| 9. VESA Standard 800 x 600 at 37.8 kHz/60 Hz | |
| 10. VESA Standard 800 x 600 at 48 kHz/72 Hz | |
| 11. VESA Standard 800 x 600 at 46.9 kHz/75 Hz | |
| 12. VESA Standard 800 x 600 at 53.7 kHz/85 Hz | |
| 13. Macintosh-compatible 832 x 624 at 49.7 kHz/75 Hz | |
| 14. Macintosh-compatible 1152 x 870 at 68.7 kHz/75 Hz | |
| 15. VESA Standard 1024 x 768 at 35.5 kHz/43.4 Hz | |
| 16. VESA Standard 1024 x 768 at 48.4 kHz/60 Hz | |
| 17. VESA Standard 1024 x 768 at 56.4 kHz/70 Hz | |
| 18. VESA Standard 1024 x 768 at 60 kHz/75 Hz | |
| 19. VESA Standard 1024 x 768 at 68.7 kHz/85 Hz | |
| 20. VESA Standard 1280 x 1024 at 64 kHz/60 Hz | |
| 21. VGA Compatibility 640 x 480 at 31.5 kHz/60 Hz | |
| 22. HDTV 720P (Progressive) | 1280 x 720 at 45 kHz/60 Hz |
| 23. HDTV 1080I (Interlaced) | 1920 x 1080 at 33.8 kHz/30 Hz |
- Product Features
- Introduction
- ⑦ Documentation kit:
- Identifying the Projector Buttons
- Identifying the Input/Output Panel Components
- Using the Projector
- Setting Up the Projector
- Connecting the Projector to a Notebook Computer
- Connecting the Projector to a Desktop Computer
- Connecting the Projector to a Compaq iPAQ Pocket PC
- Powering On the Projector
- Powering Off the Projector
- Adjusting the Projected Image
- Adjusting the Projector Height
- Adjusting the Image Size
- Adjusting the Projector Focus
- Using the On-Screen Display Menu
- Introducing the On-Screen Display Menu
- Adjusting the On-Screen Display Menu
- Sample On-Screen Display Menu Adjustment
- On-Screen Display Menu Adjustments (Continued)
- Main Menu Menu Level 2 Menu Level 3
- Explaining Functions in the On-Screen Display Menu
- Special On-Screen Messages
- Using the Tripod Mount and Ceiling Mount
- Using the Tripod Mount
- Using the Ceiling Mount
- Using the Remote Control
- Identifying the Remote Control Components
- Remote Control Functions
- Using the Home Theater Kit
- Contents of the Home Theater Kit
- Connecting a DVD Player
- Connecting a Videocassette Recorder (VCR)
- Connecting a Camcorder
- Connecting an HDTV Device
- Connecting a Personal Computer (PC)
- HDTV Modes
- Care and Maintenance
- Protecting the Projector
- Cleaning the Lens
- Replacing the Projector Lamp Module
- Troubleshooting
- Troubleshooting (Continued)
- Agency Regulatory Notices
- Federal Communications Commission Notice
- Modifications
- Cables
- Declaration of Conformity for Products Marked with the FCC Logo-United States Only
- Canadian Notice
- Avis Canadien
- Japanese Notice
- Specifications
- Preset Display Resolutions Table
Brand : COMPAQ
Model : iPAQ MP4800
Category : Projector