
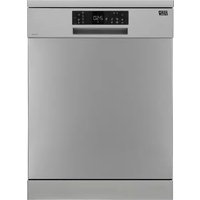
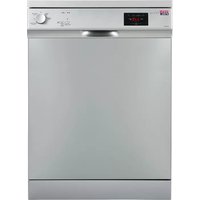
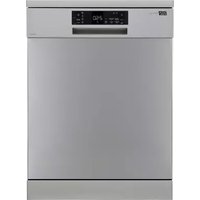
LVG 2040 - Dishwasher NEW POL - Free user manual and instructions
Find the device manual for free LVG 2040 NEW POL in PDF.


| Product Type | Built-in Dishwasher |
| Brand | NEW POL |
| Model | LVG 2040 |
| Dimensions (W x D x H) | 60 cm x 55 cm x 82 cm |
| Weight | 45 kg |
| Power Supply | 220-240 V ~ 50 Hz, 10 A |
| Energy Class | E |
| Capacity | 12 Place Settings |
| Noise Level | 49 dB(A) |
| Number of Programs | 6 |
| Programs | Intensive, Eco, Auto, Glass, Quick 30, Rinse |
| Water Consumption per Cycle | 9.5 L |
| Annual Energy Consumption | 295 kWh/year |
| Annual Water Consumption | 2660 L/year |
| Drying Performance Class | A |
| Delay Start | Up to 24 Hours |
| Safety Features | Child Lock, Flood Prevention, Overfill Protection |
| Spare Parts | Filters, Spray Arms, Racks, Detergent Dispenser |
| Maintenance | Clean filter monthly, use salt and rinse aid |
| Installation Type | Integrated under counter |
| Color | White |
| Control Type | Electronic Push Button |
Frequently Asked Questions - LVG 2040 NEW POL
User questions about LVG 2040 NEW POL
0 question about this device. Answer the ones you know or ask your own.
Ask a new question about this device
Download the instructions for your Dishwasher in PDF format for free! Find your manual LVG 2040 - NEW POL and take your electronic device back in hand. On this page are published all the documents necessary for the use of your device. LVG 2040 by NEW POL.
USER MANUAL LVG 2040 NEW POL
Instruction booklet of the dishwasher

Fitting decor panels
The door and the lower panel of the appliance are fitted with suitable frames which can easily be removed to make it possible to cover them with a sheet of laminated plastic (or stainless steel). In this way the dishwasher can be matched to the design of the kitchen furniture.
The dimensions of the laminated covering sheet should have the following measurements:
Door covering sheet
| Width | 590 mm |
| Height | 461 mm |
| Max. thickness | 4 mm |
Lower panel covering sheet:
| Width | 590 mm |
| Height | 114 mm |
| Max. thickness | 4 mm |
To apply the covering sheet, proceed as follows:
remove the lower panel (Fig.18) by loosening, without removing them, the two securing screws, and then free it from its top catch;
remove the frames from the door and the lower panel after unscrewing the respective securing screws (Fig.18);
fit the covering sheet and screw down the frames;
refit the lower panel by fastening it first on the top catch and then retighten the two lower screws.

Fig. 18
Indice
Cómo se instala
natural_image
Diagram of a wall-mounted device with attached cable and wiring (no text or symbols)Fig. 1

natural_image
Diagram of a mechanical device with a circular component and internal components, no visible text or symbolsFig. 2
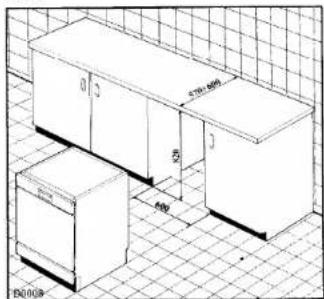
Fig. 3
Something not working
If there is a malfunction, make the following checks before you call for service: it may save you trouble and expense.
The machine will not start
check that
the door is correctly closed
the water tap is fully open
the plug is perfectly inserted in the wall socket
the fuses of the wiring system are not blown.
The machine will not drain
check that
the drain hose is not kinked (bent)
the filters are not clogged.
The crockery does not come out clean check that
the detergent used is suitable for dishwashers and the quantity dispensed is the right one
the crockery is correctly arranged in the baskets
the sprayarms turn freely and the nozzles are not obstructed
the filters are clean.
There are limestone deposits on the crockery
check that
there is enough salt in the container
the rinse aid supply is not depleted
the quantity of rinse aid dispensed is sufficient.
There are traces of tea, coffee or lipstick left on the crockery
check that
the quantity of detergent loaded in the machine is sufficient.
The crockery is not completely dry
If the crockery remains in the machine for a long period of time after washing, condensation may occur on the inner walls of the dishwasher and on the crockery itself.
Useful hints
It stands to reason that a machine of this standing should be utilized and exploited rationally and to its full capacity to make the most of it.
Therefore, place the crockery in the machine immediately after the meals, conveniently arranging the various pieces in the respective compartments. If only partial loads are placed in the machine, do carry out a rinse & hold programme until the load is completed later in the day. We would also suggest that you take into account the capacity and the space availability of your dishwasher when buying new crockery, particularly pots and pans, all of which should be suitable to be washed in the dishwasher.
Pots
This machine will also wash pots. Needless to say, the washing results depend on how soiled the pots are. If there are plenty of dried up food scraps or if there are burnt scraps, it is advisable to pre-rinse the pots by hand or to pre-soak them so as to loosen the scraps.
Cutlery
As a rule, you should not wash in the dishwasher cutlery having wooden or horn handles or glued parts which will not withstand hot water.
Silver cutlery
This may be washed in the dishwasher with very good results, provided it does not come in touch with steel cutlery. The fact is that the oxidizing effect of the soapy water might cause unsightly spots due to the chemical interaction between the two metals. Therefore, they should be arranged separately in the cutlery basket.
Aluminium ware
Aluminium is not very suitable for dishwashing.
Decorated chinaware
Some decorations might fade when machine-washed, just as it sometimes happens when washing by hand, and we would therefore suggest that you wash one single piece a number of times in the machine and then compare it with the other pieces to see if the decoration has faded.
Crystalware, small and plastic items
If the items are not dishwasher-proof, you are advised to wash them by hand. However, we recommend that you load them in the upper basket. Weigh down plastic items with other pieces of crockery.
Important:
Do not load very small items of crockery that could fall out of the baskets.

natural_image
Technical line drawing of a kitchen sink with faucet and pipe fittings (no text or symbols)Fig. 4
Conexión hidráulica
Fig. 6
Cleaning the sprayarm nozzles
The holes of the sprayarm nozzles should not be obstructed as this would greatly reduce the effectiveness of the washing cycle. To remove the bottom sprayarm release it from its securing catches and pull it out (Fig.16).
To clean the nozzles of the top sprayarm, slide out the top basket whereby the sprayarm will become perfectly accessible. To remove it, disengage conveyor A from its coupling and unscrew ring nut B (Fig. 17).
Cabinet cleaning
The outer cabinet and the control board in particular should be wiped periodically with a soft damp cloth and, if necessary, with a little neutral detergent.
To clean these parts, never use abrasive products which might scratch the surface.
Long idle periods
If the machine is not to be used for some time, it is advisable to take the following precautions:
Disconnect the machine from the electrical network and from the water supply.
Fill up the rinse aid container.
Leave the door ajar to prevent bad smells from lingering in the machine.
Leave the inner part of the machine clean, by carrying out a rinse & hold programme (n.4).
If you are moving
If you are moving and the dishwasher is transferred to a new location, make sure that the machine is not tilted too much during transport.
Care & cleaning
Cleaning the filter assembly
The filter assembly consists of a large circular fine-mesh filter (A) and two small cone-shaped filters (B-C), fitting one within the other, both being housed in the large filter (Fig. 15).
We recommend that you inspect the two small filters B and C after each wash cycle, removing any food scraps that you might detect.
These two concentric filters can be removed simply by lifting them up. To remove the inner filter C, squeeze together the two small plastic tongues (Fig. 15) sticking out from the bottom of outer filter B.
Replace the filters by pushing them back until you feel they click. The large finemesh filter (A) should be cleaned from time to time (roughly once every two months) on both sides with a suitable brush.
To remove this large filter (A), take off the bottom sprayarm by releasing the catches (D - Fig.16), and unlock part E. Replace the assembly reversing the above procedure, making sure that the outer rim of the circular filter fits correctly in its housing on the tub bottom.
The dishwasher should not be operated without the filters being correctly installed. Periodic cleaning of the filters is essential for a smooth and efficient operation of the machine.

Fig. 15
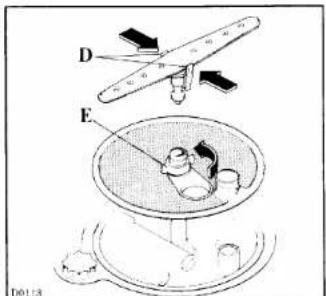
Fig. 16

Fig. 17
Cómo se usa


natural_image
Black-and-white illustration of a large, textured object with a central vertical structure and surrounding structures (no visible text or symbols)Fig. 7
natural_image
Black-and-white photo of a multi-tiered container with spherical objects and a textured base (no visible text or symbols)Fig. 8

natural_image
Medical scan image showing internal anatomical structures (no visible text or labels)Fig. 9
| Programme knob setting | Required pushbutton(s) | Cycle description |
| 1 | Cold prewashExtended main wash up to 65°C2 cold rinses1 hot rinseHot air drying | |
| 2 | Cold prewashMain wash up to 65°C2 cold rinses1 hot rinseHot air drying | |
| 3 | Main wash up to 65°C2 cold rinses1 hot rinseHot air drying | |
| 1 | Cold prewashExtended main wash up to 55°C2 cold rinses1 hot rinseHot air drying | |
| 3 | Main wash up to 55°C2 cold rinses1 hot rinseHot air drying | |
| 4 | Cold rinse to prevent food scraps from drying up and sticking to the dishes | |
| Washing programmes | Type of load and degree of soil | Recommended programme |
| Extremely soiled crockery, pots, pans and cutlery | Energetic with prewash | |
| Normally soiled crockery, pots, pans and cutlery, with a normal quantity of food scraps | Universal with prewash | |
| Normally soiled crockery, pots, pans and cutlery, with a reduced quantity of food scraps | Universal no prewash | |
| Lightly soiled crockery, pots and cutlery | Economy with prewash | |
| Lightly soiled dishes and glasses with delicate decorations | Gentle no prewash | |
| Partial load (to be completed later in the day) | Rinse & hold |

natural_image
Black-and-white illustration of a plastic crate containing various items, no text or symbols visibleFig. 10
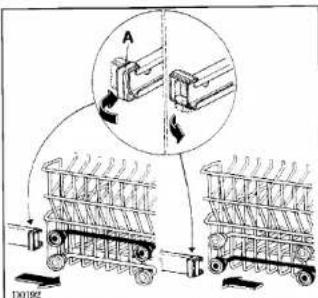
Fig. 11
Adjusting the water softener
The water softener is preset for water having a maximum hardness of 21" dH. This setting is designed to suit most of the field requirements.
At any rate, if the water hardness exceeds 21° dH (up to a maximum of 34" dH), the water softener should be adjusted. To this purpose it is sufficient to open the door and to drill the membrane «A» (fig. 14).
Note: our water softener can treat water hardness up to 34° dH.

Fig. 14
Starting the machine
After connecting the machine to the water supply and to the electric power supply, close the door and then proceed as follows:
Turn the programme selector knob (5) to the required setting.
Depress the pushbutton as required (3).
Depress the START pushbutton (2).
At this point the pilot lamp (1) will light up and the machine starts operating.
Stopping the machine
When the wash cycle is completed, the machine stops automatically but the pilot lamp remains alight and to turn it off the STOP pushbutton has to be depressed. If you require to stop the machine at any moment during the wash cycle, simply depress the aforementioned STOP pushbutton. To restart the machine, depress again the same pushbutton and the wash cycle will resume from where it was interrupted.
It is not advisable to open the door during operation. At any rate, the machine incorporates a safety device which stops operation when the door is opened. We would also recommend, at the end of a wash cycle, that you turn off the water tap and unplug the machine from the wall socket.
Emptying the baskets
You are advised to empty the lower basket first and then the upper one.
Water softener
Depending on the area, water contains more or less limestone and mineral salts which tend to deposit on the crockery forming whitish markings that eventually cause all surfaces to become dull. The dishwasher incorporates a water softener which purifies the water of all limestone for dishwashing. In this way the cleaning action is greatly enhanced, no incrustations form and during the rinsing phases the crockery is restored to its original brilliance. Operation of the water softener is completely automatic.

natural_image
Line drawing of a glass with liquid being poured into a cup, accompanied by a small object (no text or symbols)Fig. 13
30
Salt filling
After unscrewing the cap, fill 1.5 kg. of coarse salt using the funnel supplied with the machine into the container on the bottom (Fig.13). Fill the container with water (this operation should be carried out during the first salt filling). Carefully replace the container screw cap, making sure that the threading and the gasket have no trace of salt. After this, it will suffice to periodically top up the container with salt only. This model features a green refill indicator on the cap of the water softener. When the green indicator disappears, which will be approximately every 40 washes, the water softener needs refilling with salt.
Note: Salt refilling is not required for a water hardness up to 7° dH.
Important
All salt refilling and topping up operations should be carried out immediately prior to starting any one of the complete wash cycles (with the exception of the RINSE & HOLD programme) in order to prevent the possibility that any salt granules or salt water, which might flow out of the salt container during refilling of the same, remain for some time on the bottom of the wash tub without being properly diluted. Use only coarse salt or specific equivalent products for water softeners.
Detergentes
natural_image
Line drawing of a glass bowl pouring liquid into a cup, with a small object nearby (no text or symbols)Fig. 13
12
Detergents
In order to obtain a good wash, it is necessary to use detergents specially designed for dishwashers.
To ensure that your dishwasher functions perfectly, NEW POI recommends using Calgonit System, a unique and complete product, tested by millions of householders.
Calgonit System includes Calgonit detergent, rinse aid, salt, machine detergent and Citro-Fresh.
It is able to fulfil the main requirements for cleaning both the crockery and the machine itself.
The washing powder should be poured into the compartment of the container (Fig.12).
When the lid of the container happens to be closed, in order to open it simply push back the small catch C which holds it clamped down.
Quantity of detergent
The quantity to be loaded depends on the brand used, on the degree of soil and type of load. On the average, we recommend 4 teaspoonfuls (25 grams) if you have to wash normally soiled crockery, and up to 5 teaspoonfuls (30 grams) for heavily soiled crockery. After loading the detergent in the proper compartment, close the lid. The detergent will be automatically dispensed at the proper time.
Important
Only use detergents specially made for dishwashers. To obtain fine washing results you should only use top quality detergents. An insufficient quantity of detergent will give poor washing results, whereas an excessive quantity will not improve the result but will only represent a waste.
Loading the rinse aid
The rinse aid dispenser, which automatically dispenses the right amount of rinse aid at the proper time, is located inside the dishwasher door. This special liquid product is essential to ensure prompt drying of the crockery and to make it come out crystal-clear since it prevents formation of stains due to the salt contained in the water.
Filling
Press catch A (Fig. 12) to open the container lid. Pour the rinse aid into the funnel. The container holds approx. 110 cu.cms. of rinse aid. The level can be checked through the level indicator (Fig. 12).
Quantity
The quantity of rinse aid dispensed automatically from the container can be adjusted, in each single case, to compensate for hard or soft water, more being required for hard water and less for soft. The quantity can be adjusted by means of knob B - Fig.12.
Important
Leave the knob at position 2 when you first use the machine and only adjust it if, after a few cycles, you notice any of the following: - crockery remaining dull looking and/or showing occasional round spots: in this case the quantity of rinse aid dispensed must be increased; - crockery feeling sticky or showing whitish spots: the quantity of rinse aid must be decreased.

Fig. 12
natural_image
Black-and-white illustration of a multi-tiered kitchen sink with food items (no text or symbols)Fig. 10

Adjusting the height of the upper basket (Fig. 11)
If washing very large plates (over 27 cm and up to 31 cm in diameter) you can load them in the lower basket after moving the upper basket to the higher position as follows:
move the front runner stops (A) of the upper basket outward and slide the basket out.
Refit the basket in the higher position and replace the stops (A) in the original position.
When the top basket is in the higher position it will only take plates up to 19 cm in diameter and you will not be able to use the raised cup racks.
Important
When loading the crockery be absolutely sure not to accidentally obstruct the water inlet funnel at the centre of the upper basket. Only a correct loading of the dishwasher will ensure good washing results. After loading the crockery, make sure that the spray arms turn freely.
Loading the crockery
Prior to arranging the crockery in the baskets, do remove the bigger food scraps (such as tiny bones, fish-bones, meat or vegetable scraps, fruit peels, etc.), to prevent the filter from clogging, which would cause poor washing results. Open the door and slide out the baskets to be able to load the crockery.
Using the bottom basket (Fig. 7-8)
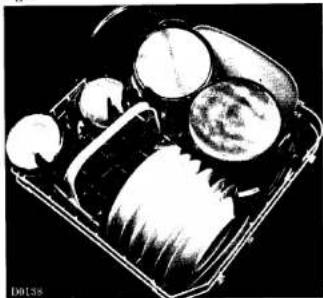
The lower basket is designed to take pots, lids, dishes, salad-bowls, cutlery etc. The cutlery should be placed into the special small removable basket. To obtain good washing results, it is recommended to intermix spoons with knives and forks so that they will not stick together. We also suggest that you stack the cutlery into the special small basket with the handles facing downwards. However, if the handles of your cutlery are very thin it is advisable to stack the cutlery with the handles facing upwards, so as to prevent them from sticking out from the bottom of the small basket and thereby blocking the lower spray arm.
Using the top basket (Fig. 9-10)
The top basket is designed to take dishes (dessert plates, saucers) plus cups and glasses which should be arranged as shown in the respective pictures.

natural_image
Black-and-white illustration of a person standing in front of a large structure with smoke-like patterns (no text or symbols visible)Fig. 7

natural_image
Black-and-white photo of a food delivery box with round items and a bag (no visible text or symbols)Fig. 8

natural_image
Black-and-white illustration of a stylized animal or creature with no visible text or symbolsFig. 9
Fig. 16

Fig. 17
Operation
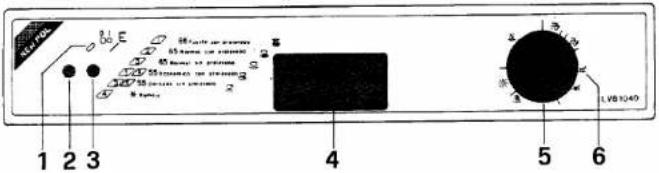

Controls description
- «Machine-live» pilot light
- START & STOP pushbutton 1 or ①
- Water temperature pushbutton E
- Door handle
- Programme selector
- Wash-cycle phase indicator
START & STOP pushbutton or ①
By depressing this pushbutton the machine starts operating and, at the same time, the pilot lamp (4) will light up. When depressing it again, the machine stops and the pilot lamp goes out.
Water temperature pushbutton E
This pushbutton permits selection of the required water temperature.
When depressed, it will cause the water to heat up to 55^ C. By depressing it again and thus releasing this pushbutton, the wash water will heat up to 65^ C.
Door handle
To open the door press the catch in the top of the recess and pull the door toward you at the same time. To close the door, push it.
Programme selector
This control permits selection of the required wash cycle. Turn this knob clockwise until the index points exactly on the proper letter of the required wash cycle.
Before selecting a programme or changing an ongoing programme the machine must be switched off by depressing the START & STOP pushbutton.
Wash cycle phase indicator
Prewash
Main wash
Cold rinses
Warm rinse
Hot air drying
Water outlet connection (Fig. 6)
The outlet hose should be firmly booked over the edge of a sink, by using the curved end delivered with the appliance or connected under the sink or to a suitable waste pipe in the wall which should incorporate an airbreak. The top of the drain hose (curved end) should not be lower than 30 cms (minimum) or higher than 100 cms (maximum) from the floor level.
The water should be able to drain freely and, therefore, the outlet hose should not be choked or placed in such a way as to obstruct the normal water flow. If an extension of the hose is required, it should not exceed 2 meters and the extension itself should have at least the same inner diameter as the machine's own drain hose.
Electrical connection
The machine operates on a rated voltage of 220 V (50 Hz). Maximum power absorbed is approx. 2.1 kW.
The domestic wiring system (including wall sockets, interior wiring, fuses and electricity meter) should therefore be adequate and suitable to carry such a load.
It is absolutely essential that the machine be properly earthed. The manufacturer declines to accept any liability should this safety measure not be observed.
This appliance complies with E.E.C. directive No. 87/308 of 2/6/87 dealing with radio interference suppression.
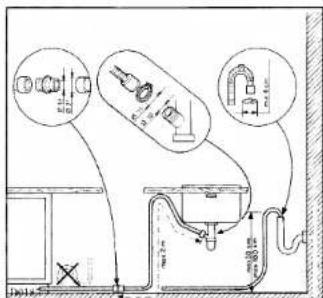
Fig. 6
Limpieza externa
natural_image
Line drawing of a kitchen sink with faucet and shower system (no text or symbols)Fig. 1
Connection to the water supply
The machine may be supplied with either cold or hot water. In the latter case, make sure that the temperature of the hot water never exceeds 70^ C ( 158^ F). The inlet hose should be connected to a 3/4" gas thread spout (Fig. 4-5) or to a quick-coupling tap (Press-Block) after inserting the special strainer A supplied with the machine. Make sure that the water supply pressure is within the limits indicated under the technical data.

Fig. 5
Installation
Positioning
After removing the outer carton, set up the machine in the selected spot,
preferably very close to water loading and draining facilities. Furthermore, the machine can be installed with the sides and back in touch with the adjacent furniture or with the wall.
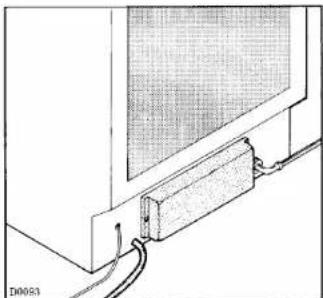
The dishwasher features fill and drain hoses which can be turned either to the right or to the left (Fig. 1) to suit the installation.
The worktop can be adjusted either forwards or backwards up to 25mm to make it possible to align the machine properly with the kitchen furniture. To do this, simply remove the securing screws from the front (Fig. 2): adjust the worktop as required, then replace the previously removed screws. The machine can also be installed under the kitchen counter or under the sink. To do this, remove the worktop from the machine by unscrewing the two front securing screws and then release it from its rear catch by pulling it outwards.
The dimensions of the special recess required to house the machine are given in Fig. 3.
Levelling
The machine should be accurately levelled by adjusting the front levelling feet (max. allowed error: ±2^ ).
natural_image
Technical line drawing of a wall-mounted electrical component with wires and a grid-patterned panel (no text or symbols)Fig. 1

natural_image
Diagram of a mechanical device with a circular component and a tool inside, showing no text or symbols.Fig. 2

Fig. 3

Fig. 18
It is most important that this instruction book should be retained with the appliance for future reference. Should the appliance be sold or transferred to another owner, or should you move house and leave the appliance, always ensure that the book is supplied with the appliance in order that the new owner can be acquainted with the functioning of the appliance and the relevant warnings.
These warnings are provided in the interest of safety. You must read them carefully before installing or using the appliance.
Unplug the appliance and turn off the water after use.
Any plumbing work to install this appliance should be carried out by a qualified plumber or competent person. Any electrical work required to install this appliance should be carried out by a qualified electrician or competent person. This appliance is designed to be operated by adults. Children should not be allowed to tamper with the controls or play with the product.
This product should be serviced by an authorized Network Service Centre, and only genuine spare parts should be used. It is dangerous to alter the specifications or modify the product in any way.
Care must be taken to ensure that the appliance does not stand on the electrical supply cable.
This dishwasher is designed to be used for washing normal household utensils. Items that are contaminated by petrol, paint, steel or iron debris, corrosive, acidic or alkaline chemicals are not to be washed in a dishwasher.
When finishing loading or unloading close the door, as an open door can be a hazard.
Do not put in your dishwasher: Cutlery with wooden or horn handles or glued parts, bronze cutlery, saucepans with wooden handles unless they are sold as dishwasher proof, aluminium ware, crystal ware, leaded glass, plastic articles unless sold as dishwasher proof, antique china or fire decorated china unless sold as dishwasher proof. Always check with the manufacturer of the item if in any doubt.
A chemical reaction can occur between silver cutlery and stainless steel cutlery. As a precaution do not wash together. Under no circumstances should you open the door whilst the appliance is in operation. Always turn off the appliance before opening the door.
Built-in dishwashers only: The appliance must be secured to the underside of the worktop (see the relevant instructions). Failure to do this could result in an unstable appliance which may cause damage or injury.
Under no circumstances should you attempt to repair the appliance yourself. Repairs carried out by inexperienced persons may cause injury or more serious malfunctioning. Refer to your local Network Service Centre. Always insist on genuine spare parts.
Contents
Installation
| Positioning | page 22 |
| Levelling | page 22 |
| Connection to the water supply | page 23 |
| Water outlet connection | page 24 |
| Electrical connection | page 24 |
Operation
| Controls description | page 25 |
| Loading the crockery | page 26 |
| Loading the rinse aid | page 28 |
| Detergents | page 29 |
| Water softener | page 30 |
| Adjusting the water softener | page 31 |
| Starting the machine | page 31 |
| Stopping the machine | page 31 |
| Washing programmes | page 32 |
Care and cleaning
| Cleaning the filter assembly | page 34 |
| Useful hints | page 36 |
| Something not working | page 37 |
| Fitting decor panels | page 38 |
Technical data
| Width | 60 cms |
| Overall depth | 57÷60 cms |
| Overall depth | |
| with open door | 120 cms |
| Height | 85 cms |
| Capacity (in standard IEC place settings) | 12 |
| Supply voltage | 220 V |
| Motor rating | |
| during washing | 220 W |
| Heating element power | 1900 W |
| Max. power absorbed | 2100 W |
| Water supply pressure: | |
| minimum | 5 N/sc |
| maximum | 80 N/sc |
- Fitting decor panels
- Indice
- Something not working
- The machine will not start
- The machine will not drain
- The crockery does not come out clean check that
- There are limestone deposits on the crockery
- There are traces of tea, coffee or lipstick left on the crockery
- The crockery is not completely dry
- Useful hints
- Pots
- Cutlery
- Silver cutlery
- Aluminium ware
- Decorated chinaware
- Crystalware, small and plastic items
- Important:
- Conexión hidráulica
- Cleaning the sprayarm nozzles
- Cabinet cleaning
- Long idle periods
- If you are moving
- Care & cleaning
- Cleaning the filter assembly
- Cómo se usa
- Adjusting the water softener
- Starting the machine
- Stopping the machine
- Emptying the baskets
- Water softener
- Salt filling
- Important
- Detergentes
- Detergents
- Quantity of detergent
- Loading the rinse aid
- Filling
- Quantity
- Adjusting the height of the upper basket (Fig. 11)
- Loading the crockery
- Using the bottom basket (Fig. 7-8)
- Using the top basket (Fig. 9-10)
- Operation
- Controls description
- START & STOP pushbutton D or ①
- Water temperature pushbutton E
- Door handle
- Programme selector
- Wash cycle phase indicator
- Water outlet connection (Fig. 6)
- Electrical connection
- Limpieza externa
- Connection to the water supply
- Installation
- Positioning
- Levelling
- Contents
- Technical data
Brand : NEW POL
Model : LVG 2040
Category : Dishwasher