SME625DPBB - Tumble dryer Mabe - Free user manual and instructions
Find the device manual for free SME625DPBB Mabe in PDF.


| Product Type | Tumble dryer |
| Brand | Mabe |
| Model | SME625DPBB |
| Capacity | 4.0 cu. ft. |
| Dimensions (H x W x D) | 38.5 x 27 x 27 in |
| Weight | 115 lb |
| Power Supply | 240 V, 30 A, 60 Hz |
| Power Consumption | 3.5 kWh per cycle |
| Number of Drying Cycles | 8 cycles including Delicates, Normal, Heavy, Timed Dry |
| Wrinkle Guard | Yes |
| Lint Filter | Removable mesh filter |
| Drum Material | Galvanized steel |
| Exhaust Type | Vented (4-inch duct) |
| Control Type | Electronic dial and buttons |
| Energy Star Certified | Yes |
| Assembly Required | No (freestanding) |
| Optional Pedestal | Available separately |
| Warranty | 1 year limited parts and labor |
| Safety Certifications | UL listed, CSA approved |
| User Manual Language | English, Spanish |
Frequently Asked Questions - SME625DPBB Mabe
User questions about SME625DPBB Mabe
0 question about this device. Answer the ones you know or ask your own.
Ask a new question about this device
Download the instructions for your Tumble dryer in PDF format for free! Find your manual SME625DPBB - Mabe and take your electronic device back in hand. On this page are published all the documents necessary for the use of your device. SME625DPBB by Mabe.
USER MANUAL SME625DPBB Mabe
natural_image
Line drawing of a washing machine with front panel and door (no text or symbols)natural_image
Line drawing of a hand using a tool to adjust or install a component, with no visible text or symbols.natural_image
Line drawing of hands using a tool to adjust or install a component (no text or symbols present)natural_image
Line drawing of an electrical plug connected to a wall socket (no text or symbols)natural_image
Diagram of a device's cable connector with a switch and port (no text or symbols)natural_image
Diagram of a mechanical assembly showing a cylindrical component being inserted into a housing, with no visible text or symbols.natural_image
Pure technical line drawing of a rectangular frame with rounded edges and no text or symbolsPuerta Interior

natural_image
Simple line drawing of a rectangular object with a small rectangular cutout on the left side (no text or symbols)Panel de la puerta
puerta de cristal

natural_image
Technical line drawing of a rectangular frame with internal compartments and mounting holes (no text or symbols)puerta interior

natural_image
Simple line drawing of a rectangular device with a blank screen (no text or symbols)marco de la puerta
natural_image
Diagram showing a door opening with a switch and screwdriver inserted, no text or symbols presentnatural_image
Technical line drawing of a mechanical component with a screwdriver inserted, showing internal structure and assembly (no text or symbols)natural_image
Illustration of a stack of three stacked documents with an upward arrow on the top cover (no text or symbols)natural_image
Technical illustration of a device with a screwdriver inserted, showing internal components and a close-up view (no text or symbols)natural_image
Pure diagram of a rectangular container with internal curved lines, no text or symbols present5. reinstale la puerta
natural_image
Technical line drawing of a mechanical component with two fasteners inserted (no text or symbols)puerta de cristal
1. antes de empezar
natural_image
Diagram showing a door opening with a close-up of the window and a screwdriver inserted into a bracket (no text or symbols)natural_image
Technical line drawing of a device with a screwdriver inserted, showing internal components and a handle (no text or symbols)natural_image
Technical line drawing of a layered electronic device with a central component and mounting holes (no text or symbols)natural_image
Technical line drawing of a device handle with a screwdriver inserted, showing internal components and a close-up view (no text or symbols)natural_image
Pure diagram of a rectangular container with internal flow arrows, no text or symbols present5. reinstale la puerta
natural_image
Technical line drawing of a mechanical component with a screwdriver inserted (no text or symbols)modelos SMV630DEWWY, SMV630DPWWY, SMV630DEGGY

natural_image
Line drawing of a hand opening a washing machine with a valve, showing internal components (no text or symbols)rejilla de secado
solamente modelos SMA14103PGG, SMA14103EGG, SMA14103JGG, SMA1435PWW, SMA1435GWW, SMA1435EWW, SMA1435JWW, SMA1940PPV, SMA1940EPV, SMA1940GPV, SMA1940PGG, SMA1940EGG, SMA1940GGG, SMA1940PPB, SMA1940EPB, SMA1940GPB, SMA1940PBB, SMA1431PGG, SMV719XPBB, SMV719XPGG, SMV719XEBB, SMV719XGGG, SMV719XEGG, SMV747NXPBB, SMV747NXEBB, SMV747NXEGG, SMV745NXPBB, SMV747NXPGG, SMV745NXEBB, SMV745NXPGG, SMV745NXEGG, SMV749NXPBB, SMV749NXEBB, SMV749NXPGG, SMV749NXEGG, SMV719SXPBB, SMV719SXEBB, SMV719SXPGG, SMV719SXEGG, SMV749NXPRR, SMV745WXPBB.
natural_image
Technical line drawing of a mechanical device with internal components (no text or symbols)natural_image
Line drawing of a hand pressing down on a small component inside a corner bracket (no text or symbols)
natural_image
Line drawing of an industrial piping system with a valve and tank (no text or symbols)natural_image
Simple line drawing of a printer placed on a desk against a brick wall background (no text or symbols)- Las superficies de acero inoxidable.
Safety Instructions....45
installation instructions
Before you begin....47
Installation Instructions 48-53
operating instructions
Reversing the Door Swing. 54
Control Panels....57
Operating Instructions ....57
Loading and Using the Dryer 58
Care and Cleaning 60
Dryer Ventilation 61
Washing Labels 61
Troubleshooting....62
consumer support
Consumer Support 66
important safety information read all the instructions before using your dryer save these intructions

WARNING!
For your safety, the information in this guide must be followed to minimize the risk of fire or explosion, electric shock, and to prevent property damage, personal injury, or death.
- Do not store or use gasoline or other flammable vapors and liquids near this of any other appliance.
• Installation and service must be performed by a qualified installer, a service agency or your gas supplier.
FOR FOR PROPER FUNCTIONING OF THIS APPLIANCE IT IS THE LINT FILTER BEFORE AND AFTER EACH DRYING CYCLE.
Benefits of keeping the lint filter cleanend:
• Clothes dry better.
• Less energy consumption.
• Clothes dry faster.
what to do if you smell gas:
-
Do not try to light matches or cigarettes, or turn on any gas or electrical appliance.
-
Do not touch any electrical switch; do not use any phone in your building.
-
Clear the room, building or area of all occupants.
-
Immediately call your gas supplier from a neighbor's phone. Follow the gas supplier's instructions carefully.
-
If you cannot reach your gas supplier, call the fire department.
⚠ warning- laundry area
- Keep the area underneath and around your appliances free of flammable materials such as: lint, paper, rags, chemicals, gasoline and other flammable vapors and liquids.
- Keep the floor around your appliances clean and dry to reduce the possibility of slipping.
- Keep the area around the exhaust vent and adjacent surrounding areas free from the accumulation of lint, dust and dirt.
- This appliance is not intended for use by persons (including children) with reduced physical, sensory or mental capabilities, or lack expensive knowledge, unless they have given supervision or instruction concerning use for the appliance by a person responsible for their safety.
- Close supervision is necessary if this appliance is used by or near children. Do not allow children to play on, with or inside this or any other appliance.
- Keep laundry aids (such as detergents, bleaches, etc.) out of the reach of children, preferably in a locked cabinet. Follow all warnings on container labels to avoid injury.
- Never climb or stand on the dryer.
- Do not install or store this appliance where it will be exposed to weather.
- Do not block the exhaust. store clothing or rugs on top or behind the dryer.
re l ip Too
when using your dryer
- Never reach into the dryer while the drum is moving. Before loading, unloading or adding clothes, wait until the drum has completely stopped.
- Clean the lint filter before each load to avoid accumulation of lint inside the dryer or in the room. NEVER OPERATE THE DRYER WITHOUT THE LINT FILTER IN PLACE.
- Do not wash or dry items that have been cleaned in, washed in, soaked in or spotted with combustible or explosive substances (such as: Wax, oil, paint, gasoline, degreasers, dry-cleaning solvents, kerosene, etc.) which may ignite or explode. Do not add these substances to the wash water. Don't use or place these substances near your washer or dryer during operation.
- Do not place into or near the dryer items that have been used with cleaning solvent or that contain flammable materials (such as: cleaning cloths, mops; towels used in beauty salons, restaurants or barber shops, etc.) until solvents or flammable materials have been removed. There are many highly flammable items used in homes such as acetone, denatured alcohol, gasoline, kerosene, several household cleaners and spot removers, turpentines, waxes, wax removers and products containing petroleum distillates.
- The laundry process can reduce the flame retardant capacity of fabrics. To avoid such a result, carefully follow the printed instructions on the garment manufacturer's label.
- Do not dry items containing rubber, plastic or similar materials (such as: padded bras, tennis shoes, sneakers, bath mats, rugs, bibs, baby pants, plastic balls, pillows, etc.) that may melt or burn. Some rubber materials, when heated, can under certain circumstances produce fire by spontaneous combustion.
- Do not store plastic, paper or clothing that may burn or melt, on top of the dryer during operation.
- Do not spray aerosol inside, on or near the dryer.
- Never attempt to operate this appliance if it is damaged, malfunctioning, partially disassembled, or has a missing or broken part, including a damage power cord or plug.
- Garments labeled as "Dry away from heat" (Dry Away from Heat) or Don't dry in drum (Do Not Tumble Dry) (such as: life jackets with kapok) They must not be put in the dryer.
- Do not dry fiberglass items in your dryer. Skin irritation could result from the remaining particles that may be picked up by clothing during subsequent dryer uses.
- To minimize the possibility of electric shock, unplug this appliance from the power supply or disconnect the dryer from the distribution panel by removing the fuse or switching off the circuit breaker before attempting any maintenance or cleaning (except the removal and cleaning of the lint filter). NOTE: Pressing power OFF, does NOT disconnect the appliance from the power supply.
- Do not place items exposed to cooking oils in your dryer. Items contaminated with cooking oils may contribute to a chemical reaction that could cause a load of laundry to catch on fire.
- The interior of the machine and the exhaust duct connection inside the dryer should be cleaned at least once a year by a qualified technician. See the Loading and Using the Dryer section.
- Do not use aerosol when cleaning the inside of dryer. You may breath hazardous vapors or receive electric shock.
- If yours is a gas dryer, it is equipped with an automatic electric ignition and does not have a pilot light. DO NOT ATTEMPT TO LIGHT THE DRYER WITH A MATCH. Burns may result from having your hand near the burner when the automatic ignition turns on.
- You may wish to soften your laundered fabrics or reduce the static electricity in them by using a dryer-applied fabric softener or an anti-static conditioner. We recommend you use either a fabric softener in the wash cycle, following the manufacturer's instructions for those products, or try a dryer-added product for which the manufacturer gives written assurance on the package that their product can be safely used in your dryer. Service or performance problems caused by use of these products are the responsibility of the manufacturers of those products and are not covered by the warranty for this appliance.
- Never attempt to use the inlet hose to connect gas into your dryer. The hose should be replaced every 2 years at most.
when dryer is not in use
- Firmly grasp the plug when disconnecting this appliance to avoid damages to the cord while pulling. Place the cord away from traffic areas so it will not be stepped on, tripped over or exposed to damage.
Do not attempt to repair or replace any part of this appliance or attempt any servicing unless it is specifically recommended in this Owner's Manual.
proper installation
This dryer must be installed properly and grounded in accordance with the installation instructions before it is used.
This dryer operates with LP Gas, Natural Gas or Electricity (Observe specification label on the back of the dryer or Features Chart). If you need to operate a Gas dryer with a different type of gas from the design, you will only need a special accesory available in a Serviplus Service Center and it must be installed by a qualified technician.
BEFORE YOU BEGIN
Carefully and completely read these instructions.
• IMPORTANT: Save these instructions for your local inspector's use.
. IMPORTANT: Observe all codes and regulations.
- Note for the installer: Be sure to leave these instructions with the customer.
- Note for the customer: Keep the instructions and owner's manual for future reference.
- Dryer must be exhausted to the outside.
- Before discarding an old dryer or removing it from service, remove the door from the dryer compartment.
- The safety information and electrical diagram are located on the control panel.
• Service must be performed by a qualified installer, a service agency or your gas provider.
- Close supervision is necessary if this appliance is used by or near children. Do not allow children to play on or inside this appliance.
- Verify your gas installation
- Prepare the area and the exhaust vent for new installation.
- Keep the area around the exhaust vent clean
FOR YOUR SAFETY :
▲ warning
- Use only rigid or flexible metal 10 cm diameter ductwork to exhaust to the outside. Never use plastic or other easy to puncture flammable ductwork.
- This appliance must be grounded and installed properly in accordance with these instructions.
- Do not install or store this appliance where it will be exposed to water and/or weather.
• Install the dryer where the temperature is above 50^ F for satisfactory operation of the dryer control system.
SAVE THESE INSTRUCTIONS
materials you will need
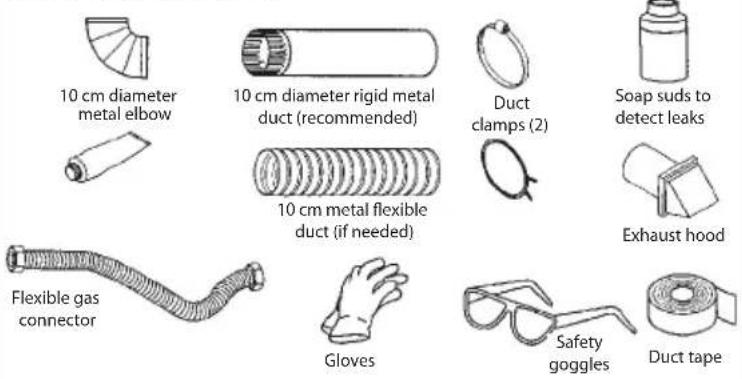

tools you will need

Adjustable spanner 25,4 cm (2)

Slip joint pliers

Flat blade screwdriver

Pipe wrench 20.3 cm
installation
step 1. Remove the literature and accessories bag from the dryer drum.
step 2. Place the corner posts from dryer box - or two boards - on the floor and turn the dryer upside down.
step 3. Remove the foam rubber from under the dryer by pulling at the sides and breaking them away from the dryer legs. Be sure to remove all of the foam pieces around the legs.
step 4. Place dryer back to a vertical position.
step 5. Move the dryer to the desired location.
step 6. Adjust leveling legs to fit the height of the washer. Dryer must be leveled and firm over its 4 leveling legs.
step 7. If yours is a gas dryer, connect the gas supply and check for gas leaks. Connect the current (see ELECTRICAL CONNECTION INFORMATION in these instructions).

Pull here to separate the foam pads from the front leveling leg.
Pull here to separate the foam from the back leveling leg.
Leveling legs
Pull here to separate the foam pads from the front leveling leg.
step 8. Connect air flow exhaust duct (See EXHAUST DUCTWORK INFORMATION).
step 9. Make sure the dryer is properly operating.
step 10. Place the Owner's Manual and Installation Instructions where they will be noticed by the customer.
gas dryer installation instructions
preparing to install the new dryer disconnecting the gas supply:
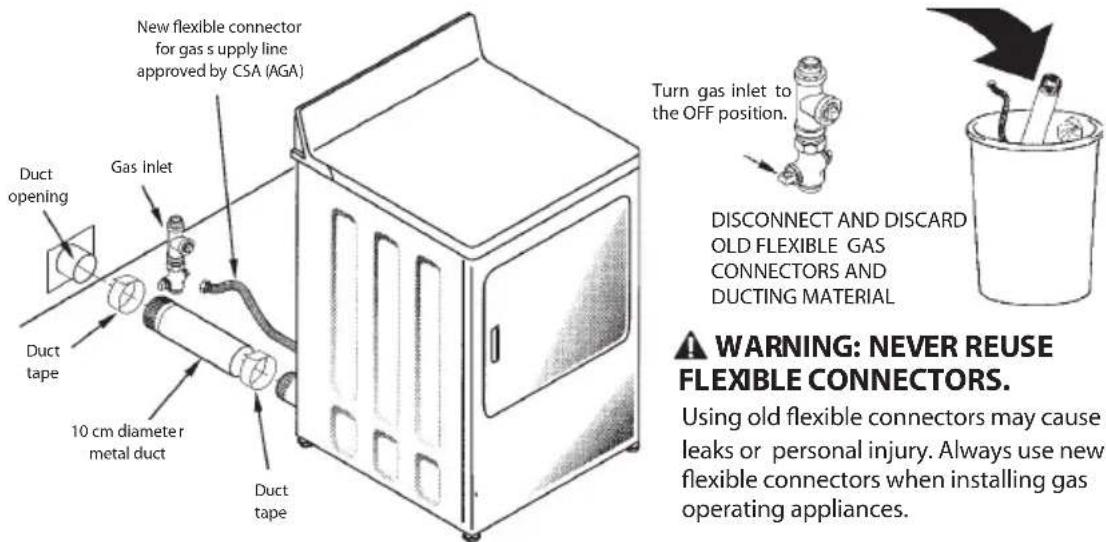
WE RECOMMEND INSTALLING YOUR DRYER BEFORE YOUR WASHER.
THIS WILL ENABLE DIRECT ACCESS TO A SIMPLER EXHAUST CONNECTION.
REMOVING LINT FROM THE EXHAUST WALL OPENING

electrical connection instructions for gas dryers
warning: TO REDUCE THE RISK OF FIRE, ELECTRICAL SHOCK AND PERSONAL INJURY: t h r e e w j r e c o n n e c t i o n c o r d • DO NOT USE AN EXTENSION CORD OR AN ADAPTER PLUG WITH THIS APPLIANCE.
The dryer must be electrically grounded in accordance with local codes and regulations.
ELECTRICAL REQUIREMENTS
This dryer must be powered with 220V\~, 60 Hz, 120 V\~ 60 Hz, or 220V\~, 50Hz to a properly grounded branch circuit, protected by the circuit breakers or required 15 A time delay fuse. If the electrical installation does not meet the specifications, call a licensed electrician.
make sure there is proper grounding before using.

natural_image
Line drawing of a plug with two socket outlets inserted into a wall (no text or symbols)electric dryer connection
For your convenience, the dryer includes an electric cordless plug so you can choose the type of power plug to use according to the socket you have at home. Once you have unpacked the dryer, on the back you will find a black wire that has four more different colored wires, as shown in the following figure:

Representation of the power supply cord.
The red wire represents Line 1 (with voltage), the black wire represents Line 2 (with voltage), the white wire represents neutral (without voltage) and the green wire represents ground; this wire is very important, as it could save your life in case of electric shock.
Do not connect the electric dryer by yourself. Electric dryers must be properly connected by a qualified electrician.
To avoid danger, do not use damage cord. If the power supply cord is damaged, it must be replaced by the manufacturer, your service agent or qualified personnel.
warning:
To reduce the risk of electrical shock, this dryer has a (for grounding) and it must be connected to the appropriate three wire supply socket. Do not cut or remove the ground connector wire of this plug.

Before proceeding, keep the following in mind:
- Your electrical installation must have two lines with voltage (line 1 and line 2), a neutral (w/o voltage) and a ground. You must have a neutral line independent from the grounding one. Otherwise your dryer could be damaged. The way to make sure you comply with this requirement is a s follows:
- At home, you have a socket similar to the one shown in figure 2. (Note: this type of socket is only an example of the different 220 V\~ sockets for home electrical installation).
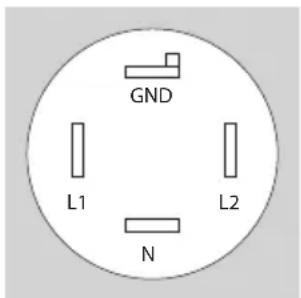
Ideal connection
FIGURE2
A multimeter is to be used to ensure the installation meets with the specifications. This tool will be used to measure the voltage between L1 (line 1) and N (neutral), which must be 120 V\~; and also between L2 (line 2) and N (neutral). The voltage between L1 (line 1) and L2 (line 2) is 120 V\~. Once the specifications are complied, you must proceed to choose a plug. The plug you select must support 30 A, and be specified to 250 V\~. Furthermore, your choice must fit your home socket.
electric dryer connection
For this models, an electrical outlet is included that may contain one of the plugs shown below. The electrical connection must be performed with the appropriate electric contact according to the type of plug of your electrical outlet.
"If the outlet installation does not meet the specifications, have a proper outlet installed by a licensed electrician."
Before proceeding, read the following instructions:
- Your electrical installation must have one line with voltage (line 1), a neutral (w/o voltage) and a ground. You must have a neutral line independent from the grounding one. The voltage in Line 1 must be 220 V.

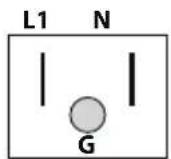
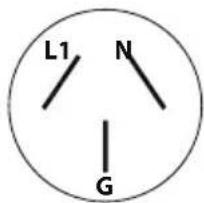

chemical
Molecular orbital diagram showing electron density distribution with labeled orbitals L1, N, and Gelectric dryer connection
Turn off the circuit breaker (30 amps) or remove the dryer's circuit fuse at the electrical box. Verify that the dryer cord is unplugged from the socket. Remove the power cord cover located at the lower back. Install 3/4 in. UL recognized strain relief to power cord entry hole. Bring power cord through strain relief. Connect power cord as follows:
a. Connect live wire to the upper outer screw of the terminal block (marked L1)
b. Connect the neutral wire to the lower outer screw of the terminal block (marked N)
c. Connect the grounding wire to the central screw of the terminal block.
Ensure that ground strap is connected to neutral (center) terminal block and to green ground screw on cabinet rear.
Tighten all terminal block screws (3) of terminal block.

3 copper conductors #10 AWG minimum 120 / 240 V304 marked for dryer use and provided with close loop terminals or female with ends upwards (not provided).
dryer dimensions
MODELS:
| Valve type | Diameter perforation in inches |
| LP Gas | 0.055 (1.40) +/-0.001 (0.02) Diameter |
| Natural Gas | 0.089 (2.26) +/-0.001 (0.02) Diameter |

36.65 in (931 mm)

natural_image
Line drawing of a person pushing a large object with an arrow, no text or symbols presentTILT THE DRYER SIDEWAYS AND REMOVE THE FOAM SHIPPING PADS BY PULLING AT THE SIDES AND BREAKING THEM AWAY FROM THE DRYER LEGS. BE SURE TO REMOVE ALL OF THE FOAM PIECES AROUND THE LEGS.
gas requirements
▲ warning
• Installation must comply with all local codes and regulations.
• The dryer must be disconnected from the gas supply piping system during any pressure testing over (3.4 KPa).
- The dryer must be isolated from the gas supply piping system by closing the equipment shut-off valve during any pressure tests - of the gas supply piping - that are equal to or less than 0.5 PSI (3.4 KPa).
gas supply
- A plug branch of 3.2 mm with cord must be installed, accessible for the connection of a testing meter above the dryer gas supply. Contact your supplier for questions regarding the installation of plug branch with cord.
- Supply line is to be a 12.7 mm (1/2-in) rigid pipe equipped with an accessible shut-off within 182 cm (6 ft.) of, and in the same room as the dryer.
DRYER GAS SUPPLY CONNECTION

NOTE: Add the distance between the lower part of the cabinet and the floor to the vertical dimension.
- Use pipe thread sealer compound or Teflon tape appropriate for natural or LP gas in the threaded joints.
- You must use a flexible metal connector certified by ANSI Z22.25/CSA 6.10. The length shall not exceed 91.4 cm (3 ft).
- Connect flexible metal connector to dryer and gas supply.
- Open shut-off valve.
reconnecting gas
Connectors certified by ANSI Z21.24/CSA 6.1

note: use only new connectors.
Do not reuse other appliance connectors or old installation connectors. Keep flare end of adaptor free of dust, grease, oil or sealing compound.
warning: Use adaptors as shown in figures.
Do not use the flexible connector nuts direct to dryer or house pipe thread. Appropriate and approved adaptors (Conical and NPT) must be used.


natural_image
Illustration of hands using a mechanical tool to adjust a spring-loaded component (no text or symbols present)LEAK TESTING
TIGHTEN ALL CONNECTIONS USING TWO ADJUSTABLE WRENCHES
DO NOT OVERTORQUE GAS CONNECTIONS!

natural_image
Illustration of a hand using a tool to adjust or install a mechanical component (no text or symbols visible)APPLY SEALER COMPOUND TO THE CONNECTOR AND THE GAS DRYER

natural_image
Line drawing of hands using a tool to adjust or install a component (no text or symbols present)TIGHTEN FLEXIBLE GAS LINE USING TWO ADJUSTABLE WRENCHES
Check all connections for leaks with soap solution or equivalent. Apply soap solution.
Leak test solution must not contain ammonia which could cause damage to brass connectors.
If leaks are found, close valve, retighten the joint and repeat soap test.
exhaust duct information

warning: use only rigid metal 4" duct. do not install longer duct than specified in the exhaust length table
A longer exhaust duct than specified will:
- Increase the drying times and energy cost.
- Reduce the dryer life.
- Accumulate lint, creating a potential fire hazard.
The correct exhaust installation is your responsibility. Problems related to to incorrect installation are not covered by the warranty.
The MAXIMUM ALLOWABLE duct length and number of bends of the exhaust system depends upon the type of duct, number of elbows, the type of exhaust hood (wall cap), and all the conditions noted below. The maximum duct length for rigid and flexible metal ducts is shown in the table below.
exhaust length
RECOMMENDED MAXIMUM LENGTH
| Exhaust hood types | ||||
| Recommended | Only for short length installations | |||
  |  35 cm 35 cm | |||
| No. of 90° Rigid elbows metal | Flexible metal F | Flexible metal meters (m) | ||
| 0 | 27,4 m | 16,7 m | 18,3 m | 13,7 m |
| 1 | 18,3 m | 12,2 m | 13,7 m | 9,1 m |
| 2 | 13,7 m | 9,1 m | 10,6 m | 6,0 m |
| 3 | 10,6 m | 6,0 m | 7,6 m | 4,5 m |
ELBOW SEPARATION
For best performance, separate all elbows (turns) by at least 1.2 m. (4ft.) of straight duct, including distance between last elbow and exhaust hood.
ELBOWS OTHER THAN 90°
• One elbow of 45° or less can be ignored.
- Any elbow of 45^ or more should be treated as a 90^ elbow.
- Two 45^ elbows should be treated as one 90^ elbow.
JOINT SEALING
- All joints should be tight to avoid leaks. The male end of each section of duct must point away from the dryer.
• Do not assemble the ductwork with fasteners that extend into the duct. They will serve as a collection point for lint.
• Duct joints can be made air and moisture tight by wrapping the overlapped joints with duct tape.
• Completely horizontal installations should slope down toward the exterior 12.7 mm (1/2 inch) per 30 cm (1ft)
INSULATION
- Ductwork which runs through an unheated area or which is situated adjacent to an air conditioning duct should be insulated to reduce condensation and lint accumulation.
exhaust connection

WARNING:
• This dryer must be exhausted to the outdoors.
- Use only rigid metal duct
- Do not terminate exhaust in a chimney, gas vent, under an enclosed floor, attic or in any other (concealed space) of a building. The accumulated lint could create a fire hazard.
- Provide an access for inspection and cleaning of the exhaust system, especially at elbows and joints. The exhaust system should be inspected and cleaned at least once a year.
- Never terminate the exhaust into a common duct with a kitchen exhaust system. A combination of grease and lint creates a potential fire hazard.
- Do not obstruct incoming or exhausted air.
- WE RECOMMEND TO INSTALL YOUR DRYER BEFORE INSTALLING YOUR WASHER THIS. WILL ALLOW EASIER ACCESS WHEN INSTALLING DRYER EXHAUST.
- THIS DRYER COMES READY FOR REAR EXHAUST. IF SPACE IS LIMITED USE THE INSTRUCTIONS TO EXHAUST DIRECTLY FROM THE LEFT SIDE OR BOTTOM OF THE CABINET.
standard rear exhaust
WE STRONGLY RECOMMEND A RIGID METAL EXHAUST DUCT. HOWEVER, IF FLEXIBLE DUCT IS USED CUT IT TO THE APPROPIATE LENGTH AND AVOID STACKING THE DUCT BEHIND THE DRYER.
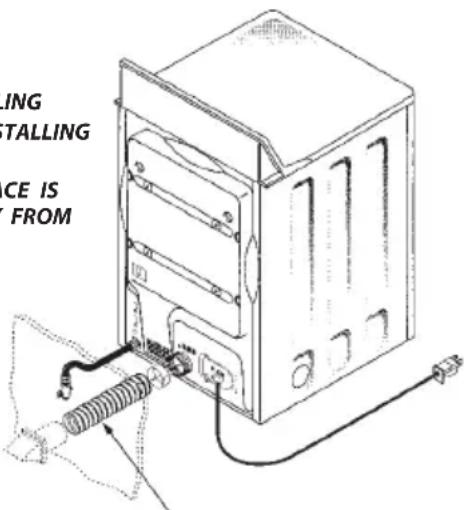
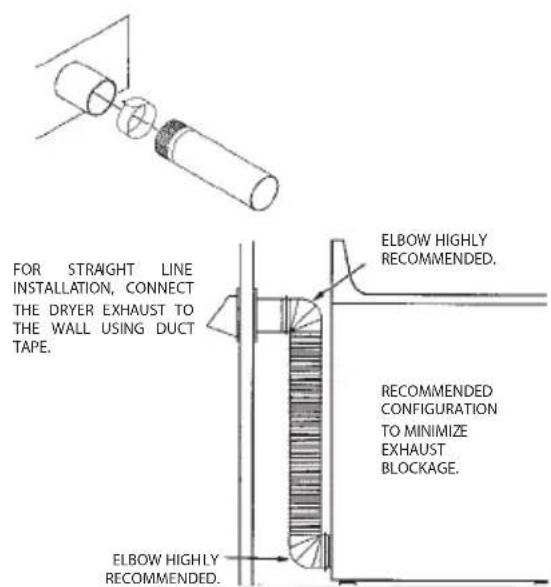
note: elbows prevent duct folding and collapsing.
using flexible metal duct
If rigid metal duct can not be used, then a flexible metal duct may be used, but it will reduce the maximum recommended length. A listed UL duct may be used in special installations when it is not possible to perform connections with the recommended specifications. The use of this duct will affect drying cycles. If flexible duct needs to be used, then the following instructions must be followed:
• Use the shortest length possible.
- Extend duct to reach maximum length.
• Do not bend or crush it.
* Never use duct in walls or inside the dryer.
• The dryer ventilation must comply with local construction codes.
- Avoid resting the duct on sharp objects.
correct

LEVELING THE DRYER

instructions to reverse the door swing.
important notes:
- Read all the instructions before starting.
- Handle parts carefully to avoid scratching or grazing.
- Set screws down by their related parts to avoid using them in the wrong places.
- Normal completion time to reverse the door swing is between 30 to 60 minutes.
- important: Once you begin, do not move the cabinet until door-swing reversal is completed.
TOOLS YOU WILL NEED:
Phillips head screwdriver

DOOR PARTS:
solid door

natural_image
Simple line drawing of a rectangular frame with rounded corners and a central oval cutout (no text or symbols)INNER DOOR

8 S CREWS (18 pieces)

PLATE (work performance)

natural_image
Simple line drawing of a rectangular object with a small protrusion on the left side (no text or symbols)DOOR PANEL
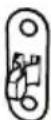
LOCK PLATE (with perforation)

HINGES (2 pieces)
glass door

natural_image
Technical line drawing of a rectangular frame with a central screen and side connectors (no text or symbols)INNER DOOR

natural_image
Simple line drawing of a rectangular electronic device with a screen and side port (no text or symbols)DOOR FRAME
solid door
1 BEFORE YOU BEGIN
Unplug the dryer from electrical current.
2 REMOVE THE DOOR
Open the door to approximately 90 degrees. Remove the bottom screw from each hinge. Insert these screws about half way into the UPPER holes of each hing on the other side. Loosen upper screw from each hinge. Remove the door from the dryer by lifting it up and out. Remove the two remaining screws and keep them in site.

natural_image
Diagram showing a door opening and a tool inserted into a corner, with no visible text or symbols.3 REVERSE THE DOOR PANEL
Placing the door on a soft protected flat surface, remove the 4 screws from the hinges and the 2 screws on the handle side.
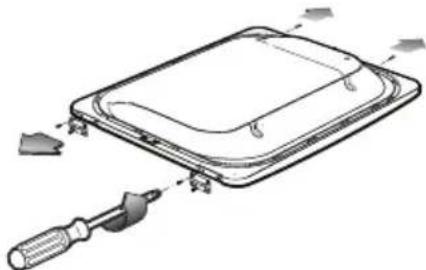
natural_image
Diagram of a device with a screwdriver inserted into a tray, showing internal components and alignment (no text or symbols)Separate the door panel from the inner door by pulling it towards you.
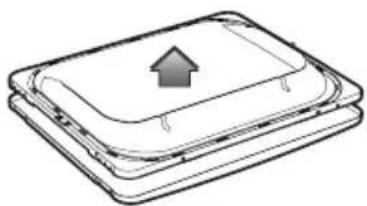
natural_image
Stacked rectangular objects with a central upward arrow, no text or symbols present3 REVERSE THE DOOR PANEL
Rotate the door panel 180 degrees and reinsert the inner door into the door panel.

Rotate the door panel 180°
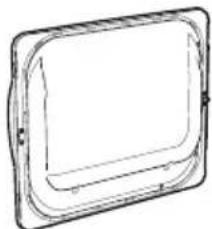
natural_image
Simple line drawing of a rectangular frame with rounded corners and a central recess (no text or symbols)Place all door parts together.
Secure hinges on the opposite side of the door handle, using the same 4 hinge screws. Secure the other two screws on the door handle side.
IMPORTANT: Note the location of the hinge before removing:
4 REVERSE THE PLATE AND THE LOCK PLATE OF THE DOOR PANEL
Unscrew both the plate and the lock plate (the one with a lock and the one without); reinstall the former in place of the latter and vice versa.

natural_image
Pure diagram of a rectangular container with internal curved lines, no text or symbols present5 REINSTALL THE DOOR
The door is now ready to be installed to the dryer. Insert each hinge to the two partially fastened screws. Secure the lower screws (remaining from step 2) and tighten the upper screws.

natural_image
Diagram showing a device being processed with a screwdriver, no text or symbols present
natural_image
Technical line drawing of a mechanical component with a screwdriver inserted (no text or symbols)glass door
1 BEFORE YOU BEGIN
Unplug the dryer from electrical current.
2 REMOVE THE DOOR
Open the door to approximately 90 degrees. Remove the bottom screw from each hinge. Insert these screws about half way into the UPPER holes of each hing on the other side. Loosen upper screw from each hinge. Remove the door from the dryer by lifting it up and out. Remove the two remaining screws and keep them in site.

natural_image
Diagram showing a door opening with a bird-shaped opening and a tool inserted into a bracket (no text or symbols)3 REVERSE DOOR PANEL
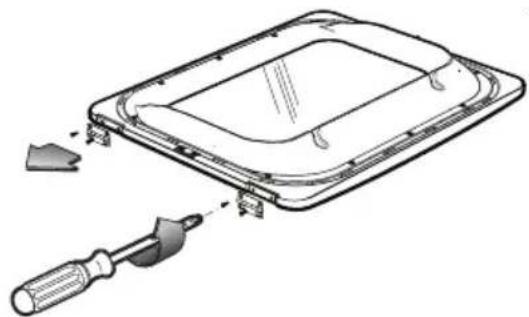
Placing the door on a soft protected flat surface, remove the 4 screws from the hinges.
natural_image
Technical line drawing of a mechanical component with a screwdriver inserted, showing internal structure without any text or symbols.Separate the door frame from inner door, unscrewing the 6 #8 screws.
IMPORTANT: Only remove the 6 screws as shown in the image.

natural_image
Technical line drawing of a layered electronic component with an upward arrow indicating motion or assembly (no text or symbols present)4 REVERSE PLATE AND LOCK PLATE FROM DOOR PANEL
Unscrew both the plate and the lock plate (the one with a lock and the one without); reinstall the former in place of the latter and vice versa.

natural_image
Pure technical line drawing of a rectangular component with internal curved lines (no text or symbols)5 REINSTALL DOOR
The door is now ready to be installed to the dryer. Insert each hinge to the two partially fastened screws. Secure the lower screws (remaining from step 2) and tighten the upper screws.
Rotate door panel 180° and reinsert the inner door into the door panel.


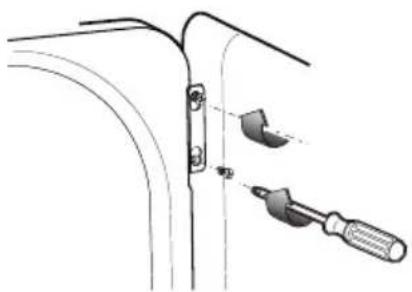
Secure hinges on the opposite side of the door handle, using the same 4 hinge screws.
natural_image
Technical line drawing of a mechanical component with a screwdriver inserted (no text or symbols)IMPORTANT: Note the location of the hinge before removing:

natural_image
Technical line drawing of a mechanical component with a tool inserted, showing a close-up view of the part (no text or symbols present)operating instructions
about the dryer control panel
You can locate the model number on the label that is on the front left side of the dryer behind the door.
models: SMV630DEWWY00, SMV630PEWWY00

1 program selection
Use the cycle dial to select predefined or timed cycles. AUTOMATIC cycles "sense" dampness of the load. Select "More Dry" for heavy fabrics and "Less Dry" for light fabrics. TIMED DRY cycles run the dryer during selected time periods.
dry level (special programs)
For Special Programs and most linens. Select "More dry" for heavy fabrics or "Less dry" for light fabrics.
timed dry (manual programs)
Turn dry cycle dial on the time you choose to use this feature.
wrinkle-free
To remove wrinkles from clean and dry garment
2 start
Close dryer door. Turn dry cycle dial clock-wise Activate position. Opening the dryer door will stop operation. To restart, close door and select start to complete cycle.
3 temperatures
Use these features in accordance to clothes types.
max heat For linens, towels and denim
For normal or heavy cottons
med heat Perm press
For synthetic, blends, delicates and items labeled as "perm press".
low heat Delicates, Lycra and Stretch
For delicates, knits and synthetic garments
no heat / fluff For Extra delicates, Knits and Tennis
To fluff items without heat. Use Timed cycle (no automatic)
loading and using the dryer
Always follow the fabric manufacturer's care label when laundering.
sorting and loading the dryer.
- As a general rule, if clothes are sorted properly for the washer, they are also sorted properly for the dryer.
- Do not add fabric softener sheets once the load has become warm. They may cause stains.
- Do not overload the dryer. This wastes energy and causes wrinkling.
- Do not dry the following items: fiberglass items, wool items, rubber-coated items, plastics, items with plastic trim and foam filled items.
damp alert sensor
This feature will only activate with Automatic cycles (COTTONS, PERM PRESS AND DELICATES)
The dampness sensor provides greatest precision to the standard dryers, resulting on shorter times and a better care of garments.
While clothes are turning in the dryer drum they will activate dampness sensor. The dampness sensor will stop the heater cycle as soon as clothes have reached dryness level, which will stop the cycle and/or selected timed dry and will reduce energy consumption.
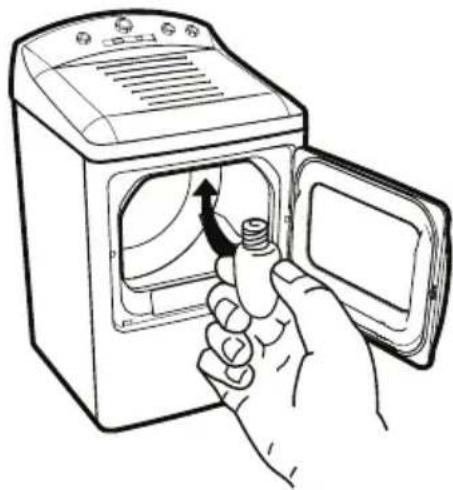
drum lamp
natural_image
Line drawing of a hand opening a washing machine with a screw being inserted (no text or symbols)Before replacing the light bulb, be sure to unplug the dryer power cord.
Reach above dryer opening from inside the drum.
Remove the bulb and replace it with the same size bulb.
dryer rack

natural_image
Technical line drawing of a mechanical device with internal components (no text or symbols)A useful drying rack may be used for drying delicate items such as washable sweaters, stuffed animals and tennis shoes.
Insert the drying rack into the slots over the lint filter, in a manner that the rack is extended inside dryer drum.
Notes:
• The drying rack is designed for use with the TIMED DRY
- Do not use this drying rack when there are other clothes in the dryer.
care and cleaning of your dryer
• The Exterior: Wipe or dust any spills or washing compounds using a damp cloth. Dryer control panel and finishes may be damaged by some laundry pretreatment soil and stain remover products. Apply these products away from the dryer. The fabric may be washed and dried normally. Damage to your dryer caused by these products is not covered by the warranty.
- The Lint Filter: Clean the lint filter before each use. Pull out the lint filter. Moisten your fingers and remove the captured lint. Once clean, slide the filter back into position. Waxy accumulation may occur by using fabric softener. To remove accumulations, wash filter off with warm soapy water. Dry completely and reinstall.
- The Exhaust Duct: Inspect and clean the exhaust ducting at least once a year to prevent clogging. A partially clogged exhaust can lengthen the drying time.
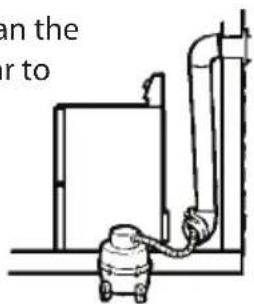
- Turn off electrical supply by disconnecting the plug from the wall socket.
-
Disconnect the duct from the dryer.
-
Vacuum the duct with the hose attachment and reconnect the duct
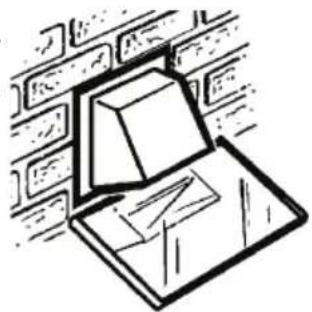
- The Exhaust Hood: Check with a mirror that the interior flaps of the hood move freely when operating. Make sure that there is no wildlife (birds, insects, etc.) nesting inside the duct or hood.
natural_image
Simple line drawing of a brick wall with a box and paper tray, no text or symbols present.
natural_image
Line drawing of a hand pressing down on a small electronic component (no text or symbols)- Do not run your dryer without lint filter in place. Call a qualified technician once a year to vacuum lint accumulated in the dryer.
- Stainless Steel: To clean stainless steel surfaces use a damp cloth with mild, non abrasive cleaner suitable for stainless steel surfaces. Remove the cleaner residue and then dry with a clean cloth.
- Stainless steel rotating drum. The stainless steel used to make the dryer drum provides the highest reliability available in a dryer. If the dryer drum should be scratched or dented during normal use, the drum will not rust or corrode. These surface blemishes will not affect the function or durability of the drum.
venting the dryer

For the best drying performance, the dryer needs to be properly vented. The dryer will use more energy and run longer if it's not vented according with the following specifications:
Use only metal - rigid or flexible - ducts.
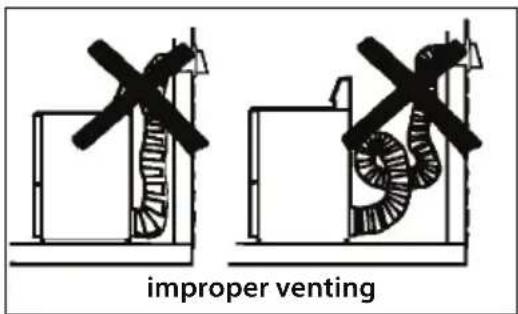
- Do not use plastic or other flammable ducts.
• Install the ductwork towards the exterior in the shortest length possible.
Do not crush or bend the duct.
Avoid resting the duct on sharp objects.
Garment care label "symbols"
wash labels
machine wash cycle.

Normal

Permanent Press / Wrinkle resistant

Gentle/Delicates

Hand wash

D o not wash
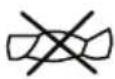
Do not wring
water temperature

Hot Warm

C

ool
bleach labels
bleach symbols

Any bleach (when needed)

bleach (when needed)

Do not bleach Only non-chlorine
dry labels
tumble dry

Dry

Normal

Permanent Press

Delicates

Do not tumble dry

Do not dry
heat

High Medium Low No heat


special instructions

Line dry

Drip dry Dry flat


In the shade
Before you call for service...
Troubleshooting tips
Save time and money! Review the charts on the following pages and you may not need to call for service.
| Problem | Possible causes | What to do |
| Dryer does not start | Dryer is unplugged | Make sure the dryer plug is pushed completely into the outlet. |
| Fuse is blown/circuit breaker is tripped. | Make sure the dryer plug is pushed completely into"Check the building's fuse or circuit breaker box and replace fuse or reset breaker. NOTE: Electric dryers use two fuses or breakers." | |
| The safety heat limiter shot | Call a qualified intaller or a service man to replace it. | |
| Dryer does not generate heat | Fuse is blown/circuit breaker is tripped. Dryer may tumble but not heat. | Check the building's fuse or circuit breaker box and replace fuse or reset breaker. |
| Gas service is off. | Make sure shutt-off and main valves are completely open. | |
| You must have two fuses at home for the dryer circuits. If 1 of the fuses is burnt out the drum will still turn but the heater will not operate. | Replace the fuse. | |
| Fuse is blown/circuit breaker is tripped. Dryer may tumble but not heat. | Make sure gas shutoff is open. Read the installation instructions to follow the procedures. | |
| The dryer does not have enough air flow supply to maintain burner flame (gas models) | Read installation instructions. | |
| LP gas supply tank is empty or an interruption on natural gas supply has occurred (gas model) | Fill or replace the tank. Dryer must heat up when natural gas supply network is restored. | |
| Dryer shakes or makes noises | Some shaking noise is normal. Dryer may be sitting unevenly. | Move dryer to an even floor space or adjust the leveling legs as necessary. |
| Greasy spots on clothes. | Improper use of fabric softener. | Follow directions on fabric softener package. |
| You may be drying dirty items with clean ones. | Use your dryer to dry only clean items. Dirty items can stain clean items or the dryer. | |
| Clothes were not completely clean. | Sometimes stains which cannot be seen when the clothes are wet, appear after drying. Use proper washing procedures before drying. | |
| Problem | Possible Causes | What to do |
| Lint on clothes | Lint filter is full | Clean lint filter before each load |
| Improper sorting | Sort lint producers (like chenille) from lint collectors (like corduroy) | |
| Static electricity can attract lint. | See suggestions in this section under STATIC. | |
| Overloading | Separate large loads in to smaller ones | |
| Paper, tissues, etc. in pockets. | Empty all pockets before washing and drying the clothes. | |
| Static occurs | No fabric softener was used. | Try using a fabric softener. |
| Clothes overdried. | Try a fabric softenerAdjust dryer controls | |
| Synthetics, permanent press and blends may cause static. | Try using fabric softener | |
| Inconsistent drying times | Heat type | Automatic Drying time will vary according to the type of heat used(electric, natural gas or LP Gas), load size, type of fabric, dampness of clothes and condition of the exhaust system. |
| Clothes take too long to dry | Improper sorting | Separate heavy articles from lightweight ones (generally,a well-sorted washer load is a well-sorted dryer load). |
| Large loads of heavy fabrics (like beach towels) | Large heavy fabrics contain more moisture and take longer to dry. Separate large, heavy fabrics into smallerloads to shorten drying time. | |
| Inappropriate control settings | Match control settings to the load you are drying. | |
| Lint filter is full | Clean lint filter before every load | |
| Improper or obstructed duct | Check the Installation Instructions to ensure proper ventilation.Make sure ducting is clean, free of kinks and unobstructedCheck to see if outside wall hood operates easily.Check the Installation Instructions to ensure proper ventilation. | |
| Blown f uses or tripped circuit breaker. | Replace fuses or reset circuit breakers. Most dryers use 2 fuses/breakers, make sure both of them areoperating. | |
| Clothes take too long to dry (CONT.) | Underloading | ·If you are drying only one or two items, add a few more to ensure proper tumbling. |
| Clothes are wrinkled. | Overdrying. | ·Select a shorter drying time·Remove items while they still holding a slight amount of moisture. |
| You are letting the items sit in the dryer after cycle ends. | ·Remove items when the cycle ends and fold or hangimmediately. | |
| Clothes shrink | Some fabrics will naturally shrink when getting washed. Others can safely be washed, but will shrink in the dryer. | ·To avoid shrinkage, follow garment care labels.·Some items may be pressed back into shape after drying·If you are concerned about shrinkage in a particular garment, do not machine wash or tumble dry it. |
| Clothes are always damp. | Lint filter is full | ·Clean lint filter before each load for:-Better performance-Less energy consumption.-Best care of clothing. |
Technical Specifications
| Gas Dryer | Electric Dryer | Electric Dryer | Gas/electric dryer | |
| Nominal power voltage (Volt) | 120 V ~ | 220 V ~ | 220 V 2N~ | 220 V~ |
| Operating frequency or nominal frequency (hertz) | 60 Hz | 60 Hz | 60 Hz | 50 Hz |
| Current (amps) | 7,0 A | 18,6 A | 24,5 A | -- |
| Maximum mass dry textile material (kg) | 6.35 kg 6.35 kg | 6.35 kg | 6.35 kg |
póliza de garantía
Blvd. E. Zapata #1585 Pte.
Fracc. Los Pinos
80120 Culiacán, Sinaloa
(01.667) 717.0353, 0458 y 714.1366
• Chihuahua
234D1361P012
- puerta de cristal
- reinstale la puerta
- antes de empezar
- rejilla de secado
- installation instructions
- operating instructions
- consumer support
- important safety information read all the instructions before using your dryer save these intructions
- WARNING!
- FOR FOR PROPER FUNCTIONING OF THIS APPLIANCE IT IS THE LINT FILTER BEFORE AND AFTER EACH DRYING CYCLE.
- what to do if you smell gas:
- ⚠ warning- laundry area
- when using your dryer
- when dryer is not in use
- proper installation
- BEFORE YOU BEGIN
- FOR YOUR SAFETY :
- ▲ warning
- SAVE THESE INSTRUCTIONS
- installation
- gas dryer installation instructions
- preparing to install the new dryer disconnecting the gas supply:
- electrical connection instructions for gas dryers
- ELECTRICAL REQUIREMENTS
- electric dryer connection
- warning:
- dryer dimensions
- gas requirements
- gas supply
- reconnecting gas
- LEAK TESTING
- exhaust duct information
- warning: use only rigid metal 4" duct. do not install longer duct than specified in the exhaust length table
- exhaust length
- ELBOW SEPARATION
- ELBOWS OTHER THAN 90°
- JOINT SEALING
- INSULATION
- exhaust connection
- standard rear exhaust
- using flexible metal duct
- instructions to reverse the door swing.
- important notes:
- TOOLS YOU WILL NEED:
- DOOR PARTS:
- solid door
- S CREWS (18 pieces)
- glass door
- BEFORE YOU BEGIN
- REMOVE THE DOOR
- REVERSE THE DOOR PANEL
- REVERSE THE PLATE AND THE LOCK PLATE OF THE DOOR PANEL
- REINSTALL THE DOOR
- REVERSE DOOR PANEL
- REVERSE PLATE AND LOCK PLATE FROM DOOR PANEL
- REINSTALL DOOR
- about the dryer control panel
- program selection
- dry level (special programs)
- timed dry (manual programs)
- wrinkle-free
- start
- temperatures
- loading and using the dryer
- sorting and loading the dryer.
- damp alert sensor
- drum lamp
- dryer rack
- Notes:
- care and cleaning of your dryer
- venting the dryer
- Garment care label "symbols"
- wash labels
- bleach labels
- dry labels
- Before you call for service...
- Troubleshooting tips
- póliza de garantía
- • Chihuahua
Brand : Mabe
Model : SME625DPBB
Category : Tumble dryer