
AirCloud - Unknown AIRLIVE - Free user manual and instructions
Find the device manual for free AirCloud AIRLIVE in PDF.


| Product Type | Wireless Cloud Router |
| Dimensions | 200 x 140 x 35 mm |
| Weight | 350 g |
| Power Supply | 12V DC, 1.5A |
| Wireless Standards | IEEE 802.11a/b/g/n/ac |
| Frequency Bands | 2.4 GHz and 5 GHz |
| Max Wireless Speed | 1200 Mbps |
| Ethernet Ports | 4 x Gigabit LAN, 1 x Gigabit WAN |
| USB Ports | 1 x USB 3.0 |
| Cloud Storage | Free 100 GB cloud space |
| Security | WPA2, WPA3, firewall, VPN support |
| Management | Web interface, mobile app |
| Operating Temperature | 0°C to 40°C |
| Humidity | 10% to 90% non-condensing |
| Maintenance | Keep clean, avoid moisture, reset button for factory reset |
| Safety | CE, FCC certified, use only included power adapter |
| Spare Parts | Power adapter, mounting screws, warranty card |
| Expected Lifespan | 3-5 years |
Frequently Asked Questions - AirCloud AIRLIVE
User questions about AirCloud AIRLIVE
0 question about this device. Answer the ones you know or ask your own.
Ask a new question about this device
Download the instructions for your Unknown in PDF format for free! Find your manual AirCloud - AIRLIVE and take your electronic device back in hand. On this page are published all the documents necessary for the use of your device. AirCloud by AIRLIVE.
USER MANUAL AirCloud AIRLIVE
natural_image
Abstract blue line drawing resembling a stylized letter 'a' with a dot above, no text or symbols present.
Ver. 1.0
Index
Chapter 1 Register and bind device into cloud 1
1.1 Determine the Network Topology 1
1.2 Register and binding device into aircloud 1
Chapter 2 Create template and configure your AP 3
2.1 Configure your AP from the Cloud 3
2.2 Create the AP template and deploy 4
Chapter 3 Create captive portal page and create user Auth 6
3.1 Create captive portal page and create user Auth 6
3.2 Create the User Account and Password 7
3.3 Import Batch 7
3.4 Create Strategy 8
3.5 Add Strategy to the AP(s) 9
Chapter 4 Home Page 10
4.1 Home Page 10
4.2 Home-Binding Device 10
4.3 Home - Personal 11
4.4 Home - System Info 11
4.5 Home - Logout 11
Chapter 5 Device 12
5.1 Topology view 12
5.1.1 List View 13
5.1.2 Edit Topology Graph 13
5.1.3 Reset Topology Graph 14
5.1.4 Scan Device 14
5.1.5 Full Screen 15
5.1.6 Search Device Name 15
5.1.7 All/Online/Offline 16
5.1.8 Search Device 16
5.1.9 Batch Function 16
5.2 Display 17
5.2.1 Config 17
5.2.2 Config - Info 18
5.3 Config - Wi-Fi 18
5.3.1 Config - Wi-Fi - Advanced 19
5.4 Wi-Fi Time Off 19
5.5 Alarm Setting 20
5.6 Device Log 21
5.7 Auth 21
5.7.1 Ethernet 22
5.7.2 Roaming 22
5.8 Other Setting 23
5.8.1 Device Password 23
Chapter 6 Project 24
6.1 Project 24
6.2 Project Note 24
Chapter 7 Maintenance 25
7.1 Upgrade 25
7.1.1 Batch Upgrade Firmware 26
7.1.2 Select per model 26
7.2 Maintenance - Log 26
7.2.1 Configuration Log 26
7.2.2 Upgrade Log 27
7.2.3 Upgrade Log per Date 27
7.3 Template 28
7.3.1 Template Add 28
7.3.2 Template - Wi-Fi 29
7.3.3 Template - Advanced 30
7.3.4 Other Setting 30
Chapter 8 Authentication 31
8.1 Authentication - Portal 31
8.1.1 Portal Page Setup 31
8.1.2 Process Authentication 32
8.1.3 After Authentication 32
8.2 Strategy 33
8.2.1 Strategy Set 33
8.3 Authentication Methods 34
8.3.1 Authentication Configuration 34
8.3.2 Import 34
8.3.3 Add Member 35
8.3.4 Delete Member 35
8.4 Authentication Details 36
8.4.1 Display by login type 36
8.4.2 Search by MAC 36
8.4.3 Export 36
Chapter 9 Account 37
9.1 Search Account 37
9.2 Search Account Type 37
9.3 Create Account 37
9.4 Account Password Reset and Delete 39
Chapter 1 Register and bind device into cloud.
1.1 Determine the Network Topology
The following figure shows a typical topology for a use case.
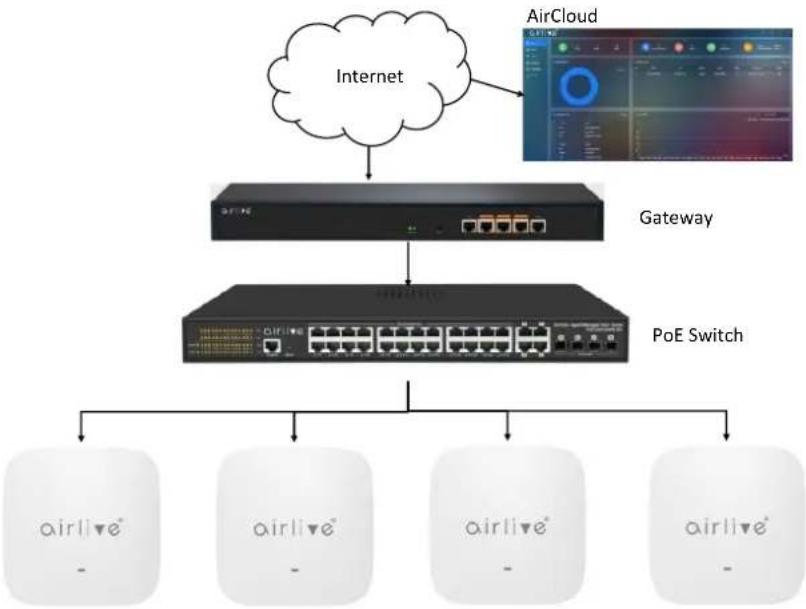
flowchart
graph TD
    A["Internet"] --> B["Gateway"]
    B --> C["PoE Switch"]
    C --> D["airlive* -"]
    C --> E["airlive* -"]
    C --> F["airlive* -"]
    C --> G["airlive* -"]
    H["AirCloud"] --> I["Image Panel"]
    I --> J["Internet"]
1.2 Register and binding device into aircloud
step 1: Open up browser and go to aircloud.airlive.com
step 2: Register account
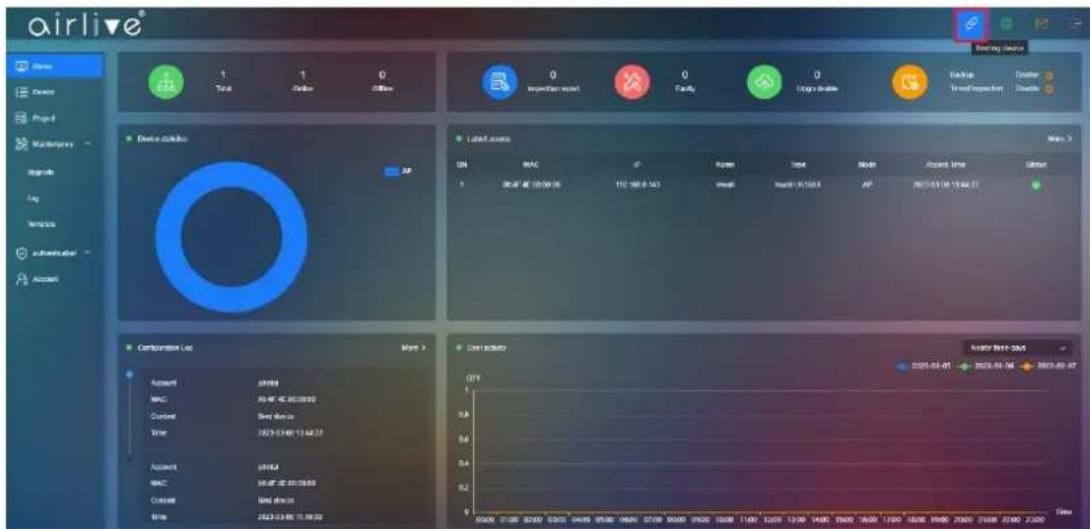
step 3: In the Home page on the right top corner click binding device

Step 4 Input the MAC address and the password of the AP, you can find these on the device label on the back of the device. In the AP Home page you can also find your MAC address.
The MAC address used can also be found in the webGUI of the AP, the MAC address used for binding is located in the red column of the below image.
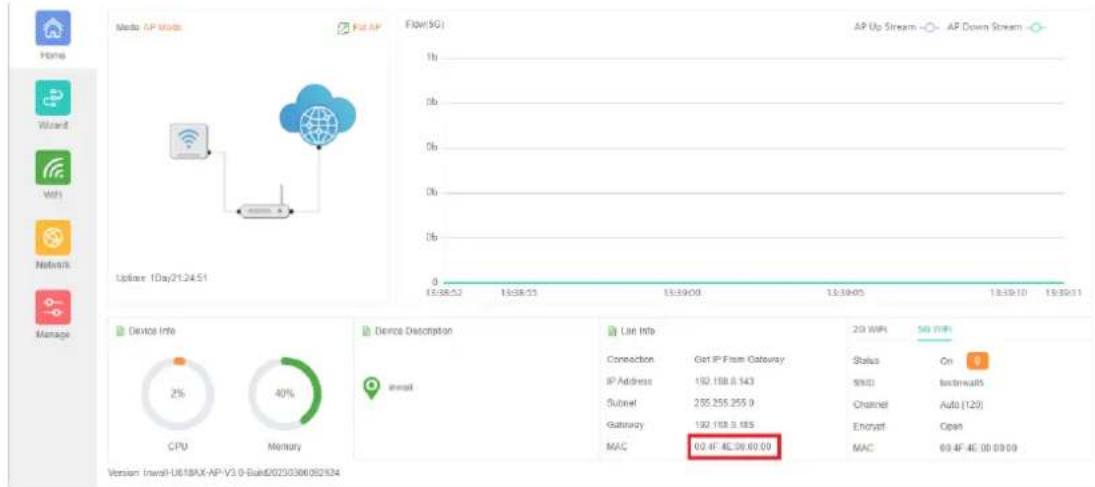
In the aircloud:
Input AP MAC address into MAC, and device password of the ap.(default device password can be found on the device label). The default AP password is admin.
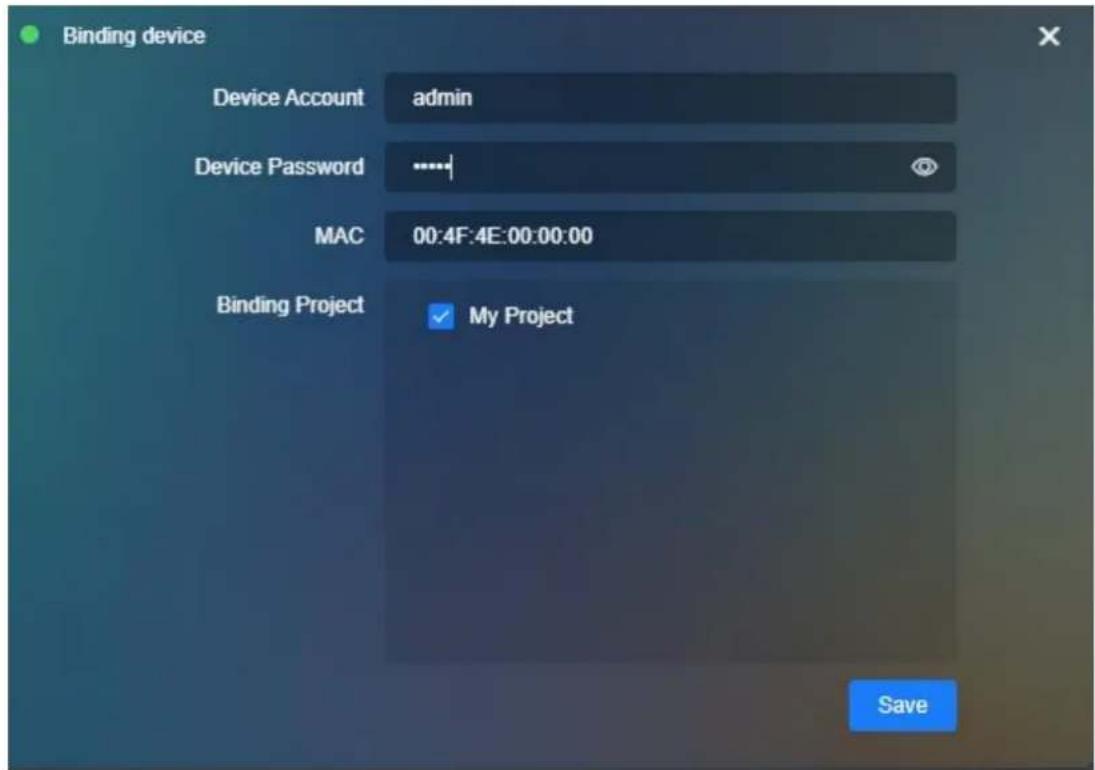
Step 5 Reload the webpage, you should now be able to find the device is bind into aircloud. Note: When the device keeps offline, then check your Internet Firewall settings these could be set to high and blocking the aircloud connection.

Chapter 2 Create template and configure your AP
2.1 Configure your AP from the Cloud
Step 1 Click device, then click the config icon behind the AP you would like to configure

Step 2: Click Wi-Fi to start configuring the 2G/5G Wi-Fi setting.

2.2 Create the AP template and deploy
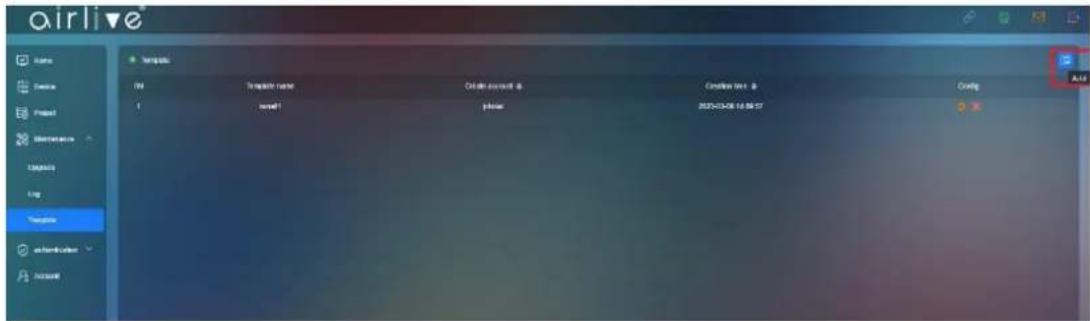
Step 1: Click Maintenance-Template-add. You can find add button in red box in the top right corner.
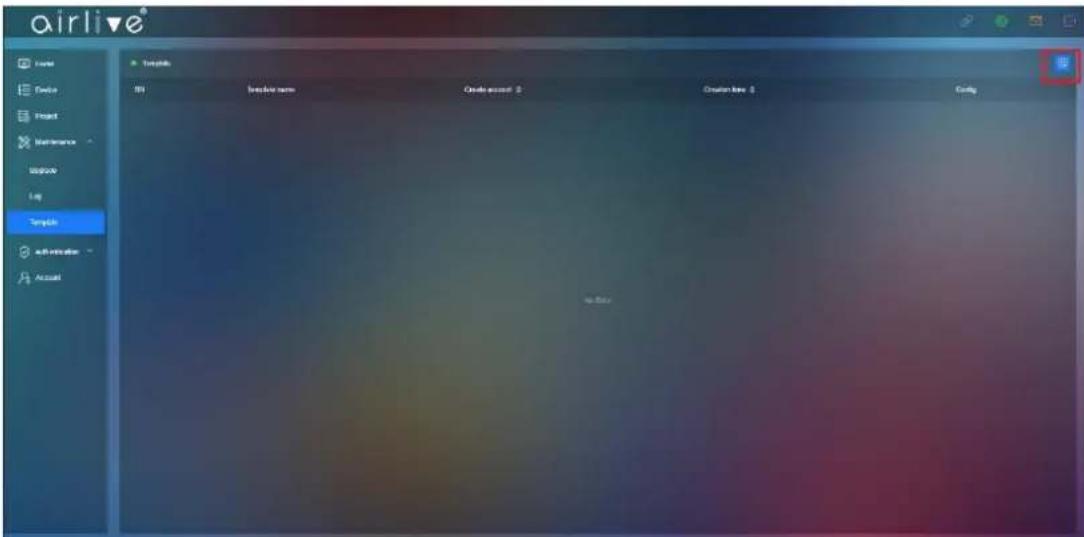
Step 2: You can pre-configure Wi-Fi/Advanced setting according to your need. Press Save, to save your template.

Step 3 Deploy Wi-Fi template into device, go to Device (1) Check mark the AP and click (2) Application Template.

Step 4 Click apply to load the Template to your device(s).

Chapter 3 Create captive portal page and create user Auth
3.1 Create captive portal page and create user Auth
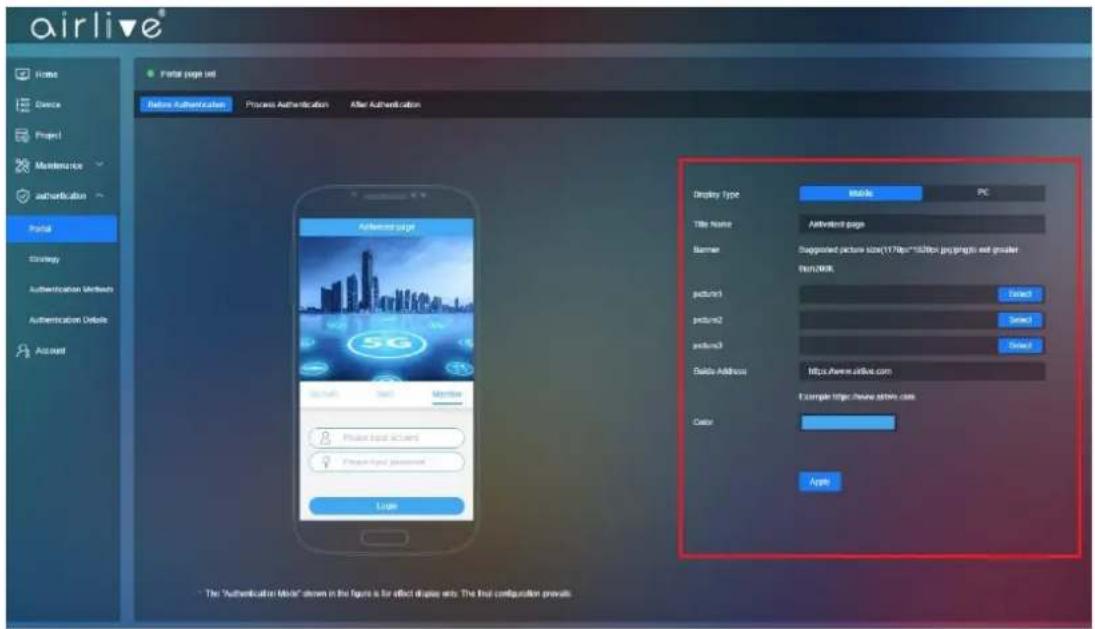
Step 1 Click Authentication - Portal
Input all information in marked in the red box for both Mobile and PC version from before Auth till after Auth.
3.2 Create the User Account and Password
Step 1 Click Authentication Methods – Add Member (marked it red box). Enter the Member Account (Username) and Login Password for the client.

3.3 Import Batch
To import a large group of usernames and passwords the Import Batch function can be used.
Step 1 Click Import

Step 2 Click Download (browser will download the excl file)
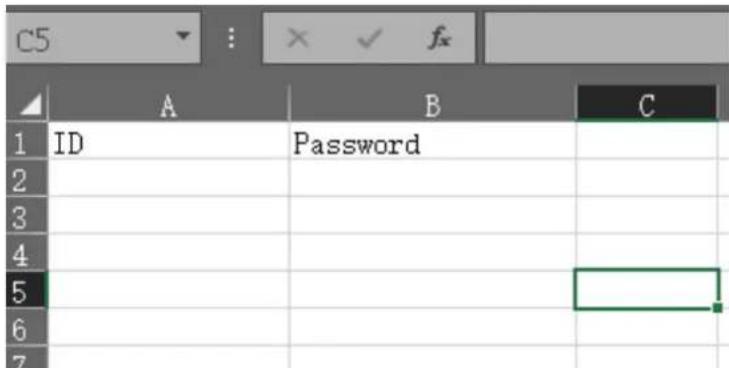
In this Excel file usernames (ID) and password can be made. After creating the Usernames and Passwords Save the excel file and Import it. Select the File and press Save. The accounts will now be added.

3.4 Create Strategy
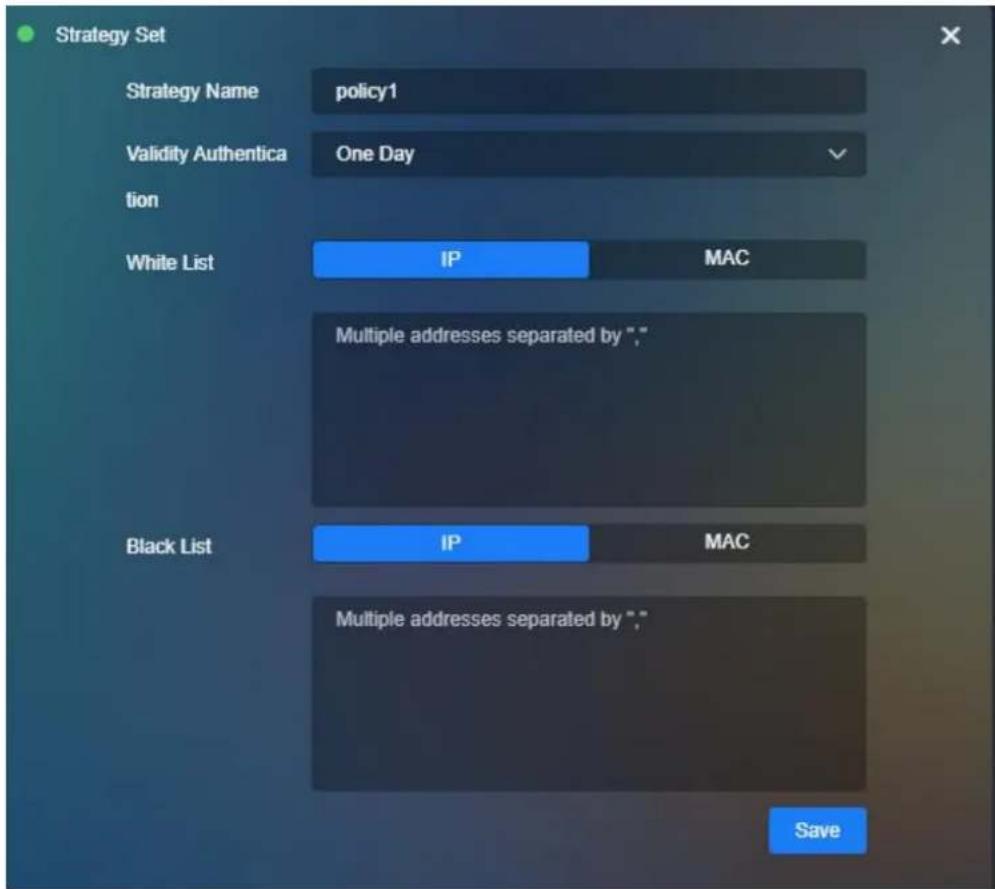
Step 1 Click Authentication- Strategy - Add

Step 2 Create a policy according to your network needs then Save the settings. IP or MAC addresses can be added to either the White or Blacklist to included or exclude them from the policy.
3.5 Add Strategy to the AP(s)
Step 1 Go to Device – Config - Auth
Select for which part of the network the Strategy would apply, 2G, 5G or Ethernet.
Step 2 Select your network for example 5G Wi-Fi and Click Enable, select your
Strategy from the pull down menu.
Step 3 Authentication Click Member to apply member you just created.

To allow for Roaming click on Roaming Service and Check mark "Join a group to roam"

Chapter 4 Home Page
4.1 Home Page
In the home page you can see an overview off your Online/Offline AP's
Check the AP IP address, Firmware version, MAC address, Model and Online status

4.2 Home - Binding Device
Click binding device in the Home page, to input more devices.
Please make sure that the Cloud function has been enabled in the Access Point or Wireless Controller which you would like to add.
4.3 Home - Personal
Basic Info will display your current aircloud Account settings these can also be changed or updated when information has changed.
To change the Account password, click on Modify password.

4.4 Home - System Info
System Mail will display Alarm information when this function has been enabled in the AP settings.

4.5 Home - Logout
Click on the Logout button to disconnected from the aircloud.

Chapter 5 Device
This function is to configure your AP or Wireless Controller
5.1 Topology view
Topology will automatically create the topology, according to the base topology you can edit your topology for troubleshooting


5.1.1 List View
Go back to device list.

5.1.2 Edit Topology Graph

Drag and place to the graph needed and save the topology setup.

5.1.3 Reset Topology Graph
Reset the Topology Graph back to default

5.1.4 Scan Device
Scan newly added devices to add them to the topology.

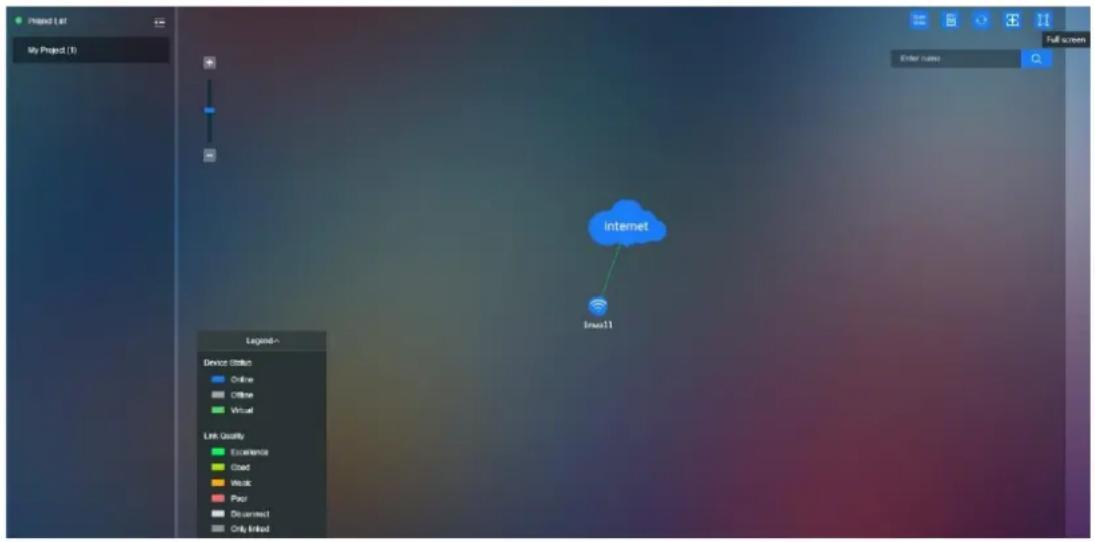
5.1.5 Full Screen
Full screen of the Topology Graph
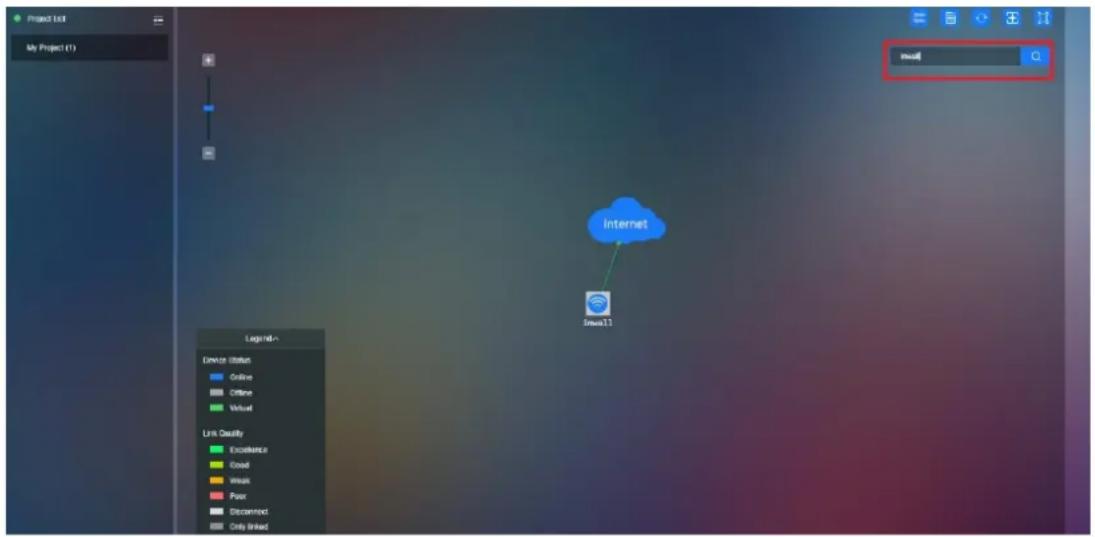
5.1.6 Search Device Name
Search Topology Device Name in the Topology
5.1.7 All/Online/Offline
Show the status of the AP's chose to show All (both Online and Offline) or select either only Online or Offline AP's.

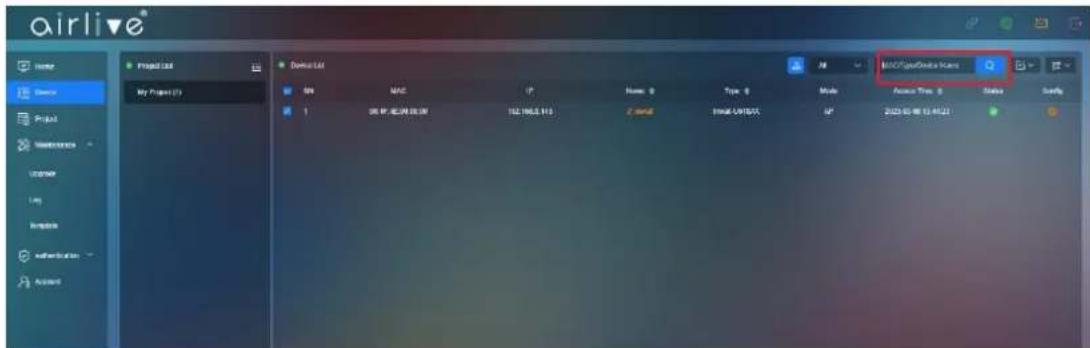
5.1.8 Search Device
To search a Device, you can enter the MAC, Model or Device name of an Access Point or Wireless Controller.
5.1.9 Batch Function
To use the Batch function Check mark one or multiple devices for which the Batch function will be active. For example, when two devices are check marked and Reboot is selected then both devices will be rebooted.
In the Batch function you can select Application Template, Reboot, Device Allocation, Export or Unbind.

5.2 Display
Choose which information from the AP or Wireless Controller is displayed in the Device page. Check mark the items which you would like to see. This can be MAC, IP, Name, Type, Mode, Version, Access Time and or Status.

5.2.1 Config
Click to config icon to enter the configuration setup.

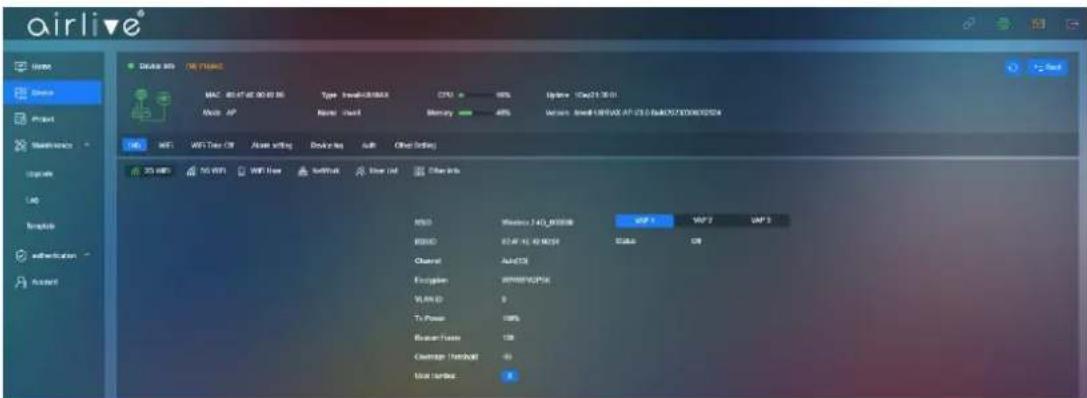
5.2.2 Config - Info
Click on Info to display the device information. Depended on the device selected this can be 2G/5G Wi-Fi, Wi-Fi user, Network, User list, and Other info.

5.3 Config - Wi-Fi
To configure the Wi-Fi settings Click on Wi-Fi, the following settings can be changed.
2G/5G Wi-Fi Enable/Disable, SSID: Input SSID name,
Select to Hide SSID: Enable/Disable
Wireless Mode: 20Mhz/40Mhz/80Mhz depend on the device
Channel: Depends on 2.4 or 5.8Ghz and on device country code set
Encryption: None/WPA2/WPA3, Password: SSID password
TX Power: Change Wireless Transmitting Power
Max User: Apply Max supported device user.
VLAN ID:0\~4094 cannot choose 0, 0= Close VLAN ID
VAP1\~VAP3: Apply to multiple SSID these are the Virtual AP's
Status: Enable/Disable, SSID: input SSID name
Hide SSID: Enable/Disable, Encryption: Enable/Disable
VLAN ID: 0\~4094 cannot choose 0, 0= Close VLAN ID

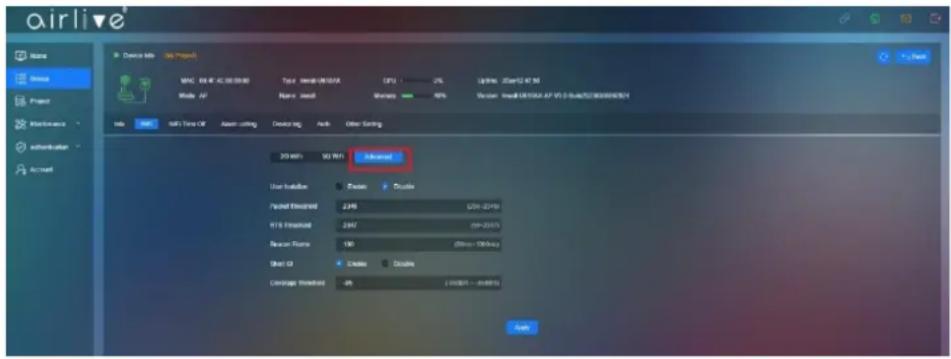
5.3.1 Config - Wi-Fi - Advanced
In Advanced the following additional settings can be made.
User Isolation: Enable/Disable, Packet Threshold: (256\~2346)
RTS Threshold: (50\~2347), Beacon Frame: (50ms\~1000ms)
Short GI: Enable/Disable, Coverage Threshold: (-95dBm \~ -65dBm)
These settings can differ per model.
5.4 Wi-Fi Time Off
Setup up the Wi-Fi operation schedule per device.
Wi-Fi Time Off: Enable/Disable
Select the Time in which the Wi-Fi would not be available to clients.

5.5 Alarm Setting
Setup the Alarm setting per device, different models will have different alarm settings.
Devices are frequently Online and Offline: On/Off
CPU usage: On/Off and select the CPU level
Memory usage: On/Off and select the percentage
Email Push: On/Off an email will be send to the email address which was used to setup the aircloud account.
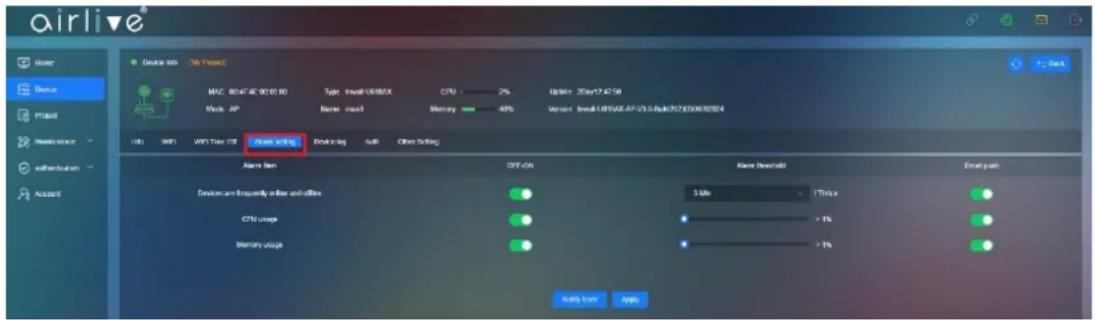
Notify User: Apply to user email box also see Chapter 4.4

5.6 Device Log
Display the device Log information
Chose to Enable or Disable the Log information. Log: Enable/Disable
Export Log the log file or Refresh.

5.7 Auth
Also see Chapter 3 for the full setup.
The Auth function will add a Strategy the network. Enable which part of the Network will be part of a set Strategy.
2G/5G Wi-Fi Status: Enable/Disable
SSID: shown the current SSID name information
Portal Page: Preconfigure default
Strategy: Apply the Strategy which was made in the Authentication – Strategy Menu. Authentication Method.
No Auth: Allow all users to pass without ID and Password
Member: Members have must be in the Member list and input ID and Password to pass the Authentication.

5.7.1 Ethernet
Ethernet this function works the same for the Wi-Fi setup only now for clients connected to the Ethernet network also.
Status: Enable/Disable
SSID: shown the current SSID name information
Portal Page: preconfigure default
Strategy: Apply the Strategy which was made in the Authentication – Strategy Menu.
Authentication Method
No Auth: Allow all users pass without ID and Password
Member: Members have must be in the Member list and input ID and Password to pass the Authentication.

5.7.2 Roaming
Roam: Join a group to roam

5.8 Other Setting
Other settings will allow you to setup an automatic Reboot schedule for the device as well as changing the device Password.
Time Reboot: Enable/Disable
Time: Set Time set schedule
Interval: 1\~10Day

5.8.1 Device Password
Input the Device Password, the Default Device Password is admin

Chapter 6 Project
6.1 Project
Add or Modify a Project according to need, this can be for example the location of were the devices were placed like a room name.

6.2 Project Note
Project name: Input or edit the name of a project.
Add content text into Project notes.

Chapter 7 Maintenance
7.1 Upgrade
With this function you can upgrade the firmware of a device directly or by schedule.
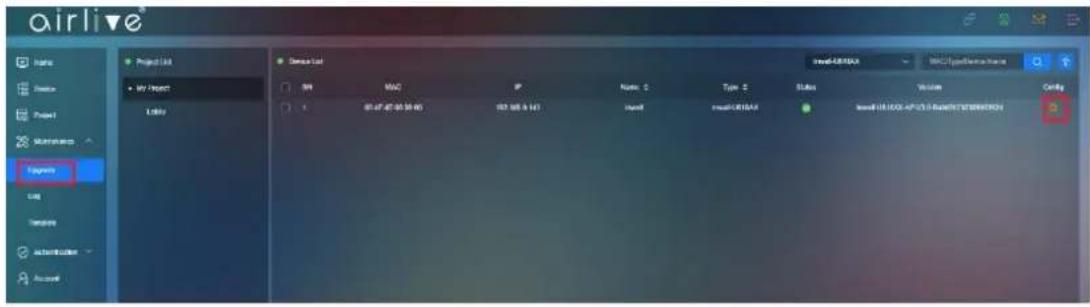

7.1.1 Batch Upgrade Firmware
With this function you can upgrade the Firmware for several devices atones by selecting (Check Mark) multiple devices. The Firmware can be updated directly, or it can be done via Time Schedule.
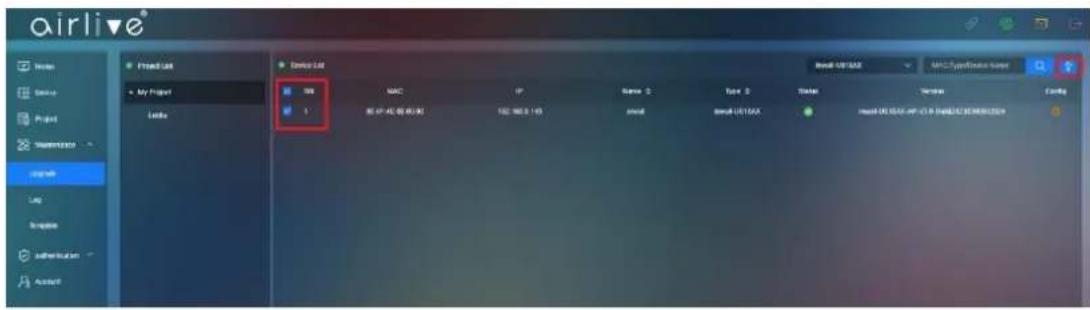
7.1.2 Select per model
The Devices can also be selected per model.

7.2 Maintenance - Log
Log will display both the Configuration Log as well as the Upgrade Log
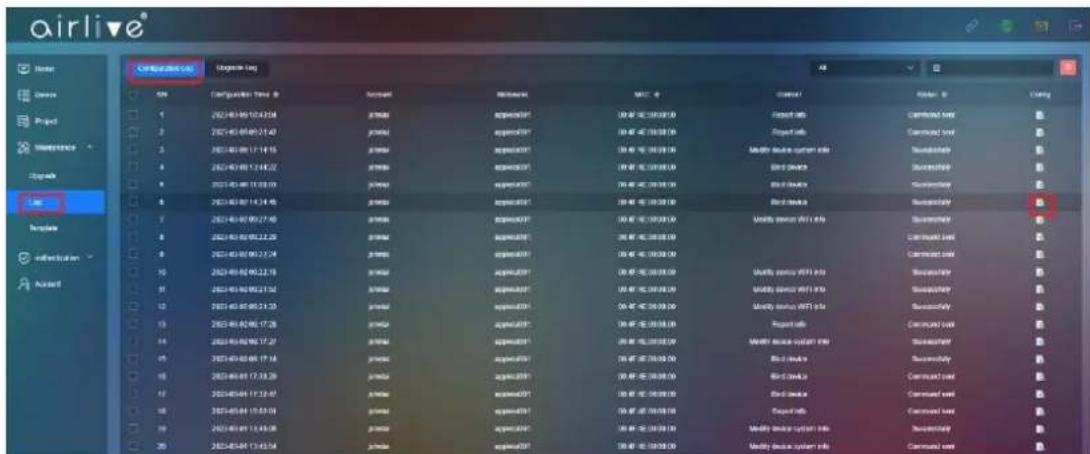
7.2.1 Configuration Log
The Configuration Log file will show the history per Date and Time of every change that was made in the aircloud. Click on the Config button to see more detail.
Detail Information.
![Detail Account johnlai MAC 00:4F:4E:00:00:00 IP 192.168.0.33 Type Inwall-U618AX Name invrSS77 Version Inwall-U618AX-AP-V3.0-Build20230301125958 Content Modify device WiFi info[00:4F:4E:00:00:00] Status Successfully Configuration Time 2023-03-02 09:27:40](/content/2026/05/1077777/images/399d5927f5a57d09dc78e98b1c9a8b783e7b881c346294eb3a234fabb56f0a77.jpg)
7.2.2 Upgrade Log
Select which Log information should be display.
All: Check all upgrade device
Wait for the upgrade: Devices waiting for the Firmware Upgrade
In the upgrade: Devices in Upgrade Firmware
Failed: Devices failed to Upgrade Firmware
Succussed: Devices which had a s successful Firmware Upgrade

7.2.3 Upgrade Log per Date
Display the Firmware Upgrade Log per Date

7.3 Template
Make a Template which can be used to change the settings for multiples AP's in one go.
7.3.1 Template Add
Click on the Add Button to start making a Template.
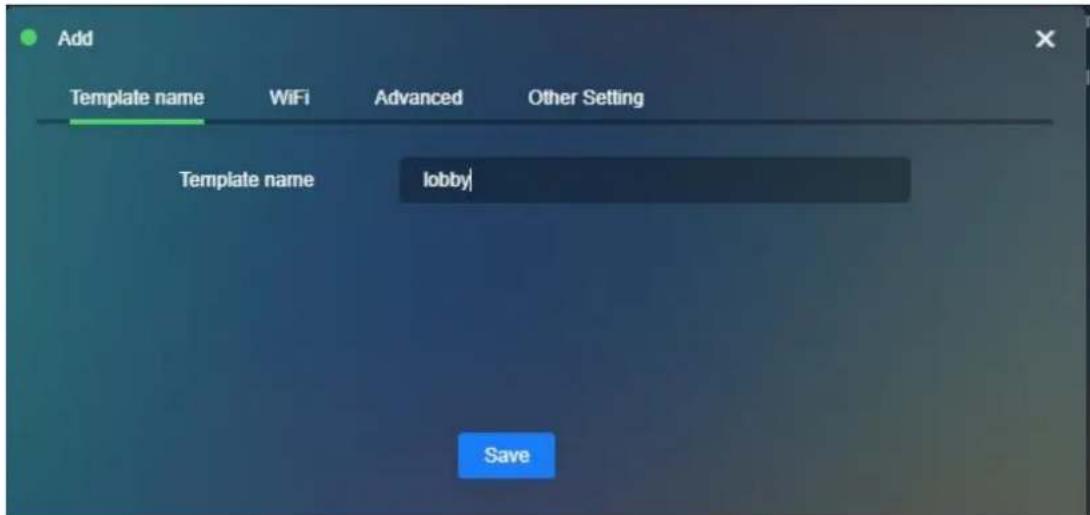
Template name: Input the Template name.
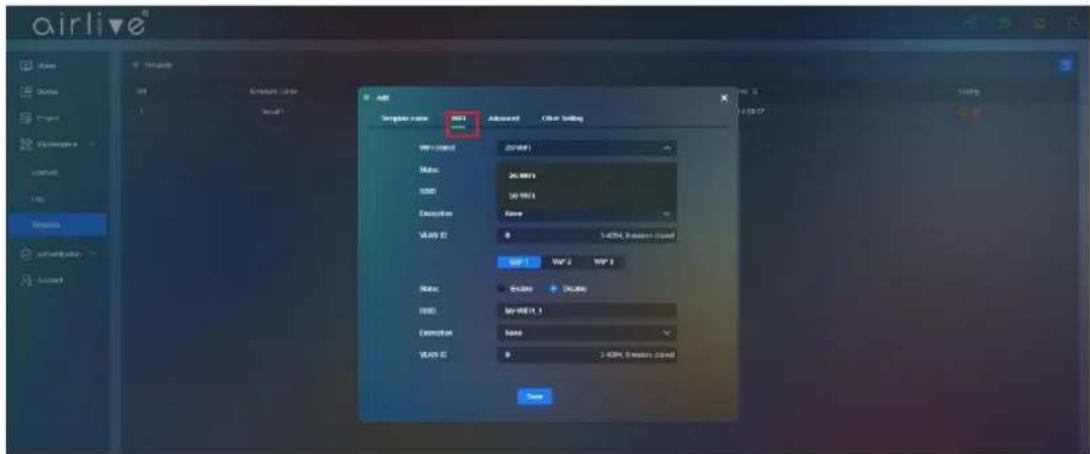
7.3.2 Template - Wi-Fi
Click to pre-configure the following Wi-Fi settings.
2G/5G Wi-Fi Enable/Disable, SSID: Input SSID name
Encryption: None/WPA2/WPA3, Password: SSID password
VLAN ID:0\~4094 cannot choose 0, 0= Close VLAN ID
VAP1\~VAP3: Apply to multiple SSID these are the Virtual AP's
Status: Enable/Disable, SSID: input SSID name
Encryption: Enable/Disable
VLAN ID: 0\~4094 cannot choose 0, 0= Close VLAN ID
7.3.3 Template - Advanced
In Advanced the following additional settings can be made.
Wi-Fi Select: Select either 2G or 5G
User Isolation: Enable/Disable, Packet Threshold: (256\~2346)
RTS Threshold: (50\~2347), Beacon Frame: (50ms\~1000ms)
Short GI: Enable/Disable, Coverage Threshold: (-95dBm \~ -65dBm)
These settings can differ per model.
Setup up the Wi-Fi operation schedule per device.
Wi-Fi Time Off: Enable/Disable
Select the Time in which the Wi-Fi would not be available to clients.

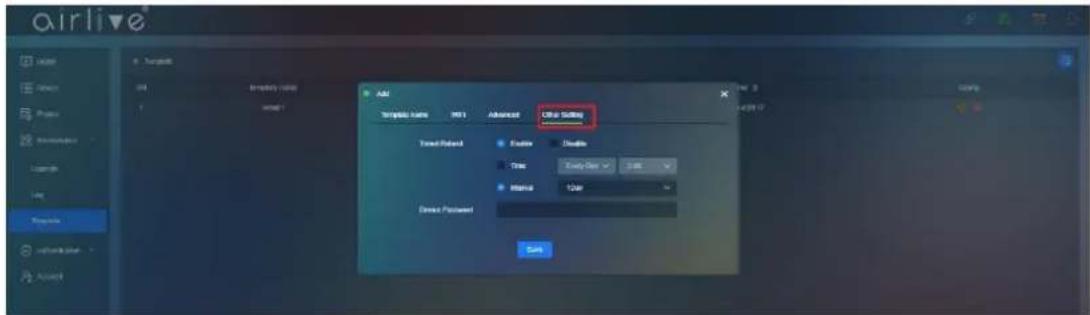
7.3.4 Other Setting
Other settings will allow you to setup an automatic Reboot schedule for the device as well as changing the device Password.
Time Reboot: Enable/Disable
Time: Set Time set schedule
Interval: 1\~10Day
Input the Device Password, the Default Device Password is admin.
Chapter 8 Authentication
8.1 Authentication - Portal
Setup the name the clients will see when they connect to the network, also your own background images can be uploaded and landing page can be setup.
8.1.1 Portal Page Setup
Display Type: Mobile/PC note that both Mobile and PC can have different images.
Title Name: Enter the Title Name of your network which clients will see.
Banner: Note that both the Mobile and PC use different image sizes.
Suggested picture size Mobile (1170px*1020px.jpg/png) not greater than 200Kb.
Suggested picture size PC (1920px*500px.jpg/png) not greater than 200Kb.
Guide Address: This is the landing page clients will be redirect to after a successful login.
Color: this is the Color of the banner on the top.

8.1.2 Process Authentication
Display Type: Mobile/PC
Suggested picture size Mobile (1170px*2280px.jpg/png) not greater than 500Kb.
Suggested picture size PC (1920px*1080px.jpg/png) not greater than 500Kb.

8.1.3 After Authentication
Display Type: Mobile/PC
Suggested picture size Mobile (1170px*2250px.jpg/png) not greater than 500Kb.
Suggested picture size PC (1920px*1080px.jpg/png) not greater than 500Kb.

8.2 Strategy
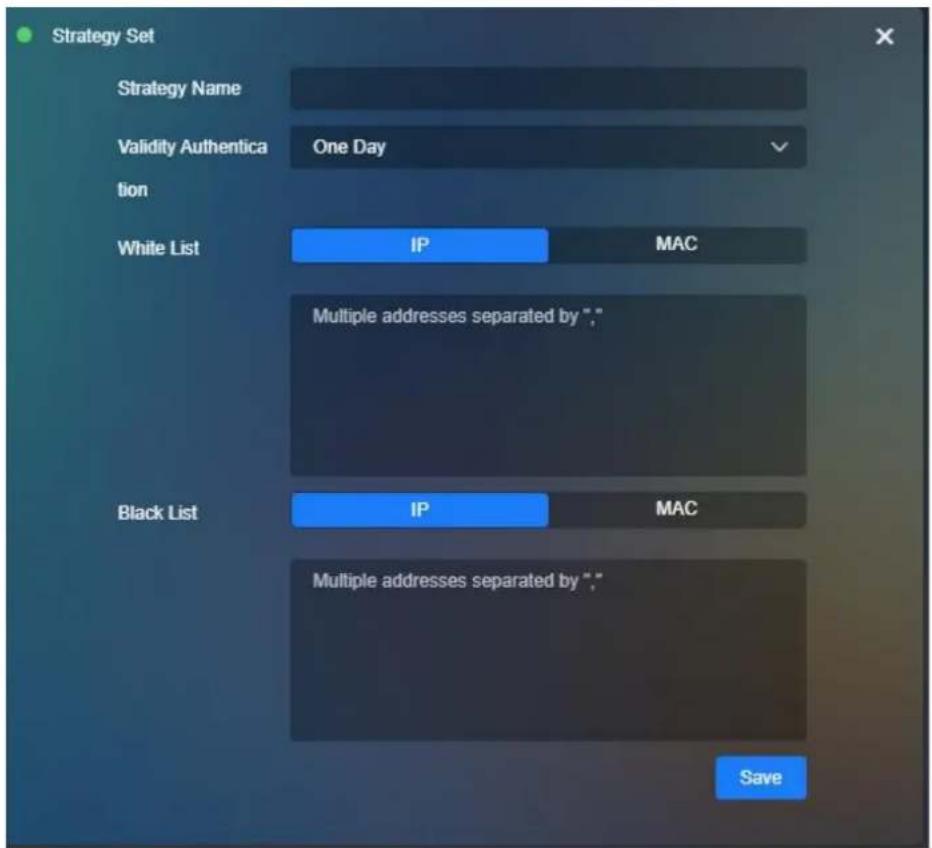
Create a policy according to your network needs then Save. IP or MAC addresses can be added to either the White or Blacklist to included or exclude them from the policy.
8.2.1 Strategy Set
Click Add to make a new Strategy

Strategy Set
Strategy Name: Enter the Name for the Strategy
Validity Authentication: 1\~10Day, permanent
White List: IP address/MAC Address
Black List: IP address/MAC Address
8.3 Authentication Methods
Also see Chapter 3 for a quick introduction. Add Members which will be able to connect to the network.
8.3.1 Authentication Configuration
Search bar: Input keyword to search user from the list.

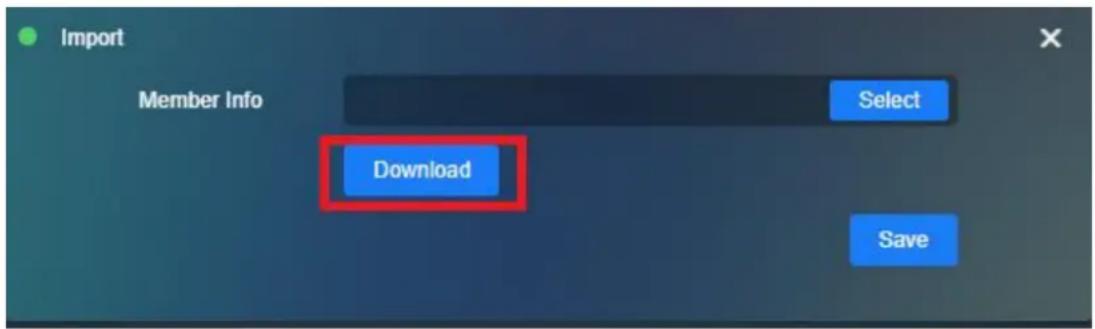
8.3.2 Import
With this function you can Download and Import an excel list with all the Members. When adding new member via the Import function use the Download Excel file as template.

Upload file that been made by admin
8.3.3 Add Member
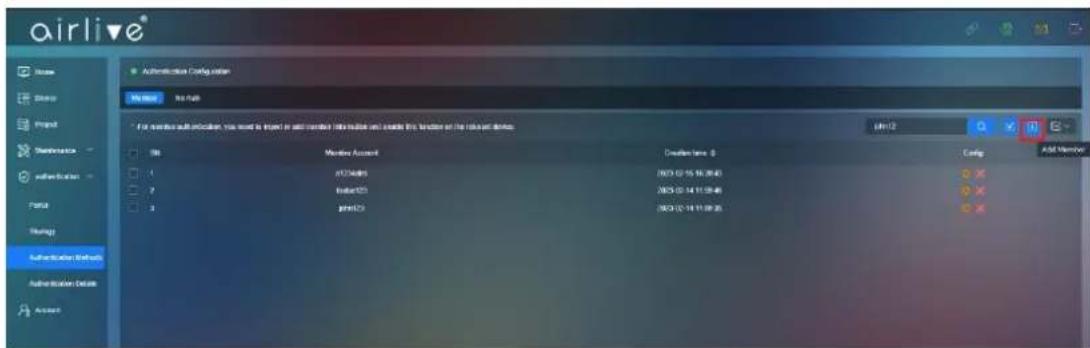
To Add a single member to the list, Click on Add Member.
You will now be able to Enter a Member Account name and Login Password.
To Edit a Member Account Check Mark the Account and press the Config Icon.

8.3.4 Delete Member
To Delete a Member Check mark the Member Account and press the Red X. Multiple Accounts can also be deleted via the Batch Delete.
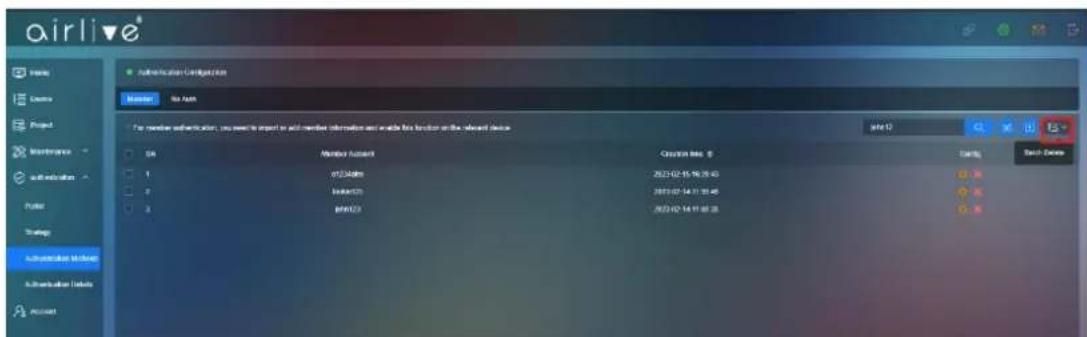
8.4 Authentication Details
This function will display the Members which are connected to the network and which made a successful connection also the time will be displayed.
8.4.1 Display by login type
Display All, No Auth or Members

8.4.2 Search by MAC
Search a Member by MAC Address
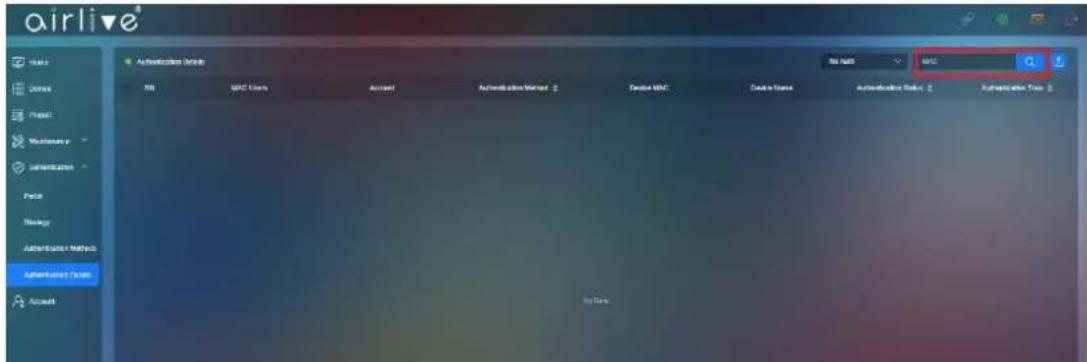
8.4.3 Export
Export Member list by date

Chapter 9 Account
9.1 Search Account
Display All or only Enabled / Disabled Accounts.

9.2 Search Account Type
Display All or only Admin / Guest Accounts.

9.3 Create Account
Create an Account to co-work current Account
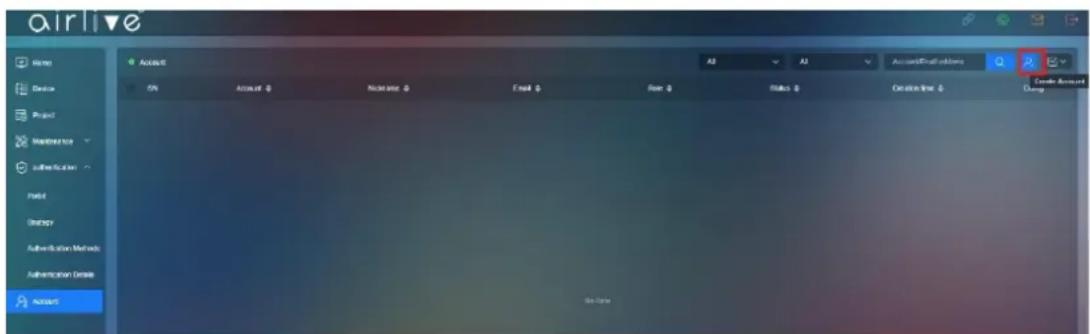
Enter the Account Information.
Account: Name of the Account
Nickname: Nickname of the Account
Password: Password of the Account
Mobile, Email
Role: Role of the Account Admin/Guest
Status: Enable/Disable
Binding Project: Bind the Account to a certain project.

9.4 Account Password Reset and Delete
Reset user password or delete account

- Index
- Chapter 1 Register and bind device into cloud.
- Determine the Network Topology
- Register and binding device into aircloud
- Chapter 2 Create template and configure your AP
- Configure your AP from the Cloud
- Create the AP template and deploy
- Chapter 3 Create captive portal page and create user Auth
- Create captive portal page and create user Auth
- Create the User Account and Password
- Import Batch
- Create Strategy
- Add Strategy to the AP(s)
- Chapter 4 Home Page
- Home Page
- Home - Binding Device
- Home - Personal
- Home - System Info
- Home - Logout
- Chapter 5 Device
- Topology view
- List View
- Reset Topology Graph
- Scan Device
- Full Screen
- Search Device Name
- All/Online/Offline
- Search Device
- Batch Function
- Display
- Config
- Config - Info
- Config - Wi-Fi
- Config - Wi-Fi - Advanced
- Wi-Fi Time Off
- Alarm Setting
- Device Log
- Auth
- Ethernet
- Roaming
- Other Setting
- Device Password
- Chapter 6 Project
- Project
- Project Note
- Chapter 7 Maintenance
- Upgrade
- Batch Upgrade Firmware
- Select per model
- Maintenance - Log
- Configuration Log
- Upgrade Log
- Upgrade Log per Date
- Template
- Template Add
- Template - Wi-Fi
- Template - Advanced
- Other Setting
- Chapter 8 Authentication
- Authentication - Portal
- Portal Page Setup
- Process Authentication
- After Authentication
- Strategy
- Strategy Set
- Authentication Methods
- Authentication Configuration
- Import
- Add Member
- Delete Member
- Authentication Details
- Display by login type
- Search by MAC
- Export
- Chapter 9 Account
- Search Account
- Search Account Type
- Create Account
- Account Password Reset and Delete
Brand : AIRLIVE
Model : AirCloud
Category : Unknown