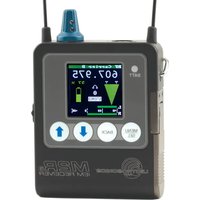
M2Ra-A1B1 - Wireless audio receiver Lectrosonics - Free user manual and instructions
Find the device manual for free M2Ra-A1B1 Lectrosonics in PDF.


| Type of product | Professional wireless microphone receiver (dual-channel) |
| Model | M2Ra-A1B1 |
| Brand | Lectrosonics |
| Frequency range | 470-614 MHz (varies by region, check label) |
| Number of channels | 2 |
| Modulation | FM |
| Audio output | XLR balanced, 1/4" unbalanced, headphone monitor |
| Power supply | 12-15 VDC, 600 mA (power supply included) |
| Dimensions (W x H x D) | 19" x 1.75" x 8" (rackmount, 1U) |
| Weight | 3.5 lbs (1.6 kg) |
| Antenna connections | 2 BNC (50 ohms) |
| Display | OLED with RF/AF level bars, frequency information |
| Controls | Push-button menu navigation, rotary encoder |
| Operating temperature | 0°C to 50°C (32°F to 122°F) |
| Storage temperature | -20°C to 60°C (-4°F to 140°F) |
| Humidity | 0% to 90% non-condensing |
| Maintenance | Clean with a soft, dry cloth. Do not use solvents. |
| Safety | Operate in a dry environment; avoid exposure to liquids. |
| Spare parts / Service | Contact Lectrosonics authorized service centers for replacement parts. |
| Warranty | 2 years (see manual for details) |
Frequently Asked Questions - M2Ra-A1B1 Lectrosonics
User questions about M2Ra-A1B1 Lectrosonics
0 question about this device. Answer the ones you know or ask your own.
Ask a new question about this device
Download the instructions for your Wireless audio receiver in PDF format for free! Find your manual M2Ra-A1B1 - Lectrosonics and take your electronic device back in hand. On this page are published all the documents necessary for the use of your device. M2Ra-A1B1 by Lectrosonics.
USER MANUAL M2Ra-A1B1 Lectrosonics
Digital IEM/IFB Receiver M2Ra-A1B1, M2Ra-B1C1

Fill in for your records:
Serial Number:
Purchase Date:
Quick Start Summary
1) Install receiver batteries (pg. 7).
2) Power unit on with On/Off and Volume knob (pg. 11).
3) Scan for an available frequency (pg.11).
4) Sync the receiver with a transmitter (pg. 11).
5) Enable RF in transmitter (see transmitter manual).
6) Send audio (pg. 11).
WARNING: Moisture, including talent's sweat, will damage the receiver. Use our silicone cover (order part # M2RCVR) or other protection to avoid damage.

CE
UK CA
Follow Us On:


You Tube


NOTE: This equipment has been tested and found to comply with the limits for a Class B digital device, pursuant to part 15 of the FCC Rules. These limits are designed to provide reasonable protection against harmful interference in a residential installation. This equipment generates, uses and can radiate radio frequency energy and, if not installed and used in accordance with the instructions, my cause harmful interference to radio communications. However, there is no guarantee that interference will not occur in a particular installation. If this equipment does cause harmful interference to radio or television reception, which can be determined by turning the equipment off and on, the user is encouraged to try to correct the interference by one or more of the following measures:
• Reorient or relocate the receiving antenna.
- Increase the separation between the equipment and receiver.
- Connect the equipment into an outlet on a circuit different from that to which the receiver is connected.
- Consult the dealer or an experienced radio/TV technician for help.
Table of Contents
Quick Start Summary......1
M2Ra Digital IEM Receiver....4
FlexList™ 4
Smart Tuning (SmartTune ^™ ) 4
RF Front-End with Tracking Filter 4
Encryption....4
Panels and Features....5
Battery Status LED 6
RF Link LED 6
On/Off and Volume Knob....6
IR (infrared) Port......6
USB Port 6
Battery Compartment......6
Keypad and LCD Interface....6
Installing Batteries 7
LCD Main Window 7
System Setup Procedure....8
Navigating the Menus....9
M2Ra LCD Menu Map 10
Menu Item Descriptions 12
Supplied and Optional Accessories....16
Specifications 17
Wireless Designer Software.... 17
Firmware Update Instructions.... 17
Service and Repair 18
Returning Units for Repair....18
M2Ra Digital IEM Receiver
The M2Ra Digital IEM Receiver is a compact, rugged body-worn unit providing excellent sound quality for performers or any professionals needing to monitor detailed audio wirelessly. The M2Ra employs advanced antenna diversity switching during digital packet headers for seamless audio. The receiver uses digital modulation and covers a wide range UHF frequencies - A1B1, or B1C1.
The headphone jack is fed from a high-quality stereo amplifier with 250 mW available to drive even inefficient headphones or earphones to sufficient levels for stage performance or other noisy environments. The receiver can select from stereo, mono from left or right channels only, or mono from both channels, giving the unit flexibility in terms of application as an IEM or IFB receiver. An intuitive interface and high resolution, color LCD on the unit provide performing artists and audio professionals alike with a comfortable and confident user experience.
The M2Ra also employs 2-way IR sync, so can data from the receiver can be sent to an M2T transmitter and thus onto Wireless Designer™ Software. This way, frequency planning and coordination can be done quickly and confidently with on-site RF information.
FlexList™
Additionally, the M2Ra includes a FlexList ^™ mode, where up to 24 mixes can be accessed by name. This feature enables a user to quickly find and listen to any of the feeds on a stage or set.
A FlexList mix is a profile made up of the channel name, frequency, mixer settings and limiter settings. The mix is easily added to the FlexList via the M2Ra IR port, as synced from an M2T or DCHT and stored until cleared by the user. The M2Ra allows the user to scroll through the mixes, making listening and troubleshooting easy and efficient.
Smart Tuning (SmartTune™)
A major problem facing wireless users is finding clear operating frequencies, especially in RF saturated environments. SmartTune ^™ overcomes this problem by automatically scanning all the frequencies available in the receiver's frequency range and tuning the receiver to the frequency with the lowest RF interference, significantly reducing setup time.
NOTE: Some regions have certain frequency restrictions. Depending on LOCALE selection, the SmartTune and Scan frequency ranges are:
NA: 470.100 - 607.950 MHz EU: 470.100 - 614.375 MHz A1RJ: 520.000 - 614.375 MHz JA: 470.150 - 614.375 MHz
EU: 537.600 - 691.175 MHz B1C1: AU: 537.600 - 691.175 MHz JA: 537.600 - 691.175 MHz
RF Front-End with Tracking Filter
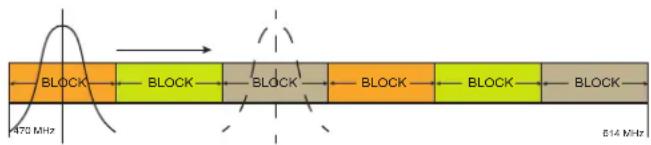
A wide tuning range is helpful in finding clear frequencies for operation, however, it also allows a greater range of interfering frequencies to enter the receiver. The UHF frequency band, where almost all wireless microphone systems operate, is heavily populated by high power TV transmissions. The TV signals are immensely more powerful than a wireless microphone or IEM transmitter signal and will enter the receiver even when they are on significantly different frequencies than the wireless system. This powerful energy appears as noise to the receiver, and has the same effect as the noise that occurs with extreme operating range of the wireless system (noise bursts and dropouts). To alleviate this interference, front-end filters are needed in the receiver to suppress RF energy below and above the operating frequency.
The M2Ra receiver employs a selective frequency, tracking filter in the front-end section (the first circuit stage following the antenna). As the operating frequency is changed, the filters re-tune into six different “zones” depending on the selected carrier frequency.
When transmitting audio, there are situations where privacy is essential, such as during professional sporting events, in court rooms or private meetings. For instances where your audio transmission needs to be kept secure, without sacrificing audio quality, Lectrosonics implements AES256 encryption in our digital wireless systems. High entropy encryption keys are first created by one of the units in the system. The key is then synced with another encryption-capable unit, via the IR port. The audio will be encrypted and can only be decoded if both the transmitter and receivers have the matching encryption key. If you are trying to transmit an audio signal and keys do not match, all that will be heard is silence. The M2Ra gives the option of Encrypted (DCHX, D2 or HDM modes) with AES 256-CTR, or non-encrypted (Duet mode) operation under one firmware version. Four different key management policies are available for different applications and workflows.
Panels and Features

When on Main Screen, UP Button will turn LEDs on and DOWN Button will turn LEDs off.

Tip: The headphone jack is protected from phantom power. However, it is always good practice to turn off P48 power on any device connected to this unit.
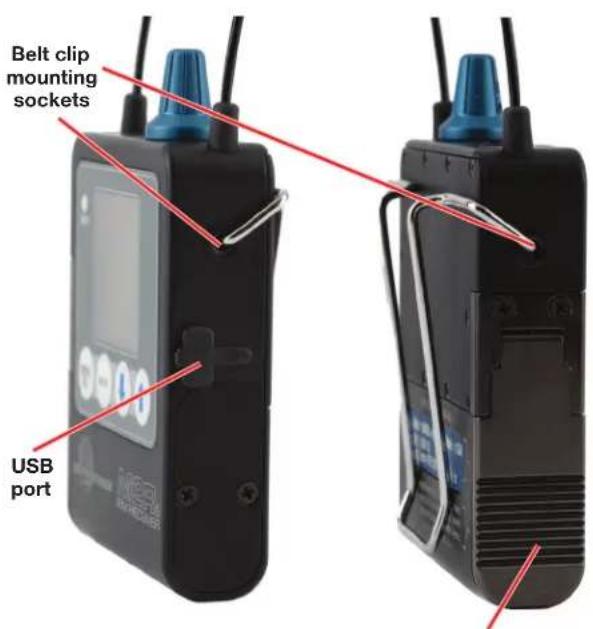
Battery compartment door
Battery Status LED
When the battery status LED on the keypad glows green the batteries are adequate. The color changes to red at a midpoint during the runtime. When the LED begins to blink red, only a few minutes remain.
The exact point at which the LED turns red will vary with battery brand and condition, temperature and power consumption. The LED is intended to simply catch your attention, not to be an exact indicator of remaining time.
A weak battery will sometimes cause the LED to glow green immediately after the transmitter is turned on, but it will soon discharge to the point where the LED will turn red or the unit will turn off completely.
RF Link LED
When a valid RF signal from a transmitter is received, this LED will light up blue.
On/Off and Volume Knob
Turns unit on or off and controls headphone audio level.
IR (infrared) Port
Settings, including frequency, name, limiter, mix mode, Flexlist, etc. can be transferred between transmitter and receiver or receiver and receiver (M2Ra to M2Ra). FlexList profiles can be gathered by the receiver. Frequency scan information can be sent from the receiver to the transmitter and on to Wireless Designer software for coordination purposes.
Headphone Output
A recessed, high duty cycle 3.5 mm stereo jack is provided for standard headphones and earphones.
If using a mono earphone with this unit, you must select "Mono" under "Earphone Type" in the menu. Likewise, when using stereo earphones or headphones, select "Stereo" under "Earphone Type." Otherwise, the unit will use batteries very quickly and get hot.
USB Port
Firmware updates via Wireless Designer are made easy with the USB port on the side panel.
Battery Compartment
Two AA batteries are installed as marked on the rear panel of the receiver. The battery door is hinged and remains attached to the housing.
Keypad and LCD Interface

MENU/SEL Button
Pressing this button enters the menu and selects menu items to enter the setup screens.
BACK Button
Pressing this button returns to the previous menu or screen.
Arrow Buttons
Used to navigate the menus. When on Main Screen, UP Button will turn LEDs on and DOWN Button will turn LEDs off.
Installing Batteries
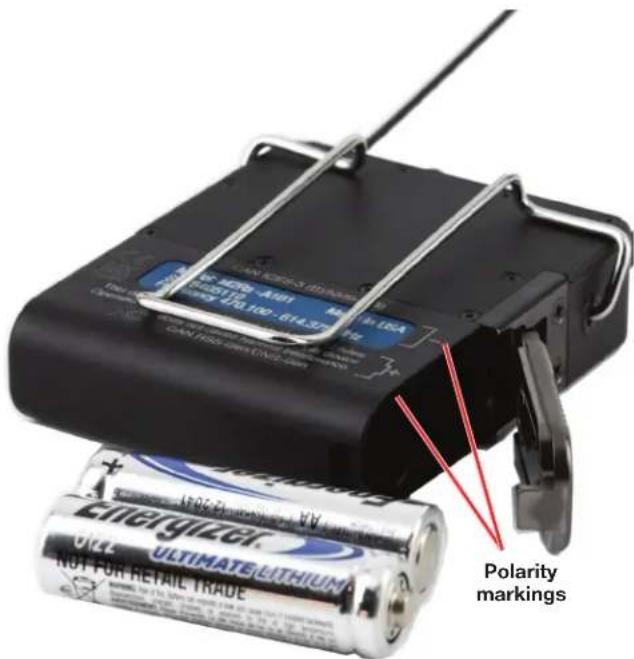
Power is provided by two AA batteries. The batteries are connected in series by a plate in the battery door. It is suggested that you use lithium or high capacity NiMH rechargeable batteries. Do not use alkaline batteries.
WARNING: Risk of explosion if the battery is replaced by an incorrect type.

Polarity is marked on the rear panel.
LCD Main Window

RF level
The triangle graphic corresponds to the scale on the left side of the display. The scale indicates the incoming signal strength in microvolts, from 1 uV at the bottom to 1,000 uV (1 millivolt) at the top.
NOTE: RF level will turn from white to green when the signal is acquired. This is a redundant indication of the blue RF Link LED.
Diversity activity
The two antenna icons will alternately light up depending on which one is receiving the stronger signal.
Battery life indicator
The battery life icon is an approximate indicator of the remaining battery life. For the most accurate indication, the user should select "Battery Type" in the menu and select Alkaline or Lithium.
Audio level
This bar graph indicates the level of the audio entering the transmitter. The "0" refers to the level reference, as chosen in the transmitter, i.e. either +4 dBu or -10 dBV.
Mixer mode
Indicates which mixer mode has been selected for the receiver.
System Setup Procedure
Step 1) Install Batteries
Install the batteries according to the diagram marked on the back of the housing. The battery door makes a connection between the two batteries. Use lithium or high capacity NiMH rechargeable batteries. Do not use alkaline batteries.
Step 2) Turn the power on
Power on the M2Ra with the On/Off/Volume knob and select the battery type in the menu. Check the BATT LED on the control panel to verify adequate power is present. The LED will glow green with good batteries.
Step 3) Locate and Set a Clear Frequency
A clear frequency can be located and set using the SmartTune function, or with manual scanning of the spectrum and selecting a frequency. Before scanning, you will be prompted to choose a frequency band.
Using SmartTune
- SmartTune will scan the entire tuning range of the receiver and automatically find a clear frequency for operation. Navigate to SmartTune in the menu and press MENU/SEL. The receiver will scan the spectrum and display and set a clear frequency.
- The clear frequency will then need to be chosen (it is not automatic) and then transferred to or set on the associated transmitter (see Step 4).
Manual Scanning
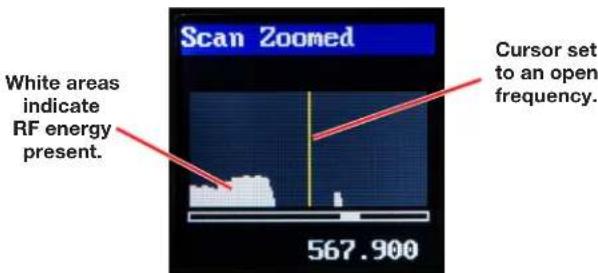
- Navigate to Scan in the LCD menu and press MENU/SEL. The scanning will continue across the spectrum and then wrap back and start over. Allow the scan to complete at least once. If you let the scanning continue to wrap and repeat, the scanning results will accumulate and may identify RF signals that are intermittent and might be missed with a single scan.
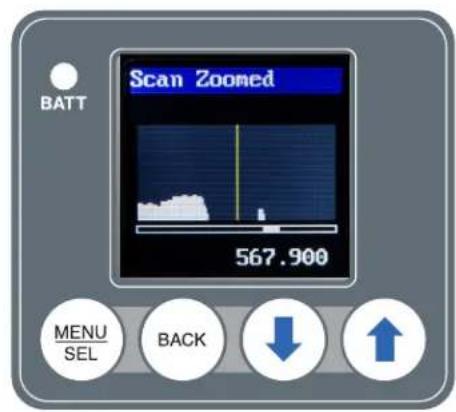
- Press MENU/SELECT to pause the scan. Use the UP and DOWN arrows to roughly tune the receiver by moving the cursor to an open frequency.
- Press MENU/SELECT again to zoom in for fine tuning and use the UP and DOWN arrows to scroll across the spectrum to a place with little or no RF activity (open frequency). Select a frequency and press the BACK button for the option to keep your newly selected frequency or to revert to the previous frequency.
Step 4) Sync with a Transmitter
In the transmitter, use "GET FREQ" or "GET ALL" in the menu to transfer frequency or other information via the IR ports. Hold the M2Ra receiver IR port close to the front panel IR port on the transmitter and press GO on the transmitter.
Step 5) Enable RF in the Transmitter
In the transmitter menu, enable RF and select appropriate RF power level. The blue "link" LED on the top of the receiver should light up, indicating a valid RF link.
Step 6) Send Audio
Send an audio signal to the transmitter and the receiver audio meters should respond. Plug in headphones or earphones. (Be sure to start with the receiver volume knob at minimum!)
Tip: The headphone jack is protected from phantom power. However, it is always good practice to turn off P48 power on any device connected to this unit.
WARNING: If using a mono earphone with this unit, you must select "Mono" under "Earphone Type" in the menu. Likewise, when using stereo earphones or headphones, select "Stereo" under "Earphone Type." Otherwise, the unit will use batteries very quickly and get hot.
NOTE: Scan data is preserved when the receiver is powered off.
Navigating the Menus
From the Main Window, press MENU/SEL to enter the menu, then navigate with the UP and DOWN arrows to highlight the desired setup item. Press MENU/SEL to enter the setup screen for that item. Refer to the menu map on the following pages.

Submenus and screens for the selected item
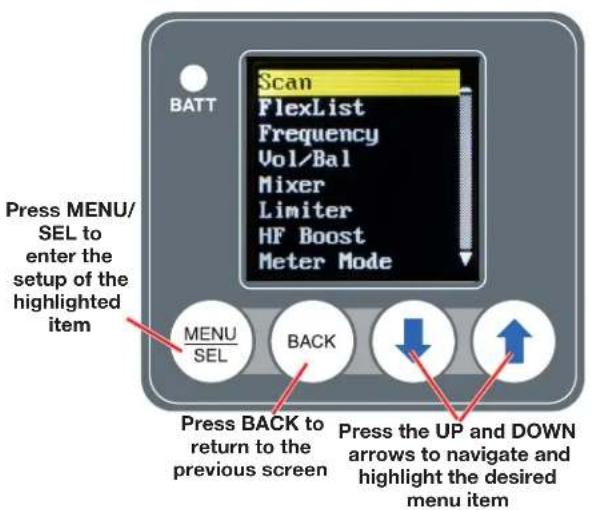

M2Ra LCD Menu Map
The menus presented on the LCD are arranged in a straightforward manner, with those that are likely to be used more often located at the top of the tree.

flowchart
graph TD
    A["RF Setup"] --> B["SmartTune"]
    B --> C["Scan"]
    C --> D["Frequency"]
    D --> E["Clear Scan Data"]
    E --> F["Audio Setup"]
    F --> G["Vol/Bal"]
    G --> H["Mixer"]
    H --> I["Limiter"]
    I --> J["HF Boost"]
    J --> K["Vol. Taper"]
    K --> L["Meter Mode"]
    L --> M["Compat. Mode"]
    M --> N["FlexList"]
    N --> O["Listen*"]
    O --> P["Add"]
    P --> Q["Update*"]
    Q --> R["Delete*"]
    R --> S["Clear All*"]
    S --> T["Share List"]

    subgraph RF Setup
        B --> U["BACK"]
        U --> V["wait for scan"]
        V --> W["Tuning to..."]
        W --> X["Automatic tuning to available frequency"]
        U --> Y["BACK"]
        Y --> Z["wait for scan"]
        Z --> AA["pause scan"]
        AA --> AB["zoom scan"]
        AB --> AC["Use arrow keys to tune to desired frequency"]
        AC --> AD["BACK"]
        AD --> AE["Press BACK to keep or revert back to old frequency"]
        AE --> AF["Keep scan freq? @ Keep ○ Revert"]
    end

    subgraph Audio Setup
        F --> AG["Volume 0 Locked Balance NTR"]
        AG --> AH["Mixer Mono Ch1 Stereo SwapLR"]
        AH --> AI["Limiter Gain +9 Threshold +0"]
        AI --> AJ["Mixer Mono Ch1 Stereo SwapLR"]
        AJ --> AK["Limiter Gain +9 Threshold +0"]
        AK --> AL["Mixer Mono Ch1 Stereo SwapLR"]
        AL --> AM["Limiter Gain +9 Threshold +0"]
        AM --> AN["Mixer Mono Ch1 Stereo SwapLR"]
        AN --> AO["Mixer Mono Ch1 Stereo SwapLR"]
        AO --> AP["Mixer Mono Ch1 Stereo SwapLR"]
        AP --> AQ["Mixer Mono Ch1 Stereo SwapLR"]
        AQ --> AR["Mixer Mono Ch1 Stereo SwapLR"]
        AR --> AS["Mixer Mono Ch1 Stereo SwapLR"]
        AS --> AT["Mixer Mono Ch1 Stereo SwapLR"]
        AT --> AU["Mixer Mono Ch1 Stereo SwapLR"]
        AU --> AV["Mixer Mono Ch1 Stereo SwapLR"]
        AV --> AW["Mixer Mono Ch1 Stereo SwapLR"]
        AW --> AX["Mixer Mono Ch1 Stereo SwapLR"]
        AX --> AY["Mixer Mono Ch1 Stereo SwapLR"]
        AY --> AZ["Mixer Mono Ch1 Stereo SwapLR"]
        AZ --> BA["Mixer Mono Ch1 Stereo SwapLR"]
        BA --> BB["Mixer Mono Ch1 Stereo SwapLR"]
        BB --> BC["Mixer Mono Ch1 Stereo SwapLR"]
        BC --> BD["Mixer Mono Ch1 Stereo SwapLR"]
        BD --> BE["Mixer Mono Ch1 Stereo SwapLR"]
        BE --> BF["Mixer Mono Ch1 Stereo SwapLR"]
        BF --> BG["Mixer Mono Ch1 Stereo SwapLR"]
        BG --> BH["Mixer Mono Ch1 Stereo SwapLR"]
        BH --> BI["Mixer Mono Ch1 Stereo SwapLR"]
        BI --> BJ["Mixer Mono Ch1 Stereo SwapLR"]
        BJ --> BK["Mixer Mono Ch1 Stereo SwapLR"]
        BK --> BL["Mixer Mono Ch1 Stereo SwapLR"]
        BL --> BM["Mixer Mono Ch1 Stereo SwapLR"]
        BM --> BN["Mixer Mono Ch1 Stereo SwapLR"]
        BN --> BO["Mixer Mono Ch1 Stereo SwapLR"]
        BO --> BP["Mixer Mono Ch1 Stereo SwapLR"]
        BP --> BQ["Mixer Mono Ch1 Stereo SwapLR"]
        BQ --> BR["Mixer Mono Ch1 Stereo SwapLR"]
        BR --> BS["Mixer Mono Ch1 Stereo SwapLR"]
        BS --> BT["Mixer Mono Ch1 Stereo SwapLR"]
        BT --> BU["Mixer Mono Ch1 Stereo SwapLR"]
        BU --> BV["Mixer Mono Ch1 Stereo SwapLR"]
        BV --> BW["Mixer Mono Ch1 Stereo SwapLR"]
        BW --> BX["Mixer Mono Ch1 Stereo SwapLR"]
        BX --> BY["Mixer Mono Ch1 Stereo SwapLR"]
        BY --> BZ["Mixer Mono Ch1 Stereo SwapLR"]
        BZ --> CA["Mixer Mono Ch1 Stereo SwapLR"]
        CA --> CB["Mixer Mono Ch1 Stereo SwapLR"]
        CB --> CC["Mixer Mono Ch1 Stereo SwapLR"]
        CC --> CD["Mixer Mono Ch1 Stereo SwapLR"]
        CD --> CE["Mixer Mono Ch1 Stereo SwapLR"]
        CE --> CF["Mixer Mono Ch1 Stereo SwapLR"]
        CF --> CG["Mixer Mono Ch1 Stereo SwapLR"]
        CG --> CH["Mixer Mono Ch1 Stereo SwapLR"]
        CH --> CI["Mixer Mono Ch1 Stereo SwapLR"]
        CI --> CJ["Mixer Mono Ch1 Stereo SwapLR"]
        CJ --> CK["Mixer Mono Ch1 Stereo SwapLR"]
        CK --> CL["Mixer Mono Ch1 Stereo SwapLR"]
        CL --> CM["Mixer Mono Ch1 Stereo SwapLR"]
        CM --> CN["Mixer Mono Ch1 Stereo SwapLR"]
        CN --> CO["Mixer Mono Ch1 Stereo SwapLR"]
        CO --> CP["Mixer Mono Ch1 Stereo SwapLR"]
        CP --> CQ["Mixer Mono Ch1 Stereo SwapLR"]
        CQ --> CR["Mixer Mono Ch1 Stereo SwapLR"]
        CR --> CS["Mixer Mono Ch1 Stereo SwapLR"]
        CS --> CT["Mixer Mono Ch1 Stereo SwapLR"]
        CT --> CU["Mixer Mono Ch1 Stereo SwapLR"]
        CU --> CV["Mixer Mono Ch1 Stereo SwapLR"]
        CV --> CW["Mixer Mono Ch1 Stereo SwapLR"]
        CW --> CX["Mixer Mono Ch1 Stereo SwapLR"]
        CX --> CY["Mixer Mono Ch1 Stereo SwapLR"]
        CY --> CZ["Mixer Mono Ch1 Stereo SwapLR"]
        CZ --> DA["Mixer Mono Ch1 Stereo SwapLR"]
        DA --> DB["Mixer Mono Ch1 Stereo SwapLR"]
        DB --> DC["Mixer Mono Ch1 Stereo SwapLR"]
        DC --> DD["Mixer Mono Ch1 Stereo SwapLR"]
        DD --> DP["Mixer Mono Ch1 Stereo SwapLR"]
        DP --> DQ["Mixer Mono Ch1 Stereo SwapLR"]
        DQ --> DR["Mixer Mono Ch1 Stereo SwapLR"]
        DR --> DV["Mixer Mono Ch1 Stereo SwapLR"]
        DV --> DW["Mixer Mono Ch1 Stereo SwapLR"]
        DW --> DX["Mixer Mono Ch1 Stereo SwapLR"]
        DX --> DXA["Mixer Mono Ch1 Stereo SwapLR"]
    end

    subgraph Compat. Mode
        M["Compat. Mode @ Icon"] & N["Compat. Mode @ Icon"] & O["Compat. Mode @ Icon"] & P["Compat. Mode @ Icon"] & Q["Compat. Mode @ Icon"] & R["Compat. Mode @ Icon"] & S["Compat. Mode @ Icon"] & T["Compat. Mode @ Icon"] & U["Compat. Mode @ Icon"] & V["Compat. Mode @ Icon"] & W["Compat. Mode @ Icon"] & X["Compat. Mode @ Icon"] & Y["Compat. Mode @ Icon"] & Z["Compat. Mode @ Icon"] & AA["Compat. Mode @ Icon"] & AB["Compat. Mode @ Icon"] & AC["Compat. Mode @ Icon"] & AD["Compat. Mode @ Icon"] & AE["Compat. Mode @ Icon"] & AF["Compat. Mode @ Icon"] & AG["Compat. Mode @ Icon"] & AH["Compat. Mode @ Icon"] & AI["Compat. Mode @ Icon"] & AJ["Compat. Mode @ Icon"] & AK["Compat. Mode @ Icon"] & AL["Compat. Mode @ Icon"] & AM["Compat. Mode @ Icon"] & AN["Compat. Mode @ Icon"] & AO["Compat. Mode @ Icon"] & AP["Compat. Mode @ Icon"] & AQ["Compat. Mode @ Icon"] & AR["Compat. Mode @ Icon"] & AS["Compat. Mode @ Icon"] & AT["Compat. Mode @ Icon"] & AU["Compat. Mode @ Icon"] & AV["Compat. Mode @ Icon"] & AW["Compat. Mode @ Icon"] & AX["Compat. Mode @ Icon"] & AY["Compat. Mode @ Icon"] & AZ["X(Extr)X(Extr)"] & BA["X(Extr)X(Extr)"] & BB["X(Extr)X(Extr)"] & BC["X(Extr)X(Extr)"] & DD["X(Extr)X(Extr)"] & DE["X(Extr)X(Extr)"] & FD["X(Extr)X(Extr)"] & DG["X(Extr)X(Extr)"] & DH["X(Extr)X(Extr)"] & DI["X(Extr)X(Extr)"] & DJ["X(Extr)X(Extr)"] & DK["X(Extr)X(Extr)"] & DL["X(Extr)X(Extr)"] & DEX["X(Extr)X(Extr)"] & DGX["X(Extr)X(Extr)"] & DEY["X(Extr)X(Extr)"] & DEZ["X(Extr)X(Extr)"] & DEAD["X(Extr)X(Extr)"] & DEAVX["X(Extr)X(Extr)"] & DEAVZ["X(Extr)X(Extr)"] & DEAVD["X(Extr)X(Extr)"] & DEAVS["X(Extr)X(Extr)"] & DEAVG["X(Extr)X(Extr)"] & DEAVH["X(Extr)X(Extr)"] & DEAVI["X(Extr)X(Extr)"] & DEAVJ["X(Extr)X(Extr)"] & DEAVK["X(Extr)X(Extr)"] & DEAVL["X(Extr)X(Extr)"] & DEAVM["X(Extr)X(Extr)"] & DEAVN["X(Extr)X(Extr)"] & DEAVO["X(Extr)X(Extr)"] & DEAVP["X(Extr)X(Extr)"] & DEAVQ["X(Extr)X(Extr)"] & DEAVR["X(Extr)X(Extr)"] & DEAVS["X(Extr)X(Extr)"] & DEAVT["X(Extr)X(Extr)"] & DEAVU["X(Extr)X(Extr)"] & DEAVV["X(Extr)X(Extr)"] & DEAVW["X(Extr)X(Extr)"] & DEAVXW["X(Extr)X(Extr)"]
    end

flowchart
graph TD
    A["IR&Keys"] --> B["Send Freq"]
    B --> C["Send All"]
    C --> D["Get Freq"]
    D --> E["Get All"]
    E --> F["Backlight"]
    F --> G["LEDs Off"]
    G --> H["Battery Type"]
    H --> I["Battery Alert"]
    I --> J["Earphone Type"]
    J --> K["Lock/Unlock"]
    K --> L["Locale"]
    L --> M["About M2Ra"]
    M --> N["Default"]

    subgraph Settings
        B -->|MENU REL| B1["Backlight"]
        B1 -->|MENU REL| B2["LEDs Off"]
        B2 -->|MENU REL| B3["Battery Type"]
        B3 -->|MENU REL| B4["Battery Alert"]
        B4 -->|MENU REL| B5["Earphone Type"]
        B5 -->|MENU REL| B6["Lock/Unlock"]
        B6 -->|MENU REL| B7["Locale"]
        B7 -->|MENU REL| B8["About M2Ra"]
        B8 -->|MENU REL| B9["Default"]

    end

    subgraph Settings
        C -->|SEND Freq to sync| C1["Use UP arrow to sync"]
        C1 -->|SEND All to sync| C2["Use UP arrow to sync"]
        C2 -->|SEND All to sync| C3["Use UP arrow to sync"]
        C3 -->|SEND All to sync| C4["Use UP arrow to sync"]
        C4 -->|SEND All to sync| C5["Use UP arrow to sync"]
        C5 -->|SEND All to sync| C6["Use UP arrow to sync"]
        C6 -->|SEND All to sync| C7["Use UP arrow to sync"]
        C7 -->|SEND All to sync| C8["Use UP arrow to sync"]
        C8 -->|SEND All to sync| C9["Use UP arrow to sync"]
        C9 -->|SEND All to sync| C10["Use UP arrow to sync"]
        C10 -->|SEND All to sync| C11["Use UP arrow to sync"]
        C11 -->|SEND All to sync| C12["Use UP arrow to sync"]
        C12 -->|SEND All to sync| C13["Use UP arrow to sync"]
        C13 -->|SEND All to sync| C14["Use UP arrow to sync"]
        C14 -->|SEND All to sync| C15["Use UP arrow to sync"]
        C15 -->|SEND All to sync| C16["Use UP arrow to sync"]
        C16 -->|SEND All to sync| C17["Use UP arrow to sync"]
        C17 -->|SEND All to sync| C18["Use UP arrow to sync"]
        C18 -->|SEND All to sync| C19["Use UP arrow to sync"]
        C19 -->|SEND All to sync| C20["Use UP arrow to sync"]
        C20 -->|SEND All to sync| C21["Use UP arrow to sync"]
        C21 -->|SEND All to sync| C22["Use UP arrow to sync"]
        C22 -->|SEND All to sync| C23["Use UP arrow to sync"]
        C23 -->|SEND All to sync| C24["Use UP arrow to sync"]
        C24 -->|SEND All to sync| C25["Use UP arrow to sync"]
        C25 -->|SEND All to sync| C26["Use UP arrow to sync"]
        C26 -->|SEND All to sync| C27["Use UP arrow to sync"]
        C27 -->|SEND All to sync| C28["Use UP arrow to sync"]
        C28 -->|SEND All to sync| C29["Use UP arrow to sync"]
        C29 -->|SEND All to sync| C30["Use UP arrow to sync"]
        C30 -->|SEND All to sync| C31["Use UP arrow to sync"]
        C31 -->|SEND All to sync| C32["Use UP arrow to sync"]
        C32 -->|SEND All to sync| C33["Use UP arrow to sync"]
        C33 -->|SEND All to sync| C34["Use UP arrow to sync"]
        C34 -->|SEND All to sync| C35["Use UP arrow to sync"]
        C35 -->|SEND All to sync| C36["Use UP arrow to sync"]
        C36 -->|SEND All to sync| C37["Use UP arrow to sync"]
        C37 -->|SEND All to sync| C38["Use UP arrow to sync"]
        C38 -->|SEND All to sync| C39["Use UP arrow to sync"]
        C39 -->|SEND All to sync| C40["Use UP arrow to sync"]
        C40 -->|SEND All to sync| C41["Use UP arrow to sync"]
        C41 -->|SEND All to sync| C42["Use UP arrow to sync"]
        C42 -->|SEND All to sync| C43["Use UP arrow to sync"]
        C43 -->|SEND All to sync| C44["Use UP arrow to sync"]
        C44 -->|SEND All to sync| C45["Use UP arrow to sync"]
        C45 -->|SEND All to sync| C46["Use UP arrow to sync"]
        C46 -->|SEND All to sync| C47["Use UP arrow to sync"]
        C47 -->|SEND All to sync| C48["Use UP arrow to sync"]
        C48 -->|SEND All to sync| C49["Use UP arrow to sync"]
        C49 -->|SEND All to sync| C50["Use UP arrow to sync"]
    end

    subgraph Settings
        D --> E
        E --> F
        F --> G
        G --> H
        H --> I
        I --> J
        J --> K
        K --> L
        L --> M
        M --> N
        N --> O
        O --> P
        P --> Q
        Q --> R
        R --> S
        S --> T
        T --> U
        U --> V
        V --> W
        W --> X
        X --> Y
        Y --> Z
        Z --> AA
        AA --> AB
        AB --> AC
        AC --> AD
        AD --> AE
        AE --> AF
        AF --> AG
        AG --> AH
        AH --> AI
        AI --> AJ
        AJ --> AK
        AK --> AL
        AL --> AM
        AM --> AN
        AN --> AO
        AO --> AP
        AP --> AQ
        AQ --> AR
        AR --> AS
        AS --> AT
        AT --> AU
        AU --> AV
        AV --> AW
    end

    subgraph Settings
        B1 --> B2
        B2 --> B3
        B3 --> B4
    end

    subgraph Settings
        E1 --> E2
        E1 --> E3
    end

    subgraph Settings
        F1 --> F2
    end

    subgraph Settings
        G1 --> G2
    end

    subgraph Settings
        H1 --> H2
    end

    subgraph Settings
        I1 --> I2
    end

    subgraph Settings
        J1 --> J2
    end

    subgraph Settings
        K1 --> K2
    end

    subgraph Settings
        L1 --> L2
    end

    subgraph Settings
        M1 --> M2
    end

    subgraph Settings
        N1 --> N2
    end

    subgraph Settings
        O1 --> O2
    end

    subgraph Settings
        P1 --> P2
    end

    subgraph Settings
        Q1 --> Q2
    end

    subgraph Settings
        R1 --> R2
    end

    subgraph Settings
        S1 --> S2
    end

    subgraph Settings
        T1 --> T2
    end

    subgraph Settings
        U1 --> U2
    end

    subgraph Settings
        V1 --> V2
    end

    subgraph Settings
        W1 --> W2
    end

    subgraph Settings
        X1 --> X2
    end

    subgraph Settings
        Y1 --> Y2
    end

    subgraph Settings
        Z1 --> Z2
    end

    subgraph Settings
        AA1 --> AA2
    end

    subgraph Settings
        AB1 --> AB2
    end

    subgraph Settings
        AC1 --> AC2
    end

    subgraph Settings
        AD1 --> AD2
    end

    subgraph Settings
        AE1 --> AE2
    end

    subgraph Settings
        AF1 --> AF2
    end

    subgraph Settings
        AG1 --> AG2
    end

    subgraph Settings
        AH1 --> AH2
    end

    subgraph Settings
        AI1 --> AI2
    end

    subgraph Settings
        AJ1 --> AJ2
    end

    subgraph Settings
        AK1 --> AK2
    end

    subgraph Settings
        AL1 --> AL2
    end

    subgraph Settings
        AM1 --> AM2
    end

    subgraph Settings
        AN1 --> AN2
    end

    subgraph Settings
        AO1 --> AO2
    end

    subgraph Settings
        AP1 --> AP2
    end

    subgraph Settings
        AQ1 --> AQ2
    end

    subgraph Settings
        AR1 --> AR2
    end

    subgraph Settings
        AS1 --> AS2
    end

    subgraph Settings
        AT1a["Menu REL"] <--> BAGK<--> BAGK<--> BAGK<--> BAGK<--> BAGK<--> BAGK<--> BAGK<--> BAGK<--> BAGK<--> BAGK<--> BAGK<--> BAGK<--> BAGK<--> BAGK<--> BAGK<--> BAGK<--> BAGK<--> BAGK<--> BAGK<--> BAGK<--> BAGK</script>
Menu Item Descriptions
SmartTune
SmartTune™ automates the discovery of a clear operating frequency. It does this by scanning all the available operating frequencies within the system's frequency block range (in 100 kHz increments) and then selecting the frequency with the least amount of RF interference. When SmartTune™ is complete and selection is confirmed, it returns to the Main Window displaying the selected operating frequency.

Scan
Use the scan function to identify a usable frequency. The area in red has not been scanned. Allow the scan to continue until the entire band has been scanned.

Once a full cycle has been completed, press MENU/SELECT again to pause the scan.
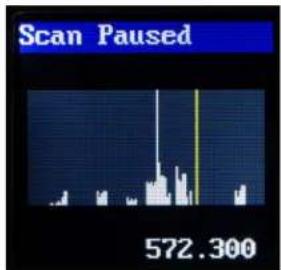
Use the UP and DOWN arrows to roughly tune the receiver by moving the cursor to an open spot. Press MENU/SELECT to zoom in for fine tuning.

When a usable frequency has been selected, press the BACK button for the option to keep your newly selected frequency or to revert to where it was set before the scan.


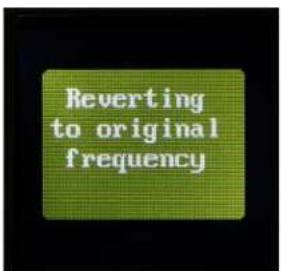
To capture this scan info in the transmitter and thus make it available to wireless designer, use the SYNC SCAN menu function in the M2T Transmitter.
Flex List
FlexList allows the user to set up a list of profiles, by name, to quickly and easily listen to any of the mixes on site individually.
Listen - choose a mix from the list and hear what is transmitting. The list may contain frequencies that are outside the receiver's frequency coverage; those entries will appear grayed out.


Add - add a mix to the available Flex List (action performed via the IR port) using an M2T or DCHT.
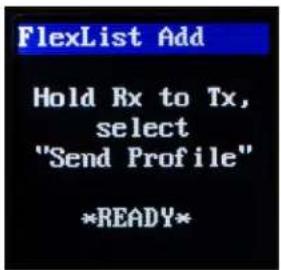
Update - Update settings in a mix (frequency, etc.). Action performed via the IR port using an M2T or DCHT.

Delete - Remove a mix from the Flex List

Clear All - Remove all mixes from the Flex List
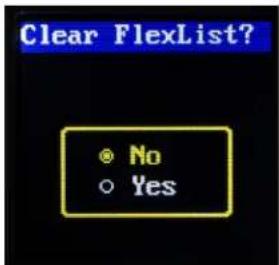
Share List - Share Flex List from one M2Ra to another via IR port.

Frequency
Allows manual selection of the operating frequency in MHz and KHz, tunable in 25 kHz steps.

Vol/Bal
Displays the volume, from 0 to 100, Locks or Unlocks the volume control (lock shown on main screen) and adjusts the balance to left, right or center.

Volume locked display on main screen

Mixer
This screen allows you to choose a stereo mix, mono mix from either audio channel 1, channel 2 or both, or custom, allowing for varied width of the signal and how much level from each channel.

The available modes are:
- Stereo
- SwapLR
- Custom
- Mono 1&2
- Mono Ch 1
- Mono Ch 2
Limiter
Limiter function allows the user to set volume and dynamic range for headphone use.
Gain - The default setting (0) is linear, but if volume adjustments are needed, use the UP and DOWN arrows to adjust the audio by up to +18 dB and down to -6 dB in 3dB steps.
WARNING: Increasing the Gain can make headphone volume excessively loud. Use caution when setting and using.
Threshold - Use the UP and DOWN arrows to adjust the threshold for limiter engagement in 3dB increments.
NOTE: A common setup to play loud and bring softer dynamics up a bit is to set the pregain at +6 or +9 dB and set the threshold for -3 or -6dB.

HF Boost
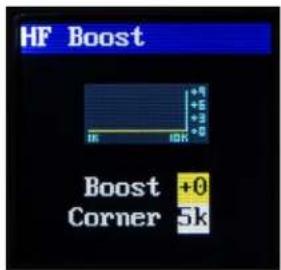
Adjusts loudness of higher frequencies in the audio output as preferred by the listeneof 5 KHz or 7 KHz can be selected and boosted.
Meter Mode
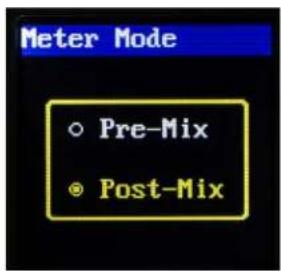
Changes the appearance of the audio level indicator on the main window; can show either pre- or post mix audio levels.
Clear Scan Data

Erases scan results from memory.
Backlight

Selects the length of time the backlight on the LCD remain turned on: Always on, 5 seconds, and 30 seconds.
LEDs Off
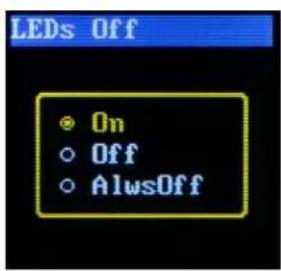
Selects front and top panel LED status: On, Off, or AlwaysOff (persists through-power cycle).
Battery Type

Selects the type of battery being used: NiMH or Lithium so the remaining battery meter on the home screen is as accurate as possible. Do not use alkaline batteries.
Please note that the screen and menu "misspelling" is intentional due to limited space in programming code.
Battery Alert
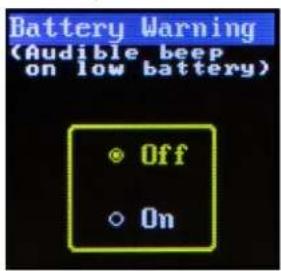
Selects whether or not an audible low battery warning (a beep sound) is inserted into the audio stream. The low battery audible warning corresponds to when the BATT LED on the front of the unit starts to blink red.
Earphone Type

Selects the type of earphone being used Stereo (default) or Mono. Choose the correct type to match with ear-phones or headphones to avoid short battery life (Mono with mono, Stereo with stereo).
Vol. Taper

Choose between Log or Linear taper volume control.
Compat. Mode
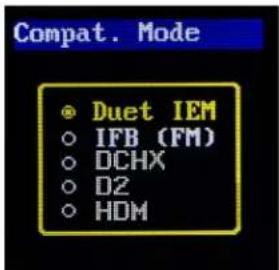
Compatibility mode is available to allow the receiver to operate with IFB (FM). Icon on main screen is shown when IFB (FM) Mode is active. The M2Ra is compatible with Lectrosonics Hybrid transmitters in IFB mode.

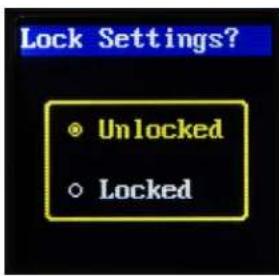
Lock/Unlock
The front panel controls can be locked to prevent unwanted changes. To lock/unlock, hold UP + DOWN.
Locale

North America (NA) and Australia (AU) have certain frequency restrictions, and the restricted frequencies are not available in SmartTune. When chosen, these locales include the following available frequency selections in SmartTune:
EU: 537.600 - 691.175 MHz
B1C1: AU: 537.600 - 691.175 MHz
JA: 537.600 - 691.175 MHz
About M2Ra

Displays general information about the M2Ra, including serial number and the versions for both FPGA and main firmware running in the receiver.
Default

Returns all settings to the factory defaults as shown in the table below.
Menu Item Setting
| Flexlist Cleared | |||
| Vol/Bal Centered | |||
| Mixer Mode Stereo | |||
| Limiter Pregain 0 | |||
| HF Boost 0 | |||
| Meter Mode | Post-Mix | ||
| Backlight | Always On | ||
| Battery Type | Lithium | ||
| Earphone Type | Stereo | ||
| Settings | Unlock | ||
| Receiver Name | M2Ra IEM Receiver | ||
| Frequency Depends on Locale: | |||
| A1B1 | NA/EU/JA | 512.000 | |
| AU | 525.000 | ||
| B1C1 | EU/JA | 537.600 | |
| AU | 537.600 | ||
NA: 470.100 - 607.950 MHz
EU: 470.100 - 614.375 MHz
A1B1: AU: 520.000 - 614.375 MHz
JA: 470.150 - 614.375 MHz
Supplied Accessories
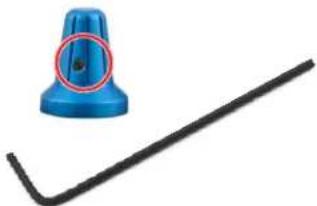
35854
Hex key wrench for tightening screws on volume knob
natural_image
Blue plastic object with a red circle highlighting a small hole, alongside a black L-shaped tool (no text or symbols)40073 Lithium Batteries
M2Ra is shipped with two (2) batteries. Brand may vary.

26895
Wire belt clip.

35983 Case Insulating Pad
Two (2) foam pads for M2Ra.

Optional Accessories
21926
USB cable for firmware updates

natural_image
Coiled black cable with two connectors, no visible text or symbolsLRSHOE
This optional kit includes the accessories needed to mount the M2Ra on a standard cold shoe using the wire belt clip that comes with the receiver.

natural_image
Mechanical assembly component with a central gear and mounting base (no visible text or symbols)P1291
Replacement USB port dust cover.

LTBATELIM
Battery Eliminator for LT, DBu and DCHT transmitters, and M2Ra; camera hop and similar applications. Optional power cables include: P/N 21746 right angle, locking cable, 12 in.; P/N 21747 right angle, locking cable, 6 ft.; DCR12/A5U universal power supply for AC power; DC cable, P/N PS200A.

natural_image
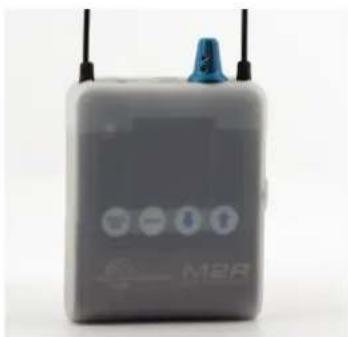
Close-up of a black electronic component with a metallic connector and multiple screws (no visible text or symbols)M2RCVR
This tough silicone cover protects the M2Ra from moisture and dust. The pliable material and the two-part design make it easy to install and remove. Cutouts for the antennas and knob and the raised dome for the LED provide a snug fit.
natural_image
Exterior view of a gray M2R device with antenna and control buttons (no readable text or symbols beyond branding)Specifications
Operating Spectrum (dependent on Locale):
NA: 470.100 - 607.950 MHz
EU:479.100 - 614.375 MHz
AU: 520.000 - 614.375 MHz
JA: 470.150 - 614.375 MHz
EU: 537.600 - 691.175 MHz
AUB9371600 - 691.175 MHz
JA: 537.600 - 691.175 MHz
Modulation Type: 8PSK with Forward Error Correction
Encryption Type: AES-256 in CTR mode
Latency: (overall system)
Digital Source: 1.0 ms plus Dante network
Analog Source: <1.6 ms
Audio Performance:
Frequency Response: 10 Hz - 12 KHz, +0, -3dB
THD+N: 0.15% (1kHz @ -10 dBFS)
Dynamic Range: >95 dB weighted
Adj. Channel Isolation >85dB
Third Order Intercept: +15 dBu
Diversity Type: Switched antenna phase, during packet headers
Audio Output: 3.5 mm stereo jack
Power requirements: 2 x AA batteries (3.0V)
Battery life: 7 hours; (2) Lithium AA
Power consumption: 1 W
Dimensions: Height: 3.5 in. / 90 mm. (with knob)
Width: 2.375 in. / 60.325 mm.
Depth: .625 in. / 15.875 mm.
Weight: 5.6 ounces / 159 grams (with
batteries)
Specifications subject to change without notice.
Wireless Designer Software
Download the Wireless Designer software installer from the web sites under the SUPPORT tab at:
https://lectrosonics.com/wireless-designer.html
NOTE: If Wireless Designer is already installed, you must uninstall it before attempting to install a new copy.
Firmware Update Instructions
Firmware updates are made with Wireless Designer software and a file downloaded from the web site and the M2Ra connected via USB. Firmware files are located at https://lectrosonics.com/firmware.html and Wireless Designer software can be downloaded for Mac or Windows here https://lectrosonics.com/wireless-designer.html.
The USB port on the transmitter requires a micro-B male plug on the connecting cable. The other end of the cable would normally be a USB A-Type male connector to fit the most common type of USB jack used on computers. Our part number for this cable is 21926.
Step 1:
Connect your computer to the M2Ra using the USB cable. The receiver will automatically power on into Update mode.
Step 2:
Start Wireless Designer and under the “Connect (Live)” menu, scroll down to Update Firmware, and in the Duet submenu, click on M2Ra.
Step 3:
Follow the on-screen instructions to choose the update file, check to see if an update is needed, and initiate the update process. When finished, check the firmware version in Setup>About to verify the update.
Service and Repair
If your system malfunctions, you should attempt to correct or isolate the trouble before concluding that the equipment needs repair. Make sure you have followed the setup procedure and operating instructions. Check the interconnecting cables.
We strongly recommend that you do not try to repair the equipment yourself and do not have the local repair shop attempt anything other than the simplest repair. If the repair is more complicated than a broken wire or loose connection, send the unit to the factory for repair and service. Don't attempt to adjust any controls inside the units. Once set at the factory, the various controls and trimmers do not drift with age or vibration and never require readjustment. There are no adjustments inside that will make a malfunctioning unit start working.
LECTROSONICS' Service Department is equipped and staffed to quickly repair your equipment. In warranty repairs are made at no charge in accordance with the terms of the warranty. Out-of-warranty repairs are charged at a modest flat rate plus parts and shipping. Since it takes almost as much time and effort to determine what is wrong as it does to make the repair, there is a charge for an exact quotation. We will be happy to quote approximate charges by phone for out-of-warranty repairs.
Returning Units for Repair
For timely service, please follow the steps below:
A. DO NOT return equipment to the factory for repair without first contacting us by e-mail or by phone. We need to know the nature of the problem, the model number and the serial number of the equipment. We also need a phone number where you can be reached 8 A.M. to 4 P.M. (U.S. Mountain Standard Time).
B. After receiving your request, we will issue you a return authorization number (R.A.). This number will help speed your repair through our receiving and repair departments. The return authorization number must be clearly shown on the outside of the shipping container.
C. Pack the equipment carefully and ship to us, shipping costs prepaid. If necessary, we can provide you with the proper packing materials. UPS or FEDEX is usually the best way to ship the units. Heavy units should be "double-boxed" for safe transport.
D. We also strongly recommend that you insure the equipment, since we cannot be responsible for loss of or damage to equipment that you ship. Of course, we insure the equipment when we ship it back to you.
Lectrosonics USA:
| Mailing address: | Shipping address: | Telephone: | ||||||
| Lectrosonics, | Inc. | Lectrosonics, | Inc. | +1 | (505) | 892 | ||
| PO Box 15900 | 561 Laser Rd., Suite 102 | (800) | 821-1121 | Toll-free US and Canada | ||||
| Rio Rancho, NM | 87174 | Rio Rancho, NM | 87124 | Fax +1 (505) | 892-6243 | |||
| USA | USA | |||||||
Web: E-mail:
| www.lectrosonics.com | service.repair@lectrosonics.com |
| sales@lectrosonics.com |
Lectrosonics Canada:
| Mailing Address: | Telephone: | E-mail: |
| 720 Spadina Avenue, Suite 600 Toronto, Ontario M5S 2T9 | +1 (416) 596-2202(877) 753-2876 Toll-free Canada(877) 7LECTRO Fax (416) 596-6648 | Sales: colinb@lectrosonics.comService: joeb@lectrosonics.com |
Self-Help Options for Non-Urgent Concerns
Our Facebook groups and weblists are a wealth of knowledge for user questions and information. Refer to:
Lectrosonics General Facebook Group: https://www.facebook.com/groups/69511015699
D Squared, Venue 2 and Wireless Designer Group: https://www.facebook.com/groups/104052953321109
The Wire Lists: https://lectrosonics.com/the-wire-lists.html
EU Declaration of Conformity
LECTROSONICS, INC.
581 Laser Road
Rio Rancho, NM 87124 USA
Declares under our sole responsibility that the following product:
Model: M2RA-A1B1
Wireless microphone receiver
are in conformity with the provisions of the following EC directive(s) (including applicable amendments) and are designed and manufactured in accordance with the harmonized standards:
| Document | Description | Date/Version |
| RL 2014/53/EU | Radio Equipment Directive 2014/53/EU (RED) | 2014-04 |
| EN 300 422-1 | Wireless Microphones; Audio PMSE up to 3 GHz; Part 1: Glass A Receivers | V2.2.1(2021-11) |
| Electromagnetic Compatibility | ||
| EN 301 489-1 | ElectroMagnetic Compatibility (EMC) standard for radio equipment and services; Common Technical Requirements | V2.2.3(2019-11) |
| EN 301 489-9 | Specific Conditions for wireless microphones, similar Radio Frequency (RF) audio link equipment, cordless audio and in-ear monitoring devices | V2.1.1(2019-04) |
| Safety and Health | ||
| EN 62388-1 | Audio/Video, information and communication technology equipment – Safety Requirements | 2020+A11:2020 |
| RL 2011/65/EU | RoHS Directive 2011/65/EU: Restriction of the use of certain hazardous substances (RoHS Recast) | 2011 |
The EU type examination was performed by notified body Bay Area Compliance Laboratories Corp.
Software version of M2RA-A1B1: 0.17/0.20
Rio Rancho, NM USA, 21 November 2022

Robert Cunnings
V.P. IT & Logistics
Lectrosonics, Inc.
UKCA Declaration of Conformity
LECTROSONICS, INC.
581 Laser Road
Rio Rancho, NM 87124 USA
Declares under our sole responsibility that the following products:
Model: M2RA-A1B1
Wireless microphone receiver
is in conformity with the provisions of the following EC directive(s) (including applicable amendments) and are designed and manufactured in accordance with the harmonized standards:
| Document | Description | Date/Version |
| UK: Radio Equipment Regulations | 2017 | |
| EN 300 422-1 | Wireless Microphones; Audio PMSE up to 3 GHz; Part 1: Class A Receivers | V2.2.1(2021-11) |
| UK: Electromagnetic Compatibility Regulations | 2016 | |
| EN 301 489-1 | ElectroMagnetic Compatibility (EMC) standard for radio equipment and services; Common Technical Requirements | V2.2.3(2019-11) |
| EN 301 489-9 | Specific Conditions for wireless microphones, similar Radio Frequency (RF) audio link equipment, cordless audio and in-ear monitoring devices | V2.1.1(2019-04) |
| UK: Electrical Equipment (Safety) Regulations | 2016 | |
| EN 62368-1 | Audio/Video, information and communication technology equipment – Safety Requirements | 2020+A11:2020 |
| UK: The Restriction of the Use of Certain Hazardous Substances In Electrical and Electronic Equipment Regulations | 2012 | |
| RL 2011/65/EU | RoHS Directive 2011/65/EU: Restriction of the use of certain hazardous substances (RoHS Recast) | 2011 |
The EU type examination was performed by notified body Bay Area Compliance Laboratories Corp.
Software version of M2RA-A1B1: 0.17/0.20
Rio Rancho, NM USA, 11 November 2022

Robert Cunnings
V.P. IT & Logistics
Lectrosonics, Inc.
LIMITED ONE YEAR WARRANTY
The equipment is warranted for one year from date of purchase against defects in materials or workmanship provided it was purchased from an authorized dealer. This warranty does not cover equipment which has been abused or damaged by careless handling or shipping. This warranty does not apply to used or demonstrator equipment.
Should any defect develop, Lectrosonics, Inc. will, at our option, repair or replace any defective parts without charge for either parts or labor. If Lectrosonics, Inc. cannot correct the defect in your equipment, it will be replaced at no charge with a similar new item. Lectrosonics, Inc. will pay for the cost of returning your equipment to you.
This warranty applies only to items returned to Lectrosonics, Inc. or an authorized dealer, shipping costs prepaid, within one year from the date of purchase.
This Limited Warranty is governed by the laws of the State of New Mexico. It states the entire liability of Lectrosonics Inc. and the entire remedy of the purchaser for any breach of warranty as outlined above. NEITHER LECTROSONICS, INC. NOR ANYONE INVOLVED IN THE PRODUCTION OR DELIVERY OF THE EQUIPMENT SHALL BE LIABLE FOR ANY INDIRECT, SPECIAL, PUNITIVE, CONSEQUENTIAL, OR INCIDENTAL DAMAGES ARISING OUT OF THE USE OR INABILITY TO USE THIS EQUIPMENT EVEN IF LECTROSONICS, INC. HAS BEEN ADVISED OF THE POSSIBILITY OF SUCH DAMAGES. IN NO EVENT SHALL THE LIABILITY OF LECTROSONICS, INC. EXCEED THE PURCHASE PRICE OF ANY DEFECTIVE EQUIPMENT.
This warranty gives you specific legal rights. You may have additional legal rights which vary from state to state.
- Digital IEM/IFB Receiver M2Ra-A1B1, M2Ra-B1C1
- Quick Start Summary
- Table of Contents
- M2Ra Digital IEM Receiver
- FlexList™
- Smart Tuning (SmartTune™)
- RF Front-End with Tracking Filter
- Panels and Features
- Battery Status LED
- RF Link LED
- On/Off and Volume Knob
- IR (infrared) Port
- Headphone Output
- USB Port
- Battery Compartment
- MENU/SEL Button
- BACK Button
- Arrow Buttons
- Installing Batteries
- RF level
- Diversity activity
- Battery life indicator
- Audio level
- Mixer mode
- System Setup Procedure
- Step 1) Install Batteries
- Step 2) Turn the power on
- Step 3) Locate and Set a Clear Frequency
- Using SmartTune
- Manual Scanning
- Step 4) Sync with a Transmitter
- Step 5) Enable RF in the Transmitter
- Step 6) Send Audio
- Navigating the Menus
- M2Ra LCD Menu Map
- Menu Item Descriptions
- SmartTune
- Scan
- Flex List
- Frequency
- Vol/Bal
- Mixer
- Limiter
- Vol. Taper
- Compat. Mode
- Lock/Unlock
- Locale
- About M2Ra
- Default
- Supplied Accessories
- Optional Accessories
- LRSHOE
- Specifications
- Wireless Designer Software
- Firmware Update Instructions
- Step 1:
- Step 2:
- Step 3:
- Service and Repair
- Returning Units for Repair
- Self-Help Options for Non-Urgent Concerns
- EU Declaration of Conformity
- Model: M2RA-A1B1
- UKCA Declaration of Conformity
- LIMITED ONE YEAR WARRANTY
Brand : Lectrosonics
Model : M2Ra-A1B1
Category : Wireless audio receiver