D800 - Lock Dormakaba - Free user manual and instructions
Find the device manual for free D800 Dormakaba in PDF.


| Product Type | Electronic Lock |
| Brand | Dormakaba |
| Model | D800 |
| Dimensions (W x H x D) | 3.2 x 7.8 x 2.8 inches |
| Weight | 2.1 lbs |
| Power Supply | 4 AA batteries (9V backup) |
| Battery Life | Up to 1 year (normal use) |
| Locking Mechanism | Motorized deadbolt |
| Access Methods | Keypad code, key override, smartphone app (optional) |
| User Codes | Up to 50 user codes |
| Wireless Protocol | Bluetooth 4.0 |
| Security Rating | ANSI Grade 1 |
| Fire Rating | Not fire rated (standard use) |
| Operating Temperature | -15°C to 50°C |
| Installation | Standard door prep, drill required |
| Maintenance | Clean with dry cloth, check battery monthly |
| Spare Parts | Batteries, faceplate, mounting screws available |
| Repairability | User replaceable batteries; professional repair for motor |
| Certification | UL 294 |
| Warranty | 2 years limited |
Frequently Asked Questions - D800 Dormakaba
User questions about D800 Dormakaba
0 question about this device. Answer the ones you know or ask your own.
Ask a new question about this device
Download the instructions for your Lock in PDF format for free! Find your manual D800 - Dormakaba and take your electronic device back in hand. On this page are published all the documents necessary for the use of your device. D800 by Dormakaba.
USER MANUAL D800 Dormakaba
Standard door thickness range : 1 3/8"\~2 1/8"
1 Mark door
1 Place template on door and mark center for 2 1/8" hole at desired backset.
2 Template should be placed on high edge of beveled door edge.

natural_image
Diagram of hands holding a rectangular object with an arrow indicating direction (no text or symbols)High side of door bevel
② Bore two holes
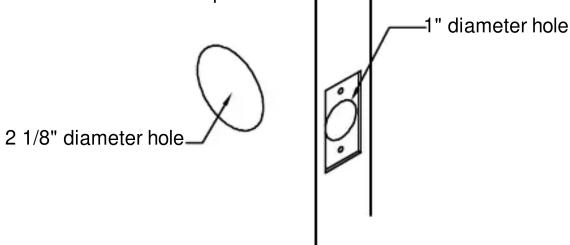
1 Bore a 2 1/8" diameter hole. To avoid splintering a wood door, bore the hole from both sides of door.
Note : If there is an existing 1 1/2" diameter cross bore, there is no need to re-drill cross bore. 1" diameter edge hole must be drilled 4" deep to accommodate deadbolt.
2 Drill a 1" diameter hole from the edge of door that intersects the 2 1/8" hole.
3 Using the deadbolt faceplate as a guide, mortise the edge of door to recess the faceplate.
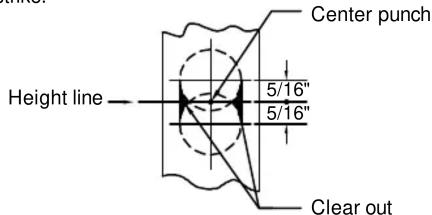
③ Prepare wood door jamb
1 Locate exact center of bolt and mark center lines on jamb as shown.
2 Mark drill points 5/16" above and below horizontal center line.
3 Bore two overlapping 7/8" holes, 1 1/8" deep.
4 Clean out holes for strike box and place strike box in hole.
5 Place strike over box and trace for cutout.
6 Chisel about 1/4" deep for flush fit of strike box, strike reinforcer and strike.
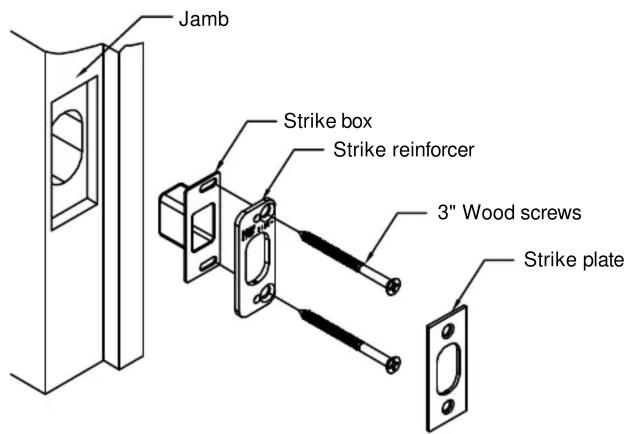
4 Install strike plate
1 Place strike reinforcer with screw holes toward doorstop.
2 Mark and drill two 3/16" holes for 3" wood screws.
3 Install strike reinforcer, strike box, and finish strike in the order shown.
⑤ Install deadbolt assembly
1 Insert the deadbolt with slotted driver bar hole at the bottom of the assembly.
2 Secure the deadbolt to the door with screws.

6 Install Indicator
1 Retract deadbolt with a screwdriver.
2 Set up the Indicator Assembly to "VACANT"
3 Slide the driver bar in indicator assembly over deadbolt.

7 Attach inside trim
1 Slide the thumbturn assembly over the driver bar.
2 Secure the thumbturn assembly to the door with the mounting screws supplied.
3 Test thumbturn. Bolt must travel freely and project fully into strike without binding.

8 Test thumbturn
1 "VACANT" indicates Deadbolt is retraced.
2 "OCCUPIED" indicates Deadbolt is in locked position.


Brand : Dormakaba
Model : D800
Category : Lock