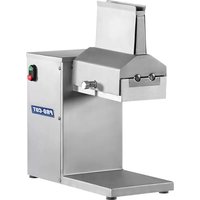
KT-8 - Chopper Pro-Cut - Free user manual and instructions
Find the device manual for free KT-8 Pro-Cut in PDF.


| Product Type | Meat Tenderizer (Mincer) |
| Brand | Pro-Cut |
| Model | KT-8 |
| Dimensions (L x W x H) | 50 cm x 24 cm x 58.5 cm (19.7 in x 9.4 in x 23.0 in) |
| Weight | Approx. 30.4 kg (67 lb) |
| Material | Stainless steel (total construction) |
| Motor Power | 3/4 HP (559 W), single phase |
| Voltage / Frequency | 115V~ or 220V~, 60 Hz or 50 Hz (see ID plate) |
| Current | 10 A (115V) or 5.2 A (220V) |
| Product Entrance (Max) | 21 cm (8.3 in) width x 1.5 cm (0.6 in) thickness |
| Meat Requirement | Boneless, temperature 0°C to 3°C (32°F to 37.4°F) |
| Knife Type | Two knife assemblies (marked B and F), replaceable |
| Safety Features | Lid lock, microswitch (prevents operation when lid open), thermal protector, reset button |
| Cleaning | Daily cleaning; wash knives and support with warm water and mild detergent; do not submerge unit; avoid abrasive cleaners |
| Maintenance | Replace knives every 2 years; lubricate transmission box annually with lithium grease; check gears and bushings |
| Spare Parts | Available from authorized dealer (e.g., knives, gears, bushings) |
Frequently Asked Questions - KT-8 Pro-Cut
User questions about KT-8 Pro-Cut
0 question about this device. Answer the ones you know or ask your own.
Ask a new question about this device
Download the instructions for your Chopper in PDF format for free! Find your manual KT-8 - Pro-Cut and take your electronic device back in hand. On this page are published all the documents necessary for the use of your device. KT-8 by Pro-Cut.
USER MANUAL KT-8 Pro-Cut
INSTRUCTIONS FOR OPERATION, SERVICE AND MAINTENANCE OF THIS EQUIPMENT
CONTENTS: PAGE
I. INTRODUCTION 1
II. INSTALLATION 2
III. OPERATION 2
IV. KEY ELEMENTS IN TENDERING QUALITY PRODUCT 3
V. CLEANING 3
VI. MAINTENANCE 4
VII. MOST FREQUENTED ISSUES 4
VIII. GENERAL TECHNICAL INFORMATION 4
IX. ELECTRIC SPECIFICATIONS 5
X. ELECTRIC DIAGRAM 5
I.- INTRODUCTION:
Congratulations!, you have acquired a Meat tenderizer, which is made of long lasting materials that should give you years of trouble free operation and durable service.
IMPORTANT!: Before you unpack your new equipment, it is of vital importance that you and any person that will operate this unit thoroughly read this manual.

WARNING!:
This machine is designed to process boneless meat, and is by nature dangerous if is not used and maintained properly for optimum safety. It is very important that you follow the indications from this manual.
*Note: for id numbers - marked with ( ) - refers to schematic diagram in the central pages


The appliance is not be used by persons (including children) with reduced physical, sensory or mental capabilities, or lack of experience and knowledge, unless they have given supervision or instruction. Children being supervised not play with the appliance.
Never perform service, cleaning or maintenance on this unit while connected to a power source.
Keep the guard closed during work, check that the lock (5) is completely into its hole.
Do not leave the machine unattended while in operation & turn it off when it is not being used.
Warning! Never introduce hands or fingers within the feeding area where the knives are rolling.

WARNING!
Do not touch the sharp knives, serious injuries may happen. Never operate the machine without appropriate training
II.- INSTALLATION
Before connecting the meat tenderizer to the power source, follow this easy set up steps:
1.- Choose the place where you will install the unit:
A. It should be a clean and leveled place with an accessible electrical source
B. To level the meat tenderizer, use the four level rubber pads (17) by turning them counter clock wise and/or clock wise until the machine is completely leveled.
C. Assure that the electrical features are the adequate for this unit. If you have doubts about your electrical features, contact a qualified electrician or your authorized dealer.
D. Be sure there are not strange objects between blades.
E. Assure that the lid is correctly close and that the lock (5) is completely into the hole.
2.- Connect the power cord (14) into a power source.
III.-OPERATION.
Normal operation of the meat tenderizer.
IMPORTANT!: Due to the robust design, the noise level when the equipment is operating is high but without exceed the permissible limit. Even though is recommended not be exposed during long period of time.
1.- Turn on the machine by pushing the green button of the on-off switch (19). The red button turns off the unit (if the machine do not turn on, read the "Most frequented issues" section.

CAUTION!
Before turning on the equipment, verify that the lid (B) is correctly closed. Do not introduce foreign objects through the interior of the lid while operation or not operation of the machine, because it can cause the bending or the rupture of the knives.
2.- Now, you can introduce the product through the entrance located in the top of the stainless steel lid (B). Be careful! do not introduce your hands or fingers.
With only one passing through the knives will be enough to tender the product and have it in optimum conditions.

CAUTION!
Use only one piece of boneless meat from 0°C to 3°C [32°F to 37.4°F],
1.5cm [ 0.59 in.] maximum thickness, and 21cm. [ 8.26 in.] maximum width each time.
*Note: Before starting with normal operation, we recommend to tender about three singles pieces of boneless meat in order to clean the knives.
IV.- KEY ELEMENTS IN TENDERING QUALITY PRODUCT
- It is not recommended to force the product feeding into the entrance of the stainless steel lid (B) of the meat tenderizer, just let it fall gradually into this entrance.
- Pass the product through the unit as many times as you think it will be necessary to have the product well tenderized.
- Periodically check the sharp edges of the knives (3) & (4). If you feel that the product is not good tender after passing it through the unit, replace the knives for a new ones.
*Note: if you need to replace the knives, please contact your authorized dealer. The sharp edges from the knives are designed to give you high durability.
V.- CLEANING
It is recommended to clean the machine daily. In order to do this, follow the next steps:
A) Pull the button (5) from the lock and turn the lid (B) toward up.
B) Raise and remove the knives by removing the knives support (1).
C) Take out the knives (3) & (4) from the knives support by taking them from the edges (do not touch the knives with your hands, they have sharp edges and you can cut yourself).
D) Introduce the knives (3) & (4) and the knives support (1) within a recipient with warm water and rinse, wash with detergent, remove the grease with a smooth soft brush (not included) and rinse with water.

IMPORTANT!:
Avoid use of abrasive cleaners, acid, fibers, chlorides (such as chlorine bleach), on stainless steel surfaces will cause pitting, corrosion, and metal discoloration. Allowing salty solutions to evaporate and dry on stainless steel may also contribute to corrosive conditions. Do not submerge the entire unit into water.
E) Wash the lid (B), the base (C), the cabinet (D), the knives' shaft and the rest of the structure with a damp cloth and a appropriate detergent, rinse and dry with a soft cloth or a flannel. Reassemble in reverse order.

FIG. 1 CORRECT ASSEMBLY OF KNIVES
*IMPORTANT!: Gears and knives' support are carved with letter "B" and "F" to match and make easier its assembly. The aluminum knives box (A) also is marked to guide how the Knives assembly must be placed into the unit. A correct assembly prevent noise, bad operation and avoid the risk of entrapment in moving parts.
How to disassemble the lid for cleaning
In order to improve the cleaning and operation of the Meat Tenderizer, it is possible to disassemble the lid (B). Please follow next procedure to install and uninstall the lid.
Uninstalling the lid
A. Pull the button (5) from the lock and turn the lid (B) toward up.
B. Raise and remove the knives by removing the knives support (1).
C. Turn the lid cover slightly downwards in order to match the clamp bolt of the lid and the hinge slot (See Fig. 1A).
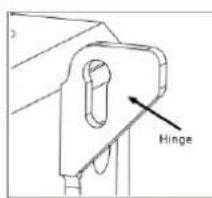
Fig 1A. Clamp bolt and hinge


Fig 1B. Lid out of hinges
D. Move the lid (B) towards the right side in order to release it from hinges and remove the lid from the knives box (A)
Follow the cleaning instructions described in the preceding paragraph of this section
Installation of the Lid
-
Place the lid on the knives box matching the lid bolts whit notches of hinges (See Fig. 1C) on the left side of hinges.
-
Push softly the lid to the right until lid bolts touch the hinges. Turn down the lid and make sure the button lock secure the lid. (See Fig. 1D)

Fig 1D. Cover installation in blade support
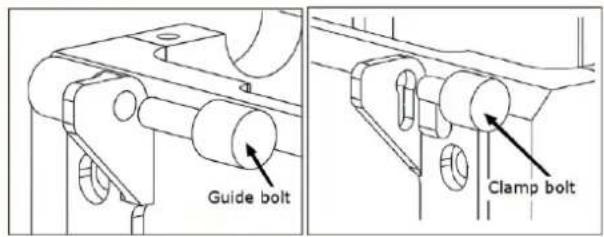
Fig 1C. Location of bolts hinges

CAUTION!
Always verify that the lid is well closed before to use the equipment.
VI.- MAINTENANCE
1.- It is recommended to replace the knives for a new ones at least every two years of operation.
2.- Gears (23) & (24): periodically check the gears, they should be in perfect conditions (not wear or damaged). If they are not in good conditions, replace them for new ones in order to have a perfect movement and force in both knives's shafts.
3.- Bushings (21) & (22): keep the bushings clean in order to avoid friction and allow the knives's shaft rotate correctly.
4.- Transmission box (13): disconnect the power plug (14), remove screws and remove the stainless steel cabinet (D) being careful not to disconnect any wire. Remove screws with a slotted screwdriver in order to remove the transmission lid (6), lubricate the gear (10) and worm gear (11) that are inside the transmission box (13).
Use lithium based grease (100 gr. - 3.53oz aprox); do this at least each year of normal operation.
5.- If the power cable is damaged, it must be replaced by your nearest technical service or qualified personnel to avoid risk of electric shock.
1.- Every time voltage is lower than limits - It depends of the product voltage specification - the thermal protector will turn off the motor to protect it, if this happens, push the red (OFF) button and then push the green button to turn it on again (See Fig 2).
2.- Every time the motor is overloaded the thermal protector included in the switch (20) will turn off the motor to protect it, if this happens push it (3 sec.) to restart it and then turn ON the equipment again (See Fig 3).
3.- The Meat tenderizer has a micro switch (7) to protect from serious injuries when the lid (D) is open, that's why if the lid is not closed correctly the motor won't turn on.
*Note: it is recommendable that an authorized dealer technician gives general maintenance to your meat tenderizer at least once a year.

"ON" button (green color)
"OFF" button (red color)
FIG. 2 START/STOP BUTTON

FIG. 3 RESET BUTTON
VIII.-GENERAL TECHNICAL INFORMATION
| SIZE | Length 50 cm. (19.685 in.) | |
| Width | 24 cm. (9.448 in.) | |
| Height 58.5cm. (23.031 in.) | ||
| WEIGHT | approximately 30.4 kg. (67 lb.) | |
| PRODUCT ENTRANCE | maximum 21 cm. (8.267 in.) width x 1.5cm. (0.59 in.) thickness. | |
| MATERIAL CONSTRUCTION | Totally Stainless steel | |
| MOTOR | See next table | |
Materials that come in contact with the product are zytel and stainless steel which should have strict cleaning in order not to contaminate the product.
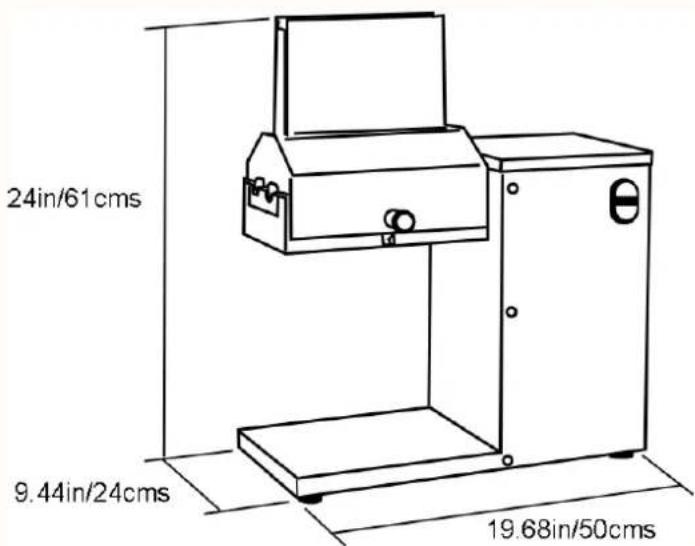
FIG. 4 MEAT TENDERIZER DIMENSIONS
IX. ELECTRIC SPECIFICATIONS (Depends on your equipment. See ID plate):
| MODEL VOLTAGE FREQUENCY CURRENT MOTOR POWER | ||||
| Meat tenderizer | 115 V~ OR | 60 Hz OR 50 Hz 10 | 4 A 559 W 3/4 (HP) | |
| 220V~ | 60 Hz OR 50 Hz | 5.2 A | 559 W 3/4 (HP) | |
X. ELECTRIC DIAGRAM:
The electric diagram for this unit is located inside the cabinet.
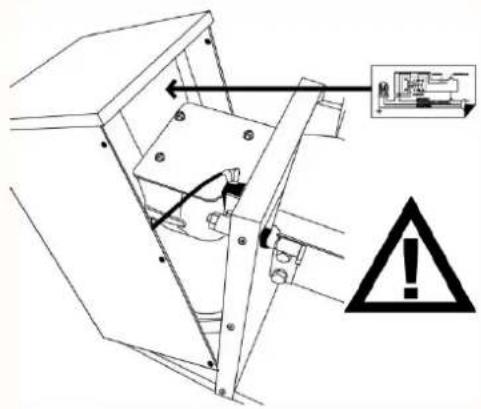
WARNING!:
The cabinet for this equipment must be opened by qualified personnel only.
For any problem or doubt related to electric specifications and connections, please call to your authorized dealer.
MEAT TENDERIZER DIAGRAM FOR COMPONENTS (SEE CENTRAL PAGES)
| ITEM DESCRIPTION QTY | ||
| 1 | KNIVES SUPPORT (ASSY) | 1 |
| 2 | KNIVES SCRAPER | 2 |
| 3 | KNIFE ASSEMBLY (B) | 1 |
| 4 | KNIFE ASSEMBLY (F) | 1 |
| 5 | LOCK (ASSEMBLY) | 1 |
| 6 | TRANSMISSION CAP S.S. | 1 |
| 7 | SENSOR | 1 |
| 8 | SENSOR SUPPORT 1 | |
| 9 | POSITION BOLT 1 | |
| 10 | BASE COVER WITH MESH 1 | |
| 11 | TRIPLE- THREAD WORM (Not Shown) 1 | |
| 12 | 3/4 HP ONE PHASE MOTOR | 1 |
| 13 | TRANSMISSION (ALUM.) | 1 |
| 14 | POWER CORD | 1 |
| 15 | GROMMET MP27-2 1 | |
| 16 | GEAR S.S | 1 |
| 17 | RUBBER FOOT | 4 |
| 18 | RELAY 110V OR 220 V. 1 | |
| 19 | ON-OFF SWITCH 1 | |
| 20 | CIRCUIT BREAKER 220 OR 110 1 | |
| A | KNIVES BOX | 1 |
| B | STAINLESS STEEL LID | 1 |
| C | TENDERIZER BASE | 1 |
| D | TENDERIZER CASE | 1 |

- INSTRUCTIONS FOR OPERATION, SERVICE AND MAINTENANCE OF THIS EQUIPMENT
- I.- INTRODUCTION:
- WARNING!:
- WARNING!
- II.- INSTALLATION
- 1.- Choose the place where you will install the unit:
- 2.- Connect the power cord (14) into a power source.
- III.-OPERATION.
- CAUTION!
- IV.- KEY ELEMENTS IN TENDERING QUALITY PRODUCT
- V.- CLEANING
- IMPORTANT!:
- VI.- MAINTENANCE
- ELECTRIC DIAGRAM:
Brand : Pro-Cut
Model : KT-8
Category : Chopper