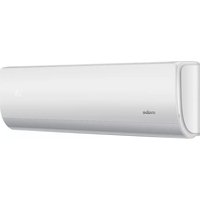
MMT18HDBWCAM8 - Air conditioner Mabe - Free user manual and instructions
Find the device manual for free MMT18HDBWCAM8 Mabe in PDF.


| Brand | Mabe |
| Model | MMT18HDBWCAM8 |
| Product Type | Air Conditioner |
| Cooling Capacity (BTU/h) | 18000 |
| Energy Efficiency Ratio (EER) | 11.0 |
| Power Supply | 115 V ~ 60 Hz, 10 A |
| Dimensions (Width x Height x Depth) | 26 x 19 x 28 inches |
| Weight | 85 lbs |
| Refrigerant Type | R-410A |
| Air Flow (CFM) | 500 |
| Fan Speeds | 3 (Low, Med, High) |
| Control Type | Remote Control and Touch Panel |
| Timer Function | Yes, 24-hour programmable |
| Sleep Mode | Yes |
| Air Filter | Washable, reusable mesh filter |
| Installation Type | Window mounting kit included |
| Noise Level (dBA) | 50 (indoor) / 55 (outdoor) |
| Safety Features | Overheat protection, child lock, anti-frost |
| Maintenance | Clean filter every 2 weeks; annual professional service |
| Warranty | 1 year parts and labor, 5 years on compressor |
Frequently Asked Questions - MMT18HDBWCAM8 Mabe
User questions about MMT18HDBWCAM8 Mabe
0 question about this device. Answer the ones you know or ask your own.
Ask a new question about this device
Download the instructions for your Air conditioner in PDF format for free! Find your manual MMT18HDBWCAM8 - Mabe and take your electronic device back in hand. On this page are published all the documents necessary for the use of your device. MMT18HDBWCAM8 by Mabe.
USER MANUAL MMT18HDBWCAM8 Mabe
for the English version, go to page 47
lea este instructivo antes de instalar su aire acondicionado read this manual before installing your new air conditioner
modelos/models
MMT12HABWCAM8
MMT12HDBWCAM8
MMT12CDBWCAM8
MMT12CABWLCAM8
MMT12CDBWLCAM8
MMT12HABWLCAM8
MMT12HDBWLCAM8
MMT12CABWCAM8
MMT12CABSCAM8
MMT12HABSCAM8
MMT12CDBSCAM8
MMT12HDBSCAM8
MMT18CDBWCAM8
MMT18HDBWCAM8
MMT18CDBSCAM8
MMT18HDBSCAM8
MMT24CDBWCAM8
MMT24HDBWCAM8
MMT24CDBSCAM8
MMT24HDBSCAM8

PM01
mabe
bar
| Category | Value | |---|---| | Row 1 | 100 | | Row 2 | 100 | | Row 3 | 100 | | Row 4 | 100 | | Row 5 | 100 | | Row 6 | 100 | | Row 7 | 100 | | Row 8 | 100 | | Row 9 | 100 | | Row 10 | 100 | | Row 11 | 100 | | Row 12 | 100 | | Row 13 | 100 | | Row 14 | 100 | | Row 15 | 100 | | Row 16 | 100 | | Row 17 | 100 | | Row 18 | 100 | | Row 19 | 100 | | Row 20 | 100 | | Row 21 | 100 | | Row 22 | 100 | | Row 23 | 100 | | Row 24 | 100 | | Row 25 | 100 | | Row 26 | 100 | | Row 27 | 100 | | Row 28 | 100 | | Row 29 | 100 | | Row 30 | 100 | | Row 31 | 100 | | Row 32 | 100 | | Row 33 | 100 | | Row 34 | 100 | | Row 35 | 100 | | Row 36 | 100 | | Row 37 | 100 | | Row 38 | 100 | | Row 39 | 100 | | Row 40 | 100 | | Row 41 | 100 | | Row 42 | 100 | | Row 43 | 100 | | Row 44 | 100 | | Row 45 | 100 | | Row 46 | 100 | | Row 47 | 100 | | Row 48 | 100 | | Row 49 | 100 | | Row 50 | 100 | | Row 51 | 100 | | Row 52 | 100 | | Row 53 | 100 | | Row 54 | 100 | | Row 55 | 100 | | Row 56 | 100 | | Row 57 | 100 | | Row 58 | 100 | | Row 59 | 100 | | Row 60 | 100 | | Row 61 | 100 | | Row 62 | 100 | | Row 63 | 100 | | Row 64 | 100 | | Row 65 | 100 | | Row 66 | 100 | | Row 67 | 100 | | Row 68 | 100 | | Row 69 | 100 | | Row 70 | 100 | | Row 71 | 100 | | Row 72 | 100 | | Row 73 | 100 | | Row 74 | 100 | | Row 75 | 100 | | Row 76 | 100 | | Row 77 | 100 | | Row 78 | 100 | | Row 79 | 100 | | Row 80 | 100 | | Row 81 | 100 | | Row 82 | 100 | | Row 83 | 100 | | Row 84 | 100 | | Row 85 | 100 | | Row 86 | 100 | | Row 87 | 100 | | Row 88 | 100 | | Row 89 | 100 | | Row 90 | 100 | | Row 91 | 100 | | Row 92 | 100 | | Row 93 | 100 | | Row 94 | 100 | | Row 95 | 100 | | Row 96 | 100 | | Row 97 | 100 | | Row 98 | 100 | | Row 99 | 100 | | Total (Row) | -2.5%contenido
Notas:
natural_image
Illustration of a cartoon character holding a box next to a rectangular container (no text or symbols)natural_image
Diagram of a hand holding a rectangular device with a grid and directional arrow indicating rotation (no text or symbols)natural_image
Illustration of two children playing badminton, one holding a bat and the other standing with a net (no text or symbols)natural_image
Three technical diagrams showing mechanical assembly and mounting bracket (no text or symbols)Important Safety Instructions 48
Parts and features 49
Operation instructions .... 51
Remote control 51
Emergency and Test operation 58
Air flow direction adjustment 59
SLEEP function 60
Healthy Airflow 61
Timer On/Off operation 62
TURBO operation 62
Installing the batteries 63
Maintenance 64
WARNINGS 67
Troubleshooting 70
Installation instructions 73
Selection of installation place 73
Installation of indoor and outdoor units 74
Indoor Unit 77
Outdoor Unit 81
Installation checklist and test run 87
Rated electrical specifications 88
welcome
Everything you need to know for the proper operation of your product can be found here and in our web sites. We invite you to get to know your product, read this manual and get the most out of it.
Important Safety Instructions
- Your own safety is important for us. Please read this information before using your new product.
- Do not use extension cords.
- Do not plug other electric appliances to the same power outlet.
- Hold the connector by the power plug, not by the cord.
- This product is equipped with a "Y" type polarized plug having a built-in grounding wire.
- Do not remove the grounding terminal or use outlet adapters.
- If the power cord is damaged, it must be replaced by the manufacturer, its authorized service agent or by qualified personnel in order to avoid a hazard.
- If voltage variations are usual in your area, have a voltage regulator installed.
- This appliance is not intended for use by persons (including children) having reduced physical, sensory or mental capabilities, or lack of experience and knowledge, unless they have been given supervision or instruction concerning the use of the appliance by a person responsible for their safety.
• Children should be supervised to make sure they do not use the appliance as a toy. - IMPORTANT: Failure to follow these warnings, will make you entirely responsible for personal injuries or material damages that may occur from using this equipment.
- If the appliance will be connected to a fixed power supply wiring, a surge protector must also be installed and a main power switch and/or fuse rated 1.5 times the maximum current of the unit should be used.
The following conditions are not considered as a normal use of the appliance:
- If it has not been operated in accordance with the provided operation instructions.
- Damages caused by accidents, electrical overloads, voltage fluctuations, using an energy other than the specified, or catastrophes.
- If it has been used with commercial or industrial purposes, or for other than the indicated in the operation instructions.
- If the product has been repaired by unauthorized persons and/or service workshops.
indoor unit

display board B
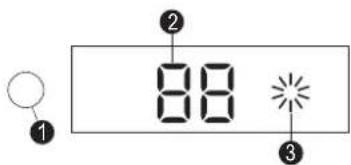
- Signal receiver hole.
- Ambient temp. display. When receiving the remote control signal, display the set temperature.
- Operation mode indicator (lights up when the compressor is on.)
display board C (on models having only LED indicators)

- Remote control signal receiver. A beep is heard when a signal from the remote control is received.
- Power indicator. Lights up when the unit starts.
- TIMER mode indicator. Lights up when the TIMER operation is selected.
- Operation mode indicator. Lights up when the compressor is on.
display board
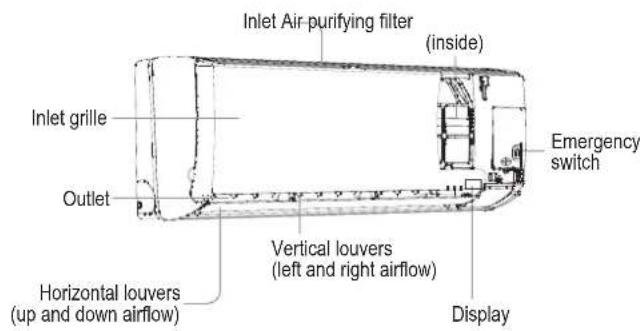
display board A

- Signal receiver hole.
- Ambient temp. display. When receiving the remote control signal, display the set temperature.
- COOL display
- HEAT display
- HEALTH display
- DRY display
outdoor unit

- Outlet
- Inlet
- Connecting piping and electrical wiring
- Drain hose
operation Instructions
remote control

- Mode display
| Operation Mode | COOL | DRY FANAUTO | ||
| Remote Control | ||||
- Signal sending display
- SWING display
- FAN SPEED display

- LOCK display
- TIMER OFF display TIMER ON display
- TEMP display
8. Additional functions display
Operation mode QUIET SLEEP TURBO
Remote control


9. TURBO button
-
FAN button
-
COOL button
-
F/C button (Fahrenheit degrees/Celsius degrees)
-
FAN SPEED button
-
QUIET button
-
SLEEP button
-
LOCK button
-
LIGHT button. Turns ON and OFF the indoor unit LED display.
-
POWER/SOFT button
-
DRY button
-
TEMP button
-
SWING UP/DOWN button
-
TIMER OFF/ON button
-
HEALTH AIRFLOW button
-
CANCEL/CONFIRM button. Function: Setting and cancel to the timer and other additional functions.
-
RESET button. If the remote control is not operating properly, use a sharp pointed item to press this button to reset the remote control.
remote control
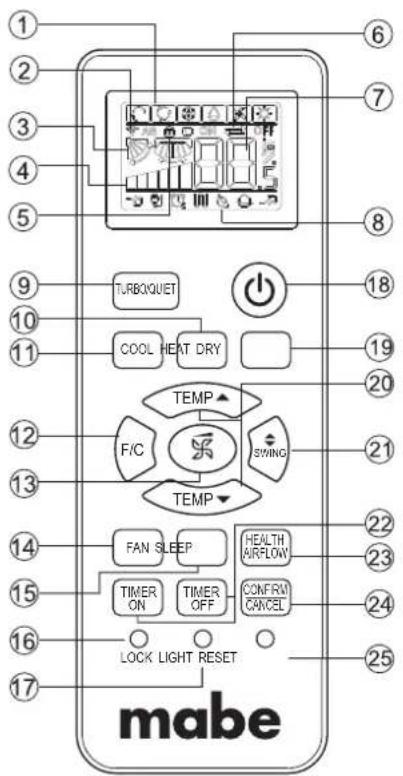
- Mode display
| Operation Mode | COOL | DRY FANAUTO | HEAT | |
| Remote Control |
- Signal sending display
- SWING display
- FAN SPEED display

- LOCK display
- TIMER OFF display TIMER ON display
- TEMP display
8. Additional functions display
| Operation mode | QUIET | SLEEP | HEALTH | TURBE | SupplementedElectricalheating |
| Remote control |
9. TURBO button
- HEAT button
- COOL button
- F/C button (Fahrenheit degrees/Celsius degrees)
- FAN SPEED button
- FAN button
- SLEEP button
- LOCK button
- LIGHT button. Turns ON and OFF the indoor unit LED display.
- POWER/SOFT button
- DRY button
- TEMP button
- SWING UP/DOWN button
- TIMER OFF/ON button
- HEALTH AIRFLOW button
- CANCEL/CONFIRM button
Function: Setting and cancel to the timer and other additional functions.
- RESET button
If the remote control is not operating properly, use a pen point or similar object to press this button to reset the remote control.
remote control for cool-only models equipped with the MY TEMP feature

When the MYTEMP function is activated, the remote control will sense and display the temperature around it in order to achieve the desired temperature.
The distance between the remote control and the indoor unit should be 7 m maximum, without obstacles.
Press AUTO then enter auto mode.
MODE button, it will follow cycle "cooling---dehumidify---air blowing---heating---cooling" (For cooling only model, heating mode is invalid).
Energy saving function, it works under cooling only mode, after enter ECO function, the logo of "ECO" will display on the remote screen.
basic operation


- Unit start
Press ON/OFF on the remote controller, unit starts.
- Select a temperature setting
Press the TEMP+ or TEMP- button
TEMP+ Every time the button is pressed, the temperature setting increases 1 °C, if kept depressed, it will increase rapidly.
TEMP- Every time the pad is pressed, the temperature setting decreases 1 °C, if kept depressed, it will decrease rapidly.
Select a desired temperature.
- Fan function
Press the FAN pad.
Each time the FAN SPEED button is pressed, the fan speed will change as follows:
Remote control:

Air conditioner is running under displayed fan speed.
When FAN is set to AUTO, the air conditioner automatically adjusts the fan speed according to room temperature.
| Operation mode | Remote control Note |
| AUTO Under the mod | Auto operation, air conditioner will automatically select Cool or Heat operation according to room temperature.When FAN is set to AUTO, the air conditioner automatically adjusts the fan speed according to room temperature. |
| COOL | |
| DRY | |
| HEAT (only on some models) | |
| FAN |
emergency and test operation
emergency operation
- Use this operation only when the remote control is defective or lost, and with function of Emergency running air conditioner can run automatically for a while.
- When the emergency operation switch is pressed, a "Pi" sound is heard once, which means the start of this operation.
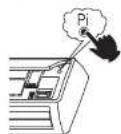
- When POWER switch is turned on for the first time and emergency operation starts, the unit will run automatically in the following mode:
- It is not possible to change the temperature setting or fan speed setting. It is also not possible to operate the timer or the DRY mode.
| Room temperature | Designated temperature | TIMER mode Fan Speed | Operation mode |
Above 23 "C COOLING26 "C No AUTOMATIC
test operation
air flow direction adjustment
vertical air flow
Pos. 1:

Pos. 2: No initial state displayed on remote control. The vertical louvers will be fixed on the current position.
CAUTIONS:
- Before adjusting the louvers manually, turn off the unit.
- When humidity is high, condensate water might occur at air outlet if all vertical louvers are adjusted to the right.
- It is advisable not to keep horizontal flap at downward position for a long time in COOL or DRY mode, otherwise, condensate water might occur.
- When restarting after turning the unit OFF with the remote control, the remote will automatically return to the previous set swing position.
SLEEP function
Press the SLEEP button, the remote control will show 📋, and then achieve to the sleep function. Press again the SLEEP pad, the sleep function will be cancelled.
Operation mode
- In COOL or DRY mode
1 hour after SLEEP mode starts, the temperature will become 1 °C higher than temperature setting. After another hour, the temperature will rise another 1 °C. The unit will run for further 6 hours then stops. Temperature is higher than temperature setting so that room temperature won't be too low for your sleep.

flowchart
graph TD
    A["SLEEP operation starts"] --> B["1 hour"]
    B --> C["Rises 1 °C"]
    C --> D["6 hours approx."]
    D --> E["Unit stops"]
    F["Temperature setting"] --> G["1 hour"]
    G --> H["Rises 1 °C"]
    H --> I["In COOL and DRY modes"]
- In HEAT mode (only on some models)
1 hour after SLEEP mode starts, temperature will become 2 °C lower than temperature setting. After another 1 hour, the tem-
- In AUTO mode
The unit operates in corresponding sleep mode adapted to the automatically selected operation mode.
- In FAN mode
The SLEEP function will not be available under the FAN mode.
- When quiet sleeping function is set to 8 hours the quiet sleeping time can not be adjusted. When TIMER function is set, the quiet sleeping function can't be set up. After the sleeping function is set up, if user resets TIMER function, the sleeping function will be cancelled; the machine will be in the state of timing-on, if the two modes are set up at the same time, either of their operation time is ended first, the unit will stop automatically, and the other mode will be cancelled.
Note:
- When TIMER function is set, the sleeping function can't be set up. After the sleeping function is set up, if user resets TIMER function, the sleeping function will be cancelled; the machine will be in the state of timing-on.
- Power failure resume: Press the sleep pad ten times within five seconds and enter function after hearing four sounds. And press the sleep pad ten times within five seconds and leave this function after hearing two sounds.
- Power failure resume function: If the unit is started for the first time, the compressor will not start running unless 3 minutes have elapsed. When the power resumes after power failure, the unit will run automatically, and 3 minutes later the compressor starts running.
healthy airflow
- Press ⏻ to start.
timer On/Off operation
-
After unit starts, select the desired operation mode.
-
Press the TIMER ON or TIMER OFF button to change TIMER mode. When pressing TIMER ON button, the display will show "ON 0.5". After 10 seconds the time display will be blank.
When pressing TIMER OFF button, the display will show "OFF 0.5". After 10 seconds the time display will be blank.
Then select the desired TIMER mode, (TIMER ON or TIMER OFF or TIMER ON-OFF). "ON" or "OFF" will flash.
-
Press TIMER ON or TIMER OFF button to set time. Each time you press the button, the time setting will be increased by 0.5 hours until reaching 12 hours, then each press will increase the time by 1 hour until reaching 24 hours.
-
Confirm TIMER setting. After setting the desired time press the CONFIRM/CANCEL button to CONFIRM your selection "ON" or "OFF" will stop flashing.
To cancel the TIMER
Press the CONFIRM/CANCEL button again. The set TIME will be deleted.
After replacing batteries or a power failure, the time should be reset.
According to the time setting sequence of TIMER ON or TIMER OFF, either Start-Stop or Stop-Start can be achieved.
TURBO operation
When you need rapid heating or cooling, you can use this function. Press the TURBO pad, the remote control will show ↗, and then
installing the batteries
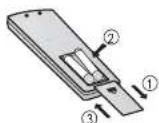
- Remove the battery cover.
- Insert 2 "AAA" batteries as illustrated noting battery polarity.
- Reinstall the battery cover.
Notes:
- The distance from the remote control to the receiver should be less than 7 meters with no obstructions.
- If the remote control display is weak or the operating distance has diminished, the batteries may need to be replaced.
- Remote control malfunctions can sometimes be corrected by removing the batteries from the remote for a few minutes and then reinstalling them.
- Remove the batteries from the remote control if the unit will not be in use for an extended period of time.
- If any segments of the display remain active after battery removal, press the reset button.
maintenance
Set a proper room temperature. Do not block air inlets and outlets.

Propper temperature


Close doors and windows during operation.

During cooling operation, avoid direct sunlight using curtains or blinds.
Use the timer effectively.


If the unit is not to be used for a long time, turn off the power supply main switch.

Use the louvers effectively.
do not use the following for cleaning
Gasoline, benzine, thinner or cleanser may damage the finish of the unit.

Hot water over 40 °C (104 °F) may cause discoloration or deformation.

air filter cleaning
- Open the inlet grille by pulling it upwards.
- Remove the filter. Push up the filter's center tab slightly until it is released from the stopper, and remove the filter downward.

- Clean the filter. Use a vacuum cleaner to remove dust, or wash the filter with water. After washing, dry the filter completely in the shade.
- Attach the filter. Attach the filter correctly so that the "FRONT"
- for the English version, go to page 47
- contenido
- Notas:
- welcome
- Important Safety Instructions
- indoor unit
- display board B
- display board C (on models having only LED indicators)
- operation Instructions
- Additional functions display
- TURBO button
- emergency and test operation
- emergency operation
- air flow direction adjustment
- SLEEP function
- Operation mode
- healthy airflow
- timer On/Off operation
- To cancel the TIMER
- TURBO operation
- installing the batteries
- maintenance
- do not use the following for cleaning
- air filter cleaning
Brand : Mabe
Model : MMT18HDBWCAM8
Category : Air conditioner