
TDP-D2 - Video projector TOSHIBA - Free user manual and instructions
Find the device manual for free TDP-D2 TOSHIBA in PDF.


| Product Type | DLP Data Projector |
| Display Technology | DLP (1-chip DMD) |
| Native Resolution | XGA (1,024 x 768) |
| Lens | Zoom lens F=2.4-2.6 f=24.19-30.65 mm |
| Lamp Type | High-pressure mercury lamp |
| Replacement Lamp Model | TDPLD2 (sold separately) |
| Projection Screen Size | 37 - 160 inches |
| Projection Distance | 1.5 - 6 m |
| Speaker | 1 W (Monaural) |
| Power Consumption | 340 W |
| Weight | 2.4 kg |
| Input Terminals | COMPUTER IN (Mini D-sub 15 pin), S-VIDEO (Mini DIN 4 pin), VIDEO (RCA), AUDIO IN (3.5 mm stereo mini-jack) |
| Output Terminals | MONITOR OUT (Mini D-sub 15 pin), AUDIO OUT (3.5 mm stereo mini-jack) |
| Control Terminal | Mini DIN 8 pin (RS-232C) |
| USB Terminal | Type B (USB 1.1) |
| Safety Features | Automatic power off, overheat protection, lamp cover detection |
| Maintenance | Lens cleaning with blower; lamp replacement after ~1500 hours |
| Package Contents | Remote control, batteries, RGB cable, video cable, audio cables, USB cable, CD-ROM, carrying bag |
| Operating Temperature | 0°C to 35°C |
| Relative Humidity | 30% to 70% |
Frequently Asked Questions - TDP-D2 TOSHIBA
User questions about TDP-D2 TOSHIBA
0 question about this device. Answer the ones you know or ask your own.
Ask a new question about this device
Download the instructions for your Video projector in PDF format for free! Find your manual TDP-D2 - TOSHIBA and take your electronic device back in hand. On this page are published all the documents necessary for the use of your device. TDP-D2 by TOSHIBA.
USER MANUAL TDP-D2 TOSHIBA
SAFETY PRECAUTIONS


The lightning flash with arrowhead symbol, within an equilateral triangle, is intended to alert the user to the presence of uninsulated "dangerous voltage" within the product's enclosure that may be of sufficient magnitude to constitute a risk of electric shock to persons.

The exclamation point within an equilateral triangle is intended to alert the user to the presence of important operating and maintenance (servicing) instructions in the literature accompanying the appliance.
WARNING: TO REDUCE THE RISK OF FIRE OR ELECTRIC SHOCK, DO NOT EXPOSE THIS APPLIANCE TO RAIN OR MOISTURE. DANGEROUS HIGH VOLTAGES ARE PRESENT INSIDE THE ENCLOSURE. DO NOT OPEN THE CABINET. REFER SERVICING TO QUALIFIED PERSONNEL ONLY.
WARNING: Handling the cord on this product or cords associated with accessories sold with this product, will expose you to lead, a chemical known to the State of California to cause birth defects or other reproductive harm. Wash hands after handling.
FCC NOTICE: This equipment has been tested and found to comply with the limits for a Class B digital device, pursuant to part 15 of the FCC Rules. These limits are designed to provide reasonable protection against harmful interference in a residential installation. This equipment generates, uses and can radiate radio frequency energy and, if not installed and used in accordance with the instructions, may cause harmful interference to radio communications. However, there is no guarantee that interference will not occur in a particular installation.
If this equipment does cause harmful interference to radio or television reception, which can be determined by turning the equipment off and on, the user is encouraged to try to correct the interference by one or more of the following measures:
- Reorient or relocate the receiving antenna.
- Increase the separation between the equipment and receiver.
- Connect the equipment into an outlet on a circuit different from that to which the receiver is connected.
- Consult the dealer or an experienced radio/TV technician for help.
WARNING: Changes or modifications made to this equipment, not expressly approved by USA only Toshiba, or parties authorized by Toshiba, could void the user's authority to operate the equipment.
IMPORTANT SAFETY INSTRUCTIONS
CAUTION: PLEASE READ AND OBSERVE ALL WARNINGS AND INSTRUCTIONS GIVEN IN THIS OWNER'S MANUAL AND THOSE MARKED ON THE UNIT. RETAIN THIS BOOKLET FOR FUTURE REFERENCE.
This set has been designed and manufactured to assure personal safety. Improper use can result in electric shock or fire hazard. The safeguards incorporated in this unit will protect you if you observe the following procedures for installation, use and servicing. This unit is fully transistorized and does not contain any parts that can be repaired by the user.
DO NOT REMOVE THE CABINET COVER, OR YOU MAY BE EXPOSED TO DANGEROUS VOLTAGE. REFER SERVICING TO QUALIFIED SERVICE PERSONNEL ONLY.
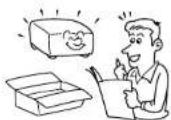
1. Read Owner's Manual
After unpacking this product, read the owner's manual carefully, and follow all the operating and other instructions.
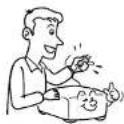
2. Power Sources
This product should be operated only from the type of power source indicated on the marking label. If you are not sure of the type of power supply to your home, consult your product dealer or local power company. For products intended to operate from battery power, or other sources, refer to the operating instructions.
3. Source of Light
Do not look into the lens while the lamp is on. The strong light from the lamp may cause damage to your eyes or sight.

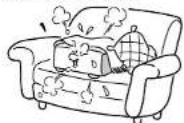
4. Ventilation
Openings in the cabinet are provided for ventilation and to ensure reliable operation of the product and to protect it from overheating, and these openings must not be blocked or covered. The openings should never be blocked by placing the product on a bed, sofa, rug or other similar surface. This product should not be placed in a built-in installation such as a bookcase or rack unless proper ventilation is provided or the manufacturer's instructions have been adhered to.
IMPORTANT SAFETY INSTRUCTIONS (Continued)
5. Heat
The product should be situated away from heat sources such as radiators, heat registers, stoves, or other products (including amplifiers) that produce heat.

6. Water and Moisture
Do not use this product near water. - for example, near a bath tub, wash bowl, kitchen sink, or laundry tub; in a wet basement; or near a swimming pool and the like.

7. Cleaning
Unplug this product from the wall outlet before cleaning. Do not use liquid cleaners or aerosol cleaners. Use a soft cloth for cleaning.

8. Power-Cord Protection
Power-supply cords should be routed so that they are not likely to be walked on or pinched by items placed upon or against them, paying particular attention to cords at plugs, convenience receptacles, and the point where they exit from the product.

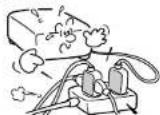
9. Overloading
Do not overload wall outlets; extension cords, or integral convenience receptacles as this can result in a risk of fire or electric shock.
10. Lightning storms
For added protection for this product during storm, or when it is left unattended and unused for long periods of time, unplug it from the wall outlet. This will prevent damage to the product due to lightning and power-line surges.
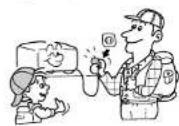
11. Object and Liquid Entry
Never push objects of any kind into this product through openings as they may touch dangerous voltage points or short-out parts that could result in a fire or electric shock. Never spill liquid of any kind on the product.

12. Do not place the product vertically
Do not use the product in the upright position to project the pictures at the ceiling, or any other vertical positions. It may fall down and dangerous.
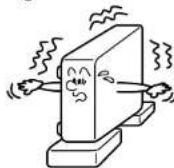
13. Stack Inhibited
Do not stack other equipment on this product or do not place this product on the other equipment. Top and bottom plates of this product develops heat and may give some undesirable damage to other unit.

14. Attachments
Do not use attachments not recommended by the product manufacturer as they may cause hazards.
15. Accessories
Do not place this product on an unstable cart, stand, tripod, bracket, or table. The product may fall, causing serious injury to a child or adult, and serious damage to the product. Use only with a cart, stand, tripod, bracket, or table recommended by the manufacturer, or sold with the product. Any mounting of the product should follow the manufacturer's instructions, and should use a mounting accessory recommended by the manufacturer. A product and cart combination should be moved with care. Quick stops, excessive force, and uneven surfaces may cause the product and cart combination to overturn.

IMPORTANT SAFETY INSTRUCTIONS (Continued)
16. Damage Requiring Service
Unplug this product from the wall outlet and refer servicing to qualified service personnel under the following conditions:
a) When the power-supply cord or plug is damaged.
b) If liquid has been spilled, or objects have fallen into the product.
c) If the product has been exposed to rain or water.
d) If the product does not operate normally by following the operating instructions. Adjust only those controls that are covered by the operating instructions as an improper adjustment of other controls may result in damage and will often require extensive work by a qualified technician to restore the product to its normal operation.
e) If the product has been dropped or damaged in any way.
f) When the product exhibits a distinct change in performance - this indicates a need for service.
17. If glass components, including lens and lamp, should break, contact your dealer for repair service.
This product incorporates glass components, including a lens and a lamp. If such parts should break, please handle with care to avoid injury and contact your dealer for repair service. The broken pieces of glass may cause to injury. In the unlikely event of the lamp rupturing, thoroughly clean the area around the projector and discard any edible items placed in that area.
18. Servicing
Do not attempt to service this product yourself as opening or removing covers may expose you to dangerous voltage or other hazards. Refer all servicing to qualified service personnel.

19. Replacement Parts
When replacement parts are required, be sure the service technician has used replacement parts specified by the manufacturer or have the same characteristics as the original part. Unauthorized substitutions may result in fire, electric shock, or other hazards. (Replacement of the lamp only should be made by users.)
20. Safety Check
Upon completion of any service or repairs to this product, ask the service technician to perform safety checks to determine that the product is in proper operating condition.
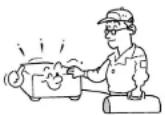
21. Do not leave thermal-paper documents or easily deformed items on top of the unit or near the air exhaust.
The heat from the unit could erase the information on the thermal paper, or cause deformation or warping.
Also, when you touch a metal object put near the air exhaust, a burn may be caused.
If your line voltage is 220 to 240V, use one of the following types of cable.
| Plug configuration | Plug type | Line voltage |
| EURO | 220 – 240V | |
| UK | 220 – 240V | |
| Use a 5A fuse which is approved by ASTA or BSI to BSI362.Always replace the fuse cover after changing the fuse. | ||
Plug configuration


IMPORTANT PRECAUTIONS
Save Original Packing Materials
The original shipping carton and packing materials will come in handy if you ever have to ship your projector. For maximum protection, repack the set as it was originally packed at the factory.
Moisture Condensation
Never operate this unit immediately after moving it from a cold location to a warm location. When the unit is exposed to such a change in temperature, moisture may condense on the crucial internal parts. To prevent the unit from possible damage, do not use the unit for at least 2 hours when there is an extreme or sudden change in temperature.
Place and Manner of Installation
- Do not place in hot locations, such as near heating equipment. Doing so could cause malfunction, and shorten the life of the projector.
- Avoid locations with oil or cigarette smoke. Doing so will dirty the optical parts, shortening their lives, and darkening the screen.
- Do not use in angle of 20° or more degrees. Doing so could shorten the life of the lamp.
- If used at high altitudes, the unit could cease operation even if used within the rated temperature range. This is because the thinner air at high altitudes decreases the internal cooling efficiency. Therefore, please lower the ambient temperature if using at high altitudes
IMPORTANT PRECAUTIONS (Continued) POWER SUPF
Avoid Volatile Liquid
Do not use volatile liquids, such as an insect spray, near the unit. Do not leave rubber or plastic products touching the unit for a long time. They will leave marks on the finish. If cleaning with a chemically saturated cloth, be sure to follow the product's precautions.
In the spaces provided below, record the Model and Serial No. located at the bottom of your projector.
Model No. Serial No.
Retain this information for future reference.
DECLARATION OF CONFORMITY
USA only
TRADE NAME: DLP DATA PROJECTOR
MODEL NAME: TDP-D1/TDP-D2
RESPONSIBLE PARTY: TOSHIBA AMERICA INFORMATION SYSTEMS, INC.
9740 Irvine Blvd., Irvine, CA 92618-1697 U.S.A
Phone: (949) 583-3000
This device complies with part 15 of the FCC Rules.
Operation is subject to the following two conditions:
(1) this device may not cause harmful interference, and
(2) this device must accept any interference received, including interference that may cause undesired operation.
EXEMPTION CLAUSES
- Toshiba Corporation bears no responsibility in the case of damages arising from natural disaster such as earthquakes, lightning, etc., fire not liable to Toshiba Corporation, operating by third parties, other accidents, or use under abnormal conditions including erroneous or improper operation and other problems.
- Toshiba Corporation bears no responsibility for incidental damages (lost profit, work interruption, corruption or loss of the memory contents, etc.) arising from the use of or the inability to use this unit.
- Toshiba Corporation accepts no liability whatsoever for any damages arising from not having followed the descriptions in this Instruction Manual.
- Toshiba Corporation accepts no liability whatsoever for any damages arising from malfunctions arising from combination with equipment or software that is not related to Toshiba Corporation.
OTHER CAUTIONS AND INFORMATIONS
Copyrights
Publicly showing or transmitting commercial imaging software or broadcast or Cable-broad casting programs, either commercially or collecting a fee from the audience, or modifying images using the freeze or resize functions, could violate the direct or indirect copyrights of the imaging software or broadcast program, etc., if done without first consulting with the copyright holder. For this reason, please take appropriate measures before performing one of the actions listed above, including obtaining a license from the copyright holder.
Disposal
This product contains substances which are harmful to humans and the environment.
•The solder used in the PCB manufacturing process contains lead.
•The lamp contains inorganic mercury.
Please dispose of this product or used lamps in accordance with local regulations.
Trademarks
•VGA, SVGA, XGA, SXGA, UXGA are trademarks or registered trademarks of International Business Machines Corporation.
- Digital Light Processing, DLP, Digital Micromirror Device and DMD are trademarks of Texas Instruments.
- Windows is a registered trademark of Microsoft Corporation in the U.S. and other countries.
Notational Conventions Used in This Manual
References to pages with related information are annotated as follows.
For example, if making a reference to page 36: p.36
CONTENTS
Before Using
SAFETY PRECAUTIONS 2
IMPORTANT SAFETY INSTRUCTIONS 3
POWER SUPPLY CORD SELECTION 8
IMPORTANT PRECAUTIONS 8
EXEMPTION CLAUSES 10
OTHER CAUTIONS AND INFORMATIONS 10
CONTENTS 11
Preparations
Checking the package contents.... 12
Names of each part on the main unit 13
Names of each part on the control panel and remote control.... 14
Names of the connection terminals 15
Preparing and using the remote control 16
Placement 17
Connection 18
Operations
Turning the power on and off 19
Basic operations 21
Using handy features 23
Using auto setting (Auto setting) 23
Correcting the keystone distortion (Keystone) 24
Cutting off the picture and sound temporarily (Mute) 24
Freezing the image (Freeze) 25
Enlarging the picture size (Resize) 25
Displaying Information [Status display] 26
Using the menus 27
How to use the menus 27
The image adjustment menu 28
The default setting menu 28
The display setting menu 29
Reset menu (Special menu) 29
Operating a computer by the remote control 30
Maintenance
Lens and main unit cleaning 31
Lamp replacement 31
Others
Trouble indications 33
Before calling service personnel 34
Specifications 35
List of general specifications 35
List of supported signals (RGB signals) 36
List of supported signals (Y/PB/PR signals) 37
List of supported signals (Video, S-Video signals) 37
Pin assignment of COMPUTER IN terminal 37
CONTROL terminal 38
Separately Sold Product 38
Checking the package contents
Please make sure that the following items are included in the box, along with the main unit. If an item is missing, please contact the store from which you purchased the product immediately.
(1)

(6)
(11)

(2)

(8)

(3)

(4)

(9)

(5)

(10)

□
(1) Remote control
□
(2) R03 (SIZE AAA) batteries for remote control (2)
三
(3) Quick Reference
□
(4) CD-ROM
F
(5) Owner's Manual (Getting started)
□
(6) Power cord (See note)
□
(7) RGB cable
(8) Video cable
☐ (9) Audio cable (for computer)
(10) Audio cable
(11) USB cable
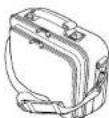
(12) Carrying bag
Note
The shape and number of power cords supplied vary depending on the product destination.
◆The Supplied CD-ROM
The supplied CD-ROM contains an owner's manual including information omitted in the Owner's manual (Getting started), Acrobat® Reader™, which is needed to view the manual.
■ Installing Acrobat® Reader™
Windows: In the CD-ROM, select the Reader/English folder, and run ar500enu.exe. Follow the on-screen instructions. Macintosh: In the CD-ROM, select the Reader/English folder, and run Reader Installer. Follow the on-screen instructions to install the software.
■ Viewing the manual
In the CD-ROM, double-click on Start.pdf. Acrobat® Reader™ launches, and the menu screen of the Owner's manual appears. Click on your language. The Owner's Manual cover and list of bookmarks appear. Click on a bookmark title to view that section of the manual. Click on 📄 to view a reference page with related information. See the Help menu for more information about Acrobat® Reader™.
Names of each part on the main unit

CAUTION Label

Name : Function
(1) Infrared remote sensor : Senses commands from the remote control p.16
(2) Lens : Projects expanded image
(3) Focusing ring : Adjusts screen focus
(4) Zooming lever : Adjusts screen size
(5) Speaker: Plays audio
(6) Control panel: Operates the projector
(7) Air intake : Draws in air from outside unit
(8) Foot adjuster: Adjusts the vertical projection angle
(9) Foot adjuster release button: Press to stow the foot adjuster
(10) Anti-theft lock hole : Attach a security chain, etc. here
(11) Connection terminal : Connect to an external device p.18
(12) AC IN socket : Connect the supplied power cord here
(13) Main power switch : AC power line ON/OFF p.19
(14) Air exhaust : Expels air that has grown hot inside the projector
(15) Lamp cover : Remove to replace lamp p.32
(16) Tilt adjuster : Adjusts the projector's horizontal tilt p.22
Names of each part on the control panel and remote control
Control Panel

Caution - use of controls or adjustments or performance of procedures other than those specified herein may result in hazardous radiation exposure.
Name: Main Function
(1) ON/STANDBY button: Turns the power on/off (standby)
(2) INPUT button : Selects input
(3) AUTO SET button : Sets up image and mode
(4) AUTO KEYSTONE button: Adjusts keystone (trapezoidal distortion)
(5) MENU button : Displays menus and makes selections
(6) Selection button: Menu selections and adjustments, etc.
(7) FAN indicator : Displays cooling fan mode
(8) TEMP indicator : Lights when internal temperature too high
(9) LAMP indicator : Displays lamp mode p.20
(10) ON indicator : Displays whether power is on or off p.19
(11) MUTE button : Cuts off the picture and sound temporarily p.24
(12) FREEZE button : Pauses image p.25
(13) RESIZE button : Enlarges picture size p.25
(14) RESIZE OFF button : Turns off enlarged picture display p.25
(15) CALL button : Displays the information on the screen p.26
(16) PAGE DOWN button : Canges page of file (Computer operation) p.30
(17) PAGE UP button : Canges page of file (Computer operation) p.30
(18) Pointer control button: Moves mouse pointer (Computer operation)
(19) L-CLICK button : L-click of mouse (Computer operation)
(20) R-CLICK button : R-click of mouse (Computer operation) p.30
(21) DRAG button : DRAG of mouse (Computer operation) 0.30
(22) INPUT + - button : Changes input source in order p.21
(23) LASER button : Displays laser point
(24) Laser indicator : Lights when laser point displaying
Notes
- For the remainder of this manual, buttons are referred to as follows: Selection button → ▲ ▼ ▶ ▶; MENU button → 📄
Names of the connection terminals
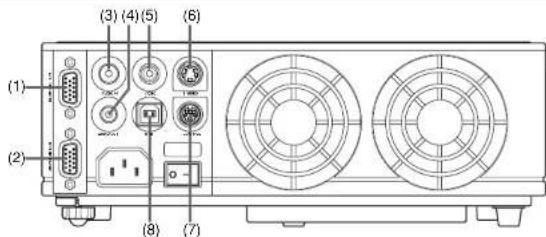
(1) COMPUTER IN terminal
Input RGB signal from a computer or other source, or a component video signal (Y/PB/PR) from video equipment.
(2) MONITOR OUT terminal
Connect to a computer display, etc.
(3) AUDIO IN terminal
Input audio signals from a computer or video equipment.
(4) AUDIO OUT terminal
Outputs audio signals adjusted volume by a projector
(5) VIDEO terminal
Input video signals from video equipment.
(6) S-VIDEO terminal
Input S video signals from video equipment.
(7) CONTROL terminal
When operating the projector via a computer, connect this to the controlling computer's RS-232C port. p.36
(8) USB terminal
Connect to a computer's USB port when using the remote-control mouse function. p.30
Preparing and using the remote control
■ Loading dry-cell batteries into the remote control
① Remove the battery cover.
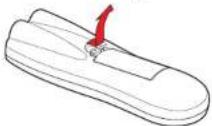
② Insert the dry-cell batteries.
Be sure to align the plus and minus ends of the batteries properly.

Two batteries (R03, SIZE AAA) are used.
③ Replace the battery cover.

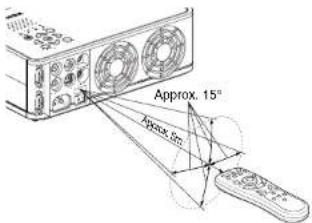
■ Operating the remote control Point the remote control toward the projector's infrared remote sensor, and press a button on the remote control.
- Operating the projector from the front

- Operating the projector from the rear
Batteries
- Remove batteries from remote control when not using for extended periods.
- If the remote control stops working, or if its range decreases, replace all the batteries with new ones.
The remote control
- The remote control may fail to operate if the infrared remote sensor is exposed to bright sunlight or fluorescent lighting.
- Do not drop or bang.
- Do not leave in hot or humid locations.
- Do not get wet or place on top of wet objects.
- Do not take apart.
- In rare cases, ambient conditions could impede the operation of the remote control. If this happens, point the remote control at the main unit again, and repeat the operation.
Placement
Placement Styles
As shown in the figures below, this device can be placed in 4 different styles. The factory setting is "floor-mounted front projection." Set the placement style in the default setting menu p.28, in accordance with your needs.
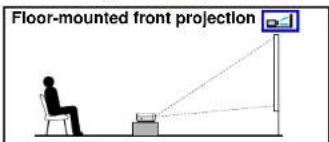


CAUTION
• Always obey the instructions listed in IMPORTANT SAFETY INSTRUCTIONS when placing the unit.
- If you wish to mount the projector on the ceiling, be sure to ask your dealer to do so. Mounting the projector on a ceiling requires special ceiling brackets (sold separately) and specialized knowledge. Improper mounting could cause the projector to fall, resulting in an accident.
Projection Distance and Screen Size
Use the figures, table, and formula below to determine the screen size and projection distance. (Screen sizes are approximate values for full-size picture and no keystone adjustment)
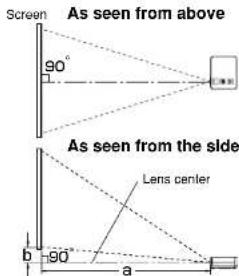
a (min. length) = projection size (inches) x 0.0333
a (max. length) = projection size (inches) x 0.0406
b = projection size (cm) x 0.096
| screen size (cm) | projection distance a (m) | b (cm) | |
| min length max length (zooming max) | (zooming min) | ||
| 37 (94) — 1.50 9.0 | |||
| 45 (114) 1.50 1.83 11.0 | |||
| 60 (152) 2.00 2.44 14.6 | |||
| 80 (203) 2.66 3.25 19.5 | |||
| 100 (254) 3.33 4.06 24.4 | |||
| 148 (376) 4.93 6.00 36.1 | |||
| 180 (457) 6.00 — 43.9 | |||
"a" is the distance (m) between the lens and the screen, and corresponds to a range of 1.4 m to 6 m. "b" is the distance (cm) between the lens center and the bottom of the projection image.
Connection
Before connection
- Read the owner's manual of the device to be connected to the projector.
- Some types of computer cannot be used connected to this projector.
Check for an RGB output terminal, supported signal p.36, etc. - Turn off the power of both devices before connection.
- The figure below is a sample connection. This does not mean that all of these devices can or must be connected simultaneously. (Dotted lines mean items can be exchanged.)

Note
• The AUDIO IN terminal is common among all the devices for input terminal.
- On the AUDIO OUT terminal, L and R mixture audio signal (monaural) that volume is adjusted by a projector is output.
- When a plug is inserted to the AUDIO OUT terminal, the projector's speaker outputs no sound.
Turning the power on and off
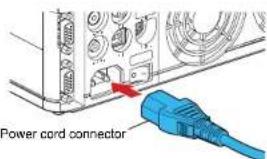
■ Connecting the power cord
① Insert the power cord connector into the AC IN socket of the projector.
② Insert the power cord plug into a wall or other power outlet.
■ Removing the lens cover

Be sure to remove the lens cover when the power is turned on. If it is left on, it could become deformed due to heat.
■ Turning the power on
1 Turn on the main power switch
Then, following three green indicators will come on for several seconds: ON, TEMP, and LAMP. Next, the ON indicator will change to orange, indicating standby mode.
② Press the ON/STANDBY button.
The power turns on, and the following 3 green indicators light: ON, LAMP, and FAN. After a moment, the start-up screen appears.


CAUTION
- Do not look into the lens during operation. Doing so could damage your vision.
- Do not block the air intake or exhaust. Doing so could cause a fire due to internal overheating.
- Do not place your hands, face, or other objects near the air exhaust. Doing so could cause burns, deform/break the object.
Turning the power on and off (Continued)
Notes
- The start-up screen will disappear after a moment. You can dismiss the start-up screen before this by performing any operation. You can also configure the start-up screen not to appear via the Display setting menu p.29.
- The first time you use the projector after purchase, after the start-up screen disappears, the Language menu is displayed p.21.
■ Turning the power off
① Press the ON/STANDBY button.
A message appears on the screen, confirming that you wish to shut off the power. This message will disappear after a moment. (This operation is no longer valid after the message disappears.)
② Press the ON/STANDBY button again.
The screen turns off, but the internal cooling fan continues to operate for a short while. Then, the projector goes into standby mode.
![graph LR A["When cooling lamp"] --> B["During internal cooling"] B --> C["After cooling complete"]](/content/2026/05/1075678/images/c2c07132e1e7dadcb91b8986e28aa1cb870fee4d310061492fbe8c928012f078.jpg)
A During cooling, the LAMP indicator flashes. In this state, the power cannot be turned back on. In addition, unplugging the power cord or turning off the main power switch in this state will shorten the life of the lamp.
B After the LAMP indicator goes off, the cooling fan continues to operate for a short while, in order to expel excess internal heat. If you are in a hurry, there is no problem with unplugging the power cord or turning off the main power switch in this state.
C In standby mode
Note
- The projector consumes about 6W of power in standby. We recommend that you unplug the power cord or turn off the main power switch if you will not be using the projector for an extended period.
PRECAUTIONS
- Before unplugging the power cord or turning off the main power switch, make sure that the LAMP indicator is off. Unplugging the power cord or turning off the main power switch and cutting off the power while the projector is running or being cooled will shorten the life of the lamp. However, please unplug the power cord if the projector locks up or acts abnormally.
- If the power cord is unplugged before cooling is complete, give the lamp time (about 10 minutes) to cool before plugging it back in. If the lamp overheats it may fail to light, and its lifetime will be shortened.
Basic operations
⑦ Turn on the power.
Turn on the power, following the instructions in "Turning on the power" p.19.
② Select language (When using for first time).
When the projector is used for the first time after purchase, a message is displayed on the screen, and the language menu appears. The default language is English. (If the screen focus is not on the menu, adjust according to step 6.)
① Use the 🔊▼ buttons to select the desired language, and press the 🔊 button.
A message displays the selected language.
②Press the button to erase the message.
| English | English |
| Français | French |
| Deutsch | German |
| Italiano | Italian |
| Español | Spanish |
| Portugues | Portuguese |
| 日本語 | Japanese |
| 中文(简体字) | Chinese (simplified) |
| 中文(繁體字) | Chinese (traditional) |
| 한국아 | Korean |
Notes
- After the first time the projector is turned on, the Language menu does not appear upon startup. However, from the Reset menu 3.29 select "Reset all" to display the Language menu the next time the projector is turned on.
• The language can also be set via the Display setting menu p.29 - This owner's manual assumes that English has been selected.
③ Place connected device(s) in operating status.
Turn on and boot up connected computers and other devices. Select "Cancel" or install driver contained in the supplied CD-ROM, when the dialog box of the Add New Hardware Wizard screen appears on the computer when connecting a computer. (The supplied CD-ROM contains a driver information file named TOSHIBA_TDP.inf. Click the Browse button of the dialog box to find and designate this file.)
4 Select Input.
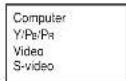
①Press the INPUT button.
A list of inputs appears on the screen.
② Use the ▲▼ buttons to select the desired input, and press the ● button.
The picture for the selected input is projected.

Basic operations (Continued)
⑤ Projector placement angle adjustments
The placement angle and the height of the projected image can be adjusted by the foot adjuster.
① Lift up the front of the projector until it is at the desired angle, then press the foot adjuster release button.
The foot adjuster extends. Release the button to lock the position.
②Turn the foot adjuster to fine-tune the angle.
③To adjust the horizontal angle, use the tilt adjuster.
To stow the foot adjuster, hold up the projector while pressing the foot adjuster release button, then slowly lower the projector will the button depressed.

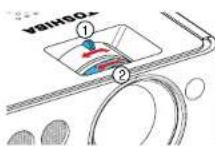
⑥ Adjusting the picture size and focus
①Use the zooming lever to adjust the screen size.
②Use the focusing ring to adjust the focus.
7 Adjusting the volume with the ▶▶ buttons
The speaker volume can be adjusted when an audio signal is being input.
Notes
- Note that the lamp characteristics may rarely cause the brightness to fluctuate slightly.
- A lamp is consumable supplies.
If used for extended periods, images will appear dark, and the lamp could burn out. This is characteristic of a lamp, and is not malfunction. (The lifetime of the lamp depends on conditions of use.) - The DMD™ is made using extremely advanced technology, but there may be black spots (pixels that do not light) or bright spots (pixels that are constantly lit) on the panel. Please note that these are not malfunctions.
- Although this projector supports a wide range of RGB signals p.36, any resolutions not supported by this projector (XGA) will be expanded or shrunk, which will affect image quality slightly. To view high-quality images, it is recommended that the computer's external output should be set to XGA (1,024 x 768) resolution.
- With some models of computer having LCD displays or the like, displaying images simultaneously on the projector and the monitor's display may prevent the images from displaying properly. If this happens, turn off the computer's LCD display. For information on how to turn off the LCD display, see the owner's manual of your computer.
- If a signal not supported by the projector is input, the ? icon will appear.
- If a no signal is being input from the connected device, the off icon will appear.
- If an unavailable operation button is pressed, the ✗ icon will appear.
Using handy features
■Using auto setting (Auto setting)
This function sets up the projector to the optimum state for each type of the input signal by using simple operations.
1 Press the AUTO SET button. The Auto setting menu appears.
② Press the AUTO SET button again. The menu item is automatically adjusted/set. For computer input, the icon will appear during processing.
Control panel

Note
- Auto adjustment/setting may not be performed correctly for input signals other than those supported by the projector p.36, p.37.
●Manual adjustment and setting
The menu items vary according to the input type, as shown in the table below. Use the 🔊 ➕ ➕ buttons to adjust the items in the table below, then press the 🔊 button when you are finished. The menu disappears.
| Input Item | Select Item | Description | |
| Computer | Select Item | Phase | Adjust withto eliminate flicker. |
| Frequency | Adjust withto eliminate periodic patterns and flickering when many vertical lines appear in the screen. | ||
| H-position | Move leftMove right | ||
| V-position | Move upMove down | ||
| Y/PB/PR | Phase | Adjust withto eliminate flicker. | |
| Signal format | [●: Enter to setting mode]→[▲▼: Select one of the following]→ [Apply▼]480i(525i)@60Hz/480p(525p)@60Hz/576i(625i)@50Hz/576p(625p)@50Hz/720p(750p)@60Hz/720p(750p)@50Hz/1080i(1125i)@60Hz/1080i(1125i)@50Hz/1035i(1125i)@60Hz/1152i(1250i)@50Hz | ||
| Video S-video | Video mode | [●: Enter to setting mode]→[▲▼: Select one of the following]→ [Apply▼]NTSC/PAL/SECAM/PAL-N/PAL-M/PAL60/NTSC4.43 | |
Using handy features (Continued)
■Correcting the keystone distortion (Keystone)
When the foot adjuster p.22 is used to change the projection angle, the picture will undergo keystone (trapezoidal) distortion.
This projector is capable of correcting this keystone distortion.


1 Press the AUTO KEYSTONE button.
The Keystone menu appears.
② Press the AUTO KEYSTONE button again.
The keystone distortion is automatically corrected. The neon will appear during processing.
●Manual adjustment
Use the 🔊 buttons for keystone adjustment. When the adjustment is finished, press the 🔊 button. The menu disappears.
| Item Description | |
| Shrink screen bottom ⬆ Shrink screen top | |
Notes
- Depending on the amount of keystone adjustment and the contents of images, some information may be lost, or the picture quality may suffer.
- Keystone adjustment will not change the shape of the menus.
■Cutting off the picture and sound temporarily (Mute)
When you want to temporarily project the images of another projector, overhead projector, etc., this projector's images and sound can be turned off.
Press the remote control's MUTE button.
The picture and sound are cut off. The Mute function is released when pressing the MUTE button again.
Remote Control

Notes
- The can will appear while mute is in effect. - Operating any other function exits the muting.
■Freezing the image (Freeze)
The image being projected can be made to be frozen. This function is to be used to pause a video during a presentation, etc.
Remote Control
- Press the remote control's FREEZE button.
The picture is paused. The Freeze function is released when pressing the FREEZE button again.

Notes
• The moon will appear while freeze is in effect.
- The freeze function can be used on the resize function. Other operations will release the freeze.
- Even if an image is frozen on the projector, it is still changing on the video or other equipment.
■Enlarging the picture size (Resize)
The image being projected can be enlarged.
① Press the remote control's RESIZE (+) button.
The enlargement ratio is increased each time the RESIZE (+) button is pressed.

② To decrease the enlargement ratio, press the remote control's RESIZE (-) button.
The enlargement ratio is decreased each time the RESIZE (-) button is pressed. (The image cannot be shrunk to less than its original size.)

③ Press and hold down the ▶ buttons to move the enlarged area.
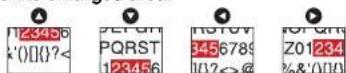

④ Press the RESIZE OFF button to undo the resize.
The resize is released, and the image returns to its original size.
Notes
- The icon will appear while resize is in effect.
- An enlarged image can be frozen using the FREEZE button. The resize function on a frozen image can also be used.
• Operations other than freeze will release the resize. - Since the enlargement is performed using digital processing, enlarging the image will cause it to appear jagged.
• Rarely, the picture could become garbled while the enlarged area is being moved.
Using handy features (Continued)
■Displaying Information [Status display]
This displays information about the input signal, lamp use time, etc.
- Press the button twice (or press the CALL button on the remote control once).
When the button is pressed once, the Setting display menu appears. Pressing it again displays information p.27. The table below shows what kind of information is displayed. Press the button (or the CALL button on the remote control) again to dismiss the display.

Remote
"Yes": displayed, "No": not displayed
| Item Description | Computer | Y/Pa/Pr V | deo S-video | ||
| Input Input source | name Yes Yes Yes Yes | ||||
| RGB signal mode | RGB input mode [Note 1] | Yes | No | No | No |
| H-resolution | Horizontal resolution (in bits) | Yes | No | No | No |
| V-resolution | Vertical resolution (in bits) | Yes | No | No | No |
| H-frequency | Horizontal sync frequency | Yes | No | No | No |
| V-frequency | Vertical sync frequency [Note 2] | Yes | No | No | No |
| Sync Sync signal polarity [Note 3] | Yes | No | No | No | |
| Signal format | Y/Pa/Pr signal format | No | Yes | No | No |
| Video mode | Color method of video signal | No | No | Yes | Yes |
| Lamp time | Time of lamp use [Note 4] | Yes | Yes | Yes | Yes |
| Version | Firmware version [Note 5] | Yes | Yes | Yes | Yes |
Notes
1: The mode of supported RGB signals p.36 is shown.
2: Same as the refresh rate of the computer signal.
3: Sync signal polarity shown as P (positive) or N (negative) for [H/V].
4: Displays [Lamp time] as a measure of when the lamp should be replaced. (Cannot be used as a counter of guaranteed lamp time.) When the time displayed approaches 1,500 hours, consult with a store about getting a replacement lamp (for TDP-D1: TDPLD1 and for TDP-D2: TDPLD2) (sold separately) prepared.
5: [Version] shows the version of the projector's internal control program. This version is referred to for customer service, etc.
Notes
- The displayed information will not be refreshed if the status changes. To refresh the information, dismiss the display, then display it again.
- Conducting another operation while information is being displayed dismisses the display.
Using the menus
You can call up on-screen menus, and conduct a number of adjustments and settings, using the operation buttons p.14 on the control panel (main unit side) and remote control.
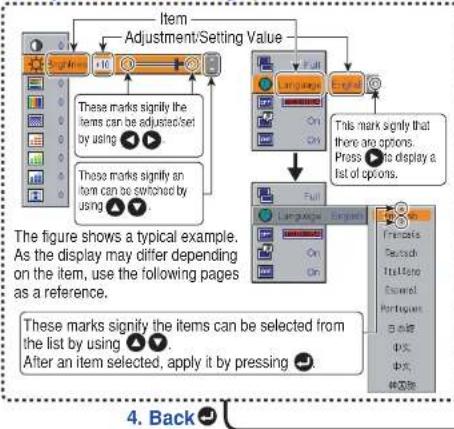
■How to use the menus
The menu shown below is only for operation instructions and might be different from the actual display.

Note
- Menu adjustments and settings are saved when the power is turned off via the ON/STANDBY button. If the main power switch is turned off before this, or the power goes out, then the data will not be saved.
Using the menu (Continued)
■The image adjustment menu
Use this menu to adjust image-related items.
Items Items that can be adjusted are marked with "Yes", and those that cannot are marked with "No".
| Item ▲Description | Computer | Y/PB/PR | Video S-video | ||||
| Contrast Lower Higher Yes Yes Yes/Yes | |||||||
| Brightness Darker Brighter Yes Yes Yes | |||||||
| Color | Lighter | Deeper | No | Yes | Yes | Yes | |
| Tint [Note 1] | Reddish | Greenish | No | No | Yes | Yes | |
| Sharpness | Softer | Sharper | No | Yes | Yes | Yes | |
| R-level | Less red | More red | Yes | Yes | Yes | Yes | |
| G-level | Less green | More green | Yes | Yes | Yes | Yes | |
| B-level | Less blue | More blue | Yes | Yes | Yes | Yes | |
| Up/down shift [Note 5] | Shift down | Shift up | No | Yes Yes Yes | |||
Notes
1: Tint can only be adjusted when Video mode p.23 is NTSC or NTSC4.43.
2: Up/down shift can only be adjusted when Screen size p.29 is Wide. During the adjustment, the picture may be instability.
■The default setting menu
This menu shows placement status and other settings.
| Item | Description |
| Set projection mode in accordance with Placement Style p.21(Placedon floor) (Rear) (Hung fromceiling) (Back hungfrom ceiling) | |
| Set the time to wait after signal input stops until turning off the power:Off (not turned off) 1 mln 2 mln ... 60 mln | |
| Set whether to turn on the power when the ON/STANDBY button is pressed(Manual), or the main power switch is used (Auto). Manual Auto | |
| Set the lamp power Standard Low | |
| Set standby mode according to functions used Standard Economy |
Note
1: When lamp power is set to low, the screen becomes a little darker, but the cooling fan noise gets quieter. This setting will be cleared when you turn the power off.
Notes
- Note that if Power on is set to Auto, then if the main power switch is turned on when power is restored after a power outage, the projector power will come on.
- Even if Power on is set to Auto, press the ON/STANDBY button to turn off the power. Turning off the main power switch to cut off the power will shorten the life of the lamp.
■The display setting menu
Use this menu to set screen display-related items.
| Item | Description |
| Screen size | |
| (Full): Display with native resolution (1,024 x 768 pixels) | |
| (Thru): Display with sampling resolution (for computer input) | |
| (Wide): Wide-screen display (for Video, S-video, and Y/PB/PR) | |
| Language | Select one of the languages below to use for displaying menus and messages [●: Enter setting mode] → [▲▼:Selection] → [Apply: ▼]English/Français/Deutsch/Itallano/Espanol/Português/ 日本語/ 中文(簡体字)/ 中文(繁体字)/ 한 국어 |
| Background | Screen to display when there is no input signal [Logic] ▼ ▼ ▼ Blue ▼ ▼ ▼ ▼ More] |
| Icon | Display icons as function guides On Off |
| Start-up screen | Display start-up screen when power turned on On Off |
Note
- If "Thru" is selected for screen size, portions exceeding the native resolution will not appear on the screen. Note that for RGB signals with clock frequency 140MHz or lower, all input pixel signals are sampled. (This effect is noticeable when the screen is enlarged using the Resize function p.36). However, if the clock speed is higher than this, the RGB pixel signal is thinned before sampling.
■Reset menu (Special menu)
This menu is displayed when other menus are not displayed, and the ⏻ button is held down until the menu appears.
- When the screen is placed vertically, and Auto keystone correction is executed, but the keystone correction is not successful, stow the foot adjuster in its original position, place the projector on a flat surface, select Horizontal reference value reset, and press the button.
- Select Reset All and press the ⏻ button to return all menu items to the factory settings.
| Item | Description |
| Horizontal reference value reset | Reset the horizontal reference value for Auto keystone correction [ ➤: Enter execution mode] → [Yes ➤ No] → [Apply: ➤] |
| Reset all | Reset all menu items to their factory settings [ ➤: Enter execution mode] → [Yes ➤ No] → [Apply: ➤] |
Operating a computer using the remote control
A computer can be operated using the projector's remote control. This function is available on any computer with the Windows 98SE, Windows Me, Windows 2000, Windows XP, Mac OS 9, or Mac OS X, that is equipped with a USB port which can support USB1.1. However, please note that Toshiba does not the guarantee operation of all computers.
① Connecting a computer
Connect the projector to a computer using the supplied USB cable.

② Operating a computer
● Moving the mouse pointer
Move the pointer control button in the direction that you wish the mouse pointer to move, then press.
●To left click
Press the L-CLICK button.
●To right click
Press the R-CLICK button.
●To drag and drop
Press the DRAG button on the object. Next, move the object to the position where you wish by using the pointer control button then press the DRAG button again.
●Changing page of file
Use the PAGE UP and PAGE DOWN buttons to switch PowerPoint slides, etc.

Lens and main unit cleaning
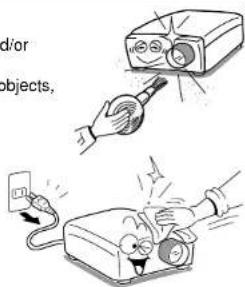
■Lens cleaning
- Clean the lens with a commercially available blower and/or lens cleaner.
- The lens is easily scratched, so do not rub it with hard objects, or strike it.
■Main unit cleaning
- Clean the main unit after unplugging the power cord.
- Wipe dirt off the main unit gently with a soft cloth.
- If the soiling is severe, dip the cloth in a neutral detergent diluted in water, wring well, and gently wipe off the dirt, then finish up by wiping with a dry cloth.
●Replacing cooling fans
To maintain the performance, it is recommended that cooling fans should be replaced about every 2 to 3 years. Consult with your dealer for details.
Lamp replacement
A lamp is consumable supplies. If used for extended periods, images will appear dark, and the lamp could burn out. This is characteristic of a lamp, and is not malfunction. (The lifetime of the lamp depends on conditions of use.) If this happens, replace it with a new one.
CAUTION
- Request cleaning and maintenance of a ceiling-mounted unit from your projector dealership.
- When replacing, always use the specified lamp (for TDP-D1: TDPLD1 and it for TDP-D2: TDPLD2) (sold separately).
- If you have been using the projector, the lamp will be very hot, and may cause burn injuries.
Wait for the lamp to cool (for longer than 1 hour) before replacing it. - If the lamp should break, please handle with care to avoid injury due to broken pieces and contact your dealer for repair service.
① Unplug power cord.
② Wait until lamp is sufficiently cooled.
Wait for at least 1 hour.
Lamp replacement (Continued)
③ Remove the lamp cover.
Loosen the screws and remove the lamp cover.
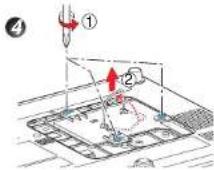
④ Pull out the lamp.
Loosen the three screws holding the lamp in place, and pull on the handle to remove the lamp.
⑤ Mount the new lamp.
Align the orientation, press down until the bottom is reached, and lock in place using the three lamp locking screws.
⑥ Replace the lamp cover.
Align the cover, and press it in, then screw in the screw loosened in step ③ until the lamp cover is no longer loose.
⑦ Reset the lamp timer.
See the lamp's manual for instructions on resetting the lamp timer.


Notes and Precautions
- Press the 📁 button twice to display (a rough guide) of the time of use from the Lamp time item on the Status display menu. p.26
- As a rule of thumb, it is recommended that the lamp should be replaced after 1,500 hours of use. When Lamp time reaches 1,500 hours, the icon and a message will appear. When pressing the button, the message disappears.
- Attach the lamp cover correctly so that it is not loose. If it is not attached correctly, the lamp may fail to come on p.33, and the lamp's lifetime may be shortened.
• Always replace the lamp with a new one. - The lamp is made out of glass. Do not touch the glass surface with your bare hands, bang it, or scratch it. (Dirt, jolts, scratches and the like could break the lamp.)
Used Lamps
This projector's lamps contain trace amounts of environmentally harmful inorganic mercury. Be careful not to break used lamps, and dispose it in accordance with local regulations.
Trouble indications
The indicator lights inform you of internal abnormalities.
| ONFANTEMP No power⇒Problem with projectorUnplug the power cord, and contact your dealer.⇒The lamp cover is not properly attached.Unplug the power cord, and reattach the lamp cover. p.32 | |
| ONFANTEMP Lamp went out during use, or won't come on⇒The abnormal indication of the LED continues for about 1 minute then the projector returns to standby mode after cooling for a while. If the projector fails to operate normally after turning the power back on, either the lamp needs replacing, or there is a problem with the projector.If a lamp burns out, replace it with a new one.Unplug the power cord, and contact your dealer. | |
| ONFANTEMP Power went out during use, or power won't come on⇒Internal overheating, or the outside temperature is too high.Place the projector so that the air intake and exhaust are not blocked.Unplug the power cord and wait for a short while, then turn the power back on.Clean the air filter. p.30*The can will appear before the power goes out.*The abnormal indication of the LED continues for about 1 minute then the projector returns to standby mode after cooling for a while. | |
| ONFANTEMP Power went out during use, or power won't come on⇒Problem with internal cooling fan.Unplug the power cord, and contact your dealer.The icon will appear before the power goes out.The abnormal indication of the LED continues for about 1 minute then the projector returns to standby mode after cooling for a while. |
PRECAUTIONS
• Make sure to unplug the power cord if something goes wrong.
- If the power cord is unplugged before cooling is complete, give the lamp time (about 10 minutes) to cool before plugging it back in. If the lamp overheats it may fail to light. Unplugging the power cord repeatedly when the temperature is high will shorten the life of the lamp. (Even if you are not concerned about lamp lifetime, the light may not come on if you do not wait at least 3 minutes.)
Before calling service personnel
If you think something is wrong, check the following before contacting customer service. Please see "Trouble indications" p.33 as well.
| If This Happens | Check |
| No power | • Is the power cord plugged in? Is it connected to the projector? • Is the lamp cover loose? p.33 |
| Power goes out during use | • Is the ambient temperature high? p.33 • Is the air intake or air exhaust blocked? p.33 |
| No picture | • Is the input source selecting properly? p.21 • Is the mute function on? p.24 • Is the brightness setting minimized? p.28 • Are the connections set up correctly? p.18 • Are all the connected devices functioning properly? |
| No audio | • Is a plug inserted to AUDIO OUT terminal? p.18 • Is the mute function on? p.24 • Is the volume setting minimized? p.22 • Are the connections set up correctly? p.18 • Are all the connected devices functioning properly? |
| Picture not displayed correctly | • Is the input signal supported by the projector? p.36 , p.37 • Is the correct video mode selected? p.23 • Is the correct signal format selected? p.23 • Is the selecting of computer or Y/Pr/Pr input correct? p.21 • Is there something generating an abnormal video signal, for instance the video tape? |
| Picture blurred Part of picture out of focus | • Is the lens dirty? p.31 • Is the lens focus adjusted optimally? p.22 • Is the projection distance within the projector's supported range? p.17 • Is the projector's screen placement angle tilted too far? p.17 • Are the sharpness or sampling phase adjustments off? p.28 p.23 |
| Image is dark | • Are the brightness or contrast adjustments off? p.28 • Is the lamp nearing the end of its service life? p.26 |
| Colors too light Bad shading | • Are the color, tint, R-level, G-level, or B-level adjustments off? p.28 • Is the screen dirty? • Is the lamp nearing the end of its service life? p.26 |
| Remote control doesn't work | • Are the remote control's batteries drained? • Are the batteries inserted into the remote control correctly? p.16 • Is the remote control being used within the effective range? p.16 • Are there any obstructions between the remote control and projector? • Are there any fluorescent or other bright lights shining at the projector's infrared remote sensor? |
Specifications
■List of general specifications
| Item Specification | |
| Consumption Power 340 W | |
| Weight 2.4 kg | |
| External Dimensions (including protruding parts) | |
| Cabinet material Magnesium alloy, Aluminum alloy | |
| Conditions for usage environment | |
| Display system DLP | Temp: 0°C to 35°C; relative humidity: 30% to 70% TM (1-tip DMD TM ) |
| Native resolution 1,024H × 768V XGA | |
| Lens Zoom lens F=2.4-2.6 f=24.19-30.65 mm | |
| Lamp High-pressure mercury lamp | |
| Projection screen size 37 - 160 inches | |
| Projection distance 1.5 - 6 m | |
| Speaker 1 W (Monaural) | |
| COMPUTER IN terminals | Mini D sub 15 pin RGB / Y/PB/PR (dual use) |
| MONITOR OUT terminal | Mini D sub 15 pin RGB / Y/PB/PR (dual use) |
| S-VIDEO terminal Mini DI | IN 4 pin |
| VIDEO terminal | RCA Pin Jack, 1 V (p-p), 75 Ω |
| AUDIO IN terminal | 3.5 mm dia. stereo mini-jack, 1.5 V (rms); 22 kΩ or more |
| AUDIO OUT terminal | 3.5 mm dia. stereo mini-jack, 1.5 V (rms); 8 Ω or more |
| CONTROL terminal | Mini DIN 8 pin (RS-232C) |
| USB terminal | Type B (USB 1.1) |
Specifications (Continued)
■List of supported signals (RGB signals)
This projector supports the following RGB signals. Note, however, that depending on the computer model, the screen may show flicker or streaking. Please adjust the projector if this happens.
(Press the AUTO SET button, and adjust automatically or manually. p.23)
| Resolution | Mode | Refresh rate (Hz) | H-frequency (kHz) | Clock (MHz) |
| 720 x 400 | 720x400_85 | 85.039 | 37.927 | 35.500 |
| 640 x 480 | VGA_60 | 59.940 | 31.469 | 25.175 |
| VGA_72 | 72.809 | 37.861 | 31.500 | |
| VGA_75 | 75.000 | 37.500 | 31.500 | |
| VGA_85 | 85.008 | 43.269 | 36.000 | |
| 800 x 600 | SVGA_56 | 56.250 | 35.156 | 36.000 |
| SVGA_60 | 60.317 | 37.879 | 40.000 | |
| SVGA_72 | 72.188 | 48.077 | 50.000 | |
| SVGA_75 | 75.000 | 46.875 | 49.500 | |
| SVGA_85 | 85.061 | 53.674 | 56.250 | |
| 832 x 624 | MAC16" | 74.550 | 49.725 | 57.283 |
| 1024 x 768 | XGA_43i | 86.957 | 35.522 | 44.900 |
| XGA_60 | 60.004 | 48.363 | 65.000 | |
| XGA_70 | 70.069 | 56.476 | 75.000 | |
| XGA_75 | 75.029 | 60.023 | 78.750 | |
| XGA_85 | 84.997 | 68.667 | 94.500 | |
| MAC19" | 74.700 | 60.134 | 79.857 | |
| 1152 x 864 | SXGA1_75 | 75.000 | 67.500 | 108.000 |
| 1280 x 960 | QuadVGA_60 | 60.000 | 60.000 | 108.000 |
| QuadVGA_85 | 85.002 | 85.938 | 148.500 | |
| 1280 x 1024 | SXGA3_60 | 60.020 | 63.981 | 108.000 |
| SXGA3_75 | 75.025 | 79.976 | 135.000 | |
| SXGA3_85 | 85.024 | 91.146 | 157.500 | |
| 1400 x 1050 | SXGA+ | 60.012 | 63.973 | 118.094 |
| 1600 x 1200 | UXGA_60 | 60.000 | 75.000 | 162.000 |
| UXGA_65 | 65.000 | 81.250 | 175.500 | |
| UXGA_70 | 70.000 | 87.500 | 189.000 | |
| UXGA_75 | 75.000 | 93.750 | 202.500 | |
| UXGA_85 | 85.000 | 106.250 | 229.500 | |
| 1792 x 1344 | 1792x1344_60 | 60.000 | 83.640 | 204.750 |
| 1856 x 1392 | 1856x1392_60 | 60.000 | 86.333 | 218.250 |
| 1920 x 1440 | 1920x1440_60 | 60.000 | 90.000 | 234.000 |
Note
- Signals whose resolution exceeds the native resolution (1,024 x 768 pixels) will be compressed. For this reason, some information may be lost, or image quality may be affected.
■ List of supported signals (Y/PB/PR signals)
| Signal format th(kHz) fv(Hz) | |
| 480i(525i)@60Hz 15.73 59.94 | |
| 480p(525p)@60Hz 31.47 59.94 | |
| 576i(625i)@50Hz 15.63 50.00 | |
| 576p(625p)@50Hz 31.25 50.00 | |
| 720p(750p)@60Hz 45.00 60.00 | |
| 720p(750p)@50Hz 37.50 50.00 | |
| 1080i(1125i)@60Hz 33 75 60.00 | |
| 1080i(1125i)@50Hz 28 13 50.00 | |
| 1035i(1125i)@60Hz 33 75 60.00 | |
| 1152i(1250i)@50Hz 31 25 50.00 |
■List of supported signals (Video, S-Video signals)
| Video mode fh(kHz) | fv(Hz) fsc(MHz) | ||
| NTSC 15.73 60 | 3.58 | ||
| PAL 15.63 50 | 4.43 | ||
| SECAM 15.63 50 | 4.25 or 4.41 | ||
| PAL-M 15.73 60 | 3.58 | ||
| PAL N 15.63 50 | 3.58 | ||
| PAL-60 | 15.73 60 | 4.43 | |
| NTSC4.43 | 15.73 60 | 4.43 |
■Pin assignment of COMPUTER IN terminal

Mini D sub 15 Pin connector Input Signal
- RGB input
R/G/B signals: 0.7V (p-p) 75 Ω
Horizontal sync signal: TTL level (Pos/neg polarity) Vertical sync signal: TTL level (Pos/neg polarity)
- Y/PB/PR input Y signal: 1.0V (p-p) 75 Ω PB/PR signals: 0.7V (p-p) 75 Ω
| Pin No. | Pin description | |
| During RGB input | During Y/P0/P3 input | |
| 1 | Video signal (R) | Color difference signal (P4) |
| 2 | Video signal (G) | Luminance signal (Y) |
| 3 | Video signal (B) | Color difference signal (P5) |
| 4 | GND | * |
| 5 | GND | * |
| 6 | GND (R) | GND (P4) |
| 7 | GND (G) | GND (Y) |
| 8 | GND (B) | GND (P5) |
| 9 | N.C * | |
| 10 | GND | * |
| 11 | GND | * |
| 12 | DDC data * | |
| 13 | Horizontal sync signal | * |
| 14 | Vertical sync signal | * |
| 15 | DDC clock | * |
Do not connect anything.
■CONTROL terminal
●Pin assignment
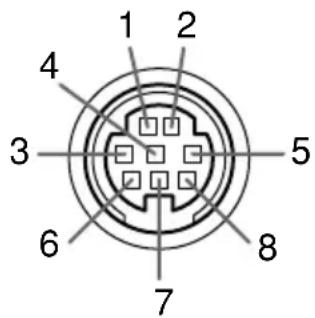
Mini DIN 8 pin connector
| Pin No. | Signal Name | Description |
| 1 | RXD | Receiving data |
| 2 | CTS | Consent to send |
| 3 | DSR | Data set ready |
| 4 | GND | Signal ground |
| 5 | RTS | Request to send |
| 6 | N.C | No connection |
| 7 | TXD | Sending data |
| 8 | N.C | No connection |
●Interface format
1 Communication method RS-232C, 9600bps, No Parity, Data Length: 8 bits;
Stop Bit Length: 1 bit
2 Communication format STX (02h) Command (3Byte) ETX (03h)
Only 1 command valid per communication.
3 Data format For input commands, only ASCII-compliant all-uppercase
alphanumeric characters supported.
4 Replies Acknowledge ACK (06h) CR (0Dh) Data .... Succeed
ACK (06h) ESC (1Bh) .... Failure
No acknowledge NAK (15h)
If commands are to be sent consecutively, wait for the replies from the projector before sending the next command.
●Main Commands
| Item | Command |
| Power on | PON |
| Power off | POF |
| Icon display on | MO0 |
| Icon display off | MO1 |
| Auto setting (RGB input) | PAT |
| Status display on | DON |
| Status display off | DOF |
| Item | Command |
| Computer input select | IN1 |
| Y/PB/PR input select | IN2 |
| Video input select | IN3 |
| S-video input select | IN4 |

Note
- Contact your dealer for control cable and other commands.
■Separately Sold Product
Replacement Lamp
Model NO.; for TDP-D1: TDPLD1, for TDP-D2: TDPLD2

Note
- Design, specifications, etc. subject to change without notice for improvements, etc.
TOSHIBA CORPORATION

- SAFETY PRECAUTIONS
- IMPORTANT SAFETY INSTRUCTIONS
- READ OWNER'S MANUAL
- POWER SOURCES
- SOURCE OF LIGHT
- VENTILATION
- IMPORTANT SAFETY INSTRUCTIONS (CONTINUED)
- HEAT
- WATER AND MOISTURE
- CLEANING
- POWER-CORD PROTECTION
- OVERLOADING
- LIGHTNING STORMS
- OBJECT AND LIQUID ENTRY
- DO NOT PLACE THE PRODUCT VERTICALLY
- STACK INHIBITED
- ATTACHMENTS
- ACCESSORIES
- DAMAGE REQUIRING SERVICE
- IF GLASS COMPONENTS, INCLUDING LENS AND LAMP, SHOULD BREAK, CONTACT YOUR DEALER FOR REPAIR SERVICE
- SERVICING
- REPLACEMENT PARTS
- SAFETY CHECK
- DO NOT LEAVE THERMAL-PAPER DOCUMENTS OR EASILY DEFORMED ITEMS ON TOP OF THE UNIT OR NEAR THE AIR EXHAUST
- IMPORTANT PRECAUTIONS
- SAVE ORIGINAL PACKING MATERIALS
- MOISTURE CONDENSATION
- PLACE AND MANNER OF INSTALLATION
- IMPORTANT PRECAUTIONS (CONTINUED) POWER SUPF
- AVOID VOLATILE LIQUID
- DECLARATION OF CONFORMITY
- EXEMPTION CLAUSES
- OTHER CAUTIONS AND INFORMATIONS
- COPYRIGHTS
- DISPOSAL
- TRADEMARKS
- NOTATIONAL CONVENTIONS USED IN THIS MANUAL
- CONTENTS
- BEFORE USING
- PREPARATIONS
- OPERATIONS
- MAINTENANCE
- OTHERS
- CHECKING THE PACKAGE CONTENTS
- ◆THE SUPPLIED CD-ROM
- INSTALLING ACROBAT® READER™
- VIEWING THE MANUAL
- NAMES OF EACH PART ON THE MAIN UNIT
- NAME : FUNCTION
- NAMES OF EACH PART ON THE CONTROL PANEL AND REMOTE CONTROL
- NAME: MAIN FUNCTION
- NOTES
- NAMES OF THE CONNECTION TERMINALS
- PREPARING AND USING THE REMOTE CONTROL
- PLACEMENT
- PLACEMENT STYLES
- CAUTION
- PROJECTION DISTANCE AND SCREEN SIZE
- CONNECTION
- BEFORE CONNECTION
- NOTE
- TURNING THE POWER ON AND OFF
- CONNECTING THE POWER CORD
- REMOVING THE LENS COVER
- TURNING THE POWER ON
- 1 TURN ON THE MAIN POWER SWITCH
- ② PRESS THE ON/STANDBY BUTTON
- TURNING THE POWER ON AND OFF (CONTINUED)
- TURNING THE POWER OFF
- ① PRESS THE ON/STANDBY BUTTON
- ② PRESS THE ON/STANDBY BUTTON AGAIN
- PRECAUTIONS
- BASIC OPERATIONS
- ⑦ TURN ON THE POWER
- ② SELECT LANGUAGE (WHEN USING FOR FIRST TIME)
- ③ PLACE CONNECTED DEVICE(S) IN OPERATING STATUS
- 4 SELECT INPUT
- BASIC OPERATIONS (CONTINUED)
- ⑤ PROJECTOR PLACEMENT ANGLE ADJUSTMENTS
- ⑥ ADJUSTING THE PICTURE SIZE AND FOCUS
- 7 ADJUSTING THE VOLUME WITH THE ▶▶ BUTTONS
- USING HANDY FEATURES
- USING AUTO SETTING (AUTO SETTING)
- ●MANUAL ADJUSTMENT AND SETTING
- USING HANDY FEATURES (CONTINUED)
- CORRECTING THE KEYSTONE DISTORTION (KEYSTONE)
- CUTTING OFF THE PICTURE AND SOUND TEMPORARILY (MUTE)
- FREEZING THE IMAGE (FREEZE)
- ENLARGING THE PICTURE SIZE (RESIZE)
- DISPLAYING INFORMATION [STATUS DISPLAY]
- PRESS THE BUTTON TWICE (OR PRESS THE CALL BUTTON ON THE REMOTE CONTROL ONCE)
- USING THE MENUS
- HOW TO USE THE MENUS
- USING THE MENU (CONTINUED)
- THE IMAGE ADJUSTMENT MENU
- THE DEFAULT SETTING MENU
- THE DISPLAY SETTING MENU
- RESET MENU (SPECIAL MENU)
- OPERATING A COMPUTER USING THE REMOTE CONTROL
- ① CONNECTING A COMPUTER
- ② OPERATING A COMPUTER
- LENS AND MAIN UNIT CLEANING
- LENS CLEANING
- MAIN UNIT CLEANING
- ●REPLACING COOLING FANS
- LAMP REPLACEMENT
- ① UNPLUG POWER CORD
- ② WAIT UNTIL LAMP IS SUFFICIENTLY COOLED
- LAMP REPLACEMENT (CONTINUED)
- ③ REMOVE THE LAMP COVER
- ④ PULL OUT THE LAMP
- ⑤ MOUNT THE NEW LAMP
- ⑥ REPLACE THE LAMP COVER
- ⑦ RESET THE LAMP TIMER
- NOTES AND PRECAUTIONS
- USED LAMPS
- TROUBLE INDICATIONS
- BEFORE CALLING SERVICE PERSONNEL
- SPECIFICATIONS
- SPECIFICATIONS (CONTINUED)
- LIST OF SUPPORTED SIGNALS (RGB SIGNALS)
- CONTROL TERMINAL
- ●PIN ASSIGNMENT
- ●INTERFACE FORMAT
- ●MAIN COMMANDS
- SEPARATELY SOLD PRODUCT
- TOSHIBA CORPORATION
Brand : TOSHIBA
Model : TDP-D2
Category : Video projector