
PLT7109-G (UK-512-4GB) - Tablet Proscan - Free user manual and instructions
Find the device manual for free PLT7109-G (UK-512-4GB) Proscan in PDF.


| Product Type | Tablet |
| Brand | Proscan |
| Model | PLT7109-G (UK-512-4GB) |
| Display Size | 7 inches |
| Display Resolution | 1024 x 600 pixels |
| Operating System | Android |
| Processor | Quad-core 1.3 GHz |
| RAM | 512 MB |
| Internal Storage | 4 GB |
| Expandable Storage | MicroSD up to 32 GB |
| Connectivity | Wi-Fi 802.11 b/g/n, Bluetooth 4.0 |
| Front Camera | 0.3 MP |
| Rear Camera | 2 MP |
| Battery Capacity | 3000 mAh |
| Power Supply | 5V 2A via micro USB |
| Dimensions | 190 x 110 x 10 mm |
| Weight | 300 g |
| Audio | 3.5mm headphone jack, built-in speaker |
| Ports | Micro USB, MicroSD slot |
| Sensors | G-sensor |
| Protection | Not specified |
Frequently Asked Questions - PLT7109-G (UK-512-4GB) Proscan
User questions about PLT7109-G (UK-512-4GB) Proscan
0 question about this device. Answer the ones you know or ask your own.
Ask a new question about this device
Download the instructions for your Tablet in PDF format for free! Find your manual PLT7109-G (UK-512-4GB) - Proscan and take your electronic device back in hand. On this page are published all the documents necessary for the use of your device. PLT7109-G (UK-512-4GB) by Proscan.
USER MANUAL PLT7109-G (UK-512-4GB) Proscan
This manual includes security measures and correct operating methods. For personal safety, please make sure to read this manual before using. Thank you!
The machine adopts capacitive touch screen, you can just touch it by finger or click with capacitive pen for operation. (Never use the sharp objects to click the screen, or the touch screen may be damaged).
Do not put the device at any high temperature, high humidity or dusty place.
Do not drop or crash the device to prevent the violent impacting between the display and the capacitive touch screen. Or the customers have to take the consequence by themselves.
Please choose the suitable volume and never make the too loud volume. If you feel uncomfortable please turn down the volume or stop to use the device soon.
◆ Please charge if you meet those situations as below:
A、Low battery on the battery icon.
B、The system turns off automatically.
C、The keys do not work.
【Note】: Don't use the different type charger or it may make the device burned. We assume no liability for the damage. Please contact with our agent if you need the original adaptor.
◆ " Is battery charging. In the charging process, the device may be warning up a little (not too hot), this is normal, and it won't
◆ effect functions.
Do not disconnect the device while formatting, downloading or uploading, or it may make the error.
Our company won't bear the duty for the loss of the memory erasing on account of the damage, repair or some other reason.
◆ Please operate the device according to the user manual rightly and backup the important data in time.
Do not dismantle this device by yourself, and do not polish it with alcohol, dilution, or benzene.
Do not use this device where electronics is forbidden, such as on the airplane.
Do not use this device while walking and driving, avoiding traffic accident.
◆ USB is for transferring data but NOT for charging.
◆ Virus can damage this device. So please use proper computer antivirus and keep it updated.
For any support needed for this device please contact the company or the authorized distributor. Any unauthorized dismantling of the device will make the warranty null and void.
We reserve the right to keep the change of the products, the specification and design is subject to change without notice!
Packing List: :
Please check box for the following items
- Device
- User Manual
- Product Warranty
- Power Adaptor
- USB Cable
Other accessories can be purchased at local retailers The accessories may not be compatible with other devices
Power Adaptor Specification: INPUT: AC 100-240V 50/60Hz 0.45A OUTPUT: 5.0V=1.5A ⊙—⊕
Device description
① ★ Camera: You can take photos and videos etc.
② Touch screen: You can click and drag in the touch screen.
③ ⏻ POWER:
Keep pressing button over 2 seconds for power on/off, press button once to turn on screen from sleep mode.
④ Earphone jack: 3.5mm standard earphone jack.
⑤ Micro USB: Micro-5pin connector
⑥ DC jack: Connect the power cable to charge to the device.
⑦ Volume : + Turn up the volume.
- Turn down the volume.
⑧ MicroSD microSD card: microSD card slot.
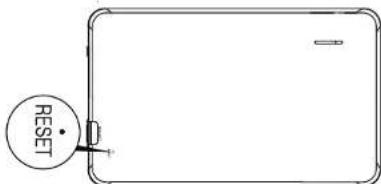
⑨ RESET: Reset the device.

【TIPS】: 1. When the battery is low, it will power off automatically.
2. Shutdown illegally, when you restart, device would scan and repair the disk. The screen will stay at the progress bar for a long time.
【Note】: The pictures in the user manual are just for your reference, about the “★” item, please according to the real products.
Setting up for the first time
Charging your device:
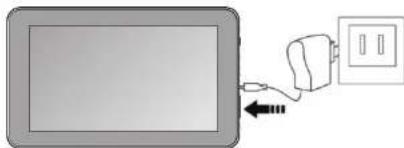
For first-time use, you need to charge the device for ten hours.
After that you can recharge the device as needed.
Connect the DC-in jack to your device and plug the AC adapter into any AC outlet.
【TIPS】:
-
This device adopts built-in polymer battery. Only the specified charger should be used.
-
It is normal for the device's surface to become warm during charging or long periods of use. All devices are factory tested before release.
-
If you do not use this set for a long time, please charge/release it once one month to avoid deep discharge. The damage caused by battery over-consuming is not included in the warranty
Battery Saving
To save battery running life, please see below key points. With below suggestions, battery can run longer time after fully charged each time.
- When device is not in use, press power button once to go to sleep mode.
- Shut down the applications when not in use.
- Turn off WLAN when not in use
- Shut off application sync selection
- Set a shorter time for display backlight
- Reduce brightness of display
Power On
Keep pressing power button over 2 seconds, device will start up opening screen, Android system is activating and enter the main screen.
Sleep Mode
After devise is on, press power button once and it goes to sleep mode. The screen is now on standby and under low battery consumption. To wake up device, press one more time power button.
Power off and Forced Shut down
When you are not using the device, keep pressing power button over 2 seconds, the screen will display "power off", select "ok" to power off unit completely. If device is hanging, use a small pin to press Reset hole, it will forced shut down and the device will power on again. Or turn off the device. Press the power key, volume + and - keys at the same time about 6 seconds. Then press volume keys to select "wipe data/ factory reset", and press power key to confirm your selection. Then press volume keys again to select "Yes--delete all user data", and press power key to confirm your selection. At last the screen will show "reboot system now", press power key to confirm. The device will reboot then and enter into home page.
Operation of Touch Panel
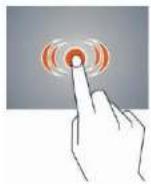
Click -- Use finger or capacity panel pen to touch once, so as to select or activate function, or select menu or turn on applications.

Tap and hold -- Tap over 2 seconds, it will turn on option list

Slide -- Slide up, down, left or right for fast scrolling browsing page and display screen

Drag – drag an icon and relocate the position

Double Click – Double click to enlarge or shrink the display size of picture or under browsing webpage.
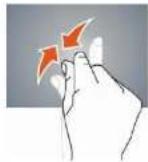
Shut --Use two fingers at same time on touch panel, to enlarge or to shrink the display scale.
Home Screen

① Google Search
② Click to turn on voice search, it will search according to voice input ( Make sure WIFI is on)
③ List of last running applications
④ Back to Home screen
⑤ Back to previous screen
⑥ Display of icons and device status, click to turn on notification screen
⑦ Shortcut to application
⑧ Enter applications page
Home screen with a set of 5 screens, slide left/ right to view individual screen
Change of Wallpaper
- Press home screen about 2 seconds, it will pop-up wallpaper selection
- Select preloaded wallpapers or picture as wallpaper
- Click "set wallpaper" to confirm
- Add shortcut on Home screen
- Enter in application page, tag the icon of application
- Locate the icon to designated position or locate it in another screen
Add Widget in Home Screen
- Press home screen about 2 seconds, and it will show Widget icon. Click it to enter to Widget page
- Slide left / right to select widget
- and designated widget and locate it in home screen
Remark : Some widgets is linked to internet service, be careful it will occur data cost
Some widgets might only be used in certain countries or under assigned service providers
➢ Relocate the shortcut on Home screen
- Tag the application icon and move
- Move icon to the designated position
➢ Cancel shortcut on Home screen
- Tag the application icon, x displays on screen
- Drag icon to x
- When icon changes to red, let go
Rotate Screen setting
1, Slide downside at the upper right corner of the screen
2, click AUTO ROTATE icon to open/close autorotation function.
➢ Notification screen
In home screen or under running application, select right side notification screen, check device status and set up below options:
| Icon | Icon | Description |
| WiFi signal | Wifi connection, icon is full under strong signal | |
| Battery | Status of battery or if device is being charged | |
| USB Connection | To show if USB port is connected | |
| Screen shot | Press power button with volume down simultaneously to take screen shot |
Applications
Internet Browsing
Browse internet and bookmark the website
Remark : Web browser and bookmark might be different in different countries or different service providers
Browsing webpage
- Enter application page, select "Browser" Icon
- To brows certain webpage, select URL and input website address, and select "confirm"
- See below browsing options:

① Open new window
② Shut down current webpage
③ Go to Next or Previous webpage
④ Accessing webpage, icon becomes "X" when webpage shows
⑤ Detail message of webpage
⑥ Enter webpage address or related words
⑦ Bookmark current page
⑧ Search message
⑨ Open bookmark and current visited webpage
⑩ Option list of browser
Browser setting
When browsing webpage, click upper right corner “ ”, adjust setting in the option menu
Current visited webpage
-
Enter application page, click "Browser"
-
Select bookmark→ current visited history
-
Select webpage
Send and Receive email
Setting of email account
-
Enter application page and click "Email"
-
Enter email address and password
-
Select next step (for personal email account) or manual setting (for commercial email account)
-
Follow and input the requested setting
Sending outgoing message
- Enter application page and select "Email"→
- Type in Recipients : Manual input email address, use “;” or “,” to separate more than one recipients
- Type in Subject
- Type in message in content
- Select □ or attachments
- Select > SEND and send out message
Remark : If user is offline, message cannot be sent out
▶ Check email message
In email account, user can check downloaded message, go online to check new messages.
Sound Recorder
1 Click "Sound Recorder" in application page
2Click to start recording
3Click ▶ to stop recording
4Click to play the recorder. And the recorder can be find in exploer.

Audio player
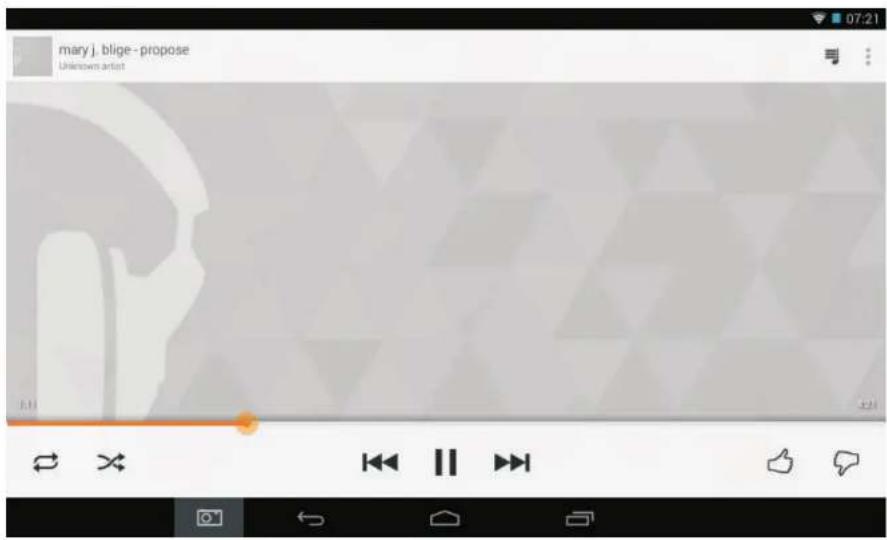
Click "Play Music" in application page
Music will be categorized by listen now, My Library, and play list. It will display all music inside “Songs”. Click the song and it will play automatically.
Video player
Click "Video" in application page.
Video player will search for all supported video files in the device, click the designated video file to play.
Camera
The built-in front camera can take picture and video file.
Take picture
-
Click "Camera" in application page, device is default at picture taking, icon is "
-
To take picture, click “☐”
Video shooting
-
Click “ ” select recording in video file, click “ ”
-
Click “☐” to record video file.
-
Click “☐” again to stop recording
Camera Setting
In camera mode, click " 🔥 " for set up.
File Explorer
Go to application page and click "Explorer".
▶ Check file
In "Explorer", user can check and manage files in SD Card、Internal Memory and USB。
Connect USB port with OTG cable, it shall detect USB device such as memory stick, click "Explorer" to check files
File operation
- Go to application page and click "Explorer".
- Select file or file path
- Press file or folder over 2 seconds, user can operate it through options
- Select Multi, select file or folder, select Editor, perform function in option list, it can manage files under option list.
Management of application files
➢ Installation of applications
In Android system, all application files and game files are in APK format. APK files can be installed through TF card, internal memory or download from SlideMe and similar third party providers.
APK installation from device: download APK file from computer, saved it in TF card or in device through OTG cable. Click the APK file under "ApkInstall" in application page, complete installation. The application icon will be shown in application page.
Uninstall APK file
-
Go to application page and click "ApkInstaller".
-
Select "Manage"
-
Click APK file to uninstall.
Shut down running application
-
Go to setting menu page
-
Click "Apps", slide to the right and find the running applications
-
Shut down certain application or shut down all running applications.
Connecting to a PC:
- You can connect with PC by USB cable attached with the device. You can transfer your personal data to the PC.
- Connect the PC and the device, it will change to the USB mode, in this state, realize the files transfer function between the PC and the device.

Connecting a USB device:
- USB devices are supported, such as a keyboard, mouse through the USB port.
• View media files on USB storage with installed photo, music or video applications.
【Caution】: Before removing this USB storage, make sure your device is not accessing data from the USB storage.

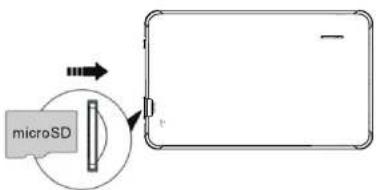
Inserting the Micro SD card:
You may install a Micro SD card to expand your device's storage space.
-
This device supports Micro SD card up to 32GB capacity.
-
Insert the Micro SD card as shown.
【Note】: Ensure that the Micro SD card is inserted all the way into the card slot.
【Caution】: Before removing this card, make sure your device is not accessing data on the card.
Connecting to the Network:
Wi-Fi wireless setup:
Enter the setting interface, and turn on the Wi-Fi item.
The device will automatically search any accessible nearby wireless networks.

Commonly used settings
Press the setup icon to enter the setting.
◆ Wi-Fi: Click ON or OFF to open or close Wi-Fi.
When open Wi-Fi, the system will scan the wifi signal around automatically.
Meanwhile, users could add network manually as well.

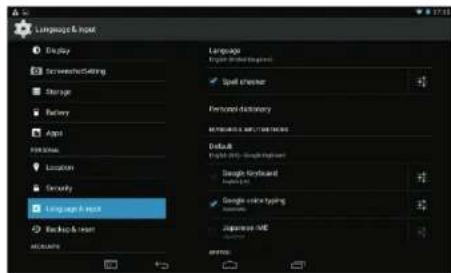
◆ Language & input:
- Language: Users can choose OSD Languages.
- KEYBOARD & INPUT METHODS: select language method.
【Remark】: In this state, users can switch the input method.
◆ Date & time: when the internet is connected, turn on "Automatic date & time", the device can obtain the real date and time from the internet.

◆ Developer options
Enter setting menu: About tablet→Build number, click build number about 8 times, the Developer options will appear at the setting menu
【Caution note】
USERS are solely responsible for the apps they download, and to ensure that the apps are from an entrusted sources prior to downloading, and the Curtis International Ltd is not liable for any shape or form should the tablet be damaged for something they download.
Trouble shooting
- Can not power on:
--Connect the power cable to charge to the device, after a while and then check again. --If it still can not power on, please contact with our distributor or service centre.
- Serious noise:
--Check if the music file is damaged. --If the music files are damaged, it may cause serious noise and jumping sound.
- Can not download or copy:
--Check if it is connecting correctly between the device and PC. --Check the spare space of the memory. --Check the USB cable.
• USB connect is fail:
--Make sure that the USB device is securely connected to the USB jack. --Check if the USB device or a cable is damaged. --If the USB device is connected via a USB hub, connect the USB device directly to the device.
- Cannot connect the device to the wireless LAN router:
--Check if the wireless LAN router is on. --Depending on the surrounding environment, such as the wall material, radio wave receiving condition, or obstacles between the device and the wireless LAN router, the communication distance may be shortened. Move the device and the wireless LAN router closer to each other. --Devices that use a 2.4GHz frequency band, such as a microwave, Bluetooth, or digital cordless device, may interrupt the communication. Move the device away from such devices, or turn off such devices.
Product Specification
| OS | Google Android 4.4 |
| CPU | CPU Type: Rockchip 3026, Cortex-A9 1.0GHz / GPU: Mali-400 MP |
| System RAM | 512MB DDRIII |
| Memory | 4GB NAND Flash |
| LCD | 7" LCD 800x 480 |
| Touch Panel | 5 Point Capacitive touch screen |
| Wi-Fi | 802.11 b/g/n |
| Camera(front) | 0.3-megapixel |
| Gravity | 3D gravity sensor |
| Music format | MP3,WMA,FLAC,AAC,OGG,WAV,APE |
| Video format | AVI, WMV, MP4, MKV, RM, RMVB, FLV, MOV, 3GP...etc |
| Picture format | JPEG, JPG, BMP, GIF,PNG |
| Battery | 2200mAh / 3.7V |
Specifications are for reference, to prevail in kind
Note: 1. The 4GB nand flash was divided into two parts, one part is used for system memory which will not show on the tablet. The other part you can see from the tablet is available memory.
2. The manufacturer is not responsible for any interference, for example RADIO or TV interference, caused by unauthorized modifications to this equipment. Such modifications could void the user's authority to operate the equipment.
Warning: Changes or modifications to this unit not expressly approved by the party responsible for compliance could void the user's authority to operate the equipment.
NOTE: This equipment has been tested and found to comply with the limits for a Class B digital device, pursuant to Part 15 of the FCC Rules. These limits are designed to provide reasonable protection against harmful interference in a residential installation. This equipment generates, uses and can radiate radio frequency energy and, if not installed and used in accordance with the instructions, may cause harmful interference to radio communications.
However, there is no guarantee that interference will not occur in a particular installation. If this equipment does cause harmful interference to radio or television reception, which can be determined by turning the equipment off and on, the user is encouraged to try to correct the interference by one or more of the following measures:
Reorient or relocate the receiving antenna.
Increase the separation between the equipment and receiver.
Connect the equipment into an outlet on a circuit different from that to which thereceiver is connected.
Consult the dealer or an experienced radio/TV technician for help.
This device complies with Part 15 of the FCC Rules. Operation is subject to the following two conditions: (1) this device may not cause harmful interference, and
(2) this device must accept any interference received, including interference that may cause undesired operation.
Shielded cables must be used with this unit to ensure compliance with the Class B FCC limits.


- PACKING LIST
- DEVICE DESCRIPTION
- SETTING UP FOR THE FIRST TIME
- CHARGING YOUR DEVICE
- 【TIPS】
- BATTERY SAVING
- POWER ON
- SLEEP MODE
- POWER OFF AND FORCED SHUT DOWN
- OPERATION OF TOUCH PANEL
- HOME SCREEN WITH A SET OF 5 SCREENS, SLIDE LEFT/ RIGHT TO VIEW INDIVIDUAL SCREEN
- CHANGE OF WALLPAPER
- ADD SHORTCUT ON HOME SCREEN
- ADD WIDGET IN HOME SCREEN
- ➢ RELOCATE THE SHORTCUT ON HOME SCREEN
- ➢ CANCEL SHORTCUT ON HOME SCREEN
- ROTATE SCREEN SETTING
- ➢ NOTIFICATION SCREEN
- APPLICATIONS
- INTERNET BROWSING
- BROWSING WEBPAGE
- SOUND RECORDER
- AUDIO PLAYER
- VIDEO PLAYER
- CAMERA
- FILE EXPLORER
- MANAGEMENT OF APPLICATION FILES
- CONNECTING TO A PC
- CONNECTING A USB DEVICE
- INSERTING THE MICRO SD CARD
- CONNECTING TO THE NETWORK
- COMMONLY USED SETTINGS
- ◆ LANGUAGE & INPUT
- ◆ DEVELOPER OPTIONS
- 【CAUTION NOTE】
- TROUBLE SHOOTING
- CAN NOT POWER ON
- SERIOUS NOISE
- CAN NOT DOWNLOAD OR COPY
- USB CONNECT IS FAIL
- CANNOT CONNECT THE DEVICE TO THE WIRELESS LAN ROUTER
Brand : Proscan
Model : PLT7109-G (UK-512-4GB)
Category : Tablet