
DVD5030B - Blu-ray player Campomatic - Free user manual and instructions
Find the device manual for free DVD5030B Campomatic in PDF.


| Product Type | Blu-ray player |
| Brand | Campomatic |
| Model | DVD5030B |
| Disc Compatibility | Blu-ray, DVD, CD |
| Video Output | HDMI 1080p Full HD |
| Audio Output | Stereo, Coaxial, Optical |
| USB Port | 1 x USB 2.0 for media playback |
| Dimensions (W x D x H) | 430 x 250 x 40 mm |
| Weight | 2.0 kg |
| Power Supply | AC 100-240V, 50/60Hz |
| Power Consumption | 15 W (max) |
| Region Code | Region A (Blu-ray), Region 2 (DVD) |
| Playback Features | Blu-ray, DVD upscaling, JPEG slideshow |
| Connectivity | HDMI, Composite AV, Coaxial audio |
| Supported Video Formats | MPEG-2, H.264, VC-1 |
| Supported Audio Formats | Dolby Digital, DTS, MP3, WMA |
| Maintenance | Clean with a soft dry cloth; no liquids |
| Safety Certifications | CE, RoHS |
| Spare Parts Availability | Contact Campomatic support for replacements |
| Included Accessories | Remote control, power cord, user manual |
Frequently Asked Questions - DVD5030B Campomatic
User questions about DVD5030B Campomatic
0 question about this device. Answer the ones you know or ask your own.
Ask a new question about this device
Download the instructions for your Blu-ray player in PDF format for free! Find your manual DVD5030B - Campomatic and take your electronic device back in hand. On this page are published all the documents necessary for the use of your device. DVD5030B by Campomatic.
USER MANUAL DVD5030B Campomatic
Safety Notice and Important ....1
Using Remote & Battery....4
Using Discs.... 5
Panel Description....6
Remote Control Description.... 7
Device Connection Description.... 8
Setup – customizing setting in the main menu.... 11
System....11
Language....12
Play....12
Security....13
Network....15
TV....17
Video processing....19
Audio output....19
Speaker setup....21
Post processing....22
Software version....22
Playing - Advanced Playing Operation.... 23
Using screen control menu....23
Using OSD menu.... 24
BD-Live....24
Media Player – Special operation of data discs and USB playing.....26
Troubleshooting.... 28
Technical Specifications.... 31
Warning
To avoid fire and electric shock, do not expose the device to rain or moisture.
To avoid electric shock, do not open the shell; only ask qualified personnel to repair.
Please replace the AC power line only at the special maintenance center.
Prevent the battery or the device installed with battery from overheating, such as sunlight, fire or similar heat sources.
Caution
The chemical apparatus in the player is harmful to eyes. Do not open the shell because the laser beam of the Blu-ray Disc/DVD player is harmful to eyes.
Only ask qualified personnel to repair the player.
Category I laser product
The device is classified as category I laser product, the sign of which is printed on the back of the player.
Notice
- The player operates at AC 220V-240V, 50Hz/60Hz. Please check whether the local power supply complies with the operating voltage of the player.
- Keep the player away from water and moisture, and do not put any containers with liquid (e.g. vase) on the player.
• Install the player properly and ensure that it is possible to pull out the AC power line from the outlet immediately in case of failure.
Description of function that requires network connection (the "function" hereinafter)
- You agree with all terms and conditions (including but not limited to the terms and conditions in the websites and contents of third party suppliers) of using this function.
- Using this function is also subject to the service of your network supplier and its terms, as well as your network environment.
- Once you use this function, you agree to follow above terms and conditions.
Name and Content of Toxic and Hazardous Substances or Elements
| Toxic and Hazardous Substances or Elements Part name | ||||||
| Lead (Pb) | Mercury (Hg) | Cadmium (Cd) | Hexavalent chromium (Cr(VI)) | Polybrominated biphenyls (PBB) | Polybrominated diphenyl ethers (PBDE) | |
| Mounting base X O O | O O O | |||||
| Shell | X | O | O | O | O | |
| Optical unit | X | O | X | O | O | O |
| Drive unit | X O | O O O O | ||||
| Accessories (cable, mouse, remote control, etc.) | X | O | O | O | O | O |
| O: indicates that the content of toxic and hazardous substances and elements in this part is below the limit regulated in SJ/T11363-2006. | ||||||
| X: indicates that the content of toxic and hazardous substances and elements in certain homogeneous material of this part exceeds the limit regulated in SJ/T11363-2006. | ||||||
O
Notice
The player complies with the limit regulation on using connection cable within 3m in EMC directive.
Placement
- Please put the player in a ventilated place to avoid heat accumulated in the player.
- Do not put the player on soft surfaces such as carpet to avoid blocking the vents.
- Do not install the player in a narrow space (e.g. bookshelf or similar place).
- Do not place the player near heat sources, irradiated by sunlight directly, with too much dust or mechanical impact.
- Do not place the player outdoors, in vehicle, or boat.
- If the player is carried from cold place to warm place, or placed in moist room, the lens in the player may have moisture coagulated. If this happens, the player may not work normally. In this case, please take out the disc, connect the power supply and set aside for half an hour until the moisture vaporized.
•The player should be installed on a horizontal position instead of inclined position.
•The player should be installed and operated at least 20cm away from your body (excluding limbs: hands, wrists, feet and ankles). - Do not place any heavy or instable objects on the player.
- Do not place any object other than discs on the disc tray, or the player or the object will be damaged.
- When you move the player, please take out all discs, or else the discs may be damaged.
- When you move the player, please pull out the AC power line and other cables from the player.
Power supply
- As long as the power line of the player is still connected to the wall outlet, the AC power supply of the player is still connected even if the power supply is turned off.
- If you won't use the player for a long time, please pull out the power line of the player from the wall outlet.
- Please hold the plug instead of the power line (main power supply).
- Please follow the notice below to avoid AC power line damaged. If the power line is damaged, do not use it, or else it may cause electric shock or fire.
- Do not clip the AC power line between the player and wall, bookshelf, etc.
- Do not put any heavy object on the AC power line or pull the power line.
Adjusting volume
When you listen to any material with low input level or no audio signal, do not turn up the volume, or else it may hurt your hearing or damage the speaker when it plays to peak level.
Cleaning
Please wipe the shell, panel and controller with soft cloth. Do not use any sandpaper, polishing powder or solution (e.g. alcohol, gasoline).
Cleaning disc, disc/lens cleanser
Do not use cleaning disc or disc/lens cleanser (including wet or spray), or else it may damage the device.
Notice for replacing parts
If the player is repaired, the parts may be collected for recycle.
Connecting to HDMI OUT port
Improper operation may damage HDMI out port and the connection. Please follow the notice below.
- Check the shape of the port and connector, and then align and connect to the HDMI port and HDMI connector in the rear side of the player. Make sure that the connector isn't upside-down or inclined.
- When you move the player, please pull out the HDMI cable.
- When you connect or pull out the HDMI cable, please hold the HDMI connector uprightly. Do not twist or insert the HDMI connector into the HDMI out port by force.
Important
Note: The player can keep still video image or OSD image on the TV screen for long time, but it may damage the TV screen permanently. Plasma and projection TV are easily affected.
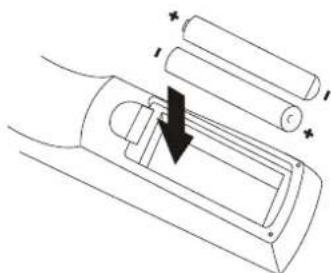
Installing the battery
1.Open the battery cover.

- Insert the battery (R03, AAA).
natural_image
Diagram of a car interior with battery and cylindrical components, no text or symbols presentAlign the +/- polarity of the battery to the sign in the slot.
- Put on the battery cover.

Using remote control
Aim the remote control at the receiver on the panel and then operate.

Notice for remote control operation
- Do not put the remote control of the player in strong light, or else the remote control malfunctions or in disorder.
- Do not drop the remote control or impact other objects, or else the remote may be damaged.
- Do not put the remote control near the places with high temperature or moisture, or else it will oxidize the components and rust the metal parts quickly.
- Do not disassemble the remote control; please ask qualified personnel for maintenance.
- If the remote control isn't sensitive or the effective range reduces significantly, please replace the batteries, and do not mix new and old batteries.
- Check whether the battery liquid leaks regularly; if yes, clean the battery slot before replacing new batteries, or else the metal splicing erodes and rusts easily, causing remote control invalid.
•Effective range of the remote control: 7m from the front end of the remote control.
•Angle: 30° in front of the remote control.
Holding the disc:
Do not touch the playing side of the disc
Do not paste paper or adhesive tape on the playing side of the disc

natural_image
Illustration of a hand holding a circular component and a separate circular component with a cross mark (no text or symbols)Cleaning the disc:
The fingerprint and dirt on the disc surface may affect the audio and video quality. Use soft cloth to wipe the disc from center to outside.


Disc storage:
If the dirt can't be cleaned with soft cloth, please wipe with wet cloth, and then use dry cloth.
Do not use any solvents, e.g. thinner, gasoline solvent and detergent on market, or else the disc may be damaged.
The User's Manual:
Do not place the disc at the places irradiated by sunlight directly or near heat source.
Do not put the discs vertically in the case, or else the discs may be bent.
The User's Manual describes the basic specifications of the DVD player. Certain DVD discs may have special requirements or limitation and may be not compatible with this player. Please refer to the disc description.
Prompt:
The company will upgrade the product continuously. If the actual operation is different from the Manual, please refer to the actual function of the player.
Prompt:
If the player won't be used for a long time, please put a disc in the machine to avoid affecting the performance of the laser head.
Parts and operation guide
Front panel
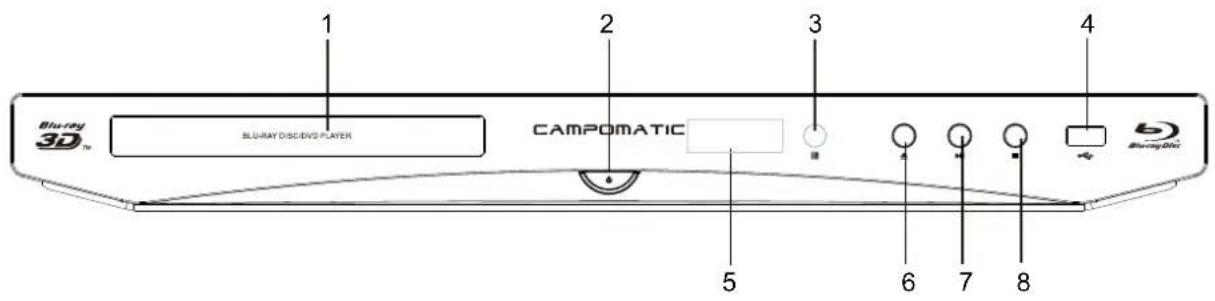
- Disc tray
2.ON/Standby
Turn on the player or set to standby mode. -
Remote receiver
-
USB interface
Connect USB device to this interface.
5.Front panel display
6.Eject/Insert
7.Play/Pause
8. Stop
Rear panel
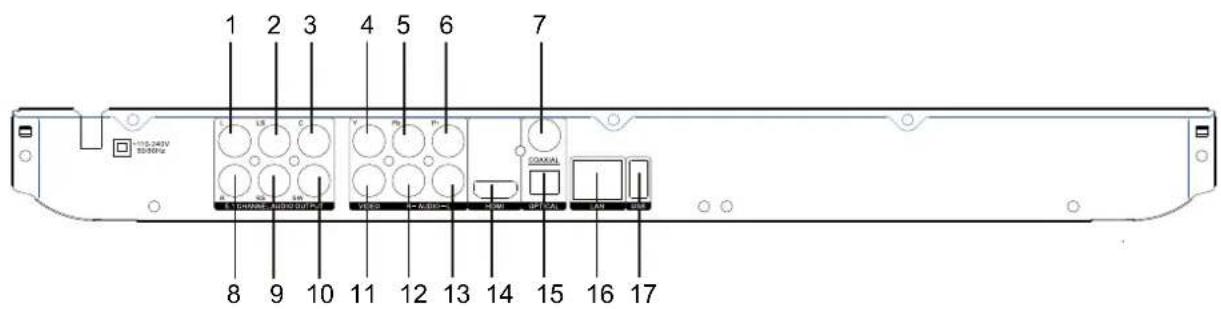
- Left Front Channel Output
2.Left Surround Channel Output - Center Channel Output
- Component Y output
- Component Pb output
- Component Pr output
- Digital audio output (coaxial)
- Right Front Channel Output
9.Right Surround Channel Output
10.Subwoofer Output
11. Composite video output
12. Audio output (R)
13. Audio output (L)
14.HDMI output
15. Digital audio output (fiber)
16.LAN input
17.USB input
Remote control
While playing, press the following buttons to operate.

- Power: turn on/off the player.
- Screen control: access more options while playing.
- Subtitle: select subtitle language.
- Mute: mute or cancel mute.
- Audio: select audio language or channel.
- Clear: clear error.
- OK: confirm.
- Setup: display setup menu.
- 0\~9: select and enter numbers.
- Play/Pause: press once to pause, and press it again to resume normal playing.
- Stop: stop playing.
- Fast rewind: fast rewind by 1×, 2×, 3×, 4×, 5× Fast forward: fast forward by 1×, 2×, 3×, 4×, 5×
- Program/red button: program playing desired tracks.
- Bookmark/green button: mark the disc being played; press it to set bookmark, or press and hold it to pop up the bookmark list.
- Eject/Insert: eject/insert the disc tray.
- Display: display the information while playing.
- Popup menu: access the main menu of the video disc.
- Title popup: enter or exit disc menu.
- Media center: access media center.
- Repeat: repeat playing title, chapter, track or disc.
- Direction: direction keys.
- Return: return to previous menu.
- HDMI: Switch to high definition digital video output mode.
- Goto: select the search time, chapter, etc. Method: press the Search button to enter the interface, press the Left/Right key to select time or chapter and press OK to enter desired node; press the Up/Down key to enter numbers directly and press OK to confirm and go to search node.
- VOL+: turn up the volume.
VOL-: turn down the volume. - Prev.: go to previous chapter/track, or chapter start of DVD Next: go to next chapter/track.
- Blue button/A-B: while playing, press it once to select the starting point, press it again to select the ending point and repeat playing the selected segment.
- Zoom/yellow button: zooming image.
Video and component input

Connecting 5.1 channel analog input amplifier

Connecting two-channel analog input amplifier

Coaxial and fiber connection

HDMI connection

Network connection

Connect the network cable, configure the network in the Setup menu (refer to P16), and then the network function is available.
Specific setting method and description
| Menu Submenu Item Setting and description | |||
General  | System | Screen saver (prevent screen aging) | ONEnable screen saver. If there is no operation in Fifteen minutes while playing, the screen saver will be activated automatically, and enters standby mode if there is no operation in Fifteen minutes.OFFDisable this function |
| Auto-play | ONEnable auto-play. When a disc is inserted, the player will read and play automatically.OFF | ||
| Reset (restore default settings) | Select this option and press [OK], and the following dialog box appears: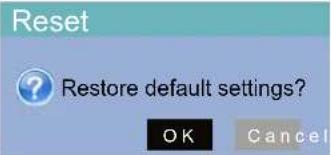 Press ▶or ▶to select [OK], and press it to restore all the settings to default, or select [Cancel] to exit the dialog box. Press ▶or ▶to select [OK], and press it to restore all the settings to default, or select [Cancel] to exit the dialog box. | ||
| Upgrade (software update) | DiscThe upgrade program is saved in the disc. When the auto-upgrade function is set to “OFF”, you need to select the upgrade option manually after inserting the disc.USBThe upgrade program is saved in USB disk.NetworkConnect the network cable to the NIC interface and make sure that the network connection is normal. | ||
| Easy setup (initial setup) | Select this function and press [OK], to show “Easy Setup Wizard” on the screen. Please follow the prompt to operate. | ||
| BUDA (for BD-J disc playing) | BUDA info (release the storage space of BUDA info)When playing BD-J or BD-LIVE disc, if the storage space is insufficient, please select [Format] and press [OK] to clear the BUDA info in the USB disk to release the space and the USB | ||
Specific setting method and description
| Menu Submenu Item Setting and description | |||
General  | System | BUDA (for BD-J disc playing) | disk can be used to save BD-J data.BUDA setup (setting the storage media of BUDA info)USB: USB disk is used as storage media, and USB disk is required (please note that HDD can't be used as the storage media of BUDA info: the USB disk for BUDA info must be in FAT 32 format) |
| Disc auto-upgrade | ONEnable: upgrade automatically after disc is inserted.OFFThis function is disabled. | ||
| CEC | ONWhen this function is enabled, the player is in standby, and the device connected through HDMI is also in standby.OFFThis function is disabled. | ||
| Language | Display (set OSD language) | English. | |
| Menu (set menu language) | English, French, Chinese, Spanish......more | ||
| Audio (set audio language) | |||
| Subtitle (set subtitle language) | English, French, Chinese, Spanish......more, OFFIf the desired language isn't in the list, select "More" to get more options.Select "OFF" if subtitle isn't required. | ||
| Play | PIP | ONEnable PIP function.The PIP function of certain BD discs allows the player plays primary screen and secondary screen simultaneously. Generally, the primary video is displayed in full screen, and the secondary video is displayed in window. When the PIP is enabled, the player will recognize whether the disc contains secondary video and notifying the user by showing this sign. | |
Specific setting method and description
| Menu Submenu Item Setting and description | |||
General | Play | PIP | Secondary screenPrimary screenOFFDisable this function. |
| Secondary audio | ONEnable secondary audio.The secondary audio function of certain BD discs allows playing the primary and secondary audio simultaneously. When the sign of secondary audio is enabled, the player will automatically check whether the disc contains secondary audio and notify the user by showing this sign.OFFDisable this function. | ||
| Memory playing | Select this function to memorize the playing of disc.(The realizing of this function depends on disc.Certain discs may be incompatible.)ONEnable memory playing. When this function is enabled, the player can memorize the playing progress of six discs. When the discs are inserted next time, a dialog box will pop up and ask you whether press [Return] to play from the start of the disc, or press [OK] to resume playing from the point stopped last time, and the memorized points will be cleared automatically after power off.OFFDisable this function. | ||
| CC subtitle off | ONWhen this function is enabled, closed caption is off automatically.OFF | ||
| PBC | PBC on/off | ||
| Angle mark | ONPlaying multi-angle discs, you can choose different scenes.OFF | ||
Specific setting method and description
| Menu Submenu Item Setting and description | |||
| General | Security | Change password | Select this function and press [OK] and the screen shows the dialog box below: Press [0]-[9] to enter current password, and the following dialog box appears if the password is valid: Press [0]-[9] to enter current password, and the following dialog box appears if the password is valid: Press [0]-[9] to enter a new password (twice) and then exit above dialog box automatically. The initial password is 0000. Press [0]-[9] to enter a new password (twice) and then exit above dialog box automatically. The initial password is 0000. |
| Child lock(allow selecting playing content according to disc rating and filtering the content improper for children) | Select this function and press [OK], the screen shows the dialog box below and asks you to enter the password. Refer to previous page for password setting.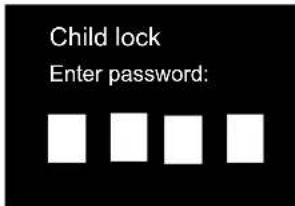 Press [0]-[9] to enter current password, and the following dialog box appears if the password is valid: Press [0]-[9] to enter current password, and the following dialog box appears if the password is valid: Use [▲]/[▶] to select the rating (see the Table below for description), and press [OK] to exit the dialog box. Use [▲]/[▶] to select the rating (see the Table below for description), and press [OK] to exit the dialog box. | ||
Specific setting method and description
| Menu Submenu Item Setting and description | |||
General | Security | Child lock(allow selecting playing content according to disc rating and filtering the content improper for children) | Motion Picture Association of America Film Rating |
| Rating Description | |||
| Childrensafe Suitable for children | |||
| G Suitable for all agesguide | |||
| PG Watch under parent | |||
| PG-13 Children younger than 13 watch under parente guid | |||
| PGR Parent guide is required | |||
| R Watch under parent guide if younger than 17 | |||
| NC-17 Prohibit watching if younger than 17 | |||
| Adult For adults only | |||
| Country(select country code, and make sure that the user only can watch the content allowed in local region) | Select this function and press [OK], the screen shows the dialog box below and asks you to enter the password, the setting of which is described in previous page.____ Press [0]-[9] to enter current password, and the following dialog box appears if the password is valid:____ Press [0]-[9] to enter current password, and the following dialog box appears if the password is valid:____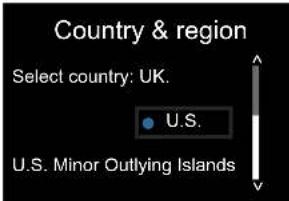 Use [▲]/[▶] to select the country, and press [OK] to exit the dialog box. Use [▲]/[▶] to select the country, and press [OK] to exit the dialog box. | ||
| Network | Internet | Enable or disable the network function. Certain functions of the player such as BD-LIVE are available only when the network is connected. Enable Disable | |
| Interface | Select the mode of network accessEthernet (select this option if the network is connected through cable)Wireless network (select this option if the network is connected through wireless NIC; in this case, | ||
Specific setting method and description
| Menu Submenu Item Setting and description | |||
General | Network | Interface | the USB interface in the rear side of the player must be inserted with a wireless NIC with Ralink 307× chip).To change the network access mode, please disconnect the current network connection first. |
| Information | Display the network information, such as interface, IP address, etc. | ||
| Connection test | Test whether the network is connected successfully. If the network setting is changed, please check whether the network setting is proper in this option.Network OK (connected successfully)Network error (connection failed; please reset)Network OK, proxy error (network is connected successfully, but the proxy setting has error; please reset the proxy) | ||
| IP setup | Set the IP address accordingly in either modes belowAuto (obtain IP address automatically)Manual (set IP address manually, and open the dialog box below)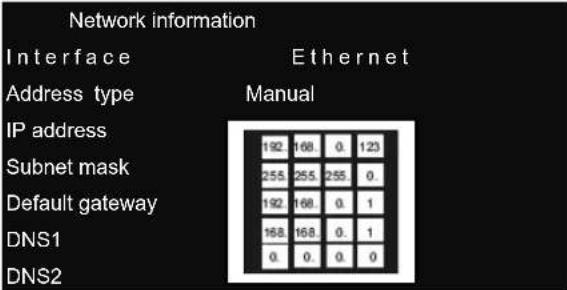 Press [◄]/[►] to select the setting item, press [▼] to clear original settings, and then press number keys to input the network information; after that, press [OK] to save the settings, which will take effect immediately; while setting, press [Return] to exit the dialog box. Press [◄]/[►] to select the setting item, press [▼] to clear original settings, and then press number keys to input the network information; after that, press [OK] to save the settings, which will take effect immediately; while setting, press [Return] to exit the dialog box. | ||
Specific setting method and description
| Menu Submenu Item Setting and description | |||
General | Network | Wireless setup | If wireless network access is selected, it requires configuration.SearchSearch available wireless network around, and the results are shown on the screen as below; you can select accordingly Press [◄]/[►] to select wireless network, press [OK] and a dialog box appears on the screen for you to enter password; if the option of “Security” is “None”, it doesn’t require password and you can select [Next] directly; for other options, please enter the password of the wireless network, then press [Next] and press [OK] to complete wireless setting.If the connection fails, the signal may be too weak. Press [◄]/[►] to select wireless network, press [OK] and a dialog box appears on the screen for you to enter password; if the option of “Security” is “None”, it doesn’t require password and you can select [Next] directly; for other options, please enter the password of the wireless network, then press [Next] and press [OK] to complete wireless setting.If the connection fails, the signal may be too weak. |
| BD-LIVE connection | Set the access authority of BD-Live content.Allow (allow all BD-Live discs connecting to network)Part (only register BD-Live discs are allowed to connect to network )Forbid (forbid all BD-Live discs connecting to network) | ||
| Proxy setup | Select the proxy server to connect to networkDisable (do not use proxy server to connect to the network)Enable (connect to the network with proxy server)Proxy host (set the host of the proxy server)Proxy port (set the port of the proxy server) | ||
Display | TV | Screen(set the aspect ratio matching the connected TV set) | When connected to 16:9 TV, select:16:9 full screenIn this mode, if the aspect ratio of the disc is 4:3, the output signal of the player will be stretched to 16:9 full screen.16:9 normalIn this mode, if the aspect ratio of the disc is 4:3, |
Specific setting method and description
| Menu Submenu Item Setting and description | |||
Display | TV | Screen(set the aspect ratiomatching the connected TV set) | the horizontal direction of the output signal will remain unchanged, and the vertical direction will be compressed to 9/16 of the horizontal width.When connected to 4:3 TV, select:4:3 panoramicThe left side and right side of 16:9 image will be cut to fit the 4:3 screen, the image quality remains unchanged, but the left and right edges are cut off4:3 letterboxThe top and bottom of 16:9 image are black to fit the 4:3 screen, but the image quality reduces because the scanning lines are reduced. |
| Resolution(set the video output resolution) | Set the resolution of display device. Number 480 and 720 indicate the resolution lines of video output, I (interlaced) or P (progressive) indicate the scanning mode of video output.AutoThe player checks and selects optimized resolution automatically.480I/576I480P/576P720P1080I1080P[IMAGE]After the resolution is adjusted, above dialog box pops up; if you are satisfied with the adjusted resolution, select [OK], or else select [Cancel]; if you don't select in 12s, the player resumes original setting.According to the selected video output terminal, the appropriate resolution is also different; please set according to video output instructions. | ||
| TV system | Set the system of output TV signalNTSCPALAUTO | ||
Resolution setting
Specific setting method and description
| Menu Submenu Item Setting and description | |||
Display | TV | Color space | Set color spaceRGBYcbCrYcbCr422Full RGB |
| HDMI high color | Set HDMI color depth to 30-bit, 36-bit, 48-bit or OFF.30-bit36-bit48-bitOFF | ||
| HDMI 1080P 24HZ | Enable/disable the output of HDMI 1080P 24HZ.ONOFF | ||
| HDMI 3D | Enable/disable the output of 3D signal.AutoThe player checks and selects whether HDMI signal outputs the signal of 3D Blu-ray disc.OFF | ||
| Video processing | Video adjustment | Press◀▶▼to adjust the brightness, contrast, tune and saturation of output image. | |
Audio | Action to deal with | Movie mode | • Standard• bright• Movie• Custom• online video |
| Color adjustment | • Red• Green• Blue• Yellow• cyan• red and purple | ||
| Noise reduction | 0123 | ||
Specific setting method and description
| Menu Submenu Item Setting and description | |||
Audio | Audio output | Digital output(select the digital audio signal format from the digital audio output terminal) | Turn off the signal output of digital audio output terminal of the player.Bit streamPCMRe-encodeOFFBit stream:When “Bit stream” is selected, the digital audio signal will output in the format of original stream. Select when connected device can decode.PCM:Select “PCM” when the connected device can’t decode. When this option is selected, output pulse code modulation (PCM) digital signal.Re-encode:Output re-encoded digital signal.OFF: |
| HDMI(select the digital audio signal format from HDMI terminal) | Bit streamPCMRe-encodeOFFSame as above | ||
| Down-sampling frequency(select the down-sampling frequency of digital audio signal PCM code) | 48KIf the input audio is higher than 48KHZ, the original audio will be down-sampled to 48KHZ or lower. If the audio device supports audio input higher than 48KHZ, this option isn’t recommended.96KIf the input audio is higher than 96KHZ, the original audio will be down-sampled to 96KHZ or lower. If the audio device supports audio input higher than 96KHZ, this option isn’t recommended.192KIf the input audio is higher than 192KHZ, the original audio will be down-sampled to 192KHZ or lower. If the audio device supports audio input higher than 192KHZ, this option isn’t recommended. | ||
| Dynamic output compression(set the dynamic compression to ON/OFF | ON (enable dynamic output compressionOFF (disable dynamic output compression)Auto | ||
Specific setting method and description
| Menu Submenu Item Setting and description | |||
Audio | Audio output | Dynamic output compression(set the dynamic compression to ON/OFF | Dynamic range is the difference between the minimum audio strength higher than device noise and the maximum audio strength before distortion. Enable dynamic compression for viewing in the night. |
| SACD Priority | Multi-channel2-channel | ||
| Speaker setup | Configuration(select according to connected speaker and power amplifier) | 5X (configuration when five channels are connected)First step: select the audio channel model/R: select this option if your power amplifier is compatible with Dolby Pro Logic;Stereo: select this option if the player is connected to stereo power amplifier.Second step: select the quantity of bass: None: select this option if there is no bass speaker;Single: select this option if there is bass speaker.Third step: select the speaker to be setIf the bass quantity is “None”: you can select to set left/right speaker;If the bass quantity is “Single”: in addition to the speaker, you can also set bass speaker;Fourth step: set the selected speaker as follows: Size: set according to speaker size, select large if the cross section area is larger than or equals to 16cm2, or else select small;Tuning: adjust the audio output strength of the speaker in the range -10~10dB.Delay: set the distance between the speaker and the listener by 5cm in the range 0~1000cm. | |
| Test tone | MoreSize: set according to speaker size, select large if the cross section area is larger than or equals to 16cm2, or else select small;Tuning: adjust the audio output strength of the speaker in the range -10~10dB.Delay: set the distance between the speaker and the listener by 5cm in the range 0~1000cm. | ||
Specific setting method and description
| Menu Submenu Item Setting and description | |||
Audio | Post-processing | EQ | OFFRockPopLiveDance |
System info | Software version | Display software version and MAC address | Confirm after upgrading. |
Advanced Playing Operation 1. Using screen control menu
With screen control menu, you can set and select certain playing status.
In the playing state, press [Screen control] key and show the screen control menu on the screen, as shown below.
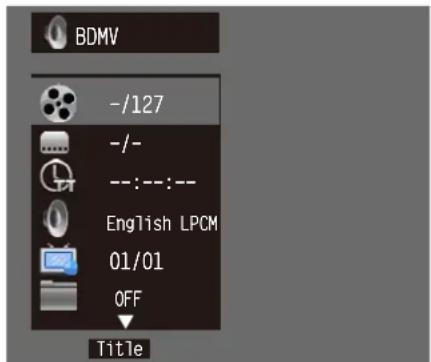
In screen control menu, press ◄▶▶ to select an item, and then press [OK] to select and set. The screen control menu contains the following items: Title [BD-V DVD-V]: display current title and total titles. Press the direction key [▶] to open title selection bar, select desired title, and press [OK] to play from the selected title.
Chapter [BD-V DVD-V]: display current chapter and total chapters. Press the direction key [▶] to open chapter selection bar, select desired chapter, and press [OK] to play from the selected chapter.
File [VIDEO AUDIO PHOTO]: display current file and total files in current folder. Press the direction key [▶] to open the selection bar, select desired file, and press [OK] to play from the selected file.
Time [BD-V DVD-V CD VIDEO AUDIO]: display the playing time of current title, chapter, disc, track, and file. Press the direction key [▶] to open the time bar, and press [▲] [▼] to switch between playing time and remaining time.
Playing mode [CD VIDEO AUDIO PHOTO]: display current playing mode. Press the direction key [▶] to open the selection bar, and switch the playing mode among "Normal", "Random" and "Shuffle".
Audio [BD-V DVD-V]: display the language and audio signal decoding mode of the audio output.
Press the direction key [▶] to open the audio bar, and press [▲] [▼] to switch the audio.
Angle [BD-V DVD-V]: display current playing angle. Press the direction key [▶] to open the angle bar, and press [▲] [▼] to switch the playing angle.
Caption [BD-V DVD-V]: display current caption state. Press the direction key [▶] to open the caption bar, and press [▲] [▼] to switch the caption language.
Caption type [VIDEO]: only available for video playing; display current caption state. Press the direction key [▶] to open the caption bar, and press [▲] [▼] to switch the caption language.
Secondary video [BD-V]: display secondary video state. Press the direction key [▶] to open the selection bar, and press [▲] [▼] to switch to full screen video output, and show secondary video window simultaneously (PIP).
Secondary audio [BD-V]: display secondary audio state. Press the direction key [▶] to open the selection bar, and press [▲] [▼] to enable/disable the output of secondary audio.
Bit rate [BD-V DVD-V CD VIDEO AUDIO]: display the bit rate of audio and video signal.
Instant search [BD-V DVD-V CD VIDEO AUDIO]: go to 30sec after current point and play.
Instant replay [BD-V DVD-V CD VIDEO AUDIO]: go to 10sec before current point and play.
Lantern slide [PHOTO]: display the switching speed of photo playing. Press [OK] to switch among fast, medium and slow.
Switch [PHOTO]: display the switching effect of photo playing. Press [OK] to switch the effect, including None, slide left, slide up, slide down, slide right, rectangular shrinking, rectangular enlarging, mixing, dissolving, horizontal interleaving, vertical interleaving, horizontal separation, vertical separation, horizontal division and vertical division.
Note
In screen control menu, press the [Screen control] key to hide the screen control menu.
2. Using OSD menu
In OSD menu, you can check the current playing state. In playing state, press the [OSD] key to show the OSD menu on the screen.
When playing BD-V DVD-V disc, the menu is shown below:

Advanced Playing Operation
OSD menu contains the following information:
1) Playing state
2)Disc type
3) Title: display current title and total titles
4) Chapter: display current chapter and total chapters in current title
5) Time: display the playing time of current title
6) Caption: display current caption state
7)Audio: display the language and audio signal decoding mode of audio output
When playing CD, the menu is shown below:

OSD menu contains the following information:
1) Playing state
2)Disc type
3) Title: display current title and total titles
4) Time: display the playing time of current title
5)Audio: display the language and audio signal decoding mode of audio output
When playing audio and video files, the menu is shown below:
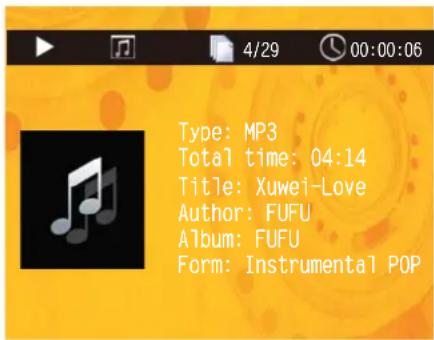
OSD menu contains the following information:
1) Playing state
2) Playing time: display current playing time
3)Disc type
4) File: display current file and the total files in current folder
5) Time: display the playing time of current track
When playing photo files, the menu is shown below:
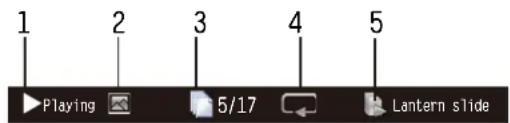
OSD menu contains the following information:
1) Playing state
2) Data file type
3) File: display current file and the total files in current folder
4) Repeat mode: display current repeat mode
5)Lantern slide: effect and switching speed
Note
In OSD menu, press the [OSD] key to hide the OSD menu.
3. BD-Live
For discs that support BD-LIVE, access the Internet with this player to download the trailer, special features and interactive games.
3.1 Connect to the network
3.2 Connect to USB disk according to BUDA setting
3.3 Play the discs that support BD-LIVE; in playing state, press the [Popup Menu] key to pop up the menu, press the direction key [▶] [◀] to select BD-LIVE, and then press [OK] to open BD-LIVE. (Network connection takes a period of time) The popup menu is shown on the screen as below:

3.4 In BD-LIVE menu, press direction key ◀▶▼, [OK] and number keys to select, download the trailer, special features and interactive games, or play downloaded content.
Note
This function is only available when the player is connected to the network successfully. When connected to the network, it is also limited by the network speed.
Please follow the content in page 16 for network setting.
The available content depends on the BD-LIVE service provider.
Advanced Playing Operation
The downloaded content is saved in BUDA specified memory. If the specified memory doesn't have sufficient space, please select "Format" in "BUDA Info" item to release the storage space, but the downloaded content may be lost.
When use BD-LIVE function, the user shall connect external USB disk, make sure the available space is at least 1GB, and select External device in System – BUDA – BUDA Setup.
When the network is disconnected, play the content saved in the player memory through above steps.
Note:
With media player, you can play the photos, music and video saved in data discs and USB devices (including HDD).
| File type | Compatible file format |
| Audio | MP3,AAC,WMA |
| Video | MKV,TS,AVI,MPG,RMVB,DIVX,WMV |
| Photo | JPEG, PNG |
MKV and AVI files support DIVX encoding. Depending on the disc type, certain discs can't be played and certain functions may be not compatible.
Selecting and playing data file
- Insert data disc, or connect to USB device (e.g. USB disk, digital camera, card reader, MP3 player or mobile hard disk) with USB cable.
Note
Before connecting to USB device, please press the power key to set the player to standby, and then press the power key to turn on the player after connected. Before disconnect the USB device, also set the player to standby state first, or else the files in the memory may be damaged. For certain mobile hard disk without independent power supply, maybe the data can't be read.
- After reading the data disc or USB device (including HDD), the media center menu shows automatically. In stopped mode, press the Media Center key to open the Media Center menu, as shown below.
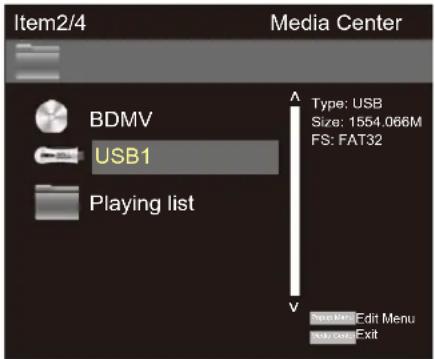
- Press the direction key [▲] [▼] to select the media of the data files to be played (e.g. data disc or USB disk), and then press OK to enter data type selection, as shown below:

- Press the direction key to select the type of the data file to be played (e.g. picture, music or movie), and then press OK to select the file directory of selected type, as shown below:

Note
To return to previous menu:
Press direction key
Press direction key▲▼ to select Return, and then press [OK] to show the files of the selected type in the menu.
- Press direction key [▲▼] to select the folder of the data files to be played, and then press OK open the folder; in the folder, press the direction key [▲▼] to select the data files to be played, and press OK to play.
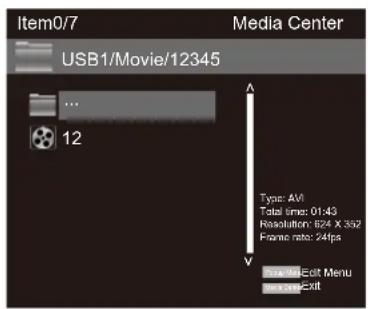
Note
When playing audio files, the OSD menu appears on the screen. If the files are longer than 6 hours, press the [▶◀◀] key to turn pages.
Special operation in playing picture files
- Operations while playing
[Stop]: stop playing and return to media center;
[Pause]: pause playing of lantern slide;
[Play]: start playing lantern slide;
[Next]: go to next picture;
[Previous]: go to previous picture;
[▲]: pause playing and convert the picture;
[▼]: pause playing and mirror the picture;
[◀]: pause playing and rotate the picture counterclockwise;
[▶]: pause playing and rotate the picture clockwise;
Using playing list
You can favorite files to the playing list, and play the selected files with the playing list.
1. Editing playing list
Follow the instructions of "Selecting and playing data files" in previous page to select files, and press [Popup Menu] to pop up a dialog box, select accordingly and then press [OK].
Add to playing list
Select all
Clear all
Cancel
Add to playing list: add the selected files to the playing list; (selected files are marked with red check marks)
Select all: select all the files in current folder, and then add all the files to the playing list;
Clear all: clear all the options in current folder;
Cancel: cancel the operation and close the dialog box.
Note
The edited playing list will be cleared after the player is turned off.
When the disc is taken out or the USB disk is disconnected, the selected files in these media will also disappear from the playing list.
The maximum file number of picture, music and movie in the playing list is 100.
2. Playing the list
After the playing list is edited, press the direction key [◀] to return to the root directory of the media center, press the direction key [▲▼] to select "Playing list", and then press OK to open data type selection menu.
Press the direction key [▲▼] to select data type, and then press [OK] to open the playing list of selected type.
In the opened playing list, press the direction key
[▲▼] to select data files, and then press [OK] to play all the files in the playing list.
In the playing list, press [Popup Menu] to pop up a dialog box, select accordingly and press [OK].
Clearing from the playing list:
Clear the selected file from the playing list;
Select all: select all the files in current playing list, and then delete the files from the list;
Clear all: Clear all selected files;
Cancel: cancel the operation and close the dialog box.
Note
While playing, press the Stop key to stop playing and return to the playing list. At this moment, press the direction key [◀] to exit current playing list.
If there is any failure, please check as below. If you are not sure with the instructions or the problems still can't be solved, please contact your local distributor.
It isn't the problem of the player in the following cases.
There is noise when the disc is rotating;
Image distortion occurs in the process of scanning.
Warning
In any case, it is prohibited to repair the player without authorization, or else the warranty is void. Do not disassemble the shell to avoid electric shock.
| Failure | Reason and solution | |
| No power supply | Please make sure that the AC outlet has electricity.Insert the AC power line firmly.Press the Power key on the front panel to turn on the player. | |
| Image is frozen and operation is invalid | Cut off the power supply and connect again, and then press the Power key on the remote control to restart the player. | |
| Auto standby | The default setting of the player: in stopped state, if there is no operation in 5 minutes, the player enables screen saver automatically; if there is no operation in 10 minutes in screen saver, the player enters standby automatically. You can press the Power key on the remote control to restart the player, or select “OFF” in “Main menu – General – System – Screen saver”. | |
| Remote control can’t work normally | The remote control isn’t aimed at the receiver. Please aim the remote control at the receiver on the front panel.There is obstacle between the remote control and the player.Please remove it.Battery is too low. Please replace with new batteries.Please refer to the instruction of “Using remote control”. | |
| Can’t play discs | Please make sure that the label of the disc is upwards. If the disc is dirty, please clean first.The disc is empty or can’t be played. Please check whether the area code of the disc matches the player. | |
| Red key appears on the screen | Selected function or operation is unavailable in current state.The reason may be:1. Software function limit of certain BD/DVD discs.2. Certain BD/DVD discs don’t support selected function.3. The selected function is invalid in current mode. | |
| Playing mode is different from the setting | For certain discs, the settings in the menu are invalid. Please operate according to the disc menu. | |
| No HDMI output | Check whether the HDMI connection between the player and external device is loose, and insert properly if yes.Check whether your TV supports 720p/1080i/1080p/1080p24 HDMI output resolution, and adjust the output resolution of the | |
| player according to the specification of the TV. HDMI always has output, and CVBS only has output at 720P. Therefore, certain user can't watch BD images in CVBS, because the output resolution in the setting menu is too high; please set the resolution in HDMI state to lower than 720P. | ||
| TV has no image | Please make sure that the TV has been connected to the player through VIDEO OUT terminal or HDMI terminal. Please make sure that the AV selection of the TV is proper. | |
| Video output resolution is too low Please reset the resolution in “Main menu – Display – TV”, and set according to the video output signal format of different terminals. | ||
| Aspect ratio can’t be changed | The aspect ratio of certain DV/DVD is fixed. Please refer to the TV manual to adjust the aspect ratio. | |
| No audio | Check whether the audio signal connection between the player and external device is loose, and insert properly if yes Please make sure that the audio output is set properly in “Main menu – Audio”. If a power amplifier is connected, please check whether the input mode of the power amplifier is set properly. | |
| Can’t hear desired audio effect In “Main menu – Audio – Speaker”, set the speaker properly according to the connected device. | ||
| Can’t switch audio | Due to the difference in disc production, certain discs can’t switch audio. | |
| Forget the password of parent lock The default password of parent lock is 0000. | ||
| Blu-ray discs can’t play PIP | Please check whether the disc supports PIP. Not all Blu-ray discs support this function. PIP and secondary audio need disc support. In the setting menu, select ON, and press “Screen control” while playing; this function is set in screen control menu. | |
| Can’t select audio channel and caption | The disc doesn’t contain the language. Certain discs can’t be changed, and only can be selected in disc menu. The disc doesn’t contain caption information, or caption isn’t enabled; press the [Caption] key to enable. | |
| Support BD-J discs | Certain keys on the remote control are invalid for certain BD-J discs, e.g. select with numbers, program, repeat, return, zoom in and A-B. These discs contain playing navigation, integrate java, and the program can’t process these discs; however, common DVD is valid. | |
| BD-LIVE function | First, the disc must be marked with BD-LIVE, and ensure that the network is connected normally, insert USB disk, | |
| Then, make sure that the BUDA in system setting is set to “External”. | ||
| Lyrics display of MP3 | The MP3 file and lyrics must have the same name, and the lyrics must be in LRC format. | |
| Support WIFI dongle | Only support the ic port of Ralink 307X WIFI dongle . | |
| How to adjust area code | Press [Setup] to enter main menu interface, and press number “8520” to enter area code page.Blu-ray code: adjust the area code of Blu-ray discs, and enter “1”, “2” or “4” directly to select A, B or C. | |
Specifications
Note
The specification is subject to change without prior notice.
Area code
The player supports the following area code.
| DVD | Blu-ray | Country/Region |
 |  | The Middle East |
Compatible media
BD-Video
DVD-Video, DVD+R/+RW, DVD-R/-RW, DVD+R/-R DL (double-layer)
VCD/SVCD
Audio CD, CD-R-/CD-RW, MP3, JPEG
MKV
USB device
File format
Video: .avi、.mp4、.mkv、.rmvb、.rm、.divx、.wmv
Audio: .mp3、.wma、.AAC
Picture: .jpg、.gif、.png
Video
Signal system: PAL/NTSC
Composite video output: 1 Vp-p (75Ω)
HDMI output 480p, 576p, 720p, 1080i, 1080p, 1080p24
Audio
Two channel analog output
Front left/right channel: 2Vrms (>1000Ω)
Digital output: 0.5 Vp-p (75Ω)
Coaxial cable
HDMI output
Sampling frequency:
MP3: 32KHZ, 44.1KHZ, 48KHZ
Fixed bit rate:
MP3: 112kbps-320kbps
USB
Compatibility: high speed USB (2.0)
Category support: USB mass storage
File system: FAT16, FAT32, NTFS
Support HDD (portable hard disk): may require external power supply.
Master device
Rated power: AC 110V-240V, 50Hz-60Hz
Power consumption: 20W
Power consumption in standby (fast wake-up is disabled): <0.5W
Size (W*H*T): : 430x40x201mmmm
Net weight: 1.6kg
Accessories
Remote control and battery
HDMI Cable
User's Manual
- Warning
- Caution
- Notice
- Description of function that requires network connection (the "function" hereinafter)
- Placement
- Power supply
- Adjusting volume
- Cleaning
- Cleaning disc, disc/lens cleanser
- Notice for replacing parts
- Connecting to HDMI OUT port
- Important
- Installing the battery
- Using remote control
- Notice for remote control operation
- Holding the disc:
- Cleaning the disc:
- Disc storage:
- The User's Manual:
- Prompt:
- Parts and operation guide
- Remote control
- Video and component input
- Connecting 5.1 channel analog input amplifier
- Connecting two-channel analog input amplifier
- Coaxial and fiber connection
- HDMI connection
- Network connection
- Resolution setting
- Advanced Playing Operation 1. Using screen control menu
- Note
- Using OSD menu
- Advanced Playing Operation
- BD-Live
- Note:
- Selecting and playing data file
- Special operation in playing picture files
- Using playing list
- Editing playing list
- Add to playing list
- Select all
- Clear all
- Cancel
- Playing the list
- Specifications
- Area code
- Compatible media
- File format
- Video
- Audio
- USB
- Master device
- Accessories
Brand : Campomatic
Model : DVD5030B
Category : Blu-ray player