
T2808 - Toaster BLACK & DECKER - Free user manual and instructions
Find the device manual for free T2808 BLACK & DECKER in PDF.


| Product Type | Toaster |
| Brand | Black & Decker |
| Model | T2808 |
| Dimensions (approx.) | 10 x 6 x 8 inches |
| Weight (approx.) | 2.5 lbs |
| Power Rating | 800 W |
| Number of Slots | 2 |
| Browning Control | Variable with 7 settings |
| Functions | Toast, Reheat, Defrost, Cancel |
| Self-Centering Racks | Yes |
| Extra-Lift Carriage | Yes |
| Removable Crumb Tray | Yes |
| Cool-Touch Exterior | Yes |
| Auto Shut-Off | Yes |
| Cord Storage | Yes |
| Cleaning Instructions | Unplug, empty crumb tray, wipe with damp cloth |
| Safety Features | Non-slip feet, cool-touch housing, automatic shut-off |
| Spare Parts Availability | Crumb tray, cord assembly (contact customer service) |
| Warranty | 2-year limited warranty |
Frequently Asked Questions - T2808 BLACK & DECKER
User questions about T2808 BLACK & DECKER
0 question about this device. Answer the ones you know or ask your own.
Ask a new question about this device
Download the instructions for your Toaster in PDF format for free! Find your manual T2808 - BLACK & DECKER and take your electronic device back in hand. On this page are published all the documents necessary for the use of your device. T2808 by BLACK & DECKER.
USER MANUAL T2808 BLACK & DECKER
natural_image
Exterior view of a modern stainless steel Fisher 19 trowel toaster with control knobs and buttons (no visible text or symbols on the device itself)
natural_image
Exterior view of a modern black and white BARRICK BEEDDER 100 tanger (no text or symbols visible on the device body)Register your product online at www.prodprotect.com/applica, for a chance to WIN \$100,000!
For US residents only
Accessories/Parts (USA/Canada)
When using electrical appliances, basic safety precautions should always be followed, including the following:
□ Read all instructions.
☐ Do not touch hot surfaces. Use handles or knobs.
☐ To protect against electrical shock do not immerse cord, plugs or appliance in water or other liquid.
☐ Close supervision is necessary when any appliance is used by or near children.
☐ Unplug from outlet when not in use and before cleaning. Allow to cool before putting on or taking off parts, and before cleaning the appliance.
☐ Do not operate any appliance with a damaged cord or plug, or after the appliance malfunctions or has been damaged in any manner. Return appliance to the nearest authorized service facility for examination, repair or adjustment. Or, call the appropriate toll-free number on the cover of this manual.
☐ The use of accessory attachments not recommended by the appliance manufacturer may cause injuries.
☐ Do not use outdoors.
☐ Do not let cord hang over edge of table or counter, or touch hot surfaces.
☐ Do not place on or near a hot gas or electric burner, or in a heated oven.
☐ Extreme caution must be used when moving an appliance containing hot oil or other hot liquids.
☐ To disconnect remove plug from wall outlet.
☐ Do not use appliance for other than intended use.
☐ Oversized foods, metal foil packages or utensils must not be inserted in a toaster as they may involve a risk of fire or electric shock.
☐ A fire may occur if toasters are covered or touching flammable material, including curtains, draperies, walls and the like, when in operation.
☐ Do not attempt to dislodge food when toaster is plugged in.
SAVE THESE INSTRUCTIONS.
This product is for household use only.
POLARIZED PLUG (120V Models Only)
This appliance has a polarized plug (one blade is wider than the other). To reduce the risk of electric shock, this plug is intended to fit into a polarized outlet only one way. If the plug does not fit fully into the outlet, reverse the plug. If it still does not fit, contact a qualified electrician. Do not attempt to modify the plug in any way.
TAMPER-RESISTANT SCREW
Warning: This appliance is equipped with a tamper-resistant screw to prevent removal of the outer cover. To reduce the risk of fire or electric shock, do not attempt to remove the outer cover. There are no user-serviceable parts inside. Repair should be done only by authorized service personnel.
ELECTRICAL CORD
a) A short power-supply cord (or detachable power-supply cord) is to be provided to reduce the risk resulting from becoming entangled in or tripping over a longer cord.
b) Longer detachable power-supply cords or extension cords are available and may be used if care is exercised in their use.
c) If a long detachable power-supply cord or extension cord is used,
1) The marked electrical rating of the detachable power-supply cord or extension cord should be at least as great as the electrical rating of the appliance,
2) If the appliance is of the grounded type, the extension cord should be a grounding-type 3-wire cord, and
3) The longer cord should be arranged so that it will not drape over the countertop or tabletop where it can be pulled on by children or tripped over.
Note: If the power supply cord is damaged, it should be replaced by qualified personnel or in Latin America by an authorized service center.
Product may vary slightly from what is illustrated.

Note: Model shown is 4-slice toaster (T4808); 2-slice model (T2808) includes same features, but with 2 toasting slots only.
- Toasting slots
- Toast shade selection knob(s)
† 3. Slide out crumb tray(s) (Part # T2808-01) - Sleek chrome casing
- Polarized plug
- BAGEL button(s)
- CANCEL button(s)
- Toasting lever(s)
Note: + indicates consumer replaceable/removable parts.
How to Use
This product is for household use only.
GETTING STARTED
- Carefully unpack your toaster and remove all packaging materials.
- Remove and save literature
- Please go to www.prodprotect.com/applica to register your warranty.
- To remove any dust that may have accumulated during packaging, simply wipe toaster exterior with a clean, damp cloth.
Important: Do not use abrasive cleansers.
Important: Do not put toaster, cord or plug in water or other liquid.
- Plug power cord into standard 120V AC electrical outlet.
- Before toasting for the first time, operate all toasting slots without bread and with toast shade selection knobs set to maximum (7) setting. This will help burn off any dust or oils that may have accumulated during manufacturing. Toaster may give off an unpleasant smell, but this is normal for a new toaster. Make sure the room is well ventilated while doing this.
- Select a location where toaster is to be used, allowing enough space at back and top of the unit to allow heat to flow without damage to cabinets and walls. SELECTING TOAST COLOR
Note: The toast shade selection knob(s) can be found on the front of your toaster. The T4808 has 2 knobs, one for each set of slots.
- Adjust the knob(s) to the desired toast color: 1 is for warming and very light toasting; 7 is for dark toasting (B); the numbers are a guide to help you select your desired color (the higher the number, the darker the toast).
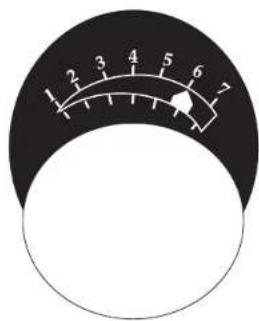
Note: The first time you toast, it is best to use all of the toasting slots; position toast shade selection knob(s) to the middle setting (4); then adjust each subsequent toasting to your preference.
CANCEL BUTTON
If you wish to stop the toasting cycle before it is complete, press the CANCEL button. Heating elements will be turned off and toast or toaster food will pop up.
Note: The T4808 has 2 CANCEL buttons, one for each set of slots.
BREAD TOASTING INSTRUCTIONS
-
Place your toaster on a flat, level surface.
-
Plug power cord into a standard 120V AC electrical outlet.
-
Set toast shade selection knob(s) to desired toasting color (see SELECTING TOAST COLOR).
-
Remove all protective wrappings from bread or toaster food before placing in slots.
Important: Avoid toasting torn slices of bread and broken pastries that may get lodged in toasting slots.
- Place bread or toaster food into toasting slots and push down toasting lever(s) to lower bread and begin toasting. Self-adjusting guides will automatically center bread for even toasting.
Note: When toasting a single slice in the T4808, bread may be placed in any toasting slot, but may toast slightly darker on the inside of either pair of toasting slots than on the outside.
Note: Toasting lever(s) will not lock down unless toaster is plugged into an electrical outlet.
-
When selected color is reached, toasting lever(s) will pop up and toaster will shut off automatically.
-
Unplug cord from wall outlet when not in use.
Note: To prevent a fire hazard, never place bread over opening of toaster.
Note: Do not operate toaster unless crumb tray(s) are in position and correctly fitted.
- To interrupt toasting, press CANCEL button(s).
BAGEL AND ENGLISH MUFFIN TOASTING INSTRUCTIONS
Note: This setting changes the toaster to gently heat the outside of each bagel while toasting, the cut side of the bagel to the desired color. The BAGEL setting works great for English muffins, too!
- Place your toaster on a flat, level surface.
- Plug power cord into a standard 120V AC electrical outlet.
- Set toast shade selection knob(s) to desired toasting color (see SELECTING TOAST COLOR).
- Remove all protective wrappings from bread or toaster food before placing in slots.
- Slice bagel or English muffin in half; place one half in each toasting slot with cut sides facing center of toasting slots.
- Push down to lower toasting lever(s).
- As soon as toasting lever(s) are lowered and locked into position, press BAGEL button(s).
- When bagel or muffin is done, toasting lever(s) will pop up. Toaster will shut off automatically.
- To interrupt toasting, press CANCEL button(s).
CONVENIENCE FOODS TOASTING
Tip: The extra-wide toasting slots can accommodate many varieties of packaged convenience food available today, both frozen and non-frozen (shelf pastry).
Note: Since toaster foods and individual tastes vary, it is difficult to recommend exact toaster shade settings. However, after a little experimentation you will discover the best setting for your needs. You may also wish to refer to the heating instructions on food packaging.
Pastries
Tip: For best results, follow instructions printed on pastry package; if package does not have instructions, position toast shade selection knob(s) midway (4). Some pastries may require a second toasting cycle.
Note: Do not use this toaster for toasting pastry items with runny-type frosting or open fillings.
REMOVING LODGED FOOD
If a piece of toast or toaster food becomes lodged in toaster, unplug and allow to cool. Turn toaster upside down and shake toast/toaster food loose.
Important: Never use a fork or sharp-edged utensil to remove toast, as this may damage the heating elements or cause injury.
IMPORTANT POINTS
- Remove all protective wrappings from bread or toaster food before placing in toasting slot(s).
- For best results, clean crumb tray(s) frequently.
- Different breads require different color settings. Press CANCEL button(s) at any time to check toast color.
- Do not block toasting slot(s). Do not place any object over toasting slots.
- Do not toast buttered bread or buttered pita bread. Melted butter will cause fire.
- Bread which has been toasted but not buttered may be reheated. Use a lighter setting and watch it carefully.
- When toasting more than one slice of bread, use slices of similar size, thickness and freshness.
- Stale bread, thin bread or sweet bread products – such as tea cakes and fruit loaf – brown more quickly than ordinary bread; they should be toasted on the lighter settings.
- Never immerse toaster in water.
- Never use a fork or sharp-edged utensil to remove toast or toaster foods because this may damage the heating elements or cause injury.
Care and Cleaning
This product contains no user serviceable parts. Refer service to qualified service personnel.
CLEANING
Caution: Do not immerse in water or other liquid.
-
Unplug toaster and allow to cool.
-
Wipe outside with soft, damp cloth. Polish with soft, dry cloth.
Important: Do not use abrasive cleaners, as they may scratch the stainless steel surface.
-
Crumb tray(s) are located under toaster. For easy cleaning, grasp crumb tray handle and pull out.
-
Brush crumbs from tray(s) and, if necessary, wipe with a clean, damp cloth. Always dry tray(s) thoroughly before replacing.
-
When replacing tray(s), be sure to push firmly so that it is fully inserted in bottom of loaster.
TO STORE
Unplug unit, allow to cool and clean before storing. Store in its box in a clean, dry place. Never store it while it is hot or still plugged in. Never wrap cord tightly around the appliance. Do not put any stress on the cord where it enters the unit, as this could cause the cord to fray and break.
TROUBLESHOOTING
| PROBLEM POSSIBLE CAUSE SOLUTION | ||
| Unit not heating or stops heating. | Electrical outlet is not working or toaster is unplugged. | Check to make sure outlet is working. Unplug unit and re-insert plug. Test toaster by select-ing a setting and depressing the toast lever with nothing in the toaster. |
| Second toasting is too dark. | Setting on toast is too dark. | If doing repeated toasting in the toaster, you may want to select a shade slightly lighter than the pre-vious setting. |
| Bread is jammed The bread may be too thick. | Most breads, pastries and bagels will fit into the slot, however, occasionally the bread may be too thick, simply remove from the toaster and slice a slightly thinner piece | |
| Toast is too light or too dark. | You may have changed the shade selector and need to readjust the setting. | Simply reset the shade selector to the desired setting for the function you wish to use. |
| Burnt food odor or smoking when toaster is being used. | Remnants of food in crumb tray. | Refer to directions in CARE AND CLEANING section of this Use & Care booklet. Make sure the crumb tray is empty and wiped clean. Check to make sure no large crumbs are caught in the slot. Turn unplugged unit upside down over the sink and shake to remove. |
For service, repair or any questions regarding your appliance, call the appropriate "800" number on the cover of this book. Do not return the product to the place of purchase. Do not mail the product back to the manufacturer nor bring it to a service center. You may also want to consult the website listed on the cover of this manual.
One-Year Limited Warranty
(Applies only in the United States and Canada)
What does it cover?
- Any defect in material or workmanship; provided; however, Applica's liability will not exceed the purchase price of the product.
For how long?
• One year after the date of original purchase.
What will we do to help you?
- Provide you with a reasonably similar replacement product that is either new or factory refurbished.
How do you get service?
- Save your receipt as proof of the date of sale.
- Check our on-line service site at www.prodprotect.com/applica, or call our toll-free number, 1-800-231-9786, for general warranty service.
- If you need parts or accessories, please call 1-800-738-0245.
What does your warranty not cover?
• Damage from commercial use
• Damage from misuse, abuse or neglect
- Products that have been modified in any way
- Products used or serviced outside the country of purchase
• Glass parts and other accessory items that are packed with the unit
- Shipping and handling costs associated with the replacement of the unit
- Consequential or incidental damages (Please note, however, that some states do not allow the exclusion or limitation of consequential or incidental damages, so this limitation may not apply to you.)
How does state law relate to this warranty?
- This warranty gives you specific legal rights, and you may also have other rights that vary from state to state or province to province.
¿NECESITA AYUDA?

- SAVE THESE INSTRUCTIONS.
- POLARIZED PLUG (120V Models Only)
- TAMPER-RESISTANT SCREW
- ELECTRICAL CORD
- How to Use
- GETTING STARTED
- CANCEL BUTTON
- BREAD TOASTING INSTRUCTIONS
- Important: Avoid toasting torn slices of bread and broken pastries that may get lodged in toasting slots.
- BAGEL AND ENGLISH MUFFIN TOASTING INSTRUCTIONS
- CONVENIENCE FOODS TOASTING
- Pastries
- REMOVING LODGED FOOD
- Important: Never use a fork or sharp-edged utensil to remove toast, as this may damage the heating elements or cause injury.
- IMPORTANT POINTS
- Care and Cleaning
- CLEANING
- Caution: Do not immerse in water or other liquid.
- Important: Do not use abrasive cleaners, as they may scratch the stainless steel surface.
- TO STORE
- One-Year Limited Warranty
- (Applies only in the United States and Canada)
- What does it cover?
- For how long?
- What will we do to help you?
- How do you get service?
- What does your warranty not cover?
- How does state law relate to this warranty?
- ¿NECESITA AYUDA?
Brand : BLACK & DECKER
Model : T2808
Category : Toaster