
DVD3880 - DVD player Campomatic - Free user manual and instructions
Find the device manual for free DVD3880 Campomatic in PDF.


| Product Type | DVD Player |
| Brand | Campomatic |
| Model | DVD3880 |
| Dimensions (W x H x D) | 190 x 43 x 260 mm |
| Weight | 0.9 kg |
| Power Supply | AC 110-240 V, 50/60 Hz |
| Power Consumption | < 15 W |
| Video Outputs | Composite, Component (Y, Pb, Pr), HDMI |
| Audio Outputs | Analog L/R, Coaxial |
| USB Input | Yes (front panel) |
| Compatible Disc Formats | DVD, CD, CD-R, CD-RW, DVD+R, DVD+RW |
| Compatible File Formats | MP3, JPEG, MPEG-4 |
| Signal System | NTSC / PAL |
| Frequency Response | 50 Hz - 60 Hz |
| Signal-to-Noise Ratio | > 80 dB |
| Remote Control | Included |
| Laser Class | Class 1 |
| Safety Certifications | Dolby Digital licensed, Macrovision copy protection |
Frequently Asked Questions - DVD3880 Campomatic
User questions about DVD3880 Campomatic
0 question about this device. Answer the ones you know or ask your own.
Ask a new question about this device
Download the instructions for your DVD player in PDF format for free! Find your manual DVD3880 - Campomatic and take your electronic device back in hand. On this page are published all the documents necessary for the use of your device. DVD3880 by Campomatic.
USER MANUAL DVD3880 Campomatic
natural_image
Black Campomatic DVD3860 external device with control buttons and drive slots (no visible text beyond branding)Table of Content
Parts 1-2
Operation 3-7
Troubleshooting 8
Safety Instructions 9-10
Specifications 12
Front Panel:

- Disc tray
- Eject/Insert
- USB interface
Connect USB device to this interface.
- Remote receiver
5.Play/Pause
6. Stop
7.ON/Standby
Turn on the player or set to standby mode.
Back Panel:

- Component Y output
- Audio output (R)
-
Audio output (L)
-
Component Pb output
- Component Pr output
- Composite video output

- Open/Close: Open/close the disc tray.
- Audio: Choose a audio language of the DVD disc.
- 0-9: Number buttons 0-9.
- Setup: Open the setup of the DVD Player.
- Volume -: Decrease the volume of the playback.
- Slow: Set the playback in slow motion.
- Play/Pause: Play or pause the playback.
- Step: Go through the playback, frame by frame.
- Stop: Stop the playback.
- Mark: Setup a returning point in the playback.
- ◀ / ▶: Fast wind backward/forward within chapters.
- Repeat: Repeat the current chapter.
- PBC: Open/Close PBC playback.
- Video: Select a video output.
- USB: Select the USB input.
- Program: Create a playback program of different files.
- Title: Return to the menu of the DVD disc.
- Channel: Switch channel output (2 CH and 5.1 CH).
- Angle: Switch between different video angles.
- ◀ / ▶: Skip backward/forward between chapters.
- Q-Play: Skip to the beginning of the playback.
- Zoom: Increase/decrease the playback picture.
- Clear: Clear the content of a program or mark.
- A-B: Set a segment of the playback on repeat.
- Search: Search directly for a segment of the playback.
- Volume +: Increase the volume of the playback.
- Navigation/Ok: Navigation arrows/Confirmation button.
- Return: Go back in the setup/menu.
- Copy/Delete: Copy and/or delete files on a USB unit.
- Display: Show playback information (time/title/chapter).
- Menu: Open the menu for the playback.
- On/Off: Turn on/off the DVD Player.
- Subtitle: Select a subtitle language of the playback.
- Mute: Activate/deactivate the audio.
Operation
Get Started:
- Connect the power plug of the DVD Player to a wall outlet. The power indicator on the front panel will illuminate in red.
- Press the On/Off button on the front panel or the Remote Control to start the DVD Player. The power indicator on the front panel will illuminate in green.
- Make all the right cable connections to your DVD Player by following the instructions in the paragraph 'Cable Connections' on page 7.
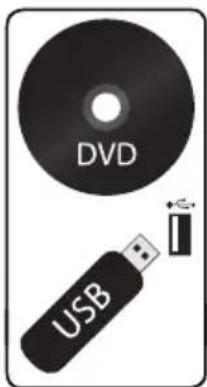
4a. If you wish to play a DVD disc in the DVD Player. Follow the instructions in the paragraph 'DVD Operation' on page 7.
4b. If you wish to connect a USB unit to the DVD Player. Follow the instructions in the paragraph 'USB Operation' on page 7.
-
If you wish to adjust the system setup of the DVD Player, follow the instructions in the paragraph 'System Setup' on page 7-10.
-
When you are done using your DVD Player, press the On/Off button on the front panel or the Remote Control to turn off the DVD Player. The power indicator on the front panel will illuminate in red.
Cable Connections:
1a. Connect a RCA cable between the Video, Left and Right Output on the back panel of the DVD Player to the RCA input on your TV.
1b. Connect a HDMI cable between the HDMI Output on the back panel of the DVD Player to the HDMI input on your TV.
-
If you have a stereo amplifier, connect a coaxial cable between the Coaxial Output on the back panel of the DVD Player to the coaxial input on your stereo.
-
Control the playback via the buttons of the Remote Control.

DVD Operation:
- Press the Open/Close button on the front panel or the Remote Control and place a DVD dics on the Disc Tray.
- Press the Open/Close button again to close.
- The DVD will read the DVD disc and begin the playback.
- Control the playback via the buttons of the Remote Control.
USB Operation:
- Insert a USB unit into the USB Port on the front panel of the DVD Player.
- Press the USB button on the Remote Control to enter the USB source. The DVD Player will read and display the file list of the USB unit.
- Browse the file list by pressing the ▲/▼/◄/► buttons on the Remote Control. Select a file by pressing the OK button of the Remote Control.
System Setup:
- Press the Setup button on the Remote Control to open the setup of the DVD Player.
- There is four different menus in the setup, General, Audio, Video and Preference. Follow the instructions in the individual paragraphs 'General Setup', 'Audio Setup', 'Video Setup' and 'Preference Setup' on page 7-10.
- To close the setup of the DVD Player, press the Setup button on the Remote Control.
General Setup:
-
Press the ▲/▼/◄/► buttons on the Remote Control to open the 'General' menu.
-
Eight submenus will appear (read more about the sub-menus later in this paragraph), press the ▲/▼
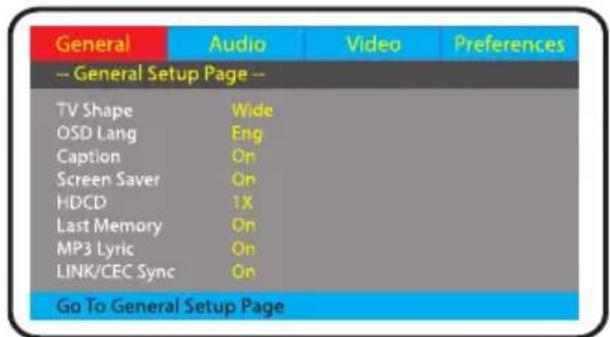
buttons on the Remote Control to circle between the sub-menus.
- Press the ◀/▶ buttons to leave/enter a sub-menu.
- When you enter a sub-menu, a number of options will appear for the entered sub-menu.
- To leave the opened menu, press the ◀ button twice.
→ TV Shape - Set the aspect ratio of the DVD Player.
→ OSD Language - Select a language for the OSD setup.
→ Caption - Display closed captions (if available).
→ Screen Saver - Select a screen saver for when the TV display goes into standby.
→ HDCD - Select a output audio signal.
→ Last Memory - Resume the memorized playback.
→ LINK/CEC Sync - Activate/deactivate syncing and control of several devices via HDMI protocol.
Audio Setup:
- Press the ▲/▼/◄/► buttons on the Remote Control to open the 'Audio' menu.
- Two submenus will appear (read more about the sub-menus later in this paragraph), press the ▲/▼ buttons on the Remote Control to circle between the sub-menus.
- Press the ◀/▶ buttons to leave/enter a sub-menu.
- When you enter a sub-menu, a number of options will appear for the entered sub-menu.
- To leave the opened menu, press the ◀ button twice.
→ Speaker Setup - Select the stereo output.
LT/RT: Switch between left/right audio channel.
Stereo: Select to play the audio via the two front speakers of the TV.
→ Digital Audio Setup - Set HDMI as the audio output.

Video Setup:
- Press the ▲/▼/◄/► buttons on the Remote Control to open the 'Video' menu.
- Six submenus will appear (read more about the sub-menus later in this paragraph), press the ▲/▼ buttons on the Remote Control to circle between the sub-menus.
- Press the ◀/▶ buttons to leave/enter a sub-menu
- When you enter a sub-menu, a number of options will appear for the entered sub-menu.
- To leave the opened menu, press the ◀ button twice.
→ Sharpness - Set the sharpness of the video picture.
→ Brightness - Set the brightness of the video picture.
→ Contrast - Set the contrast of the video picture.
→ Gamma - Set the gamma of the video picture.
→ Hue - Set the hue of the video picture.
→ Saturation - Set the saturation of the video picture.
Preference Setup:
- Press the ▲/▼/◄/► buttons on the Remote Control to open the 'Preference' menu.
- Eight submenus will appear (read more about the sub-menus later in this paragraph), press the ▲/▼ buttons on the Remote Control to circle between the sub-menus.
- Press the ◀/▶ buttons to leave/enter a sub-menu.
- When you enter a sub-menu, a number of options will appear for the entered sub-menu.
- To leave the opened menu, press the ◀ button twice.
→ TV Type - Select the color system (PAL/NTSC/Auto) of your TV.
→ PBC - Select if the playback of the disc starts directly or to enter the disc meny when playing a VCD disc. meny vid uppspelning av en VCD-skiva.
→ Audio - Select a language of the audio (if available).


Operation
→ Subtitle - Select a subtitle language (if available).
→ Disc Menu - Set the language for the menu of the DVD disc (if available).
→ Parental - Set the parental level of the DVD disc (if available).
→ Password - Open the sub menu for the password settings.
Note: The default password is '8806'.
→ Default - Reset the settings to the factory settings.
| Problem | Solution |
| No power | Make sure that the power plug is connected correctly to the wall outlet. |
| No video | Make sure that the video cables are connected correctly. |
| Reset the setups of the DVD Player. | |
| No audio | Make sure that the audio cables are connected correctly. |
| Make sure that the coaxial connected stereo is powered on. | |
| Reset the setups of the DVD Player. | |
| Distorted video | Clean DVD disc from dust/dirt. |
| The playback is fast winding backward/forward. | |
| Unable to play | Place a DVD disc in the Disc Tray. |
| Place the disc with the correct side up. | |
| Clean DVD disc from dust/dirt. | |
| Close the setup of the DVD Player. | |
| Remote Control does not work | Aim the Remote Control towards the front panel of the DVD Player. |
| Use the Remote Control closer to the DVD Player. | |
| Check the battery level of the batteries. |


→ Warning: To reduce the risk of electric shock, do not remove the cover or back. There are no user-serviceable parts inside. Refer servicing to qualified personnel.
→ Warning: To prevent fire or electric shock hazard, do not expose the unit to rain or moisture.
→ Warning: Only use attachments/accessories specified or provided by Andersson.
→ Warning: When the unit is used by children, parents must make sure to let the children understand all contents in the instruction manual.
→ Before you connect the AC adapter: Ensure the voltage rating on the type plate corresponds to your mains voltage (type plate is located on bottom of the unit).
→ Do not expose the adapter or players to water (dripping or splashing) and no objects filled with liquids, such as vases, should be placed on the unit.
→ Keep the portable DVD away from direct sunlight and heat source such as radiators or stoves.
Do not block the ventilation openings. Slots and openings on the unit are provided for ventilation. The openings should never be blocked by placing your portable DVD on a cushion, sofa or other similar surface.
→ Do not place the portable DVD on unstable cart, stand, tripod, bracket or table. The unit may fall, resulting in possible damage or injury.
→ Never place heavy or sharp objects on the LCD panel or frame.
→ Only use the AC adapter included with the portable DVD. Using any other adapter will void your warranty.
→ Excessive sound pressure from earphones or headphones can cause hearing loss.



→ Warning: To reduce the risk of electric shock, do not remove the cover or back. There are no user-serviceable parts inside. Refer servicing to qualified personnel.
→ Warning: To prevent fire or electric shock hazard, do not expose the unit to rain or moisture.
→ Warning: Only use attachments/accessories specified or provided by Andersson.
→ Warning: When the unit is used by children, parents must make sure to let the children understand all contents in the instruction manual.
→ Before you connect the AC adapter: Ensure the voltage rating on the type plate corresponds to your mains voltage (type plate is located on bottom of the unit).
→ Do not expose the adapter or players to water (dripping or splashing) and no objects filled with liquids, such as vases, should be placed on the unit.
→ Keep the portable DVD away from direct sunlight and heat source such as radiators or stoves.
Do not block the ventilation openings. Slots and openings on the unit are provided for ventilation. The openings should never be blocked by placing your portable DVD on a cushion, sofa or other similar surface.
→ Do not place the portable DVD on unstable cart, stand, tripod, bracket or table. The unit may fall, resulting in possible damage or injury.
→ Never place heavy or sharp objects on the LCD panel or frame.
→ Only use the AC adapter included with the portable DVD. Using any other adapter will void your warranty.
→ Excessive sound pressure from earphones or headphones can cause hearing loss.

Class 1 Laser Product:
→ Laser product symbol: Indicates this player is a Class 1 Laser Product. It means it only uses weak laser and no hazardous radiation outside of the unit.
CLASS 1 LASER PRODUCT
→ Warning: This player employs a laser system. Use of controls, adjustments, or the performance of procedures other than those specified herein may result in hazardous radiation exposure.
→ Warning: To prevent direct exposure to laser beam, do not open the enclosure. There is visible laser radiation when lid is open. Never stare directly into the laser beam.
Other
Notes on Copyright:
→ It is forbidden by law to copy, broadcast, show, broadcast via cable, play in public, or rent copyrighted material without permission.
→ This product features the copy protection function developed by Macrovision. Copy protection signals are recorded on some discs. When recording and playing the pictures of these discs picture noise will appear. This product incorporates copyright protection technology that is protected by method claims of certain U.S. Patents and other intellectual property rights owned by Macrovision Corporation and other rights owners. Use of this copyright protection technology must be authorized by Macrovision Corporation, and is intended for home and other limited viewing uses only unless otherwise authorized by Macrovision Corporation. Reverse engineering or disassembly is prohibited.
Sound Enhancement Technology:
→ This product is manufactured under license from Dolby Laboratories. "Dolby" and the double-D symbol are trademarks of Dolby Laboratories. Confidential Unpublished Works. 1992-1997 Dolby Laboratories.Inc. All rights reserved.
Specifications
| Product Name | DVD3880 |
| Power Supply | AC 110-240 V, 50/60 Hz |
| Power Consumption | < 15W |
| Signal System | NTSC/PAL |
| Frequency Response | 50Hz to 60 Hz |
| Signal Ratio | >80 dB |
| Compatible Formats | Files: MP3/JPEG/MPEG-4/DVD. DVD: CD/CD-R/CD-RW/ DVD+R/DVD+RW. |
| Operating Environment | Temperature: 0°C ~ +40°C Humidity: 65 + 20% |
| Storage Environment | Temperature: -20°C ~ +50°C Humidity: 65 + 20% |
| Dimensions | 190 x 43 x 260 millimetres |
| Weight | 0,9 kilograms |
Manufactured under license from Dolby Laboratories. Dolby and the double D symbol are trademarks of Dolby Laboratories.
Brand : Campomatic
Model : DVD3880
Category : DVD player