
KBA14011 - Virtual reality headset Kaiser Baas - Free user manual and instructions
Find the device manual for free KBA14011 Kaiser Baas in PDF.


| Product Type | Electronic Device |
| Brand | Kaiser Baas |
| Model | KBA14011 |
| Product Category | Uncategorized |
| Manual Language | English |
| Manual Pages | 9 |
| Manual File Format | |
| Download Available | Yes |
| Rating | 9.5/10 |
| Dimensions (approx.) | 5.5 x 3.5 x 0.5 inches |
| Weight (approx.) | 0.5 lbs |
| Power Supply | Battery (rechargeable) or USB |
| Connectivity | USB, HDMI |
| Display | LED indicator |
| Memory | SD card slot |
| Primary Functions | Recording, Playback, Data Storage |
| Care and Cleaning | Wipe with dry cloth; avoid liquids |
| Safety Precautions | Keep away from water and extreme temperatures |
| Spare Parts Availability | Contact manufacturer or authorized dealers |
| Repairability | Professional service recommended |
| Warranty | Check with retailer or manufacturer |
| General Information | Device manual available for free download in PDF |
Frequently Asked Questions - KBA14011 Kaiser Baas
User questions about KBA14011 Kaiser Baas
0 question about this device. Answer the ones you know or ask your own.
Ask a new question about this device
Download the instructions for your Virtual reality headset in PDF format for free! Find your manual KBA14011 - Kaiser Baas and take your electronic device back in hand. On this page are published all the documents necessary for the use of your device. KBA14011 by Kaiser Baas.
USER MANUAL KBA14011 Kaiser Baas
Complete User Guide VR-X
VR-X PRO
DISCOVER: ADVENTURE
To view the entire Kaiser Baas
product range visit:
www.kaiserbaas.com
Join the social movement and follow us on


CONTENTS
03 Disclaimers & Warnings
05 VR-X Pro Specifications
07 Getting Started
09 Android Functions
10 IOS Functions
11 Installations
11 FAQ
12 Recommended Apps
13 Support


Disclaimers & Warnings
Before using your KB VR-X Pro Headset, please ensure you read and understand the following product and safety precautions.
Kaiser Baas reserves the right to make changes to this User Guide if required. The information within this manual is subject to change without notice.
- If using a wall charger, ensure that it is a certified product for your region. AC Input: 100-240VAC 50/60Hz. DC Output: 5V 1A. Only use a USB wall charger with suitable approval and certification. Do not charge in conditions outside of the 10°C - 45°C range. If you do not know the voltage and current of your charger, use the included cable to charge from your computer.
- The VR-X Pro Headset is not recommended for use by children under the age of 13. Small parts may represent a potential choking hazard for small children.
- For persons under the age of 18, use of the VR-X Pro Headset should be supervised by a responsible Adult. Prolonged use should be avoided to avoid a negative impact on hand-eye co-ordination and balance.
- ATTENTION: Use only in a safe environment. The VR-X Pro Headset produces an immersive virtual reality experience that can distract you and block your view of your actual surroundings.
- ATTENTION: DO NOT use the VR-X Pro Headset whilst in a moving vehicle as this can increase your susceptibility to motion sickness.
- ATTENTION: NEVER use the VR-X Pro Headset in situations that require attention, such as walking, bicycling or driving.
- ATTENTION: DO NOT handle any sharp or other dangerous objects whilst using the VR-X Pro Headset.
- ATTENTION: DO NOT share your VR-X Pro Headset with other people, in order to avoid the transfer of contagious conditions. To avoid transferring contagious conditions, particularly of the eyes, skin or scalp - the VR-X Pro Headset should be cleaned between each use with an antibacterial wipe and then dried with the provided Lens Cleaning Cloth.
- The VR-X Pro Headset is worn in contact with your skin and scalp. Stop using the VR-X Pro Headset if you notice swelling, itchiness or other irritation. If symptoms persist, contact your physician.
- DO NOT use harsh chemicals or abrasive materials to clean your VR-X Pro Headset.
- ATTENTION: Immediately discontinue use if anyone using the VR-X Pro Headset experiences any of the following symptoms:
- Seizures
- Loss of awareness
- Eye strain
- Eye or muscle twitching
• Involuntary movements
- Visual abnormalities including but not limited to: altered, blurred or double vision
• Dizziness, disorientation or impaired balance
- Impaired hand-eye coordination
- Excessive sweating, increased salivation, nausea or light-headedness
• Discomfort or pain in the head or eyes
• Drowsiness, fatigue or any symptoms attributed to motion sickness.
- As a minimum requirement, take a 10 to 15 minute break every 30 minutes - even if you don't think you need it. Each person is different, take more frequent and longer breaks if you feel discomfort. You should decide what works best for you.

VR-X Specifications

A Phone Bracket
B Headset Cover
Interpupillary(IPD) Adjustment Ring
Face Pads
F Status LED
F Lens
BT Mode Selector
H Micro USB Port
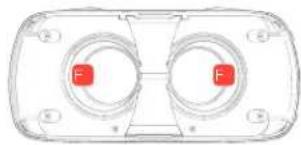
natural_image
Front view of a VR headset with two circular buttons labeled 'F' (no text or symbols beyond the label)
natural_image
Technical line drawing of a curved mechanical component with labeled points H and G (no text or symbols beyond labels)
Getting Started
Compatibility
In order to achieve the best experience, KB recommends that you use a smartphone with a resolution of 1080p or higher. Smartphones with a screen size of 5.5" are the recommended size for the clearest and best results.
Charging
The status LED light on headset will be RED when charging and will be OFF when charged.
-
Connect the USB Charging Cable to the Mini USB port located on the bottom of the headset.
-
Connect the USB Charging Cable to a computer or wall charger.
-
The headset status LED will be RED whilst charging. Once charging is complete, the status LED light will switch OFF.
- A full charge cycle will take approximately 2 hours by 0.5A/1A charger.
A completely flat battery will take approximately 4 hours to fully charge.
WARNING: If using a wall charger, ensure that it is a certified product for your region. AC Input: 100-240VAC 50/60Hz. DC Output: 5VDC 0.5A/1A. Only use a USB charger with suitable approval and certification. If you do not know the output voltage/current of the charger use a computer to charge the battery. Do not charge in conditions outside of the 10°C-45°C range.
Pairing
To pair the Headset with your Smartphone:
If you are using an iOS device, set the BT Mode selector to "A". If you are using an Android device, set the selector to "B".

natural_image
Technical line drawing of a car body component with two inset diagrams labeled A and B showing internal structure (no text or symbols beyond labels)Note: The headset will automatically sleep to save power when it has not been used within 5 minutes of use.
- Hold the OK Button for 3 seconds to power on.
- The Headset Status LED will turn Blue and flash indicating it is ready to pair.
- Open your smartphone Bluetooth settings and search for the VR-X Pro Headset Device.
- Once paired, the Headset Status LED light will stop flashing. The Status LED will light up when pressing any button.
- To turn off the Headset, hold the OK button for 5 seconds and release. The Status led will not light up when clicking a button, indicating it is off.

Android Functions IOS Functions
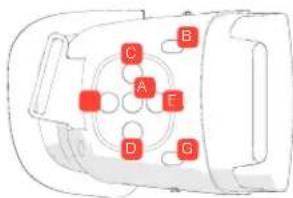
A OK Key-Play/Pause
B Back Key-Return
C Up Key - Volume Up
D Down Key - Volume Down
E Right Key - Next/Forward
F Left Key - Previous/Back
Camera - Camera Shutter (Remove the Headset Cover)
Please note: These functions rely on the App you are using and may/may not work for all applications/systems.
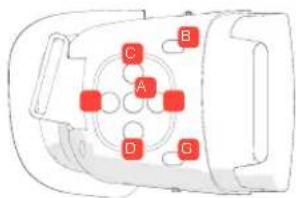
A OK Key-Play/Pause
B Back Key -
Return / Hold for Siri command
C Up Key - Volume Up
D Down Key - Volume Down
Right Key – Next Track
F Left Key – Previous Track
G Camera - Camera Shutter when using Camera App (Remove the Headset Cover)
Please note: These functions rely on the App you are using and may/may not work for all applications/systems.

Installation FAQ Recommended Apps
- Install the headbands on 3 headband points.
- Headbands can be adjusted using the Velcro.
- Open the phone clip and slide the phone in. Ensure the screen is centred and ready to play! Refer to the connection guide to pair the headset.
- Click the phone clip and check the phone is securely in place.
- Use the headset phone cover to securely lock in your smartphone.
- Make sure the lenses are clean for the best results before using
- Adjust the IPD ring to suit your eyes.
- You are ready to enjoy VR content!
I am having trouble connecting to the unit with my smartphone.
Make sure the headset has not connected to any other device before attempting to pair.
The buttons on the headset don't work.
The headset relies on the operating system and application to determine what the buttons will do. If the app doesn't support the buttons or the app works a little differently, the buttons may not work.
The image is blurry after adjusting the focus.
Make sure you remove the plastic film from the lens. The headset is suitable for eyesight within 600° myopia or 200° hyperopia. If you have poor eyesight, we recommend using the headset with contact lenses.
HUNDREDS OF VR APPS AVAILABLE

Google Cardboard

Arlo350 VR

Sbs On Demand Vr

Discovery VE

VRE

Zombre Shooter VR

Star Warn VE

Inland VE
For more apps on iOS please scan the QR code or go to the Apple Store and search for VR


For more apps on: ANDROID please scan the QR code or go to the Google PlayStore and search for VR


Kaiser Baas Support
Having trouble with your headset?
Don't worry, our friendly support team can help. Please visit us at: www.kaiserbaas.com/support or send us an email at: helpdesk@kaiserbaas.com
Regulatory Information
To see the complete list of country compliance and certification, please visit kaiserbaas.com/compliance.

KBP14011-002-A01




- Complete User Guide VR-X
- VR-X PRO
- DISCOVER: ADVENTURE
- CONTENTS
- Disclaimers & Warnings
- Getting Started
- Compatibility
- Charging
- Pairing
- Android Functions IOS Functions
- Installation FAQ Recommended Apps
- I am having trouble connecting to the unit with my smartphone.
- The buttons on the headset don't work.
- The image is blurry after adjusting the focus.
- Kaiser Baas Support
- Regulatory Information
Brand : Kaiser Baas
Model : KBA14011
Category : Virtual reality headset