
CSM-QMTDC-250-4-EX - Indoor blind Crestron - Free user manual and instructions
Find the device manual for free CSM-QMTDC-250-4-EX Crestron in PDF.


| Product Type | Motor Control Module |
| Brand | Crestron |
| Model | CSM-QMTDC-250-4-EX |
| Number of Channels | 4 |
| Nominal Current per Channel | 250 mA |
| Input Voltage | 24 VDC |
| Output Type | Low-voltage DC motor drive |
| Control Interface | Cresnet, RS-232, or Ethernet (via external controller) |
| Dimensions (H x W x D) | 1.7 x 4.2 x 3.5 inches (43 x 107 x 89 mm) |
| Weight | 0.5 lb (0.23 kg) |
| Operating Temperature | 32 to 104°F (0 to 40°C) |
| Humidity Range | 10% to 90% non-condensing |
| Mounting Type | DIN rail or surface mount with included bracket |
| Compatible Motors | DC motors with 2-wire or 4-wire control, up to 250 mA per channel |
| Key Functions | Open/close, stop, position feedback, speed control |
| Status Indication | Green LED per channel (power/activity) |
| Protection Features | Overcurrent, short-circuit, thermal shutdown |
| Software | Compatible with Crestron Toolbox, SIMPL Windows |
| Maintenance | Clean with dry cloth; no user-serviceable parts inside |
| Safety Certifications | UL, CE, FCC Class B |
| Spare Parts and Repairability | Contact Crestron authorized service center; no field-replaceable parts |
Frequently Asked Questions - CSM-QMTDC-250-4-EX Crestron
User questions about CSM-QMTDC-250-4-EX Crestron
0 question about this device. Answer the ones you know or ask your own.
Ask a new question about this device
Download the instructions for your Indoor blind in PDF format for free! Find your manual CSM-QMTDC-250-4-EX - Crestron and take your electronic device back in hand. On this page are published all the documents necessary for the use of your device. CSM-QMTDC-250-4-EX by Crestron.
USER MANUAL CSM-QMTDC-250-4-EX Crestron
Crestron Shading Solutions Roller Shade and Drapery Track Systems
Original Instructions
The U.S. English version of this document is the original instructions.
All other languages are a translation of the original instructions.
Crestron product development software is licensed to Crestron dealers and Crestron Service Providers (CSPs) under a limited nonexclusive, nontransferable Software Development Tools License Agreement. Crestron product operating system software is licensed to Crestron dealers, CSPs, and end-users under a separate End-User License Agreement. Both of these Agreements can be found on the Crestron website at www.crestron.com/legal/software_license_agreement.
The product warranty can be found at www.crestron.com/warranty.
The specific patents that cover Crestron products are listed at www.crestron.com/legal/patents.
Certain Crestron products contain open source software. For specific information, visit www.crestron.com/opensource.
Crestron, the Crestron logo, Cresnet, infiNET EX, QMT, and Quiet Motor Technology are either trademarks or registered trademarks of Crestron Electronics, Inc. in the United States and/or other countries. PANTONE is either a trademark or registered trademark of Pantone, Inc. in the United States and/or other countries. Other trademarks, registered trademarks, and trade names may be used in this document to refer to either the entities claiming the marks and names or their products. Crestron disclaims any proprietary interest in the marks and names of others. Crestron is not responsible for errors in typography or photography.
©2024 Crestron Electronics, Inc.
Contents
Crestron Shading Solutions 6
Roller Shade and Drapery Track Systems...6
Purpose of This Guide...6
Features ..7.
Daylight Control...7.
Security and Privacy...7.
Quiet Shade Motors...7.
Brushless Motor Technology....7.
Easy Installation...7.
Right Size Guarantee...7.
Crestron Shading Solutions Limited Warranty...7
Pattern Print...8
Design Resources...9
Crestron Design Tool Shades (CDTS) Software...9.
Hardware Sample Case...9
Crestron Shade Fabrics 10
Crestron Roller Shades
Crestron Roller Shade Options
Digital QMT Roller Shade Motors
3/4 Nm Motors 16
4 Nm Motors 17
Manual Clutch...17
Roller Shade Mounting Brackets
QMT3 Series Architectural Brackets 18
QMT5 Series Architectural Brackets 19
QMT3 Series Décor Brackets 20
QMT5 Series Décor Brackets 21
Roller Shade Tube Options
Roller Shade Mounting Options.
Inside Mount 24
Outside Mount 25
Pocket Mount 25
Roller Shade Accessories
Blackout Accessories 26
Fascia Options 27
End Cap Options 28
Top and Back Cover 28
Pocket 28
Roller Shade Fabrics and Textiles
Fabric Characteristics 30
Fenestration Data 30
Hem Bar Styles...31.
Fabric Railroading...32
Specialty Roller Shades...34
Battery-Powered Shades...34
Crestron Horizontal Sheers...35
Roman Shades...35
Cable Guided Shades...36
Roller Shade Measuring Guidelines...37
How to Measure Single Roller and In-Line Coupled Roller...Shades...37
How to Measure Angled Coupled Shades...38.
Installation Dimensions...39.
QMT3 Series Architectural Brackets 39
QMT5 Series Architectural Brackets...43.
Creating Custom Pockets for QMT3 Series Architectural Brackets 46
Creating Custom Pockets for QMT5 Series Architectural .Brackets
48
Crestron Drapery Track 50
Determining the Proper Drapery Track System 51
Mounting Options 52
Ceiling Mount 52
Wall Bracket 52
Pocket Mount 53
Arm Types 54
Splicing 55
Track Styles 56
Straight Track 56
Bent Track 56
Curved Track 58
Fabric Types 59
Pinch Pleat 59
Ripplefold 59
Draw Types 60
Measuring Guidelines 62
Dimensions 63
Arm Dimensions 63
Drapery Track Ceiling Mount Configurations 65
Drapery Track Wall Mount Configurations 69
Designing and Specifying 73
Programming 74
Wiring and Power 75
Wiring 75
Power Supplies...75.
Single-Motor Power Supply...75
Ten-Motor Power Supply....76
Ordering Guidelines 77
Installation Guidelines....78
Shipping and Receiving Shades...79
Fabric Care and Maintenance...80
How to Clean Fabric...80.
Roller Shade Fabric Edge Fray 80
Detailing the Cut Edges...80
Minimizing Fraying...80
Glossary ...81
Resources ...82
Crestron Support and Training...82
Programmer and Developer Resources 82
Product Certificates 82
Related Documentation 82
Crestron Shading Solutions
Roller Shade and Drapery Track Systems
Crestron brings the same engineering excellence from its advanced control and automation solut its shading product line, providing precise, quiet one-touch daylight management with a complete motorized window shades and drapery track systems. Shading systems allow the customer to regulate the natural light in a room with a simple touch of a button. Shades are energy ef provide UV protection, glare control, and privacy at a competitive cost.
Purpose of This Guide
This design guide includes the following:
- How to select the correct shade or drape system for the application.
- How to measure for proper installation.
- Detailed views of product design specifications (with dimensions) for the Décor as well as Architectural mounting brackets and drapery track systems in a variety of configurations.
- Overview of the fabric styles.
- How to select fabric based on application.
• How to care for the fabric.
• Information on fabric types and how to use the fabric binder.
• How to select a power supply.
• Overview for integrating shades and drapery track systems with Crestron control systems.
This section provides the following information:
Features
Daylight Control
Protect fine furnishings and floor coverings from harmful UV rays with intelligent shading solutions added energy efficiency, shades can also reduce solar-heat gain in the summer and utilize its the winter.
Security and Privacy
Shades provide privacy and security. Use semi-translucent shade fabrics to allow natural light in space, or blackout shade fabric to completely block views.
Quiet Shade Motors
Crestron automated shades feature low-voltage Digital QMT® shade motors for quiet operation. Crestron shades help manage daylight without audible disruptions to the space. For details, refi Digital QMT Roller Shade Motors on page 16.
Brushless Motor Technology
The Crestron Digital QMT shade motor is a brushless design, which translates into exceptional smoother operation, and ultra-quiet performance.
Easy Installation
Crestron shades are easy to install. Brackets are easily mounted, and the shade components are secured with no special tools required.
Right Size Guarantee
The Crestron Right Size Guarantee (RSG) enables Crestron's authorized resellers in selected cour to confidently measure their customers' space for custom residential shading solutions without the worry of making a mistake. A simple measuring mishap need not result in extra costs to rep incorrectly measured shade. If the requested replacement qualifies for the terms of the Right Guarantee, Crestron will not charge its authorized resellers for the replacement shade. For more information, refer to crestron.com/Legal/ShadesRightSizeGuarantee.
Crestron Shading Solutions Limited Warranty
The limited warranty is applicable to Crestron Shading Solutions mounting hardware, shade fabr Digital QMT shade motors, and QMT shade motors only. For more information, refer to the Crestron
Shading Solutions Limited Warranty.
Pattern Print
Create a custom look by printing custom graphics and logos directly on shade fabric. Custom submitted through the Crestron Design Tool (CDT).
Design Resources
Crestron provides the following tools and resources to assist the user when designing shade at track systems.
Crestron Design Tool Shades (CDTS) Software
The Crestron Design Tool Shades (CDTS) is a web-based tool used for quoting and ordering Crestron roller shades and drapery tracks. The software may be used to easily create proposals for cu and place orders directly to Crestron.
Hardware Sample Case
Crestron offers two hardware sample cases that display all mounting brackets and accessories QMT3 series (CSA-DSK-HDWR-QMT3) and QMT5 series (CSA-DSK-HDWR-QMT5) shade hardware.
The sample cases contain brackets, end caps, fascia, and accessories for each series. Also include variety of color chips that show the various colors that the components are available in.

natural_image
Open cardboard box containing various office supplies (no visible text or labels)Crestron Shade Fabrics
These Shade Fabric resources are available:
• Shade Fabric Book Collection on page 10
• Shade Fabric Sample Decks on page 10
- Crestron Horizontal Sheer Fabric Sample Binder on page 11
Shade Fabric Book Collection

natural_image
Three open-framed images of a modern living room interior, featuring minimalist furniture and wall finishes (no visible text or symbols)The Crestron® Shade Fabric Book Collection (CSF-FABRIC-COLLECTION) elegantly displays the complete line of Crestron shade fabrics. Our Heritage, Designer, and Horizontal Sheers collections are each organized and presented in three separate stylized binders. Neatly store and transport all of the required shade fabric material using the included satchel — perfect for taking on the go to site visits and client consultations.
Shade Fabric Sample Decks

The Crestron® Shade Fabric Sample Decks (CSF-FABRIC-COLLECTION-DECK-01)
compliment the Heritage and Designer fabric books by providing larger, 4.5 by 9-inch fabric samples. The
CSF-FABRIC-COLLECTION-DECK-01 provides six fabric sample decks; three fabric sample decks for the Heritage fabric book and three fabric sample decks for the Designer fabric book.
The Heritage fabric decks are separated into solar, dual-sided, and eco-friendly fabric decks while the Designer fabric decks are separated into sheer, light-filtering, blackout decks.
Crestron Horizontal Sheer Fabric Sample Binder

natural_image
Interior view of a room with a window, curtains, and a desk (no visible text or symbols)The Crestron Horizontal Sheer Fabric Sample Binder
(CSF-FABRIC-COLLECTION-HSHEER) elegantly displays the horizontal sheer fabric collections in a highly stylized, eye-catching binder. The binder contains a variety of colors to suit shading needs and makes it easy to envision a particular roller fabric in a room. Information about the fabric is printed on the back of each card, including its fabric number and fenestration data.
Crestron Roller Shades
Crestron Shading Solutions (CSS) offers a variety of components to assemble a roller shade t any application.
This section provides the following information:
- Crestron Roller Shade Options
• Digital QMT Roller Shade Motors - Roller Shade Mounting Brackets
- Roller Shade Tube Options
- Roller Shade Mounting Options
- Roller Shade Accessories
• Roller Shade Fabrics and Textiles
• Specialty Roller Shades - Roller Shade Measuring Guidelines
• Installation Dimensions
Crestron Roller Shade Options
| CS-SHADE-ROLLER CS-SHADE-ROLLER-BATT CS-SHADE-ROMAN CS-SHADE-ROLLER-HSHEER CS-SHADE-ROLLER-CABLEGUIDED | ||||||||||
| Compatible Bracket: | CSA-ARCH5 | CSA-ARCH3 | CSA-DECORS | CSA-DECORS | CSA-ARCH3 | CSA-DECORS | CSA-DECORS | CSA-ARCH3 | CSA-ARCH5 | CSA-DECORS |
| Mounting Style | ||||||||||
| Single Roll | √ | √ | √ | √ | √ | √ | √ | √ | √ | √ |
| Dual Roll | √ | √ | ||||||||
| Coupled | √ | √ | ||||||||
| Exposed Brackets | √ | √ | √ | |||||||
| Exposed Fabric Roll | √ | √ | √ | |||||||
| Mounting Location | ||||||||||
| Inside Mount | √ | √ | √ | √ | √ | √ | √ | √ | ||
| Outside Mount | √ | √ | √ | √ | √ | √ | √ | √ | √ | √ |
| Crestron Pocket | ||||||||||
| Single Pocket | √ | √ | ||||||||
| Dual Pocket | √ | |||||||||
| Hem bar Options | Open Pocket, Open Pocketwith End Caps, Sealed PocketExposed Blackout | Open Pocket, with End Caps, Sealed Pocket,Exposed Blackout | Open Pocket, Open Pocket with End Caps,Sealed Pocket, Exposed Blackout | N/A | Bottom Slat | |||||
| Fascia | √Square orRound | √Square orRound | N/A | N/A | √Square orRound | N/A | N/A | √With or without fabric insert | √ | |
| Blackout Accessories | √ | √ | √ | |||||||
CS-SHADE-ROLLER CS-SHADE-ROLLER-BATT CS-SHADE-ROMAN CS-SHADE-ROLLER-HSHEER CS-SHADE-ROLLER-CABLEGUIDED
| Compatible Bracket: | CSA-ARCH5 | CSA-ARCH3 | CSA-DECORS | CSA-DECOR3 | CSA-ARCH3 | CSA-DECOR3 | CSA-DECORS | CSA-ARCH3 | CSA-ARCH5 | CSA-DECORS |
| Color/Finish Options | White, Brown, Gray, Black, Almond | White, Brown, Almond, Bronze Brushed Nickel, | Gray, Black, Antique, Chrome | White, Brown, Gray, Black, Almond | White, Brown, Almond, Bronze Brushed Nickel, | Gray, Black, Antique, Chrome | White, Brown, Almond | Gray, Black, Almond | ||
| Shade Motor | ||||||||||
| CSM-GMTDC-163-1-EX/CN | √ | √ | √ | |||||||
| CSM-GMTDC-163-1-5G | √ | √ | ||||||||
| CSM-GMTDC-250-1-EX/CN | √ | √ | √ | √ | √ | |||||
| CSM-GMTDC-275-1-EX/CN | √ | √ | √ | √ | ||||||
| System Width | ||||||||||
| Minimum | 18 in.(458 mm) | 17.5 in.(445 mm) | 18 in.(458 mm) | 17.5 in.(445 mm) | 24 in.(610 mm)29 in.(737 mm) with blackout channels | 22 in.(559 mm) | 18 in.(458 mm) | 17.5 in.(445 mm) | 18 in.(458 mm) | 18 in.(458 mm) |
| Maximum Bracket-to Bracket (B2B) Width | 168 in.(4,268 mm) | 96 in.(2,439 mm) | 133 in.(3,379 mm) | 96 in.(2,439 mm) | 96 in.(2,439 mm) | 96 in.(2,439 mm) | 120 in.(3,048 mm) | 96 in.(2,439 mm) | 120 in.(3,048 mm) | 120 in.(3,048 mm) |
| Mounting Bracket Features | ||||||||||
| Ceiling, Wall, or Jamb Mount | √ | √ | √ | √ | √ | √ | √ | √ | √ | √ |
CS-SHADE-ROLLER CS-SHADE-ROLLER-BATT CS-SHADE-ROMAN CS-SHADE-ROLLER-HSHEER CS-SHADE-ROLLER-CABLEGUIDED
| Compatible Bracket: | CSA-ARCH5 | CSA-ARCH3 | CSA-DECOR5 | CSA-DECOR3 | CSA-ARCH3 | CSA-DECOR3 | CSA-DECOR5 | CSA-ARCH3 | CSA-ARCH5 | CSA-DECOR5 |
| 3-Axis Adjustment | √ | √ | √ | √ | ||||||
| 2-Axis Adjustment | √ | √ | √ | √ | √ | √ | ||||
| Power | ||||||||||
| 24VDC | √ | √ | √ | √ | √ | √ | √ | √ | ||
| Battery | √ | √ | ||||||||
| Communications | ||||||||||
| Cresnet® Wired | √ | √ | √ | √ | √ | √ | √ | √ | ||
| infiNET EX® Wireless | √ | √ | √ | √ | √ | √ | √ | √ | ||
| SG Wireless | √ | √ | ||||||||
| Non-Motorized | √ | √ | √ | √ | √ | |||||
* Bronze antique, brushed nickel, and chrome not available for non-motorized shades
Digital QMT Roller Shade Motors
Crestron offers a variety of Digital QMT ® shade motors providing quiet, yet robust operation f Crestron roller shades. All Crestron QMT shade motors are available using Crestron's reliable Cr wired communication and SG and infiNET EX wireless communication.
Digital QMT shade motor features:
- Long-life brushless motor featuring Digital Quiet Motor Technology™ for nearly inaudible operation
• Real-time activity monitoring and status feedback - Local pushbutton interface for testing shades and setting shade limits
- Local diagnostic LEDs to indicate shade status
- Smooth starts and stops with programmable stop points
- Reactive features that detect and react to obstructions in the shade path to avoid motc
- Limited Lifetime Warranty
3/4 Nm Motors
CSM-QMTDC-163 Series Shade Motors
- 3/4 Nm torque.
• Used with the 1.625 in. (42 mm) shade tube.
• Available with built-in infiNET EX (-EX models), SG models), or Cresnet (-CN models) communications.
• Available models:
CSM-QMTDC-163-1-CN
CSM-QMTDC-163-1-EX
CSMI-QMTDC-163-1-EX
CSM-QMTDC-163-1-SG
CSMI-QMTDC-163-1-SG

natural_image
Two cylindrical mechanical components with black and metallic bodies, one labeled (-S) and the other (no visible text or symbols on the objects themselves)4 Nm Motors
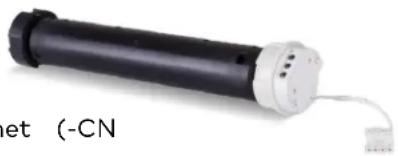
CSM-QMTDC-250-4 Series Shade Motors
• 4 Nm torque.
• Used with the 2.50 in. (64 mm) shade tube.
• Available with built-in infiNET EX (-EX models) or Cresnet (-CN models) communications.
• Available models:
CSM-QMTDC-250-4-CN
CSM-QMTDC-250-4-EX
CSMI-QMTDC-250-4-EX
natural_image
Black cylindrical device with white top and cable, labeled 'et (-CN)' (no other text or symbols visible)CSM-QMTDC-275 Series Shade Motors
- 4 Nm torque.
• Used with the 2.75 in. (70 mm) shade tube.
• Available with built-in infiNET EX (-EX models) or Cresnet (-CN models) communications.
• Available models:
CSM-QMTDC-275-4-CN
CSM-QMTDC-275-4-EX
CSMI-QMTDC-275-4-EX

natural_image
Black cylindrical device with attached wires and a label '-CN' (no visible text or symbols on the device itself)Manual Clutch
Keep the same look and feel on all your windows even if they are not all motorized. Many roller shade solutions are available with manual clutch operation using a bead-chain to raise a the shade fabric. Manually operated shades are a cost-effective alternative to motorized shades.
A manual-to-motorized upgrade kit is available which allows any single-roll manual clutch shade easily converted to motorized operation.
Roller Shade Mounting Brackets
Crestron offers variety of Architectural and Décor roller shade mounting brackets to fit virtually mounting scenarios. The mounting brackets can be mounted on a wall, on a ceiling, in a poc window jamb.

natural_image
Interior corner of a room with two large windows and a tree visible in the corner (no text or symbols)QMT3 Series Architectural Brackets
QMT3 Series Architectural hardware from Crestron is a small mounting system. The hardware of solutions for both single and dual roll shade applications.
CSA-ARCH3-BRKT
• The CSA-ARCH3-BRKT supports a single Crestron roller shade.
- Motorized shade operation is provided by the Crestron CSM-QMTDC-163-1 Digital QMT motor.
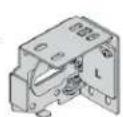

- Brackets are left-right and up-down adjustable to ensure mounting precision and to shorten installation time by allowing the installer to make changes without removing and reinstall entire bracket.
- Compatible with CS-SHADE-ROLLER, CS-SHADE-ROLLER-BATT, and CS-SHADE-ROLLER-HSHEER shade systems
CSA-ARCH3-BRKT-DUAL
- The CSA-ARCH3-BRKT-DUAL supports two Crestron roller shades in compact space.


- Motorized shade operation is provided by the Crestron CSM-QMTDC-163-1 Series Digital QMT motor.
- Brackets are left-right and up-down adjustable to ensure mounting precision and to shorten installation time by allowing the installer to make changes without removing and reinstall entire bracket.
- Compatible with CS-SHADE-ROLLER shade systems
QMT5 Series Architectural Brackets
QMT5 Series Architectural Shade Hardware from Crestron is a mounting system that allows Cr shades to be mounted on a wall or ceiling, or in a pocket or window jamb. The hardware for both single roll and dual roll shade applications.
CSA-ARCH5-BRKT
• The CSA-ARCH5-BRKT supports a single Crestron roller shade.
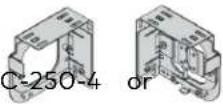
- Motorized shade operation is provided by the Crestron CSM-QMTDC-250-4 or CSM-QMTDC-275-4 Series Digital QMT motor.
- Brackets are left-right and up-down adjustable to ensure mounting precision and to shorten installation time by allowing the installer to make changes without removing and reinstall entire bracket.
- Compatible with CS-SHADE-ROLLER and CS-SHADE-ROLLER-HSHEER shade systems
CSA-ARCH5-BRKT-DUAL
• The CSA-ARCH5-BRKT-DUAL supports two Crestron roller shades.
- Motorized shade operation is provided by the Crestron CSM-QMTDC-250-4 or CSM-QMTDC-275-4 Series Digital QMT motor.
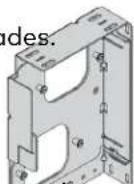

- Brackets are left-right and up-down adjustable to ensure mounting precision and to shorten installation time by allowing the installer to make changes without removing and reinstalling the entire bracket.
- Compatible with CS-SHADE-ROLLER shade systems
CSA-ARCH5-BRKT-CPLR-ANG
- The CSA-ARCH5-BRKT-CPLR-ANG supports a single Crestron roller shade.

- Couple up to six roller shades (depends on shade width and selection).
- Conforms to virtually any angled wall or window configuration.
- Compatible with CS-SHADE-ROLLER shade systems
CSA-ARCH5-BRKT-CPLR
- The CSA-ARCH5-BRKT-CPLR supports a single Crestron roller shade.
- Couple up to six roller shades (depends on shade width and fabric selection).
- Compatible with CS-SHADE-ROLLER shade systems

natural_image
3D mechanical part diagram with no visible text or symbolsCSA-ARCH5-BRKT-DUAL-CPLR
• The CSA-ARCH5-BRKT-DUAL-CPLR supports dual Crestron roller shades.
- Couple two groups of up to six roller shades (depends on shade width and fabric selection).
- Compatible with CS-SHADE-ROLLER shade systems

QMT3 Series Décor hardware from Crestron is a small mounting system that allows a Crestro be mounted on a wall, ceiling, or window jamb where the entire shade will be exposed, giving contemporary look.
CSA-DECOR3-BRKT
- The CSA-DECOR3-BRKT supports a single Crestron roller shade.
- Motorized shade operation is provided by the Crestron CSM-QMTDC-163-1 Series Digital QMT motor.
- Brackets are left-right and up-down adjustable to ensure mounting precision and to shorten installation time by allowing the installer to make changes without removing and reinstalling the entire bracket.
• Compatible with CS-SHADE-ROLLER and CS-SHADE-ROLLER-BATT shade systems


natural_image
3D rendering of a mechanical bracket component with mounting holes and internal cavity (no text or symbols)QMT5 Series Décor Brackets
QMT5 Series Décor hardware from Crestron is a stylish mounting system that allows a Crestr to be mounted on a wall, ceiling, or window jamb where the entire shade will be exposed, space a contemporary look.

natural_image
Interior corner view of a room with two large windows under a white roller-up, one showing a blue sky and the other a green tree (no text or symbols)CSA-DECOR5-BRKT
• The CSA-DECOR5-BRKT supports a single Crestron roller shade.
- Motorized shade operation is provided by the Crestron CSM-QMTDC-250-4 Series Digital QMT motor.
- Brackets are left-right and up-down adjustable to ensure mounting precision and to shorten installation time by allowing the installer to make changes without removing and reinstalling the entire bracket.
- Compatible with CS-SHADE-ROLLER, CS-SHADE-ROMAN, and CS-SHADE-ROLLER-CABLEGUIDED shade systems


CSA-DECOR5-BRKT-CPLR
- The CSA-DECOR5-BRKT-CPLR supports a single Crestron roller shade.
- Couple up to six roller shades (depends on shade width and fabric selection).
- Compatible with CS-SHADE-ROLLER shade systems

Roller Shade Tube Options
Crestron offers several shade tube options to accommodate a wide array of roller shade width shade fabric weights. When multiple shade tube sizes are used in the area, all roller shades upgraded to the larger tube size to keep a similar aesthetic across the shades.
- The QMT3 Series Architectural and Décor hardware utilize a 1.625 in. shade tube to suppo shade fabric.
- The QMT5 Series Architectural and Décor hardware utilize a 2.50 in. or 2.75 in. shade tube support the shade fabric. The 2.75 in. shade tube allows heavier fabric to be used and r amount of deflection in the system.
- The QMT5 Series Architectural and QMT5 Series Décor hardware when used with couplers the 2.50 in. shade tube.
- Roman shades utilize a 2.50 in. shade tube to support the shade fabric.
Roller Shade Mounting Options
There are three different mounting options available for each mounting bracket.
Inside Mount
The mounting brackets are installed within the window frame. They can be mounted to the job header.
Shade accessories such as fascia, top/back cover, and end caps may be used to conceal the hardware.

natural_image
Exterior view of a modern building corner with a large window and green tree visible through the window (no text or symbols)Outside Mount
The mounting brackets are installed outside of the window frame. They can be mounted to the ceiling.
Shade accessories such as fascia, top/back cover, and end caps may be used to conceal the hardware.

natural_image
Exterior view of a modern building corner with a large window and sheer curtain (no text or symbols visible)Pocket Mount
The mounting brackets can be installed inside of a pocket to conceal the entire shade assembly, prefabricated pocket may be purchased from Crestron, or a pocket may be custom built to form mounting brackets. The prefabricated pocket can be installed using either the inside mount or mount method.
NOTE: Battery-powered shades (CS-SHADE-ROLLER-BATT) are not compatible with pocket moun installations.

natural_image
Exterior view of a modern building corner with a large open window and green tree visible through the window (no text or symbols)Roller Shade Accessories
A variety of accessories are available to make sure that the shades are perfectly installed.
NOTE: Accessories are not compatible with all shade systems and all configurations. For details, refer to CDT and Crestron Roller Shade Options on page 13.
Blackout Accessories
Crestron offers blackout accessories to eliminate light leaking around the edges of fabrics. Black accessories are typically used with Architectural style hardware and can be ordered with each independently.
Side Channel

The Side Channel (CSA-ARCH-BO-CHANNEL-U) is used on the sides of shades for blackor applications. The Side Channel comes in 2-1/2 in. (64 mm) and 1-1/2 in. (38 mm) widths. The mounting surface of the Side Channel has a grooved line for easy drilling. The opposite the Side Channel is smooth.
H-Channel
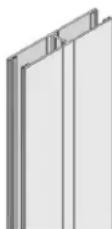
The H-channel (CSA-ARCH-BO-CHANNEL-H) is used between two shades for blackout applications. The H-channel is 5 in. (127 mm) wide. The mounting surface of the H-channel has grooved lines for easy drilling and for reducing the need for a center punch. The side of the H-channel is smooth. Plugs are available to conceal holes in the channel. 3/8 in. drill bit for the plugs.
Sill Angle
natural_image
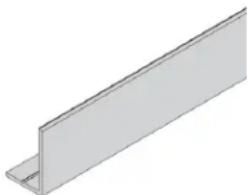
3D rendering of a metallic I-beam with a flat top and flange (no text or symbols)The sill angle (CSA-ARCH-BO-SILL) is used for blackout applications by prevent light leaks along the bottom of the shade. The sill angle is used in conjunction with a blackout hem bar. The side of the sill angle contains a grooved line for drilling and for reducing the need for a center punch.
Liner (Wool Pile)
Liner comes in two sizes and is available in black and white. Small liner is installed in Side and large liner is optionally installed in pocket. Liner is used to enhance the light block chart these accessories and is preinstalled when side channel or pockets are ordered with a shade.
Channel Cap

H-channels and Side Channels come with caps (CSA-ARCH-BO-CHANNEL-CAP) to provide a clean finish on the cut ends. The channel caps can fit the 2-1/2 in. or 1-1/2 in. (38 mm) channel widths. The channel caps press into place. Four ch caps come with the H-channel; two channel caps come with the Side Channel.
Fascia Options
The fascia is used to conceal the front and bottom of the shade bracket. The lip on the b fascia also helps conceal the shade roller tube. The fascia snaps onto the tabs of the mount
The fascia is available square or round and is designed to fit single brackets (CSA-ARCH5-BRK dual brackets (CSA-ARCH5-BRKT-DUAL). A smaller square fascia is designed for manual shades (CSA-ARCH5-BRKT-MAN).
Square Fascia

natural_image
3D rendering of a metal structural bracket (no text or symbols visible)For battery-operated shades, the battery pack is integrated into the fascia. The integrated battery provides access to the batteries for fast and easy installation and replacement.
Round Fascia for Battery-Powered Shades

natural_image
Technical illustration of a metal bracket with cutouts and mounting holes (no text or symbols)End Cap Options
Decorative end caps help visible shade brackets blend into the room.
Decor End Caps

natural_image
Two 3D mechanical bracket components with no visible text or symbolsDecorative end caps are placed over the mounting brackets to conceal mou hardware. End caps are provided in a variety of colors.
Architectural End Caps

natural_image
Two 3D-rendered panels: one with labeled 'TOP' and 'LEFT', the other plain (no text or symbols)Architectural end caps conceal the end of the bracket when the sides are exposed. The end caps can be used with square or curved fascia and the back cover. The end caps are available square or round and are designed single brackets (CSA-ARCH5-BRKT) and dual brackets (CSA-ARCH5-BRKT-DUAL).
Top and Back Cover
natural_image
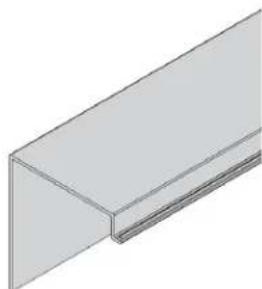
3D rendering of a rectangular metal profile with a sloped edge (no text or symbols)The top and back cover allow the Architectural shade hardware to be conc when the shade is viewed from above and when the shade can be viewed outside the window. Top and back covers are available for single Architectur brackets (CSA-ARCH3-TBC and CSA-ARCH5-TBC) and dual Architectural brackets (CSA-ARCH5-TBC-DUAL).
natural_image
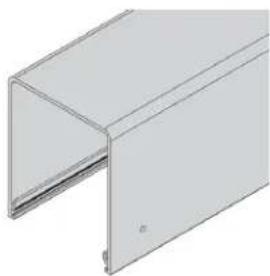
3D rendering of a U-shaped metal bracket or panel (no text or symbols visible)Prefabricated pockets reduce the need for custom framing for the shade and allow an easy installation. A single pocket (CSA-ARCH5-POCKET and CSA-ARCH3-POCKET) and a dual pocket (CSA-ARCH3-POCKET-DUAL) are available for installations where the pocket cannot be built into the window frame (retrofit applications). The inside of the pocket contains grooved lines easy drilling and for reducing the need for a center punch.
Pockets are available with a tile lip that supports the edge of a ceiling tile.
Flap

natural_image
3D rendering of a flat rectangular metal profile with no text or symbolsThe flap (CSA-ARCH5-FLAP) is an accessory that attaches to the inside of the pocket from the room or window side of the pocket. It blocks the opening bottom of the pocket so that the shade and hardware cannot be seen. T can also attach to a hanger.
Hanger

natural_image
3D rendering of a rectangular panel with a small protrusion and mounting bracket (no text or symbols)Hangers are designed to mount to the edge of a custom fabricated pocket a pocket flap. The hanger should be mounted inside the pocket. The hanger tile lip is used where there is a drop ceiling. The side of the hanger cont grooved line for easy drilling and for reducing the need for a center punch
Hanger with Tile Lip
The pocket flap hanger with tile lip is designed to mount to the edge of a custom fabricat hold a pocket flap. It also has a lip to support ceiling tiles. The side of the hanger contain for easy drilling and for reducing the need for a center punch.
Pocket End Cap
Metal pocket end caps are available for use with pockets and provide a finished look in an application or provide a complete shade enclosure in a recessed application.
Roller Shade Fabrics and Textiles
Crestron offers a variety of fabric colors with an array of fabric properties that suit every s budget. Crestron offers shade fabrics that are certified environmentally safe, recyclable and eco-friendly, mold- and bacteria-resistant, PVC-free, lead-free, and fire-retardant.
Fabric Characteristics
Crestron offers fabric in transparent, translucent, and blackout.
Transparent

natural_image
View through a window with a green field and distant hills (no text or symbols visible)Translucent

natural_image
Window with a blank grid and a small green window showing trees (no text or symbols visible)Blackout

natural_image
Window with a beige roller blind and a small white fence visible through the window (no text or symbols)Transparent fabrics transmit Translucent fabrics transmit light so that objects or imaglused light and enhance are seen through the weave privacy. The exterior view is the fabric. These have an only partially visible as openness factor between 3-silhouettes and shadows. These fabrics typically have an 10%. Benefits:
Blackout fabrics provide advanced light blockage and privacy. Use additional accessories to create a complete blackout solution and prevent light leaks along the window jambs and sill.
Benefits:
- Solar protection
• Natural light and glare control -
Reduced solar heat gain
-
Solar protection
- Privacy
• Enhanced natural light filtration - Reduced solar heat gain
Benefits:
• Ultimate light and glare control
- Complete privacy
• Dramatic reduction in solar heat gain
Fenestration Data
Fenestration data is used by designers to assist them when choosing a fabric. Fenestration data includes the following:
- Solar Transmittance (Ts): The ratio of total solar energy that contacts the shade fabric allowed through the fabric and into the space.
- Solar Reflectance (Rs): The ratio of total solar energy that contacts the shade fabric an reflected away from the space.
- Solar Absorbance (As): The ratio of total solar energy that contacts the shade fabric an absorbed into the shade fabric.
NOTE: The sum of Ts, Rs, and As will always be 100.
- Visible Transmittance (Tv): The ratio of total solar energy that is allowed to pass through shade fabric. The value is the amount of glare that is seen through the shade fabric. I a Tv value of 2% indicates that 98% of glare is reduced.
- Openness Factor (OF): The OF is the percentage of open space in the fabric. The percent determines how much light, heat, and glare the fabric allows to enter. A high OF facto more light than a lower OF factor. UV blocking shades do not provide privacy at night.
Hem Bar Styles
The hem bar on a Crestron roller shade provides weight at the bottom of the fabric so that hangs straight and travels up and down smoothly on the tube. Hem bars are available in the styles: Open Pocket, Sealed Pocket, and Exposed Blackout.
Open Pocket Hem Bar
The open pocket hem bar is an appropriate choice for when the designer does not want to add any additional detail to the bottom of the drawn shade. The pocket has an opening on each end of LILLER providing a simple finish to the shade. The hem bar is taped to fabric inside of the pocket to prevent the hem bar from moving.

Optional end caps may be ordered for an elegant finish to an open pocket.

Sealed Pocket Hem Bar
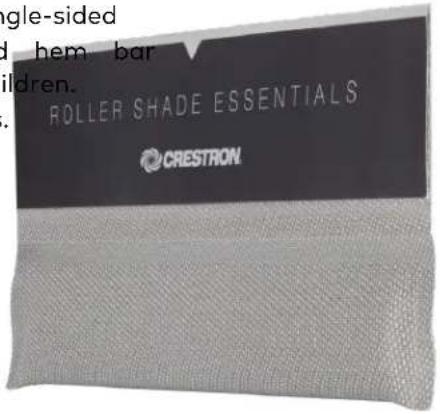
The sealed pocket hem bar is intended for use with single-sided seamable fabrics. The sealed pockets enclose the weighted hem bar making them ideal for schools and homes with small children.
However, the pinched end is less desirable with designers.
Exposed Blackout Hem Bar
The exposed blackout hem bar is intended for use in blackout applications. The hem bar blocks light from leaking in through the bottom of the roller shade fabric. The exposed blackout available in almond, black, brown, gray, and white.

Fabric Railroading
When the desired roller shade width is larger than the shade fabric width, railroading the shade an option to meet the desired shade width. Railroading the shade fabric rotates the shade for any associated pattern in the shade fabric, 90 degrees.

natural_image
Illustration of a scroll with directional arrows indicating flow or movement (no text or symbols)
natural_image
Illustration of a rolled-up wooden panel with vertical arrows indicating direction (no text or symbols)Seams
If the shade fabric is railroaded and the window height is larger than the width of the fab pieces of fabric must be connected which creates a seam in the shade fabric.
When placing multiple roller shades in the same room, if one shade needs to be railroaded v all other shades should be railroaded. This creates a consistent view amongst the shades in t Seams can be specified for non-railroaded shades in the same room at no extra cost.
When possible, align seams with window hardware or a mullion.
Vertical seams are not allowed on roller shades because they create an uneven roll on the telescoping or tracking. Telescoping occurs when the fabric shifts excessively to the left or right roller tube as the shade is being rolled up.
Batten
When shade fabrics are very tall or very wide, the shade fabric may curl along the edges. stability for the shade or to prevent edge curling, battens may be sealed into the fabric.
When possible, align battens with window hardware or a mullion.
Battens are typically spaced evenly throughout the length of the shade fabric. Custom batten requests can be made to position battens to suit the window architecture. When using side c large shades, battens can be used to minimize fabric edge curling.
Specialty Roller Shades
Crestron also offers Battery Powered roller shades, Horizontal sheers, Roman Shade kits and Guided roller shades.
Battery-Powered Shades
Crestron battery-powered shades (CS-SHADE-ROLLER-BATT) add beauty, convenience, and comfort to any interior space. Install battery-powered shades in locations where power and control wires cannot be run. A battery pack powers the shade motor while the SG radio provides control and status of the shade.
- Easy installation in post-construction or retrofit applications
• 3 year (average) battery life
• Install shades where power and control cabling cannot be run - Designed for use with Crestron® QMT®3 Series Architectural or QMT3 Series Décor shade hardware
- For roller shades 22 to 96 in. (559 to 2,439 mm) wide using Décor shade hardware
- For roller shades 24 to 96 in. (610 to 2,439 mm) wide using Architectural shade hardware
- Fully integrated antenna— no external antenna or dongle required
• Control system integration using SG wireless communications - Powered using 8 D cell batteries in an external battery pack


Crestron Horizontal Sheers
The Crestron Horizontal Sheers (CS-SHADE-ROLLER-HSHEER) add beauty, convenience, and comfort to interior space. Horizontal fabric vanes between two layers of sheer, knitted The horizontal sheer can be raised f unobstructed view and lowered to so the view. When the horizontal sheer lowered, the vanes can be tilted to the natural light levels or to provide


natural_image
Interior view of a modern bedroom with bed, coffee table, and large window (no visible text or symbols)- Horizontal sheers are available for windows up to 8 ft x 8 ft (2.4 m x 2.4 m).
- Vane fabrics are available in 36 decorative colors and patterns with a choice of 25 light and 11 room darkening options.
- The large 2.5 in. (64 mm) vanes provide \~1.25 in. (\~32 mm) view-through when tilted open.
- Universal mounting brackets allow inside mount within a window jamb or outside mount 1 window casing, wall, or ceiling surface.
• Decorative curved front fascia with matching fabric insert. Available with top and back cc
Roman Shades

natural_image
Interior view of a modern living room with large windows and a sofa, no visible text or symbolsRoman shades use a variety of fabric folds, such as flat, cascade, relaxed, or pleated, to provide an elegant look to t space.
Roman shades give windows the softness and style of draperies, but with less bulk.
Similar to other Crestron roller shades, roman shades can be used as aesthetically as the focal point of the room or functionally to block out sunlight.
Crestron offers Roman Shade kits that use QMT5 Series Déc shade hardware (CSS-DECOR5). Provide the Roman Shade kit to a local workroom to create a shade that is powered by Crestron and created by you.
Cable Guided Shades
The Crestron Cable Guided Shades
(CS-SHADE-ROLLER-CABLEGUIDED) use Crestron QMT5 Series
Architectural and Décor shade hardware (CSS-ARCH5 and CSS-DECOR5) mounting hardware and a set of cables to guide roller shades on an angle.
As part of a complete engineered shading solution, it provides cable-guided tracking solution to prevent the shade fabric from swaying and allows for installation on angled windows.

It is compatible with inside, outside, and pocket mounted roller shades up to 10 ft (3 m) wide or 10 ft (3 m) long when using the 2.50 in. tube, and 13 ft (4 m) or 10 ft (3 m) long when using the 2.75 in. tube. Cable guided shade assemblies accommodate windows pitched inwardly or outwardly at up to 20 degrees from vertical.
The cable-guided option employs a pair of tensioned steel cables running vertically at either side shade fabric. A specially weighted hem bar with slotted end caps glides up and down the cable shade is raised and lowered. Small decorative anchors attach the cables at the bottom to the windowsill, window jamb, or floor. Precision brackets or blocks mount at the top to the windowsill window jamb, or ceiling. Adjustable cable fittings allow for proper tensioning of each cable to smooth travel and minimal sag.
NOTE: The shade fabric does not retract fully when raised. At its upper limit, the hembar and some amount of fabric remains visible. Not compatible with blackout options. A minimum 1-1/4 in. (32 mm) light gap is expected.
Roller Shade Measuring Guidelines
Take the measurements for roller shades after the window is fully finished, this allows window mounting pocket, window sill, window hardware, and other obstructions to be taken into consid Log shade measurements as width by height.
How to Measure Single Roller and In-Line Coupled F Shades
Use the Shade Measuring Worksheet - Single Roller and In-Line Coupled Shades (PDF) (Doc. 7925) for
additional information when measuring shades, to log the measurements, and to submit the measurements.
When measuring for single roller or in-line coupled shade, note the following:
- Inspect the window and the area around the window for window hardware (knobs, sills, may prevent the smooth travel of the shade.
- Verify that the window frame, window sill, and the window header are level, and then i designations.
- Measure the location where the brackets will be mounted.
- Measure the shade height and width in three different locations. Log the smallest value.
- For outside mount shades, measure the bracket-to-bracket (B2B) width (1) or the fabric and the shade height (2).
- For inside mount shades, measure the bracket-to-bracket (B2B) width (4), shade height (6), depth (5)
- When placing an order for an inside mount shade in CDT, the user will be asked if C adjust the bracket-to-bracket measurement. If Yes is selected, an 1/8 in. deduction will be on all roller shades that were specified as inside mount.

How to Measure Angled Coupled Shades
Use the Shading Solutions Measuring Worksheet - Angle Coupled Shades (PDF) (Doc. 7925) for additional information when measuring shades, to log the measurements, and to submit the measurements.
When measuring for an angled coupled shade, note the following:
- Check that all window frames are level and plumb with each other.
- Check that the surface is flat before measuring angles.
- Inspect the window and the area around the window for window hardware (knobs, sills, may prevent the smooth travel of the shade.
• Measure the location where the brackets will be mounted.
• Measure the shade height and width in three different locations. Log the smallest value.
- If the brackets are not installed, measure the shade width (B-1, B-2, B-3, etc), the inside (θ-1, θ-2, etc.), and the shade height (A).
- If the brackets are installed, measure the bracket-to-bracket width (B2B-1, B2B-2, B2B-3, e) Measure to the outside of the brackets.
- Angled coupled shades are not configurable with any top treatments (fascia, pocket, etc.). custom-built pocket is suggested to have a (5 in. depth x 6 in. height) minimum inside dir for the custom pocket.
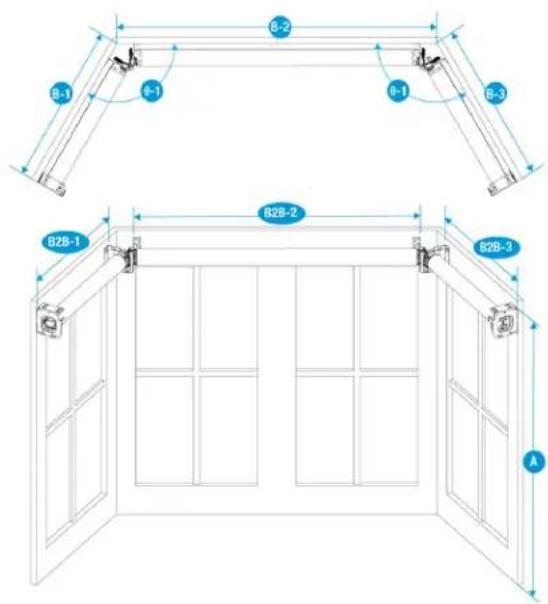
A Shade Height
8 Shade Width
Inside Angle
B2B Bracket to Bracket
Installation Dimensions
QMT3 Series Architectural Brackets
CSA-ARCH3-BRKT
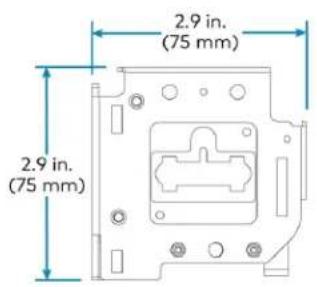


CSA-ARCH3-BRKT in a Blackout Configuration

CSA-ARCH3-BRKT Bracket for CS-SHADE-ROLLER-BATT

CSA-ARCH3-BRKT-DUAL

CSA-ARCH3-BRKT-DUAL with Square Fascia and Top and Back Cover

CSA-ARCH3-BRKT-DUAL with Curved Fascia and Top and Back Cover
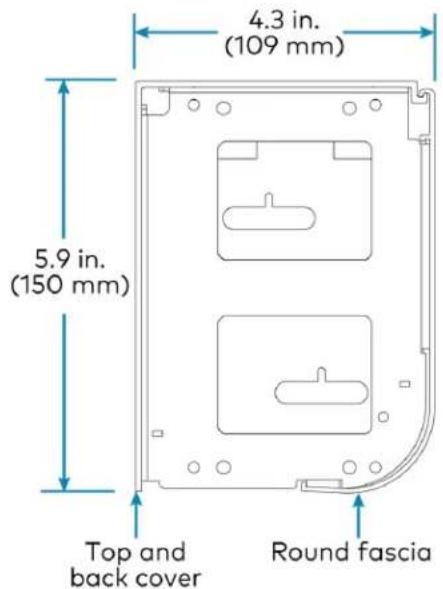
QMT3 Series Dual Architectural Pocket with Flap, Hanger, and Tile Lip

CSA-ARCH3-BRKT-DUAL in a Blackout Configuration

QMT5 Series Architectural Brackets
CSA-ARCH5-BRKT
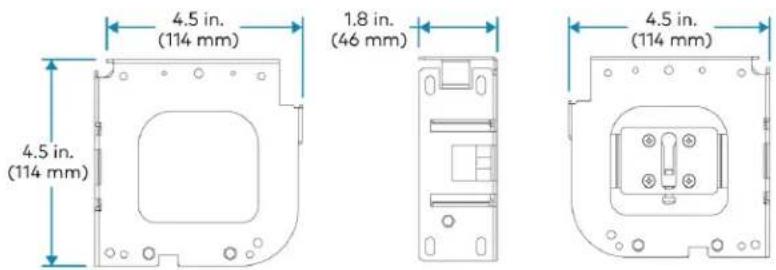
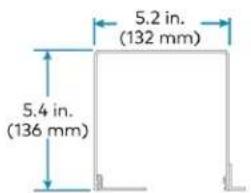
QMT5 Series Architectural Pocket with Flap, Hanger, and Tile Lip
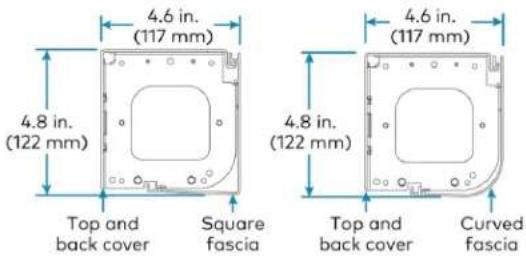
CSA-ARCH5-BRKT with Square and Curved Fascia and Top and Back Cover
CSA-ARCH5-BRKT in a Blackout Configuration

CSA-ARCH5-BRKT-DUAL
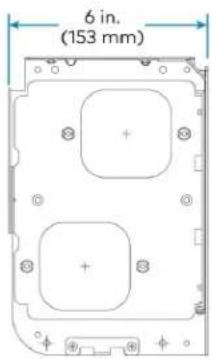

CSA-ARCH5-BRKT-DUAL with Square and Curved Fascia and
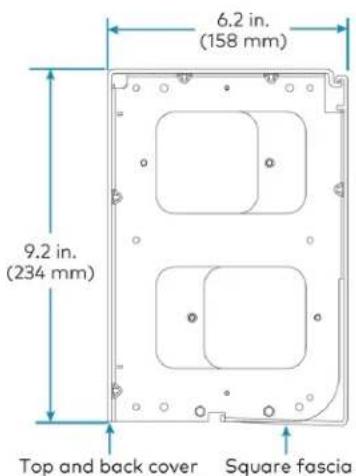
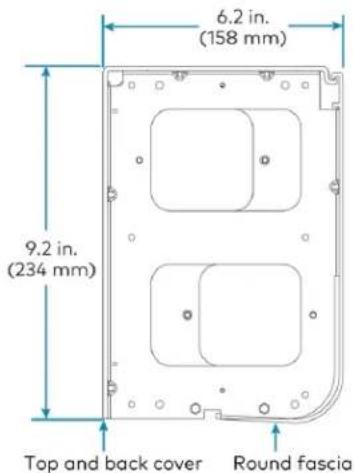
CSA-ARCH5-BRKT-CPLR-ANG


CSA-ARCH5-BRKT-CPLR

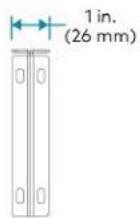
CSA-ARCH5-BRKT-DUAL-CPLR
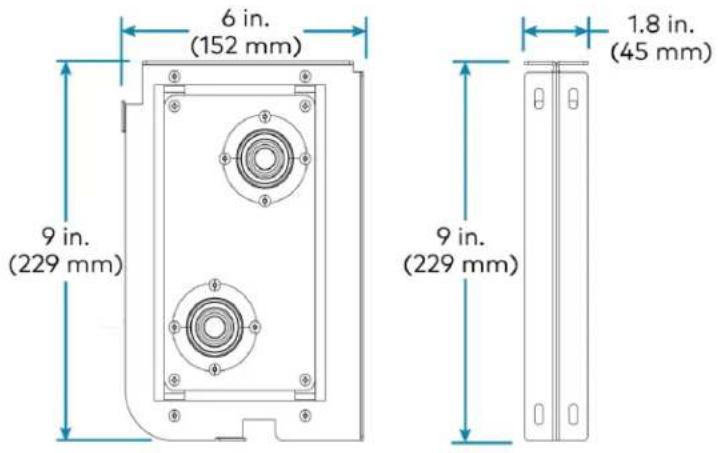
QMT5 Series Décor Brackets
CSA-DECOR5-BRKT

CSA-DECOR5-BRKT-CPLR

Creating Custom Pockets for QMT3 Series Architectur Brackets
CSA-ARCH3-BRKT in a Custom Pocket

CSA-ARCH3-BRKT-DUAL in a Custom Pocket

Creating Custom Pockets for QMT5 Series Architectur Brackets
CSA-ARCH5-BRKT in a Custom Pocket
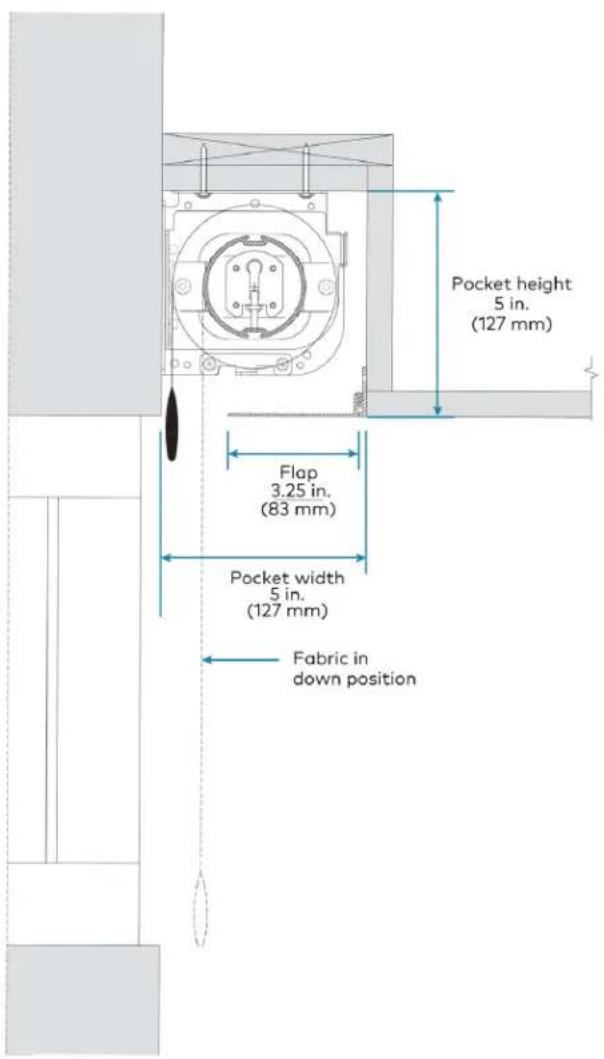
CSA-ARCH5-BRKT-DUAL in a Custom Pocket

Crestron Drapery Track
Crestron Shading Solutions (CSS) offers a variety of components to assemble a drapery track any application.
This section provides the following information:
• Determining the Proper Drapery Track System
- Mounting Options
- Arm Types
- Splicing
- Track Styles
- Fabric Types
- Draw Types
• Measuring Guidelines
- Dimensions
Determining the Proper Drapery Track System
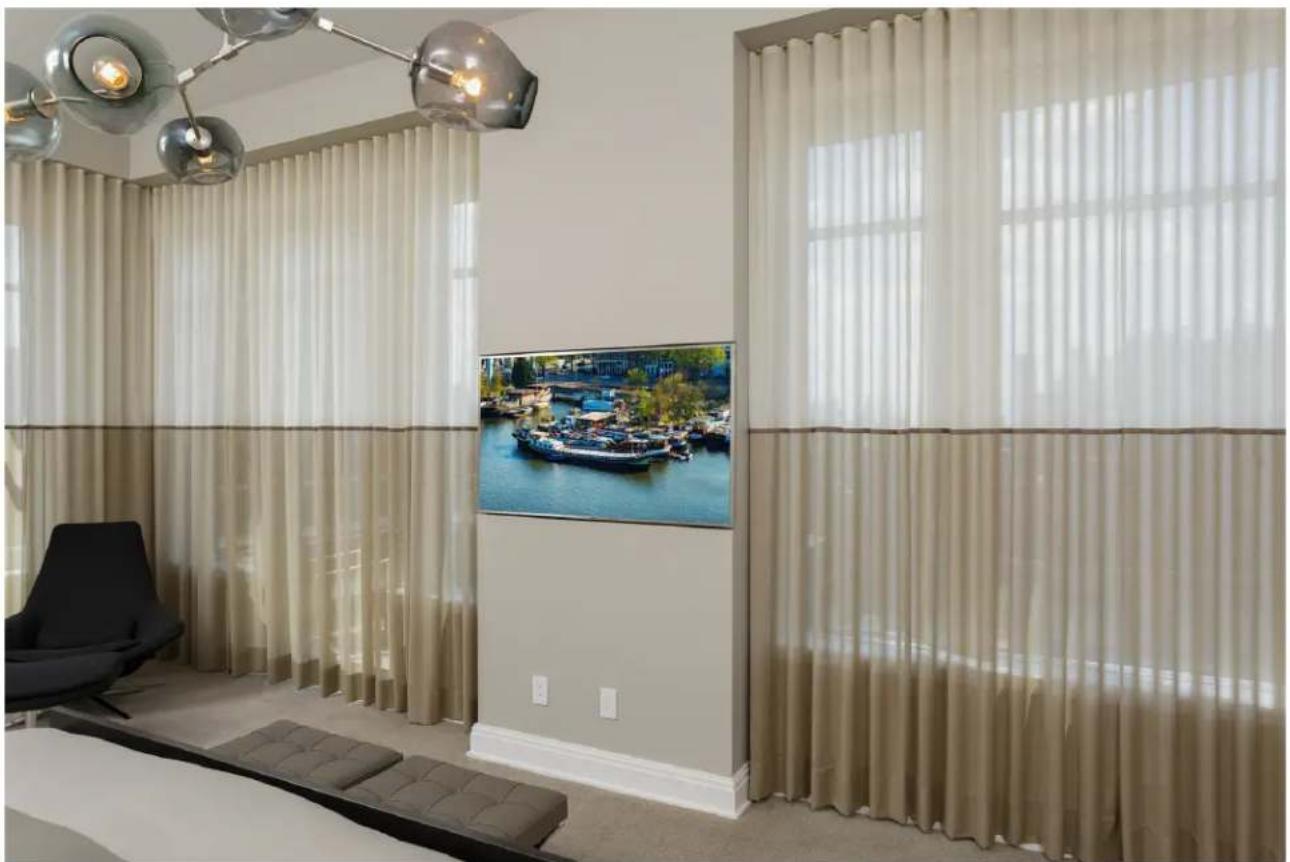
Every drapery track system has a draw configuration and arm style. Draw configuration refers point or points on the track where the draperies are opened. Fabric can be opened using a draw application. Fabric can also be opened using a center draw, asymmetric draw, or a multi-for spaces that require more than one opening.
Drapery fabrics are pleated into a pinch pleat or Ripplefold style to suit any décor.
Depending on their individual characteristics, drapery fabrics are pleated into one of several sty pinch pleat, and Ripplefold drapery styles are both supported by Crestron drapery track system carriers from which the draperies hang attach to the fabric in patterns specifically designed to the pleat style. The master carrier arm is also designed to complement the pleat style and configuration. For example, center-draw draperies with a pinch pleat often use an overlap arm the fabric meets for an illusion of continuity when in the closed position. Ripplefold draperies center draw achieve a different aesthetic with arms that butt up against one another when draperies are closed.
NOTE: To cover windows wider than 32 ft (9.8 m), multiple drapery tracks should be used.
natural_image
Interior of a modern hotel room with white curtains, a large wall-mounted display showing boats, and a black chair (no visible text or symbols)Mounting Options
Drapery track system hardware can be mounted to a ceiling, on a wall, or inside a custom by the customer).
Ceiling Mount
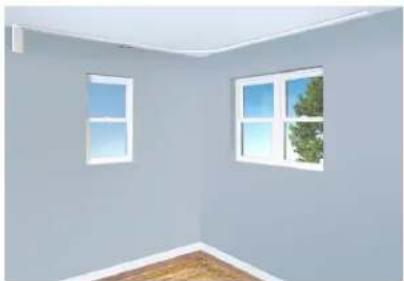
Use cam-lock mounting brackets (CSA-DRP-CAM-LOCK) to secure the drapery track directly to the ceiling. Cam-locks have a handle that rotates to engage and secure the drapery track. In special circumstances where cam-locks cannot be used, the drapery track can be secured directly to the ceiling with screws.
natural_image
Interior corner of a room with light blue walls and two white windows, no text or symbols visible
natural_image
Interior view of a room with curved gray curtains and sheer curtains, no text or symbols visibleWall Bracket
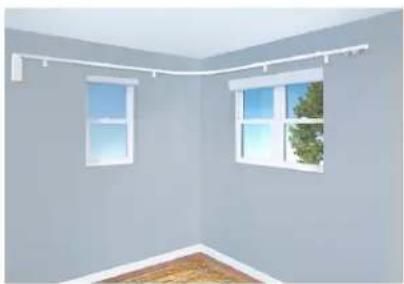
Adjustable "L" brackets secure the drapery track system to a wall. The adjustable "L" brackets are available in single-track (CSA-DRP-BRKT) and dual-track (CSA-DRP-BRKT-DUAL) mounting configurations. Cam-locks secure the drapery track to the "L" brackets."
The "L" brackets can be adjusted to ensure that the drapery track is properly positioned on
NOTE: The "L" brackets are not intended for use in a pocket.
natural_image
Interior corner of a room with two windows and a wooden floor, no text or symbols visible
natural_image
Interior corner view of a room with dark gray curtains and sheer curtains, no text or symbols visiblePocket Mount
Customer fabricated pockets can be created to fully conceal the drapery track system. The drapery track system can be mounted in a pocket using cam-lock mounting brackets or screws.
Arm Types
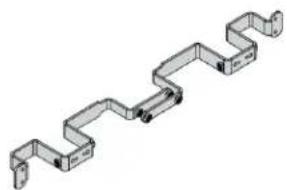
Drapery track arms are available to cover a variety of different draw and fabric styles. The prevent light from entering through the gap in the fabric. Butt arms help preserve the consist of Ripplefold aesthetic, although may not prevent light gaps in a center draw application."
Center Draw Over/Underlap Arm (Pinch Pleat and Ripplefold)
Extended Over/Underlap Arm (Ripplefold)

natural_image
Isometric line drawing of a zigzag architectural or mechanical structure with no text or symbolsCenter Draw Butt Arm (Ripplefold) Extended Over/Underlap Arm (Pinch Pleat)


natural_image
Technical line drawing of a mechanical bracket or connector (no text or symbols)One-Way Butt Arm (Ripplefold) One-way Arm (Pinch Pleat)


natural_image
Technical drawing of a mechanical lever or bracket (no text or symbols)Splicing
To provide a convenient solution for shipping and installing long drapery tracks, drapery tracks spliced. When a drapery track is spliced, it is shipped in shorter sections and then assembled installation site to create a full length track. When spliced, a drapery track can be made up (9.8 m) in length.
Drapery Track Splicing Rules:
- No more than two splices should be used on one track length.
- Splices can only be made along straight sections. A minimum of 10 in. (254 mm) of straight section is required on both sides of a splice on any curved, S curved, or bent sections
- The recommended splice location for center and asymmetric draw is at the draw location recommended splice location for a one-way draw is furthest away from the motor.
• The maximum drapery track length is 32 ft (9.8 m) with splices. - The maximum drapery track length without a splice is 20 ft (6 m).
- The maximum width of a drapery track shipping container is 5 ft (1.5 m). Bent and curve may require additional splices to meet the shipping container constraints.
NOTE: Splices create a slight gap in the drapery track. As the carriers travel across the gap in the drapery track, a slight click may be heard.
Track Styles
Crestron Drapery Tracks are available in straight track, bent track, and curved track configurati conform to virtually any wall configuration. The Drapery Tracks are made of aluminum and av white or brown.
| Drapery Track Length Straight Track Single Bend Dual Bend Curved | ||||||||
| 0 to 20 ft(0 to 6 m) | 175 lbs(79 kg) | 110 lbs(50 kg) | 80 lbs(36 kg) | 80 lbs(36 kg) | ||||
| 20 to 32 ft(6 to 9.8 m) | 145 lbs(66 kg) | 100 lbs(45 kg) | 80 lbs(36 kg) | 80 lbs(36 kg) | ||||
Straight Track
Straight track is used in most applications where the window and wall are flat and on the
Bent Track
Bent drapery tracks can be used for bay windows, corner conditions, ect. This allows a single control a drapery spanning multiple sections of straight track with intermittent 45irc or 90irc ben
NOTE: Bent tracks have a minimum bend radius of 19 in. (483 mm).
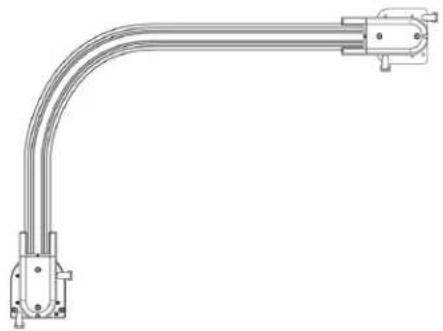
A standard bent track uses 45irc and 90irc bends in the track. For nonstandard bends, submit that can be used by our production facility to match the layout of your room. For informative drapery track templates, refer to the CSA-DRAPERY-TEMPLATE-KIT Instruction Guide (PDF) (Doc 7821).
Drapery Track with a 45° Bend

natural_image
Technical line drawing of a mechanical linkage component (no text or symbols)The 45irc bend drapery track has a minimum bend radius of 19 in. (483 mm).
Drapery Track with a 90° Bend
natural_image
Pure mechanical pipe connection diagram without any text, numbers, or symbolsDrapery Track with a 90° Double Bend

natural_image
Pure mechanical linkage diagram with no text, numbers, or symbolsDrapery Track with a 45° Double Bend

natural_image
Technical line drawing of a mechanical linkage or connector assembly (no text or symbols)NOTE: Double bend tracks may incorporate a splice along the middle section for ease of shipping.
Curved Track
Curved drapery tracks can be installed in any application that has a continuously curved wind allows smooth coverage of a curved wall, or other applications. A standard curved track can lengths up to 20 ft (6 m). Custom bends are also available.
NOTE: The curved drapery track has a minimum arc radius of 10 ft (3 m).
Templates are required for all curved drapery tracks. To submit a template, refer to the CSA-DRAPERY-TEMPLATE-KIT Instruction Guide (PDF) (Doc 7821).
NOTE: Splices are not recommended on a curved track.
Drapery Track with a 10 ft (3 m) Arc Radius

natural_image
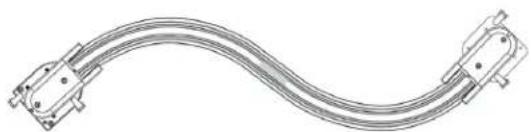
Technical line drawing of a curved mechanical component with mounting brackets (no text or symbols)The S Curve drapery tracks can be made only by splicing two bends together and must have section at each end of the curves where they meet in order to place the splice. There must of 10 in. (254 mm) of straight track before and after the splice in S Curve drapery tracks. The radius for a continuous curve is 10 ft (3 m).
S Curve
natural_image
Pure electrical circuit lines without any symbolsFabric Types
The fabric for Crestron Drapery Track systems is provided by your local drapery fabric suppliercan be designed to be hung using a pinch pleat style or ripplefold style.
Pinch Pleat
The pinch pleat style has a pleated look created by a pinched, consistent gathering of fabric of the drapery panel. The pin-on hooks, inserted into the back of the pleats, hang from the the drapery track.
Ripplefold
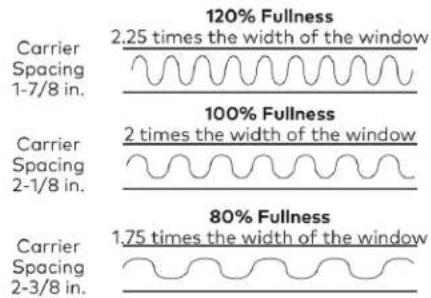
The Ripplefold style uses snap tape sewn directly on the back of the drapery panel. The drap snaps directly to the carriers on the drapery track. Snap carriers are available in 80%, 100%, fullness. The distance between the carriers strung together defines the fullness.
Ripplefold Drapery Fullness
other
| Carrier Spacing | Fullness Level | Time to Window Width | | --------------- | -------------- | --------------------- | | 1-7/8 in | 120% | 2.25 times | | 1-7/8 in | 100% | 2.00 times | | 2-1/8 in | 80% | 1.75 times | | 2-1/8 in | 100% | 2.00 times | | 2-1/8 in | 120% | 2.25 times | | 2-3/8 in | 80% | 1.75 times | | 2-3/8 in | 100% | 2.00 times | | 2-3/8 in | 120% | 2.25 times |Draw Types
Drapery track draw styles are available for almost any application or room shape. The draw configuration refers to the point or points on the track where the draperies can be opened.
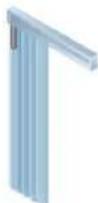
- Left Draw - Drapery fabric opens from the right to the left. The motor is mounted on the left end of the drapery track.
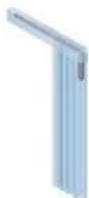
- Right Draw - Drapery fabric opens from the left to the right. The motor is mounted on end of the drapery track.
- Center Draw - Drapery fabric opens from the middle of the drapery track. The fabric of travels to the left, the fabric on the right travels to the right. The motor is mounted right or left end of the drapery track.

natural_image
Illustration of a vertical shelf with three parallel blue bars, no text or symbols present.- Dual Draw - A left draw drapery track and a right draw drapery track are installed next other. Drapery fabrics open from the middle of the drapery track. The fabric on the left track travels to the left, the fabric on the right drapery track travels to the right.

natural_image
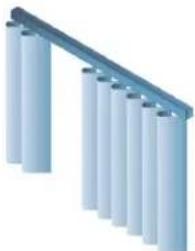
Two identical blue vertical slatted panels with metal clamps, shown side by side (no text or symbols)- Asymmetric Draw - Similar to center draw, but the fabric opening is not centered on the fabric on the left travels to the left, the fabric on the right travels to the right. mounted on the right or left end of the drapery track.
natural_image
Pure diagram of a structural beam with multiple vertical supports (no text or symbols)NOTE: The asymmetric draw (where the drapery is wider on one side) may be more appropriate a window that is not centered on the wall. This draw style will only fully open for the distance of travel between the master carrier and the end of the track. The multiple draw more appropriate for one long track that is used for two individual window openings.
Measuring Guidelines
Refer to the information below when measuring for a drapery track system:
- Measure the drapery track width at the top of the window where the drapery track system mounted.
- Check each window frame for level and plumb.
- To accommodate the stackback width when mounted in a pocket, the track must be cer space at a minimum of 6.5 in. (165 mm) wide for single tracks and 11 in. (280 mm) for c in order for the drapery to move freely.
- Drapery tracks should be mounted at least 3.5 in. (89 mm) from the wall.
- Inspect the window and the area around the window for obstructions (knobs, sills, etc.) block the travel of the drapery.
- Drapery stackback, typically 1/3 of the total track length, is an area that will always be fabric when the drapery is open. In a center draw configuration, the 1/3 stackback will with 1/6 on the left and 1/6 on the right. When possible, the drapery stackback should positioned covering the wall adjacent to the window in question. If the stackback is going partially obstructing the view out the window, it is important to set this expectation with customer.
- For a drapery track that measures greater than 20 ft (6 m) in length, a splice is required is when one long track is broken up into two or more shorter tracks. For more information drapery track splicing, refer to Splicing on page 55.
- If using an asymmetric draw drapery track, consider the drapery track location. An asymmetry draw is when the drapery is wider on one side. For more information, Draw Types on
- If a curved or bent drapery track is to be used, refer to Track Styles on page 56 and CSA-DRAPERY-TEMPLATE-KIT Instruction Guide (PDF) (Doc 7821).
For more information, refer to the Shade Measuring Worksheet: Drapery System (PDF) (Doc. 7 th located on the CSS web page.
Dimensions
The dimensions for parts of the Drapery Track system are shown in the following illustrations.
Arm Dimensions
Center Draw Over/Underlap Arm


Center Draw Butt Arm (Ripplefold)
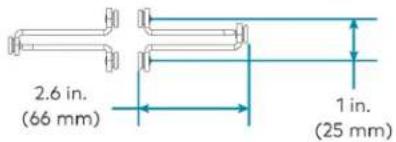

One-Way Arm (Pinch Pleat)

natural_image
Technical line drawing of a mechanical tool or bracket with two views (top and side), no text or symbols present.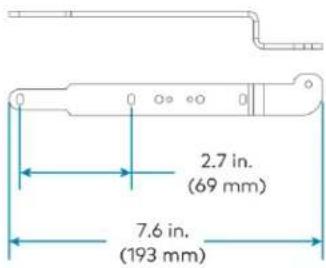
One-Way Butt Arm (Ripple Fold)

Extended Over/Underlap Arm (Ripple Fold)
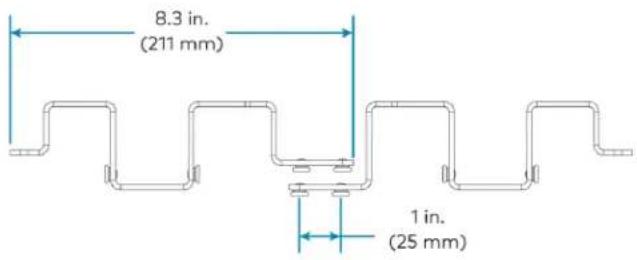
NOTE: The Extended Over/Underlap Arm (Ripple Fold) will extend 0.7 in. (18 mm) past the end the drapery track.
Extended Over/Underlap Arm (Pinch Pleat)

NOTE: The Extended Over/Underlap Arm (Pinch Pleat) will extend 1.5 in. (38 mm) past the end of the drapery track.
Drapery Track Ceiling Mount Configurations
This section provides several different types of ceiling mounted drapery tracks.
One Way Pinch Pleat Arm Ceiling Mount Drapery Track - Top and Front Views

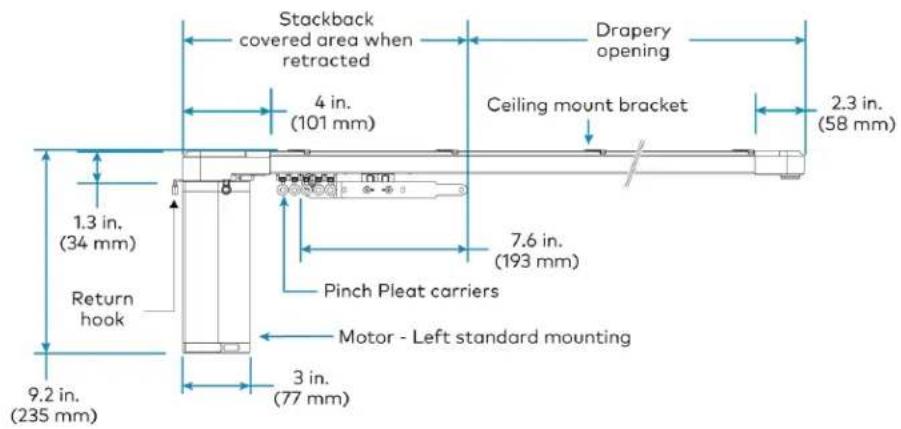
NOTE: Additional brackets may be required in the stackback area under heavy load conditions
One Way Ripplefold Butt Arm Ceiling Mount Drapery Track - Top and Front Views
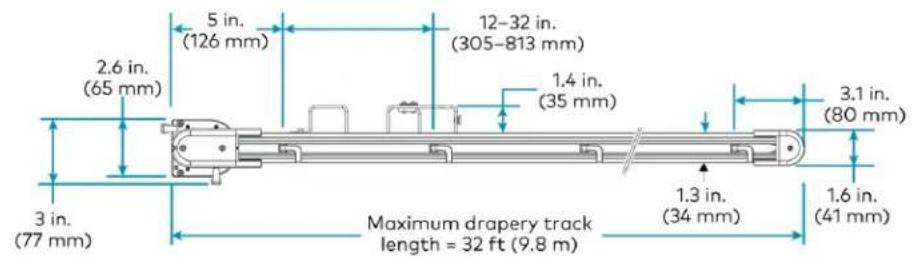

NOTE: Additional brackets may be required in the stackback area under heavy load conditions
Center Draw Pinch Pleat Arm Ceiling Mount Drapery Track - Top and Front Views


NOTE: Additional brackets may be required in the stackback area under heavy load conditions
Center Draw Ripplefold Butt Arm Ceiling Mount Drapery Track - Top and Front Views


NOTE: Additional brackets may be required in the stackback area under heavy load conditions
Drapery Track Wall Mount Configurations
This section provides several different types of wall mounted drapery tracks.
One Way Pinch Pleat Wall Mount Drapery Track - Top and Front Views


NOTE: Additional brackets may be required in the stackback area under heavy load conditions
One Way Ripplefold Butt Arm Wall Mount Drapery Track - Top and Front Views
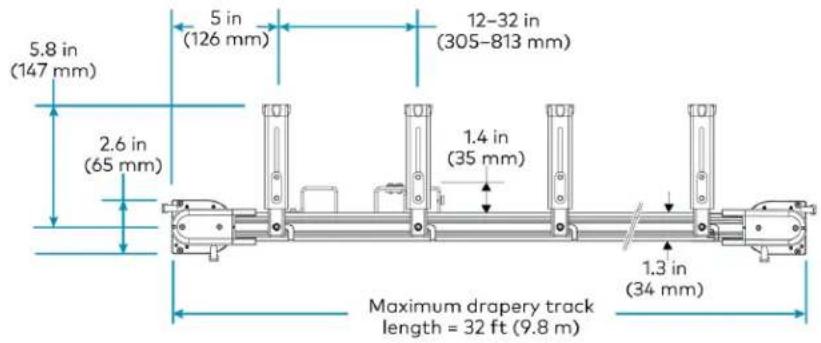
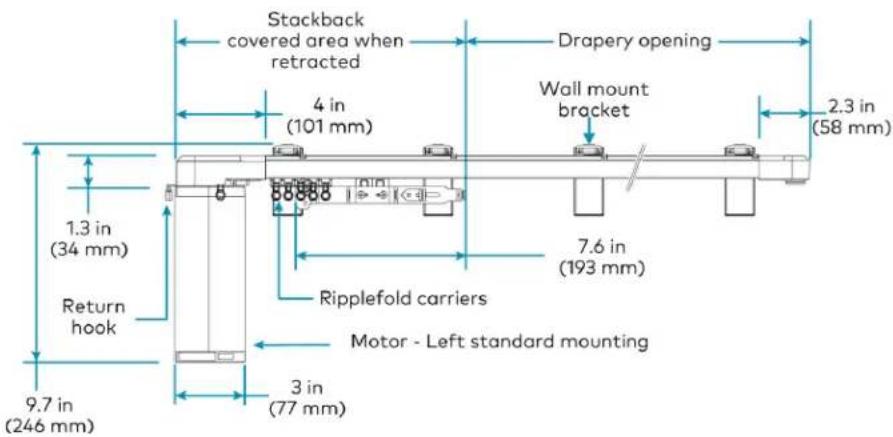
NOTE: Additional brackets may be required in the stackback area under heavy load conditions
Center Draw Pinch Pleat Arm Wall Mount Drapery Track - Top and Front Views
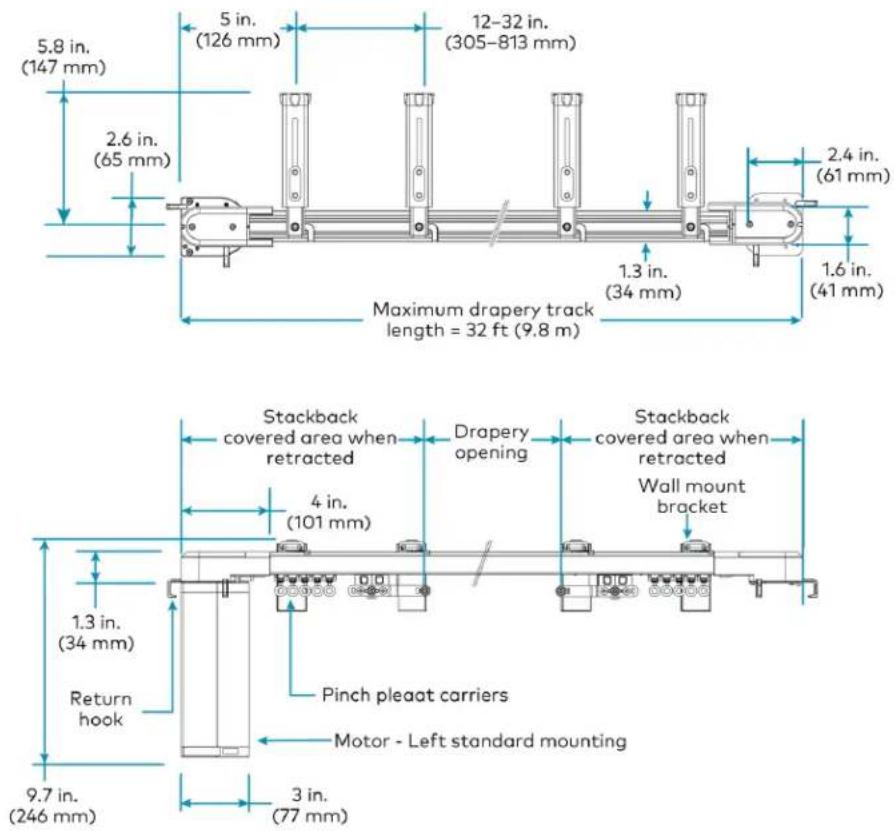
NOTE: Additional brackets may be required in the stackback area under heavy load conditions
Center Draw Ripplefold Butt Arm Wall Mount Drapery Track - Top and Front Views

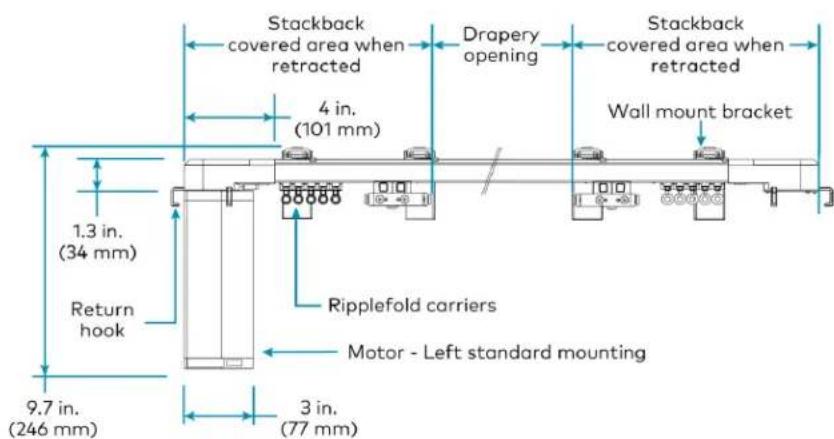
NOTE: Additional brackets may be required in the stackback area under heavy load conditions Dual Spacing Wall Mount Drapery Track
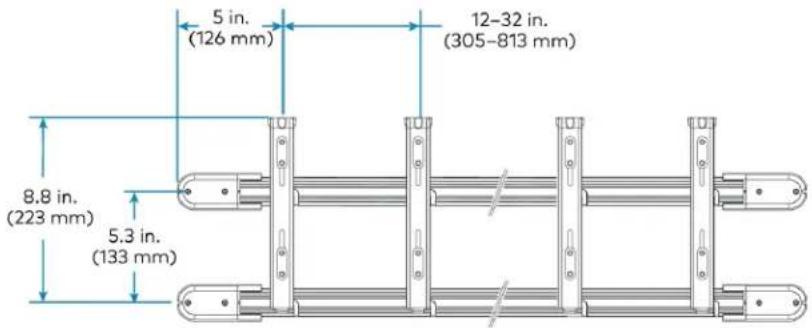
NOTE: Additional brackets may be required in the stackback area under heavy load conditions
Designing and Specifying
When designing or specifying a Crestron shade or drapery track system, adhere to the followir
- Do not take the final window measurements until the trim is installed and construction of the windows is complete.
- Measure the width of the shade or drapery track system where it will be mounted (top window). It is likely that the window frame is not perfectly square, so be sure to measure middle, and bottom widths of the window frame.
- Make sure that there is blocking behind the location where the shades and drapery track will be mounted, or make note of the type of shade mounting surface, so that the ins plan to bring the appropriate fasteners.
- Talk to the owner or designer when outside mounting a shade, if the window has trim whether to cover the trim completely with fabric, half of it, or any other portion.
- Take into consideration obstructions in the window opening, and above and below the wir (crank handles, baseboards, and tilting windows, etc.) to ensure that the shade does not while moving.
- Take note of HVAC ductwork. Air blowing directly on a shade or drapery track system performance. Prolonged exposure to heat may also damage the fabric.
- Verify that the usable roll width of the selected fabric can accommodate the window size
- Verify that the selected bracket will fit in the jamb or pocket that is specified.
Programming
When programming Crestron shades or drapery track systems, adhere to the following:
- Be sure that shade or drapery track system motors are running on the most recent Cre firmware.
- Use dedicated Open and Close buttons to control shades or drapery track systems. The of the button sends the shade or drapery track system to the open or closed limit. A of the button stops the shade or drapery track system.
- Check if button real estate is at a premium at the location, and if so use a single b control. An Open/Stop and Close/Stop control is how a typical garage door opener works easily understandable.
- Do not control shades that are not in view, because there may be an object left on another obstruction that prevents the shade or drapery track system from moving freely. could result in damage to the fabric, or damage to the obstruction.
Wiring and Power
Use Cresnet cable and Crestron power supplies when installing and connecting shades and drap. Refer to the following wiring and power supply options.
Wiring
- Use Cresnet cable for power and communication.
- The maximum Cresnet cable length between the power supply and a QMT shade and dr motor:
Cresnet Cable: 130 ft (39.5 m) maximum.
Cresnet HP Cable: 500 ft (152 m) maximum.
• Each QMT shade and drape motor requires a dedicated power supply output.
- Do not daisy-chain QMT shade and drape motors.
- The QMT shade and drape motor must be home-run from the power supply.
Power Supplies
Use a Crestron power supply to power Crestron QMT Shade and Drape motors. Crestron offe single-motor power supply and a ten-motor power supply.
Single-Motor Power Supply
The Crestron CSA-PWS40 (domestic) and CSAI-PWS40 (international) are outlet-mountable power supplies that provide power for a QMT Shade or Drape motor. Single-motor power supplies are especially useful when providing power from a local outlet to an infiNET EX wireless motor.
Ten-Motor Power Supply
The CSA-PWS10S-HUB-ENET Power Supply powers up to 10 (home run) reestron Shade or Drape motors with independent connections. There are five communication segments which handle two motors each. System communication options are Ethernet or Cresnet. Multiple power supplies can be daisy chaired with Cresnet. There is a recommended maximum of three CSA-PWS10S-HUB-E power supplies per Ethernet connection to minimized potential latency.

Ordering Guidelines
When ordering Crestron shades or drapery track systems, adhere to the following:
- Do not order shades or drapery track systems before it is necessary, as they can be left lying around. Shades and drapery track systems are typically the last technology to
- Measure multiple times and take the final measurements after all trim work and painting complete.
- Review the window for deductions on inside mount shades in the Crestron Design Tool (Either use CDT, or calculate the deductions yourself before entering the dimensions.
- Order fascia and the top and back cover separately and at a longer length than require the metal extrusions can be cut on-site for a perfect fit.
Installation Guidelines
When installing Crestron shades or drapery track systems, note the following:
- Do not install shades or drapery track systems when construction is still in progress. If absolutely necessary to perform shade or drapery track system installation work while construction is in progress:
- Leave the paper wrapping on the package.
- Mount all brackets and terminate wires with connectors.
• Install the shade or drape fabric after construction is complete. Mounting the fabric making power and data connections is a fast process that only takes a few minut
• Make sure that the painting at the location is complete to avoid getting paint on the
- For optimal performance, mount shades and drapery track systems so that they are level
- To ensure a perfect fit when installing shades with Crestron fascia that is provided with shade:
- Secure the brackets to the fascia and then hold the bracket and fascia assembly desired installation location.
- Mark the location of both brackets.
-
Remove the bracket from the fascia and then mount the brackets.
-
For wall-mount applications, thick trim may require shimming the bracket away from the reversing the roll of the shade so that the fabric does not contact the trim.
- Properly dress all wiring. Wires or connectors that make contact with the shade tube or make noise and potentially damage the fabric.
• After the shade is hung:
The factory set defaults will likely need to be adjusted. Do not raise or lower the without being able to monitor the shade. If necessary, someone needs to be in fro shade with the ability to stop the motor.
- Check for telescoping. The first time the shade travels up after installation is the critical time to verify the shade is traveling straight. Telescoping is adjusted at the but may still occur if the shade is not level. It is important to fix the problem k to the fabric occurs. All Crestron shade brackets have adjustments built in to minimal telescoping, but sometimes shim tape may need to be used.
- Check the shade for frayed edges and, if necessary, trim the frays. Frayed edges of manufacturing defect. Fraying occurs from handling shades and is most common with coated fiberglass fabrics.
- Return to the work site after 30 and 90 days to check limits, telescoping, and trim fro
Shipping and Receiving Shades
When shipping and receiving Crestron shades or drapery track systems, adhere to the following
- The maximum box length sent via UPS is limited. If the shade or drapery track system than 92 in. long, shipping via motor freight is necessary. In most cases, this means the cannot ship overnight. In cases where it is possible to ship overnight, the shipping fees prohibitive.
- When shades or drapery track systems are shipped to or received at a home that is u construction, a semitruck may not be able to deliver to the house. The truck may need at the street.
- Remember that someone needs to be present at the shipping location to receive the shc
- If there are several shades delivered on a pallet, be prepared to use a forklift to get the truck. If a forklift is not available at the time of delivery, it may be necessary to pallet down by hand to unload the cartons off the truck. If lift gate service is required, Shade Support know when placing the order.
- Do not stand shade cartons on the ends; this could wrinkle or damage the fabric.
- Splices can be used to split drapery tracks for shipping purposes.
- Check to be sure that long shades or drapery track systems can be maneuvered around location. Remember that shades or drapery track systems may not fit in elevators or up staircases.
- Install the shades within 2-3 weeks of receipt. Keeping the shades in their original cartor create impressions on the fabric. Impressions typically "hang out" over time when the sha hung in the window or can be coaxed with a hair dryer.
Fabric Care and Maintenance
How to Clean Fabric
Refer to the care instructions for the fabric to determine the appropriate cleaning methods. C reputable dry cleaner when fabric requires dry cleaning.
Roller Shade Fabric Edge Fray
Some shading fabrics are manufactured using PVC coated fiberglass yarns. During the cutting | the PVC coating is melted together on the shade edges. Inevitably, some fiberglass strands mo completely sealed. Over time, the fiberglass strands can fray slightly and become noticeable. Sir trim away frayed fibers.
While the bigger more noticeable frays are trimmed by the manufacturer at the factory, small can reappear during shipping, installation, or over time from daily operation. But don't worry, if of scissors this is an easy problem to fix. With your fingers, fluff the fabric edge so that it is visible, then simply trim them away with your scissors.
Detailing the Cut Edges
Primarily noticeable on dark fabrics, white fiberglass yarns may be visible even after you've tried frayed edges. With a permanent marker you can easily color the white fiber ends so they blied the fabric. For best results use a quick drying marker. Black, brown, or gray markers generally best with most dark fabrics.
If you have a two-colored fabric, make sure to select a marker color that matches the light fabric. Test a hidden spot first to ensure that the colors match. To prevent markers from bl the fabric and staining the edge of the shade, go slowly and handle your markers with care.
Minimizing Fraying
It's important to give your shades a clear path in which to operate. By keeping your shade rubbing on other objects, unwanted fraying can be minimized or prevented. Telescoping, as men above, can also increase fraying - particularly when the fabric edge starts rubbing against the brackets.
Glossary
Deflection:

As a shade increases in width, the metal tube begins to sag due to the did the tube and the weight of the fabric.
"V" or "V-ing", "A" or "A-ing":
When deflection is present in the tube, the fabric sags and produces a "V" or "A" shape type center of the shade.
Ripple/Wave:

Vertical ripples in the fabric. Ordering shades with battens can help minimize effect.
Curling/Cupping:
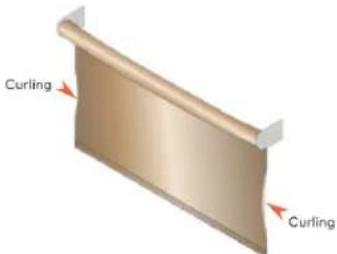
The edges of the fabric panel curl. It starts out normal at the top tube, becomes more pronounced toward the middle of the panel, and lessens as its gets closer to the hembar. Ordering shades with batten help minimize this effect.
Twisting:
Typically visible on tall and narrow shades where the fabric twists vertically.
Telescoping:
The tendency for a shade fabric to not roll up perfectly square with the shade tube. The fc telescope to the right or left and hang over the side of the tube. All shades are adjusted ensure proper tracking. Actual installation conditions may prevent the shade from tracking proper levelness of the mounting surface is the most common cause of telescoping.
Resources
The following resources are provided for the Crestron Shading Solutions.
NOTE: You may need to provide your Crestron.com web account credentials when prompted to access some of the following resources.
Crestron Support and Training
- Crestron True Blue Support
• Crestron Resource Library
• Crestron Online Help (OLH) - Crestron Training Institute (CTI) Portal
Programmer and Developer Resources
- help.crestron.com: Provides help files for Crestron programming tools such as SIMPL, SIMPL# and Crestron Toolbox™ software
• developer.crestron.com: Provides developer documentation for Crestron APIs, SDKs, and other development tools
Product Certificates
To search for product certificates, refer to support.crestron.com/app/certificates.
Related Documentation
- Crestron Design Tool Shades (CDTS)
-
Crestron Shading Solutions Feature Page
• crestron.com/shadesafety (PDF)
• CS-SHADE-ROLLER-BATT
• CS-SHADE-ROLLER-CABLEGUIDED (PDF)
• CS-SHADE-ROLLER-HSHEER (PDF)
• CSA-DRAPERY-TEMPLATE-KIT (PDF)
• CSA-PWS10S-HUB-ENET (PDF)
• CSA(I)-PWS40 (PDF) -
Shade Measuring Worksheet Drapery System (PDF)
- Shade Measuring Worksheet Single roller and In-line Coupled (PDF)
- Original Instructions
- Contents
- Crestron Shading Solutions 6
- Crestron Roller Shades
- Crestron Drapery Track 50
- Designing and Specifying 73
- Programming 74
- Wiring and Power 75
- Ordering Guidelines 77
- Installation Guidelines....78
- Shipping and Receiving Shades...79
- Fabric Care and Maintenance...80
- Glossary ...81
- Resources ...82
- Crestron Shading Solutions
- Roller Shade and Drapery Track Systems
- Purpose of This Guide
- Features
- Daylight Control
- Security and Privacy
- Quiet Shade Motors
- Brushless Motor Technology
- Easy Installation
- Right Size Guarantee
- Crestron Shading Solutions Limited Warranty
- Pattern Print
- Design Resources
- Crestron Design Tool Shades (CDTS) Software
- Hardware Sample Case
- Crestron Shade Fabrics
- Shade Fabric Book Collection
- Shade Fabric Sample Decks
- Crestron Horizontal Sheer Fabric Sample Binder
- Digital QMT Roller Shade Motors
- 3/4 Nm Motors
- CSM-QMTDC-163 Series Shade Motors
- Nm Motors
- CSM-QMTDC-250-4 Series Shade Motors
- CSM-QMTDC-275 Series Shade Motors
- Manual Clutch
- Roller Shade Mounting Brackets
- QMT3 Series Architectural Brackets
- CSA-ARCH3-BRKT
- CSA-ARCH3-BRKT-DUAL
- QMT5 Series Architectural Brackets
- CSA-ARCH5-BRKT
- CSA-ARCH5-BRKT-DUAL
- CSA-ARCH5-BRKT-CPLR-ANG
- CSA-ARCH5-BRKT-CPLR
- CSA-ARCH5-BRKT-DUAL-CPLR
- CSA-DECOR3-BRKT
- QMT5 Series Décor Brackets
- CSA-DECOR5-BRKT
- CSA-DECOR5-BRKT-CPLR
- Roller Shade Tube Options
- Roller Shade Mounting Options
- Inside Mount
- Outside Mount
- Pocket Mount
- Roller Shade Accessories
- Blackout Accessories
- Side Channel
- H-Channel
- Sill Angle
- Liner (Wool Pile)
- Channel Cap
- Fascia Options
- End Cap Options
- Decor End Caps
- Architectural End Caps
- Top and Back Cover
- Flap
- Hanger
- Hanger with Tile Lip
- Pocket End Cap
- Roller Shade Fabrics and Textiles
- Fabric Characteristics
- Fenestration Data
- Hem Bar Styles
- Open Pocket Hem Bar
- Sealed Pocket Hem Bar
- Exposed Blackout Hem Bar
- Fabric Railroading
- Seams
- Batten
- Specialty Roller Shades
- Battery-Powered Shades
- Crestron Horizontal Sheers
- Roman Shades
- Cable Guided Shades
- Roller Shade Measuring Guidelines
- How to Measure Single Roller and In-Line Coupled F Shades
- How to Measure Angled Coupled Shades
- Installation Dimensions
- Creating Custom Pockets for QMT3 Series Architectur Brackets
- Creating Custom Pockets for QMT5 Series Architectur Brackets
- Crestron Drapery Track
- Determining the Proper Drapery Track System
- Mounting Options
- Ceiling Mount
- Wall Bracket
- Arm Types
- Splicing
- Track Styles
- Straight Track
- Bent Track
- Curved Track
- Fabric Types
- Pinch Pleat
- Ripplefold
- Draw Types
- Measuring Guidelines
- Dimensions
- Arm Dimensions
- Drapery Track Ceiling Mount Configurations
- Drapery Track Wall Mount Configurations
- Designing and Specifying
- Programming
- Wiring and Power
- Wiring
- Power Supplies
- Single-Motor Power Supply
- Ten-Motor Power Supply
- Ordering Guidelines
- Installation Guidelines
- Shipping and Receiving Shades
- Fabric Care and Maintenance
- How to Clean Fabric
- Roller Shade Fabric Edge Fray
- Detailing the Cut Edges
- Minimizing Fraying
- Glossary
- Deflection:
- Ripple/Wave:
- Curling/Cupping:
- Twisting:
- Telescoping:
- Resources
- Crestron Support and Training
- Programmer and Developer Resources
- Product Certificates
- Related Documentation
Brand : Crestron
Model : CSM-QMTDC-250-4-EX
Category : Indoor blind