
CA300P2/24V - Receiver CALIBER - Free user manual and instructions
Find the device manual for free CA300P2/24V CALIBER in PDF.


| Product Type | Car Audio Power Amplifier |
| Model | CA300P2/24V |
| Brand | Caliber |
| Max Power Output (24V) | 2x 450W @ 4Ω (stereo) / 1x 1500W @ 4Ω (bridged) |
| RMS Power Output (24V) | 2x 150W @ 4Ω (stereo) / 1x 480W @ 4Ω (bridged) |
| Frequency Response | 5Hz - 55kHz |
| Input Sensitivity (RCA) | 0.2V - 3V |
| Low/High Pass Filter | 50 - 250Hz |
| Total Harmonic Distortion (THD) | <0.5% |
| Signal-to-Noise Ratio (A-Weighted) | >76dB |
| Output Impedance | 2 - 16Ω |
| Bass Boost | 0 / 6 / 12dB @ 45Hz |
| Fuses | 2x 15A |
| Dimensions (Heatsink) | 320(W) x 151(D) x 50(H) mm |
| Overall Dimensions | 347(W) x 151(D) x 52(H) mm |
| Mounting | Self-tapping screws, min. 5cm ventilation clearance |
| Power Supply | Pulse Width Modulated (PWM) MOSFET |
| Protection | Thermal, overload, short circuit, muting circuitry |
| Input Options | RCA and high-level (speaker) input; do not use simultaneously |
| Remote Turn-On | REM terminal from radio or separate switch |
| Warranty | 12 months if installed by authorized dealer, 30 days otherwise |
| Included Accessories | High-level input plug, self-tapping screws, mounting template |
| Recommended Cable Size | At least 10 mm² for power and ground |
| Operating Temperature Range | 0°C to +45°C |
| Certifications | CE, RoHS |
Frequently Asked Questions - CA300P2/24V CALIBER
User questions about CA300P2/24V CALIBER
0 question about this device. Answer the ones you know or ask your own.
Ask a new question about this device
Download the instructions for your Receiver in PDF format for free! Find your manual CA300P2/24V - CALIBER and take your electronic device back in hand. On this page are published all the documents necessary for the use of your device. CA300P2/24V by CALIBER.
USER MANUAL CA300P2/24V CALIBER
Max power output at 24V: 2x 450W/4Ω or lx 1500W/4Ω (bridged)
RMS output at 24V: 2x 150W/4Ω or lx 480W/4Ω (bridged)
Frequency response 5Hz-55kHz
Input Sensitivity RCA input 0.2 - 3V
Low/high pass filter 50 - 250Hz
Total Harmonic Distortion <0.5%
Signal to noise ratio (A-Weighted) >76dB
Output Impedance 2 - 16Ω
Bass Boost 0-6-12dB · 45Hz
Fuses 2x15A
Dimensions heatsink: 320(W) x 151(D) x 50(H) mm
Total dimensions: 347(W) x 151(D) x 52(H) mm (Mounting feet and connectors)
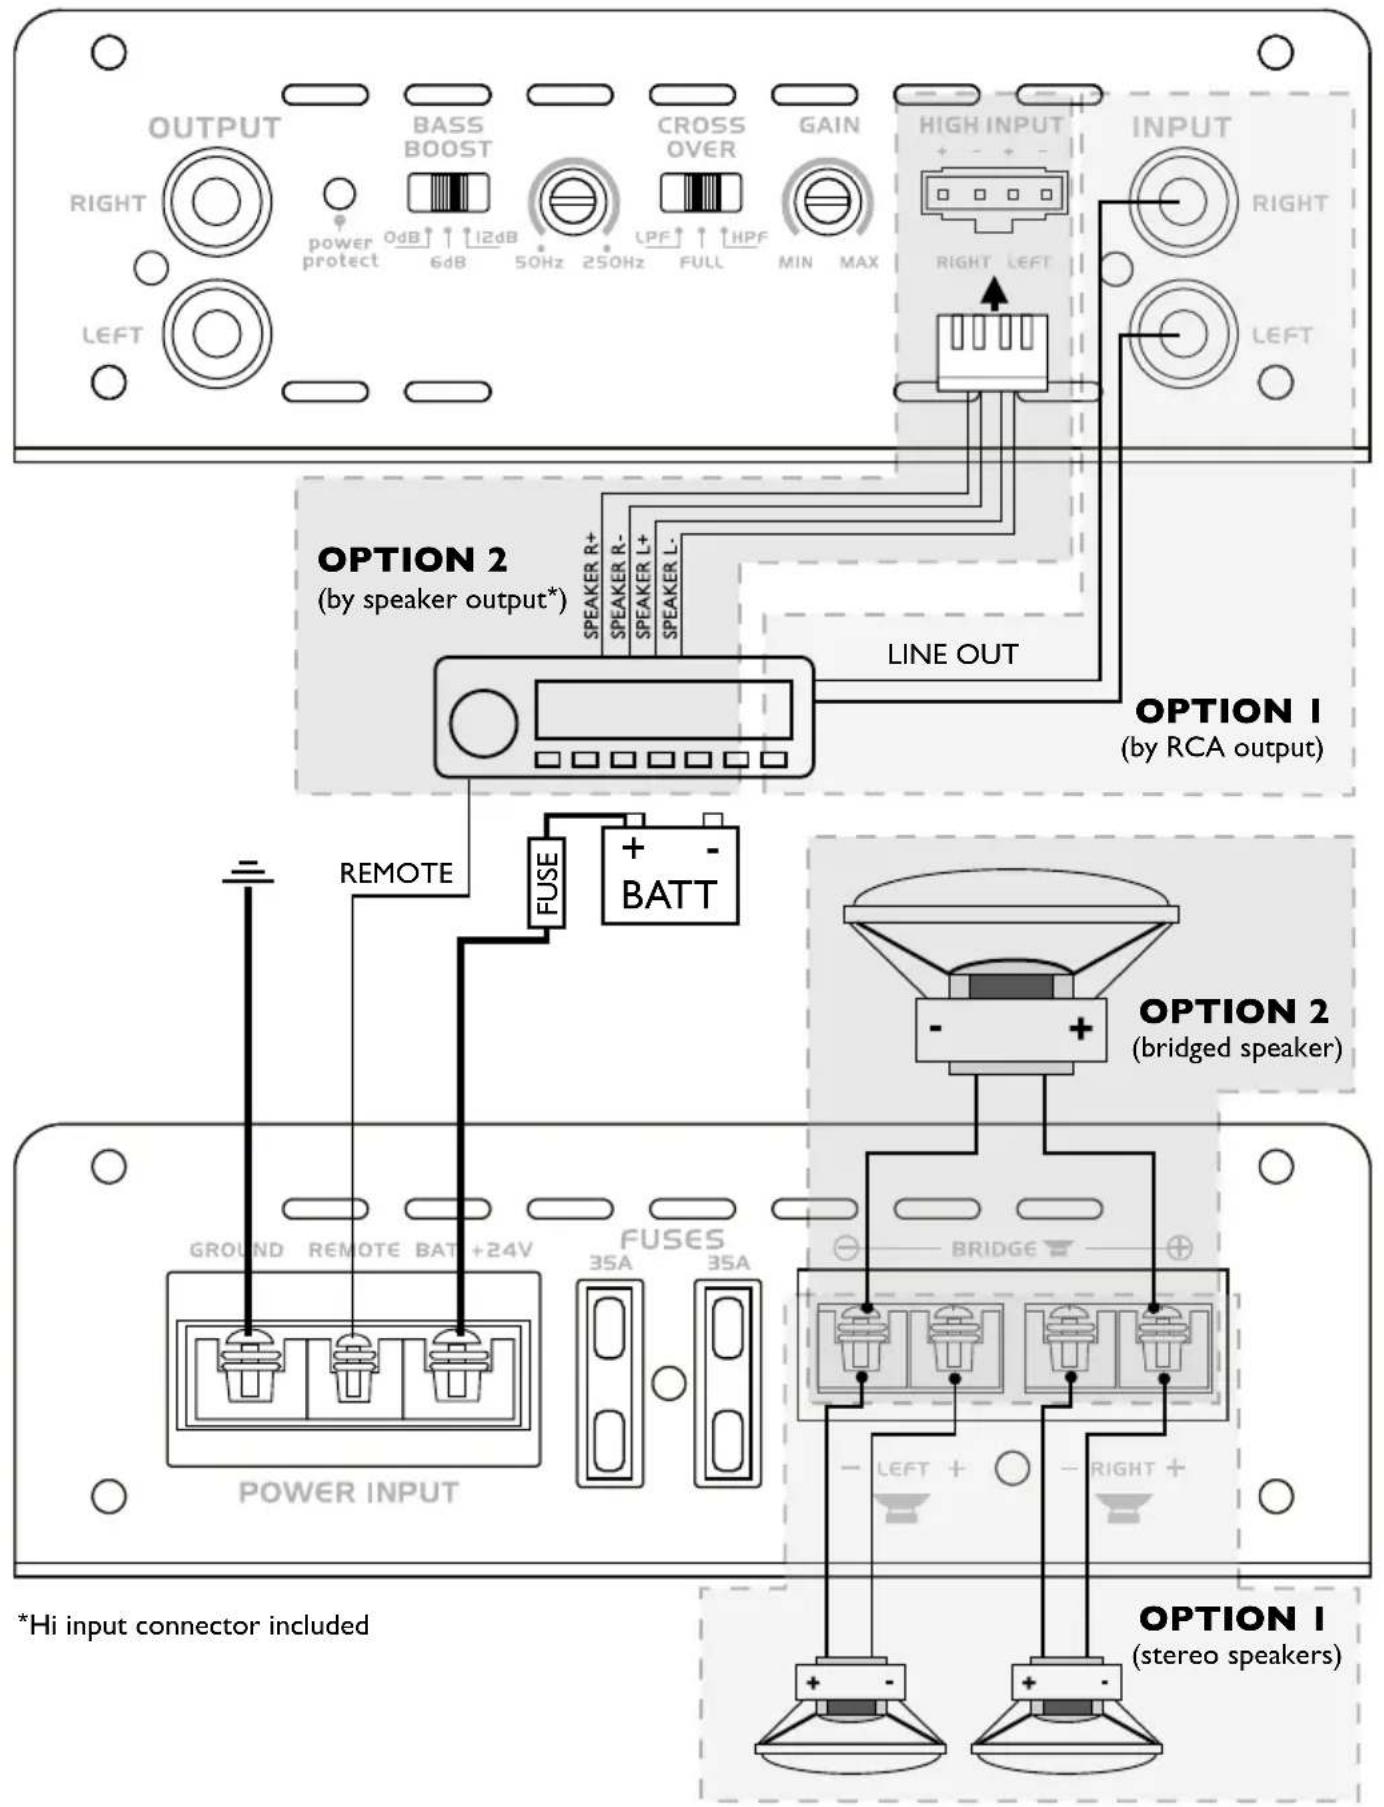
*Hi input connector included
FEATURES
- Stereo output.
- Pulse Width Modulated (PWM) MOSFET Power Supply.
• Variable input sensitivity: RCA input 0.2V to 3V.
• Thermal-, Overload- and Shortcircuit protection. - Excellent muting circuitry assures no turn on/off 'pops'.
• Built-in High / Low Pass Filter
• Gold plated power connectors for optimal power distribution.
• European design and engineering.
• Gold plated speaker connectors for optimal signal output.
MOUNTING
The amplifier has to have at least 5 cm (2") ventilation space at all sides, to allow the heat to rise away from the amplifier. Be sure that the power and signal cables can enter and leave the amplifier in a straight line, to avoid the risk of malfunction. Always place the power- and signalcables at opposite sides of the vehicle to reduce any noises.
The amplifier should be protected from exposure to moisture and direct sunlight.
Mark the mounting surface using the amplifier as a template, then drill 2.5 mm (1/8") diameter holes at the marked locations and mount the amplifier using the supplied self-tapping screws.
INSTALLATION
Remember to always disconnect battery ground before working on a vehicle's electrical system! Always place a fuse or circuit breaker no more than 30 cm (12") from the battery, no greater than the fuse(s) of your amplifier for optimal protection.
GETTING YOUR POWER STARTED
- First, the +24V terminal is connected directly to the battery of your car. Use a cable of at least 10 mm ^2 , and make sure that the connectors are of the same value.
- Don't forget the extra "Vehicle protection" fuse.
- The +24V terminal should NOT be connected to the car fuse box.
- Second, the ground terminal (GND) must be fastened securely to the chassis of the vehicle with the same mm ^2 cable as the positive cable (the same amount of power has to run through it). Ensure that all paint, undercoating or any other insulation is removed from the area where you want to make your ground connection to.
- Third, the last cable to connect is your remote turn-on (REM). Many radio-cassette and CD-players have an output terminal for connection of the REM of an amplifier. If you don't have such an output, a separate switch must be installed to control your amplifiers on/off function.
SIGNAL INPUT
The Caliber Amplifiers offer you two possibilities for your signal input.
- A High Level input, using the loudspeaker output from your radio and the special High Level inputplug you found in the box.
- Signal input by using a RCA cable from your radio's RCA outputs to the amplifiers signal input RCA's.
NEVER USE THE HI INPUT AND RCA INPUT AT THE SAME TIME!
RCA INPUT
- Connect the RCA-outputs of your radio to the RCA input terminals of the amplifier. Take good care that you connect the Right output of your radio to a Right input of your amplifier, and that you connect the Left output of your radio to a Left input of your amplifier.
AMPLIFIER ADJUSTMENTS
- Put the input level adjustment knob to the minimum.
- Put the volume of your radio to 3/4 of the maximum.
- Adjust the Bass Boost to your personal sound.
- Now adjust the input level of the front channel. Slowly turn up the input level and listen carefully until you hear the amplifier begin to distort. A Caliber Amplifier "clips" very softly, so this can sometimes be a difficult adjustment. If you have turned up the Bass Boost to much, the amplifier will start clipping immediately. In that case you must turn back the Bass Boost and start adjusting the inputlevel again. You will hear that the Bass you wanted can be required in this way.
CALIBER WARRANTY
Due to the complexity of our products, we strongly recommend that this amplifier is installed by your authorized Caliber dealer. If properly installed by your dealer we provide a warranty for 12 months from the date of purchase. If you install this amplifier yourself, we wish you lots of fun and succes in doing so. If you follow our guidelines, you'll get the best result. Our warranty, however, will be limited to and not exceed 30 days from the date of purchase.
WARNING
Points to observe for safe usage
Read this manual carefully before using this item and its components. They contain instructions on how to use this product in a safe and effective manner. Caliber Europe BV cannot be responsible for problems resulting from failure to observe the instructions in this manual.
Turn off the device immediately in case of a problem.
Failure to do so may cause personal injury or damage to the product. Return it to your authorized Caliber Europe BV dealer for repairing.
Product cleaning.
Use a soft dry cloth for periodic cleaning of the product. For more severe stains, please dampen the cloth with water only. Anything else has the chance of dissolving the paint or damaging the plastic.
Temperature.
Be sure the temperature inside the room/vehicle is between +45°C (+113°F) and 0°C (+32°F) before turning your unit on.
Maintenance.
If you have problems, do not attempt to repair the unit yourself. Return it to your Caliber Europe BV dealer for servicing.
Placement.
Place the product on a flat surface. Provide enough space around the product for sufficient ventilation.
Heat.
Do not locate the appliance in the vicinity of a heat surface or in direct sunlight.
Accessories.
Use only supplied accessories
PARTICULARITÉS
MAI USARE INPUT HI E INGRESSO RCA ALLO STESSO TEMPO!
INGRESSO RCA
GB Caliber hereby declares that the item CA300P2 is in compliance with the essential requirements and other relevant provisions of Directive 2004/108/EC (CE) and 2011/65/EU (Rohs)
- FEATURES
- MOUNTING
- INSTALLATION
- GETTING YOUR POWER STARTED
- SIGNAL INPUT
- RCA INPUT
- AMPLIFIER ADJUSTMENTS
- CALIBER WARRANTY
- WARNING
- Points to observe for safe usage
- Turn off the device immediately in case of a problem.
- Product cleaning.
- Temperature.
- Maintenance.
- Placement.
- Heat.
- Accessories.
- PARTICULARITÉS
- MAI USARE INPUT HI E INGRESSO RCA ALLO STESSO TEMPO!
- INGRESSO RCA
Brand : CALIBER
Model : CA300P2/24V
Category : Receiver