
MIHO099 - Thermostat EnerGenie - Free user manual and instructions
Find the device manual for free MIHO099 EnerGenie in PDF.


| Product Type | Smart Thermostat |
| Brand | EnerGenie |
| Model | MIHO099 |
| Dimensions | 4.2 x 4.2 x 1.1 inches (107 x 107 x 28 mm) |
| Weight | 0.45 lbs (204 g) |
| Power Supply | 24 VAC (C-wire required) or 3 x AA batteries (optional) |
| Display Type | Touchscreen LCD |
| Connectivity | Wi-Fi 802.11 b/g/n (2.4 GHz) |
| Compatibility | Most 24V HVAC systems (gas, electric, heat pump, oil) |
| Main Functions | Temperature control, scheduling (7-day), remote control via app, geofencing, energy usage reports, voice assistant integration (Alexa, Google Assistant) |
| Temperature Range | 40°F to 95°F (4°C to 35°C) |
| Accuracy | ±0.5°F (±0.3°C) |
| Wireless Range | Up to 150 ft (45 m) indoors |
| Security | Encrypted Wi-Fi communication, secure cloud connection |
| Cleaning & Maintenance | Gently wipe the exterior with a soft, dry cloth. Do not use water or liquid cleaners. |
| Safety Certifications | UL, FCC, RoHS |
| Spare Parts & Repairability | No user-serviceable parts. Contact EnerGenie support for repairs or replacement. |
| Warranty | 2-year limited warranty |
| Package Contents | Thermostat, mounting plate, screws, user manual, quick start guide |
Frequently Asked Questions - MIHO099 EnerGenie
User questions about MIHO099 EnerGenie
0 question about this device. Answer the ones you know or ask your own.
Ask a new question about this device
Download the instructions for your Thermostat in PDF format for free! Find your manual MIHO099 - EnerGenie and take your electronic device back in hand. On this page are published all the documents necessary for the use of your device. MIHO099 by EnerGenie.
USER MANUAL MIHO099 EnerGenie
Mi|Home Thermostat User Guide
The MiHome Thermostat is part of Energenie's heating range of products and part of the MiHome home automation range. The heating range includes the radio controlled MiHome thermostat, radio controlled radiator valves*.
MiHome products link directly to the MiHome Gateway* which provides the communications between your MiHome device and the internet.
(* MiHome Gateway, radiator valves are available to purchase separately)
The MiHome thermostat is suitable for switching any standard domestic boiler (see product specification below). Control of the thermostat is by radio control using either the Android or IOS smartphone App, or by using the MiHome server web portal, in conjunction with an internet connected Gateway
In the Box:
- MiHome Thermostat (Product Code MIHO069)
- Batteries (2 x AA (LR6))
- Screw Fittings (please note that while we provide screw fittings it is your responsibility to check their compatibility with the surface to which you are fixing the thermostat).
Installation
MUST BE INSTALLED BY A COMPETENT PERSON
- Remove your old thermostat, if it is necessary cut the power off in the installation area
- Remove the back of the thermostat by inserting your finger into the opening and pulling back the panel connections box
- Enter the connection cables to the boiler through the hole in the connections box.
- Screw the connections box to the wall, using either the fixings included in the package, or if they are unsuitable for your wall material please use alternative fixings

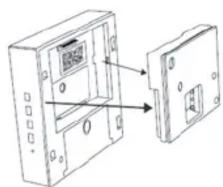


- Connect the control wires to the W and COM terminals on the connections box. If the cable is rigid, you can enter it directly. If its flexible, you may need help from the tip of a pen to press on the thermostat terminal block.


- Insert the batteries into the thermostat. The LED will flash three times, indicating that they have been inserted correctly.
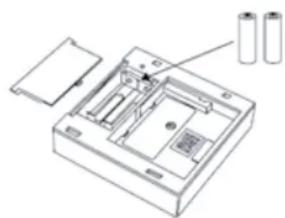
- Fit the thermostat to the connections box on the wall and your thermostat is now ready to use

Pairing with the MiHome Gateway
To pair the thermostat to your MiHome Gateway, follow the instructions below to pair using either the MiHome App or the web browser. When requested by the app/web browser, put the thermostat into pairing mode by pressing the 'M' button on the side of the unit until the pairing LED icon starts to flash (approx. 3 seconds). Successful pairing will be indicated on the app or MiHome server web portal by a message, and the pairing LED icon on the unit's display will stop flashing and stay steady on.
Smartphone:
- Log into your MiHome account on the MiHome App (Available for free on both iOS and Android platforms)
- Select Add a new device from the menu and choose Thermostat.
- Follow on-screen pairing instructions
Web Browser
- Log into your MiHome account at mihome4u.co.uk.
- Select Pair New Device from the mihome4u.co.uk/devices
- Select the Thermostat, followed by Pair Device and follow the on screen pairing instructions
Remote Control Operation
Once paired with the MiHome gateway all functions of the MiHome thermostat can be controlled and viewed through the Smartphone App and Web portal. Available functions include:
- Set the target temperature
- View current and historical graphs of ambient temperature and relative humidity
- Set up a schedule
- Setup Geofencing to automatically switch your heating when you're away
- Choose between Comfort and Eco modes
- Choose a battery-saving summer mode
- Configure MiHome TRVs to work with the MiHome Thermostat
Configuring the Thermostat

Display (1)
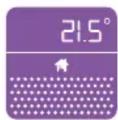
Swipe to view temperature, humidity and motion.
Manual On/Off control (2)
The thermostat may be set to either:
On - normal operation, powered on, controlling the heating, and reporting temperature, humidity, and motion.
Button shows green when selected, otherwise light grey.
Off - standby mode, powered on, not controlling the heating, but still reporting temperature, humidity and motion. Button shows dark grey when selected, otherwise light grey.
On and Off may be set from the MiHome server on the web browser, from the MiHome smartphone app device list, or from the thermostat page on the MiHome smartphone app.
Set the Target Temperature (3)
The target temperature may be set in 0.5°C steps using the slider control on either the web browser, or smartphone app. The temperature is shown on the slider itself (point 3) and the Target Temperature dial.
Comfort and Eco mode (4)
Comfort mode keeps the temperature control close to the target temperature, whereas Eco mode will allow the temperature to fall lower than Comfort mode before switching the boiler back on. This may be set from the Comfort/Eco selector on the main page. The margins for Comfort and Eco mode may be set in the settings section on either the web browser, or smartphone app.
Programmes (5)
Programmes comprise of an On time, an Off time, any or all days of the week, and a target temperature which together provide for controlled operation of the heating system. Multiple programmes may be configured for each thermostat. These programmes may be set on either the web browser, or smartphone app.

Name your thermostat (6)
The thermostat may be given a logical/descriptive name via the Rename Your Device section on either the web browser, or smartphone app.
Geofencing (7)
Geofencing uses the GPS technology on your smartphone (Apple or Android) to create a virtual geographic boundary, enabling software to perform a trigger activity when your mobile device enters or leaves a particular geographical area.
Configuring the thermostat – Settings page (8)
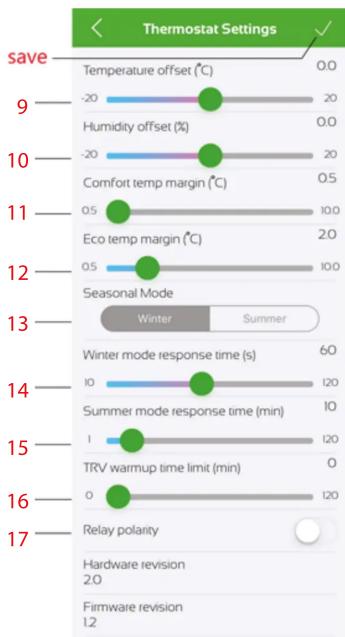
Temperature offset (9)
The thermostat may be given an offset in steps of 0.5° C to align with either other rooms or temperature measuring devices within your home. This offset may be set from the settings section on either the web browser, or smartphone app.
Humidity offset (10)
The thermostat may be given an offset in steps of 1% to align with either other rooms or humidity measuring devices within your home. This offset may be set from the settings section on either the web browser, or smartphone app.
Comfort and Eco temp margins (11 and 12)
See "Comfort and Eco Mode" on the previous "Configure thenThermostat" section.
Seasonal modes, Winter and Summer (13, 14, and 15)
During Winter, the heating control is normally required to be quite responsive to maintain the target temperatures, so the response time may be set accordingly (IO to 120 seconds in 1 second steps). During summer, battery life of the thermostat may be extended as the response time of the heating control may be set to a higher value (IO to 120 minutes in 1 minute steps).
Note: Setting the response time to less than one minute could significantly reduce battery life.
This summer and winter response times may be set from the settings section on either the web browser, or smartphone app.
TRV warmup time (16)
To allow any TRVs to reach their own designated target temperature, the heating can be set to continue heating for abdefined time after it has reached the target temperature at the thermostat location. This TRV warmup time can be set from the settings section on either the web browser, or smartphone app.
Reverse relay (17)
Depending on the boiler requirements, the relay may be left as default (Normally Open), or may be set to reverse operation (Normally Closed) This may be set from the settings section on either the web browser, or smartphone app.
eTRV Integration
For initial eTRV setup please refer to the eTRV instructions which are available on our eTRV product page.
All sections in eTRV Integration refer to the eTRV pages on the app. Repeat the following procedures as required for all eTRVs that are to follow the thermostat.
Follow Thermostat
You can enable any of your eTRVs to follow your Thermostat. By following the Thermostat, the eTRV will replicate and maintain the same target temperature as the Thermostat. To do this, select your desired eTRV from the dashboard. Select the last option on the page "Follow Thermostat"

Select your Thermostat from the list and save.
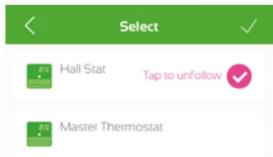
This returns you to the eTRV screen which now displays the Thermostat being followed, and the "Thermostat Overrides" option

Thermostat Overrides
An Override timer allows an eTRV that is following a Thermostat to ignore the target temperature of the Thermostat for a period. The timer will specify the time of the override, the days to activate the override and the desired temperature during this time. To set an Override timer select your desired eTRV, then select the "Thermostat Overrides" option.

Create the Override by defining the target temperature, times and days as required then save.

This will save the record showing an overview of the Override.

Selecting back returns you to the eTRV screen which now displays the number of Overrides created in the circle to the right of "Thermostat Overrides".

Unfollow Thermostat
From the eTRV page, select the "Following ..." option that shows the name of your thermostat. On the following page, select the option "Tap to unfollow" and save.

Safety
If you do not install and use in line with this guide the warranty will become invalidated and we will not be liable for any damage or loss whatsoever, including indirect loss, damage to property or personal injury. You must only use the product in dry areas indoors, and it must be protected from moisture and water. Do not disassemble as it does not contain any parts to service. If it arrives faulty, return it to where you bought it. Your statutory rights are not affected.
Further Help
For more help, look online at mihome4u.co.uk/troubleshooting and www.energenie4u.co.uk or contact our helpful support team in the UK via 08000 469 466 or support@mihome4u.co.uk Further contact methods can be found at: energenie4u.co.uk/about_us/contact_us
Parameter Settings
| Range | In steps of | Default | |
| Temperature Offset | ± 20°C | 0.5°C | 0°C |
| Humidity Offset | ± 20% | 1% | 0% |
| Comfort margin | 0.5 to 10 | 0.5°C | 0.5°C |
| Eco margin | 0.5 to 10 | 0.5°C | 2.0°C |
| Winter mode response time | 10 to 120 secs | 1 sec | 60s |
| Summer mode response time | 1 to 120 mins | 1 min | 10 mins |
| TRV warmup time | 0 to 120 mins | 1 min | 0 mins |
| Relay polarity | Normally open or normally closed | n/a | Normally open |
Product Spec
Model: MIH00069,
Radio: 433MHz OpenThings
Batteries (2 x AA (LR6))
Voltage Range 220 – 240 V 50Hz ac
Temperature, humidity and presence sensor
Temperature accuracy ±0.3°C
LED display
Switching Rating: DC 2A/30V max, AC 0.25A/230V max
Max Power: 62.5VA / 60W
Relay Type: Single pole, volt free, dry contacts
Dimensions: 100 x 100 x 25 mm
Weight 150g
Rx Frequency: 433.9 MHz
Range: 30 m in open area
SIMPLIFIED EU DECLARATION OF CONFORMITY
Hereby, Sandal Plc, T/a Energenie declares that the radio equipment type MIHO069 MiHome Thermostat is in compliance with Directive 2014/53/EU. The full text of the EU declaration of conformity is available at the following internet address: www.energenie4u.co.uk
Copyright Notice
© 2017 Sandal Plc.
User Manual
Part no: MIHO0069
Energenie and MiHome are brand names of Sandal Plc. Registered Office: Claremont House, Deans Court, Bicester
Oxon, OX26 6BW



- MI|HOME THERMOSTAT USER GUIDE
- IN THE BOX
- INSTALLATION
- MUST BE INSTALLED BY A COMPETENT PERSON
- PAIRING WITH THE MIHOME GATEWAY
- SMARTPHONE
- WEB BROWSER
- REMOTE CONTROL OPERATION
- DISPLAY (1)
- MANUAL ON/OFF CONTROL (2)
- SET THE TARGET TEMPERATURE (3)
- COMFORT AND ECO MODE (4)
- PROGRAMMES (5)
- NAME YOUR THERMOSTAT (6)
- GEOFENCING (7)
- TEMPERATURE OFFSET (9)
- HUMIDITY OFFSET (10)
- COMFORT AND ECO TEMP MARGINS (11 AND 12)
- SEASONAL MODES, WINTER AND SUMMER (13, 14, AND 15)
- TRV WARMUP TIME (16)
- REVERSE RELAY (17)
- ETRV INTEGRATION
- FOLLOW THERMOSTAT
- THERMOSTAT OVERRIDES
- UNFOLLOW THERMOSTAT
- SAFETY
- FURTHER HELP
- PRODUCT SPEC
- SIMPLIFIED EU DECLARATION OF CONFORMITY
Brand : EnerGenie
Model : MIHO099
Category : Thermostat