MTD65-P7501PO - Washing machine Tisira - Free user manual and instructions
Find the device manual for free MTD65-P7501PO Tisira in PDF.


| Product Type | Washing Machine |
| Brand | Tisira |
| Model | MTD65-P7501PO |
| Capacity (kg) | 6.5 |
| Dimensions (H x W x D) cm | 85 x 60 x 45 |
| Weight (kg) | 65 |
| Energy Class | A+++ |
| Spin Speed (rpm) | 1200 |
| Number of Programs | 15 |
| Noise Level Washing/Spinning (dB) | 52 / 72 |
| Water Consumption per Cycle (L) | 45 |
| Annual Energy Consumption (kWh) | 190 |
| Display Type | LED |
| Delay Start (hours) | 1-24 |
| Child Lock | Yes |
| Self-Cleaning | Yes |
| Place of Manufacture | China |
| Voltage / Frequency | 220-240V / 50Hz |
| Water Connection | Cold water only |
| Spare Parts Availability | 7 years |
Frequently Asked Questions - MTD65-P7501PO Tisira
User questions about MTD65-P7501PO Tisira
0 question about this device. Answer the ones you know or ask your own.
Ask a new question about this device
Download the instructions for your Washing machine in PDF format for free! Find your manual MTD65-P7501PO - Tisira and take your electronic device back in hand. On this page are published all the documents necessary for the use of your device. MTD65-P7501PO by Tisira.
USER MANUAL MTD65-P7501PO Tisira
●Do not connect to the hot water supply.
●After using, be sure to unplug the power plug.
●Be sure to use plug that is properly grounded.
The maximum gradient of the supporting surface for the washing machine should not exceed 2° .
●Do not tear down electrical wires and components in the machine by yourself.
● There are holes on the base for ventilation. These holes should not be blocked by foreign objects (carpets, etc.).
●Never connect the grounding wire with the live wire, or it may lead to an electric shock.
- If the power cord is damaged, it must be replaced by a qualified person to avoid a hazard.
If the following symptoms occur, please disconnect the power plug and perform the following checks:
| Symptom | Reason |
| The washing machine does not work. | ● Check that the power supply is in good condition. ● Check that the power plug is inserted properly. ● Check that the wash timer knob or the spin timer knob is not in the "0" position. |
| The drain hose does not work. | ● Check that the drain hose is not laid too high. ● Check that the drain hose is not frozen. ● Check that the drain hose is not blocked by foreign matter. |
| There is abnormal noise during washing. | ● Check that there are no coins or any other foreign objects dropped into the wash tub. |
| There is abnormal noise and violent vibration during spinning. | ● Check that the washing machine is placed on flat, stable floor. ● Check that clothes are evenly distributed in the spin tub. ● Check that there are no washing materials or foaming debris dropped into the outside of the spin tub. |
Main Technical Parameters
| Wash | Spin | |
| Capacity (dry Clothes) | 6.5 kg | 4.6kg |
| Power Supply | 240V/50Hz | |
| Input Power | 340W | 135W |
| Maximum Time | 15 min. | 5 min. |
| Water volume | H: 59L M: 51L L: 39L | / |
| Maximum water pressure | 0.6Mpa | |
| Overall dimension | 761x448x885(mm) | |
| Net weight | Upper Drain System | 19.5kg |
| Pump Input Power | 30W | |
t tisira
Before using your washing machine, please read this manual carefully and keep it for future reference.
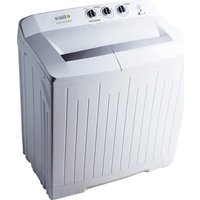
Twin Tub Washing Machine OWNER'S MANUAL
MODEL:MTD65-P7501PO
Read This Manual
Inside you will find many helpful hints on how to use and maintain your washing machine properly. Just a little preventative care on your part can save you a great deal of time and money over the life of your washing machine. You'll find many answers to common problems in the chart of troubleshooting tips. If you review the chart of troubleshooting tips first, you may not need to call for service.
Safety Precaution 1
Attention To Installation 3
Lay upper drain hose 3
Installation site 3
Preparation Instructions 4
Reference of laundry quantity
corresponding to different capacities 4
Laundry volume and detergent
dosage reference 4
Name Of Parts 5
Accessories 5
Introduction Of Control Panel 5
Quick Start 6
Washing Method 6
Rinsing Method 6
Spinning Method 7
Efficiency Program 7
Special Features 8
Notes 8
Attention To Maintenance 9
Cabinet maintenance 9
Cleaning the lint filter 9
Anti-freezing protection 9
Operation when objects are 9
dropped into outside of the spin tub 9
Main Technical Parameters ____ back cover
SAFETY PRECAUTIONTABLE OF CONTENTS
Safety Precaution
Be sure to comply with the following to prevent damage to body and property of you and others:

The sign stands for "pay attention", and the picture of specific items needs attention shows in△.

The sign stands for "forbid", and the picture of specific items forbidden shows in .

The sign stands for "must do", and the picture of specific items must be done shows in ●

This appliance is not intended for use by persons (including children)
with reduced physical, sensory or mental capabilities, or lack of experience and knowledge, unless they have been given supervisionor instruction concerning use of the appliance by a person responsible for their safety.
This appliance is for indoor use only.
Children should be supervised to ensure that they do not play with the appliance.
When choosing the water inflowing to wash tub or spin tub, please do not move the water inlet valve during the process of water inflowing.
The new hose-sets supplied with the appliance are to be used and that old hose-sets should not be reused.
If the supply cord is damaged, it must be replaced by the manufacturer, its service agent or similarly qualified persons in order to avoid a hazard.
The openings must not be obstructed by a carpet.
If strong vibration occurs in time of spinning, open the spin cover immediately. Make sure that the washing machine is placed on a flat and stable floor, and then adjust washing materials, distribute them evenly.
To do spinning and draining together, please spin for 1 minute before draining. Do not wash or spin waterproof clothes or clothes that float easily to avoid abnormal vibration or damage to the clothes.

Warning
Do not dismantle the machine by yourself.
(No text)
Do not install the machine in damp or rainy environment to avoid electric shock, fire, machine failure, or deformation
(1) 本说明仅供参考。


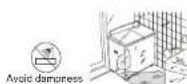
Do not place inflammable materials like burning candle, mosquito incense, cigaret etc. or heating source like electric stove, calorifier etc. on the machine.


SAFETY PRECAUTION
Warning
Do not spray water directly to the machine.

Do not let baby sit on it or place heavy things on it.

Do not wash do the s that are stained with kerosene, petrol, alcohol, and other flammable substance.


Make sure that the water inlet hose is connected and the tap is opened before washing.

Do not exceed the max. water level to avoid water overflowing and machine failure.

To avoid electric shock resulting from electric leakage, please connect grounding wire of the plug properly.


Do not let baby climb to the machine or play near running tub to avoid accident.

If use warm water, the water temperature should not exceed 50°C.

Do not wash down-filled coat, raincoat or similar clothes.


Wipe off dirty and dust on the plug often to prevent poor contact with power supply.

Do not put hands into the tub before it stopping running.
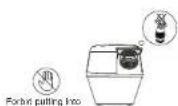
Do not replace power cord by yourself.


Do not damage the power cord and plug to avoid electric shock, short circuit or fire.


Insert the plug tightly when use.

Do not pull the cord when unplug the plug.


SAFETY PRECAUTION & INSTALLATION
Warning
Do not insert or unplug the plug with wet hands to avoid electric shock.
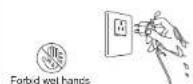
Unplug the plug from socket after use.

Attention To Installation
Lay upper drain hose

- Needs a drain hose with minimum diameter of 3 cm, and minimum carry away capacity of 40 liters per minute. - For upper drain system, the drain hose must be placed at least 86 cm (30 inches) from the bottom of washer, but not higher than 100 cm.
In order to avoid electrical failure, discoloration and deformation, do not install the machine in the following places:
● Locations exposed to direct sunlight
● Locations exposed to rain or snow
● Locations with uneven or unstable ground


USAGE METHOD
Preparation Instructions
● Plug in power and connect the water inlet hose.
- Lay down the lower drain hose and connect it to the sewer, or lay the upper drain hose to places as indicated in page 3.
- Check that there are no objects such as coins, hairpins, mud or sand in the pocket.
● Strings should be knotted in advance to prevent entanglement.
● Clothes can be classified for washing according to the texture, dirty degree and color.
● For small pieces (e.g., stockings) or fluffy clothes, put them into a nylon net for washing.
Attachment: Reference of laundry quantity corresponding to different capacities
| LaundryCapacity | Shirtabout 500 g | Uniformabout 650 g | Jeansabout 900 g | Jacketabout 1600 g |
| 2.0kg Capacity | about 4 pcs. | about 3 pcs. | about 2 pcs. | about 1 pcs. |
| 3.0kg Capacity | about 6 pcs. | about 4 pcs. | about 3 pcs. | about 1 pcs. |
| 3.6kg Capacity | about 7 pcs. | about 5 pcs. | about 4 pcs. | about 2 pcs. |
| 4.6kg Capacity | about 9 pcs. | about 6 pcs. | about 5 pcs. | about 2 pcs. |
| 5.0kg Capacity | about 10 pcs. | about 7 pcs. | about 5 pcs. | about 3 pcs. |
| 5.5kg Capacity | about 11 pcs. | about 8 pcs. | about 6 pcs. | about 3 pcs. |
| 6.0kg Capacity | about 12 pcs. | about 9 pcs. | about 6 pcs. | about 3 pcs. |
| 7.0kg Capacity | about 14 pcs. | about 10 pcs. | about 7 pcs. | about 4 pcs. |
| 7.5kg Capacity | about 15 pcs. | about 11 pcs. | about 8 pcs. | about 4 pcs. |
| 8.0kg Capacity | about 16 pcs. | about 11 pcs. | about 8 pcs. | about 4 pcs. |
| 8.5kg Capacity | about 17 pcs. | about 12 pcs. | about 9 pcs. | about 5 pcs. |
| 10.0kg Capacity | about 20 pcs. | about 15 pcs. | about 10 pcs. | about 6 pcs. |
| 12.0kg Capacity | about 24 pcs. | about 18 pcs. | about 13 pcs. | about 7 pcs. |
| ...... | ...... | ...... | ...... | ...... |
●The figure above is for reference only, specific weights are subject to actual clothes.
Attachment : Laundry volume and detergent dosage reference
| Fabric type | Laundry capacity (kg) | Water level | Water flow | Wash time (minutes) | Detergent amount (g) |
| Synthetics, silk, Delicate fabrics | 0-3.0 | Low | Gentle | 3 | About 39 |
| 3.0-5.0 | Mid | 3-5 | About 51 | ||
| Cotton or linen | 0-5.0 | Mid | Gentle | 7 | About 51 |
| 5.0-6.5 | High | 7-10 | About 59 | ||
| Heavy soils | 0-5.0 | Mid | Normal | 10 About 51 | |
| 5.0-6.5 | High | ||||
●The dosage of washing detergent varies according to dirty degree and texture of laundries.
STRUCTURE INSTRUCTION
Name Of Parts

Accessories

Introduction Of Control Panel

※ he drawing above is for reference only, specific drawing is subject to actual models. T
● Water inlet: be used to inject water.
● Wash timer: be used to select required washing time.
● Spin timer: be used to select required spinning time.
- Wash-Drain selector: For washing or rinsing, select "Gentle" or "Normal". For Draining, select "Drain".
USAGE METHOD
Quick Start
![graph TD A["1. Install the washing machine"] --> B["2. Load the laundry"] B --> C["3. Add detergent and water into the wash tub"] C --> D["4. Turn the wash timer knob to set wash time"] D --> E["5. Set the wash drain selector to "Drain" position after washing"] E --> F["6. Repeat the steps…](/content/2026/05/1074175/images/36827fa6bd9754ad9a78ff89227d8061f581dc60198b910e7666f16f1c41986d.jpg)
Washing Method
- Insert the inlet hose into the , and choose injectingwater water inlet mouth water to the wash lub .
- Put the laundry into the wash tub, and add detergent into it. When fill water to half of the desired water level, turn off the water tap and let laundries soak in the solution for minutes, then fill water to desired water level.
- Set wash program "Gehtle&penamount and texture of laundries.
- Turn the wash timer knob to set wash time.
- After washing, set the wash drain selector to "Drain" position for draining.
Rinsing Method
A. Spraying rinse (rinse in the spin tub)
① Put the laundry into the spin tub after washing.
2. Turn on the water tap, choose to fill water into the spin tub for 3-4 minutes, and then turn off the water tap.
③ Set the spin timer for 2-5 minutes for rinsing.
④The above steps can be repeated
Note: If there is red rust in water, do not choose spraying rinse, for the rust is easy to adhere to laundries.
Ensure that do not fill water into spin tub when spinning.

Water level indicator
USAGE METHOD
B. Common rinse (rinse in the wash tub)
①To save time, water and energy, can do pre-spinning before rinsing.
②Put laundries which have already been dehydrated into the wash tub.
③After filling water to the desired level, turn off the water tap to save water.
④Turn the "Wash selector" knob to the " " @entle Normal
⑤Set the "wash timer" to the desired time (about 3-5 minutes) for rinsing.
⑧After rinsing, put the washing materials into the spin tub to spin for 1 to 5 minutes.
Drain out the rinsing water in the wash tub.
⑧The above steps can be repeated.

Spinning Method
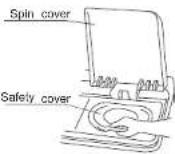
| 1.Shake out the laundry and put them into the spin tub. | 2.Put the inner spin cover on the laundry Confirm the inner spin cover is placed horizontally. | ||
 | [5YZY  Correct Incorrect Correct Incorrect | ||
| 3.Close the safety cover and the spin cover. | 4.Refer to the following table to select spinning time. | ||
 | Washing materials | Spin time | |
| Silk | About 50 seconds | ||
| Light clothes (fiber/blended) | About 1 minute | ||
| Knitwear (fiber) | About 1~2 minutes | ||
| Underwear (cotton) | About 2~3 minutes | ||
| Slipover (cotton/linen) | About 3~4 minutes | ||
| Toweling coverlet (cotton) | About 5 minutes | ||
Incorrect
Efficiency Program
(For efficiency program only)
The tests were carried out under program Normal. Below is the detail for test setting and steps;
1. Main wash: 30 min., HU water level, wash temperature 40 °C;
2. Spin: 3 min., 2 times: 3kg/3.5kg test load for one turn;
3. Rinse: 3 min., M water level, water temperature 20 °C;
4. Spin: 3 min., 2 times; 3kg/3.5kg test load for one turn.
USAGE METHOD
Special Features
This machine can wash blended blanket (less than 3 kg) marked with the "hand washing" label. Washing method is as follows:
① Daldequabeege was infulwater (below 50°C), then pour the solution into ② Fold the blanket as shown in the figure, and into the wash tub.

● Fold in half along the long edge

● 1/3 fold in the same direction

Roll up the blanket

● Put into the tub with blanket edge facing down
Notes
The washing machine employs alternative current with rated voltage and frequency. When voltage fluctuates between -10% and 10% of the rated voltage, the machine can work normally. Connection mode of the power cord of this machine is Y-shaped connection. Users should not detach or reconnect the wire by themselves. Please be installed to be acquired, service center.
MAINTENANCE
Attention To Maintenance
Cabinet maintenance
After using the washing machine, wipe the moisture and stain on it with a piece of soft cloth. To avoid damage to the surface, do not use corrosive or volatile chemicals.
Cleaning the lint filter
◆ Press the button head, and pull the lint filter out.
◆ Turn the filter net inside out, and rinse it in water.
◆ After inserting the claw, press the button to insert it into place.
◆ A sound of "ba" means proper installation.

Claw
Anti-freezing protection
▲ To prevent from freezing:
①Turn off the water tap, remove the water inlet hose and empty water in the water inlet hose completely.
②Lay the drain hose and turn the drain selector knob to the "Drain" position to empty the water in the tub.
▲ If the water is frozen, please take the following steps:
①Put the water inlet hose into warm water of about 50°C.
②Keep about 2 liters of warm water below 50°C in the wash
tub for about 10 minutes. and then lay the drain hose and turn the wash drain selector knob to the "Drain" position to empty the water
③Fit the water inlet hose and turn on the water tap to confirm water filling and draining work properly.

Operation when objects are
dropped into the outside of the spin tub
①Remove all screws on the frame with a screw driver and loosen the connector of the brake belt.
②Pull up the frame with both hands and turn it backwards.
③Take out the clothes dropped into the outside of the spin tub.
④Fasten the connector of the brake belt, Press the frame to reset and lighten screws.
Frame
Cabinet
△ After you use the washing machine, never forget to do the following two things:
- Disconnect the power plug.
- Remove the water inlet hose.


- T TISIRA
- TWIN TUB WASHING MACHINE OWNER'S MANUAL
- READ THIS MANUAL
- SAFETY PRECAUTIONTABLE OF CONTENTS
- SAFETY PRECAUTION
- WARNING
- SAFETY PRECAUTION & INSTALLATION
- ATTENTION TO INSTALLATION
- LAY UPPER DRAIN HOSE
- USAGE METHOD
- PREPARATION INSTRUCTIONS
- STRUCTURE INSTRUCTION
- QUICK START
- WASHING METHOD
- RINSING METHOD
- SPINNING METHOD
- EFFICIENCY PROGRAM
- SPECIAL FEATURES
- NOTES
- MAINTENANCE
- ATTENTION TO MAINTENANCE
- ANTI-FREEZING PROTECTION
- ▲ TO PREVENT FROM FREEZING
- ▲ IF THE WATER IS FROZEN, PLEASE TAKE THE FOLLOWING STEPS
- OPERATION WHEN OBJECTS ARE
- DROPPED INTO THE OUTSIDE OF THE SPIN TUB
Brand : Tisira
Model : MTD65-P7501PO
Category : Washing machine