
5713 - Steamer OSTER - Free user manual and instructions
Find the device manual for free 5713 OSTER in PDF.


| Product Type | Food Steamer |
| Brand | Oster |
| Model | 5713 |
| Voltage | 120 V (for 120-V and 127-V markets) |
| Timer Range | Up to 75 minutes |
| Steam Start Time | 35 seconds (with heating element sleeve) |
| Water Reservoir Capacity | Approximately 1.5 L (estimated based on HI/LO marks) |
| Number of Steaming Bowls | 2 (upper and lower) plus rice bowl |
| Egg Capacity | 8 eggs (using lower bowl as egg tray, except model 5709) |
| Removable Heating Element Sleeve | Yes |
| Drip Tray | Yes |
| Water Inlet for Refilling | Yes |
| Polarized Plug | Yes |
| Dishwasher Safe Parts | Lid, steaming bowls, rice bowl, drip tray (top rack) |
| Descaling Method | White vinegar and water solution |
| Warranty | 1 year limited |
| Country of Origin | China (assumed, manual mentions distribution in USA) |
| Weight | Approximately 4-5 lbs (estimated typical steamer) |
Frequently Asked Questions - 5713 OSTER
User questions about 5713 OSTER
0 question about this device. Answer the ones you know or ask your own.
Ask a new question about this device
Download the instructions for your Steamer in PDF format for free! Find your manual 5713 - OSTER and take your electronic device back in hand. On this page are published all the documents necessary for the use of your device. 5713 by OSTER.
USER MANUAL 5713 OSTER
natural_image
Black-and-white photo of a Oster heat exchanger with layered food ingredients and a digital control panel (no visible text or symbols on the main subject)Visit us at www.oster.com
P.N. 111858 (Rev.A)
IMPORTANT SAFEGUARDS
When using electrical appliances, basic safety precautions should always be followed, including the following:
- READ ALL INSTRUCTIONS.
- Do not touch hot surfaces. Use potholders when removing cover or handling hot containers to avoid steam burns.
- To protect against electrical shock, do not immerse cord, plug or base unit in water or other liquids.
- Close supervision is necessary when any appliance is used by or near children.
- Unplug from outlet when not in use. Unplug before putting on or taking off parts, and allow to cool before cleaning.
- Do not operate any appliance with a damaged cord or plug, or after the appliance malfunctions or has been damaged in any manner. Return appliance to an authorized Oster® Service Center for examination, repair or adjustment.
- Do not use outdoors.
- Do not let cord hang over edge of table or counter, or touch hot surfaces.
- Do not operate appliance while empty or without water in the reservoir.
- Do not place on or near a hot gas or electric burner, or in a heated oven.
- Extreme caution must be used when moving an appliance containing hot food or water or other hot liquids.
- Do not use appliance for other than intended use.
- Lift and open cover carefully to avoid scalding and allow water to drip into steamer.
- The use of accessory attachments not recommended by this appliance manufacturer may cause hazards.
SPECIAL INSTRUCTIONS
- This appliance is intended for household use only.
- Make sure the voltage in your outlet is the same as the voltage indicated on the appliance's rating label.
- The length of the cord used on this appliance was selected to reduce the hazards of becoming tangled in, or tripping over a long cord.
- For safety it is not recommended to use an electrical extension cord with this appliance.
- Do not immerse base unit in water or other liquids.
- U se with wall receptacle only.
FOR 120-V AND 127-V MARKETS ONLY
To reduce the risk of electrical shock, this appliance has a polarized plug (one blade is wider than the other). This plug fits a polarized outlet only one way. This is a safety feature intended to help reduce the risk of electrical shock. If the plug does not fit fully into the outlet, reverse the plug. If it still does not fit, contact a qualified electrician. Do not attempt to defeat this safety feature.
THIS UNIT IS FOR HOUSEHOLD USE ONLY
SAVE THESE INSTRUCTIONS
WELCOME
Congratulations on your purchase of an OSTER® Food Steamer!
Tolearn more about OSTER ^® products, please visit us at www.oster.com.
FOOD STEAMER FEATURES
1

2

3

natural_image
Line drawing of a cylindrical container with a circular side plate (no text or symbols)4
natural_image
Line drawing of a cylindrical container with a circular side panel (no text or symbols)5

8
-
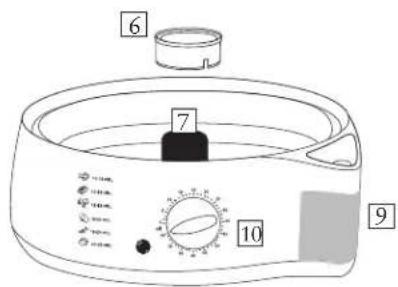
Lid
-
Rice Bowl
-
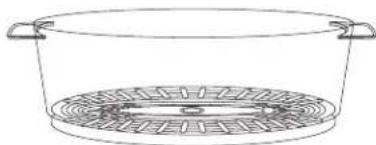
Upper Steaming Bowl
-
Lower Steaming Bowl Can Be Used As Egg Tray (Not available on Model 5709)
-
Drip Tray
-
Removable Heating Element Sleeve
-
Heating Element
-
Base Unit
-
Water Inlet
-
Timer
-
Light
BEFORE THE FIRST USE
- Remove any labels or stickers from appliance.
- Thoroughly wash lid, rice bowl, upper steaming bowl, lower steaming bowl, drip tray and heating element sleeve in warm, soapy water before first use, then rinse and dry carefully. The heating element sleeve must be installed around the heating element for proper operation.
- W ipe the inside of the water reservoir with a damp cloth.
INSTANT STEAM FUNCTION
Included is a removable heating element sleeve. Before cooking, when this sleeve is placed around the heating element, the steam function will automatically produce steam in 35 seconds. Do not operate the steamer without the heating element sleeve.
PLEASE NOTE: The heating element sleeve may be removed to allow cleaning of the heating element. On the heating element sleeve, there is a small indentation (cut) which should face downward when replaced on the heating element.
USING YOUR STEAMER
Place unit on a flat, sturdy surface with adequate clearance (i.e., do not place under wall cabinets). The steamer unit and components are not for use in ovens (microwave, convection or conventional) or on stovetop.
(Step 1A) Fill water reservoir with clean water only. Do not put any other liquids or add any salt, pepper, etc., in the water reservoir. Make sure the water does not exceed the HI fill level or go lower than the LO fill level as indicated inside the water reservoir. Then place the drip tray on the base. (Step 1B)

natural_image
Line drawing of a hand operating a small appliance with a rotary knob (no text or symbols)REMOVABLE HEATING
ELEMENT SLEEVE

FILLING WATER RESERVOIR

DRIP TRAY
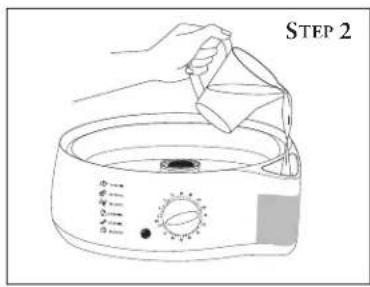
Or you can fill the water reservoir from the water inlet. There are MAX and MIN lines on the water box to indicate the water level. Even while food is still cooking, if the water box shows that the water level is low, you can add water accordingly to the water inlet without moving any of the steaming bowls. (Step 2)
NOTE: WATER SHOULD NEVER GO LOWER THAN LO (MIN) LINE.
WATER INLET
TO USE UPPER OR LOWER STEAMING BOWL
(Step 3) Place vegetable, seafood or other foods without sauce or liquid into the steaming bowl. Arrange food in center of bowl. Try not to block steam vents. You can use lower steaming bowl as an egg tray by directly placing a total of 8 eggs on it. (Egg holding steaming tray not available on Model 5709).
FOR DOUBLE TIER OR THREE TIER STEAMER
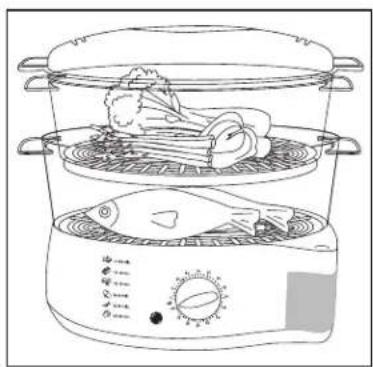
Place the largest piece of food with longest cooking time in the lower steaming bowl. Place lower bowl on top of drip tray and base. Place the upper steaming bowl on top of the base unit, or you can place upper steaming bowl directly on top of the lower steaming bowl. (Upper steaming tray not available on Model 5709).
Cooking times are estimates and depend on the quantity, size, required degree of cooking and temperature of food. Consider all the cooking time given in the following guide as suggested times for double tier steamer.
When handling and removing hot components, use POTHOLDERS to avoid burns from hot steam.

UPPER OR LOWER STEAMING BOWLS
natural_image
Line drawing of a two-tiered food heater with vegetables and fish inside (no text or symbols)MULTI-TIERED STEAMING
USING THE RICE BOWL
Place rice or other foods with sauce or liquid in rice bowl. Place rice bowl in the lower steaming bowl and cover with the lid. Plug into wall outlet and set timer. When food is well cooked, unplug unit.
TIMER SETTING (Maximum 75 Minutes)
Set the timer to the recommended cooking time (steaming times can be adjusted as per your experiment). The light turns on and steam comes in 35 seconds. The light will turn off when cooking is completed and the timer will give a signal bell.

natural_image
Diagram showing two containers with different contents, one above and one below, indicating a cooking or storage process (no text or symbols present)RICE BOWL
CARE AND CLEANING
- Unplug cord from outlet. Before cleaning, allow Steamer to cool.
- Never immerse the Base, Cord or Plug in water.
- Empty the drip tray and the water reservoir. If there is a small amount of water remaining inside the water box, you can just turn the unit upside down and water will come out from the water inlet.
- Wash lid, steaming bowl, rice bowl and drip tray in hot, soapy water. Rinse and dry all parts, or wash on top rack of dishwasher.
- Clean reservoir with soapy water then wipe with damp cloth.
- Do not use abrasive cleaners
- The lower steaming bowl and the rice bowl can be stored inside the upper steaming bowl with the lid on top.
- In hard water areas, the scale may build up on the heating element. If scale is allowed to accumulate, the steam could turn off before the food is cooked. So, after 7-10 uses, pour 3 cups clear vinegar into the water reservoir then fill with water up to the HI level. Do not place lid, steaming bowl, rice bowl and drip tray in this procedure.
- Plug in and set timer to 20 minutes. When the timer rings, unplug cord from outlet. Allow the unit to cool completely before emptying the water reservoir. Use cold water to rinse the water reservoir several times.
REHEATING: BREADS AND LEFTOVERS
- Do not wrap or cover when reheating breads.
- For leftovers, reheating times are based on foods at refrigerator temperatures.
- When reheating leftovers in the rice bowl, always spread leftovers evenly in RICE BOWL and use aluminum foil to cover.
- Experiment with your own leftovers.
Grains
ny types of rice. Follow specific directions for variety used.
measure rice and water then combine in rice bowl. Pour specified water in water reservoir. Cover and steam.
∴, increase by 1 - 2 tablespoons the water mixed with rice by the unt of water on the chart. For firmer rice decrease water mixed he same amount.
ess and consistency of rice at minimum time specified for each rice at the same time.
ng/stirring rice, be careful not to drip the condensate into the rice would reduce the quality and flavor of the steamed rice.
n water in water reservoir.
seasoned with salt, pepper or butter after steaming.
| RICE | COMBINED IN RICE BOWL | APPROX. TIME(Minutes) | |
| RICE AMOUNT | WATER | ||
| Wild Rice Mixpkg.) Mix 1-1/2 cups 50 - 55g (6-1/2 oz. pkg.) Mix 1-3/4 cups 18 - 201 cup 1-1/2 cups 15 - 181 cup 1-1/2 cups 45 - 501 cup 1-2/3 cups 50 - 55 | |||
Vegetables
- Clean the vegetables thoroughly. Cut off stems; trim, peel or chop if necessary. Smaller pieces steam faster than larger ones.
- Quantity, quality, freshness, size/uniformity and temperature of frozen food may affect steam timing. Adjust water amounts and cooking time as desired.
- Frozen vegetables should not be thawed before steaming.
- Some frozen vegetables should be placed in the rice bowl and covered with a piece of aluminum foil during steaming. The frozen foods should be separated or stirred after 10-12 minutes. Use a long-handled fork or spoon to separate or stir foods.
| VARIETY | WEIGHT OR NUMBER OF PIECES | APPROX. TIME (MINUTES) |
Artichokes, Whole 4 whole, tops trimmed 30 - 32
Asparagus, Spears 1 pound 10 - 14
Beans,
Green/Wax 1/2 pound 10 - 14
Cut or Whole 1 pound 12 - 16
Beets 1 pound, cut 25 - 28
Broccoli, Spears 1 pound 10 - 14
Brussels Sprouts 1 pound 15 - 18
Cabbage 1 pound, sliced 16 - 18
Celery 1/2 pound, thinly sliced 14 - 16
Carrots 1 pound, thinly sliced 10 - 14
Cauliflower, Whole 1 pound 10 - 14
Corn on the Cob 3 - 5 ears 25 - 30
Eggplant 1 pound 16 - 18
Mushrooms, Whole 1 pound 25 – 30
Okra 1 pound 18 - 20
Onions 1/2 pound, thinly sliced 12 - 14
Parsnips 1/2 pound 10 - 14
Peas 1 pound shelled 12 - 13
Peppers, Whole Up to 4 medium (not stuffed) 12 - 13
Potatoes, Whole – Red 1 pound, about 6 small 35 – 45
Rutabaga 1 medium, diced 28 - 30
Spinach 1/2 pound 14 - 16
Squash
Summer Yellow and Zucchini 1 pound, sliced 12 - 14
Winter Acorn and Butternut 1 pound 22 - 24
Turnips 1 pound, sliced 20 - 22
All Frozen Vegetables 10 ounces 28 - 50
Fish and Seafood
- The steaming times listed in the chart are for fresh, frozen or fully thawed seafood and fish. Before steaming, clean and prepare fresh seafood and fish.
- Most fish and seafood cook very quickly. Steam in small portions or in amounts as specified.
- Clams, oysters and mussels may open at different times. Check the shells to avoid overcooking.
- You may steam fish fillets in the RICE BOWL. Serve steamed seafood and fish plain or use seasoned butter or margarine, lemon or favorite sauces.
- Adjust steaming times accordingly.
| VARIETY | WEIGHT OR NUMBER OF PIECES | APPROX. TIME (MINUTES) |
Clams in Shell
Littlenecks/Cherrystones 1 pound 12 - 14
Crab
King Crab, legs/claws 1/2 pound 20 - 22
Soft Shell 8 - 12 pieces 10 - 12
Lobster
Tails 2 - 4 16 - 18
Split 1 to 1-1/4 pounds 18 - 20
Whole, Live 1 to 1-1/4 pounds 18 - 20
Mussels
(fresh in shell) 1 pound 14 - 16
Oysters
(fresh in shell) 3 pounds 18 - 20
Scallops(fresh)
Bay (shucked) 1 pound 14 - 16
Sea (shucked) 1 pound 18 - 20
Shrimp
Medium in shell 1 pound 12 - 14
Large/Jumbo in shell 1 pound 16 - 18
Fish
Whole 1/2 to 3/4 pound 18 - 25
Dressed 1/2 to 3/4 pound 18 - 25
Fillets 1 pound 18 - 25
Steaks 1 pound, 1-inch thick 20 - 25
One-Year Limited Warranty
Sunbeam Products Inc., d/b/a Jarden Consumer Solutions, or if in Canada, Sunbeam Corporation (Canada) Limited d/b/a Jarden Consumer Solutions, (collectively "Sunbeam") warrants that for a period of one year from the date of purchase, this product will be free from defects in material and workmanship. Sunbeam, at its option, will repair or replace this product or any component of the product found to be defective during the warranty period. Replacement will be made with a new or remanufactured product or component. If the product is no longer available, replacement may be made with a similar product of equal or greater value. This is your exclusive warranty.
This warranty is valid for the original retail purchaser from the date of initial retail purchase and is not transferable. Keep the original sales receipt. Proof of purchase is required to obtain warranty performance. Sunbeam dealers, service centers, or retail stores selling Sunbeam products do not have the right to alter, modify or any way change the terms and conditions of this warranty.
This warranty does not cover normal wear of parts or damage resulting from any of the following: negligent use or misuse of the product, use on improper voltage or current, use contrary to the operating instructions, disassembly, repair or alteration by anyone other than Sunbeam or an authorized Sunbeam service center. Further, the warranty does not cover: Acts of God, such as fire, flood, hurricanes and tornadoes.
What Are the Limits on Sunbeam's Liability?
Sunbeam shall not be liable for any incidental or consequential damages caused by the breach of any express, implied or statutory warranty or condition.
Except to the extent prohibited by applicable law, any implied warranty or condition of merchantability or fitness for a particular purpose is limited in duration to the duration of the above warranty.
Sunbeam disclaims all other warranties, conditions or representations, express, implied, statutory or otherwise.
Sunbeam shall not be liable for any damages of any kind resulting from the purchase, use or misuse of, or inability to use the product including incidental, special, consequential or similar damages or loss of profits, or for any breach of contract, fundamental or otherwise, or for any claim brought against purchaser by any other party.
Some provinces, states or jurisdictions do not allow the exclusion or limitation of incidental or consequential damages or limitations on how long an implied warranty lasts, so the above limitations or exclusion may not apply to you.
This warranty gives you specific legal rights, and you may also have other rights that vary from province to province, state to state or jurisdiction to jurisdiction.
How to Obtain Warranty Service
In the U.S.A. -
If you have any question regarding this warranty or would like to obtain warranty service, please call 1.800.334.0759 and a convenient service center address will be provided to you.
In Canada -
If you have any question regarding this warranty or would like to obtain warranty service, please call 1.800.667.8623 and a convenient service center address will be provided to you.
In the U.S.A., this warranty is offered by Sunbeam Products, Inc., located in Boca Raton, Florida 33431. In Canada, this warranty is offered by Sunbeam Corporation (Canada) Limited, located at 5975 Falbourne Street, Mississauga, Ontario L5R 3V8.
PLEASE DO NOT RETURN THIS PRODUCT TO ANY OF THESE ADDRESSES OR TO THE PLACE OF PURCHASE.
PRECAUCIONES IMPORTANTES
natural_image
Simple line drawing of a dome-shaped object with two side handles, no text or symbols present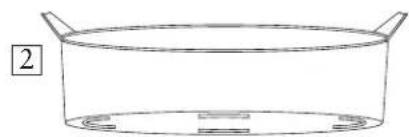
natural_image
Simple line drawing of a cylindrical container with two handles and a base (no text or symbols)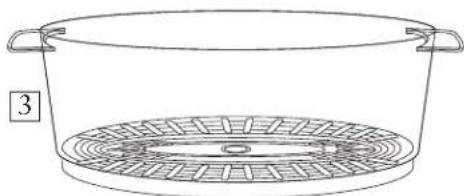
natural_image
Line drawing of a cylindrical basin with two handles and a circular base (no text or symbols)
natural_image
Line drawing of a cylindrical container with a circular side panel and two handles, labeled with number 4 (no text or symbols on the diagram itself)
natural_image
Simple line drawing of a circular basin or basin with a central hole, no text or symbols present.
natural_image
Line drawing of a hand placing a small pot into a digital kitchen appliance with control knobs (no text or symbols)CUBIERTA REMOVIBLE DEL ELEMENTO CALEFACTOR

LLENE EL TANQUE

BANDEJA DE GOTEO
natural_image
Line drawing of a two-tier food heater with a fish inside, showing cooking process (no text or symbols)VAPOERAS DE DOS O TRES NIVELES
natural_image
Diagram showing a container with granular material being placed into a circular filter (no text or symbols)For product questions contact: Sunbeam Consumer Service
USA : 1.800.334.0759
Canada : 1.800.667.8623
www.oster.com
©2005 Sunbeam Products Inc., d/b/a Jarden Consumer Solutions. All Rights Reserved.
Distributed by Sunbeam Products Inc., d/b/a Jarden Consumer Solutions,
Boca Raton, Florida 33431.
AMB:8222005
Sunbeam Consumer Service
©2005 Sunbeam Products, Inc., d/b/a Jarden Consumer Solutions.
- IMPORTANT SAFEGUARDS
- SPECIAL INSTRUCTIONS
- FOR 120-V AND 127-V MARKETS ONLY
- THIS UNIT IS FOR HOUSEHOLD USE ONLY
- SAVE THESE INSTRUCTIONS
- WELCOME
- FOOD STEAMER FEATURES
- BEFORE THE FIRST USE
- INSTANT STEAM FUNCTION
- USING YOUR STEAMER
- TO USE UPPER OR LOWER STEAMING BOWL
- FOR DOUBLE TIER OR THREE TIER STEAMER
- USING THE RICE BOWL
- TIMER SETTING (Maximum 75 Minutes)
- CARE AND CLEANING
- REHEATING: BREADS AND LEFTOVERS
- Grains
- Vegetables
- Fish and Seafood
- One-Year Limited Warranty
- How to Obtain Warranty Service
- PLEASE DO NOT RETURN THIS PRODUCT TO ANY OF THESE ADDRESSES OR TO THE PLACE OF PURCHASE.
- PRECAUCIONES IMPORTANTES
Brand : OSTER
Model : 5713
Category : Steamer