
BCCK32NX - Cooker BLANCO - Free user manual and instructions
Find the device manual for free BCCK32NX BLANCO in PDF.


| Product Type | Freestanding Cooker |
| Brand | BLANCO |
| Model | BCCK32NX |
| Overall Dimensions (W x D x H) | 60 cm x 60 cm x 85 cm |
| Net Weight | 55 kg |
| Power Supply | 220-240 V, 50/60 Hz |
| Total Connected Load | 8.5 kW |
| Hob Type | Electric Ceramic |
| Number of Cooking Zones | 4 |
| Oven Type | Electric Fan Oven |
| Oven Capacity | 65 L |
| Oven Functions | Conventional, Grill, Fan-assisted |
| Energy Efficiency Class | A |
| Safety Features | Child Lock, Auto Shut-off, Overheat Protection |
| Cleaning | Enamel Interior, Easy-clean Hob |
| Spare Parts Availability | Yes, through authorized service centers |
| Repairability Index | 8/10 |
| Warranty | 2 years |
| Installation Type | Freestanding |
Frequently Asked Questions - BCCK32NX BLANCO
User questions about BCCK32NX BLANCO
0 question about this device. Answer the ones you know or ask your own.
Ask a new question about this device
Download the instructions for your Cooker in PDF format for free! Find your manual BCCK32NX - BLANCO and take your electronic device back in hand. On this page are published all the documents necessary for the use of your device. BCCK32NX by BLANCO.
USER MANUAL BCCK32NX BLANCO
Instructions for the Use and Care and Installation of
BCCK60N
BCCK60X
BCCK6X
BCCK6N
BCCK32NX
Ceran Knob Control Cook Top.
Dear Customer
You will find that the clean lines and modern look of your Blanco cooktop blends in perfectly with your kitchen décor. It is easy to use and performs to a high standard.
Blanco also makes a range of products that will enhance your kitchen – such as ovens, rangehoods, dishwashers, microwaves, sinks and taps. There are models to complement your new Blanco cooktop. Blanco now has a range of laundry products to choose from.
Of course, we make every effort to ensure that our products meet all your requirements, and our Customer Relations Department is at your disposal, to answer all your questions and to listen to all your suggestions.
Please complete the warranty section of this manual and keep your receipt as proof of purchase. Retain all documents relating to the purchase of Blanco product.
Blanco is committed to providing increasingly efficient products that are easy to use, respect the environment and are attractive and reliable.
BLANCO
INSTALLATION
All operations relative to installation (electric connection) should be carried out by skilled personnel in conformity with the rules in force. As for the specific instructions see part pertaining to installer. This instructions book is valid for different models. Please consider only the relative paragraphs.
INSTRUCTIONS FOR THE INSTALLER
The present instructions are for the skilled installer as a guide to installation, regulation and maintenance in compliance with the laws and the rules In force.
1.1 ELECTRICAL CONNECTIONS (Fig.1)
For models BCCK60 and BCCK6 refer to diagrams on page 3 and for model BCCK32NX refer to diagrams on page 4.
Before carrying out the electrical connections be sure that:
— the characteristics of the cooktop are indicated on the part number plate applied to the bottom of the work top;
— the system is provided with effective ground in compliance with the rules and the provisions of law in force. The ground is binding according to the law.
In case the appliance isn't provided with cable and/or with relative plug choose material which is suitable for the load indicated on the part number plate and for the working temperature. At any point, the cable should not reach a temperature 50ircC higher than the room temperature.
If one wishes a direct connection to the line, it's necessary to interpose an omnipolar switch with minimum opening between the contacts of 3mm dimensioned for the plate load and in conformity with the rules in force (the ground cable yellow/green should be not interrupted by the switch).
The plug on the omnipolar switch should be easily reachable with apparatus installed.
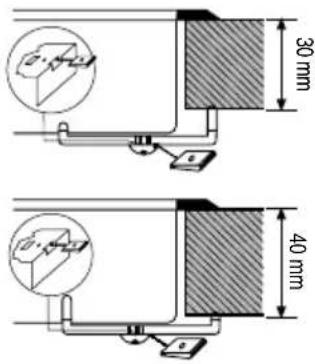
1.2 POSITIONING (Fig.2)
For models BCCK60 and BCCK6 refer to diagrams on page 3 and for model BCCK32NX refer to diagrams on page 4.
The appliance is provided to be built-in a bench top as shown in Figure 2. Preset the sealing agent along all the perimeter. (Cut dimensions fig. 2)
For flush mounting the cooktop refer page 6.
Install the appliance into the benchtop using the 4 brackets and taking into consideration the thickness of the benchtop.
NB. The manufacturer declines all responsibility in case the above and the usual safety rules aren't respected.
INSTRUCTIONS FOR THE USER
2.1 WARNINGS:
- The appliance is not intended for use by young children or infirm persons without supervision.
- Young children should be supervised to ensure that they do not play with the appliance.
- WARNING: If the surface of the ceramic cooktop is cracked, switch off the appliance to avoid the possibility of electric shock.
- Do not use a steam cleaner to clean this appliance.
- If the supply cord is damaged, it must be replaced by the manufacturer or its service agent or a similarly qualified person in order to avoid a hazard.
2.2 USE
Rotate the knob to increase or decrease the heat. Depending on the model, heat is increased by a higher number or increase of the thickness of the line indicator.
Setting the power for models BCCK6 fitted with extended zones:
a) Turn the control knob in a clockwise direction to activate the internal zone. When you arrive at the end, turn the control knob a little more (still in a clockwise direction) until you hear a 'click'. This action will activate the double zone at maximum power level. By turning the control knob anti-clockwise you will decrease the power level of both the internal and external zones.
Note: At position zero, the cooktop is OFF. If you turn the control knob anti-clockwise, you will activate both the internal and external zones at maximum level. You can decrease the power by continuing to turn the control knob anti-clockwise.
Clean the hob before using it for the first time. Afterwards, switch on the elements to the highest level one after the other, without pots, for three minutes in order to eliminate any odours due to newness and so that any moisture that may still be in the heating elements may evaporate. This is necessary so that the electronic circuits function properly.
2.3 PILOT LIGHTS (fig. 4)
The pilot lights are ON when:
— at least one element is turned on; (fig. 4a)
— the top temperature at the indicated spot is higher than 50°C (fig. 4b)
2.4 SAUCEPANS (fig. 3)
When one makes use of heating elements, we advise saucepans with a flat bottom having the same diameter or slightly larger than that of the hot area. The containers should not have rough bottoms in order to avoid scratching the heat surface of the top; (fig. 3)
We recommend the use of only Stainless Steel sauce-pans, which are flat based and excellent conductors of heat, therefore shortening the cooking time and reacting to temperature changes more rapidly than other cookware.
The use of cast iron, copper based and aluminium saucepans and pots is not recommended as these can cause damage to the cooktop surface. The base of all
cookware should be dry prior to placing on the cooktop.
2.5 IMPORTANT
— avoid overflows of liquid; when pot is boiling reduce temperature to avoid overflow of liquid
— don't leave the heating elements on without pots and pans on the top or with void pots and pans;
— at the end of cooking take again the knob to position "0" (off).
WARNING: In the event of there being even a slight fracture of the cooking surface, disconnect the electric power supply immediately.
MAINTENANCE
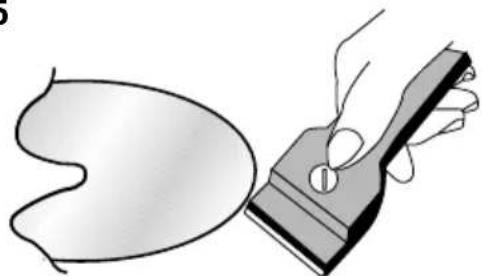
First of all remove stray food bits and grease drops from the cooking surface with the special scraper option (fig.5). Then clean the hot area as best as possible with SIDOL, BLANCOPOLISH or other similar products with a paper towel, then rinse again with water and dry with a clean cloth.
Pieces of aluminium foil and plastic material which have inadvertently melted or sugar remains or highly sacchariferous food have to be removed immediately from the hot cooking area with the special scraper option (fig. 5). This is to avoid any possible damage to the surface of the top.
Under no circumstances should abrasive sponges or irritating chemical detergents be used such as oven sprays or spot removers.
In order to polish the cooktop you may apply a coating of Cerafix with a dry paper towel, leave for approximately two minutes allowing it to dry, then buff off with a soft cloth and shine to a perfect finish.
Fig.1 BCCK60 - BCCK6
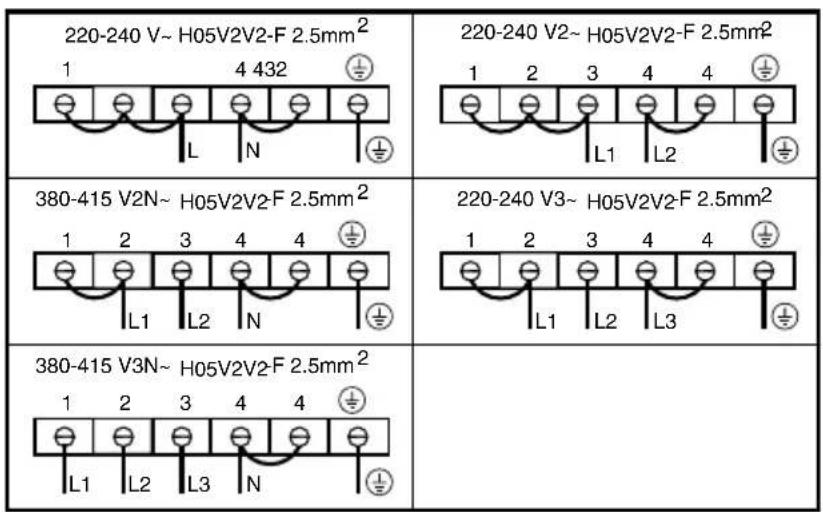
Fig.2

When installing the cooktop above a cupboard, a dividing shelf as pictured above must be installed. If installing above an underbench oven this is not required.

Fig.3

natural_image
Simple line drawing of a cooking pot with crossed lines indicating resistance or crossed panes (no text or symbols)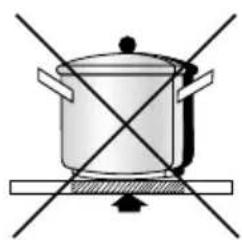
natural_image
Simple line drawing of a cooking pot with crossed lines indicating resistance or crossed panes (no text or symbols)
natural_image
Illustration of a stainless steel cooking pot on a heating element (no text or symbols)Fig.4a
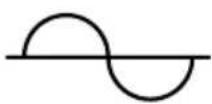
Fig.4b

Fig.5

natural_image
Illustration of a hand holding a tool interacting with a curved object (no text or symbols present)Fig.1 BCCK32N

Fig.2
When installing the cooktop above a cupboard, a dividing shelf as pictured above must be installed. If installing above an underbench oven this is not required.

Fig.3

natural_image
Simple line drawing of a cooking pot with crossed lines indicating resistance or crossed pan (no text or symbols)
natural_image
Simple line drawing of a cooking pot with crossed panes and a base, no text or symbols present.
natural_image
Illustration of a stainless steel cooking pot on a heating element (no text or symbols)Fig.4a
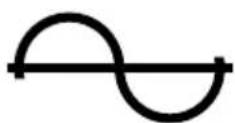
Fig.4b

Fig.5
natural_image
Illustration of a hand holding a tool interacting with a curved object (no text or symbols present)5. INSTRUCTIONS FOR FLUSH-MOUNTING NON FRAMED COOKTOPS
Note
Attention when using plastic worktops
Some producers of plastic worktops refuse to install semi-integrated hobs into their plastic worktops. Please make enquiries at the producer of your worktop concerning usability in the case of semi-integrated cooking zones.
Should a producer not expressly agree to installation, we must point out that we will not be held liable for any consequential damage to the worktop (which may possibly tear due to thermal expansion).
5.1 Notes for fitting
■ The worktop must be installed absolutely horizontally and the opening must be cleanly cut.
■ The distances of the opening to the wall for the front, the back and the side have to correspond to the dimension drawing (see also the chapter Installation in the Instructions for use and installation).
■ A corner moulding of solid wood may be fitted to the worktop at the back of the hob provided that the minimum clearances are maintained.
■ The distance to mounted cupboards should be for technical reasons at least 300 mm.
■ Traverse bars and side walls under the worktop opening must be cut out in accordance with the installation depth of the built-in hob.
■ The plastic finish or the veneer of built-in kitchen furniture must have been produced using a heat-resistant adhesive (100 °C).
■ Cooker hoods or wall cupboards mounted above the hob must be installed with a minimum distance of 650 mm to the hob.
■ We recommend to seal the cut sections of the worktop for built-in dishwashers and oven hobs with a waterrepellent protection paint.
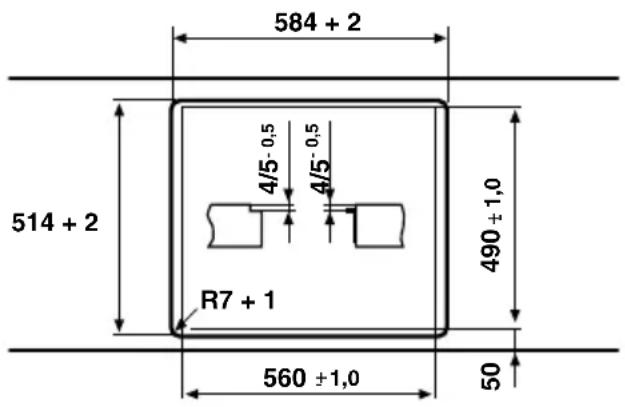
5.2 Installation dimensions of the worktop opening
See also chapter "Making the worktop recess".
Please note:
- Before cutting benchtop check all dimensions including glass thickness of the actual unit you are installing.
- The radius of the glass is R5. Therefore R7 includes an additional 2mm clearance.
Installation when milling out the worktop

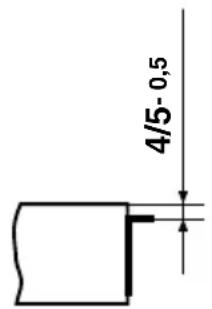
Installation when using supporting angles or strips of wood or stone.

5.3 Making the worktop recess
The cut-out is produced in two work steps.
- Make the opening for the base trough.

- Making the recess for the support of the glass ceramic hob.
(For this recess at least one recessing machine with guide strip is required.)
The outside dimension of the recess should always be min. 4 mm, max. 6 mm longer than the outside dimension of the glass ceramic hob so that a seal can be provided (see: "Gluing in the hob").
Note! Alternatively, instead of carrying out the second stage, the support of the glass ceramic hob can be cut out completely and then glued in again with the height adjusted.
It is also possible to install strips of wood or stone as well as steel angles.
- Make the opening for the hob.

Note!
In order to ensure that it is exactly flush with stone worktops, the recess may have to be modified accordingly.
5.4 Gluing in the hob
Notes
In order to avoid damage to the worktop and the hob, it is necessary to glue the worktop/hob system with a permanent seal so that it is water-proof.
■ The parts to be glued together must be dry and free from grease.
■ To glue the hob, you require water-proof wash primer and heat and moisture-resistant silicone adhesive (150°C).
■ Only glue the hob on its outer edges!
■ With stone worktops installation is to be flush, with heat-sensitive worktops (e.g. wood) the hob must project about 1 mm.
■ Never place the hob with the glass ceramic surface unprotected on the worktop or the floor. Dirt (metal chips, small pieces of stone etc.) can cause scratches in the surface of the glass ceramic hob. Please always place it on cardboard or a wool rug.
Procedure
- Glue the sealing tape (1) onto the corner of the supporting edge of the worktop so that no silicone adhesive can be pressed under the hob.
Attention! Only use the sealing tape that is supplied with the hob!
Should you use any other sealing there is no guarantee that the hob will not sink down after installation.
- Insert the hob without adhesive into the worktop opening and check the height. If necessary, place the shims provided on the support edge for the hob at equal distances to adjust the height.
- Remove the hob again.
- Use the wash primer to pre-treat the outer edges of the hob and the side cut surfaces of the worktop where they will be glued. Apply a thick coat of the primer with a brush on highly absorbent surfaces (e.g. chipboard). With less absorbent surfaces (e.g. marble or granite) it is sufficient to apply the primer with a felt cloth. Important! After application, the primer must be left for about 30 minutes.
- Now insert the hob and align.
- Finally, fill the gap between the hob and the worktop with silicone adhesive (2).
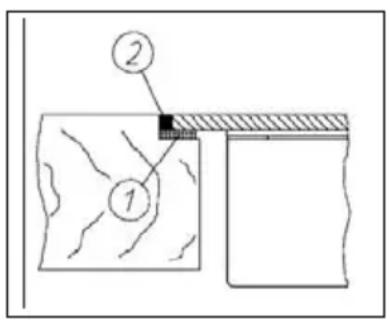

- Smooth the joint with a spatula and low-surface-tension water.
Attention! Use sealing tape! Silicone adhesive may not be pressed anywhere under the supporting surface, otherwise it will no longer be possible to remove the hob at a later stage. No liability will be assumed in the case of failure to observe these instructions.

- Dear Customer
- BLANCO
- INSTALLATION
- INSTRUCTIONS FOR THE INSTALLER
- ELECTRICAL CONNECTIONS (Fig.1)
- POSITIONING (Fig.2)
- INSTRUCTIONS FOR THE USER
- WARNINGS:
- USE
- PILOT LIGHTS (fig. 4)
- SAUCEPANS (fig. 3)
- IMPORTANT
- MAINTENANCE
- INSTRUCTIONS FOR FLUSH-MOUNTING NON FRAMED COOKTOPS
- Note
- Attention when using plastic worktops
- Notes for fitting
- Installation dimensions of the worktop opening
- Making the worktop recess
- Note!
- Gluing in the hob
- Notes
- Procedure
- Attention! Only use the sealing tape that is supplied with the hob!
Brand : BLANCO
Model : BCCK32NX
Category : Cooker