
BIC603T - Cooker BLANCO - Free user manual and instructions
Find the device manual for free BIC603T BLANCO in PDF.


| Brand | BLANCO |
| Model | BIC603T (also BIC604T, BIC75T) |
| Product Type | Induction Cooktop |
| Power Supply | 220-240 V~, 50/60 Hz |
| Maximum Power | Up to 6400 W (cable cross-section 2.5 mm²); for higher power use 4 mm² |
| Number of Cooking Zones | 3 or 4 (depending on variant) |
| Cooking Principle | Induction (magnetic field generates heat directly in pan) |
| Booster Function | Yes, provides extra power for up to 5 minutes |
| Timer | Yes, 1-99 minutes, automatic switch-off |
| Minute Minder (Countdown) | Yes, independent of cooking zones |
| Key Lock (Child Safety) | Yes, locks all functions except ON/OFF |
| Overflow Safety Device (OSD) | Yes, automatically switches off when liquids on control panel |
| Pan Detection | Yes, displays symbol if no pan or unsuitable pan |
| Residual Heat Indicator | Yes, shows "H" when surface >50°C |
| Overheating Protection | Yes, temporarily reduces power to cool down |
| Installation Type | Flush-mounted in worktop (cutout required) |
| Minimum Clearance Below | 40 mm between hob and any appliance underneath |
| Electrical Connection | Permanent connection via omnipolar switch (min 3 mm contact gap) |
| Cleaning Instructions | Use special scraper for residues; avoid abrasive sponges; use SIDOL, STAHLFIX or similar |
| Safety Warnings | Do not use steam cleaners; keep children away; if surface cracked, switch off |
| Compatible Cookware | Ferromagnetic base (check with magnet); diameter not more than 10% larger or 40% smaller than zone marking |
| General Information | Conforms to EU WEEE directive; disposal via recycling collection points |
Frequently Asked Questions - BIC603T BLANCO
User questions about BIC603T BLANCO
0 question about this device. Answer the ones you know or ask your own.
Ask a new question about this device
Download the instructions for your Cooker in PDF format for free! Find your manual BIC603T - BLANCO and take your electronic device back in hand. On this page are published all the documents necessary for the use of your device. BIC603T by BLANCO.
USER MANUAL BIC603T BLANCO
Instructions for the Use and Care and Installation of
BIC603T
BIC604T
BIC75T
Induction Cooktop
Dear Customer
You will find that the modern look of your Blanco rangehood blends in perfectly with your kitchen décor. It is easy to use and performs to a high standard.
Blanco also makes a range of products that will enhance your kitchen – such as cooktops, ovens, dishwashers, microwaves, sinks and taps. There are models to complement your new Blanco rangehood. Blanco now has a range of laundry products to choose from.
Of course, we make every effort to ensure that our products meet all your requirements, and our Customer Service Department is at your disposal, to answer your questions and to listen to your suggestions.
Please complete the warranty section of this manual and keep your receipt as proof of purchase. Retain all documents relating to the purchase of Blanco product.
Blanco is committed to providing increasingly efficient products that are easy to use, respect the environment and are attractive and reliable.
BLANCO
Fig.1

flowchart
graph TD
    A["Current"] --> B["Electric circuit."]
    B --> C["Magnetic field."]
    C --> D["Magnetic with ferromagnetic base."]
    D --> E["Glass-ceramic cooker top."]
    E --> F["Archimedean spiral coil."]
    F --> G["- Polarized coil with magnetic field"]
Fig.2


flowchart
graph TD
    F --> 8.0["8.0"]
    F --> 3["3"]
    D --> -["-"]
    D --> D
    + --> E["+"]
    E --> E
    1.0["1.0"] --> A
    A --> I["1"]
    I --> B
    2.0["2.0"] --> B
    B --> C
    C --> A
Fig.2B
| 220-240 V~ H05V2V2-F | 220-240 V2~ H05V2V2-F |
 | 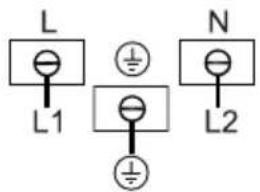 |
Fig.3

flowchart
graph TD
    A["1. A"] --> B["6."]
    B --> C["B"]
    C --> D["D"]
    D --> E["E"]
    E --> F["I"]
    F --> G["B2"]
    G --> H["B1"]
    style A fill:#fff,stroke:#000
    style B fill:#000,stroke:#000
    style C fill:#fff,stroke:#000
    style D fill:#fff,stroke:#000
    style E fill:#fff,stroke:#000
    style F fill:#fff,stroke:#000
    style G fill:#fff,stroke:#000
    style H fill:#fff,stroke:#000
Fig.3B

Fig.4

flowchart
graph TD
    A["M1"] --> B["2."]
    C["M2"] --> D["0."]
    E["N"] --> F["3."]
    G["D"] --> H["-"]
    I["+"] --> J["E"]
    K["I"] --> L["1."]
    M["M3"] --> N["1."]
    O["C"] --> P["1."]
    Q["BLANCO"] --> R["INDUCTION"]
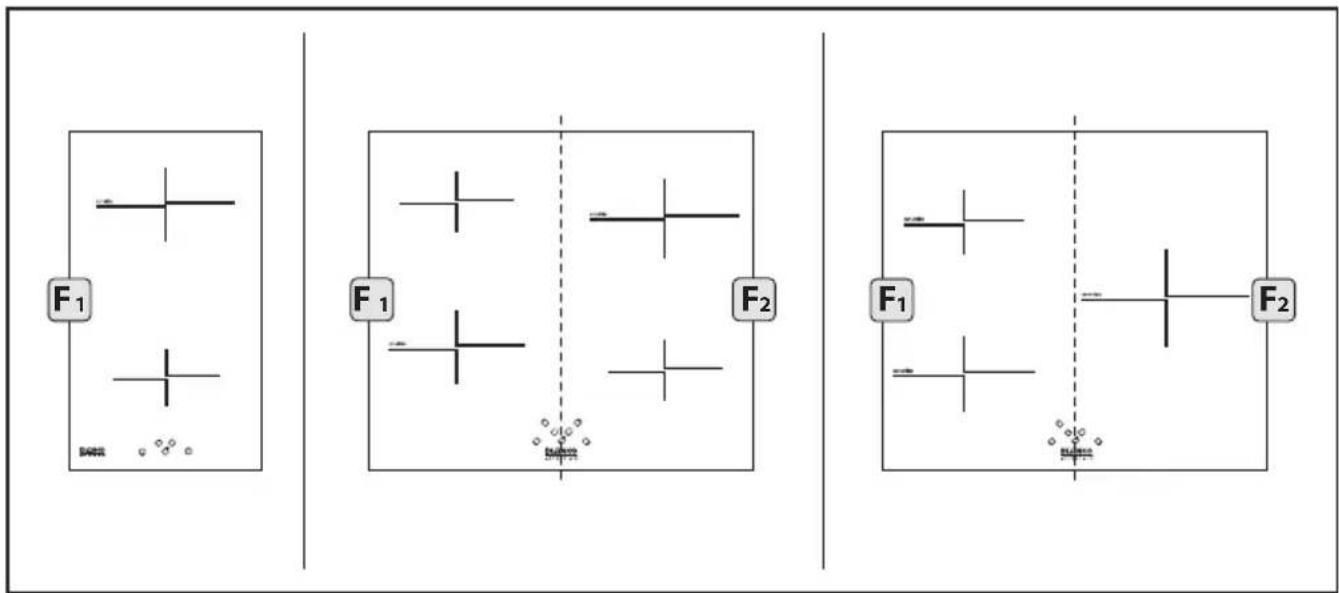
Fig.5

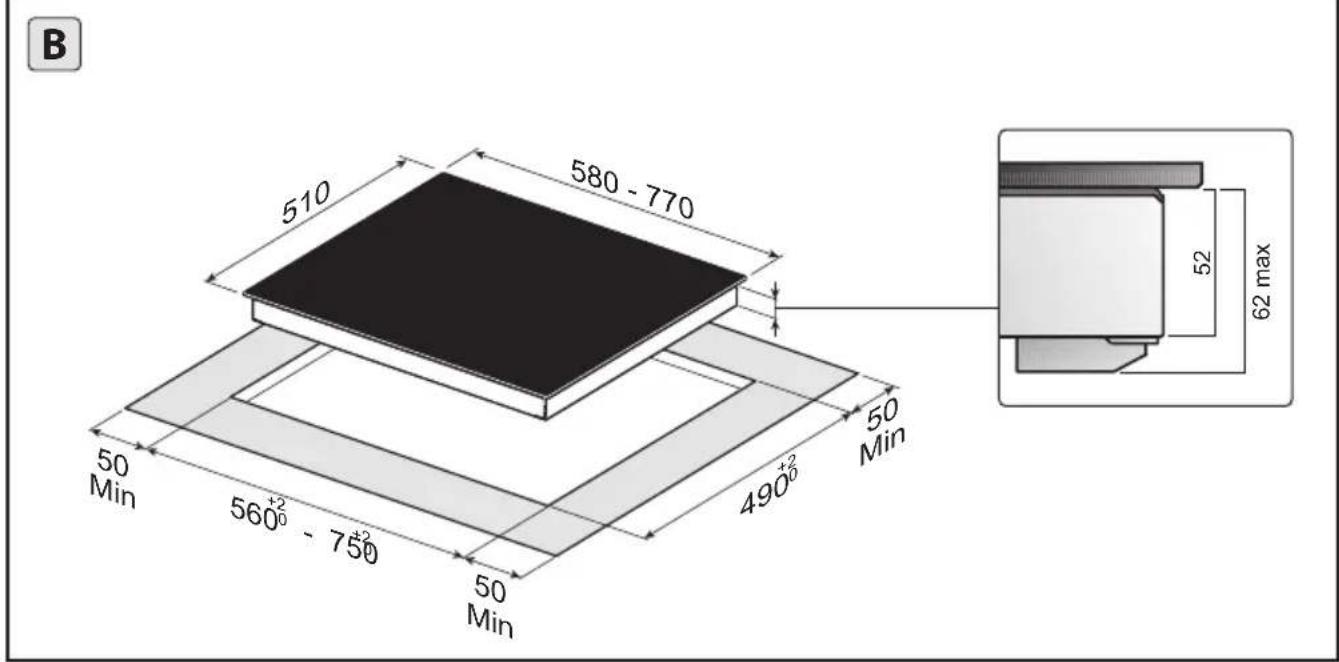
Fig.6
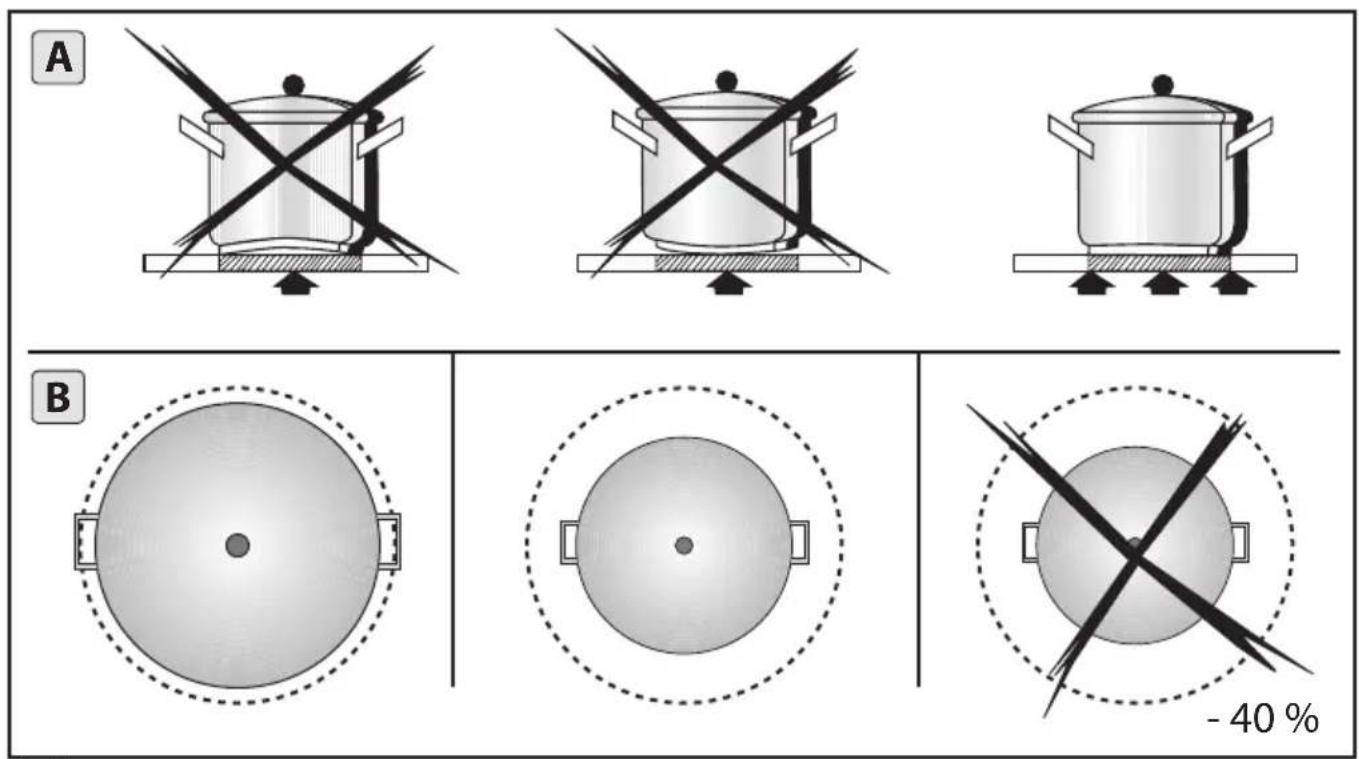
Fig.7

natural_image
Illustration of a hand using a power tool to brush a curved object, no text or symbols presentFig.8

Fig.9

natural_image
Illustration of an oven with airflow arrows indicating internal flow (no text or symbols)
Fig.10
SAFETY WARNINGS
- Read the following carefully to avoid an electric shock or fire.
- It is most important that this instruction book should be retained with the appliance for future reference.
- Should the appliance be sold or transferred, always ensure that the book is left with the appliance in order that the new owner can get to know the functions of the appliance and the relevant warnings.
• These warnings are provided in the interest of safety. You MUST read them carefully before installing or using the appliance. - All operations related to electrical wiring and installation must be carried out by qualified persons, in accordance with safety regulations.
- Means for disconnection must be incorporated in the fixed wiring in accordance with the wiring rules
• The appliance is not intended for use by persons (including children) with reduced physical, sensory or mental capabilities, or lack of experience and knowledge, unless they have been given supervised or instruction concerning use of the appliance by a responsible person for their safely. - Young children should be supervised to ensure that they do not play with the appliance.
- WARNING: If the surface is cracked, switch off the appliance to avoid the possibility of an electric shock
- Metallic objects such as knives, forks, spoons and lids should not be placed on the hob surface since they can get hot.
- Do not spray aerosols in the vicinity of the appliance when it is in operation.
- Do not store or use flammable liquids or items in the vicinity of this appliance, e.g. aerosols.
- WARNING: Accessible parts will become hot when in use. To avoid burns and scalds children should be kept away.
- Do not allow large cookware to overhang the hob onto the adjacent benchtop. This will cause scorching to the benchtop surface.
- Before using the appliance, ensure that all packing materials are removed from the appliance.
- Only authorised personnel should carry out servicing.
• Always ensure the appliance is switched off before cleaning or replacing parts.
• To maintain safe operation, it is recommended that the product be inspected every five years by an authorized service person. - If the supply cord is damaged, it must be replaced by the manufacturer or its service agent or similarly qualified person in order to avoid a hazard.
- Do not use a steam cleaner to clean this appliance.
- Do not turn on the heating zones if aluminium foils or plastic items have been placed on the hob surface.
- WARNING: If the surface is cracked, switch off the appliance to avoid the possibility of an electric shock.
- Metallic objects suck as knives, forks, spoons and lids should not be placed on the hotplate since they can get hot
Before connecting the appliance to the electricity supply:
Check that the voltage and power values listed on the data plate (positioned on the lower part of the appliance) are compatible with the electricity supply and socket. If you have any doubts, please consult a qualified electrician for assistance.
1.1 The principle of induction:
The system of cooking by induction is based on the physical phenomenon of magnetic induction. The fundamental feature of this system is direct transfer of heat energy from the generator to the pan without intermediate means (different from traditional cooker tops see Fig.1).
1.2 Advantages:
If you compare your electric cooker tops, with the induction cooker top, the result will be:
-Safer: low temperature on the glass surface.
-Quicker: brief heating times.
-Moreprecise: the top reacts immediately to your commands.
-Moreefficient: 90% of the energy absorbed is tran sfor med into heat.
Furthermore, once the pan has been removed from the hob, heat transmission is stopped immediately, thereby preventing the needless dispersion of heat.
The system also automatically recognises the various diameters of all pans and uses a suitable power level for each size.
This means that we are able to use pans of various sizes, provided that the pan diameter is no more than 10% larger - or 40% smaller - than the printed detail marked on the hob (Fig.7B).
Caution: if you are using a pan with a diameter which is more than 40% smaller than the printing marked on the glass, the cooking zone may not be activated.
1.3 Cooking vessels (Fig.7A):
Cooking by induction uses magnetism to generate heat. The vessels must therefore contain iron.
Check if the vessel material is magnetic using a magnet.
Important:
To prevent permanent damage to the cooker surface, do not use:
- Pans with bases that are not perfectly flat.
- Metal pans with enamelled bases.
- Do not use pans with rough bases as they may scratch the hob's surface.
Before connecting the appliance to the electricity supply:
-Check that the voltage and power values listed on the data plate (positioned on the lower part of the appliance) are compatible with the electricity supply and socket. If you have any doubts, please consult a qualified electrician for assistance.
Important
- metal objects such as knives, forks, spoons or lids must not be placed on the cooker surface as they can get hot.
- after use, switch the cooker off using the control device and do not rely on the pan detector.
- avoid liquid spilling, therefore to boil or heat liquids reduce the heat supply.
- do not leave the heating elements switched on with empty vessels or without vessels.
- when you have finished cooking, switch off the relative resistance using the control indicated below.
- never use aluminium foil for cooking, or never place products wrapped in aluminium foil onto the cooking surface. The aluminium would melt and damage your apparatus irreversibly.
- Never heat a tin or can of food without opening it – it could explode! This warning applies to hobs of all types.
Attention: steam cleaners must not be used.
Attention: if the surface is cracked, switch the ap paratus off to prevent electric shocks.
Attention: the appliance is not intended to be operated by means of external timer or separated remote-control system.
Other Information:
This appliance conforms to the European Directive EC/2002/96, Waste Electrical and Electronic Equipment (WEEE). By making sure that this appliance is disposed of in a suitable manner, the user is helping to prevent potential damage to the environment or to public health.

The symbol on the product or on the packaging label on the carton indicates that the appliance should not be treated as domestic waste, but should be delivered to a suitable electric and electronic appliance recycling collection point. Follow local guidelines when disposing of waste. For more information on the treatment,
re-use and recycling of this product, please contact your local authority or domestic waste collection service.
INSTALLATION INSTRUCTIONS
These instructions address specialised installers and serve as a guide for installation, adjustment and maintenance in conformity with the laws and regulations in force.
Warning: Failure to install the screws or fixing device in accordance with these instructions may result in electrical hazards (see technical data if supplied).
Positioning (Fig.6):
The appliance is made for fixing into a worktop, as shown in the relevant figure. Apply the supplied sealant to the entire perimeter of the hob and insert it into the fitment hole (for sizing see Fig.6B). Fix the appliance into the worktop with the 4 stays, rotating them according to the top's depth (Fig.6A).
If the underside of the appliance will be accessible after installation, a separator panel G (Fig.9A) will need to be mounted maintaining the distances shown (Fig.9B).
If the appliance is installed over an oven the panel is not necessary (Fig.10A-10B)..
Important: if there is an oven under the induction hob it is advisable for it to have a cooling fan. Do not use the induction hob while PYROLITIC cleaning is in process.
Warning: to allow the circulation of as much fresh air as necessary, there must be at least 40 mm between the induction hob module and any appliance installed under it (Fig.10B). In any event, adequate aeration must be provided. To allow fresh air circulation there must be openings in the kitchen furniture (Fig.9A-10A) of the sizes indicated in Fig.9B-10B.
Electrical connections (Fig.2B - Fig.3B):
Before making the electrical connections, check that:
- the ground cable is 2 cm longer than the other cables;
- the system ratings meet the ratings indicated on the identification plate fixed on the lower part of the worktop;
- the system is fitted with efficient earthing compliant to the laws and regulations in force.
If the appliance is not fitted with a cable, use type:
"H05V2V2-F" for a power level of up to 6400 Watts. The cross-section of the cable should be at least 2.5mm2 , or 4 mm2 for greater power levels. The cable should never reach a temperature which is 50ircC above the temperature of the room in which it is installed. The appliance is designed for permanent connection to the electricity supply and should therefore be fitted with an omnipolar switch which has a minimum opening of 3mm between contacts. The switch should be suitable for the charge indicated on the appliance data plate and must conform to all current legislation (the yellow/green earth wire must not be interrupted by the switch).
The omnipolar switch must be easy to reach once the installation process has been completed..
USE AND MAINTENANCE
- Use (Fig.2):
A=ON/OFF key
B = Cooking zone display
C = Cooking zone selection key
D="-"key / Timer "-" key
E = "+" key / Timer "+" key
F = Timer Display
I = Decimal point indicator
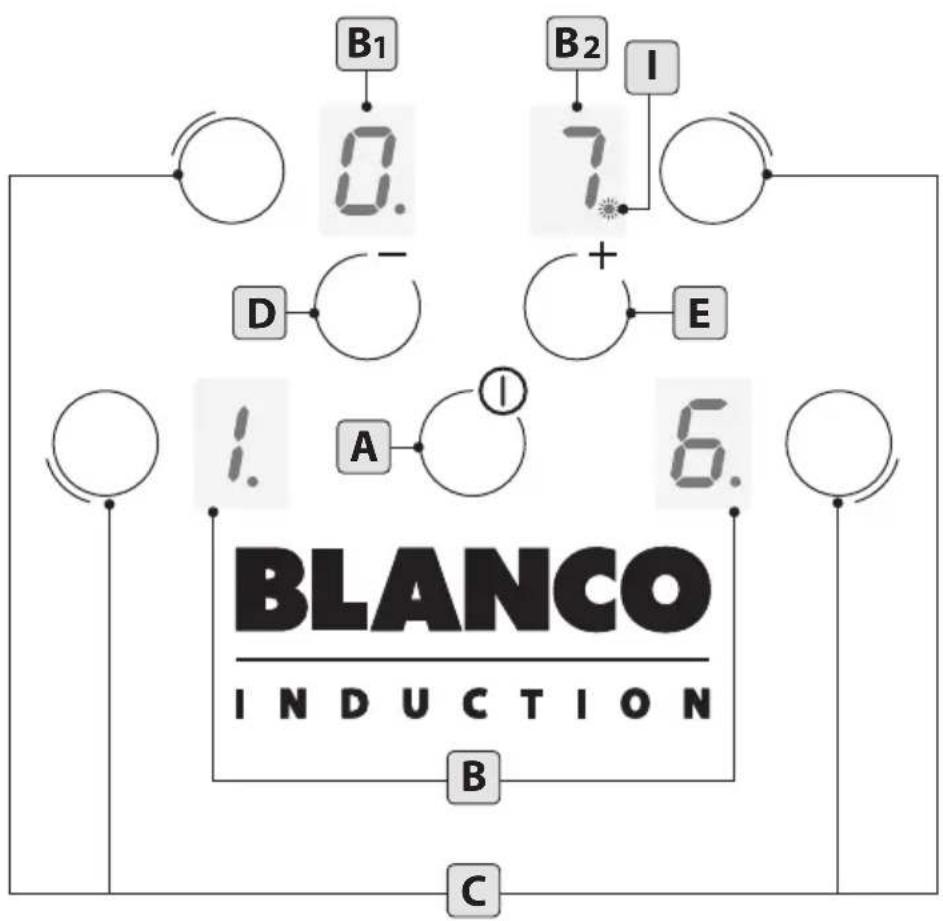
- Use (Fig.3):
A=ON/OFF key
B = Cooking zone display
B1 = Cooking zone R2 display - Timer display
B2 = Cooking zone R3 display - Timer display
C = Cooking zone selection key
D="-"key / Timer "-"key
E = "+" key / Timer "+" key
I = Decimal point indicator
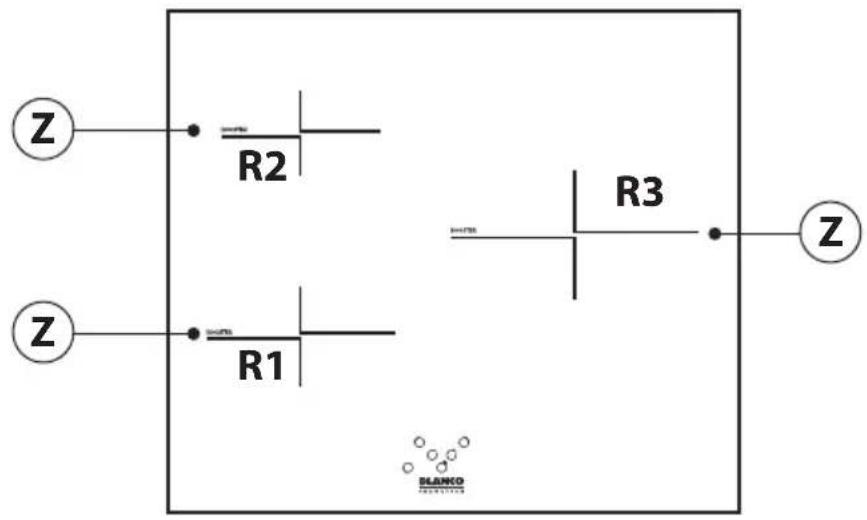
- Use (Fig.4):
A=ON/OFF key
M1 = Cooking zone R1 display
M2 = Cooking zone R2 display - Timer display
M3 = Cooking zone R3 display
N=TimerDisplay
C = Cooking zone selection key
D="-" key / Timer "-" key
E = "+" key / Timer " + " key
I = Decimal point indicator
-To activate the hob, press the "ON/OFF" key. Some zeros with flashing decimal points will appear for about 20 seconds on all the displays.
If no operation is carried out within this time, the hob will turn off.
-A cooking zone may be switched on by selecting one of the "C" keys.
- The display will view the corresponding numbers; the grading of the concerned zone will be intense while the others will be weaker.
-Use "+" or "-" buttons to regulate the power level.
- By selecting the “-” key the power level goes directly to 9.
- If after about 10 seconds no operation is carried out, display shade goes back to the initial one. The hob will continue its normal cooking.
- If the power level is set at zero, the cooking zone will shut off.
-To turn off the cooking zone, select the corresponding "C" key and switch the cooking level to 0.
- The display will view the corresponding numbers; the grading of the concerned zone will be intense while the others will be weaker.
- All operations will be combined with a "BEEP" acoustic signal.
-When a cooking zone "C" is brought to the OFF position and the glass top temperature is greater than approximately 50°, the display of the interested zone will signal a fixed "H".
Warning:
To prevent damage being inflicted on the electronic circuits, the hob is fitted with an overheating safety system. In situations where the appliance is used at high power levels for a prolonged period of time, the hob may switch off one or more of the activated zones temporarily, until the temperatures return to the set levels. On the display corresponding to the cooking zone which has been temporarily switched off, the power level will be shown in alternation with a E/2. This will stop flashing once the cooking zone has been reactivated.
• Key function:
To keep children or persons needing supervision from using the hob surface, all of the functions can be blocked in the following way:
1- Switch to hob on (if it is off) by selecting the "ON/OFF" key. The cooking zones must be off.
2-Press the “-” key and the R2 (Fig.2), R4 (Fig.3) or R3 (Fig.4) key simultaneously according to the model you own.
3- Press only the cooking zone R2 (Fig.2), R4 (Fig.3) or R3 (Fig.4) key once again according to the model you own.
The "L" letter indicating that the function is active will appear on the display.
Should one or more zones still be hot, the letter "H" and "L" will alternate on the relative displays.
-To deactivate the key function, switch the hob off (if it is on) by selecting the "ON/OFF" key.
- Once it is off, switch the hob back on.
-Press the “-” key and the R2 (Fig.2), R4 (Fig.3) or R3 (Fig.4) key simultaneously according to the model you own.
-Pressthe"-" key a second time.
- Zeros will appear on all the displays for a few seconds.
- If the cooker top is switched off with the KEY function active, when subsequently activated the top will be in the same situation, meaning with the KEY function active.
-If the hob is switched on and the Lock function is enabled, button ON/OFF will still work.
• Magnetic sensor:
- The hob is equipped with a pan sensor; when the pan is removed or badly positioned, the _symbol will appear. If, on the other hand, the surface of the glass is still hot, the _symbol will appear alternating with the .
• O.S.D. (Overflow Safety Device):
The hob is equipped with a safety system which moves all hotplates to the OFF position and activates the safety lock when liquids or items are detected on the control panel.
These symbols will flash on the display: Er 03
They can be deactivated by removing the item or the liquid. The hob will switch off automatically.
- Timer:
Note: the Timer can be activated on all the cooking zones simultaneously.
This function allows to establish the time (from 1 to 99 minutes) or automatic switch-off of the cooking zone selected.
Activation:
1- Select the cooking zone "C".
2- Set the cooking level.
3- Press the "+" and "-" keys simultaneously. The decimal point "•" will start to flash. The time on the timer will appear on the relative displays.
4- Adjust the time within about 10 seconds by using the "+" and "-" keys. By pressing the "-" key directly the time will be set at 30 minutes.
3/4 burner version:
- If the decimal point “•” appears on the displays, it means that timer is active.
- During cooking the time set previously with the timer is not displayed.
- In order to view the time remaining on the Timer of a cooking zone, select that cooking zone and then press the "+" and "-" keys simultaneously. On the "B1" and "B2" displays (4 burner version) and on the "M2" and "N" displays (3 burner version) the remaining time will appear.
- When time is up an acoustic signal beeps and the timer displays flash. Any key can be selected to stop the acoustic signal. If you leave the acoustic signal it will deactivate after about 2 minutes.
2 burner version:
- If the decimal point “•” appears on the displays, it means that timer is active.
- When the decimal point flashes it indicates the zone with the least time on the timer and therefore the first zone will switch off. The timer display will show the remaining time of the next zone which will switch off.
- In order to view the time remaining on the Timer of a cooking zone, select that cooking zone and then press the "+" and "-" keys simultaneously. Afterwards the remaining time will appear on the timer "F" display.
- When time is up an acoustic signal beeps and the timer displays flash. Any key can be selected to stop the acoustic signal. If you leave the acoustic signal it will deactivate after about 2 minutes.
To deactivate the timer function before the set time, select the cooking zone and then press the "+" and "-" keys simultaneously. By selecting the "-" key a second time the time goes to 0. After that the cooking zone will continue its standard function.
• Minute Minder (Countdown):
This function can be used both with cooking zones activated/deactivated and with the timer inserted.
-The Minute Minder allows to set an established countdown that goes from 1 to 99 minutes.
On expiry of the time, the hob emits an acoustic signal without changing the active functions.
Activation:
1- The function is activated with the hob on.
2-Press the "+" and "-" keys simultaneously.
3- Adjust the time within about 10 seconds by using the "+" and "-" keys. By pressing the "-" key directly the time will be set at 30 minutes.
3/4 burner version:
-If no zone is activated or if the hob is deactivated by selecting the ON/OFF key, the decimal point on the R2 and R3 displays begins to flash.
-If the hob is turned on with the Minute Minder function active, zeros will appear on all the displays. By pressing the "+" and "-" keys simultaneously, the remaining time will appear.
-In order to view the remaining time of the Minute Minder press the "+" and "-" keys simultaneously. On the "B1" and "B2" displays (4 burner version) and on the "M2" and "N" displays (3 burner version) the remaining time will appear.
- When time is up an acoustic signal beeps and the timer displays flash. Any key can be selected to stop the acoustic signal. If you leave the acoustic signal it will deactivate after about 2 minutes.
2 burner version:
-If the "F" displays of the timer or the hob are deactivated, by selecting the ON/OFF key the remaining time of the Minute Minder will appear
-If the Minute Minder and the Timer are active, the "F" display will signal the time left. If it is the Timer function, the decimal point of the concerned zone will flash.
- When time is up an acoustic signal beeps and the timer displays flash. Any key can be selected to stop the acoustic signal. If you leave the acoustic signal it will deactivate after about 2 minutes.
To deactivate the Minute Minder function before the set time, press the "+" and "-" keys simultaneously. By selecting the "-" key a second time the time goes to zero. After that the cooking zone will continue its standard function.
It is possible to use the Minute Minder and the Timer simultaneously.
- Booster (Fig.2-3-4):
Depending on the appliance model, it may be fitted with a Booster system which can be used to speed up cooking times through the application of a power level which is greater than the nominal value, within a defined period of time.
The cooking zones supplied with this function are indicated in Fig.2-3-4 by the letter (Z).
1- To activate it, switch on the concerned cooking zone bringing the power level to 9.
2- By selecting the "+" key on the display the letter "P" will appear.
-The Booster can be activated simultaneously on all the enabled zones.
-The Booster function will be active for about 5 minutes, after which cooking will continue at level 9.
-In order to stop this function, select the concerned cooking zone and the “-” key until you reach the desired level.
- All operations will be combined with a "BEEP" acoustic signal.
-The Booster might not turn on if the cooking zone (indicated by the letter (Z)) was activated previously with high temperature levels.
• Integrated power control (Fig.5):
Each phase (this is divided into two zones in a vertical line: F1 e F2) is capable of using a maximum power of 3,700W.
If this is exceeded for example by activating the Booster, the software automatically lowers power of the previously selected zone until it reaches the allowed power level.
The display of the zone with limited power will begin to flash for about 3 seconds. During this time it is possible to modify the power level.
• Maintenance (Fig.8):
Remove any residues of food and drops of grease from the cooking surface using the special scraper supplied on request.
Clean the heated area as thoroughly as possible using SIDOL, STAHLFIX or similar products and a cloth/paper, then rinse with water and dry with a clean cloth.
Using the special scraper (optional) immediately remove any fragments of aluminium and plastic material that have unintentionally melted on the heated cooking area or residues of sugar or food with a high sugar content. In this way, any damage to the cooktop surface is prevented.
Under no circumstances use abrasive sponges or irritating chemical detergents such as oven sprays or stain removers.
THE MANUFACTURER DECLINES ALL RESPONSIBILITY FOR EVENTUAL DAMAGES CAUSED BY BREACHING THE ABOVE WARNINGS.
- Error codes:
| Error code: | Description: Possible causes: Error recovery: | ||
| C The cooking | zone can be configured if a static “C” is shown. | It's not an error, the user is in the service menu. | A suitably pan must be placed on the relevant cooking zone. |
| C/- The cooking | zone will be configured if a blinking “C” is shown. After a successful configuration the relevant display shows “-”. When the “-” is not displayed please check the possible causes of the E/5. | The user is in the service menu, it's not an error. | Wait for the symbol “-” or abort the configuration activities by pressing the selectkey and the “C” does not blink anymore. |
| E A blinking | “E” on each cooking zone indicates, that all configs will be deleted. | The user is in the service menu, it's not an error. | Manual configuration. |
| E/2 Temperature | ure limits are excessed. | Electronik temperature to high. System must cool down. | |
| E/3 Unsuitable | pot. Pot creates on the modul an | improper operating point which can destroy devices, e.g IGBT'. | 1. The error is automatically cancelled after 8s and the cooking zone can be used again. In case of further upcoming errors the pot have to be changed. |
| E/4 Unconfigured | induction modul. | Induction modul is not configured. | 1. Delete the hob configuration and activate the manual configuration.2. Start the UI service menu to configure the induction modul. |
| E/5 No communication between UI and induction modul. | No power supply of induction modul. | Contact the technical Service. | |
| E/6 Main power disturbance. | er disturbance. 1. Failure in main power frequency detection.2. Over voltage. | Power frequency detection. | Contact the technical Service. |
| E/8 Fan failure. | Fan or control electronic is defect. | defect. | Contact the technical Service. |
| E/9 Defect T sensor on inductor. | Sensor signal out of valid range; sensor or electronic is defect. | Signal out of valid range; sensor or electronic is defect. | Contact the technical Service. |
| E/A | Hardware defect of induction modul. | Defect hardware device detected by the self check of the modul. | Contact the technical Service. |
| E/C | Configuration failure. | 2 cooking zones are dedicated to the same element of the UI. | 1. Erase the actual configuration manual configuration with service menu. |
| E/H | Fixed sensor value. | - | System must cool down. |

natural_image
Symbolic logo featuring a stylized plant with leaves and a circular element containing an euro symbol (no text or numbers present)
- Dear Customer
- BLANCO
- SAFETY WARNINGS
- The principle of induction:
- Advantages:
- Cooking vessels (Fig.7A):
- Important:
- Before connecting the appliance to the electricity supply:
- Important
- Other Information:
- INSTALLATION INSTRUCTIONS
- Warning: Failure to install the screws or fixing device in accordance with these instructions may result in electrical hazards (see technical data if supplied).
- Positioning (Fig.6):
- Electrical connections (Fig.2B - Fig.3B):
- USE AND MAINTENANCE
- Warning:
- • Key function:
- • Magnetic sensor:
- • O.S.D. (Overflow Safety Device):
- - Timer:
- Activation:
- 3/4 burner version:
- burner version:
- • Minute Minder (Countdown):
- - Booster (Fig.2-3-4):
- • Integrated power control (Fig.5):
- • Maintenance (Fig.8):
- THE MANUFACTURER DECLINES ALL RESPONSIBILITY FOR EVENTUAL DAMAGES CAUSED BY BREACHING THE ABOVE WARNINGS.
Brand : BLANCO
Model : BIC603T
Category : Cooker