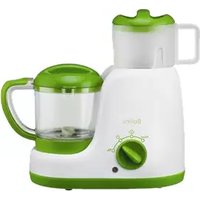
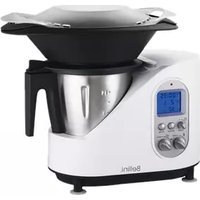
BBT100 - Blender Bellini - Free user manual and instructions
Find the device manual for free BBT100 Bellini in PDF.


| Brand | Bellini |
| Model | BBT100 |
| Product Type | Baby Food Maker (Steamer and Blender) |
| Functions | Steaming, Blending, Reset |
| Steam Time | Up to 20 minutes; water capacity 25-150 ml |
| Blending Time | Maximum 30 seconds continuous |
| Material | BPA Free plastic |
| Blade Material | Stainless steel (sharp) |
| Safety Features | Interlock system, auto cut-out, overheat protection |
| Cleaning | Hand wash removable parts; do not immerse base |
| Descaling | Every 4 weeks using citric acid or vinegar solution |
| Power Supply | Standard domestic power outlet |
| Warranty | 1 year from date of purchase |
| Country of Origin | China |
| Included Accessories | Steamer basket, blender bowl, blade assembly, lid, handle |
| Intended Use | Household only |
Frequently Asked Questions - BBT100 Bellini
User questions about BBT100 Bellini
0 question about this device. Answer the ones you know or ask your own.
Ask a new question about this device
Download the instructions for your Blender in PDF format for free! Find your manual BBT100 - Bellini and take your electronic device back in hand. On this page are published all the documents necessary for the use of your device. BBT100 by Bellini.
USER MANUAL BBT100 Bellini
All in one steamer and blender


natural_image
White and green baby food blender with control knob (no text or symbols visible)
Important Safeguards
When using electrical appliances, in order to reduce the risk of fire, electric shock, and/or injury, these basic safety precautions should always be followed:
For Your Safety
Read all instructions carefully, even if you are familiar with the appliance.
- To protect against the risk of electric shock, DO NOT IMMERSE main body of this appliance in water or any other liquid.
- This appliance is not intended for use by persons (including children) with reduced physical, sensory and mental capabilities, or lack of experience and knowledge, unless they have been given supervision or instruction concerning use of the appliance by a person responsible for their safety.
• Children should be supervised to ensure that they do not play with the appliance. - Switch off the power outlet and remove the plug before cleaning or when not in use. To unplug, grasp the plug and pull from the power outlet. Never pull the cord. Never carry the appliance by the cord.
- Do not operate any appliance with a damaged cord or plug; if the appliance malfunctions; or if it is dropped or damaged in any manner.
- Do not allow the cord to hang over the edge of a table or counter, or touch hot surfaces.
- Do not operate or place any part of the appliance on or near any hot surfaces (such as a hot gas or electric burner, or in a heated oven).
- Do not use this appliance for anything other than its intended use. This product is intended for household use only.
- This appliance is intended to be plugged in a standard domestic power outlet only.
- Do not attempt to repair, disassemble or modify the appliance. There are no user-serviceable parts.
-
Do not use outdoors.
-
Operate on a dry level surface. Sinks, drainboards or uneven surfaces must be avoided.
- The use of attachments or accessories not recommended or sold by the manufacturer can cause fire, electric shock or injury.
- Never insert utensils into the appliance.
- Allow to cool before cleaning.
- Do not use with an extension cord.
- Store the unit indoors in a dry location.
- Do not operate under or near flammable materials, such as curtains, drapes or any other combustible materials.
- Caution should be taken when handling this appliance as some surfaces may be hot during and immediately after boiling. Severe burns may result from misuse.
- Avoid contact with steam from the lid when water is boiling, or just after the steamer has switched off. Take care when opening the lid when the steamer has recently boiled, as steam can burn.
- Extreme caution is necessary when moving any appliance containing hot water. Wait until the appliance has switched off automatically, or switch it off manually before moving it.
- Do not move the appliance containing hot liquids or food.
- Do not directly touch food inside the steamer.
- Do not touch the appliance when it is producing steam. Use a cloth to remove the lid and steam compartment.
- To disconnect, remove plug from wall outlet.
- CAUTION: This appliance generates heat and escaping steam during use. Proper precautions must be taken to prevent the risk of burns, fires or other damage to persons or property.
- Do not touch any moving parts.
-
Keep hands and utensils away from cutting blade while chopping food to reduce the risk of injury to persons or damage to the appliance. A plastic or wooden scraper may be used but only when the blender is not running.
-
Never attach the chopping blade without the bowl in place.
- This appliance is intended for processing small quantities of food for immediate consumption. It is not intended to process large quantities of food at one time.
- Avoid running the motor continuously for periods over 30 seconds.
- Do not operate the appliance when empty.
- Do not operate any appliance with a damaged cord or plug after the appliance malfunctions, or is dropped or damaged in any manner.
- Ensure the bowl and lid are tted correctly before starting appliance.
- Motor and blender attachment must stop completely before removing lid.
- Do not touch the blades when removing food from the bowl or when removing the blades for cleaning as they are sharp.
- Do not attempt to override the cover lock mechanism.
- Do not touch the blades, especially when the appliance is plugged in. The blades are very sharp.
- If the blades get stuck, unplug the appliance before you remove the ingredients blocking the blades.
- The appliance becomes very hot during steaming and may cause burns when touched. Only lift the bowl by its handle.
• Always unplug the appliance and let it cool down before you clean it. - Never use the bowl or any other part of the appliance in a microwave, as they are not suitable for this use.
- Never sterilise the bowl or any other part of the appliance in a steriliser or in a microwave, as they are not suitable for this use.
- This appliance is intended for household use only.
- Do not use the appliance if it has fallen or is damaged in any way.
-
Never use the steaming function without water.
-
Do not exceed the maximum level indicated on the tank.
- When you steam ingredients, make sure that you do not overll the steam basket.
- When you blend liquids, do not exceed the maximum level indicated on the bowl.
• Always make sure that the lid has cooled down after steaming before you open it to add more ingredients for blending if necessary. - Never connect this appliance to a timer switch or remote control system in order to avoid a hazardous situation.
• Always check the temperature of the baby food before you feed your baby.
• Always check the consistency of the baby food. Make sure there are no chunks in the food. - When the steaming process has finished (maximum 20 minutes) wait for the appliance to cool down for a few minutes, turn the dial to the Reset position before starting a new steaming process.
- Regular descaling prevents damage to the appliance.
Compulsory Warning
If the supply cord is damaged, the cord must be replaced by the manufacturer, its service agent or similarly qualified persons in order to avoid a hazard.
This product has not been designed for any uses other than those specified in this booklet.
Save These Instructions
Features of Your Baby Food Maker
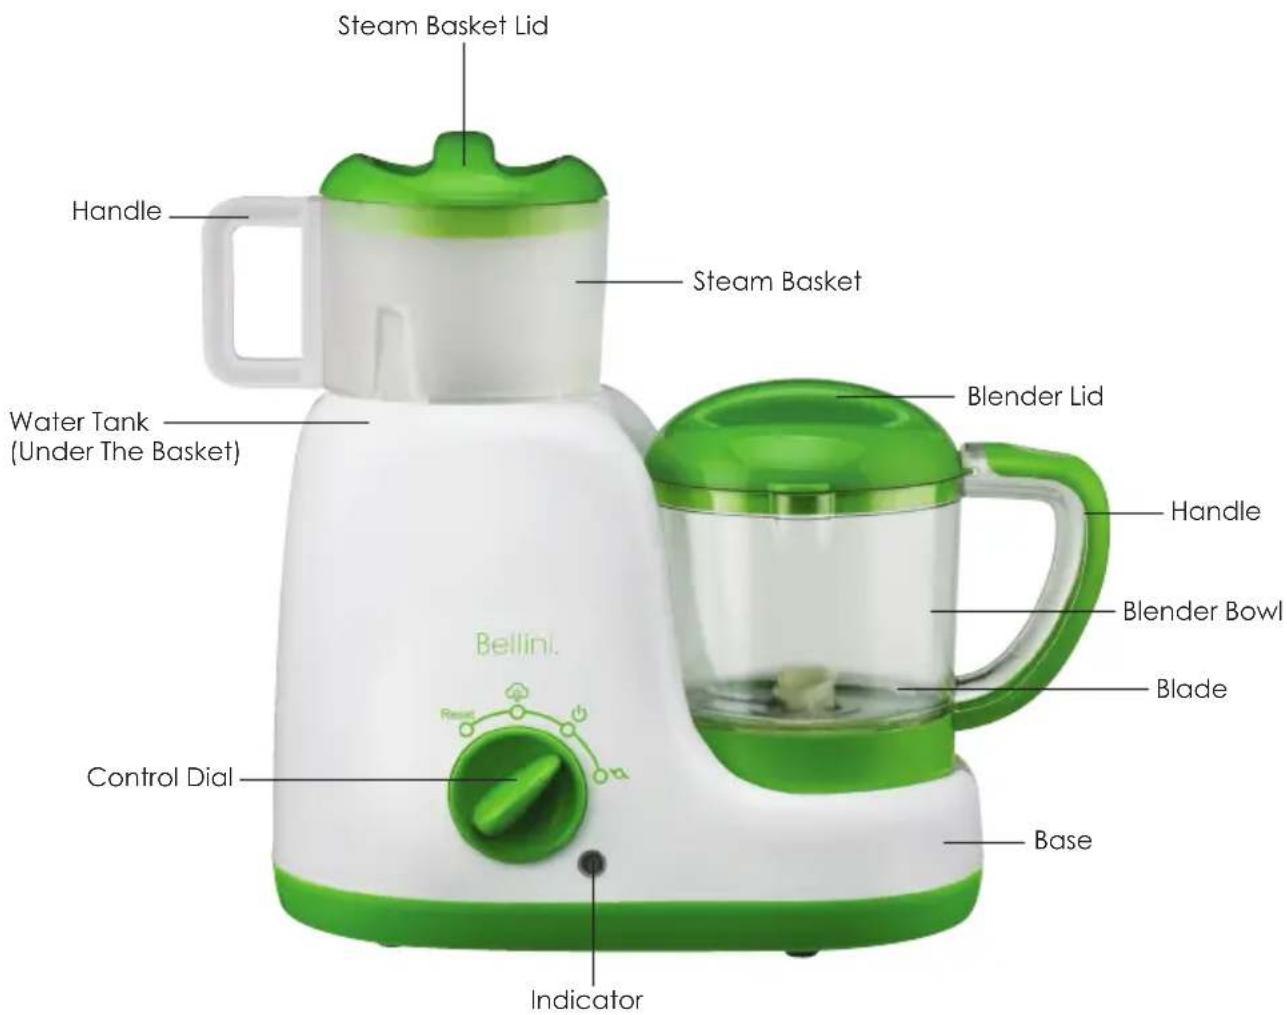
| Setting Function | |
| OFF | |
| Steamer | |
| Blender | |
| Reset | Reset |
Getting to Know Your Baby Food Maker
Congratulations on the purchase of your new BPA Free Bellini Baby Food Maker.
Before first using your new Baby Food Maker, it is most important that you read and follow the instructions in this Use and Care booklet, even if you feel you are quite familiar with this type of appliance. Find a place and keep this booklet handy for future reference. Attention is particularly drawn to the section dealing with "IMPORTANT SAFEGUARDS".
This appliance has been designed to operate from a standard domestic power outlet. It is not intended for industrial or commercial use.
Before First Use
Carefully unpack the unit and remove all packaging materials. Remove the power plug cover from pins. Clean all parts except the main unit (see Cleaning and Maintenance), rinse and dry them thoroughly, taking care to handle the blending blades carefully.
Caution: Do not immerse the base, cord or plug in water or any other liquid. Do not use harsh detergents or abrasive cleaners on any part of the blender.
How to Assemble Your Baby Food Maker
IMPORTANT: Be sure the Baby Food Maker is off and unplugged before removing or replacing parts.
Steamer Basket Handle
Place the handle in the upward position and slide it upwards to secure to the steamer basket. Remove the handle from the steam basket in the inverse direction.

natural_image
Pure architectural line drawing of a room or structure with no text, numbers, or symbols
natural_image
Simple line drawing of a rectangular object with a small protrusion on the side (no text or symbols)Steamer Basket
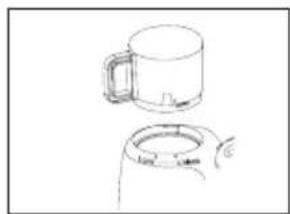
Place the steamer basket onto the water tank. Make sure the triangle icon on the basket is aligned to the "unlock" position on the base. Turn the handle clockwise to the "lock" position.
Remove the steamer basket in the inverse direction.
natural_image
Line drawing of two types of kitchen mugs, one upright and one closed, with no text or symbols present.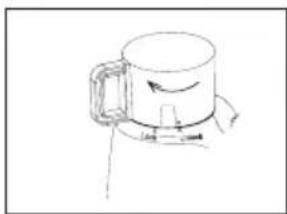
natural_image
Simple line drawing of a mug with handle and side arm, no text or symbols present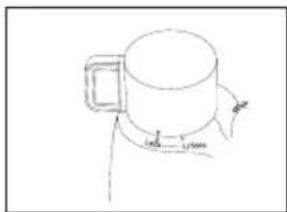
natural_image
Simple line drawing of a mug with a handle and a small arrow pointing to the side (no text or symbols)Blades
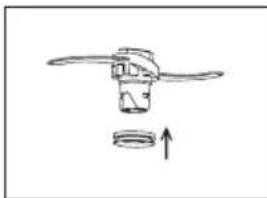
Place the searing ring on the bottom of the blade.
natural_image
Simple line drawing of a propeller with an upward arrow indicating motion (no text or symbols)Using your hand, hold the top of the blade and place it through the hole on the bottom of the bowl.

natural_image
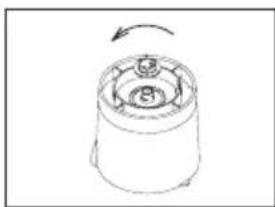
Line drawing of a mug with a handle and lid, showing a small object above it (no text or symbols)Turn the bowl over with its opening downward, place the blade retention nut on the blade's other end and twist it anti-clockwise until it locks into position.
natural_image
Simple line drawing of a cylindrical object with a circular top and arrow indicating rotation (no text or symbols)Remove the blade in the inverse direction.
Blender Bowl
Place the blending bowl over the centre post in the base. Make sure the triangle icon on the blending bowl is aligned to the “unlock” position on the base. Turn the handle anti-clockwise to the “lock” position.
Remove the blender bowl in the inverse direction.

natural_image
Line drawing of a kitchen mixer with a stand mixer and fan (no text or symbols)
natural_image
Line drawing of a kettle with a handle and a small knob, no text or symbols presentBlender Lid
Place the lid on the bowl as the below drawing, turn it anticlockwise until it locks into position.
Remove the blender lid in the inverse direction.

natural_image
Line drawing of a kettle with lid and handle, placed on a stand (no text or symbols)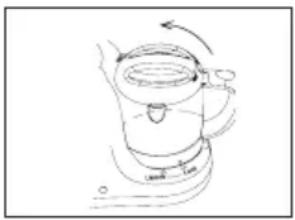
natural_image
Line drawing of a kettle with a rotating handle and scroll, no text or symbols presentWarning: This unit has an interlocking system. The unit will not operate unless the lid has been fitted correctly. Do not attempt to start the unit without the lid being correctly placed and locked into position.
Operation
Always check the temperature of the baby food before you feed your baby.
Always make sure that the lid has cooled down after steaming before you open it to add more ingredients for blending.
Empty the water tank before you refill it to start a new steaming process.
Do not exceed the maximum level indicated on the blender bowl when blending food.
Do not exceed the maximum level indicated on the blender bowl when blending liquids.
This appliance is intended for steaming fresh solid ingredients and then blending them to obtain baby food. Normally you would first steam the ingredients and then blend them. However, you can also use the appliance for steaming or blending only. When you use the appliance for blending only, skip the sections 'Filling the water tank' and "Steaming' and only follow the instructions in section "Blending'. After blending, never steam already blended food. Never steam the same batch of ingredients for longer than 20 minutes or more than once.
This appliance is NOT intended for:
- Defrosting food
• Steaming frozen food
• Steaming already blended food
• Steaming the same ingredients for more than 20 minutes
• Cooking rice and pasta - Blending ingredients first and then steaming them
• Heating up fluids, e.g. soup or water - Keeping food warm for several hours
- Reheating food
Filling Water to The Tank
Remove the steamer basket from the tank. Fill with water, ensuring the maximum level is not exceeded.
Note: It is advisable not to use mineral water, as the minerals contained in this type of water cause scale to build up inside the tank.
Note: Do not place anything other than water in the water tank.
Steaming
If certain vegetables and fruits are steamed gently, they are perfect for babies who start to eat solid food. Steaming is the healthiest way of preparing food, as the food retains lots of vitamins and other healthy nutrients.
- Position the unit on a flat surface.
- Insert the power cord into a standard domestic power outlet and switch on.
- Fill water tank with water.
- Place the steamer basket onto the water tank and turn to the "lock" position.
- Cut solid ingredients into small pieces (cubes not bigger than 2-3cm).
-
Place the ingredients in the steamer basket.
-
Place the lid on the steamer basket.
- Turn the control dial to the steaming position. The steaming indicator will light up to indicate that the appliance is steaming.
- When the food has steamed, turn the control dial to the "off" position. Wait 2 minutes before removing lid to ensure no more steam releases from the steam outlet.
- If you want to serve the steamed baby food without blending it, test the food to make sure it is at a safe temperature for your baby.
- If you would like to blend the steamed food, please follow the Blending instructions.
Note: You can find recipes and the cooking times required within this manual.
Note: Do not steam frozen ingredients because the appliance cannot heat up frozen food to the temperature required for steaming. Always defrost frozen solid ingredients before you steam them in this appliance. Shake off any excess water from the defrosted ingredients before you place them in the steamer basket.
Note: Do not process a large quantity of solid ingredients at the same time. Process these ingredients in a series of small batches instead.
Warning: Hot steam or hot water could burn your fingers. Do not touch and never let children touch hot parts and steam, as this may cause scalds.
Note: The steaming time depends on the amount of water you have put in the water tank.
Note: If you want to steam another batch of ingredients, let the appliance cool down for 10 minutes, turn the control dial to Reset position before you start steaming again.
Auto Cut-Out Reset
This appliance is equipped with an overheat protection. It will cut off the power automatically if the water is heating dry. The steam indicator will go out at the same time.
To start your next steaming process, wait for the appliance to cool down and turn the control dial to the reset position.
Blending After Steaming
- Place the blender bowl with the blades on the base and turn to the "lock" position.
- Place steamed food into the bowl. If necessary, add additional ingredients for blending (e.g. water or oil).
- Place the lid on the blending bowl and turn to the "lock" position.
- Turn the control dial to the blending position. Hold the knob in this position until the food is properly blended.
- When you have finished blending, simply release the control dial. The dial automatically returns to the off position.
- Remove the blended food from the bowl. If necessary, use a spatula. Make sure that the baby food is at a safe temperature for your baby.
- Unplug the appliance.
Warning: This appliance is equipped with a built-in safety lock. This appliance only functions if you have correctly assembled the lid.
Warning: Do not let the appliance blend for more than 30 seconds at a time. If you have not finished blending after 30 seconds, switch off the appliance and wait 2 minutes before continuing. If the appliance becomes hot, let it cool down for a few minutes before before continuing.
Note: If the ingredients stick to the wall of the bowl, switch off the appliance and loosen them with a spatula or add liquid.
Note: Make sure that the blended baby food is at the right consistency (e.g. no lumps) before serving.
Note: If the baby food is still too solid add liquid (e.g. water) until the baby food is soft and smooth.
Blending Without Steaming
This appliance is intended for:
- Pureeing steamed and cooked ingredients for baby food.
- Blending fluids and fruits for baby drinks.
This appliance is not intended for chopping hard ingredients such as ice or sugar cubes.
- Place the blender bowl with the blade onto the base and turn to the "lock" position.
- Place the steamed food into the bowl. If necessary, add additional ingredients for blending (e.g. water or oil).
- Place the lid on the blending bowl and turn to the "lock" position.
- Turn the control dial to the blending position. Hold the dial in this position until the food is blended to the correct consistency.
- When you have finished blending, simply release the control dial. The control dial automatically returns to the off position.
- Remove the blended food from the bowl. If necessary, use a spatula. Make sure that the baby food is at a safe temperature for your baby.
- Unplug the appliance.
Warning: This appliance is equipped with a built-in safety lock. This appliance only functions if you have correctly assembled the lid.
Warning: Do not let the appliance blend for more than 30 seconds at a time. If you have not finished blending after 30 seconds, switch off the appliance and wait 2 minutes before continuing. If the appliance becomes hot, let it cool down for a few minutes before continuing.
Note: When blending fluids, ensure you do not exceed the maximum level indicated on the bowl.
Note: If the ingredients stick to the wall of the bowl, switch off the appliance and loosen them with a spatula or add liquid.
Note: Make sure the blended food is at the right consistency before feeding to your baby.
Note: If the baby food is still too solid add some fluid (e.g. water) until the baby food is soft and smooth.
Ingredients and Steaming Times
| Type of Food Ingredients Approximate Steaming | Time | |
| Fruit Apple 10min | ||
| Orange 10 min | ||
| Peach 10 min | ||
| Pear 10min | ||
| Pineapple 15 min | ||
| Plum 10 min | ||
| Vegetables Asparagus 10 min | ||
| Broccoli 20 min | ||
| Carrot 15 min | ||
| Cauliflower 15 min | ||
| Celery 15 min | ||
| Zucchini 15 min | ||
| Fennel 15 min | ||
| French Beans 20 min | ||
| Leek | 15 min | |
| Onion 15 min | ||
| Peas 20 min | ||
| Capsicum/Pepper | 15 min | |
| Potato | 20 min | |
| Pumpkin | 15 min | |
| Spinach | 15 min | |
| Swede | 15 min | |
| Sweet Potato 15 min | ||
| Tomato | 15 min | |
| Meat | Chicken, Beef, Lamb, Pork etc. | 20 min |
| Fish | Salmon, Sole, Cod, Trout etc. | 15 min |
All food has to be cut in small cubes, no bigger than 2-3cm.
Steaming Time:
Refer to below table for water guidelines for steaming.
| Water Capacity | Steam Time (Approx.) |
| 25 ml | 3 minutes |
| 50 ml | 6 minutes |
| 75 ml | 10 minutes |
| 100 ml | 13 minutes |
| 125 ml | 16 minutes |
| 150 ml | 20 minutes |
Cleaning and Maintenance
Clean the appliance after every use.
Never immerse the main unit in water.
Never use bleach or chemical sterilising solutions/tablets in the appliance.
Never use scouring pads, abrasive cleaning agents to clean the appliance.
- Unplug the appliance and remove the lid from the steamer basket and blender bowl.
- Remove the steamer basket and blender bowl from the main unit.
- Remove the blade from the blender bowl.
- Clean the blade under the tap thoroughly, immediately after use. Make sure you also rinse the searing rubber ring.
- Handle the blade very carefully. The cutting edges are very sharp.
- Clean the other parts that have come into contact with food in hot water with some washing-up liquid immediately after use.
- To clean the water tank, fill it with warm, soapy water, then rinse thoroughly. Wipe dry with a soft cloth.
- If necessary, clean the main unit with a moist cloth.
Warning: Never immerse the main unit, cord and plug into any liquids.
Descaling The Water tank
Mineral deposits (usually white in color) may form on the inner surfaces of the tank and can cause damage to the unit.
Descaling is recommended every four weeks to ensure the appliance works effectively. To reduce scale build-up, it is helpful to use pre-boiled or filtered water in the appliance. To descale the appliance, follow the descaling instructions below.
- Make sure the appliance is switched off.
- Add one sachet of citric acid (10g) to 150ml of warm water.
-
Fill the tank with the solution of citric acid (or vinegar) and water.
-
Turn the control dial to steaming position. The indicator light will turn orange to indicate that the appliance is steaming.
- Switch off the appliance after 5-6 min of steaming and unplug it.
- Pour the used solution of citric acid (or vinegar) and water out of the tank.
- Rinse the water tank and the bowl thoroughly with fresh water several times.
- Fill the tank with 150ml water and let the appliance complete a steaming process of 20 minutes with the empty bowl before you use the appliance with food again.
Note: You can also use a solution of 100ml water and 50ml white vinegar (8% acetic acid).
Storage
- Empty the water tank before you store the appliance.
- Make sure all parts are clean and dry before you store the appliance.
- Store the appliance with the blade unit in the bowl to prevent damage.
Troubleshooting
| Problem Possible | Cause Solution | |
| The appliance does not heat. Thermostat has cut off the power. | Turn the control dial to Reset position. | |
| The appliance does not blend. Interlock switch not activated. Replace the blender bowl and lid to correct position. | ||
| The steaming light does not go on. | The appliance is not connected to the mains. | Put the plug in the wall socket. |
| Control dial not set at the Steam position. | Turn the control dial to Steam position. | |
| Thermostat has cut off the power. | Turn the control dial to Reset position. | |
| The ingredients have not heated up completely. | The pieces in the bowl are too big, there is too much food in the basket or you have not steamed the food long enough. | Cut the food into smaller pieces (2-3cm), decrease the amount of food in the basket or select a longer steaming time (max. 20 minutes). |
| The appliance does not steam. You have not put water in the appliance. | Switch off the appliance and put the right amount of water in the tank. | |
| Steaming takes too long or the steam function does not work at all. | There is too much scale in the water tank. | Descale the water tank. |
| The blade unit or motor unit is blocked. | There is too much food in the bowl. | Switch off the appliance and process a smaller quantity. Do not fill the bowl beyond the Max. level. |
| The motor unit gives off an unpleasant smell during the first few times of use. | This is normal. If the appliance continues to give off this smell after you have used it a few times, check whether the processing quantities and times are correct. | |
| Steam basket handle becomes loose when it is hot. | This is normal. Handle will tighten once appliance has cooled down. | |
| The appliance continues to give off an unpleasant smell after I have used it a few times. | There is too much food in the blender bowl or you have let the appliance blend for too long. | Process smaller quantities and do not let the appliance blend for more than 30 seconds at a time. |
| The appliance makes a lot of noise, feels hot to touch or omits smoke etc. | There is too much food in the bowl. | Switch off the appliance and process a smaller quantity. |
| The appliance has been blending too long. | Do not let the appliance blend for more than 30 seconds at a time. | |
| The lid of the bowl leaks. Lid has not been placed correctly on the bowl. | Assemble the lid on the bowl correctly. | |
| There is too much food in the bowl. | ||
Recipes
Useful Hints & Guidelines
All fruits and vegetables should be carefully washed before use.
Baby food should be cooked thoroughly until piping hot and allowed to cool before serving.
Never reheat your baby's food more than once.
Most freshly cooked foods can be stored in the refrigerator for up to 24 hours.
Do not refreeze food after it has been thawed.
Steaming times will vary according to the quantity of food in the jar. Check the instructions for use for the approximate steaming times for different foods.
To reach the desired consistency, add baby milk or water to thin it down or add baby rice or drain some of the cooking water before blending to thicken it.
All final quantities are indicative and can vary depending on the nature of the ingredients and cooking time.
First Stage Foods
Carrot & Potato Puree
Ingredients:
1 small carrot, peeled and sliced
1 small potato, peeled and sliced
14 cup turnips, peeled and diced
12 tsp olive oil
Directions:
Steam the vegetables for approx 15 minutes then drain the cooking liquid.
Add olive oil and puree to desired consistency.
Vegetable & Cheese Puree
Ingredients:
1 small carrot, peeled and diced
1 small potato, peeled and diced
1 small tomato, peeled and diced
25gms edam cheese, grated
Drizzle olive oil
Directions:
Steam the vegetables for approx 15 minutes. Once cooked, add the cheese and puree all together. To finish add a thin drizzle of olive oil.
Note: Peel the tomato to avoid constipation in younger babies.
Cinnamon Applesauce
Ingredients:
1 small Granny Smith apple, peeled, cored and diced
1 small Red Delicious apple, peeled, cored and diced
Cinnamon to taste
Maple syrup, optional
Oatmeal
Directions:
Steam apples for 15 minutes then puree. Mix in syrup (optional), cinnamon and oatmeal until desired consistency and taste.
Banana & Pear Puree
Ingredients:
1 medium banana, diced
1 small pear peeled and diced
1 tbs baby cereal
Directions:
Place the banana and pear in the steamer for approx 10 minutes. Once cooked, puree with baby cereal.
New Textures & Flavours
Butternut Squash & Carrots Puree
Ingredients:
1 small butternut squash, diced
1 small carrot, sliced
Olive Oil
Directions:
Steam the vegetables for approx 15 minutes. Drain excess liquid and reserve. Add olive oil and puree to desired consistency using the reserved liquid to achieve a thinner puree.
Smashed Potatoes
Ingredients:
1 small potato, peeled and diced
5 broccoli florets, chopped
14 cup shredded cheddar cheese
1 tbs milk
Directions:
Steam the vegetables for approx 15 minutes. Discard leftover water from steaming.
Add a tablespoon or so of milk and the cheese to taste. Mash together with a large fork.
Toddler Tastes
Ricotta Gnocchi
Ingredients:
1 fresh egg
1 cup ricotta cheese
5 tablespoons flour
1 teaspoon olive oil
1 pinch ground nutmeg
Directions:
To make the gnocchi dough, cut the cheese into small pieces and place in the mixing bowl with the egg, flour, olive oil and nutmeg. Pulse 3 times.
Dip a teaspoon in hot water and then use the spoon to shape the dough into several olive-sized gnocchi balls. (You will need to re-dip the spoon each time so the dough doesn't stick).
Heat a saucepan of water, when it boils, poach the gnocchi for 30 to 40 seconds and remove them with a slotted spoon. (Gnocchi is done when they start to float to the surface).
Drizzle with olive oil and eat immediately.
Strawberry & Banana Yoghurt Shake
Ingredients:
12 ripe banana, sliced
8 strawberries, washed, hulled and cut in 1/2
1 tsp sugar (optional)
½ cup plain yoghurt
Directions:
Place the fruit in the blending bowl and blend slightly. (One or two pulses). Add the yoghurt and sugar (optional).
Notes
Notes
Warranty
The benefits conferred by this warranty are in addition to the consumers guarantees and other rights and remedies in respect of the product which the consumer has under the Australian Consumer law.
The original purchaser of this Bellini product is provided with the following warranty, subject to the following conditions.
This product is warranted for a period of 1 year from the date of purchase for all parts defective in workmanship or materials. Should an instance occur where the product is deemed faulty, the product will need to be returned to the retailer where it was purchased to be replaced with the same product or a refund issued. In order to obtain an exchange or a refund, proof of purchase must be presented to the retailer.
This warranty is in addition to all other rights and remedies available under the Australia Consumer Law and other laws and shall not be taken as applying to exclude, restrict or modify such rights or remedies in any other matter whatsoever.
WARRANTY CONDITIONS
- This warranty is only valid for appliances used according to the manufacturer's instructions.
- This appliance must not be modified or changed in any way.
- Connection must be to the voltage requirements as specified in the ratings label located on the product.
-
The manufacturer does not accept liability for any direct or consequential damage, loss or other expense arising from misuse or incorrect installation and operation of the appliance.
-
Warranty will only be given where proof of purchase is provided, e.g. original invoice.
- Not designed or warranted for industrial or commercial use.
DO NOT SEND IN THIS WARRANTY
Fill out the following details and file with your purchase invoice.
RETAIN & FILE WITH YOUR RECEIPT
Your Purchase Receipt/Invoice is proof of date of purchase. You must be able to present it at the place of purchase to obtain a replacement or a refund.
GSM International Ltd reserves the right to discontinue items, modify designs and change specifications without incurring obligation. Whilst every effort is made to ensure that descriptions, specifications and other information in this publication is correct, no warranty is given in respect thereof and the company shall not be liable for any errors therein.
Purchased from:
Co. Name:
Address:
Date of Purchase: ____
NOTE: Consistent with our continuing product development policy, improvements may have been made which render the contents of this package slightly different to that shown.
Cat. No. BBT100
June 2011

Gerard Sourcing & Manufacturing
GSM International Ltd.
Consumer Service Centre : 1300 373 199
GSM International Ltd has a policy of continual improvement throughout the product range. As such the unit contained within may differ slightly from the unit illustrated on the pack.
MADE IN CHINA for GSM International Ltd.

- Important Safeguards
- For Your Safety
- Compulsory Warning
- Save These Instructions
- Features of Your Baby Food Maker
- Getting to Know Your Baby Food Maker
- Before First Use
- How to Assemble Your Baby Food Maker
- Steamer Basket Handle
- Steamer Basket
- Blades
- Blender Bowl
- Blender Lid
- Operation
- Filling Water to The Tank
- Steaming
- Auto Cut-Out Reset
- Blending After Steaming
- Blending Without Steaming
- Cleaning and Maintenance
- Descaling The Water tank
- Storage
- Recipes
- Useful Hints & Guidelines
- First Stage Foods
- Carrot & Potato Puree
- Directions:
- Vegetable & Cheese Puree
- Cinnamon Applesauce
- Banana & Pear Puree
- New Textures & Flavours
- Butternut Squash & Carrots Puree
- Smashed Potatoes
- Toddler Tastes
- Ricotta Gnocchi
- Strawberry & Banana Yoghurt Shake
- Warranty
- WARRANTY CONDITIONS
- DO NOT SEND IN THIS WARRANTY
- RETAIN & FILE WITH YOUR RECEIPT
- GSM International Ltd.
Brand : Bellini
Model : BBT100
Category : Blender