
PCW185S - Range hood Philco - Free user manual and instructions
Find the device manual for free PCW185S Philco in PDF.


| Type of product | Chimney range hood |
| Brand | Philco |
| Model | PCW185S |
| Width | 90 cm (36 inches) |
| Depth | 50 cm (19.7 inches) |
| Height (maximum) | 75 cm (29.5 inches) |
| Weight | 18 kg |
| Power supply | 220-240 V ~ 50 Hz |
| Motor power | 200 W |
| Max extraction capacity | 650 m³/h |
| Number of speeds | 3 (plus intensive speed) |
| Noise level | 58 dB (low speed), 68 dB (high speed) |
| Lighting | 2 x 3 W LED |
| Grease filter type | Aluminum mesh, dishwasher safe |
| Charcoal filter option | Yes (sold separately) |
| Control type | Mechanical push buttons |
| Installation type | Wall-mounted, ducted or recirculating |
| Energy efficiency class | D |
| Annual energy consumption | 85 kWh/year |
| Material | Brushed stainless steel |
| Warranty | 2 years |
| Cleaning instructions | Grease filters monthly with mild detergent; wipe exterior with soft cloth |
| Spare parts availability | Grease filters, charcoal filters, LED bulbs, control buttons |
Frequently Asked Questions - PCW185S Philco
User questions about PCW185S Philco
0 question about this device. Answer the ones you know or ask your own.
Ask a new question about this device
Download the instructions for your Range hood in PDF format for free! Find your manual PCW185S - Philco and take your electronic device back in hand. On this page are published all the documents necessary for the use of your device. PCW185S by Philco.
USER MANUAL PCW185S Philco
natural_image
Line drawing of a streamlined object with ventilation grilles and mounting holes (no text or symbols)PCW185S
PCW185W
PCW185G
適用環境:
注意:
This appliance is designed for home or indoor environment and not for commercial and outdoor uses.
PRECAUTION:
※ Please read this manual CARREFULLY before installation. During the installation, power supply must be disconnected.
- The installation should be done by a qualified technician.
- Air circulation inside kitchen must be maintained in good condition when range hood in use.
- Do not put flame on the range hood. Please turn on the hood before turning on the stove.
- Replacement of the main cord and all other parts should be done by a qualified electrician.
- Cleaning processes should follow the instructions as stated in this manual. To avoid danger or damage, no parts should be removed or modified.
- In the case when the light breaks, please disconnect the power supply before you replace it with a new bulb. Maximum power for the light bulb is 12W.
- If the supply cord is damaged, it must be replaced by the manufacturer, its service agent or qualified person in order to avoid a hazard.
- In case of changes in technical specification, there would be no prior notice.
INSTALLATIONS:
※ This appliance must be earthed. Installation must be carried out only when power supply is disconnected.
- Unpack the carton.
-
Detach the fan grille by removing the screws, then take polyform out from inside and reinstall the grille.
-
The installation height is measured vertically from the bottom of hood to the top of stove, the minimum distance between the supporting surface for the cooking vessels on the hob and the lowest part of the range hood. When the range hood is located above a gas appliance, this distance shall be at least 650mm and the best recommended height is 650-800mm, avoid left-right or up-down inclination.
- For Wall-Mounted Installation, drill two holes in an appropriate position on the wall and insert the attached inflation plastic bolts properly. Insert the self-tapping screw into the wall leaving with 1/5 space for hanging the hood, make sure the screw drive into the wall firmly.
- Unfasten the screws between the hanging bracket a little bit, pull up the bracket to the top and then fasten the screws back.
- Position the hood to the screws on the wall and balanced the inclination of the hood. Then fasten the screws tightly to mount the hood onto the wall.
- This hood could be built-under kitchen cabinet, fasten the screws tightly on the cabinet. The exhaust duct should go through the cabinet to a window.
- To increase the efficiency of hood, it is recommended to use 6" exhaust duct. The turns of exhaust duct should be always straight, or more than 90° to help exhaust system run smoothly. The outside end of exhaust duct must face downward to avoid rain and air backflow from outside and damage the appliance.
- The air must not be discharged into a flue that is used for exhausting fumes from appliances burning gas or other fuels (not applicable to appliances that only discharge the air back into the room), regulations concerning the discharge of air have to be fulfilled.
- Check the voltage on the rating lable which should match the national or local code.
Wall Mounting Instruction

Built-under Instruction

MAIN FEATURE:
- ELECTRONIC CONTROL AUTOMATIC CLEANING PROGRAMMER:
a. Carefully add water-detergent solution through the water inlet by the provided jar. (Water to detergent ratio → 20: 1)
b. Press for cleaning program which takes 36 seconds and stop afterwards, the oil with detergent will be removed.
c. The water jar can operate 2 times of cleaning, once the storage in the appliance is full, water will flow out of the excess water hole located above the oil tray, user should stop pouring. - Four speeds can be used to suit different cooking needs.
- 15° curve chassis design for maximizing CFM power and effective oil discharge.
- Non-stick coating for the rotary fans and inner exhaust chamber for effective cleaning.
OPERATION:

- Timer - Prolong Time Off Button: Press the timer button to initiate this function, the appliance will be switched off automatically after 15 minutes.
- Wash - Auto Clean Button: Before using this function, please fill in the provided jar with water and detergent. Pour detergent and water from the top of the appliance through the water inlet (water to detergent ratio → 20:1). Press the ☐ button to start the auto cleaning procedures, the appliance will first operate in speed 1. A cleaning icon will be shown on the display. After 3 seconds, both motors will be operated at Speed 1 and cleaning pump will be operated; 15 seconds later, the cleaning pump will be stopped
operating while both motors changed to Speed 3; 16 seconds later, both motors will be stopped and the cleaning program is ended. The cleaning icon on the display will be disappeared. During the cleaning procedure, press the 📋 button once to exit the cleaning program.
-
Turbo- Motors with High Speed Revolution: Press the Turbo button, the left and right motor will be operated at the highest revolution in Speed 4. Press one more to stop operation.
-
Display Panel: Display the status of the appliance.
-
L- Left Motor Speed Control Button: Press the 🔔 button to start the left motor in speed 4, press one more to stop operation.
-
R- Right Motor Speed Control Button: Press the 🔔 button to start the left motor in speed 4, press one more to stop operation.
-
-- Speed down Button: During operation, the left/right motor can be operated individually or together. Press the button to reduce 1 level. When the speed at the lowest level, press one more to switch on the highest speed 4.
-
+- Speed up Button: During operation, the left/right motor can be operated individually or together. Press the button to increase 1 level. When the speed at the highest level, press one more to switch on the lowest speed 1.
-
⚙ - Light button: Press the ⚙ button to switch on and off the light.
-
LCD display: White text on a black background with corresponding icon when the appliance is on. LCD indicator screen will be black when the appliance stops running after 3 seconds.
-
Every 2 operations of automatic cleaning system, the oil cup MUST BE CLEANED; auto sensor will stop cleaning and alert user to clean up the oil. Clean the oil cup and put back to the original position, the number of uses will clear.
-
Water tank can only storage one jug of water ("MAX" level) which can be used 2 times of cleaning. One jug of water must be added and oil cup must be cleaned after 2 operations. The oil cup can only storage 2 times of wastewater.
MAINTENANCE AND CLEANING:
▲Caution: Always disconnect the appliance from the power supply before cleaning.
-
Please clean the appliance regularly, do not use abrasive cleaner. Always clean the oil cups and grilles to prevent oil spillage and prolong the life of the hood.
-
The period of cleaning for oil tray, surface of the appliance, grilles and vanes depends on the usage of the appliance.
-
Cleaning the body of the appliance with a damp cloth with cleaning agent, and use a clean cloth to dry. Foamless detergent specified for range hood cleaning must be used for cleaning purposes (Water to detergent ratio → 20:1).
-
Remove all utensils and foods from the stove before cleaning the hood.
-
This hood is equipped with an auto cut off device when the bottom cover is dismantled.
-
Never adjust the turning angle of vane or subject it on impact/collision to avoid any hazard; do not rub it with petrol or other related chemicals.
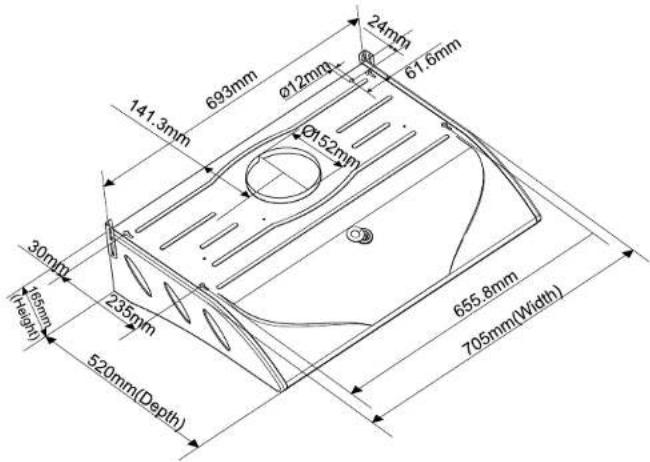
MOUNTING DIMENSIONS DIAGRAM
Attention:
- Before starting the cleaning program, please make sure water-detergent solution was injected into the water tank.
- Please use only foamless cooker hood cleaner for cleaning (water to detergent ratio 20:1).
- Please remove all utensils and food from stove before cleaning process starts.
• Installation must be carried out by qualified technician. - Please disconnect power supply before dismantling for cleaning (this appliance is equipped with automatic cut off device when the damper of the appliance is removed).
- Remember to turn on the cooker hood before turning on the hob to avoid overheating the hood.
注意
NOTE
請記錄下列資料 Please record the following information:
7/F, Goodwill Industrial Building, 36-44 Pak Tin Par Street, Tsuen Wan, Hong K
Customer Service Hotline 客戶服務熱線:(852) 8210 8210
Service E-mail 電郵地址:8210service@gilman-group.com
Please register now at 請即上網登記: www.toolbox.hk
Website 網址:www.gilman-group.com

Gilman

2/F, Shing Dao Industrial Building, 232 Aberdeen Main Road, Hong Kong 香港香港仔大道232號城都工業大廈2樓
Brand : Philco
Model : PCW185S
Category : Range hood