
EXM12HV1WI - Air conditioner ELECTROLUX - Free user manual and instructions
Find the device manual for free EXM12HV1WI ELECTROLUX in PDF.


| Product Type | Split Air Conditioner |
| Brand | Electrolux |
| Model | EXM12HV1WI |
| Cooling Capacity | 12000 BTU/h |
| Heating Capacity | 12000 BTU/h (Heat Pump) |
| Energy Efficiency Class | A++ (Cooling) / A+ (Heating) |
| Power Supply | 220-240 V, 50 Hz, Single Phase |
| Refrigerant | R32 |
| Indoor Unit Dimensions (W x H x D) | 800 x 290 x 200 mm |
| Outdoor Unit Dimensions (W x H x D) | 800 x 600 x 300 mm |
| Indoor Unit Weight | 10 kg |
| Outdoor Unit Weight | 30 kg |
| Noise Level (Indoor) | 25 - 45 dB(A) |
| Noise Level (Outdoor) | 50 - 60 dB(A) |
| Air Flow Rate | 600 m³/h |
| Timer Function | 24-hour programmable timer |
| Remote Control | Yes (Infrared) |
| Self-Cleaning Function | Yes (Auto Clean mode) |
| Sleep Mode | Yes |
| Filter Type | Washable anti-bacterial filter |
| Warranty | 2 years (parts and labor) |
| Installation | Professional installation recommended |
| Repair Service | Authorized service centers |
Frequently Asked Questions - EXM12HV1WI ELECTROLUX
User questions about EXM12HV1WI ELECTROLUX
0 question about this device. Answer the ones you know or ask your own.
Ask a new question about this device
Download the instructions for your Air conditioner in PDF format for free! Find your manual EXM12HV1WI - ELECTROLUX and take your electronic device back in hand. On this page are published all the documents necessary for the use of your device. EXM12HV1WI by ELECTROLUX.
USER MANUAL EXM12HV1WI ELECTROLUX
EN SPLIT TYPE ROOM AIR USER MANUAL 2 CONDITIONER
IT CONDIZIONATORE MANUALE PER L'UTENTE 22 SPLIT PER AMBIENTI
ES ACONDICIONADOR MANUAL DE 42 DE AIRE TIPO SPLIT INSTRUCCIONES
TR SPLIT TIPI ODA KLIMASI KULLANIM KILAVUZU 62
Table of Contents
Congratulations ....3
Safety Precautions ....4
Product's Description ....6
Indoor Unit Display ....7
Remote Control ....7
Remote Control Description 8
Remote Control Display Indicators 9
First Use ....10
How to use the Remote Control ....10
How to use the Indoor Unit ....15
Emergency Operation ....16
Optimal Operation ....16
Cleaning and Maintenance ....17
Operation Tips ....19
Troubleshooting ....20

Important Reminder
- Keep the remote control where its signal can reach the receiver of the indoor unit.
- When operate the air conditioner, make sure the remote control is pointing to the signal receiver of the indoor unit.
- When the remote control sends out a signal, the symbol will blink for about 1 second on the display of the remote control.
- The indoor unit will acknowledge the signal with a beep when it receives the signal from the remote control.
- Please press the button of the remote control and resend the signal if you did not hear a beep from the indoor unit.
Congratulations
Congratulations and thank you for choosing Electrolux split-type air conditioner. We are sure you will find your new air conditioner a pleasure to use.
Before you use the air conditioner, we recommend that you read through the entire user manual, which provides the description of the air conditioner and its functions.
To avoid the risks that are always present when you use an electrical appliance, it is important that the air conditioner is installed correctly and that you read the safety instructions carefully to avoid misuse and hazards.
We recommend that you keep this instruction booklet for future reference and pass it on to any future owners.
After unpacking the air conditioner please check it is not damaged. If in doubt, do not use the air conditioner but contact your local Electrolux authorised service centre.

environmental tip
Information on disposal for users
• Most of the packing materials are recyclable.
- Please dispose of those materials through your local recycling depot or by placing them in appropriate collection containers.
- If you wish to discard this air conditioner, please contact your local authorities and ask for the correct method of disposal.

caution
- The air conditioner is not intended for use by young children or infirmed persons without supervision.
- Young children should be supervised to ensure that they do not play with the air conditioner.
- Contact an authorised installer for installation of this air conditioner.
- Contact an authorised service technician for repair or maintenance of this unit.
- If the power cord is to be replaced, replacement work shall be performed by authorised personnel only.
• Installation work must be performed in accordance with the national wiring Standards by authorised personnel only.
Conditions of use
This appliance is intended to be used in household and similar applications such as:
• Staff kitchen areas in shops, offices and other working environments.
- Farm houses.
- By clients in hotels, motels, and other residential type environments.
• Bed and breakfast type environments.
Important notes
Contact an authorised installer for installation of this unit.
Contact an authorised service technician for repair or maintenance of this unit.
- The socket outlet required to supply power must be connected and commissioned by a licenced contractor.
- This appliance is not intended for use by children and persons with reduced physical, sensory or mental capabilities, or lack of experience and knowledge, unless they have been given supervision or instruction concerning use of the appliance by a person responsible for their safety.
- Young children should be supervised to ensure that they do not play with the air conditioner.
- If the power cord is to be replaced, replacement work shall be performed by authorised personnel only.
• Installation work must be performed in accordance with the national wiring standards and the electricity suppliers service rules by authorised personnel only.
- If the unit is to be moved to another location or disposed of, only a suitably qualified person is permitted to undertake such work.
• Take care not to catch fingers on the fan blade when adjusting vertical louvers.
• This air conditioner uses R410a refrigerant.
Safety precautions
Inside this manual you will find many helpful hints on how to use and maintain your air conditioner properly. Just a little preventive care on your part can save you a great deal of time and money over the life of your air conditioner. You'll find many answers to common problems in the chart of troubleshooting tips on page 20-21. If you review the chart of troubleshooting tips first, you may not need to call for service.
Meanings of symbols used in this manual are shown below:

caution
This indicates information concerning your personal safety and how to avoid damaging the appliance.

tips and information
This symbol indicates tips and information about use of the appliance.

environmental tip
This symbol indicates tips and information about economical and ecological use of the appliance.

This symbol indicates never to do this.

Always do this.
Important notes:
1 Do not operate unit with horizontal louvre inclosed position.
2 Do not operate unit without the air filter.

warning
| ! | If you notice an unusual situation, such as a burning smell, please switch off the power to the air conditioner and contact an Electrolux service agent. If this abnormal status continues the air conditioner may be damaged or even cause electric shock or fire. |
| ∅ | Do not operate the air conditioner with wet hands. This may cause electric shock. |
| ∅ | Do not damage or cut off the power cord or other wires. If this occurs, please have it repaired or replaced by an accredited technician |
| ∅ | Do not connect this air conditioner to a multi outlet powerboard. |
| ! | Please switch off the power supply to the air conditioner if it is not to be used for an extended period. Otherwise, it will accumulate dust and may cause a fire. |
| ! | Before cleaning the air conditioner, please disconnect the power supply in order to eliminate the possibility of electric shock. |
| ! | The power supply should be matched with the air conditioner according to the installation manual. Air conditioners provided with a supply cord should be connected directly to a power outlet with a suitable safety switch. Air conditioners that are hard wired must be connected to a suitable safety circuit breaker according to the installation manual. |
| ! | Please ensure that the power supply to the air conditioner is stable and meets the requirements set out in the installation manual. |
| ! | Always ensure the product is installed with appropriate earthing. |
| ! | For safety, be sure to turn off the circuit breaker before performing any maintenance or cleaning or when the product is not used for an extended period of time. Accumulated dust may cause fire or electric shock. |
Safety precautions

caution
| ! | Select the most appropriate temperature. It can save electricity. |
| Do not keep windows and doors open for a long time during operation. It will result in insufficient performance. | |
| Do not block the air inlet or outlet. It will result in insufficient performance and cause malfunctions. | |
| Keep combustible materials away from the units at least 1m. It may cause fire. | |
| Do not step on the top of the outdoor unit or place heavy things on it. It may cause damage or injury. | |
| Do not attempt to repair the air conditioner by yourself. Incorrect repairs may cause electric shock or fire. Please contact your local authorised service centre. | |
| Do not insert your hands or objects into the air inlet or outlet. It may cause injury. | |
| Do not expose animals or plants directly to the air flow. | |
| Do not use the unit for any other purpose, such as preserving food or drying clothes. | |
| Do not splash water on the air conditioner. It may cause electric shock or malfunction. |
Prior to Operation
1 Contact a qualified installer.
2 Plug in the power plug properly.
3 Do not use a damaged or non-standard power cord.
4 Do not share the same outlet with other appliances.
5 Do not use an extension cord.
6 Do not start/stop operation by plugging / unplugging the power cord.
Usage
Exposure to direct airflow from the air conditioner for an extended period of time could be hazardous to your health.
Do not expose people, pets or plants to the direct airflow for an extended period.
Cleaning and maintenance
1 When cleaning the unit, first make sure that the power and circuit breaker are turned off.
2 Do not touch the metal parts of the unit when removing the filters. Injuries can occur when handling sharp metal edges.
3 Do not use water to clean inside the air conditioner. Exposure to water may lead to possible electric shock.
Service
For repair and maintenance, contact your authorised service dealer.

1 Front panel
2 Digital display
3 Healthy air filter (behind the dust filter)
4 Pre-dust filter
5 Horizontal air louvers
6 Vertical air louvers
7 Cold plasma generator (if applicable)
8 Manual control button
9 Remote control
10 Remote control holder
11 Refrigerant pipe (if applicable)
12 Drain hose (if applicable)
13 Power cable (if applicable)
14 Mounting plate
15 Connecting cable (if applicable)
Note: The above drawings are for explanation purpose only.
Your air conditioner may be slightly different.
1 Heating Mode indicator
It lights when the heating function is activated
2 Cooling Mode indicator
It lights when the cooling function is activated
3 Power ON/OFF indicator
It lights when the appliance is running or at standby mode
4 Dehumidify indicator
It lights when the dehumidification function is activated
5 Temperature indicator
Displays the temperature setting when the Air Conditioner is in operation
6 Signal receiver
Remote Control
How to use the Remote Control
- Point the remote control to the signal receiver of indoor unit.
• Make sure there is no obstacle that may interfere with the signal.
Location of the remote control

- Keep the remote control where its signal can reach the receiver of the indoor unit (a maximum distance of 8m is allowed).
- When you select the timer operation, the remote control automatically transmits a signal to the indoor unit at the specified time.
- If you keep the remote control in a position that hinders proper signal transmission, a time lag of up to 15 minutes may occur.
- When the remote control sends out a signal, the symbol ⏻ will blink for about 1 second on the display. The indoor unit will acknowledge the signal with a beep when it receives an effective signal.

caution
- The air conditioner will not operate if curtains, doors or other materials block the signals from the remote control to the indoor unit.
- Prevent any liquid from falling into the remote control. Do not expose the remote control to direct sunlight or heat.
- If the infrared signal receiver on the indoor unit is exposed to direct sunlight, the air conditioner may not function properly. Use curtains to prevent the sunlight from falling on the receiver.
- If other electrical appliances react to the remote control, either move these appliances or consult your local dealer.
Battery installation/replacement
- Slide the battery compartment cover off and insert two new alkaline dry batteries (2x AAA1.5Volt). Make sure that the polarity of (+) or (-) is installed correctly.
- Slide the battery compartment cover back on

tips and information
- When changing batteries, do not use old or varied ones, otherwise, it may cause problems with the remote control.
- If the remote control is not used for a long time, remove the batteries as old batteries may leak or corrode and damage the remote control.
- The battery life during normal use is about six months.
- If the remote control does not operate normally please remove and refit the batteries. If abnormal operation continues, replace with new batteries.
Remote Control Description

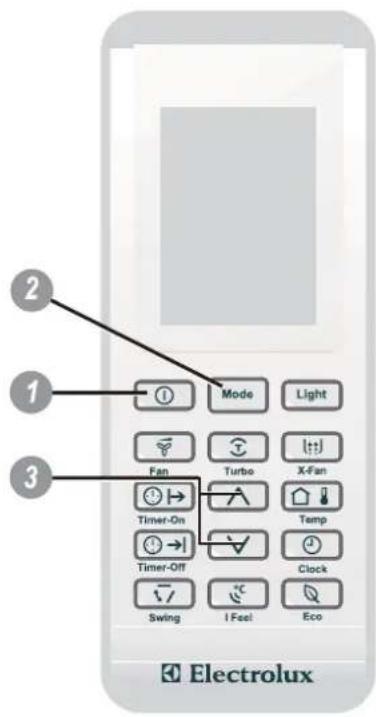
1 ON/OFF Button
Press this button to turn the air conditioner ON or OFF.
2 Mode Button
By pressing this button, AUTO, DEHUMIDIFY, FAN, COOL, and HEAT (COOL only model has no HEAT feature) mode can be selected progressively.
AUTO mode is default while power on.
Under AUTO mode, the initial value would not be displayed, and it will run in the desirable Temp.;
Under HEAT mode, the initial value is 28^ C;
Under other modes, the initial value is 25^ C.

flowchart
graph LR
    A["AUTO"] --> B["DEHUMIDIFY"]
    B --> C["FAN"]
    C --> D["COOL"]
    D --> E["HEAT"]
3 Light Button
Press this button to switch the indicating lights of the indoor unit ON or OFF.
The normal condition at start up is ON.
4 Fan Button
By pressing this button, Auto, Low, Medium and High speed can be progressively selected.
When the unit is turned on, Auto fan speed is the default.
In DEHUMIDIFY mode, the fan speed is fixed at Low speed.
5 Turbo Button
Press this button in COOL or HEAT mode to put the fan into the high speed Turbo mode and the air conditioner will work at maximum power.
Press again to cancel this function.
6 X-Fan Button
In Cooling and Dehumidification mode, press the X-Fan button to active the Self-Cleaning. After the unit is turned off, the indoor fan will continue operation for 10 minutes to dry the indoor unit and prevent bacteria and mildew from growing.
7 Timer On Button
Press this button to set the start time.
8 Timer Off Button
Press this button to set the stop time.
9 Swing Button:
Press this button, the louver will swing up and down automatically. Press again to cancel it and the louver will stay at its last position.
10 I Feel Button:
Press this button, the remote control will send the temperature information to the indoor unit every 10 minutes. The unit will operate to reach the set temperature at the location of remote control. Presss again to cancel this function.
11 Control Button:
^Forward Backward
Press the /button to increase the temperature setting.
Press the \button to decrease the temperature setting.
In Timer On/Off or Clock functions, use these buttons to set the clock or timer adjustment.
12 Clock Button:
Press this button and the Clock symbol ⏻ will blink. You can press Control buttons ∧ and ∨ to set the time you want.
13 Temp (Temperature) Button
Press this button to change the remote control display of the set temperature to the room temperature.
14 Eco (Economy) Button
Press this button to start the Eco operation.
This is ideal for the users to use while sleeping.
Press again to cancel the function.
Note:
Under heating mode, press Temp and Clock buttons to turn on the function of heating the indoor room temperature to 8°C.
Remote Control Display Indicator

1 Transmission Indicator:
Displays when the remote control transmits signals to the indoor unit.
2 Turbo Display
Displays when Turbo function is selected.
3 I Feel Display
Displays when I Feel function is activated.
4 Eco Display
Displays when Eco function is selected.
5 Healthy Display
Displayed by pressing the Healthy button. Press the Healthy button again to remove.
NOTE: there is no such indicator for the models without Cold-Plasma function.
6 Room Temperature Display
Displays when the temperature shown on the LCD screen is room temperature. It can be switched on/off by pressing the Temp button.
7 Programmed Temperature Display
Lights when the remote control displays the set temperature. It can be switched on/off by pressing the Temp button.
8 Timer On/Off Display
Displays when the Timer On/Off function is activated.
9 Fan Speed Display
Displays the selected fan speed in the following sequence:
“—” (Low), “” (Medium), “” (High) and Auto.
In Auto speed, only " symbol displays.
10 Swing Display
Displays when the Swing function is selected.
11 X-Fan Display
Displays when the X-Fan function is activated by pressing Turbo and Healthy buttons at the same time (for models with Cold-plasma function) or by pressing X-Fan button (for models without Cold-plasma function)
12 Temperature Display
Displays the room or set temperature in °C or °F. No display in Fan mode.
13 Time Display
Displays the Clock time (must be set) and/or the on/off time of the timer.
14 Mode Display
Displays the current operation mode, including Auto ( ), Dehumidify ( ), Fan ( ) Cool ( ) and Heat ( ).
NOTE: The Cool model does not offer a Heating option.
First Use
1 Ensure the unit is plugged in and power is available.
2 Be sure the batteries are inserted correctly in the remote control (the lights on the remote control will be on).
3 Set the time by Control buttons and confirm by pressing the Clock button.
4 Point the remote control to the indoor unit and press ON/OFF button to turn the unit on.
The default operating mode is AUTO. Once you select the operating mode with remote control, the operating conditions will be saved in the indoor unit's microcomputer memory. The next time the air conditioner will start operating under the same conditions when you simply push the ON/OFF button of the remote control.
How to Use the Remote Control
Automatic Operation
When the AUTO mode is selected, the air conditioner will automatically select COOL, HEAT (if applicable), or FAN only operation, depending on the programmed and/or the room temperature.
Start
1 ON/OFF Button
Press this button to turn the air conditioner on.
The temperature indicator on the indoor unit display lights on.
2 Press the Mode button to select AUTO.
3 The air conditioner starts functioning after approx 3 minutes.
Stop
1 ON/OFF Button
Press this button again to turn the air conditioner off. The horizontal louver returns back to the position upon shut down.

If the AUTO mode is uncomfortable, you can select the desired conditions manually.

tips and information
When the AUTO operating mode is selected, the temperature will be automatically cacontrolled and n be set.
Dehumidifying Operation
The DEHUMIDIFY mode works based on the difference between the set temperature and the actual room temperature.
The temperature is regulated while dehumidifying through repeatedly turning on/off of the COOLING operation or FAN only operation.

Dehumidifying Operation
Start
1 ON/OFF Button
Press this button to turn the air conditioner on. The temperature indicator on the indoor unit display lights on.
2 Mode Button
Press to select DEHUMIDIFY.
3 Control Buttons
Set the desired temperature.
Normally, set between 21°C to 28°C.
Stop
1 ON/OFF Button
Press this button again to turn the air conditioner off. The horizontal louver returns back to the position upon shut down.

tips and information
In DEHUMIDIFY mode the fan speed is fixed at Low, and Turbo function can't be used.
Fan Operation
When you select the FAN operating mode the air conditioner will just vent the indoor air.
1 ON/OFF Button
Press this button to turn the air conditioner on.
The temperature indicator on the indoor unit display lights on.
2 Mode Button
Press to select FAN.
3 Fan Button
Press to select the desired fan speed at: Auto, Low, Medium and High.
The default fan speed is Auto.

Stop
1 ON/OFF Button
Press this button again to turn the air conditioner off. The horizontal louver returns back to the position upon shut down.

tips and information
- No fan speed indication displays on the remote control if Auto fan speed is selected.
Cooling and Heating Operation
Start
1 ON/OFF Button
Press this button to turn the air conditioner on.
The temperature indicator on the indoor unit display lights on.
2 Mode Button
Press to select COOL or HEAT (if applicable) mode.
3 Control Buttons
Set the desired temperature.
Normally, set between 21^ to 28^ .
4 Fan Button
Press to select the desired fan speed at: Auto, Low, Medium and High.
The default fan speed is Auto.
i tips and information
No fan speed indication displays on the remote control if Auto fan speed is selected.

Stop
1 ON/OFF Button
Press this button again to turn the air conditioner off. The horizontal louver returns back to the position upon shut down.
Timer Settings
Timer On Operation
1 Press the Timer-On button,
8:00 will flash on the display of the remote control in case of the first use of Timer-On operation. Otherwise, the last set time will flash.
2 Set the desired time by pressing the Control buttons: ^Forward Backward
Each time you press the buttons, the time will moves forward or backward by 1 minute.
Holding the button down will scroll more rapidly through the time display.
3 Point the remote control to the indoor unit, confirm the set time by pressing the Timer-On button.
① symbol will stay on the remote control's display.
Check that the Timer indicator on the display panel of indoor unit is illuminated.
Canceling the Settings
Point the remote control to the indoor unit and press again the Timer-On button. Make sure the symbol ⏻ on the remote control is turned off.
Timer Off Operation
1 Press the Timer-Off button,
^① 17:00 will flash on the display of the remote control in case of the first use of Timer-Off operation. Otherwise, the last set time will flash.
2 Set the desired time by pressing the Control buttons: Forward Backward
Each time you press the buttons, the time will moves forward or backward by 1 minute.
Holding the button down will scroll more rapidly through the time display.
3 Point the remote control to the indoor unit, confirm the set time by pressing the Timer-Off button.
① symbol will stay on the remote control's display.
Check that the Timer indicator on the display panel of indoor unit is illuminated.
Canceling the Settings
Point the remote control to the indoor unit and press again the Timer-Off button. Make sure the symbol ⏻ on the remote control is turned off.
i tips and information
- The working time of the timer function set by the remote control depends on the Clock time. Check that the Clock on the remote control is set correctly in order to prevent malfunctioning.
- The effective operation time set by the remote control is limited in 24 hours.
Examples of Timer Settings
Timer On Operation (Timer Start Operation)
This function is recommended when you want the unit to be turned on automatically before returning home. The air conditioner will automatically start operating at the set time.
Example: It is 8:00 AM and you want the air conditioner to start working at 6:00 PM.
1 Press the Timer-On button.
2 Set the desired time by pressing repeatedly or holding down the Control buttons until 18:00 shows in the display of the remote control.

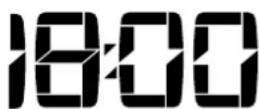
3 Confirm the set time by pointing the remote control to the indoor unit and pressing again the Timer-On button.
① symbol will stay on the remote control's display.
The Timer indicator on the display panel of indoor unit is illuminated.
Timer Off Operation (Timer Stop Operation)
This function is recommended when you want the unit to be turned off automatically for bed time.
The air conditioner will automatically stop operating at the set time.
Example: It is 6:00 PM and you want the Air Conditioner to turn off at 11:55 PM.
1 Press the Timer-Off button.


2 Set the desired time by pressing repeatedly or holding down the Control buttons until 23:55 shows in the display of the remote control.
3 Confirm the set time by pointing the remote control to the indoor unit and pressing again the Timer-Off button.
① symbol will stay on the remote control's display.
The Timer indicator on the display panel of indoor unit is illuminated.
Combined Timer
Timer On → Timer Off
(Off-Start-Stop operation)
This function is recommended when you want to turn the air conditioner on before waking up and turn it off after leaving the house.
Example: It is 10:00 PM and you want to start the air conditioner at 6:30 AM and stop it at 9:30 AM.
1 Press the Timer On button.
2 Set the desired time by pressing repeatedly or holding down the Control buttons until 06:30 shows in the display of the remote control.

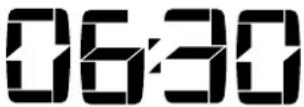
3 Confirm the set time by pointing the remote control to the indoor unit and pressing again the Timer-On button.
4 Press the Timer-Off button.
5 Set the desired time by pressing repeatedly or holding down the Control buttons until 09:30 shows in the display of the remote control.

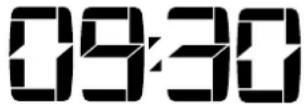
6 6 Confirm the set time by pointing the remote control to the indoor unit and pressing again the Timer-Off button.
Symbol is displayed on the remote control and the function is activated.
Timer Off → Timer On
This function is recommended when you want to turn the air conditioner off after going to bed and start it again before waking up in the morning or returning back home.
Example: It is 8:00 AM and you want to stop the air conditioner at 9:30AM and restart at 6:00PM
1 Press the Timer-Off button.
2 Set the desired time by pressing repeatedly or holding down the Control buttons until 09:30 shows in the display of the remote control.


3 Confirm the set time by pointing the remote control to the indoor unit and pressing again the Timer-Off button.
4 Press the Timer-On button.
5 Set the desired time by pressing repeatedly or holding down the Control buttons until 18:00 shows in the display of the remote control.


6 Confirm the set time by pointing the remote control to the indoor unit and pressing again the Timer-On button.
→ symbol is displayed on the remote control and the function is activated.
Setting the Clock

Before you start operating the air conditioner, set the clock of the remote control using the procedure given in this section. The clock panel on the remote control will display the time regardless of whether the air conditioner is in operation or not.
After batteries are inserted in the remote control, 12:00 will display and begin to flash.
1 Control Buttons
Press the Control buttons to set the desired time.
^ Forward Backward
Each time you press the buttons the time will moves forward or backward by 1 minute.
Holding the button down will scroll more rapidly through the time display.
2 Clock Button
When the desired time is achieved, press the Clock button again or after 5 seconds with no operation, the clock time stops flashing and the clock is set.
3 Re-set the Clock
Press the Clock button and the clock display will start to flash.
Follow step 1 and 2 to set the new time.
i tips and information
• The clock timer uses a 24 hour clock mode
- The default time for remote control is 12:00PM and it will revert to this when the batteries are changed.
Economy (Eco) Operation
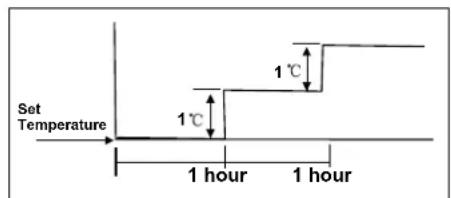
Press Eco button in COOL or HEAT (if applicable) mode, the air conditioner will automatically increase (in COOL mode) or decrease (in HEAT mode) 1 °C per hour over a 2 hour period. The set temperature will be steady for the next 5 hours then the unit will stop.
This function permits more comfort and saves energy. This operation is recommended for bed time.
Cooling

Heating
I Feel Operation
The remote control works as a remote thermostat, providing an accurate temperature control and maximum comfort.
Point the remote control to the indoor unit and press I Feel button, a beep from the indoor unit is to confirm that this function is activated.
The I Feel symbol will stay on the display of the remote control until I Feel button is pressed again.
The air conditioner will operate to reach the set temperature at the location of the remote control.
The remote control sends the temperature information at its location to the indoor unit every 10 minutes. The air conditioner will quit I Feel operation if no temperature information is received from the remote control for successive 11 minutes.
How to Use the Indoor Unit
Additional Options
1 Smart Restart Function
The air conditioner resumes automatically with the previous settings after a possible power failure.
2 Self Diagnose and Auto Protection
This air conditioner can detect the malfunctions, showing the diagnosis on the display of the indoor unit by means of an error code.
The air conditioner will change operation automatically for self-protection.
Airflow Direction Control
- Adjust the airflow direction properly, otherwise, it might cause discomfort or uneven room temperatures.
- Adjust the horizontal louvers with the remote control.
- Adjust the vertical louvers manually.

To set the vertical (up/down) airflow direction automatically
- Perform this function while the unit is in operation.
-
Press the Swing button on the remote control, the horizontal louver will swing up and down automatically.
-
When the louver moves to the desired direction, press the Swing button again and the louver will stay at where it is.
- Press the Swing button again and the louver will start swing up and down automatically.

To adjust the horizontal (left/right) airflow direction manually
- Adjust the vertical louvers manually by means of the Left/Right lever of the vertical louver arm.
- Perform these adjustments before you start the unit because once it has been started, there is a risk of your fingers getting caught on the fan.


caution
- The Swing button will be disabled when the air conditioner is not in operation (even if the Timer On is set).
-
Do not operate the air conditioner for long time with the airflow direction set downward in COOL or DEHUMIDIFY mode. Otherwise, condensate may occur on the surface of the horizontal louver and drop onto the floor or furnishings.
-
Do not move the horizontal louver manually. Always use the Swing button. Moving the louver manually may cause malfunction during operation. If the louver malfunctions, stop the air conditioner and restart it.
- Open angle of the horizontal louver should not be set too small, as cooling or heating performance may be impaired due to too restricted airflow area.
- Do not operate the air conditioner with horizontal louver in closed position.
- When the air conditioner is connected to power (initial operation), the horizontal louver may generate a sound for 10 seconds, this is a normal operation.
Emergency Operation
When the remote control is lost or fails to operate, please use the manual switch on the indoor unit. The air conditioner will operate in AUTO mode and the temperature setting or fan speed can not be changed.
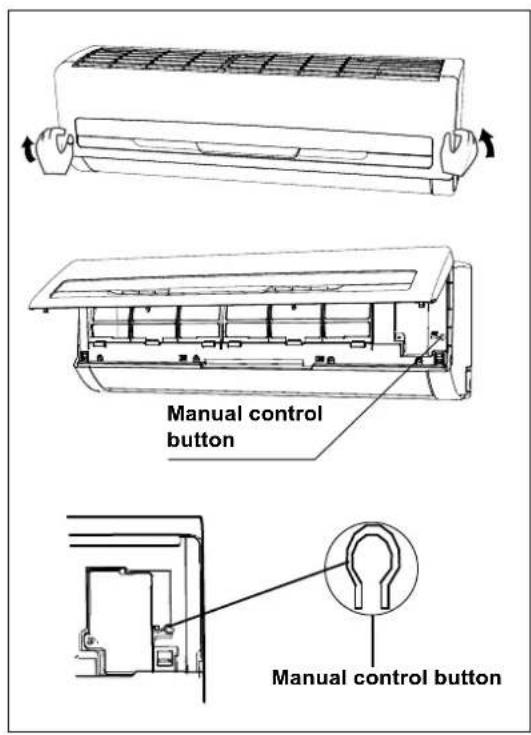
- Press the Manual Control button to enter AUTO mode. The air conditioner will select the mode of COOL, HEAT (heat pump model only) and FAN automatically according to the room temperature for reaching the best comfort.
- Press the Manual Control button again to turn the air conditioner off.
The operation mode is seen in the following table.
| Mode | Model Temperature setting Airflow | |
| AUTO | COOLING 25°C (COOL, FAN) AUTO | |
| AUTO | HEAT PUMP 25°C (COOL, FAN) AUTO | |
| AUTO | HEAT PUMP 20°C (HEAT) AUTO | |
Operating Temperature
| Operating temperature ranges | ||
| Indoor Side DB (°C) | Outdoor Side DB (°C) | |
| Maximum Cooling | 32 43 | |
| Maximum Heating | 27 24 | |
If the air conditioner is used outside of the above conditions, certain safety protection features may come into operation and cause the unit to function abnormally.
Optimal Operation
To achieve optimal performance, please note:
- Adjust the airflow direction correctly so that it is not directed on people.
- Adjust the temperature to achieve the highest comfort level. Do not adjust the unit to excessive temperature levels.
- Close doors and windows in the operation of COOL or HEAT mode, otherwise, product performance will be impaired.
- Use the Timer On and Timer Off buttons on the remote control to select the desired time for startup and shut-down.
- Do not place any object close to the air inlets or outlets, as the product efficiency may be reduced and the air conditioner may stop running.
- Clean the air filters frequently, otherwise cooling or heating performance may be reduced.
Cleaning and Maintenance
Maintenance
The following maintenance operations must be performed regularly.
| Items | Maintenance operations | Recommended frequency |
| Dust filter Clean | Every month or more often if necessary | |
| Healthy air filters | Replace/clean Every 3 months or more often if necessary | |
| Unit casing Clean | Every month or more often if necessary | |
| Water tray and evacuation piping | Clean and check for obstructions | Each season before start up* |
| Indoor and outdoor coils | Clean Each season before start up* |
* The operation must be performed by qualified personnel only.

warning
- Stop the air conditioner and disconnect the power supply before cleaning.
Indoor Unit and Remote Control Cleaning
- Use a dry cloth to wipe the indoor unit and remote control.
- A cloth dampened with cold water may be used on the indoor unit if it is too dirty.
- The front panel of the indoor unit cant be removed and cleaned with water. Then wipe with a dry cloth.
- Do not use brushes, emery paper or burnishes to clean the unit because it may cause damages.
- Do not use a chemically treated cloth or duster to clean the unit.
- Do not use benzine, thinner, polishing powder or similar solvents for cleaning. These may cause the plastic surface to crack or deform.
- Never use warm water over 40 C to clean the front panel, it may cause deformation or discoloration.
Cleaning the Filters
Note: Supply power must be disconnected before cleaning.
A clogged dust filter reduces the cooling/heating efficiency of this unit. Please clean the filter every month or more often if necessary.

1 Lift the indoor unit front panel up to an angle until it stops with a full support from the bracket.

2 Hold the dust filter handle and lift it up slightly to take it out from the filter holder.

natural_image
Hand holding a grid-patterned air vent with a black arrow pointing downward (no text or symbols)3 Then pull the dust filter downwards out of the indoor unit.
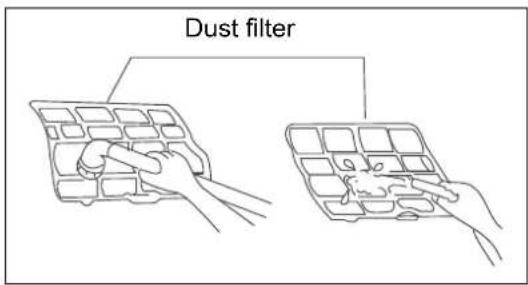
Clean the Dust filter with a vacuum cleaner or water, then dry it up in cool place.

4 The healthy air freshening filters (if applicable) like Active carbon filter / BIO filter / Vitamin C filter / Silver ion filter are fixed on the dust filter.
Remove the healthy filters from the support frame of the dust filter.
Clean the healthy filters at least every three (3) months and replace every 6 months.
Clean with vacuum cleaner if possible.

natural_image
Diagram of a grid layout with an arrow pointing to a textured top section (no text or symbols)5 Install the healthy air freshening filters back in position.

natural_image
Hand placing a grid-patterned panel with an arrow symbol (no text or labels)6 Install the upper portion of dust filters back into the unit, taking care that the left and right edges line up correctly and place dust filters into position.

warning
Do not touch or try to clean the cold plasma generator (if applicable). It may cause an electric shock.
General maintenance
If the air conditioner is not going to be used for a long period of time:
- Operate in FAN only mode for 3\~4 hours to allow the unit to completely dry out.
- Switch off the unit and pull out the power plug. Remove the batteries from the remote control.
- The outdoor unit requires periodic maintenance and cleaning. Do not attempt to do this yourself. Contact your dealer or service technician.
Checks before operation
- Check that the wiring is not broken or disconnected
• Check that the dust filter is installed. - Check if the air outlet or inlet is blocked if the air conditioner has not been used for a long time.

warning
- Do not touch the metal parts of the unit when removing the filter. Injuries can occur when handling sharp metal edges.
- Do not use water to clean inside the air conditioner. Exposure to water can destroy the insulation, leading to possible electric shock.
- When cleaning the unit, first make sure that the power and circuit breaker are turned off.
Operation Tips
The following events may occur during normal operation:
1. Protection of the air conditioner.
• Compressor protection
The compressor can't restart for 3 minutes after it stops
- Anti-freezing
If the unit is operating in COOL mode and in low ambient temperature, frost may be formed on the heat exchanger. When indoor heat exchanger temperature decreases below 0 °C, the compressor will stop operation to protect the unit.
- Defrosting
Frost may form on the outdoor unit in heating operation when the outdoor temperature is low but humidity is high, resulting in low heating efficiency.
During this condition the air conditioner will stop heating operation and start defrosting automatically. The time to defrost may vary from 3 to 12 minutes.
During defrosting, the fan motors of indoor unit and outdoor unit will stop, the indoor indicator flashes "H1" and the outdoor unit may emit vapor. This is not malfunction. After defrosting is finished, the heating operation will recover automatically.
- Anti-cold air
In HEAT mode, the indoor fan will not operate in order to prevent cold air being blown into the room (within 2 minutes), if the indoor heat exchanger does not reach a minimum temperature under the following states:
(1) Heating operation just start.
(2) After auto defrosting is just finished.
(3) Heating at low temperature.
2. Gentle breeze
The indoor unit may blow gentle breeze and the louver rotate to a certain position in the following situation:
(1) In HEAT mode, the unit is turned on, the compressor does not reach the starting condition.
(2) In HEAT mode, the temperature reaches the set value and the compressor stops running for about 1 minute.
3. A white mist coming out from the indoor unit
- A white mist may generate due to a large temperature difference between air inlet and air outlet in COOL mode in an indoor
environment that has a high relative humidity.
- A white mist may generate due to moisture generated from defrosting process when the air conditioner restarts in HEAT mode operation after defrosting.
4. Low noise of the air conditioner
- You may hear a low hissing sound when the compressor is running or has just stop running. This is the sound of the refrigerant flowing or coming to a stop.
- You also may hear a low "squeak" sound when the compressor is running or just stopped running. This is caused by heat expansion and cold contraction of the plastic parts in the unit when the temperature is changing.
• A noise may be heard due to louver restoring to its original position when power is furst turned on.
5. Dust is blown out from the indoor unit
This is a normal condition when the air conditioner has not been used for a long time or during first use of the unit.
6. A peculiar smell comes out from the indoor unit
This is caused by the indoor unit giving off smells permeated from building material, furniture or smoke.
7. The air conditioner turns to FAN only mode from COOL or HEAT mode
When the indoor temperature reaches the setting value, the compressor will stop automatically, and the air conditioner turns to FAN mode.
The compressor will start again when the indoor temperature rises in COOL mode or falls in HEAT mode to the set point.
8. Condensation
Condensate water is likely to form at the air outlet if cooling or drying for a long time when the relative humidity is more than 80% (with doors and windows open).
Set the vertical louver to its maximum angle (to the floor) and High fan speed. Close the doors and windows.
- Lighting or a car wireless telephone operating nearby may cause the unit to malfunction.
Disconnect the unit with power and then re-connect the unit with power again. Push ON/OFF button on the remote control to restart operation.
10. X-Fan function
The indoor unit may keep running after you switch off the unit by pressing ON/OFF button.
Please check whether the X-Fan function is switched off.
Trouble Shooting
The air conditioner is not user serviceable. Incorrect repair may cause electric shock or fire. Please contact an authorised service center for professional repair.

warning
If one of the following situations occur, immediately stop the air conditioner, disconnect the power, and contact the authorised service center.
- If error code (except H1) appears on the display of indoor unit.
- Power indicator or other indicator flash rapidly and this flashing can not be stopped by disconnecting the power and then connecting it again.
- Fuse blows frequently or circuit breaker often trips.
• Water or other liquid is splashed into the unit.
• Water is leaking from the unit.
• There is a harsh sound during operation.
• Strong odours are emitted during operation.
• Power cord and power plug are overheating.
• Other abnormal situations.
The pressure in the refrigeration system is low and could result in the unit breaking down. Ask a certified installer to control it.
| Malfunctions Cause What should be done | ||
| The unit does not start | Power cut Wait for power to be restored. | |
| The unit may have become unplugged. Check that plug is securely in wall receptacle. | ||
| Fuse may have blown. Replace the fuse. | ||
| Voltage is too high or too low. Test the voltage by professionals. | ||
| Batteries in remote control may have been exhausted. | Replace the batteries. | |
| The time you have set with timer is incorrect. | Wait or cancel timer setting. | |
| The unit does not cool or heat (if applicable) the room very well while air flows out from the air conditioner | Inappropriate temperature setting. Set the temperature correctly.For details please refer to “Using Remote Control” section | |
| Air filter is blocked. Clean the air filter. | ||
| Doors or windows are open. Close the doors or windows. | ||
| Air inlet or outlet of indoor or outdoor unit has been blocked. | Clear the obstructions away first, then restart the unit. | |
| Compressor 3 minutes protection has been activated. | Wait for 3 minutes. | |
| If the trouble has not been corrected, please contact a local dealer or the nearest customer service center. Be sure to inform them of the detailed malfunctions and unit model. | ||
| Malfunctions | Cause |
| The unit does not operate | The unit does not operate if it is turned on immediately after it is turned off. This is to protect the unit. Please wait about 3 minutes. |
| Odours are emitted | Some odours may be emitted from the indoor unit. This is the result of room smells (such as furniture, tobacco, etc.) which have been taken into the unit.Consult authorised service center for cleaning if the odours persist. |
| “Water flowing” noise | The swishing noise like water flowing is the refrigerant flowing inside the unit. |
| Mist is emmitted in COOL mode | During cooling operation, a thin mist may be seen emitted from the indoor unit due to high room temperature and humidity.After a period of time, the mist will disappear as the decrease of room temperature and humidity. |
| Cracking noise | This is the sound of friction caused by expansion and/or contraction of panel or other parts due to the change of temperature. |
| The unit can not be started up | Is the power cut off?Is the power plug loose?(if applicable)Is the circuit protection device tripped off?Is voltage higher or lower?(tested by professionals)Is the TIMER correctly used?Are the batteries exhausted? |
| Cooling /Heating effect is poor | Is the temperature setting appropriate?Is the air inlet/outlet blocked?Is the filter dirty?Is the door or window open?Is low fan speed set?Are there heat sources in the room? |
| Malfunctions | Cause |
| Water leakage of indoor unit | The humidity is high.Condensing water overflows.Drain hose is loose or obstructed. |
| Water leakage of outdoor unit | During cooling operation, water condensates around the pipes and connection joints.During defrosting operation, thawed water flows out.During heating operation, water on the heat exchanger drips out. |
| Noise from indoor unit | The noise emitted when the fan or compressor relay is switched on or off.When the defrosting operation is started or stopped, there is a sound of refrigerant flowing in the reverse direction. |
| Indoor unit can not blow air | In HEAT mode, when the temperature of indoor heat exchanger is very low, airflow is stopped in order to prevent cold air. (within 2 minutes)In HEAT mode, when the outdoor temperature is low or humidity is high, frost will be formed on the outdoor heat exchanger. The unit will defrost automatically and indoor unit will stop blowing air for several mintues.During defrosting operation, water or vapour may be emmitted.In DEHUMIDIFY mode, the indoor fan will stop blowing air for 3-12 minutes in order to avoid condensing water being vaporised again. |
| Moisture on air outlet | If the unit operates at high humidity for a long time, moisture may be generated on air outlet grill and then drip off. |
| H1 error code: defrosting | It is normal. The unit is in defrosting operation and heating will recommence soon. |

Do not dispose this product as unsorted municipal waste.
Collection of such waste separately for special treatment
is necessary.
Indice
natural_image
Hand placing a down arrow on a grid-patterned air vent (no text or symbols)natural_image
Isometric line drawing of a grid-like object with an arrow pointing to a textured top (no text or symbols)natural_image
Line drawing of a hand pressing down on a car air vent with a grid pattern and an upward arrow (no text or symbols)“—” (Low), “” (Medium), “” (High) y Auto.
natural_image
Hand holding a grid-patterned air vent with a black arrow pointing downward (no text or symbols)natural_image
Diagram of a grid layout with an arrow pointing to a textured top (no text or symbols)natural_image
Line drawing of a hand pressing down on a car air vent with a grid-patterned panel and an upward arrow (no text or symbols)natural_image
Hand holding a car air vent with a black arrow pointing to the vent (no text or symbols present)natural_image
Isometric line drawing of a grid-like object with an arrow pointing to a textured top (no text or symbols)natural_image
Hand placing a grid-patterned panel with an arrow symbol (no text or labels)- Table of Contents
- Important Reminder
- Congratulations
- environmental tip
- caution
- Conditions of use
- Important notes
- Safety precautions
- tips and information
- Important notes:
- warning
- Prior to Operation
- Usage
- Cleaning and maintenance
- Service
- Remote Control
- How to use the Remote Control
- Location of the remote control
- Battery installation/replacement
- Remote Control Description
- ON/OFF Button
- Mode Button
- Light Button
- Fan Button
- Turbo Button
- X-Fan Button
- Timer On Button
- Timer Off Button
- Swing Button:
- I Feel Button:
- Control Button:
- Clock Button:
- Temp (Temperature) Button
- Eco (Economy) Button
- Note:
- Remote Control Display Indicator
- First Use
- Automatic Operation
- Start
- Stop
- Dehumidifying Operation
- Fan Operation
- Cooling and Heating Operation
- i tips and information
- Timer Settings
- Timer On Operation
- Canceling the Settings
- Timer Off Operation
- Examples of Timer Settings
- Timer On Operation (Timer Start Operation)
- Timer Off Operation (Timer Stop Operation)
- Example: It is 6:00 PM and you want the Air Conditioner to turn off at 11:55 PM.
- Combined Timer
- Timer On → Timer Off
- Example: It is 10:00 PM and you want to start the air conditioner at 6:30 AM and stop it at 9:30 AM.
- Timer Off → Timer On
- Example: It is 8:00 AM and you want to stop the air conditioner at 9:30AM and restart at 6:00PM
- Setting the Clock
- Control Buttons
- Clock Button
- Re-set the Clock
- Economy (Eco) Operation
- I Feel Operation
- How to Use the Indoor Unit
- Additional Options
- Smart Restart Function
- Self Diagnose and Auto Protection
- Airflow Direction Control
- To set the vertical (up/down) airflow direction automatically
- To adjust the horizontal (left/right) airflow direction manually
- Emergency Operation
- Operating Temperature
- Optimal Operation
- Maintenance
- Indoor Unit and Remote Control Cleaning
- Cleaning the Filters
- General maintenance
- Checks before operation
- Operation Tips
- Protection of the air conditioner.
- • Compressor protection
- - Anti-freezing
- - Defrosting
- - Anti-cold air
- Gentle breeze
- A white mist coming out from the indoor unit
- Low noise of the air conditioner
- Dust is blown out from the indoor unit
- A peculiar smell comes out from the indoor unit
- The air conditioner turns to FAN only mode from COOL or HEAT mode
- Condensation
- X-Fan function
- Trouble Shooting
- Indice
Brand : ELECTROLUX
Model : EXM12HV1WI
Category : Air conditioner