
BCR431 - Manicure/Pedicure Accessories PHILIPS - Free user manual and instructions
Find the device manual for free BCR431 PHILIPS in PDF.


| Product Type | Callus removal device (pedicure accessory) |
| Brand | Philips |
| Model | BCR431 |
| Intended Use | Removing hard skin and calluses on feet |
| Power Source | Built-in rechargeable battery, powered via supply unit (HQ8505) |
| Input Voltage | 100-240 V |
| Charging Time | Up to 1.5 hours |
| Cordless Operation Time | Up to 40 minutes |
| Quick Charge | 15 minutes for up to 10 minutes of use |
| Speed Settings | 2 speeds (selectable by pressing on/off button) |
| Attachments Included | Callus removal disk (BCR372 replacement) and callus removal attachment |
| Waterproof | Yes, suitable for use in bath or shower and for cleaning under tap |
| Cleaning | Rinse under tap or use cleaning brush; disinfectant can be used occasionally |
| Safety Certifications | Complies with EMF standards; low voltage (≤24V) |
| Replacement Part | Callus removal disk (BCR372), recommended replacement once a year |
| Battery Indicator | White flashing while charging, white steady when fully charged, orange flashing when low |
| Warranty | Standard Philips warranty; normal wear parts excluded |
Frequently Asked Questions - BCR431 PHILIPS
User questions about BCR431 PHILIPS
0 question about this device. Answer the ones you know or ask your own.
Ask a new question about this device
Download the instructions for your Manicure/Pedicure Accessories in PDF format for free! Find your manual BCR431 - PHILIPS and take your electronic device back in hand. On this page are published all the documents necessary for the use of your device. BCR431 by PHILIPS.
USER MANUAL BCR431 PHILIPS
natural_image
White Philips electric shaver with power button and control buttons (no text or symbols on device body)
Introduction
Congratulations on your purchase and welcome to Philips! To fully benefit from the support that Philips offers, register your product at www.philips.com/welcome.
General description (Fig. 1)
1 Callus removal disk
2 Outer rim
4 Handle
5 On/off button
6 Battery indicator
7 Socket for small plug
8 Release button
9 Supply unit
10 Cleaning brush
3 Callus removal attachment
Important safety information
Read this important information carefully before you use the appliance and its accessories and save it for future reference. The accessories supplied may vary for different products.
Danger
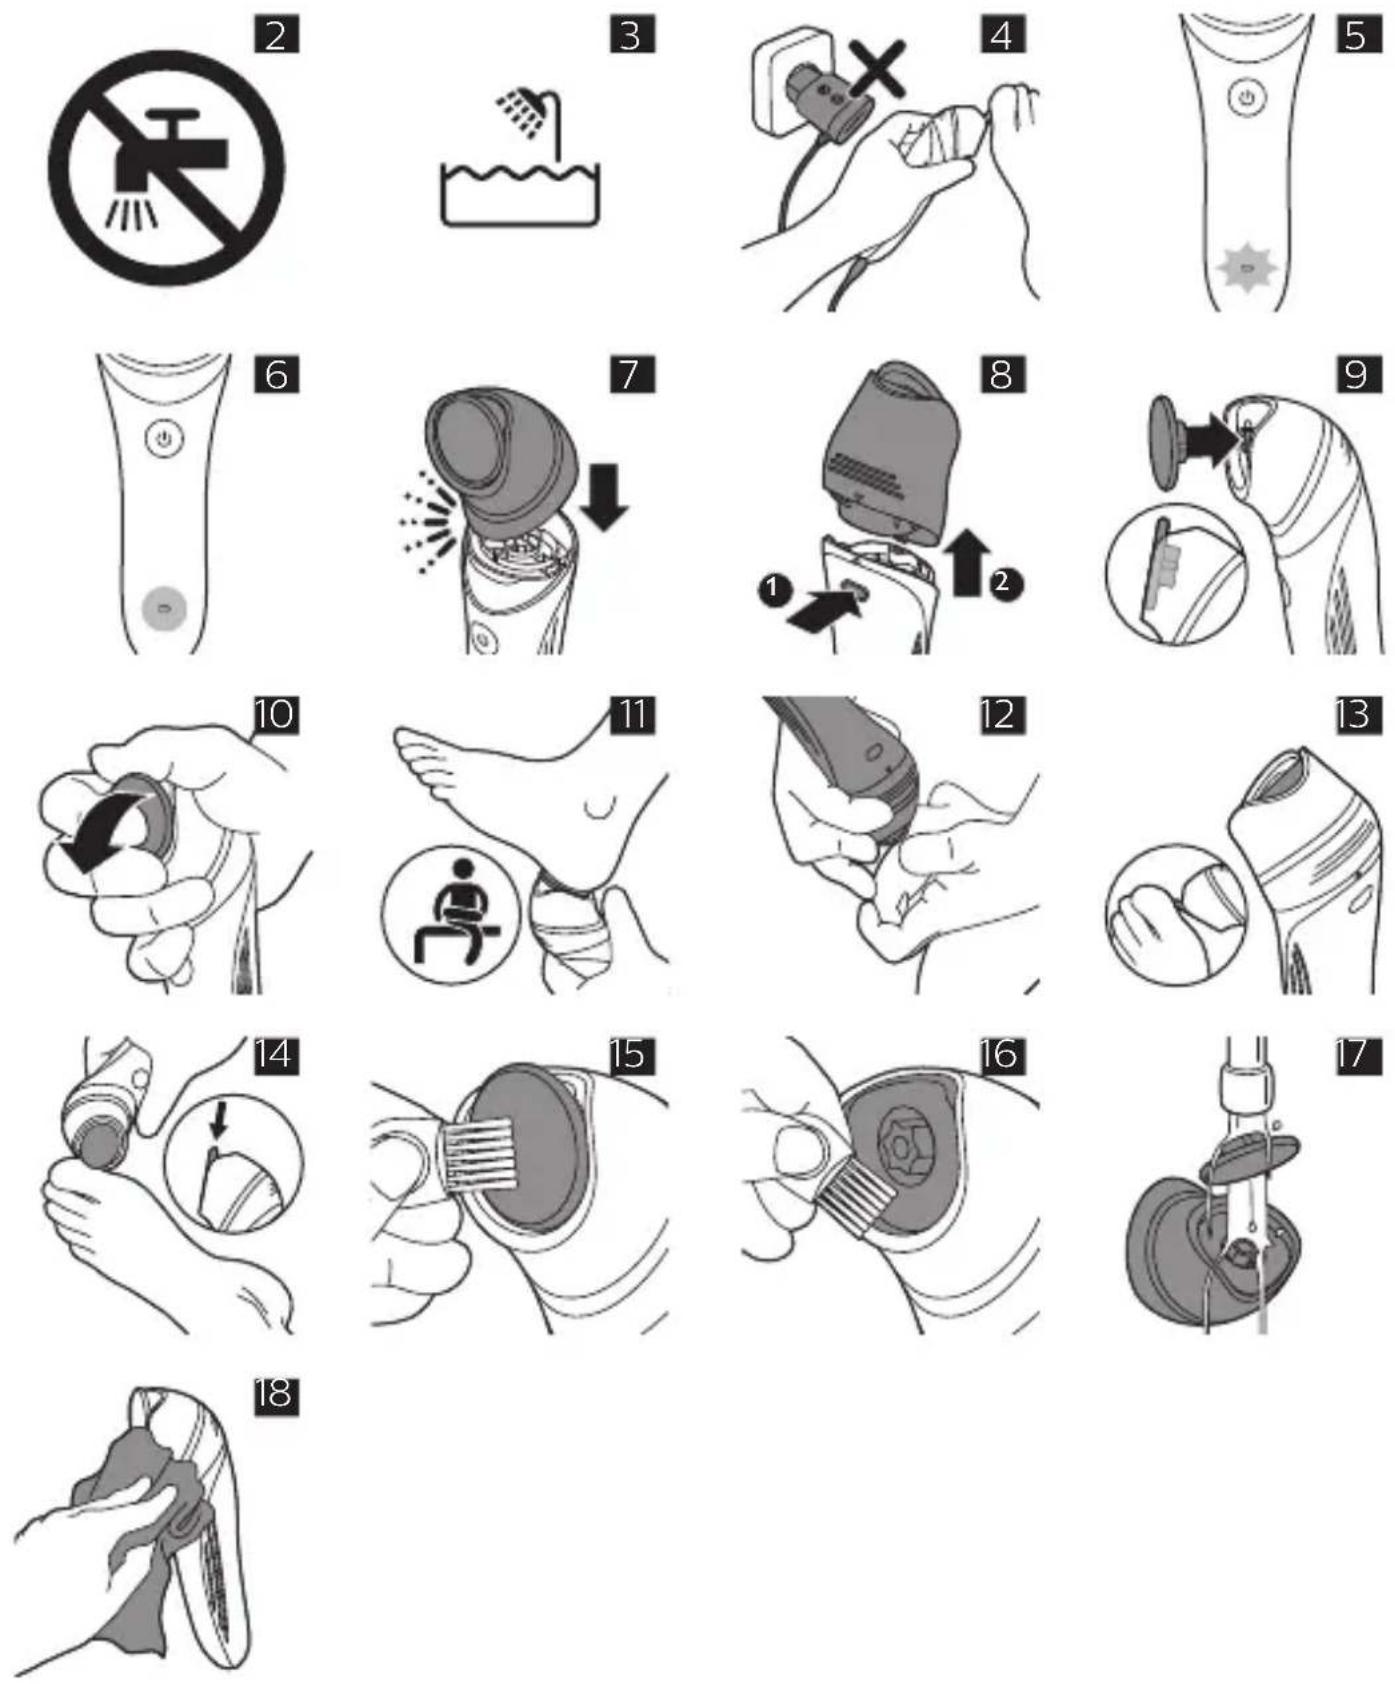
- Keep the supply unit dry (Fig. 2).
Warning
- To charge the battery, only use the detachable supply unit (HQ8505) provided with the appliance.
- The callus removal disk is only intended for use on feet.
-
The supply unit contains a transformer. Do not cut off the supply unit to replace it with another plug, as this causes a hazardous situation.
-
This appliance can be used by children aged from 8 years and above and persons with reduced physical, sensory or mental capabilities or lack of experience and knowledge if they have been given supervision or instruction concerning use of the appliance in a safe way and understand the hazards involved. Children shall not play with the appliance. Cleaning and user maintenance shall not be made by children without supervision.
- Always unplug the appliance before you clean it under the tap.
- Always check the appliance before you use it. Do not use the appliance if it is damaged, as this may cause injury. Always replace a damaged part with one of the original type.
- Do not open the appliance to replace the rechargeable battery.
Caution
- Never use water hotter than shower temperature (max. 40^ C) to rinse the appliance.
- Do not use the supply unit in or near wall sockets that contain an electric air freshener to prevent irreparable damage to the supply unit.
- Only use the appliance, heads and accessories for their intended purpose as shown in the user manual.
- For hygienic reasons, the appliance should only be used by one person.
- Do not use the appliance on irritated skin or skin with varicose veins, rashes, spots, moles (with hairs), sores or wounds without consulting your doctor first. People with a reduced immune response or people who suffer from diabetes mellitus, haemophilia or immunodeficiency should also consult their doctor first.
Do not use the callus removal disk on:
- Any area of the feet that is swollen, burned or inflamed or when skin eruptions or ulcerated sores are present.
- Any area of the feet that is anesthetized or lacks the ability to sense pressure or pain unless approved by your doctor.
Note: Should pain or discomfort result, discontinue use and consult your doctor.
Note: Do not use this appliance on areas of the skin with severe acne, a rash or other skin ailments.
- Stop using the appliance if your skin becomes sore or inflamed.
- To prevent damage and injuries, keep the operating appliance (with or without attachment) away from scalp hair, eyebrows, eyelashes, clothes etc.
- Charge, use and store the appliance between 10°C and 35°C.
- If your appliance is equipped with a light for optimal use, do not look directly into the light.
- Never use compressed air, scouring pads, abrasive cleaning agents or aggressive liquids to clean the appliance.
Electromagnetic fields (EMF)
This Philips appliance complies with all applicable standards and regulations regarding exposure to electromagnetic fields.
General
- This appliance is waterproof (Fig. 3). It is suitable for use in the bath or shower and for cleaning under the tap. For safety reasons, the appliance can therefore only be used without cord.
- The supply unit is suitable for mains voltages ranging from 100 to 240 volts.
- The supply unit transforms 100-240 volts to a safe low voltage of less than 24 volts.
Charging
Note: Charge the appliance fully before you use it for the first time.
Note: This appliance can only be used without cord (Fig. 4).
To charge the appliance, insert the small plug into the socket in the bottom of the appliance and put the supply unit in the wall socket.
- The charge indicator flashes white (Fig. 5): the appliance is charging. Charging takes up to 1.5 hours.
- The charge indicator lights up white continuously (Fig. 6): the appliance is fully charged and has a cordless operating time up to 40 minutes.
- The charge indicator does not light up when the appliance is switched on: the appliance contains enough energy to be used.
- The battery indicator flashes orange (Fig. 5): the battery is almost empty and needs to be charged. Charge the appliance when you have finished using it.
Note: If the appliance is fully charged but still connected to the wall socket, the battery indicator flashes a few times when you press the on/off button. This indicates that you should disconnect the appliance from the wall socket before you can switch it on.
Quick charge
- When the battery is completely empty and you start charging it, the battery indicator flashes white quickly.
- After approximately 15 minutes, the battery indicator starts flashing white slowly. At this point, the battery contains enough energy for up to 10 minutes of use.
Using the appliance
Attaching and detaching the attachment
1 To attach the attachment, press it onto the handle ('click') (Fig. 7).
2 To detach the attachment, press the release button on the back of the appliance (Fig. 8).
Attaching and detaching the callus removal disk
1 To attach the disk, push it onto the coupling in the head (Fig. 9).
Look at the appliance from the side to check if the disk is level with the outer rim of the head.
If the disk wobbles when you switch on the appliance, the disk is not placed correctly. Remove the disk and attach it properly.
2 To remove the disk, put your thumb in the indent behind the disk and push it forward until the disk detaches from the head (Fig. 10).
Switching the appliance on and off
1 To switch on the appliance, press the on/off button once.
2 If you want to select the low speed setting, press the on/off button again.
3 To switch off the appliance, press the on/off button once more.
Use areas
Note: This appliance is only intended to be used on the feet.
You can use the callus removal disk in 3 different ways, depending on the area or callus you want to treat.
1 To treat a large, flat area, use the entire disk (Fig. 11). Make sure you place the disk flat onto the skin for good control during use.
2 For precision treatment of smaller areas and good visibility of the treated area (Fig. 12), use the top part of the disk that sticks out beyond the top of the head (Fig. 13).
3 For precision treatment and for buffing away hard skin very quickly, use the narrow edge of the protruding top part of the disk (Fig. 14).
Move the disk back and forth gently over the skin you want to treat. Do not push too hard. When you push too hard, the disk might stop rotating.
Cleaning
- Clean the callus removal disk with the cleaning brush supplied (Fig. 15). Remove the disk and clean the inside and outside of the head with the cleaning brush (Fig. 16).
- If you prefer, you can rinse the callus removal disk and the inside of the callus removal head under a running tap (Fig. 17). You can clean the appliance with a moist cloth (Fig. 18).
Tip: You can also clean the callus removal disk and the inside of the callus removal head with disinfectant now and then.
Storage
If you travel, disconnect the callus removal head from the appliance. This protects the abrasive disk and also prevents the immediate surroundings from being damaged by the abrasive disk.
Replacement
Replace the callus removal disk when its effectiveness decreases. We advise you to replace the disk at least once every year (BCR372).
To buy accessories or spare parts, visit
www.shop.philips.com/service or go to your Philips dealer. You can also contact the Philips Consumer Care Center in your country (see the international warranty leaflet for contact details).
Warranty and support
If you need information or support, please visit
www.philips.com/support or read the international warranty leaflet.
Warranty restrictions
Parts that are subject to normal wear (such as cutting units and callus removal disks) are not covered by the international warranty.
Recycling
- Do not throw away the product with the normal household waste at the end of its life, but hand it in at an official collection point for recycling. By doing this, you help to preserve the environment.
- This product contains a built-in rechargeable battery which shall not be disposed of with normal household waste. Please take your product to an official collection point or a Philips service center to have a professional remove the rechargeable battery.
- Follow your country's rules for the separate collection of electrical and electronic products and rechargeable batteries. Correct disposal helps prevent negative consequences for the environment and human health.
Removing the rechargeable battery
Only remove the rechargeable battery when you discard the product. Before you remove the battery, make sure that the product is disconnected from the wall socket and that the battery is completely empty.
Take any necessary safety precautions when you handle tools to open the product and when you dispose of the rechargeable battery.
1 Remove the back and/or front panel of the appliance with a screwdriver. Remove any screws and/or parts until you see the printed circuit board with the rechargeable battery.
2 Remove the rechargeable battery.
简介
| (PBB) | ||||||
| PCB's | XOOOO | |||||
| Electrical contact pins | XOOOO | |||||
| Power plug | XOOOO | |||||
拆下充电电池
- Introduction
- General description (Fig. 1)
- Important safety information
- Danger
- Warning
- Caution
- Electromagnetic fields (EMF)
- General
- Charging
- Quick charge
- Using the appliance
- Attaching and detaching the attachment
- Attaching and detaching the callus removal disk
- Switching the appliance on and off
- Use areas
- Cleaning
- Storage
- Replacement
- Warranty and support
- Warranty restrictions
- Recycling
- Removing the rechargeable battery
- Take any necessary safety precautions when you handle tools to open the product and when you dispose of the rechargeable battery.
- 简介
- 拆下充电电池
Brand : PHILIPS
Model : BCR431
Category : Manicure/Pedicure Accessories