709-115 - Garden spreader Hard Head - Free user manual and instructions
Find the device manual for free 709-115 Hard Head in PDF.


| Product Type | Power Tool |
| Brand | Hard Head |
| Model | 709-115 |
| Dimensions (L x W x H) | 30 x 20 x 15 cm |
| Weight | 2.5 kg |
| Power Supply | 230 V, 50 Hz |
| Power Consumption | 1200 W |
| Main Functions | Variable speed, safety lock, ergonomic grip |
| Cleaning and Maintenance | Clean with a dry cloth; store in a dry place |
| Safety Precautions | Wear protective gear; disconnect when not in use |
| Spare Parts Availability | Available through authorized dealers and online |
| Reparability | Repairable; contact customer service for assistance |
| General Information | Suitable for DIY and professional use |
Frequently Asked Questions - 709-115 Hard Head
User questions about 709-115 Hard Head
0 question about this device. Answer the ones you know or ask your own.
Ask a new question about this device
Download the instructions for your Garden spreader in PDF format for free! Find your manual 709-115 - Hard Head and take your electronic device back in hand. On this page are published all the documents necessary for the use of your device. 709-115 by Hard Head.
USER MANUAL 709-115 Hard Head
Operating instructions for spreader
709-115

natural_image
Black pushrower with two wheels and handle, isolated on white background (no text or symbols)SE - Bruksanvisning i original
EN - Operating instructions (Translation of the original instructions)
Jula reserves the right to make changes. In the event of problems, please contact our service department. www.jula.com
Tillverkare/ Produsent / Produenci/ Manufacturer
Jula AB, Box 363, 532 24 SKARA
Importör/ Importør/ Importer/ Importer
natural_image
Line drawing of a two-wheeled pushrower with labeled parts (1 and 2), no text or symbols present.natural_image
Line drawing of a two-wheeled pushrower with labeled parts (1 and 2), no text or symbols present.- Håndtak med spredningsinnstilling
- Sprederenhet
MONTERING
- Spennarm
- Justeringsmutter
Tips
natural_image
Line drawing of a two-wheeled pushrower with labeled parts (1 and 2), no text or symbols present.Read the Operating Instructions carefully before use.
DESCRIPTION
natural_image
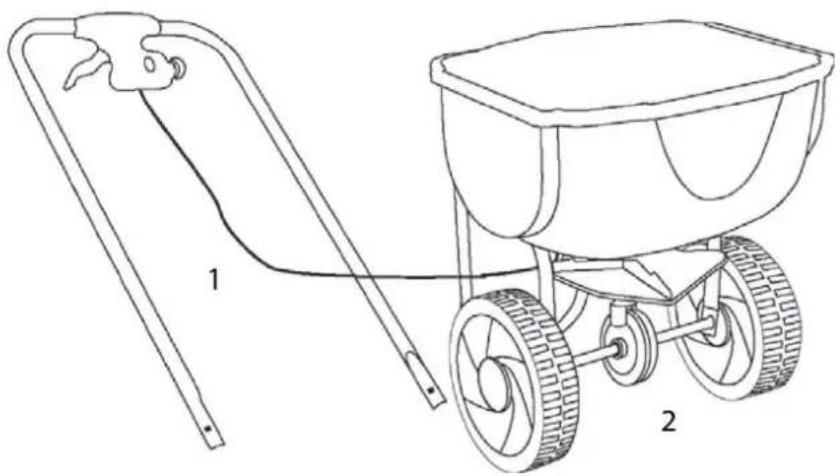
Line drawing of a two-wheeled pushrower with labeled parts (1 and 2), no text or symbols present.- Handle with speaker control
- Spreader unit
ASSEMBLY
1. Unpack all the parts.

- Remove the pre-fitted assembly parts from the handle.
- Unfold the handle and align the holes in the handle to the holes in the spreader unit, and screw tight with the supplied coach bolts and tri wing nuts.
- Put the caps over the bare threads on the coach bolts.
Adjustments
- Always check the delivery rate before using the spreader. Some materials can damage the surface if they are spread at a faster rate than recommended by the manufacturer.
- To estimate the correct setting, weigh up the volume specified by the manufacturer for 100 m2 . Put the weighed material in the hopper. Measure up and mark out an area of 100 m2 (e.g. 10 × 10 m , 8 × 12.5 m or 4 × 25 m ). Spread the material over the marked out area and check how much material is left in the hopper. Adjust the setting as necessary. With the correct setting all the material will be used up when the area has been treated.
Setting
- Turn the adjuster knob so that the required setting is shown with the arrow in the display window. Position 1 gives the minimum flow rate, position 10 gives the largest flow rate.
- Push the spreader in front of you and move the lever to open position.
IMPORTANT: Some materials can damage the surface if overdosed. Do not stop, and do not pull the spreader backwards with the lever in open position.
- Move the lever to the closed position before stopping.
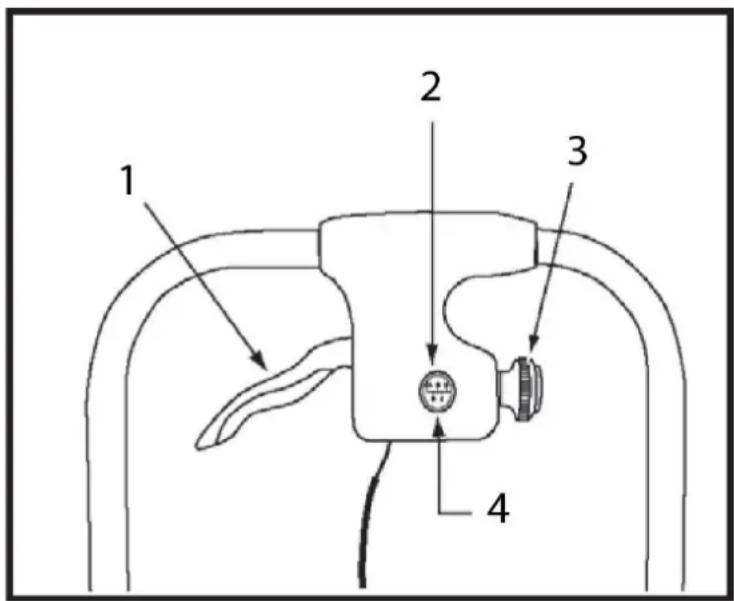
- Lever
- Display window
- Adjuster knob
- Pointer
Calibration
- Put the machine on its side with the lever up.
- Set the flow rate to position 5 and hold the lever pressed against the handle. Check that the flap in the hopper is half open.
- Adjust if necessary by screwing the adjusting nut until it is flush with the tensioner.

-
Tensioner
-
Adjusting nut
Tips
- Walk at a steady, brisk pace.
- Close the spreader before turning.
- Overlap each run by about 45 cm to avoid missing out any sections.
- Do not use the spreader when it is windy, as this will affect the results.
MAINTENANCE
- Empty the hopper when you have finished.
- Clean the machine with water and a mild detergent every time it has been used. Residual material can damage or clog components and have an adverse effect on the functionality of the machine.
- Allow the machine to dry before putting it away. Store in a clean and dry place.
- The transmission is permanently lubricated and does not require any maintenance.
Jula reserves the right to make changes. In the event of problems, please contact our service department. www.jula.com
Brand : Hard Head
Model : 709-115
Category : Garden spreader