
M-DVD1023RV - DVD player Macrom - Free user manual and instructions
Find the device manual for free M-DVD1023RV Macrom in PDF.


| Product Type | DVD Player |
| Brand | Macrom |
| Model | M-DVD1023RV |
| Dimensions (W x D x H) | 360 x 250 x 45 mm |
| Weight | 1.5 kg |
| Power Supply | AC 100-240V, 50/60Hz |
| Power Consumption | 12 W |
| Disc Formats Supported | DVD, DVD±R/RW, CD, CD-R/RW |
| Video Output | Composite Video, Component Video (YPbPr), HDMI |
| Audio Output | Stereo RCA, Digital Coaxial |
| Playback Features | Progressive Scan, PAL/NTSC, Zoom, Slow Motion |
| Remote Control | Included (batteries not supplied) |
| Display | Front panel LED display |
| USB Port | Yes, for media playback |
| Card Slot | SD/MMC card slot |
| Region Code | Region 2 (Europe) or multi-region |
| Parental Control | Yes, with password |
| Maintenance & Cleaning | Wipe with a soft dry cloth; avoid liquids |
| Safety | Class 1 laser product; do not open casing |
| Spare Parts & Repairability | Contact support for remote control, power adapter |
Frequently Asked Questions - M-DVD1023RV Macrom
User questions about M-DVD1023RV Macrom
0 question about this device. Answer the ones you know or ask your own.
Ask a new question about this device
Download the instructions for your DVD player in PDF format for free! Find your manual M-DVD1023RV - Macrom and take your electronic device back in hand. On this page are published all the documents necessary for the use of your device. M-DVD1023RV by Macrom.
USER MANUAL M-DVD1023RV Macrom
Monitor Stowed View....5-6
Monitor Open View....6
Remote Control....7-8
BasicOperation 9
Open the monitor....9
Stow the monitor....9
Handling disc....9
Turn the player on.... 10
Turn the player off....10
Adjust the display....10
Care and Maintenance....11
Use the remote control....11
Replace the battery in the remote control....12
Use the iPod/iPhone....12
Play....13
Play DVD disc....13-14
Play Audio CD disc....15
Play MP3 disc....16
Play USB device and SD/MMC card....16
Play iPod/iPhone....17-19
InstallationandWiring 20
What's in the box.... 20
Mounting and Wiring Precautions....21
Installation procedure....21
Wiring diagram....22
SystemSetup 23-24
Troubleshooting....25
Specifications....26
Legalnotice ....26
SafetyInformation
ThankyouforbuyingtheRoofMountLCDMonitorwithDVDplayer. Pleasereadthismanualcarefullybeforeusingtheplayerinordertoget themostoutofallthefeaturesandfunctions.Keepthismanualinasafe place,asitcanbeavaluabletoolinhelpingyoutounderstandallthe featuresandfunctions.
Donotoperatetheunitinanywayotherthandescribedwithinthismanual. Failuretofollowtheinstructionswithinthemanualwillinvalidateyour warranty.
✿ SAFETYFIRST!Donotinstallthedisplaywhereitmay(i)obstructthe driver's vision, (ii) impair the performance of any of the vehicle's operating systems or safety features, including airbags, or (iii) impair the driver's abilitytosafelyoperatethevehicle.
When using the system, make sure you are firmly secured by your seat belttoensureyoudonotaccidentallyhityourheadonthescreenduring sudden braking or other incidents. If you are ever in an accident, injuries canbemoresevereiftheseatbeltisnotproperlybuckled.
Donotattempttoinstallorserviceyourdisplaybyyourself.Installationor servicingofthedisplaybypersonswithouttrainingandexperiencein electronicequipmentandautomotiveaccessoriesmaybedangerousand couldexposeyoutotheriskofelectricshockorotherhazards.
✿ Becarefulnottodrainthecarbatterywhileusingtheunitwiththecarenginestopped.Toavoiddrainingthebattery,itissuggestedthatthevehicleenginealwaysisrunningwhileusingtheunit.
- Donotdisassembleoraltertheunitinanyway.Failureretodosocancause damagetotheunitandinvalidthewarranty.
✿ Never clean the surface of the screen with chemical solvent or corrosive detergent, which may cause permanent damage to the TFTLCD screen.
Avoid installing the unit wherever is under direct sunlight or near hot air vent. Pleasenotethatthenormalworkingtemperatureoftheunitis between-5 °C to +50°C. If the internal temperature of the vehicle is extremelyhigh,ashortcoolingdownperiodisnecessarybefore operating theunit.
If the temperature inside the car is very low and the monitor is used soon after switching on the heater, moisture may form on the panel of the unit. Turnofftheunitimmediately!Failuretodosomaycausetheinternal components to short. Allow the unit to rest for about one hour to allow the condensation todisappearbefore continueoperation.
In extremely cold temperatures, the movement of the picture may be slow and the picture may be dark. It is not a malfunction. The unit will work normally once it reaches its operating temperature.
Do not drop or hit the LCD panel with a hard object, as it may cause
permanentdamagetotheLCDpanel.ShouldLCDpanelbreak, avoid touchingglassandfluid.Ifdo,pleasecleanitwithplentyofwaterandaskformedicalattentionimmediately.
✿ Duetodifferentcarspecifications,pleasekindlyensuethatthedisplay monitorisproperlylocatedandnotobstructingtheair-conditioningvent.
AvoidinsertinganyforeignobjectsintotheslotofthediscPlayer.Failure toobservethismaycausemalfunctionduetotheprecisemechanismof thisunit.
Protectyourdisc.Whenyouleavethecar,besuretoejectthediscfrom thisunitandstoreitseparatelyawayfromdirectsunlight.
✿ Heatandhumiditymaydamagethediscandyoumaynotbeabletoplayit again.
◆ UsethesuppliedscrewstofixthemonitorMetalMountingPlate.
DVDPlayerFeatures
ThisplayerisaRoofMount10.2"TFT-LCDColorDisplaywithDVDplayer thatcanbeusedasastand-alonedisplay,orcanbeintegratedintoamobile multimediasystem.Thisplayerhasthefollowingfeatures:
10.2"TFT-LCDcolormonitor(16:9)
✨ RoofMountingApplication
✨ Pixel(digits):1152x234
✿ WideViewingangle(up/down/left/right):45/65/65/65
✨ NTSCandPALCompatible
AdjustableContrast/Brightness/Color/Tint
✨ ManualViewingAngleAdjustment
✨ VerticalAngleAdjustable:up/down<120°
WhiteLEDDomeLight
✨ AutomotiveStartupProtection
Built-inIRTransmitter
✨ IRRemoteControl
OnScreenDisplay
✨ 2xAVInput
☆ 1xAVOutput
✨ Slot-inDVDmechanism
✨ SupportSD/MMCcardandUSB
MadeforiPod/iPhone
Note: Madefor: iPod touch (4th generation), iPod touch (3rd generation), iPodclassic, iPod nano (6th generation), iPod nano (5th generation), iPodnano(3rdgeneration), iPhone4S, iPhone4, iPhone3GS.
◆ Capabilitytoread:DVDFormat/DVD-ROM/DVD±R/DVD±RW/CD-DA/CD-RW/CD-R/CD-ROM(XA)/MP3/WMA/VCD/SVCD/JPEG/MPEG4.
Note: Multi-session CDs and 320kbps WMA filescan't be played.
DVDVideoFeatures
DVDdrivethatsupportsthefollowingformats:
DVDs(12cm), videoCDs(12cm), audioCDs(12cm), MP3CDs(12cm)
- PlaybackofCDswithtworecordedsessions(oneaudioandonedata)
•Multi-sound:DVDaudiothatsupportsuptoeightlanguagesperfilm - Subtitles:supportupto32languages
•The playback of MP3 music files stored on a CD-R/CD-RW discor USB SD or MM Cor Card device
Controls
MonitorStowedView

| ItemNameFunctionorControl | ||
| 1 | M E N U | TouchandholdtodisplaytheOSDmenu,touchagaintoclosetheOSDmenu.OnDVD mode,touchtodisplayDVDlist,touchagaintoclosetheDVDlist;OniPod/iPhonemode,touchtodisplaythecurrentlist,touchagainto enterthemainmenu. |
| 2 | ▶II | Playorpause. |
| 3 |  ◀ ◀ | PreviousChapterorTrac k / NavigationLeft t ;Pressandholdtofas t reverseat2x,4x,8x,16x,32xandnormalspeed. |
| 4 | ▲ | NavigationUp. |
| 5 |  ▶- ▶- | NextChapterorTrac k / NavigationRight;Pressandholdtofastforwardat2x,4x,8x,16x,32xandnormalspeed. |
| 6 | ▼ | NavigationDown. |
| 7 | SOURCE | Selectsthevideoinputsource: AV 1, AV 2,iPod/iPhoneorDVD;OnDVDmode,touchand holdtoswitchthemodebetweenSD/MMCand USB. |
| 8IRWindow | ReceivesIRsignalsfromtheremotecontrolor sendsIRsignalstoIRwirelessheadphone. | |
| 9 | E j e c | tEjectthedisc. |
| 10Panelopenswitch | PresstoreleasethemonitorPanel. | |
| 11 | Discslot | Insertthedisc. |
| 12ENT. | Enter / Confirmchoose. | |
| 13Domelight | Toilluminateinthecar. | |
| 14DomelightSwitch | Turnson/offthedomelight.Whentheswitchis setto AUTO,thedomelightturnsonwhenthe doorisopen. | |
| 15SD/MMCcardslot | InserttheSDcardorMMCcard. | |
| 16USBsocket | ConnectUSBdevice. | |
| 17AV1INsocket | Externalequipmentaudio/videoinsocket. | |
MonitorOpenView
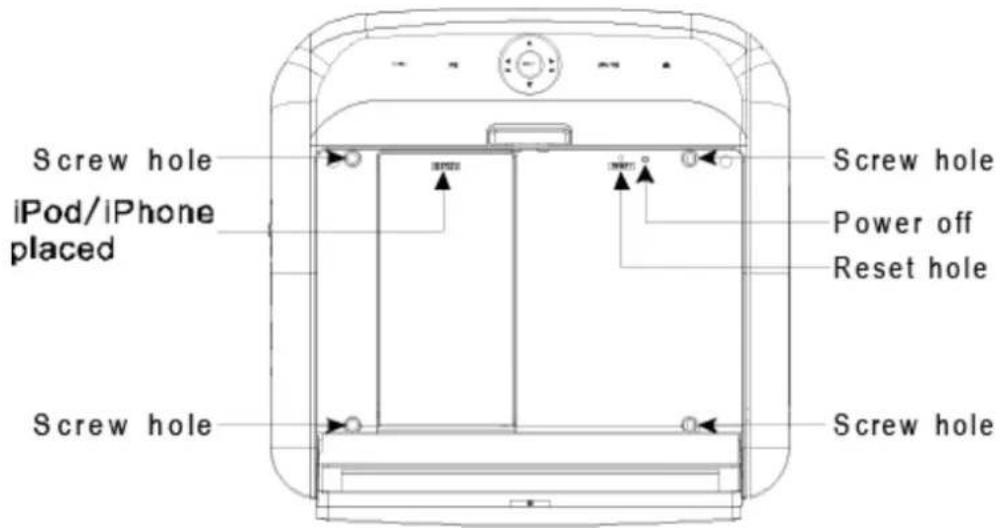
RemoteControl

| Item | Name | Functionorcontrol |
| 1 | POWER | Turnonorturnofftheplayer. |
| 2 | SETUP | PresstoaccessthesetupmenutomodifytheDVD playersettings. |
| 3 | MUTE | Turnthesoundonoroff. |
| 4 | EJECT | Ejectthedisc. |
| 5 | 0-9Numberkey | Presstoenternumbersdirectly,suchasfor settingsortracknumbers. |
| 6 | SRC | Selectsthevideoinputsource: AV 1 , AV 2,iPod/iPhoneorDVD;OnDVDmode,pressand holdtoswitchbetweenSD/MMCandUSBmode. |
| 7 | MENU | PressandholdtodisplaytheOSDmenu,press againtoclosetheOSDmenu.OnDVDmode, presstodisplayDVDlist,pressagaintoclosethe DVDlist;OniPod/iPhonemode,presstodisplay thecurrentlist,pressagaintoenterthemain menu. |
| 8 | Presstogotothepreviouschapterortrack. | |
| 9 | Arrowsand ENTER | NavigationUp/Left/Right/Downandconfirm choose. |
| 10 | Fastreverse | Presstofastreverseplaybackat2x,4x,8x,16x and32xspeeds. |
| 11 | RANDOM | Presstoplaychaptersortracksinrandomorder. |
| 12 | A-B | Presstorepeatplaybackfrompoint A topointB. |
| 13 | AUDIO | ForaDVD:Changethelanguageduringplay.For aVCD/CD:Changeaudiochannel(left,right, stereo)during playback . |
| 14 | RETURN | Presstoreturnthemainmenu,pressagainto returnthelastpositionof playback. |
| 15 | ANGLE | Presstoselectadifferentfilmingangle.This featureonlyworksiftheDVDdisrecordedwith multipleangles. |
| 16 | ZOOM | Presstosetthezoomformovieviewing. |
| 17 | REPEAT | Presstorepeatsthetrackortheentiredisc. |
| 18 | SUBTITLE | Presstoselectandturnonsubtitlesduring playback. |
| 19 | Fastforward | Presstofastforwardplaybackat2x,4x,8x,16x and32xspeeds. |
| 20 | TITLE | PresstoviewtheDVDdisc'stitlemenu. |
| 21 | ■ Stop | Presstostop playback,press ▶llorENTER buttonostartplayingatthelastposition;Press thisbuttontwicetofullystop playback,press ▶ll orENTERbuttonostartplayingatthebeginning of DVD. |
| 22 | ▶▶| | Presstogotothenextchapterortrack. |
| 23 | ▶II | Playorpause. |
| 24 | VOL-/+ | Presstodecrease / increasethevolume. |
| 25 | DISPLAY | Presstodisplaytheplaybackinformation(suchas title,chapter,trackandtime). |
| 26 | GOTO | Presstostartplaybackataselectedchapter,track ortime. |
BasicOperation
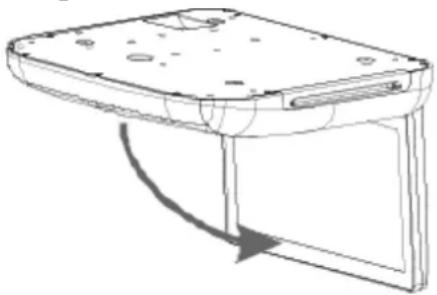
Openthemonitor
- PressthePanelopenbuttontolower theoverheadmonitorscreen.
- GentlyswingtheLCDdownandadjust theangleforviewing.
natural_image
Line drawing of a computer monitor with an open lid and scroll wheel (no text or symbols)CAUTION: The LCDopenstoamaximum angle of 120^ degrees. Donot attempt to openit further.
Stowthemonitor
Gentlypushthebacksideofthedisplaypaneluntilitclicksintotheoverhead housing. Themonitorturnsoffautomaticallywhenyoureturnittotheclosed position.
Note :When closing the display panel, do not let cords or other items get caughtbetweenthedisplayandtheoverheadhousing.Doingsocan seriouslydamagethescreen.
Foryoursafety, closetheLCDpanelwhenyouarenotusingit.
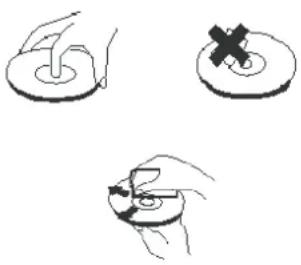
Handlingdisc
- Tokeepadiscclean, donottouchtheplayside (non-labelside).
- Donotattachstickynotestoorputtapeonadisc.
- Keepdiscsawayfromdirectsunlightandheat.
- Storediscsinaprotectivedisccase.
- Tocleanthedisc,wipethediscoutwards from the center with a clean cloth.
natural_image
Three hand-drawn diagrams showing a hand holding a ring, a cross symbol on a circular base, and a magnified view of the ring being cut (no text or symbols)Turntheplayeron
- Usethesystemwiththevehiclerunningorwiththeignitionkeyswitchin the"accessory"position.
- Tolowerthescreen, pressthePanelOpenbuttonandmovethescreen intoaviewingposition. Thesystemwillpoweronautomatically.
- TouchSOURCEicontoswitchthemode.
Note: You cannot insert a DVD into the slot if you have selected an alternate audio-video source (AVIN1, AVIN2 or iPod/iPhone).
Tumtheplayeroff
Closethemonitororpressthepowerbuttonontheremotecontroltoturnthe playeroff.
Ifadiscisplayingwhenyouturnthepoweroffandbackonagain,theplayer continuesplaybackfromwhereyoustopped.
Note: Oncetheplayeristurnedoff, you can note eject adiscin the player.
Adjustthedisplay
- TouchandholdtheMENUbuttontodisplayadjustmenu(OSD)
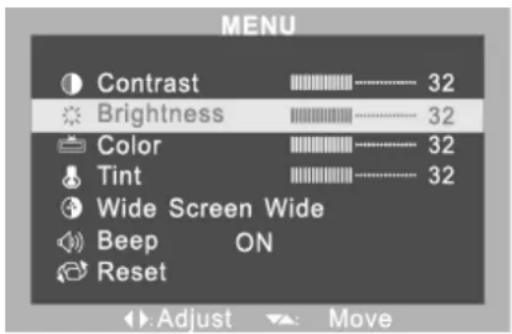
- In the OSD MENU, press ▼ or ▲ button to sequentially select each menu item.
ContrastAdjuststhedifferencesbetweenthelightanddarkareas oftheimage
BrightnessMakesthewholeimagelighterordarker
Color Adjustscolorbasedonthecolorspectrum
Tint AdjuststheintensityofthecolorwheninNTSCmode(to playbackDVDsrecordedintheUnitedStates)
WideScreen Selectstheaspectratiooftheimagewide,normal.
Beep Select the beep sound when touch each icon or button.
Reset Returnsallmenuvaluestotheirdefaultsettings.
- Press the ◀ or ▶ button to change the values of selected option.
CareandMaintenance
Cleaningthemonitor
- Useaclean,soft,dryclothtogentlywipedustanddirtfromthescreen.
- Do not use benzene, thinner, car cleaner, or other cleaners. These substances may damage the monitorsystemorcausethepainttopeel.
- ThesurfaceoftheLCDcanbeeasilyscratched.Donotrubitwith anythingabrasive.
Servicingthemonitor
Intheeventthattroublearises,neveropenthemonitorcase,disassemblethe playerorattempttorepairityourself.Theinternalpartsarenotserviceableby user.Openinganycomponentswillvoidthewarranty.
CAUTION:
Changesormodificationstothisproductnotapprovedbythe manufacturermayvoidthewarranty.
Cleaningtheremotecontrol
Useonlyaclean,soft,dampclothocleantheremotecontrol.Donotuse lighterfluid,methylalcoholorthersolvents.
Cleaningdiscs
Beforeplayingadisc, wipeitoutwardsfromthecenterwithaclean, softcloth.
Usetheremotecontrol
- Usetheremotecontrolonlyinsidethevehicle.
- Use the remote control no further than ten feet (three meters) from the sensor.
- Directsunlight(oraverybrightlight)reducessensitivitytoremotesignals. Donotusetheplayerindirectsunlight.
- Anyobjectthancomesbetweentheinfraredsensorandtheremote controlmaydisruptreception.
Replace the battery in the remote control
The battery needs changing when the button son theremotestop working or when you havetomove closetoplayer for theremotetowork.
Precautions
- Disposeofusedbatteriesproperty.
- Donotdisposeofusedbatteriestthrowingthemintofire.Ifyoudoso,they mayexplode.
- Donotshortthepositive(+)andnegative(-)terminals.
- Keep the battery and its holder away from young children. They may chokeonthebatterywhileattemptingtoswalloworchewonit.
Note: The battery typemust be CR2025. Donotreplace with any other battery type.
Procedure
- Turntheremoteup-side-down.
- Simultaneously sliding the battery latch in the direction of the arrow and pull the battery holder out of the slot.
- Removetheoldbattery.
- Placethenewbatteryintheslotwiththeplus(+)sideup.
- Pushthebatteryholderbackintotheslotuntilitlocksinplace.

UsetheiPod/iPhone
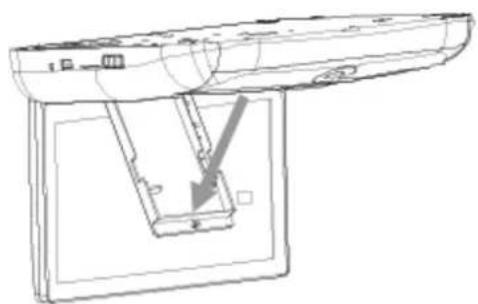
Press OPEN icon on the iPod/iPhone placed board to lower the iPod/iPhone placedboard.
Gentlyswingtheboardandadjusttheangleforconnecttheipod/iPhone.
natural_image
Technical line drawing of a mechanical assembly with a lever and base plate (no text or symbols)Play
- OnDVDmode, insert adiscintothediscslot when the screen display "NO DISC". When the disc was inserted, "LOADING" displayed, the system will read and play the discautomatically.
- PresstheEJECTbuttontoejectthedisc.
- If the disc have not been take away in 10 seconds, the system will slot it in automatically and play again.
PlayDVDdisc
Accesstherootmenu
ADVDisdividedintotitlesandchapters. Therootmenushowsthecontents ofthedisc. SomeDVDdisconlyallowyoutoselectdiscplaybackoptions fromtheDVDrootmenu.
To access the root menu of the DVD, press the RETURN or TITLE button on theremotecontrolduring playback.
Statusinformation
Toviewstatusinformationaboutthecurrentviewingsession,pressthe DISPLAYbuttoncontinuouslytocyclethroughthefollowinginformation.
| TITLE ELAPSED | ||
| TT 02/06 | ch 15/18 | 1:20:10 |
| TITLE REMAIN | ||
| TT 02/06 | ch 15/18 | 0:13:50 |
| CHAPTER ELAPSED | ||
| TT 02/06 | ch 15/18 | 0:02:20 |
| CHAPTER REMAIN | ||
| TT 02/06 | ch 15/18 | 0:01:10 |
Changlanguages
Note:
Allaudiblelanguagesmustbepre-recordedontheDVD.SomeDVDdisc onlyallowlanguageaccessthroughtheDVDmenu.
- To change the audible language, press the AUDIO button on the remote control. The player display the current language number and name, and the total number of languages available.
- To cycle through all available languages, continue pressing the AUDIO buttonontheremotecontrol. Theaudioinformationwilldisappears automaticallyafterthreesecseconds.
Usesubtitles
Languagesubtitlesarenormallyoff.
Note: SubtitlesmustbeontheDVD. SomeDVDsonlyallowsubtitleaccessthroughtheDVDmenu.
- To turn subtitles on, press the SUBTITLE button. The player displays the currentlanguagenumberandname, and the total number of languages for which subtitles are available.
- If the DVD provides subtitles in multiple languages, continue pressing the SUBTITLEbuttontochangethesubtitlelanguage.
- To turn subtitles off, press the SUBTITLE button until the screen displays "SUBTITLEOFF", Thedisplayofthesubtitleoptionsdisappears automaticallyifyyouwaitforthreeseconds.
RepeatDVDchaptersandtitles
To repeat a chapter or title, during playback continue pressing REPEAT to alternateamongoptions.
- CHAPTER---Repeatsthecurrentchapter.
•TITLE---Repeatsthecurrenttitle. - ALL---Cyclesplayallchaptersandtitles
- REPEATOFF---Resumesnormalplayback.
Repeatfavoritesections
Torepeatafavoritesectionyoumustfirstmarkwhereitbeginsandends.
- PlaybacktheDVD.
- Toidentifythebeginningofyourfavoritesection(pointA),presstheA-B buttonwhentesectionstartsplayingback.
- Toidentifytheendofyourfavoritesection(pointB), presstheA-Bbutton againwhen playbackreachestheendofthesection.
Tocanceltherepeat playback and resumenormal playback, presstheA-B button again.
Changviewingangle
Note:
Multipleanglesmustbepre-recordedontheDVD. Lookforthemultipleanglesicon()onthejacketoftheDVD.
- Tocyclethroughtheavailableviewingangles, press the ANGLE button on theremotewhileplayingback the DVD. The player display the current anglenumber and the total number of angles available.
- Tochangetheangle, presstheANGLEbuttonagain.
- Toreturntonormalviewing, presstheANGLEbuttonagain.
Zoominandout
- Tozoomin(enlarge)theimagewhenwatchingaDVD,pressZOOMduring playback.
AsyoupressZOOMontheremote, theplayeralternatesamongthe availablezoomsettings(2x,3x,4x,1/2,1/3,1/4).
- Tozoominwhenviewingphotographs(JPEG/JPGimages)storedona disc,pressZOOMontheremote,theplayeralternatesamongthe availablezoomsettings:ZOOM100%,ZOOM125%,ZOOM150%,ZOOM 200%,ZOOM75%,ZOOM50%.
PlayAudioCDdisc
DisplayCDinformation
InsertaCDdisc, thescreenwilldisplaySINGLEELAPSED. Continue pressingDISPLAYbuttontoviewSINGLEELAPSED, SINGLEREMAIN, TOTALELAPSED, TOTALREMAIN, DISPLAYOFF.
RepeatCDtracks
To repeat a track or the entire CD, press REPEAT button on the remote during playback.
To cycle through the available options, continue pressing REPEAT.
- TRACK---Repeatplaythecurrentmusic
- ALL---Cyclesplayallmusic
•REPEATOFF---Resumenormalplayback
Repeatfavoritesections
Torepeatafavoritesectionyoumustfirstmarkwhereitbeginsandends.
- PlaybacktheCD.
- To identify the beginning of your favorite section (point A), press the A-B buttonontheremotewhentesectionstartsplayingback.
- To identify the end of your favourite section (point B), press the A-B button againwhenplaybackreachestheendofthesection.
To cancel the repeat playback and resume normal playback, press the A-B buttonagain.
PlayMP3disc
MP3 is a format for storing digital audio, compresses each audio track with littlelossofaudioquality. Theresulttakesupmuchlessdiscspacethanthe trackwouldwithoutMP3compression.
- InsertaCDthatcontainsMP3filesintotheplayer.Theplayerdisplaythe MP3menu.
- To select the folders and tracks to play, press the ENTER button. The playerdisplaysthefolderstructure.
- To choose a folder from the list, press the ▲ / ▼ button.
- Press the ENTER button, the player displays the contents of the selected folder.
- ToselecttheMP3file, pressthe ▲ / ▼ button.
- Press the ENTER button to play the file.
MP3controls
- To play back to the next MP3 file, press the next button (▶▶).
- To play back the previous MP3 file, press the previous button (◀◀).
RepeatMP3
To repeat a single MP3 file, press the REPEAT button on the remote. To cycle through all the following settings, continue to press REPEAT.
• REPEATONE---repeatsthecurrentfile.
- REPEAT ALL---cycles play all current of the disc.
- REPEATFOLDER---repeatsthecurrentthefolder.
- REPEAT OFF---turns off repeat and resumes normal playback.
Play USB device and SD/MMC card
- Insert a USB device into the USB socket of the main unit.
- On DVD mode, touch SOURCE button on the panel or press SRC button on the remote control for more than 2 seconds to switch to the USB mode. ThesystemwillplayUSBdeviceautomatically.
- Use the arrow buttons to select a file type and press enter to play it.
- Playing SD/MMC card is the same operation of USB device, please refer tothestepsofplaying USB device.
PlayiPod/iPhone

OnDVDmode, opentheiPod/iPhonedoor, connectiPod/iPhonecorrectly. ThenthesystemwillswitchtotheiPod/iPhonemodeautomatically. There threekindsofmodetochoose: MUSIC, VIDEO, PHOTO.
MUSICMODE:
-
Select the icon and Music press ENTER to enter the mode. The system will playiPod/iPhoneautomatically.
-
To return to the main menu of the 'iPod / iPhone, press MENU and the " icon, until they reach the level of the main menu.
-
Theresixkindsofmodetochoose: PLAYLIST, ARTIST, ALBUM, GEMRE, TRACK, COMPOSER.
Select one of the 6 items from the menu and press Enter to select the desired track.

VIDEOMODE:
- Select the Video icon and press ENTER to confirm the selection,
the unit plays the 'iPod / iPhone automatically on the first available video
- Duringplay, pressMENUbuttontoreturntotheVIDEOmenu.
ApplytoiPodClassicfortheVideoofPodcast(foriPodClassiconly,notapplicableforiPhoneandotheriPodproducts),pleaseswitchtoPhotoModeinsystemandpressEnterwhenyouwanttoplaythePodcastVideo,andreferthestepsbelow:
- IntheiPodmenu, choosethe "PHOTO" icon.

2.Enterthemenuafterthescreenappears"NOSIGNAL".

- SelectthePodcastfromyouriPodClassic.
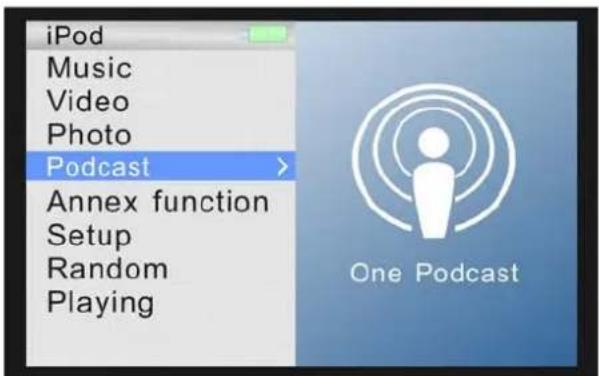
- Press "ENTER", the program title will show up.
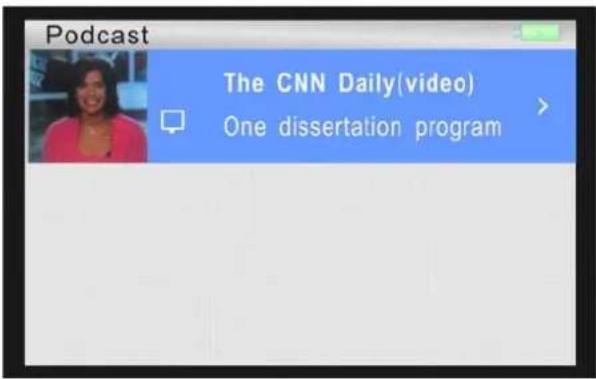
- Selectthe VideoprogramitentersthePodcastvideoplaymode.

PHOTOMODE:
- Select the Photo icon and press ENTER to confirm the selection, the unit plays your iPod / iPhone automatically on the first picture available.
- For faster scrolling of images before and after using the remote control, pressing the "◀◀" and "▶◀".
Note: BeforeenterthePHOTOmode, mustsettheiPod/iPhoneto the photomod e and play starts.
Functions
Pressing the "◀◀" icon to return to the previous chapter or track, pressing the
"▶▶" icon, you go to the chapter to the next track. Holding a long time the
"◀◀ " icon it displays the icon "◀◀" represents the rewind.
Holding a long time the "▶" icon it displays the icon "▶" which is the fast forward.
To return to normal modality play press ENTER.
Pressing the " ↑ " icon will scroll up the track list, press the icon
" ↓ " you scroll down the list of songs.
Installationan d Wiring
Donotattempttoinstallorserviceyourplayerbyyourself.Installationand servicinginelectronicequipmentandautomotiveaccessories.Ifyoudonot haveknowledgeorexperiencethisinstallationmaybedangerousandcould exposeyoutotheriskofelectricshockorotherhazards.
Readtheseinstructionsandprecautionscarefully.Improperinstallationcan damagethemonitorandthevehicle.
What'sinthebox
Inadditiontothismanual,theboxcontains:
| PartsNameQuantity | |
| Player | 1 |
| IRremotecontrolwithbattery | 1 |
| Powercable | 1 |
| AV 1 IN cable | 1 |
| AV 2 IN cable | 1 |
| AVOUTcable | 1 |
| ST4.2x16screw | 8 |
| TB2.6x6screw | 7 |
| PM4x8screw | 4 |
| InstallationBracket | 1 |
| Trim Ring | 1 |
| Usermanual | 1 |
Note: Useonlythecontentsofthispackagetoinstallandusethesystem. Usingaccessoriesnotprovidedwiththisplayermaydamagetheplayer.
MountingandWiringprecautions
- This unit is exclusively for vehicles with a negative ground, 12V power supply.
- Thisunitmaybeinstalledwithadditionalmobileaudiocomponents,such asadigitalcamera.
- Alwaysusegreatcarewhenattachinganythingtoavehicle.Check clearancesonbothsidesoftheplannedinstallationbeforedrillingany holesorinstallinganyscrews.
- Agoodchassisgroundconnectioniscriticaltominimizeresistance and avoidnoiseproblems. Usetheshortestwirepossibleandsecurely connectittothecarchassis.
- WhenroutingRCAcables, keep them away from the powercables and outputs speaker wires, engine, exhaust system, ect. Heat may damage wires.
- If the fuse should blow, make sure that all connections are correct, the cableshavenotcausedashortcircuit, and nowiresaredamaged. Then replacethefusewithanewfuseofthesameamperagevalueasthe originalfuse. Whenreplacingafuse, neverletthepowercabletouchany metalpartorotherwire.
- Never let disconnected cables or terminals touch metal on the car or any otherconductingmaterial.
- Topreventshortcircuit, donotremovethecaps from unused terminal or from the endsofunconnected cables.
• Insulate unconnected wires with vinyl tape or others similar material.
Warning!
Topreventshortcircuitsduringinstallation,disconnectthevehicle'snegative batteryleadbeforemakinganypowerconnections.
Installationprocedure
- Screw the Installation Bracket to the beam or wood using the ST4.2x16 screws.
- Installing the trim ring on the player using the TB2.6x6 screws.
- Pluginpowerharnessandaudio/videosourcecablesintotheoverhead monitor.
- AttachtheplayertotheInstallationBracketusingthePM4x8.
- Checkthecar'sbrakelights, blinkers, wiper, etc. to ensure they are working property
Wiringdiagram
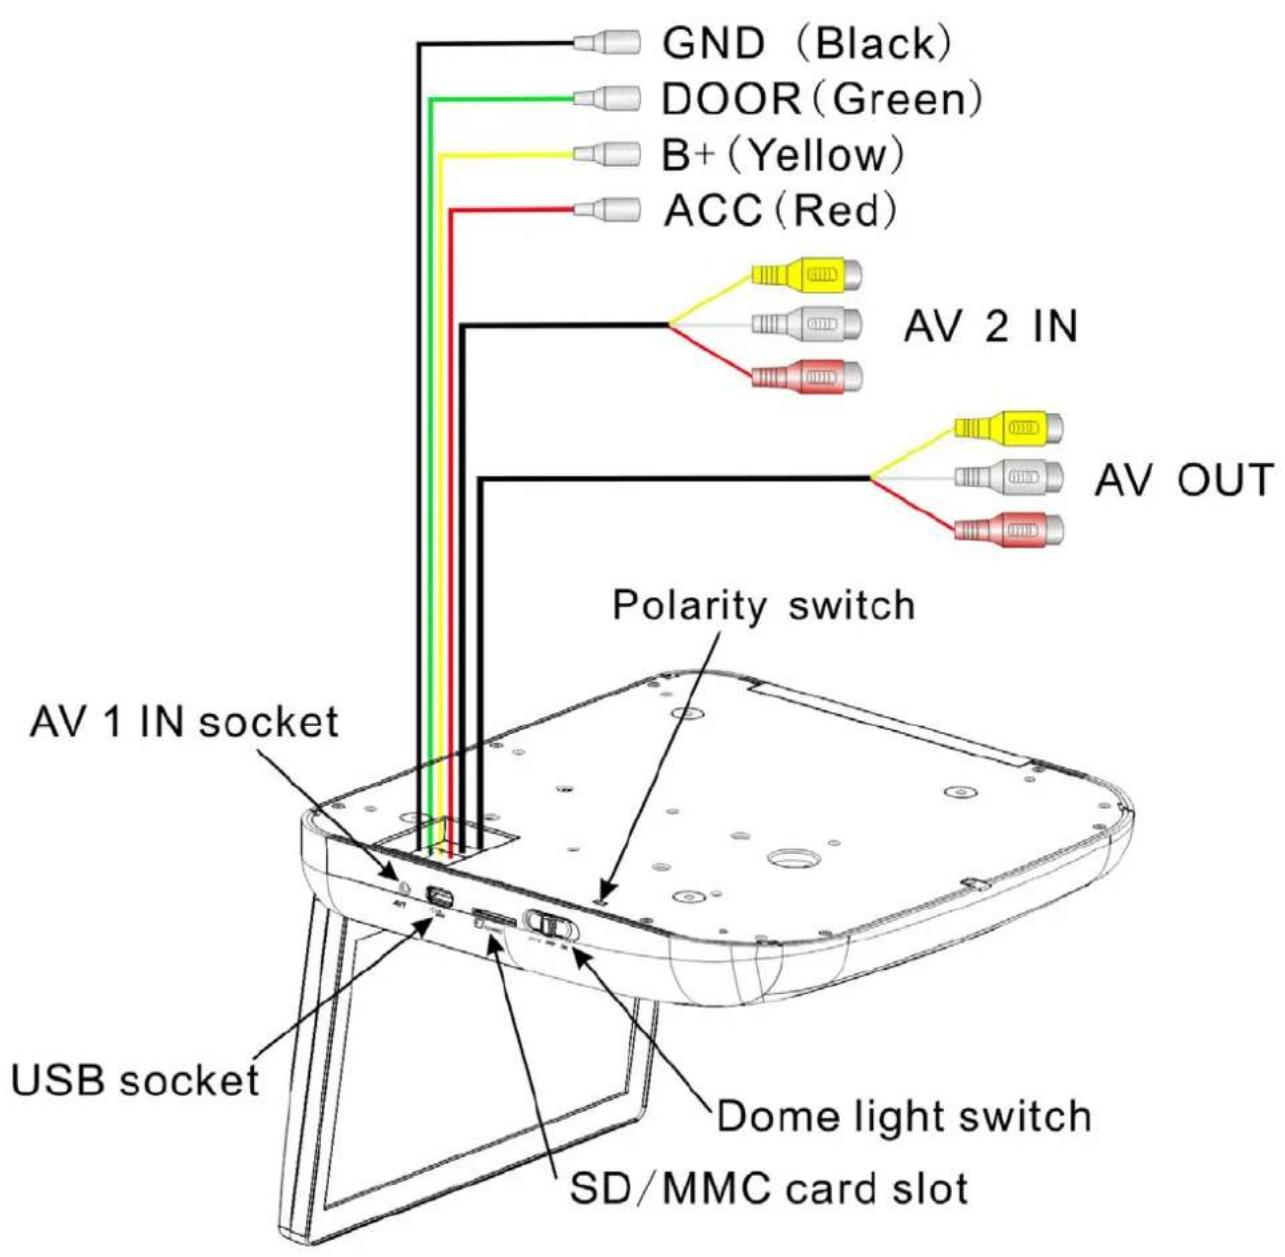
SystemSetup
- PressSETUPontheremotecontroltoaccessthesetupmenu.
- Press ▲ / ▼ buttontoselectamongmenuitems.
- Press ◀ / ▶ buttontochangethevaluesofselectedoption.
- Press ▲ /▼ buttontoselecttheoptionyouwishtochange.
- PressENTERtoconfirmyourselection.
- Press ◀ to return the previous grade menu.
- PressSETUPtoexitthesetupmenu.
| MenuDescription | |
| GENERALSETUP PAGE | ANGLEMARK:Turnthemultiple-anglefeatureonoroff, themultiple-anglemustbeprerecordontheDVDdisc. • ON • OFF |
| OSDLANG:Selectsalanguageformenu. • ENGLISH • FRENCH • SPANISH • ITALIAN | |
| CAPTIONS:Selectsthecaption. • ON • OFF | |
| SCREENSAVER:Protectsthescreenifitpausedabout 5minutes. • ON • OFF | |
| SPEAKERSETUP PAGE | DOWNMIX:AppliestoDolbydigitalsound. • LT/RT • STEREO |
| PREFERENCE PAGE | TVTYPE:SelectstheTVsystem. • PAL • NTSC |
| AUDIO:Selectstheaudiotracklanguage. • ENGLISH • FRENCH • SPANISH • GERMAN • CHINESE • RUSSIAN • THAI | |
| SUBTITLE: Selects the language of the subtitles displayedonthescreen. • ENGLISH • FRENCH • SPANISH • GERMAN • CHINESE • RUSSIAN • THAI • OFF | |
| DISCMENU:Selectsthelanguageofthecurrentdisc. • ENGLISH • FRENCH • SPANISH • GERMAN • CHINESE • RUSSIAN • THAIPARENTAL:Restrictstheviewingofmoviestochildren ofappropriateagelevelsonly.Youcanselect1to8.1KIDSAF (safeforchildren)2 G (generalaudience)3 P G (parentalguidancesuggested)4 P G 1 3 (somematerialunsuitableforchildrenunder13)5 P G R (somematerialunsuitableforchildrenunder17)6 R (somematerialunsuitableforunder17)7 N C 1 7 (notrecommendedviewingforchildrenunder17)8 A D U L T (Onlyforadultsduetographiccontent.Thisisthe defaultsetting.)Afteryouselecttheparentalsetting,pressENTER,then enterthe4-digitpassword( defaultis3308).PressENTER againtoconfirm. | |
| PASSWORD:Letsyouchangethe4-digitpassword using the number keys on the remote control . The defaultpasswordis3308,butnolongerworksafteryou changethepassword. | |
| DEFAULT:Resetsallsettingstothefactorydefaults. | |
Troubleshooting
Ifoperationfreezes, the screengoesblackortheunitshouldotherwisenot functionproperly, try turning the uniton and off. If the unit does not respond, presstheresetswitch on the Front Panel.
| ProblemCauseSolution | ||
| Playerdoesnot playdisc | Discinsertedincorrectly | Reinsertthediscwiththelabel sideup(facingtheceiling). |
| Discformatisnot supported | Checkthediscformat. | |
| DiscisdirtyorscratchedCleanorreplacethedisc. | ||
| Theplayer suddenlystopp-edworkingor thescreenwent black | Playererror | Tryturningtheplayeroffandon. Iftheplayerstilldoesn't respond,presstheresetbutton. |
| Playerdoesn't turnon | Thecarignition(or ACC/Accessory)isoff | Insertthekeyintotheignition andturnittoACC/Accessory. |
| Condensationintheplayer | Waitforaboutonehouroruntil condensationevaporates. | |
| Playeroperates erratically | BatteryneedsreplacingReplacebattery. | |
| DirtyIRwindowonthe Playerorremotecontrol | Cleantheplayer'sandthe remotecontrol'sIRwindows. | |
| Looseconnections | Checkandtightenall connections. | |
| PictureSkips Occasions | DiscisdirtyorscratchedCleanorreplacethedisc. | |
| Blurpictureon thescreen. | Interferedbyshort-distancedstrong interference.(E.g.highvoltagewire, transformationstationor aircraftetc...) | Movethevehicleawayfrom theinterference. |
| Thepictureon thescreenis dark. | 1.Theequipmentlocates atalowtemperature area.2.Brightnessissettoo low. | 1.Thisisthecharacteristics of LCDdisplayinlowtemperature, itwillrestore tonormal brightness afterstartingthe displayforfewminutes.2.Adjustthebrightness setting. |
Specifications
Specificationsanddesignaresubjecttochangewithoutnotice.
| PowerSourceVehiclebattery(DC+10V~+16V) | |
| OperatingVoltageDC+14V | |
| MechanismManualOpen/Close | |
| DisplayAngleVerticalAdjustable:Up/Down<120° | |
| Pixel1152x234 | |
| HighBrightness350cd/m | 2 |
| Viewingangle(up/down/left/right)45/65/65/65 | |
| Operatingcurrent<2000mA(TypicalIV DD=14V) | |
| DomeLight<2W | |
| OperationTemperature | -10°C to+50°C |
| StorageTemperature | -20°Cto+70°C |
LegalNoticeandCreditLine:
Made for

iPod

iPhone
"MadeforiPod,"and"MadeforiPhone,"meanthatanelectronicaccessary hasbeendesignedtoconnectspecificallytoiPodoriPhone,respectively,and hasbeencertifiedbythedevelopertomeetAppleperformancestandards. Appleisnotresponsiblefortheoperationofthisdeviceoritscompliancewith safetyandregulatorystandards.Pleasenotethattheuseofthisaccessory withiPodoriPhone,mayaffectwirelessperformance.
iPhone,iPod,iPodclassic,iPodnano,andiPodtoucharetrademarksofApple inc.,registeredintheU.S.andothercountries.
The MACROM brand is a registered trade mark of MACROM SA and any use of such marks by ALDINET S.p.A. is under license.

Declaration of Conformity

ALDINET S.p.A.
Viale C. Colombo 8 - 20090 Trezzano s/N (Mi) - Italy
Tel. +39 02 48478.1
www.macrom.it
- BasicOperation 9
- Play....13
- InstallationandWiring 20
- SystemSetup 23-24
- Troubleshooting....25
- Specifications....26
- Legalnotice ....26
- SafetyInformation
- DVDPlayerFeatures
- DVDVideoFeatures
- Controls
- MonitorStowedView
- MonitorOpenView
- RemoteControl
- BasicOperation
- Openthemonitor
- Stowthemonitor
- Handlingdisc
- Turntheplayeron
- Tumtheplayeroff
- Adjustthedisplay
- CareandMaintenance
- Cleaningthemonitor
- Servicingthemonitor
- CAUTION:
- Cleaningtheremotecontrol
- Cleaningdiscs
- Usetheremotecontrol
- Replace the battery in the remote control
- Precautions
- Procedure
- UsetheiPod/iPhone
- Play
- PlayDVDdisc
- Accesstherootmenu
- Statusinformation
- Changlanguages
- Note:
- Usesubtitles
- RepeatDVDchaptersandtitles
- Repeatfavoritesections
- Changviewingangle
- Zoominandout
- PlayAudioCDdisc
- DisplayCDinformation
- RepeatCDtracks
- PlayMP3disc
- MP3controls
- RepeatMP3
- Play USB device and SD/MMC card
- PlayiPod/iPhone
- MUSICMODE:
- VIDEOMODE:
- PHOTOMODE:
- Functions
- Installationan d Wiring
- What'sinthebox
- MountingandWiringprecautions
- Warning!
- Installationprocedure
- Wiringdiagram
- SystemSetup
- Troubleshooting
- Specifications
Brand : Macrom
Model : M-DVD1023RV
Category : DVD player