
STV50 - Television Sveon - Free user manual and instructions
Find the device manual for free STV50 Sveon in PDF.


| Product Type | Television |
| Brand | Sveon |
| Model | STV50 |
| Screen Size | 50 inches (127 cm) |
| Display Resolution | 4K UHD (3840 x 2160) |
| Panel Type | LED |
| Smart TV Platform | Android TV |
| Connectivity | HDMI x3, USB x2, Ethernet, Wi-Fi, Bluetooth |
| Sound Output | 2 x 10W speakers |
| Power Consumption | 100W (typical) |
| Standby Power | <0.5W |
| Energy Class | A+ |
| Dimensions (with stand) | 1120 x 700 x 250 mm |
| Dimensions (without stand) | 1120 x 650 x 80 mm |
| Weight (with stand) | 12.5 kg |
| VESA Mount Pattern | 400 x 400 mm |
| Refresh Rate | 60 Hz |
| Operating System | Android TV 11 |
| Remote Control | Included (batteries included) |
| Warranty | 2 years |
Frequently Asked Questions - STV50 Sveon
User questions about STV50 Sveon
0 question about this device. Answer the ones you know or ask your own.
Ask a new question about this device
Download the instructions for your Television in PDF format for free! Find your manual STV50 - Sveon and take your electronic device back in hand. On this page are published all the documents necessary for the use of your device. STV50 by Sveon.
USER MANUAL STV50 Sveon
natural_image
Computer monitor displaying a tactical video game with soldiers, alongside a black game controller and USB cable (no text or symbols visible)STV50
STV Mobile series
60Hz USB Video Capture Special for Gaming
- Cyberlink Power Producer
9. Cyberlink Power Director
9.1 Introducción
9.3 Uso de Power Director
9. Cyberlink Power Director
Audio: MP3, WAV, WMA, ASF
natural_image
Underwater scene with colorful fish and coral (no visible text or symbols)natural_image
Underwater scene with colorful fish and coral, no visible text or symbols15. Cyberlink Power Producer
15.1 El programa Power Producer
15. Cyberlink Power Producer
-
Welcome
-
Features
-
System Requirements
-
Content
-
Hardware
-
Connections
7.Driver and software installation
7.1 Driver Installation
7.2 Cyberlink Power Director installation
7.3 Cyberlink Power Producer software installation
7.4 STV50 audio settings
-
Uninstallation
-
Cyberlink Power Director
9.1 Introduction
9.2 Main Features
9.3 Power Director usage
- Multimedia Video Capture
10.1 Capture Mode
10.2 Capture Limit Options
10.3 Capture from Microphone
10.4 Capture Audio Tracks from CD
10.5 Capture from a DVD
- Preferences and options. Power Director
11.1 Preferences
11.2 Edit Window Overview
- The Workspace. Power Director
12.1 Timeline View
12.2 Media Tracks
12.3 Track Manager
12.4 Magic Movie Wizar
12.5 Preview your Production
- Production Mode. Power Director
13.1 Production Wizard
13.2 Creating a video file
13.3 Create a file for streaming
13.4 Write back to DV tape or HDV tape
13.5 Create a HDD Camcorder file
13.6 Uploading Video to YouTube
- Creating Discs. Power Director
14.1 Disc Menus
14.2 Using the Menu Designer
14.3 Modify Menu Text
14.4 Preview your Disc's Menu Page
14.5 Configure Create Disc Preferences
14.6 Burn a disc
- Cyberlink Power Producer
15.1 Power Producer Program
15.2 Power Producer Projects
15.3 Getting Started
15.4 Producing a movie disc
15.5 Right-to-disc
15.6 Disc Utilities
15.7 Project Preferences
- VivaStation
16.1 Signal setting
- Technical Specifications
Important Information
1. Welcome
Thanks for choosing the USB video capture STV50 from Sveon, a small device compatible with 60Hz video sources which will allow you to capture your best video games from your games console in your PC. Besides, tanks to your STV50 you will be able to turn your PC into a real video editing center. STV50 USB includes video and audio outputs to capture video signal from external video source as camcorders, VCD/DVD players or games consoles easily.
Through this user guide we will show you how to install and use this device to get the best performance.
2. Features
- External USB video capture compatible with 60Hz video sources that will allow you to capture videos from games consoles and other external video sources.
• High quality video capture and direct audio capture. - Compliant with the following OS: Microsoft® Windows XP, Vista and Windows 7
• Real time recording function wich allows you to record live signal
• Thanks to its AV, SVideo and YpBpr inputs you can connect different external video sources, including those working to 60Hz, as camcorders, VCD/CD/DVD players and games consoles. Besides it includes RCA audio input (left and right audio channels). - Direct screenshot function just pressing a button.
- Includes Power Director and Power Producer programs from Cyberlink to create professional movies. Also it includes VivaStation software to capture from games consoles with full screen preview.
- Power Director will allow you to adapt your captured videos to directly share them in the Internet or for playing in multi-media devices such tablets or mobile phones.
- The device doesn't need extra power supply because it is USB powered-only (USB 2.0).
• Minimum and compact size.
3. System Requirements
Minimum system requirements for digital video editing tools:
Resolution: 1024 x 768, 16 bits colour or above
Operating System: Microsoft® Windows XP, Vista and Windows 7
Memory:
• 512MB of RAM
- 2GB DDR2 or above for video editing functions (recommended)
CPU:
• Capture/Produce AVI: Pentium II a 450 MHz or AMD Athlon 500 MHzP
• VCD quality profile (MPEG-1): Pentium III 600 MHz or AMD Athlon 700 MHz
• DVD quality profile (MPEG-2): Pentium 4 2,2 GHz or AMD Athlon XP 2200+
• High Quality MPEG-4 profiles and WMV secuency, Quick Time, Real Video: Pentium 4 2,4 GHz or AMD Athlon XP 2400+
Hard disk:
• Minimum 5 GB (400 MB for SmartSound Quicktrack Library)
• 10 GB (20GB recommended) for DVD playing
Reading devices: DVD-Rom unit for drivers and software installation.
Recording devices: CD or DVD recorder needed (CD-R/RW, DVD+R/RW or DVD-R/RW) to record VCD/DVD/SVCD titles.
Microphone: A microphone is needed for narrations recording.
4. Content
- USB video capture STV50
- AV-SVideo-L/R audio cable
- YpBpr-L/R audio cable
- USB extensor cable
- DVD Driver (includes digital user guide)
- Warranty card
5. Hardware
- USB Connection
- Direct snapshot button
- AV-SVídeo-YpBpr connector
- Audio connection
- SVideo connection
- Composite video connection
- YpBpr video connection

6. Connections
PC Connection
-
Connect the device to the PC through an available USB port.
-
Turn the PC on.
-
First time you connect the device to the computer, the Windows assistant for new devices appears. Please click on "Cancel" and go to the "Software and driver installation" section in this user guide.
Note. The device includes an USB cable to make easier the connection between the computer and the STV50.
STV50 User Manual
Index
-
Welcome
-
Features
-
System Requirements
-
Content
-
Hardware
-
Connections
-
Driver and software installation
-
Uninstallation
-
Cyberlink Power Director
-
Multimedia Video Capture
-
Preferences and options
Power Director
-
The Workspace. Power Director
-
Production Mode. Power Director
-
Creating Discs. Power Director
-
Cyberlink Power Producer
-
. VivaStation
-
Technical Specifications
Important Information
External video source connection
STV50 allows you to connect several external video sources as a games console, camcorder, a VHS video or a VCD/DVD player to capture their contents and edit or record them in a disc. Also you will be able to save the files in compatible formats with Youtube ^4 , social networks, tablets and mobile phones.
To connect STV50 to your games console or other video source device it is necessary to use the adaptor included with the device. You can connect the external video source through AV (yellow, red and white connectors), through SVideo or even through YpBpr (red, blue and green connectors) depending on the features of the device. Follow these steps to complete the connections between the USB video capture and the video source:
Connection through AV
- Connect a RCA cable (three connectors: yellow, red and white) to the external video source. Cable not provided.
- Connect the end of the RCA cable to the STV50 adaptor cable. The colours must match. White and red connectors carry stereo audio signal and yellow connector carries video signal.
- Connect the adaptor cable to the connector located in the rear panel of STV50.
- Complete the connections between the STV50 and the computer following the steps shown in this guide.
Connection through SVideo
- Connect a SVideo cable to the external video source (not included).
- Connect the end of the SVideo cable to the STV50 adaptor cable. Please note you have to connect black connector for video signal and red and white connectors for audio signal.
- Connect the adaptor cable to the device through a connector located in the rear panel of STV50.
- Complete the connections between the STV50 and the computer following the steps shown in this guide.
Connection through Components
- Connect a Components cable (red, blue and green connectors) for video signal and a RCA cable (white and red) for audio signal to the external video source (not included).
- Connect the end of the Components cable to the STV50 Components and RCA adaptor cable. Please note you have to connect red, green and blue connectors for video signal and red and white connectors for audio signal.
- Connect the adaptor cable to the device through a connector located in the rear panel of STV50.
- Complete the connections between the STV50 and the computer following the steps shown in this guide.
7. Driver and software installation
The DVD disc provided with the device includes the device software and Power Director and Power Producer programs from Cyberlink and VivaStation software. Before installing the software, please make sure the USB video capture STV50 from Sveon is properly connected to your computer (please refer to the "Connection" section of this user guide).
Step 1. First time you connect the device to your computer through an available USB port, the system will detect the new device and the Windows Installation Assistant for new devices will appear. Please click on "Cancel".
Step 2. Insert the DVD Driver provided with the unit in the DVD Rom unit of your computer and the Sveon Installation Assistant will start automatically. If it doesn't, please go to "My Computer" menu, double click on "DVD ROM" unit and run the file "Autorun.exe".
7.1 Driver Installation
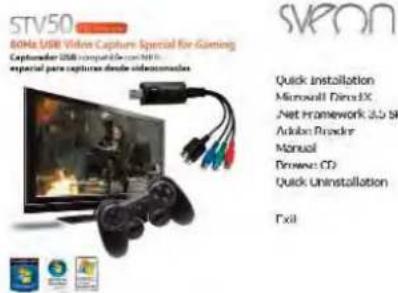
Step 1. Click on "Quick Installation".
Step 2. Select "Typical Installation" (recommended) or "Custom Installation" if you want to select the programs which are going to be installed in your computer.
Click on "Install" and the following programs will be installed: STV50 driver, Cyberlink Power Director, Cyberlink Power Producer and VivaStation softwares.
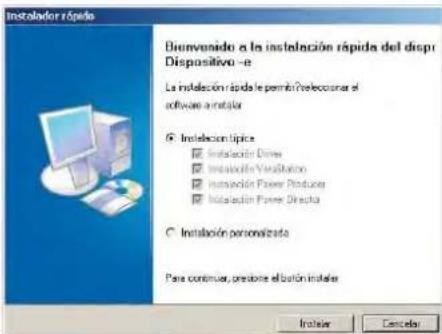
Step 3. Click on "Start" to install the drivers of the device. If you want to cancel the process click on "Cancel". Wait until the installation is finished and click on "Ok".

STV50 User Manual
Index
-
Welcome
-
Features
-
System Requirements
-
Content
-
Hardware
-
Connections
-
Driver and software installation
-
Uninstallation
-
Cyberlink Power Director
-
Multimedia Video Capture
-
Preferences and options
Power Director
-
The Workspace. Power Director
-
Production Mode. Power Director
-
Creating Discs. Power Director
-
Cyberlink Power Producer
16..VivaStation
- Technical Specifications
Important Information
7.2 Cyberlink Power Director installation
Once the driver installation finishes, the Cyberlink Power Director installation will start automatically.
Step 1. Choose the installation language and click on "Ok".

Step 2. Click on "Next" to start the installation process.

Step 3. Please read carefully the license terms of the usage of the software. If you agree please click on "Yes" to continue the installation process. If you disagree click on "No" and the installation will be finished automatically.
Step 4. Enter an user name and a company name (if it is needed).
Step 5. Click on "Next" to continue the installation process. A new folder is going to be created in: "C:\Archivos de programa\CyberLink\PowerDirector" where all the files of the software are going to be saved.
The installation program will create a Power Director icon in your desktop.
Step 6. Click on "Finish" to finish the installation process.
7.3 Cyberlink Power Producer software installation
Once the applicationPower Director is completely installed, the Power Producer installation assistant will start.
Step 1. Select the installation language and click on "Ok".
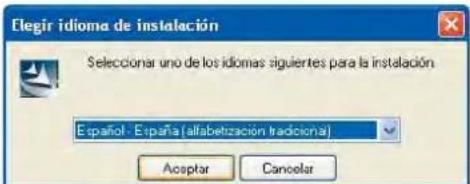
Step 2: Click on "Next" to start the installation process.
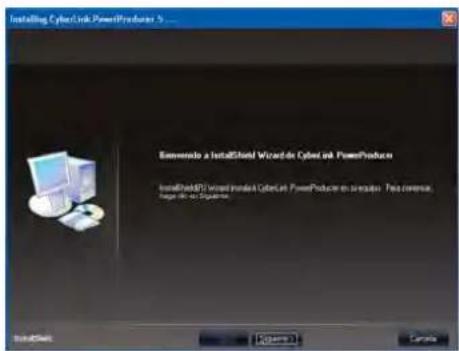
Step 3. Please read carefully the license terms for the usage of the software. If you agree please click on "Yes" to continue the installation process. If you disagree please click on "No" and the installation will be canceled automatically.
Step 4. Please enter an user name and a company name (if it is needed).
Step 5. Click on "Next" to continue the installation process. A folder will be created in "C:\Archivos de programa\Cyber Link\Powerproducer\" where are going to be saved all the files of the software.
The installation program will create a icon in the desktop.
Step 6. When the installation process finishes, press "Finish" and reboot your computer.
STV50 User Manual
Index
-
Welcome
-
Features
-
System Requirements
-
Content
-
Hardware
-
Connections
-
Driver and software installation
-
Uninstallation
-
Cyberlink Power Director
-
Multimedia Video Capture
-
Preferences and options
Power Director
-
The Workspace. Power Director
-
Production Mode. Power Director
-
Creating Discs. Power Director
-
Cyberlink Power Producer
16..VivaStation
- Technical Specifications
Important Information
7.4 VivaStation installation
Once installation of Power Producer software is completed, VivaStation will start installation automatically for an optimal performance in the captures from 60Hz video sources like games consoles.
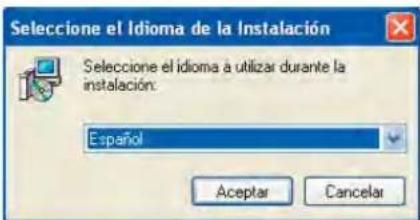
Step 1. Select the installation language and click on "Accept"
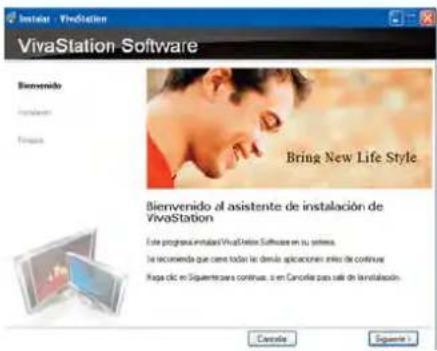
Step 2. In welcome window, please read the instructions and click on "Next"
Step 3. Wait until the software installation is completed. If you wish to cancel the installation click on "Cancel" at any moment.

Step 4. Once installation process is completed please click on "Finish"
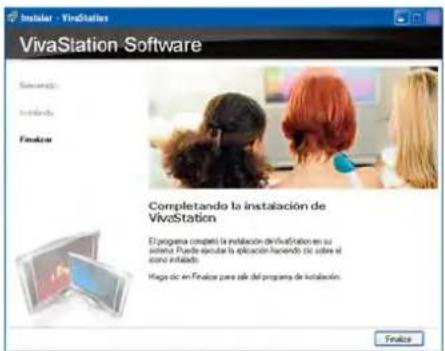
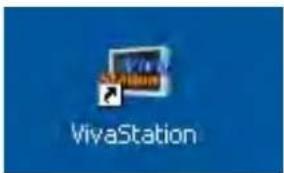
In your PC desktop a direct access icon will appear so you can run the software easily.
STV50 User Manual
Index
-
Welcome
-
Features
-
System Requirements
-
Content
-
Hardware
-
Connections
-
Driver and software installation
-
Uninstallation
-
Cyberlink Power Director
-
Multimedia Video Capture
-
Preferences and options
Power Director
-
The Workspace. Power Director
-
Production Mode. Power Director
-
Creating Discs. Power Director
-
Cyberlink Power Producer
16..VivaStation
- Technical Specifications
Important Information
7.4 STV50 audio settings
After installing the drivers of the device and the software, you need to setup the audio input through the red and white connectors of STV50 video capture.
Audio settings under Microsoft® Windows XP
Step 1. Go to Start > Control Panel > Sound, audio and voice devices > Audio and sound devices > Advanced volume controls > Options/Properties.
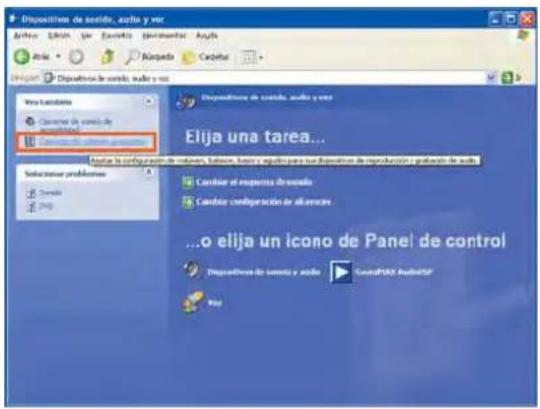
Step 2. Select the capture device as shown in the picture.

Audio settings under Microsoft® Windows Vista/W7
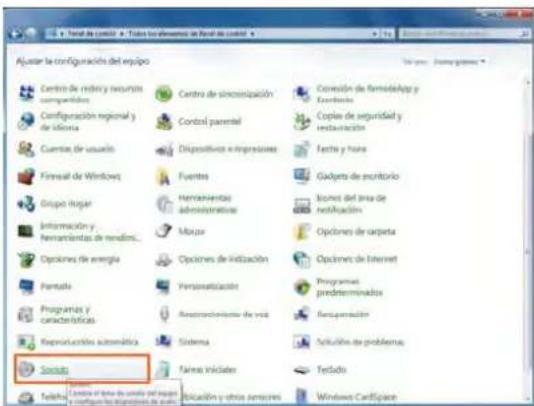
Step 1. Go to Start > Control Panel and select "Show Icons".
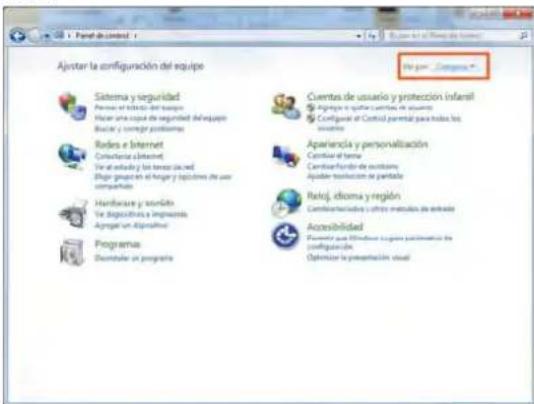
Step 2. Select "Sound" option.
-
Welcome
-
Features
-
System Requirements
-
Content
-
Hardware
6.Connections
-
Driver and software installation
-
Uninstallation
-
Cyberlink Power Director
-
Multimedia Video Capture
-
Preferences and options
Power Director
-
The Workspace. Power Director
-
Production Mode. Power Director
-
Creating Discs. Power Director
-
Cyberlink Power Producer
16..VivaStation
- Technical Specifications
Important Information
Step 3. Press "Record" and select the capture device.

8. Uninstallation
Step 1. Insert the DVD Driver of the device in the DVD ROM unit of your computer and click on "Quick Uninstallation".
Step 2. Select "Typical Uninstallation" and click on "Uninstall".
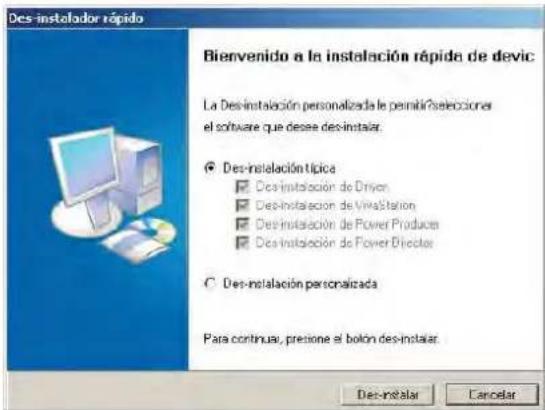
Step 3. Select if you want to reboot your computer or not and then click on "Finish".

9. Cyberlink Power Director
9.1 Introduction
This chapter introduces CyberLink PowerDirector and the digital video editing process. It provides a discussion of the different kinds of technology you will use in the digital movie-making process.
CyberLink PowerDirector is a digital video editing program that lets you create professional-looking video movies and photo slideshows, complete with music, voice-overs, special effects, transition effects and much more.
If you don't have experience making movies or creating slideshows, don't worry. CyberLink PowerDirector is an easy to use tool that, with just a little practice, will have you making movies like a Hollywood director. In no time you will be creating creative videos and stylish slideshows that you can email to friends, burn to disc to show your family, or upload to the Internet to share with the world.
STV50 User Manual
Index
-
Welcome
-
Features
-
System Requirements
-
Content
-
Hardware
-
Connections
-
Driver and software installation
-
Uninstallation
-
Cyberlink Power Director
-
Multimedia Video Capture
-
Preferences and options
Power Director
-
The Workspace. Power Director
-
Production Mode. Power Director
-
Creating Discs. Power Director
-
Cyberlink Power Producer
-
. VivaStation
-
Technical Specifications
Important Information
9.2 Main features
Library
- Download photos and audio: search for, download and import media into your Library from Flickr or Freesound directly.
- Manage library tools: Create subfolders within your Media Library to organize your media or save your entire Library as a separate file.
- Download and sharing created media: share your customized PIP objects and title effects with others by uploading them to Direct Zone. You can also add additional media to your Library by downloading then from the DirectorZone website.
Note: There are some options which are not available in the provided versions. Please download Ultra or Deluxe versions to be able to enjoy all the functions.
Edit
• Enhanced slideshow designer:
- Many new slideshow styles to choose from.
- Synchronize photos with the beat of the music and full creative control over the design in cell slideshows.
- Enhanced Magic Tools:
- Improved lighthning in the video with the new Magic Clean functions.
- Detailed frame controls for picture pan and zoom in MagicMotion.
- Improved chroma key results.
• Multiple PiP Tracks:
- The Track Manager lets you add multiple PiP tracks to the timeline, allowing you to display up to six PiP objects on a video at the same time.
- Freeze Frame: Add a freeze frame effect to your video instantly to emphasize a specific frame of video.
- Subtitles: Add subtitles for a disc, which can be switched on/off like those found on commercial discs.
Create Disc Menus
- Enhanced menu creation: Multi-layered menus and a more easy-to-use and powerful menu designer.
- Download and sharing created disc menus: Share your customized disc menus with others by uploading them to DirectorZone. You can also add additional disc menus by downloading them from the DirectorZone web site.
DirectorZone
DirectorZone is a web service that lets you download PiP objects, title templates and disc menus created by other users of CyberLink PowerDirector. You may also share your own creations by uploading them to DirectorZone.
To sign in to DirectorZone, click the Sign in to DirectorZone link on the top of the CyberLink PowerDirector window.
Power Director Versions
CyberLink PowerDirector is available in many different versions.
File format support, editing features, dismaking functions, and other features vary depending on the version that you have. For information on the availability of specific functions in the CyberLink PowerDirector version that you are using, please check the CyberLink PowerDirector Readme file.
Note: There are some options which are only available in the full versions (Ultra/Deluxe).
Software upgrading
Software upgrades may be periodically available from CyberLink. To upgrade your software, click the Upgrade button on the About CyberLink PowerDirector window. The Upgrade window will open and you can select to download new upgrades and updates for CyberLink PowerDirector. You will be redirected to CyberLink's cyberstore if you choose to purchase new upgrades.
*Note: You must be connected to the Internet to use this feature.
9.3 Power Director usage
Click on the icon of the program located in your desktop. When you first open Cyberlink Power Director, the program appears as follow:

STV50 User Manual
Index
-
Welcome
-
Features
-
System Requirements
-
Content
-
Hardware
-
Connections
-
Driver and software installation
-
Uninstallation
9. Cyberlink Power Director
-
Multimedia Video Capture
-
Preferences and options
Power Director
-
The Workspace. Power Director
-
Production Mode. Power Director
-
Creating Discs. Power Director
-
Cyberlink Power Producer
16..VivaStation
- Technical Specifications
Important Information
9.3.1 Power Director Modes
Cyberlink Power Director has separate modes that enable you to perform different tasks: Capture, Edit, Produce and Create a disc.
Capture, Capture media in a variety of formats, from a variety of sources.
Edit, Edit your production by adding video and photos to the timeline, then add transitions, effects and titles for that creative touch.
Produce, Produce your creation by outputting it to a file, DV tape or uploading to the Internet.
Create a disc, Use Create a Disc to create a custom disc, complete with menus, that can be burnt to disc.
By default, Cyberlink Power Director opens in the Edit mode, but you can easily switch between modes to perform your reqird task by using these buttons.
9.3.2 Power Director Projects
Changes you make to your video clips, audio files or photos in CyberLink PowerDirector do not affect your original media. Since your settings are all saved in the project file, you can trim, edit or delete clips in CyberLink PowerDirector, but still keep your original files on your hard drive, untouched. So let yourself get creative! If you end up changing things too drastically, you can always start over.
You can open and save a CyberLink PowerDirector project file just like any other file in Windows. Your projects are saved as .pds files, a unique file format used by the CyberLink PowerDirector program.
9.3.3 Importing Media
If you already have video files, music and photos on your computer's hard drive that you want to use in your production you can import them directly into Cyberlink Power Director's Media Library. The program supports the import of following file formats:
Image: JPEG, TIFF, BMP, GIF, PNG
Video: DV-AVI, Windows-AVI, DAT, MPEG-1, MPEG-2, DVR-MS, VOB, VRO, WMV, MOV, MOD, TOD, MP4, MTS, M2TS
Audio: MP3, WAV, WMA, ASF
When importing media into the Media Library, you have two options:
- import media files individually
- import an entire folder that contains media files you want to use in your current project.
9.3.4 Downloading Templates from Director Zone
If you are looking for additional PiP objects or title effects for your library, you can download them from the DirectorZone web site by clicking on the Templates icon within the PiP Objects Room and the Title Effects Room.
The additional templates are created by either CyberLink or other CyberLink PowerDirector users, who have uploaded them to DirectorZone.
10. Multimedia Video Capture
Cyberlink Power Director lets you capture media from a variety of sources directly into your Media Library.
10.1 Capture Mode
When you click the Capture button, you will enter the Capture mode. In Capture mode, the program appears as follows:

Capture preview window
Displays media clips during capture
Information display area
Displays information about captured file size and available HDD space
STV50 User Manual
Index
-
Welcome
-
Features
-
System Requirements
-
Content
-
Hardware
-
Connections
-
Driver and software installation
-
Uninstallation
-
Cyberlink Power Director
-
Multimedia Video Capture
-
Preferences and options
Power Director
-
The Workspace. Power Director
-
Production Mode. Power Director
-
Creating Discs. Power Director
-
Cyberlink Power Producer
16..VivaStation
- Technical Specifications
Important Information
Capture Options
You can capture video clips in the following file formats:
- MPEG-1
• MPEG-2
• AVI
Many of the options for capturing are the same for some of the capture modes.
Note:
- Cyberlink Power Director's capture functions vary, depending on version installed. For information on the availability of specific features in the version that you are using, please check the Readme file.
- There are some functions which are only available in the full versions Ultra/Deluxe.
10.2 Capture Limit Options
You can set limits on the size or duration of the video that Cyberlink Power Director captures. When the limit you set is reached, the capture will automatically stop.
- To set a maximum capture lenght, select Time limit and then enter a time in the time code box.
- To set a maximum capture file size, select Size limit and then enter a size limit (in MB).

To take a still photo of a frame video for use in your project, just click on the camera icon at the point where you want to take the snapshot and image file will be saved to the Media Library.
Note: You can specify your preferred snapshot image file format in preferences.
10.3 Capture from Microphone

Your movie may require recorded dialog. No matter what kind of audio tracks you record, they can be captured with a microphone for use in your CyberLink PowerDirector project.
10.4 Capture Audio Tracks from CD

Using your favorite music can help you to create a really fun, personalized movie. If you have music stored on an audio CD, you can record songs you want and then add them as audio tracks in your CyberLink PowerDirector project.
Note: Some CDs are protected by technology that does not allow you to capture the content they contain.
10.5 Capture from a DVD
You can capture video scenes (including the audio portion) from a DVD for use in your Cyberlink Power Director project.
Note: Some DVDs are protected by technology that does not allow you to capture the content they contain.
11. Preferences and options. Power Director
CyberLink PowerDirector offers a range of choices to set your video production environment to better suit the way you work. Before you get started working on your production you may want to set your preferences to your liking. You may also edit them at any time during the production process to accommodate your needs.
11.1 Preferences
File Preferences
To set your file preferences, click

Edit > Preferences
The preferences dialog box opens, displaying the File tab. Available options are follows:
Import directory: indicates the last folder that media was imported from into CyberLink PowerDirector. To change this folder, click Browse and select a new folder.
Export directory: set the folder where CyberLink PowerDirector saves captured media files by default. To change this folder, click Browse and select a new folder.
Capture video prefix: enter a default name for captured video files. CyberLink PowerDirector automatically appends a sequential number to this name to create a unique filename for each captured file
Always prompt me to confirm filename: Check this option if you would like CyberLink PowerDirector to prompt you to enter a filename each time you capture a video clip.
Production file prefix: enter a default name for files produced in CyberLink PowerDirector.
Snapshot filename: enter a default name for snapshot captures. CyberLink PowerDirector automatically appends a sequential number to this name to create a unique filename for each captured file. Select a file for mat from the drop-down list for your snapshots. You have the choice between .bmp, .jpg, .gif and .png formats.
STV50 User Manual
Index
-
Welcome
-
Features
-
System Requirements
-
Content
-
Hardware
-
Connections
-
Driver and software installation
-
Uninstallation
-
Cyberlink Power Director
-
Multimedia Video Capture
-
Preferences and options.
Power Director
- The Workspace. Power Director
-
Production Mode. Power Director
-
Creating Discs. Power Director
-
Cyberlink Power Producer
16..VivaStation
- Technical Specifications
Important Information
Always prompt me to confirm filename: select this option if you would like CyberLink PowerDirector to prompt you to enter a filename each time you take a snapshot.
Snapshot destination: select a destination for snapshot captures from the drop-down list if you don't want to save them as a file.
Use master video size whenever possible: select this to have the snapshot be the same size as the original video, instead of the smaller preview window it was taken in.
Number of recently used project(s): enter a number (between 0 and 20) of recently used projects that you would like to make available in the File menu when you open CyberLink PowerDirector,
Automatically load the last project when PowerDirector opens: select this option to automatically load the project you have been working on most recently whenever you open CyberLink PowerDirector.
Automatically load sample clips when PowerDirector opens: select this option for CyberLink Power Director to load sample video files and photos into the Media Library when opened.
General Preferences
To set your general preferences, click

Edit > Preferences
The preferences dialog box opens. Click the General tab. Available options are as follows:
Maximum undo levels: enter the number (between 0 and 100) of undos (Ctrl+Z) you would like to make available while you work on your movie production. Setting a higher number consumes more CPU resources.
TV format: select the TV format (NTSC or PAL) of the region in which you would like to produce your movie. This format should correspond to the format of the region in which you plan to play your movie (if you burn it to disc).
Enable animated Interface: select to enable the animated interface within CyberLink PowerDirector.
Show sound waveform in Timeline: select to display the sound waveform in the timeline that represents the sound levels in the audio portion of video clips, music clips and voice clips.
Enable file processing to speed up high definition video editing: select this to speed up the editing of high definition video by enabling CyberLink PowerDirector to process the file faster. Enabling this consumes more CPU resources.
Enable appending of information into files as RichVideo information: select to allow CyberLink Power Director to append RichVideo information into the media files.
Enable the RichVideo information in open media dialog: select to have CyberLink PowerDirector display Rich Video information when importing media into the Media Library.
Automatically check for software updates: select to have CyberLink PowerDirector periodically check for updates or new versions automatically.
Use system default language: select this option for the CyberLink PowerDirector language display to be the same as the language of your operating system.
User defined: select this option and then select the language from the drop-down list that you want CyberLink PowerDirector to use.
Editing Preferences
To set your editing preferences, click on

Edit > Preferences
Preferences dialog box opens. Click the Editing tab. Available options are as follows:
Default workspace: select whether to display the Timeline or Storyboard workspace in CyberLink Power Director by default.
Link all tracks when moving/removing content in Video track: links titles, video effects, music and PiP clips to clips in the Master Video track. Selecting this option moves these clips when a video clip in the Master Video track is moved. Uncheck this option to allow for the movement of all Timeline clips separately.
Add transition between photos when applying Magic Motion: select this option to add a transition effect between adjacent photos when you use the Magic Motion tool and apply to all photos.
Add an effect and a title when using Freeze Frame: select this option to have CyberLink PowerDirector automatically add an effect and title to the timeline when you click the Freeze Frame button.
Durations: set the default durations (in seconds) for image files and the different effects in the timeline..
STV50 User Manual
Index
-
Welcome
-
Features
-
System Requirements
-
Content
-
Hardware
-
Connections
-
Driver and software installation
-
Uninstallation
-
Cyberlink Power Director
-
Multimedia Video Capture
-
Preferences and options.
Power Director
-
The Workspace. Power Director
-
Production Mode. Power Director
-
Creating Discs. Power Director
-
Cyberlink Power Producer
16..VivaStation
- Technical Specifications
Important Information
Auto Save Project: select this to have CyberLink PowerDirector auto save your project. You can enter a specific time in the field provided. This ensures you don't lose your changes if there was a power outage or your computer crashed and you forgot to save your creation.
Confirmation Preferences
To set your confirmation preferences, click

Edit > Preferences
The preferences dialog box opens. Click the Confirmation tab. Available options are as follows:
Always prompt me when TV format conflicts: select this option to enable a warning message when you add a video clip to the workspace whose TV format (NTSC/PAL) conflicts with that of the video clips already located in the workspace.
Enable file deletion from hard drive: select this option if you would like to enable the deletion of files from your hard drive from within the Media Library.
Enable warning when chapters are removed during editing: select this option to enable the display of a warning message if chapter points have been deleted during video editing.
Always prompt me when wide screen is not supported: select this option if you would like CyberLink PowerDirector to prompt you when the widescreen format is not supported.
Capture Preferences
To set your capture preferences, click

Edit > Preferences
The Preferences dialog box opens. Click the Capture tab. Available options are as follows:
Add captured files to Library: select this option to import captured files into the Media Library directly after capture.
Add captured files to workspace: select this option to import captured files into the workspace/timeline directly after capture.
Use video overlay for capture: keep this option selected during capture unless you have an older VGA card that does not support video overlay. (Deselecting this option in this event avoids the unsupported overlay display error.)
Enable automatic file replacement when recording voiceover: select this option to overwrite existing audio if the voiceover overlaps during recording.
Enable CyberLink MPEG@Best: select to balance capture speed and video quality when you capture MPEG video.
Do not detect scenes during capture: select this option if you do not want to activate the auto scene detection function during capture.
After capture, detect scenes by changing of video frames: select this option to perform scene detection during video capture. In scene detection, CyberLink PowerDirector compares captured frames to decide when there is a scene change. Each scene is saved as a file as recording continues.
During capture, detect scenes by time code, and save each scene as a separate file (DV-VCR mode only):
Produce Preferences
To set your production preferences, click

Edit > Preferences
The Preferences dialog box opens. Click the Produce tab. The available options are as follows:
Output only selected tracks: select this option to output only the selected tracks in the timeline. The tracks that are not selected will not be produced.
Quality of 3D slideshow: use the slider to determine the quality of a produced 3D slideshow video. The slower the images move, the better the quality of the slideshow. CyberLink PowerDirector will use your computer's 3D graphics card to accelerate the production time, if there is one in your system.
Director Zone Preferences
To set your production preferences, click

Edit > Preferences
The Preferences dialog box opens. Click the DirectorZone tab. The available options are as follows:
Auto sign in to DirectorZone when PowerDirector is launched: select this option and then enter in your email address and password to have CyberLink PowerDirector automatically sign in to DirectorZone when the program is opened. If you do not have a DirectorZone account, click on the Get an Account button.
STV50 User Manual
Index
-
Welcome
-
Features
-
System Requirements
-
Content
-
Hardware
-
Connections
-
Driver and software installation
-
Uninstallation
-
Cyberlink Power Director
-
Multimedia Video Capture
-
Preferences and options
Power Director
-
The Workspace. Power Director
-
Production Mode. Power Director
-
Creating Discs. Power Director
-
Cyberlink Power Producer
16..VivaStation
- Technical Specifications
Important Information
Allow DirectorZone to gather editing information: select this option to allow DirectorZone to collect all of the names of the templates used in a finished project that is being uploaded to YouTube.
Note: There are some options which are only available in the full versions (Ultra/Deluxel).
11.2 Edit Window Overview
Before you start working on your project, you should set your movie's aspect ratio. The default aspect ratio is 4:3, but if you want your production to utilize a widescreen TV you may change the aspect ratio to 16:9, provided that the media clips you have are also in widescreen format.
To set the aspect ration for your project, click

Edit > Aspect Ratio > 4:3 or 16:9.
The preview window will change according to the aspect ration you have chosen.
Nota: There are some options which are only available in full versions (Ultra/Deluxe)
Library Window
The Library window contains all of the media in CyberLink PowerDirector, including your video, photos and music files and the effects and additions you apply to your media. The media content that is displayed in the Library window is dependent on the room you select.
The Library window is displayed as follows:

To switch rooms and the content that is displayed in the Library, use the buttons on the left side of the window. These buttons are displayed below:

Each of these buttons opens a room and displays a corresponding library of media, effects or access to controls for mixing audio, adding chapters or subtitles.
Nota: There are some options which are only available in full versions (Ultra/Deluxe).
Media Room

The Media Room contains access to the storage area, or library, of the media that you can use in your project.
Managing the Media Room Library

Use the Manage library button to manage the media within your library. You can:
- Organize your media into subfolders.
- Save the media in your library to a file,
- Clear all the contents of your library.
STV50 User Manual
Index
-
Welcome
-
Features
-
System Requirements
-
Content
-
Hardware
-
Connections
-
Driver and software installation
-
Uninstallation
-
Cyberlink Power Director
-
Multimedia Video Captur
-
Preferences and options.
Power Director
- The Workspace. Power Director
- Production Mode. Power Director
- Creating Discs. Power Director
- Cyberlink Power Producer
- Technical Specifications
- Weaming specifadionaste batteries Important Information
Effect Room

The Effect Room contains a library of special effects that can be applied to video or image clips in your project.
PiP Objectcts Room

The PiP Objects Room contains a library of graphics that you can add on the video or photo clip in the PiP Track.
There are three main types of objects:
•static graphics
•motion graphics that fly through the clip
•decorative borders that can be added to frame your clip
Title Room

The Title Room contains the library of titles that can be applied to your project to add credits or comments to your production.
Transition Room

The Transition Room is a library of transitions that can be applied between video or image clips in your project, helping to make edits appear smoother and more professional.
Audio Mixing Room

The Audio Mixing Room contains audio mixing controls for all of the audio tracks in your project.
Voice-Over Recording Room

The Voice-Over Recording Room contains controls for recording a narration from a microphone while watching the video clip the voice-over is to accompany.
Chapter Room

The Chapter Room contains options for automatically or manually setting chapter markers.
Subtitle Room

The Subtitle Room lets you add subtitles to your production manually or through the import of a .TXT or .SRT file directly into CyberLink PowerDirector.
Note: There are some functions which are only available in the full versions (Ultra/Deluxe)
12. The Workspace. Power Director
The workspace is the section of the Edit window where your create your project by adding media clips, effects, transitions, etc. The workspace has two different views, the Timeline and Storyboard view, which can be accessed by clicking on the Timeline or Storyboard buttons.
You load media and effect clips into specific tracks in the workspace, move them to different locations in your story, or remove them from the workspace. This section describes how to add clips to the proper track and how to manage clips once they have been added.
12.1 Timeline View
The Timeline view lets you view your entire project based on running time. This view is useful when wanting to insert effects, subtitles, etc. at a specific moment or time. The Timeline view also provides a view of various tracks and where they appear in the timeline. To switch to Timeline view, click


STV50 User Manual
Index
-
Welcome
-
Features
-
System Requirements
-
Content
-
Hardware
-
Connections
-
Driver and software installation
-
Uninstallation
-
Cyberlink Power Director
-
Multimedia Video Capture
-
Preferences and options
Power Director
-
The Workspace. Power Director
-
Production Mode. Power Director
-
Creating Discs. Power Director
-
Cyberlink Power Producer
-
. VivaStation
-
Technical Specifications
Important Information
12.2 Media Tracks

Master Video Track contains your project's main video and/or image clips.

Effect Track contains special effects that apply to the video or image clip in the Master Video Track at the same location.

PiP Track contains video/image clips and objects that are inserted over any clip in the Master Video Track that appear during the PiP effect's duration. Within the Track Manager you can add up to six PiP tracks into the timeline. The PiP tracks will then be numbered within the timeline accordingly


Title Track contains title effects that appear over any clips in the Master Video Track that occur during the title effect's duration.

Voice Track contains a narrative voice-over or second audio clip.

Music Track contains your project's main audio and music clips.
12.3 Track Manager
Within the Track Manager you can add PiP tracks to the timeline, allowing you to have up to six PiP objects displayed on a video at the same time. To add PiP tracks to the timeline, click on and then select the number of PiP tracks you would like add.
After you have added additional PiP tracks to the timeline, click on the Fit timeline button to have all of the tracks be dynamically displayed within the existing timeline, so you don't need to scroll to view certain tracks.
Note: There are some functions which are only available in the full versions (Ultra/Deluxe)
Locking/Unlocking Tracks in the Timeline
To lock a track in the Timeline, click 📄 at the left of the track. When a track is locked, you cannot add new clips to the track, nor move or edit the clips it contains. To unlock a track in the Timeline, click 📄 at the extreme left of the track. When a track is unlocked, you can freely add, move and edit clips..
12.4 Magic Movie Wizard

If you are new to the editing process and not sure how or where to get started, then the Magic Movie Wizard can help. The Magic Movie Wizard can take all of your media and create a dazzling movie production in just a few steps. The created production can then be edited and refined in the workspace, outputted to a file or burned to disc.
Note: The Magic Movie Wizard provides the option of using all the media in the Media Library, all the media currently in the workspace or all currently selected media. If you only want to use a specific number of clips, select the clips you want to use before you begin.
*Note. There are some functions which are only available in the full versions (Ultra/Deluxe)
12.5 Preview your Production
While you are creating your video production, you will be constantly viewing your production to ensure it is what you want. CyberLink PowerDirector offers two preview methods for viewing your production. You can choose to view a particular clip or view the entire movie production.
Preview Window
The easiest way to preview a media is by playing it in the preview window to the right of the Library. Any media clip that appears in the Library or the workspace can be previewed in this window. However, playback controls are only available for video and audio media.

STV50 User Manual
Index
-
Welcome
-
Features
-
System Requirements
-
Content
-
Hardware
-
Connections
-
Driver and software installation
-
Uninstallation
-
Cyberlink Power Director
-
Multimedia Video Capture
-
Preferences and options
Power Director
-
The Workspace. Power Director
-
Production Mode. Power Director
-
Creating Discs. Power Director
-
Cyberlink Power Producer
-
. VivaStation
-
Technical Specifications
Important Information
Media Viewer
The Media Viewer is similar to the preview window, but offers you a larger preview picture than the preview window. To launch the Media Viewer, click in the preview window.

The Media Viewer allows you to preview media clips as well as your entire movie production in a large, resizable window.

natural_image
Underwater scene with colorful fish and coral (no visible text or symbols)13. Production Mode. Power Director
When you click the Produce button, CyberLink PowerDirector enters the Produce Mode. Here you can compile your movie into a file that is ready for a variety of destinations, including burning to a disc or upload to the Internet,
13.1 Production Wizard
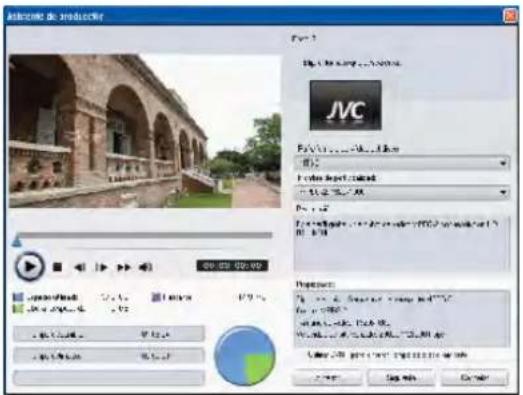
CyberLink PowerDirector uses the Production Wizard to assist you to finalize your production. When you click the Produce button, the Production Wizard is displayed as follows:

The Production Wizard is a simple interface that makes movie production easy.
The first window of the Production Wizard contains a preview window, a visual display of your hard disk space, and five buttons corresponding to the five production options available in The Production Wizard. These are described below:

Create a File: Allows you to create a movie production that you can then watch on your computer.

Create a Streaming File: Allows you to create a movie production that you can then stream over the Internet.

Write Back to DV Tape: Allows you to create a movie production that you can then write back to DV tape..

Write Back to HDV Tape: Allows you to create a movie production that you can then write back to HDV tape.

Create an HDD Camcorder File: Allows you to create a video file that can be copied back to a hard disk drive camcorder.

Upload to YouTube®: Allows you to upload your video production to the Internet to share with the world.
* Note: There are some options which are only available in the full versions (Ultra/Deluxe).
STV50 User Manual
Index
-
Welcome
-
Features
-
System Requirements
-
Content
-
Hardware
-
Connections
-
Driver and software installation
-
Uninstallation
-
Cyberlink Power Director
-
Multimedia Video Capture
-
Preferences and options
Power Director
-
The Workspace. Power Director
-
Production Mode. Power Director
-
Creating Discs. Power Director
-
Cyberlink Power Producer
16..VivaStation
- Technical Specifications
Important Information
13.2 Creating a video file
CyberLink PowerDirector lets you produce video files in a variety of formats, outputted in the quality to fit your specific requirements..
You can produce your video in one of the following formats:
• AVI
• MPEG1
- MPFG2
- Portable MPEG4
- AVC MPEG4
Note: The type of files that can be created depend on the version of CyberLink PowerDirector that is installed on your computer. Please see the Readme for information on the file types your version supports
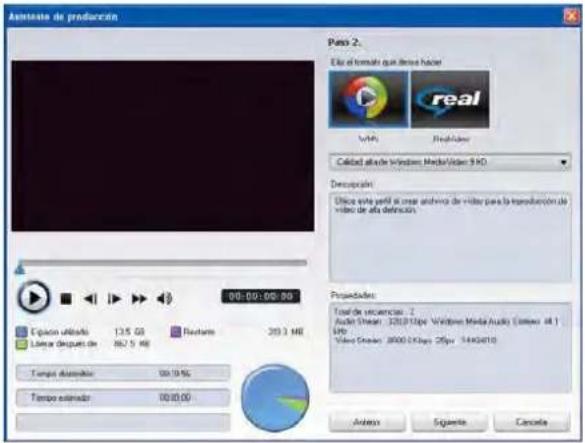
13.3 Create a file for streaming
CyberLink PowerDirector lets you produce files for streaming in a variety of formats, outputted in the quality to fit your specific requirements.
You can produce your video in one of the following formats:
• (WMV) Windows Media Video
• RealVideo
Note: The type of files that can be created depend on the version of CyberLink PowerDirector that is installed on your computer.
13.4 Write back to DV tape or HDV tape
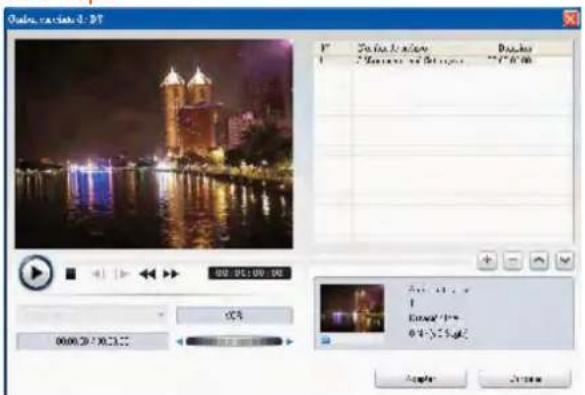
You may want to produce your movie and then write it back to a DV or an HDV tape. This allows you to store your movie in a convenient, digital format that can easily be imported into another computer for further editing.
Note: Please note you need install a firewire card on your PC (IEEE 1394).
13.5 Create an HDD Camcorder File
You may want to produce your movie and then copy it back to a hard disk drive camcorder. This allows you to store your movie in a convenient, digital format that can easily be imported onto another computer for further editing.
Note: There are some options which are only available in the full versions (Ultra/Deluxe).
STV50 User Manual
Index
- Welcome
- Features
- System Requirements
- Content
- Hardware
- Connections
- Driver and software installation
- Uninstallation
- Cyberlink Power Director
- Multimedia Video Capture
- Preferences and options
Power Director - The Workspace. Power Director
- Production Mode. Power Director
- Creating Discs. Power Director
- Cyberlink Power Producer
16..VivaStation - Technical Specifications
Important Information
13.6 Uploading Video to YouTube
To upload your video to YouTube®, follow the detailed instructions on the user interface.

14. Creating Discs. Power Director
After your movie production has been completed, you can create a disc to play your video on a DVD or other disc player. You can burn your movie onto a CD, DVD or Blu-ray Disc (Ultra version only) in three simple steps. Integrated authoring allows to you view your movie in the living room instantly after you have produced your movie. You will never have to launch another program again to create a video disc.
14.1 Disc Menus
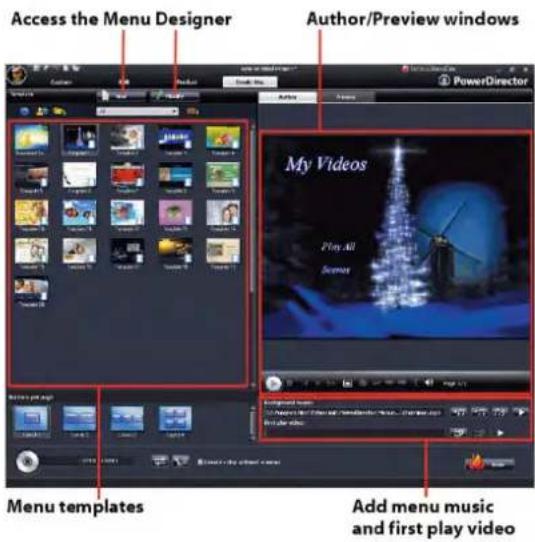
Before you burn your movie to a disc, you can add a disc menu for navigating around your disc. Within the Create Disc window, you can:
- select an existing, pre-designed disc menu template
- make modifications to an existing disc menu template
- create a brand new disc menu template
Note: If you don't want your disc to contain a disc menu, simply select Create a disc without a menu. The video will play automatically when the disc is inserted into a disc player.

All the menu templates within CyberLink PowerDirector are multilayered, consisting of a main menu home page with text links to play your movie, select chapters or turn on subtitles if included on your d
Note: The Subtitles page within disc menus will only be available if you selected Create subtitles for disc when creating subtitles in the Subtitle Room. See "Subtitles" on page 80 for more information.
14.2 Using the Menu Designer
The Menu Designer lets you customize a selected disc menu style or create your own menu style.
To open the Menu Designer to customize your menu:
- click New and create a brand new menu template.
- select an existing menu template and click Modify.

STV50 User Manual
Index
- Welcome
- Features
- System Requirements
- Content
- Hardware
- Connections
- Driver and software installation
- Uninstallation
- Cyberlink Power Director
- Multimedia Video Capture
- Preferences and options
Power Director - The Workspace. Power Director
- Production Mode. Power Director
- Creating Discs. Power Director
- Cyberlink Power Producer
16..VivaStation - Technical Specifications
Important Information
Within the Menu Designer you can edit all three possible disc menu pages. To modify a specific page, select either Home Page, Chapter Page or Subtitles Page from the Go to drop-down menu.
Note: The Subtitles Page will only be available in the Go to drop-down menu if you selected Create subtitles for disc when creating subtitles in the Subtitle Room.
14.3 Modify Menu Text
To edit text that appears on the menu page, including clickable chapter text, double-click it in the Menu Designer, and then enter the new text.
Note: Make sure you are in the Edit mode when trying to modify text.
14.4 Preview your Disc's Menu Page
At any time during the creation of your disc menu within the Create Disc Window or Menu Designer, click on Preview to preview your disc menu page. Click a button to preview the chapter associated with the button. Use the playback buttons to control the preview.

14.5 Configure Create Disc Preferences
Before you proceed to burn your creation disc, it is recommended that you configure the Create Disc Preferences.
Click to figure your Create Disc Preferences.
The following options are available under the Disc Format tab:
- Disc format: Select the disc format you will be using to burn your movie.
- Disc capacity: Select the disc capacity of your disc.
• Video Quality: Select a video quality for your disc: - DVD LP (Long Play).
- DVD SP (Standard Play).
- DVD HQ (High Quality).
The video quality settings offer different bit rates, resulting in files of different size. The higher the quality of the video, the larger the resulting file and the shorter the length of video that can fit onto a disc. Further, more CPU power is required for rendering higher quality video. The Smart Fit option automatically adjusts the bit rate to the best quality video file that fits exactly to the capacity of the disc you are using.
Audio type: The different audio types are as follows:
LPCM is an uncompressed audio format. Dolby Digital audio uses the Dolby Digital Consumer Encoder format. MPEG audio uses the MPEG-1 audio compression format. (This audio format may have compatibility issues in NTSC.)
Note: The video quality and audio type options that are available depend on the disc format that you have selected.
14.6 Burn a disc
CyberLink PowerDirector offers several methods to finalize your production, which are useful under different circumstances. You can burn your production to disc as the last step in your movie production process, save your production as a disc image for later burning, or create a DVD folder to organize your media files on your hard drive. Depending on your burning drive and disc type, one or more of these options may be available simultaneously.
CyberLink PowerDirector supports the following discs formats for burning:
• DVD: DVD-R, DVD-RW, DVD+R, DVD+RW
• VCD/SVCD: CD-R, CD-RW
Burn your movie to disc
Burning your movie to disc is the final stage of the create disc process. Once your disc is burned, you will be able to play it on a disc player to share with your family and friends. Click on the Burn button to begin the burning process.
Note: The burning process may take at least a few minutes, depending on the length and quality of your video and your computer's processing power.
STV50 User Manual
Index
-
Welcome
-
Features
-
System Requirements
-
Content
-
Hardware
-
Connections
-
Driver and software installation
-
Uninstallation
-
Cyberlink Power Director
-
Multimedia Video Capture
-
Preferences and options
Power Director
-
The Workspace. Power Director
-
Production Mode. Power Director
-
Creating Discs. Power Director
-
Cyberlink Power Producer
-
. VivaStation
-
Technical Specifications
Important Information
Set your burning configuration
Before you burn to disc for the first time, set your burning configuration on the Burn window. After you set this configuration, CyberLink PowerDirector uses the same configuration each time you burn until you change the settings.
Create a DVD folder
Selecting Create a DVD folder creates a folder on your computer that contains all the files necessary for burning. This folder can then be burned to disc at a later date.
Erase a disc
If you are using a rewritable disc, you can erase content that has data previously recorded on it. This allows you to reuse the same discs over and over without the need to continually buy new discs. Click on the Erase button to begin erasing a disc.
Note: There are some options which are only available in the full versions (Ultra/Deluxe).
15. Cyberlink Power Producer
CyberLink PowerProducer is the ultimate disc authoring tool, allowing you to make creative VCD, DVD, Blu-ray* Disc and AVCHD* media.
CyberLink PowerProducer also lets you create stunning photo slideshows, burn video right-to-disc and utilize its handy disc utilities to erase and copy discs, create and burn disc images, and more.
*Note: There are some options which are only available in the full versions (Ultra/Deluxe). Visit official Cyberlink store in the Internet to buy these full versions.
15.1 Power Porducer Program
The following is a list of the main functions you can perform in Cyberlink Power Producer:


The Produce Movie Disc task lets you create a professional looking disc in a variety of formats, including video CD, DVD, Blu-ray* Disc and AVCHD*.

With the Right-to-Disc you can burn video content from a DV camcorder, HDV camcorder, TV, webcam or VCR directly onto a DVD without the intermediary step of first writing to your hard drive.

If you burned your production onto a rewritable disc, you can go back and edit the content at a later time using the Edit Disc function.
If you saved your disc project previously, use the Open Project task to quickly access it. You can use any saved projects as a template for future disc productions.

The Disc Utilities task includes a number of useful features including erasing and copying discs, burning discs from images or folders, saving disc images, and much more.
15.2 Power Producer Projects
When you save a CyberLink PowerProducer project, it is saved as a .PPP file. This project file is the collection of all of your movie content, your special effects and your settings, but is not the final production.
Note: Any edits made to your video clips, audio files or photos in CyberLink PowerProducer do not affect your original media.
You can create a new CyberLink PowerProducer project file, as well as open or save existing files. The buttons for these tasks are located at the top of the window under most CyberLink PowerProducer functions.
Note: These tools are not always available in all functions.
STV50 User Manual
Index
-
Welcome
-
Features
-
System Requirements
-
Content
-
Hardware
-
Connections
-
Driver and software installation
-
Uninstallation
-
Cyberlink Power Director
-
Multimedia Video Capture
-
Preferences and options
Power Director
-
The Workspace. Power Director
-
Production Mode. Power Director
-
Creating Discs. Power Director
-
Cyberlink Power Producer
16..VivaStation
- Technical Specifications
Important Information
15.3 Getting Started
Where you get started with CyberLink PowerProducer depends on the function you want to perform. Even when creating a disc menu, you may decide to skip specific functions, depending on the kind of menu you want to create. Either way, this section offers a quick overview of what you need to do to create a finished disc and all the other functions.
Producing a Movie Disc
The following outlines the complete process for creating a full functioning movie disc, complete with a custom menu, chapters, etc. Where you choose to begin and the path you take is up to you.
Note: Before you begin creating your disc, it is suggested that you first set your video, audio and other preferences.
Step 1: Selecting a video format
Step 2: Acquiring content
- Importing video and photos
• Capturing video and photos
Step 3: Editing clips
Step 4: Editing photo slideshows
Step 5: Creating disc menus
- Selecting a disc menu template
- Customizing your disc menu
- Setting up chapters
- Organizing your story
Step 6: Finalizing content
- Previewing content
- Burning content to disc, saving as disc image or creating a disc folder
Power Producer versions
The features that are available to you within CyberLink PowerProducer are completely dependent on the version you have installed on your computer. Click on the CyberLink PowerProducer logo anywhere within the program to view the version number of your installed program. To purchase the full version, please go to the CyberLink online store.
Supported formats
Before getting started with the creation of your disc, you may want to know what type of files can be imported into your project. CyberLink PowerProducer allows you to import files into the program in the following formats:
- Audio input formats: .mp3, .wav, .wma
- Image input formats: .bmp, .jpg, .jpeg, .gif, .tif, .tiff, .png
- Video input formats: mpg*, .mpeg*, .avi*, .dat*, .wmv*, .asf*, .vob*, .dvr-ms*, .mod*, .tod*, .tpd*, .ts*, .pds*
Note: There are some functions which are only available in the full versions (Ultra/Deluxe).
System requirements
The system requirements listed below are recommended as minimums for working with the program. You may find that your system, while meeting these recommended minimums, requires expanded capacity for specific tasks.
CPU
- Intel Pentium 4 1,3 GHz or AMD Athlon 1500+ and above for basic DVD authoring
- Intel Pentium 4 3,0 GHz or AMD Athlon XP 3000+ and above for high definition authoring and direct DV/HDV recording.
Memory
• 512 MB (1GB or above recommended)
OS
• Windows Vista/XP/2000/w7
Windows Desktop resolution
· 1024 × 768
HDD space
•1 GB for making VCDs
- 5 GB for making DVDs
Burning
• A burning device is required for burning CDs, VCDs or DVDs.
15.4 Producing a movie disc
This chapter leads you through the process of producing a movie, from capturing content to burning your finished production to disc. It includes instructions for creating a full-feature video production or photo slideshow, customizing your disc and editing a disc after burning.
Note: The available functions depends on the installed version.
Step 1: Selecting a video format
The first step in producing a movie disc is selecting the video format of the disc you want to create.
To begin producing a movie disc, do this:
- Open Cyberlink Power Producer:
STV50 User Manual
Index
-
Welcome
-
Features
-
System Requirements
-
Content
-
Hardware
-
Connections
-
Driver and software installation
-
Uninstallation
-
Cyberlink Power Director
-
Multimedia Video Capture
-
Preferences and options
Power Director
-
The Workspace. Power Director
-
Production Mode. Power Director
-
Creating Discs. Power Director
-
Cyberlink Power Producer
16..VivaStation
- Technical Specifications
Important Information
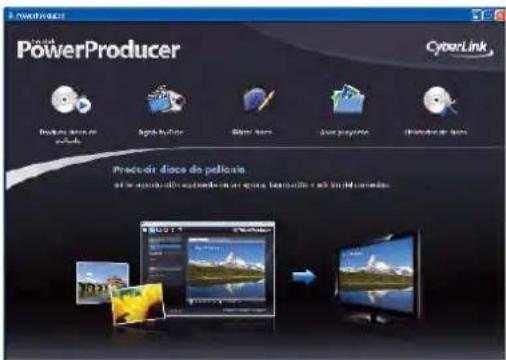
- Select the video format you want to use:
• Video CD: to create a lower-quality video or a slideshow.
• DVD: to create a longer, high-quality video - Blu-ray Disc*: to create a high-quality high definition video that will play back on a Blu-ray Disc player.
- AVCHD*: to create a high-quality high definition video that uses the MPEG-4 AVC (H.264) video codec.
Note: The creation of Blu-ray Disc and AVCHD media is optional and only available in some versions of CyberLink PowerProducer.
- Set your other options as necessary:
- Specific video recording format: select a specific video recording format.
- Disc capacity: select the capacity of the disc you are using.
• TV Aspect Ratio: select the TV aspect ratio for your disc.
- Click Next to continue

Your production can contain a mixture of video and photos. The import and capture functions are located on the Content window within the Produce Movie Disc function.
Note: Some camcorders are recognized as external disk drives on your PC. In this case you can use the Import Video Files function to import the files directly from the external drive (camcorder) to your hard drive.
To open the content window, do this:
- Start Cyberlink Power Producer.
- Click Produce Movie Disc.
- Select your disc type and then click Next. The content window opens.
- Select whether to import or capture media from the list of available options on the left-hand side:
- Import: video files, photos or scenes on a
disc.
• Capture: from a variety of sources.
Note: Some discs are protected by technology that does not allow you to import the content they contain.
Capturing Video
With CyberLink PowerProducer you can capture video (including the audio) from:
- a camcorder
• a VCR
• a DVD player
▪ video players with video output
To begin capturing video, do this:
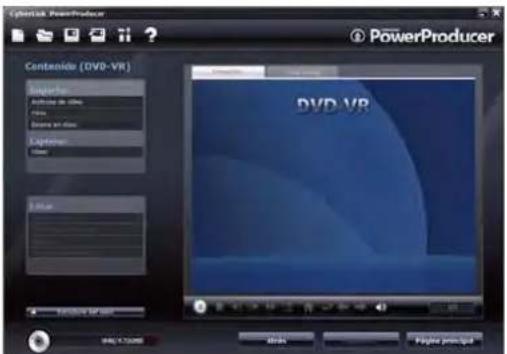
- Click Video under the Capture function on the Content window.
- In the window that opens, select the source you want to capture from the drop-down list.
- Locate the content you want to capture.
- If required, select Auto-recording duration and then enter the length of the video you want CyberLink Power-Producer to capture.
- Click on the record button (red circle) to begin capture.
- Click on the white square button to end the capture when you have captured the video you want. If you selected Auto-recording duration, CyberLink PowerProducer will stop capturing automatically once the duration has been reached.
![Capture Video (DVD) DINSTRUMENTS CORE CENSUS Description: [ ] [ ] [ ] Description & description applicable [ ] [ ] [ ] PowerProducer](/content/2026/05/1073075/images/33fae85a0318aa2039bf1d077e61b3a849a0d3e50529c183d55953e09da284df.jpg)
STV50 User Manual
Index
- Welcome
- Features
- System Requirements
- Content
- Hardware
- Connections
- Driver and software installation
- Uninstallation
- Cyberlink Power Director
- Multimedia Video Capture
- Preferences and options
Power Director - The Workspace. Power Director
- Production Mode. Power Director
- Creating Discs. Power Director
- Cyberlink Power Producer
16..VivaStation - Technical Specifications
Important Information
Capturing photos from a removable device
You can capture photos from a removable device, such as a digital camera or other USB device, for use in Cyber-Link PowerProducer by selecting the Photos option.

To capture from a removable device, do this:
- Click Photos under the Capture function on the Content window. The Slideshow Photos dialog box opens.
- Select your removable device from the drop-down menu.
- Check the photo(s) you want to capture.
- Click OK.
Editing clips
CyberLink PowerProducer lets you perform light editing tasks on your imported and captured video clips and created photo slideshows, which are treated like video clips in the edit function. You may also adjust a video clip's aspect ratio if required.
To begin a specific editing tasks, click Video clips under the Edit function within the Produce Movie Disc function.
Adjust a video clip's aspect ratio
When you import or capture a video clip, CyberLink PowerProducer will automatically detect the video clip's aspect ratio. If the video clips you are using have a different aspect ratio, you can manually adjust it to the desired aspect ratio.
To manually adjust the video clip's aspect ratio, do this:
- Select a video clip in the Author window.
- Right-click on the video clip and select Properties to open the Video Properties window.
- Select a new aspect ratio from the Aspect ratio drop down and then click OK.
AB Cut
The AB Cut option allows you to trim either the ends of a video clip/ photo slideshow or cut out a middle portion, keeping the end portions. To perform an AB cut on a clip/slideshow, do this:
- Click Video clips under the Edit function and then click the AB Cut.
- Select the clip/slideshow that you want to edit in the Storyboard pane.
- Set the mark in time/slide by using the slider or the playback controls to find the desired start position or slide in the Preview window and then click

-
Set the mark out time/slide by using the slider or the playback controls to find the desired end position or slide in the Preview window and then click
-
Select:

- Keep selected to keep the video segment indicated in orange.
- Delete selected to delete the video segment indicated in orange.
- Click . The edited clip/slideshow appears in the Storyboard pane.
Merge
You can merge a number of clips or two or more photo slideshows into one longer clip/slideshow using the Merge function.
To merge multiple clips, do this:
-
Click Video clips under the Edit function and then click on the Merge tab.
-
Select a clip/slideshow and then click to add it to the merge list view. Continue to add all the clips that you want
to merge.


button to remove clips from the merge list.
- If required, use the ↑ and ↓ buttons to order the clips in the sequence you want them in the clip.
- Click to merge the clips. The merged clip will be displayed in the Storyboard pane as one clip..
Note: When video clips are merged, the aspect ratio of the merged clip will be set to match the longest clip's aspect ratio.
Advanced editing for video (optional)
To perform more advanced video editing techniques, you may click on the Advanced Editing button to open CyberLink PowerDirector.
Note: Advanced editing functions are only available in the full versions (Ultra/Deluxe).
Editing Photo Slideshows
CyberLink PowerProducer helps you create dynamic slideshows with your photos in the Photo Slideshow window.
Note: A photo slideshow is created automatically when you import photos into CyberLink PowerProducer.
STV50 User Manual
Index
-
Welcome
-
Features
-
System Requirements
-
Content
-
Hardware
-
Connections
-
Driver and software installation
-
Uninstallation
-
Cyberlink Power Director
-
Multimedia Video Capture
-
Preferences and options
Power Director
-
The Workspace. Power Director
-
Production Mode. Power Director
-
Creating Discs. Power Director
-
Cyberlink Power Producer
16..VivaStation
- Technical Specifications
Important Information
Add photos to a slideshow
To add photos to an existing album in a slideshow, do this: click Add Photos. The Add Photos to Album window is displayed. Select the photos you want to add and then click Open.
Note: Use the Rotate button photos if required.

on the preview controls to quickly change the orientation of any of your slideshow
Set background music for a slideshow
To set the background music for a photo slideshow, do this:
- Click Photo Slideshow under the Edit function.

- Select the music files you want to add and click on Open.
- If required, set the order you want the music to play back using the buttons on the right side.
- Select Auto repeat to automatically repeat the selected audio file(s).
- Select Auto cross fade to add a cross fade between the selected audio files.
- If required, trim the audio file(s) using the playback controls and the sliders on the trim bar.
- Click OK to save your changes and include the music in your slideshow..
Set Slideshow Duration
You can set the time that each photo on a slide is displayed or how long it takes to play an entire slideshow album in the Set Duration section. You may also match the duration of an album slideshow to the background music you added.
• To set the length of time each individual slide (photo) will be displayed, select Slides and enter a duration.
• To set the length of time it will take to display the entire slideshow album, select Album and enter a duration.
• To automatically set the length of the album slideshow to match the duration of the audio file selected as the background music, select Match music duration.
Set Slideshow Effects
You can set the types of effects that will appear in your photo slideshow, including the transitions between slides and the addition of motion to your photos.
• Automatic Pan & Zoom: You can make your slideshow more engaging by adding motion. Select the
Automatic Pan & Zoom option to include pan and zoom effects in your photo slideshow.
• Transition Effect: You can choose to include transitions between each of the photos in your slideshow album.
To do this, select the transition type from the Transition effect drop down.
Note: Select Random to include various transitions between your slides, instead of the same slide repeating.
Back up photos on disc
To back up your slideshow photos on the disc that you burn, check the Back up photos on disc option.
Creating disc menus
The Customize Menu window gives you creative control over the look and creation of your disc menu. You can:
- select a custom background as your menu or choose from a number of pre-defined templates
- modify text and overall layout of buttons and text
- add chapters, a first play video and background music
To open the Customize Menu window, click Menu under the Edit function on the Content window.

STV50 User Manual
Index
-
Welcome
-
Features
-
System Requirements
-
Content
-
Hardware
-
Connections
-
Driver and software installation
-
Uninstallation
-
Cyberlink Power Director
-
Multimedia Video Capture
-
Preferences and options
Power Director
-
The Workspace. Power Director
-
Production Mode. Power Director
-
Creating Discs. Power Director
-
Cyberlink Power Producer
16..VivaStation
- Technical Specifications
Important Information
Selecting Pre-defined Templates
CyberLink PowerProducer provides you with several stylish predefined menu templates that you can choose from. These menus have already been customized for you and may include such features as motion and menu music.
Add Custom Menu Background
You can add your own photo or thumbnail from a video as a background image to use for your disc menu.
To add a custom background image as your disc menu, do this:
- Within the Customize Menu window, click Templates.
- Click and select the image or video you want to use.
- Click to close the Customize Menu window.
Set Background Music
Some menu templates have default background music, but you can use your own music if you prefer.
To add background music to your menu, do this:
-
Click + 📁. The Background Music dialog box opens.
-
Click to open an audio track. You may edit the audio file here or click to add it to the video clip
you have selected. The following options are available, if desired:
- Select a fade in/out option.
- Select to repeat the audio track until the video clip ends.
- Trim the audio file using the sliders on the trim bar.
- Adjust the volume.
- Select a fade in/out option. - Select to repeat the audio track until the video clip ends. - Trim the audio file using the sliders on the trim bar. - Adjust the volume.
- Click OK. The audio track appears in the Background music box.
Finalizing Content
After you have acquired your media, assembled your story, edited your clips, added audio and other effects, customized the layout and look of your disc, then it's time to finalize your production.
Preview Disc Content
When you have organized your clips and finalized the content, it is a good idea to preview your entire production before burning it to disc. You can also view the production summary and the disc's menu.

To preview your entire production, including video, slideshows and any settings you have added, click the Preview tab.
Click to see a motion preview of the menu and video thumbnails or click to view a preview of the entire
disc video content from the beginning. Use the controls under the Preview window to start and stop the preview.
Note: The instant/motion preview functions are not available for DVD+VR discs.
Burn your production to disc
Burning your production to disc is the final stage of the movie production process. Once it is burned you will be able to play it on a disc player to share with your family and friends.
To burn your production to disc, do this:
-
Check the Burn to disc option on the Final Output window.
-
Specify your burning options:
- Enter the number of copies you want to make.
• To give the disc a volume label, enter the desired label.
- Click Burn. The task begins immediately. CyberLink PowerProducer displays the real-time progress.
Note: The burning process may take at least a few minutes, depending on the length and quality of your video and your computer's processing power.
When the task is completed a window appears displaying a congratulatory message and offering several options to continue.

STV50 User Manual
Index
-
Welcome
-
Features
-
System Requirements
-
Content
-
Hardware
-
Connections
-
Driver and software installation
-
Uninstallation
-
Cyberlink Power Director
-
Multimedia Video Capture
-
Preferences and options
Power Director
-
The Workspace. Power Director
-
Production Mode. Power Director
-
Creating Discs. Power Director
-
Cyberlink Power Producer
16..VivaStation
- Technical Specifications
Important Information
Create a folder
Creating a folder conveniently stores all the files that make up a movie on your hard drive so that it is ready for burning. To create a folder, do this:
To create a folder, do this:
- Check the Create a folder option.
- Click on the directory button and select where you want to save the folder. Note: Creating a folder overwrites existing data in a directory.
- Click Burn. The task begins immediately. Cyberlink Power Producer displays the real-time progress.
15.5 Right-to-disc
You can burn video content from a DV camcorder, HDV camcorder, TV, webcam or VCR directly onto a DVD or Blu-ray Disc without the intermediary step of first writing to your hard drive. This can save you a lot of time when you want to store video on a disc.
Note: There are some options which are only available in the full versions (Ultra/Deluxe).
Burn video Right-to-disc
To burn video directly to disc, do this:
- Start Cyberlink Power Producer
- Click Right-to-Disc.
- Insert your target disc and ensure the correct drive is selected
- Select a recording speed in the Maximum Speed drop-down list.
- Select the target disc format from the drop-down and then click Next.

-
From the Recording from drop-down list, select the source you want to record from.
-
If requird, click to configure your device.
- If require, set the configuration items.
- Click Record to begin burning.
Note: The burning process may take at least a few minutes, depending on the length of your video.
15.6 Disc Utilities
CyberLink PowerProducer contains a number of utilities for managing disc content and format, disc image files and disc folders. To access these useful utilities, select Disc Utilities on the CyberLink PowerProducer home page.
- Erase a disc
- Copy a disc
- Make a disc DVD-player compatibleFinalize/Unfinalize a disc
- Finalizar/No finalizar un disco.
- Burn a disc from a disc image
- Save a disc image
• Burn a disc from a folder - Export to file
Note: The functions available to you may differ due to the version installed on your computer.
Erase a disc
If you are using a rewritable disc you can erase content that was previously recorded on it. This allows you to reuse the same discs over and over without the need to continually buy new discs.
To erase a disc, do this:
- Start CyberLink PowerProducer.
- Click Disc Utilities.
- Click Erase Disc.
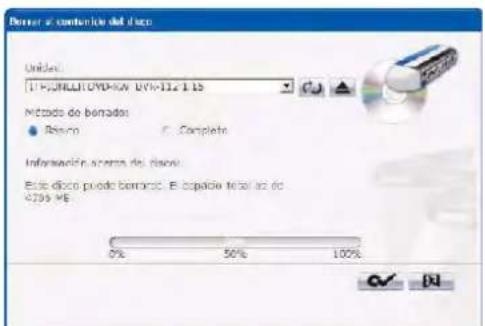
-
Welcome
-
Features
-
System Requirements
-
Content
-
Hardware
-
Connections
-
Driver and software installation
-
Uninstallation
-
Cyberlink Power Director
-
Multimedia Video Capture
-
Preferences and options
Power Director
-
The Workspace. Power Director
-
Production Mode. Power Director
-
Creating Discs. Power Director
-
Cyberlink Power Producer
16..VivaStation
- Technical Specifications
Important Information
-
Insert your disc and select your drive.
-
Select an erasing method.
- The Quick option erases the disc index contained on the disc.
- The Full option erases all of the content the disc contains.
- Click Start to begin. CyberLink PowerProducer displays the realtime progress of the task.
Copy a disc
CyberLink PowerProducer allows you to make an exact copy of a disc of any format. However, you must copy the disc onto another disc of the same format. (You cannot, for example, copy a CD onto a DVD.)
To copy a disc, do this:
-
Start CyberLink PowerProducer.
-
Click Disc Utilities.
-
Click Copy Disc.
-
Insert your source disc into your drive.
-
Insert your target disc into your burning drive.
Nota: If you use the same drive to copy discs, you must first set a disc image directory so CyberLink PowerProducer can copy the disc contents to your hard drive during the copy function.
![File Edit View [ ] 2017-03-04 [07] 2017 [ ] 2017-03-05 [08] 2017 [ ] 2017-03-06 [09] 2017 [ ] 2017-03-07 [10] 2017 [ ] 2017-03-08 [11] 2017 [ ] 2017-03-09 [12] 2017 [ ] 2017-03-10 [13] 2017 [ ] 2017-03-11 [14] 2017 [ ] 2017-03-12 [15] 2017 [ ] 2017-03-13 [16] 2017 [ ] 2017-03-14 [17] 2017 [ ] 2017-03-15 [18] 2017 [ ] 2017-03-16 [19] 2017 [ ] 2017-03-17 [20] 2017 [ ] 2017-03-18 [21] 2017 [ ] 2017-03-19 [22] 2017 [ ] 2017-03-20 [23] 2017 [ ] 2017-03-21 [24] 2017 [ ] 2017-03-22 [25] 2017 [ ] 2017-03-23 [26] 2017 [ ] 2017-03-24 [27] 2017 [ ] 2017-03-25 [28] 2017 [ ] 2017-03-26 [29] 2017 [ ] 2017-03-27 [30] 2017 [ ] 2017-03-28 [31] 2017 [ ] 2017-03-29 [32] 2017 [ ] 2017-03-30 [33] 2017 [ ] 2017-03-31 [34] 2017 [ ] 2017-03-32 [35] 2017 [ ] 2017-03-33 [36] 2017 [ ] 2017-03-34 [37] 2017 [ ] 2017-03-35 [38] 2017 [ ] 2017-03-36 [39] 2017 [ ] 2017-03-37 [40] 2017 [ ] 2017-03-38 [41] 2017 [ ] 2017-03-39 [42] 2017 [ ] 2017-03-40 [43] 2017 [ ] 2017-03-41 [44] 2017 [ ] 2017-03-42 [45] 2017 [ ] 2017-03-43 [46] 2017 [ ] 2017-03-44 [47] 2017 [ ] 2017-03-45 [48] 2017 [ ] 2017-03-46 [49] 2017 [ ] 2017-03-47 [50] 2017 [ ] 2017-03-48 [51] 2017 [ ] 2017-03-49 [52] 2017 [ ] 2017-03-50 [53] 2017 [ ] 2017-03-51 [54] 2017 [ ] 2017-03-52 [55] 2017 [ ] 2017-03-53 [56] 2017 [ ] 2017-03-54 [57] 2017 [ ] 2017-03-55 [58] 2017 [ ] 2017-03-56 [59] 2017 [ ] 2017-03-57 [60] 2017 [ ] 2017-03-58 [61] 2017 [ ] 2017-03-59 [62] 2017 [ ] 2017-03-60 [63] 2017 [ ] 2017-03-61 [64] 2017 [ ] 2017-03-62 [65] 2017 [ ] 2017-03-63 [66] 2017 [ ] 2017-03-64 [67] 2017 [ ] 2017-03-65 [68] 2017 [ ] 2017-03-66 [69] 2017 [ ] 2017-03-67 [70] 2017 [ ] 2017-03-68 [71] 2017 [ ] 2017-03-69 [72] 2017 [ ] 2017-03-70 [73] 2017 [ ] 2017-03-71 [74] 2017 [ ] 2017-03-72 [75] 2017 [ ] 2017-03-73 [76] 2017 [ ] 2017-03-74 [77] 2017 [ ] 2017-03-75 [78] 2017 [ ] 2017-03-76 [79] 2017 [ ] 2017-03-77 [80] 2.5%](/content/2026/05/1073075/images/e51bb2d86c008d1eb6c8722060414e8098da0597b847c36b91e162d1cfce13b0.jpg)
- Select the burning options you want:
- Select a recording speed.
- Enter the number of copies you want to make.
- Keep the Enable buffer underrun protection option checked in order to avoid errors during copy.
- The On the fly option burns directly to disc without the intermediary step of first burning to your hard drive. Use this option if you have two disc drives.
- Check the Create disc image option when using one disc drive for the copy function.
- Click Start to begin. CyberLink PowerProducer displays the realtime progress of the task.
Make a disc DVD Player-Compatible
CyberLink PowerProducer can convert DVD-VR discs to the DVD-Video format, which can be played on most DVD players. You must have a DVD burner to use this utility.
To make a DVD-VR disc DVD-Video compatible, do this:
-
Start CyberLink PowerProducer.
-
Click Disc Utilities.
-
Click Make Compatible.
-
Insert your source disc into your drive.
Note: The source disc must be a DVD-VR format disc.
- Insert your target disc into your burning drive.
Note: The target disc can be a DVD-R/RW or DVD+R/RW format disc.
- Select the burning options you want::
- Select a recording speed.
- Enter the number of copies you want to make.
- Keep the Enable buffer underrun protection option checked in order to avoid errors during copy.
- The Keep folder option retains a DVD folder on the disc if one is encountered while converting the disc format.
- Click Start to begin. CyberLink PowerProducer displays the realtime progress of the task.
Finalize/Unfinalize a disc
If you wish to view your DVD-RW disc with -VR profile on a player, you must first finalize the disc. (Unfinalized discs cannot be viewed on some home disc players.) When you finalize a disc, no further data can be added to it, even if the disc contains sufficient space. However, you can unfinalized a disc in order to perform further editing functions (such as appending video, adding chapters, etc.).
To finalize or unfinalize a disc, do this:
-
Start CyberLink PowerProducer.
-
Click Disc Utilities.
-
Click Finalize/Unfinalize. The Finalize or Unfinalize window opens (depending on state of the disc).
-
Insert your disc and select your drive.
-
Click Start to begin. CyberLink PowerProducer displays the realtime progress of the task.


STV50 User Manual
Index
-
Welcome
-
Features
-
System Requirements
-
Content
-
Hardware
-
Connections
-
Driver and software installation
-
Uninstallation
-
Cyberlink Power Director
-
Multimedia Video Capture
-
Preferences and options
Power Director
-
The Workspace. Power Director
-
Production Mode. Power Director
-
Creating Discs. Power Director
-
Cyberlink Power Producer
-
. VivaStation
-
Technical Specifications
Important Information
Burn a disc from a disc image
A disc image is the collection of all of your movie content and settings that is compressed and saved to disc in .RDF or .ISO format for storage so you can work on it at a later time. A disc image is saved in the file structure that is destined to be burned to disc.
To burn a disc image, do this:
- Start Cyberlink Power Producer
- Click Disc Utilities
- Click Burn Disc From Image
- Insert your disc and select your drive
- Click then open the disc
image file
- Click Start to begin.

Save as a disc image
If you have previously burned a disc image to a disc, you can save that image onto your hard drive. This function is useful for backing up your disc onto your hard drive for future burning (for example, if your computer does not have a burning drive installed).
To save a disc image, do this:
- Start CyberLink PowerProducer.
- Click Disc Utilities.
- Click Save Disc Image.
- Insert your disc and select your drive.
- Click , then select the
directory where you want to save the disc image and enter a file name.
- Click Start to begin.

Burn a disc from a folder
If you have created a folder that contains all of the media files for your production, you can burn this folder to a disc for storage. (Burning a folder to disc is similar to burning a disc image, but does not employ compression and therefore has no compatibility issues.)
To burn a disc from a folder, do this:
- Start CyberLink PowerProducer.
- Click Disc Utilities.
- Click Burn Disc From Folder.
- Insert your disc and select your drive.
- Click , then select the folder you
want to burn rom.
- Click Start to begin. CyberLink Power Producer displays the realtime progress of the task.

Using the Export to File function, you can export DVD Video, DVD-VR, DVD+VR, BDMV and AVCHD files that are stored on a disc to your hard drive in MPEG format and then use them in your movie production.
Note: There are some options which are only available in the full versions (Ultra/Deluxe).
To export files to hard drive, do this:
- Start CyberLink PowerProducer.
- Click Disc Utilities.
- Click Export to File. The Export to File window opens.
- Insert your disc and select your drive.
- Select the clips in the Scenes pane.
You can preview the video using the playback controls in the Preview window to ensure that the video content you are exporting is the content you want.
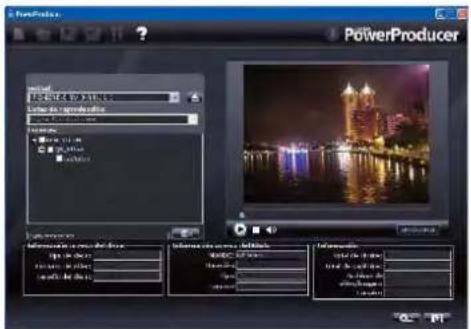
STV50 User Manual
Index
-
Welcome
-
Features
-
System Requirements
-
Content
-
Hardware
-
Connections
-
Driver and software installation
-
Uninstallation
-
Cyberlink Power Director
-
Multimedia Video Capture
-
Preferences and options
Power Director
-
The Workspace. Power Director
-
Production Mode. Power Director
-
Creating Discs. Power Director
-
Cyberlink Power Producer
16..VivaStation
- Technical Specifications
Important Information
- Select a directory to save the file to.
- Click Export. CyberLink PowerProducer displays the real-time progress of the task.
15.7 Project Preferences
- Movie playback mode: Set your video to return to the disc menu or continue on to the next movie after each movie on the disc finishes playing.
- Working directory: This is the directory that CyberLink PowerProducer uses for output. This directory is set during installation. If you change this directory, be sure that the hard disc it is on has enough free space to accommodate your production..
- Temporary directory: This is the directory that CyberLink PowerProducer uses for temporary files that are automatically deleted when you exit CyberLink PowerProducer.
- Default name for captured video: Enter a name to give to each video file you capture. CyberLink PowerProducer adds a unique timestamp to distinguish each captured file.
- Split captured video files according to disc size limit: Split video as you capture to ensure that each captured video file can fit on the type of disc you are using..
- Create new chapter every: Create a new chapter automatically whenever the set time period is reached..
- Enable Cyberlink MPEG@Best technology: Check to balance burning speed and video quality when you burn MPEG video.
- Add thumbnail index: Check to add a thumbnail index to the disc's menu.
- Enable video thumbnail: Check to allow chapter thumbnails to display moving video on the disc's menu.
- Auto-menu timeout: Select this option to have your disc begin to play automatically after the pre-defined menu background video finishes playback.
- User-defined menu duration: Enter in the amount of time video thumbnails and background music will play in a menu.
- Eject after erasing: Check to have CyberLink PowerProducer automatically eject a disc after erasing is complete.
- Display TV safe zone: Check to display a box in the Author window that indicates the safe zone when creating the disc menu. Utilizing this feature ensures that menu items, including text, thumbnails and buttons, will be within the display range of most TVs.
Video/Audio Preferences
• Video format: indicates the current video file format for the current project.
- Video quality: Select a video quality for your disc: HD (High Definition), SD (Standard Definition), HQ (High Quality), SP (Standard Play), LP (Long Play), EP (Extended Play) or Smart Fit. The video quality settings offer different bit rates, resulting in files of different sizes. The higher the quality of the video, the larger the resulting file and the shorter the length of video that can fit onto a disc. Further, more CPU power is required for capturing and rendering higher quality video. The Smart Fit option automatically adjusts the bit rate to the best quality video file that fits exactly to the capacity of the disc you are using.
- Audio format: The different audio qualities are as follows: LPCM is an uncompressed audio format. Dolby Digital Stereo Creator uses the Dolby Digital Consumer Encoder format to create a high quality stereo sound output.
- Dolby Digital 5.1 Creator (note: this feature is optional and only available in some versions of CyberLink PowerProducer) uses the Dolby Digital Consumer Encoder format to create a high quality six channel sound output.
- Location: Select the location where your disc will be played. Location determines the TV format (PAL or NTSC) that is used.
General Preferences
- Use system default language: Select this option for the CyberLink PowerProducer language display to be the same as the default language of your operating system.
- User defined: Select this option and then select the language from the drop-down list that you want CyberLink PowerProducer to use.
- Connect to the Internet: Select this option to allow CyberLink PowerProducer to automatically connect to the Internet to check for updates and display promotional information from CyberLink.
16. Viva Station
Viva Station software will allow you to capture your game plays from your games console in real time and in full screen. Please follow the indications for signal settings.
STV50 User Manual
Index
-
Welcome
-
Features
-
System Requirements
-
Content
-
Hardware
-
Connections
-
Driver and software installation
-
Uninstallation
-
Cyberlink Power Director
-
Multimedia Video Capture
-
Preferences and options
Power Director
-
The Workspace. Power Director
-
Production Mode. Power Director
-
Creating Discs. Power Director
-
Cyberlink Power Producer
16..VivaStation
- Technical Specifications
Important Information
16.1 Signal setting
Before starting to use VivaStation please set the capture options. To do so please click on the icon appearing on the Windows toolbar.
Select the device from which you want to capture de video and the source from you are going to receive the signal (S-Video, Component or Composite)
Also please choose the format in which you want the video capture to be saves and the resolution you want to have for the video capture (max. resolution 720 x 576)

May you wish to schedule the recording of the video capture, please select the date and the time of beginning and ending of the recording task.

Components input: red, blue and green jack
Audio input: RCA jack L/R Estéreo
Resolution:
NTSC:: 720x480 30fps / 720x480p 60fps
PAL: 720 x 576 25fps / 720 x 576p 50fps
Recording resolution:
NTSC: 720x480 30fps / 720x480p 60fps
PAL: 720 x 576 25fps / 720 x 576p 50fps
Device size: 69.4mm x 28.4 mm x 9.7 mm
STV50 User Manual
Index
-
Welcome
-
Features
-
System Requirements
-
Content
-
Hardware
-
Connections
-
Driver and software installation
-
Uninstallation
-
Cyberlink Power Director
-
Multimedia Video Capture
-
Preferences and options
Power Director
-
The Workspace. Power Director
-
Production Mode. Power Director
-
Creating Discs. Power Director
-
Cyberlink Power Producer
16..VivaStation
- Technical Specifications
Important Information
Important information
CE Declaration of Conformity
Sveon declares that his product STV50 is in compliance with the essential requirements and other relevant provisions of Directive 1999/5/EC
Warning message

This symbol on the product or its batteries or its packaging means that this product and any batteries it contains must not be disposed of with your household waste.
Instead, it is your responsibility to hand this over to an applicable collection point for the recycling of batteries and electrical and electronic equipment. This separate collection and recycling will help to conserve natural resources and prevent potential negative consequences for human health and the environment due to the possible presence of hazardous substances in batteries and electrical and electronic equipment, which could be caused by inappropriate disposal.
For more information about where to drop off your batteries and electronic waste, please contact your local city/municipality office, your household waste disposal service or the shopw where you purchased the product.
STV50 User Manual
Index
-
Welcome
-
Features
-
System Requirements
-
Content
-
Hardware
-
Connections
-
Driver and software installation
-
Uninstallation
-
Cyberlink Power Director
-
Multimedia Video Capture
-
Preferences and options
Power Director
-
The Workspace. Power Director
-
Production Mode. Power Director
-
Creating Discs. Power Director
-
Cyberlink Power Producer
16..VivaStation
- Technical Specifications
Important Information
- STV50
- 60Hz USB Video Capture Special for Gaming
- Cyberlink Power Director
- Introducción
- Uso de Power Director
- Cyberlink Power Producer
- El programa Power Producer
- Welcome
- Features
- System Requirements
- Content
- Hardware
- Connections
- PC Connection
- Index
- External video source connection
- Connection through AV
- Connection through SVideo
- Connection through Components
- Driver and software installation
- Driver Installation
- STV50 User Manual
- Cyberlink Power Director installation
- Cyberlink Power Producer software installation
- VivaStation installation
- STV50 audio settings
- Audio settings under Microsoft® Windows XP
- Audio settings under Microsoft® Windows Vista/W7
- Uninstallation
- Introduction
- Main features
- Library
- Edit
- Create Disc Menus
- DirectorZone
- Power Director Versions
- Software upgrading
- Power Director usage
- Power Director Modes
- Power Director Projects
- Importing Media
- Downloading Templates from Director Zone
- Multimedia Video Capture
- Capture Mode
- Capture Options
- Note:
- Capture Limit Options
- Capture from Microphone
- Capture Audio Tracks from CD
- Capture from a DVD
- Preferences and options. Power Director
- Preferences
- Power Director
- General Preferences
- Editing Preferences
- Confirmation Preferences
- Capture Preferences
- Produce Preferences
- Director Zone Preferences
- Edit Window Overview
- Library Window
- Media Room
- Effect Room
- PiP Objectcts Room
- Title Room
- Transition Room
- Audio Mixing Room
- Voice-Over Recording Room
- Chapter Room
- Subtitle Room
- The Workspace. Power Director
- Timeline View
- Media Tracks
- Track Manager
- Locking/Unlocking Tracks in the Timeline
- Magic Movie Wizard
- Preview your Production
- Preview Window
- Media Viewer
- Production Mode. Power Director
- Production Wizard
- Creating a video file
- Create a file for streaming
- Write back to DV tape or HDV tape
- Create an HDD Camcorder File
- Uploading Video to YouTube
- Creating Discs. Power Director
- Disc Menus
- Using the Menu Designer
- Modify Menu Text
- Preview your Disc's Menu Page
- Configure Create Disc Preferences
- Burn a disc
- Burn your movie to disc
- Set your burning configuration
- Create a DVD folder
- Erase a disc
- Power Porducer Program
- Power Producer Projects
- Getting Started
- Producing a Movie Disc
- Power Producer versions
- Supported formats
- System requirements
- CPU
- Memory
- OS
- Windows Desktop resolution
- HDD space
- Burning
- Producing a movie disc
- Step 1: Selecting a video format
- Capturing Video
- Capturing photos from a removable device
- Editing clips
- Adjust a video clip's aspect ratio
- AB Cut
- Merge
- Advanced editing for video (optional)
- Editing Photo Slideshows
- Add photos to a slideshow
- Set background music for a slideshow
- Set Slideshow Duration
- Set Slideshow Effects
- Back up photos on disc
- Creating disc menus
- Selecting Pre-defined Templates
- Add Custom Menu Background
- Set Background Music
- Finalizing Content
- Preview Disc Content
- Burn your production to disc
- Create a folder
- Right-to-disc
- Burn video Right-to-disc
- Disc Utilities
- Copy a disc
- Make a disc DVD Player-Compatible
- Finalize/Unfinalize a disc
- Burn a disc from a disc image
- Save as a disc image
- Burn a disc from a folder
- Project Preferences
- Video/Audio Preferences
- Viva Station
- Signal setting
- Important information
- CE Declaration of Conformity
- Warning message
Brand : Sveon
Model : STV50
Category : Television