
PRJD901 - Video projector Pyle - Free user manual and instructions
Find the device manual for free PRJD901 Pyle in PDF.


| Product Type | Video Projector |
| Brand | Pyle |
| Model | PRJD901 |
| Display Technology | 5" TFT LCD |
| Native Resolution | 640x480 (supports 720P, 1080P) |
| Brightness | 2200 Lumens |
| Contrast Ratio | 1,000:1 |
| Lamp Type | LED (100W) |
| Lamp Life | 50,000 hours |
| Projection Size | 50" - 140" |
| Keystone Correction | ±15 degrees |
| Lens Aperture | 3.8 |
| Lens Focal Length | 200mm |
| Inputs | Component (Y/Pb/Pr), VGA, HDMI (x2), USB (x2), AV, Audio L/R |
| Outputs | Audio L/R (5W x 2 speakers) |
| Multimedia Playback | Video: AVI, MPG, DAT, MOV, MKV; Audio: MP3, WMA, AAC; Picture: JPEG, BMP, PNG; Text TXT |
| Power Supply | AC 100-240V, 50/60Hz |
| Power Consumption | < 140W |
| Dimensions (W x H x D) | 330 x 257 x 105 mm |
| Weight | 3 kg (6.6 lbs) |
| Operating Temperature | 0°C to +70°C |
| Storage Temperature | -20°C to +70°C |
| Maintenance | Clean the air filter once a month |
| Safety Precautions | Do not look directly at the lens; ensure proper ventilation; unplug during thunderstorms |
| Spare Parts / Accessories | Lamp, fuse, remote control, ceiling mount (optional) |
Frequently Asked Questions - PRJD901 Pyle
User questions about PRJD901 Pyle
0 question about this device. Answer the ones you know or ask your own.
Ask a new question about this device
Download the instructions for your Video projector in PDF format for free! Find your manual PRJD901 - Pyle and take your electronic device back in hand. On this page are published all the documents necessary for the use of your device. PRJD901 by Pyle.
USER MANUAL PRJD901 Pyle
natural_image
Line drawing of a projector with a circular lens and ventilation grille (no text or symbols)Model No.: PRJD901
Users Manual
Contents
Warranty card
Warning 1
Safety Precautions.... 2
Caution 3
Installation 4
Full setting.... 4
standard setting (front projection) 5
Installation method.... 6
machine instruction.... 7
input terminals.... 8
Remote control instruction 9
Panel keystone instruction.... 10
How to turn on/off the projector .... 1
Image trapezoid adjustment 12
Focus adjustment.... 12
Trapezoid adjustment 12
Menu setting.... 13
Trouble shooting.... 17
Specification....19
Accessories 20
Name/Company: Telephone:
Address:______Fax No.:______
Product Purchased: Model No.: Serial No.:
Dealer Name: Date of Purchase: Invoice No.:
This card is to be remained by customer
Thank you very much for purchasing this product.
We offer 1 year warranty for projector and 6 months for its lamp from date of purchasing.
In the event of servicing, please return the faulty product with complete Warranty Card along with original invoice to the address indicated on the Warranty Card.
Accessories List
Warning
Please check the full contains of accessories in the box after opening.
Accessories list
Projector 1 pc
Remote control 1 pc
Power cable 1 pc
AV signal cable 1 pc
VGA signal cable 1 pc
Manual 1 pc
Spare fuse 1 pc
Purchasable accessories
1, projector screen
2, projector ceiling mount
3, spare lamps
Warning
Please write down the model number and serial number of this product in the box on the right.
MODEL NUMBER:
SERIES NUMBER:
Before using this projector, please read the manual first.
Warning:

Do not look at the light from the lens directly. It may damage your eyes, especially for children.
Warning : Do not place the projector on a wet surface to avoid electric shock.

Warning
When turn off the projector, the fans will continue working for approximately 90 seconds. Please make sure the fans are completely stopped working before unplug the power cable. Otherwise, it will damage the projector lamp.
About the remote control battery:
The remote control battery should be installed correctly, or it will be damaged. Make sure the remote control is out of children's reach.
Safety precautions
Specification
Warning:
Before using this projector, please read the manual carefully. Any wrong operation may cause electric shock or fire. Please comply with the following instructions when using and/or repairing the projector.
1. Clean
When clean this projector, please unplug the power cable and use the wet cloth not the cleanser.
2. Accessories
Please use the recommended accessories or the projector maybe damaged.
3. Using environment
Do not place the projector on any wet environments.
4. Installation
Please place this projector on a stable surface.
5. Ventilation
For best performance, please clean the filter once a month.
6. Power
Before plug in the power, please make sure the voltage of your area matches this projector (220V or 110V).
7. Ground wire
The three pin plug is the ground wire of this projector.
8. Protect the power cable
Make sure the power cable is in perfect working condition before using it.
9. Thunder
When there is thunder or not using the projector for a long period of time, unplug the power cable.
10. Repair
Due to high voltage, do not open or try to repair the projector by yourself. Refer to a professional technician if repair is needed.
11. Heat
Make sure not to put this projector near any heating devices. That may shorten the life span of the projector.
| LED | Model | 5" TFT |
| Input signal | video | component video(Ypbpr), VGA, HDMI, USB |
| audio | stereo | |
| Output signal | audio | 5W×2 speaker |
| LED | native resolution | 640x480 Support 720P,1080P |
| contrast ratio | 1,000:1 | |
| Lens | aperture | 3.8 |
| focus | 200mm | |
| Lamp | led | 100W |
| life | 50,000 hours | |
| Image | size | 50"-140" |
| brightness | 2200 Lumens | |
| keystone | ±15 degree | |
| Power | voltage | AC100-240V/50-60Hz |
| power consumption | < 140W | |
| Working condition | temperature 0°C~+70°C | |
| humidity 10%~65% | ||
| Store condition | temperature -20°C~+70°C | |
| humidity 10%~90% | ||
| Remote control frequency | 38KHz | |
| Machine | size | 330x257x105mm |
| weight | 3Kg | |
(Note: no notification will be made in advance if any of the above specifications were changed or updated.)
Trouble shooting
Caution
| Problem | The possible causes |
| 3.No Image | ◎ the choice of the input source may not be correct◎ no input signal◎ the input cable is not connected◎ if under PC mode, the PC output frequency is not 50-60Hz. Make sure that the PC output is connected with the projector. |
| 4.Auto-off after use some times | ◎ the projector ventilation is blocked◎ the voltage is not stable◎ the projector is over heat. Check if the fan is broke. |
About the installation
- In order to improve this projector's life
- About turn on/off the projector span, do not place it on a wet surface.
- To turn on the projector, some
- Do not put the projector under the direct sun light.
- Projector working temperature: 0^ +70^ - Projector store temperature: -20^ +70^
- Do not block the ventilation-window of the projector. If the projector interior temperature is too hot, it will be auto-matically shut down. This will protect the projector. To prevent over heating the projector, please clean the filter once a month.
- To turn on the projector, connect the power cable, then press the "power" key on the panel. It will take couple of minutes before the lamp works normally.
- To turn off the projector, press the "power" key again. The lamp will shut off while the fan will still working for a little longer. The projector will shut off automatically when the fan stops. DO NOT unplug the power cable before turn off the projector.
Warning:
The fan is to keep the projector's temperature low. It will turn on when projector is turned on. The speed of the fan is according to the heat of the projector. Do not unplug the power cable when the projector is not turned off and the fan is still working. If the fan stops working, the projector may be damaged due to over heat.
Installation
Trouble Shooting
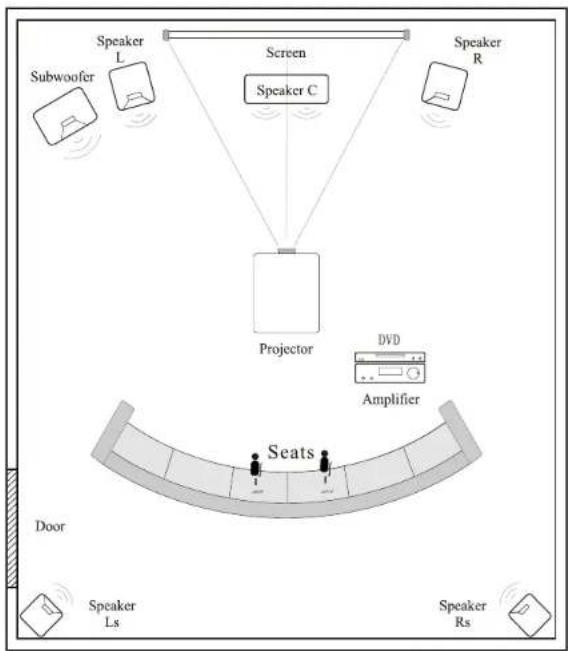
flowchart
graph TD
    A["Speaker L"] --> B["Screen"]
    C["Speaker R"] --> D["Projector"]
    E["Speaker C"] --> D
    F["Speaker Ls"] --> G["Seats"]
    H["Speaker Rs"] --> I["Speaker Ls"]
    J["Subwoofer"] --> K["Speaker L"]
    style A fill:#f9f,stroke:#333
    style C fill:#f9f,stroke:#333
    style E fill:#f9f,stroke:#333
    style F fill:#f9f,stroke:#333
    style H fill:#f9f,stroke:#333
    style J fill:#f9f,stroke:#333
    style K fill:#f9f,stroke:#333
    style L fill:#f9f,stroke:#333
    style R fill:#f9f,stroke:#333
    style S fill:#f9f,stroke:#333
    style T fill:#f9f,stroke:#333
    style U fill:#f9f,stroke:#333
    style V fill:#f9f,stroke:#333
    style W fill:#f9f,stroke:#333
    style X fill:#f9f,stroke:#333
    style Y fill:#f9f,stroke:#333
    style Z fill:#f9f,stroke:#333
For best quality of the image, avoid the direct sunlight. Draw the curtains up if using during the daytime.
Trouble Shooting
| Problem | The possible causes |
| 1. When turn on the power switch, the indicator light does not work | ◎ power cable did not connect well .◎ the power switch fuse is broken . |
| 2. the remote control can not turn on the projector. | ◎ the power switch is turned off◎ the remote control has no batteries or the batteries are low◎ the remote control does not aim at the IR point |
Menu setting
Projector Installation
6. Setting

| Menu setting | |
| OSD language | English/Germany/Chinese ... |
| Restore factory default | Yes or no |
| Blending | Off/lower/middle/high |
| OSD duration | OFF/5seconds/10seconds/15seconds |
| Software update(USB) | Software update |
7. Multimedia menu

| Multimedia Menu | |
| Picture | View the photos in gallery |
| Music | Play an album |
| Movie | Watch a movie |
| TXT | Read the book |
CAUTIONS:
1) The usb interface support USB1.1
USB2.0, including hard drive and fresh drives
2) The max. Storage supported is 400GB
3) The system format supported: FAT16、FAT32、NTFS
4) The usb interface can support
most drives but is not universal,
any unknown device problem is caused
by the device drive
5) The total voltage of the connected devices
shall not be over 1200mAh, the problems caused
by the wrong operation will not be warranted
Multimedia Format
| Task | Format | Video Decode | Audio Decode |
| MOVIE | .avi | DivX,XviD,MPEG-4 | MP3,WMA,AAC |
| .mpg | MPEG-1,MPEG-2 | ||
| .dat | MPEG-1 | ||
| .mn/mvib | RealMedia,video | ||
| .mov/mkv | H.264 | ||
| MUSIC | .mp3 | — | Mp3 |
| .wma | — | WMA | |
| .mfa/aac | — | AAC | |
| PICTURE | .jpeg/jpeg | Progressive JPEG Baseline JPEG | — |
| .bmp | BMP | — | |
| .png | Non-interlaced Interlaced | — |
Standard setting (Front projection)
Please refer to the following table to adjust your picture size and distance (from the lens to screen)
| Distance | 4:3 | 16:9 |
| 50" | 1.85m | 2.00m |
| 70" | 2.55m | 2.75m |
| 100" | 3.50m | 3.85m |
| 120" | 4.18m | 4.58m |
Please allow + - 3% to the image sizes of the above table. If the distance is less then 2 meters and more then 5 meters, the image could be blurry.
Warning
Please check the following picture to show the trapezoid adjustment
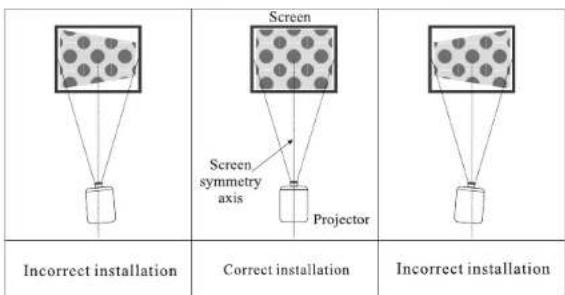
Projector installation
Menu setting
Installation method:
Contact a professional installer to mount this projector to a ceiling. Follow the instructions below for the correct projector positions:

Warning
- This projector maybe damaged beyond repair if it is incorrectly mounted on a ceiling or on a surface.
- This projector can be only used in an environment with the temperature that's not exceeding the range of 32-95°F. If the temperature is outside the normal range, it may cause the projector malfunction.
- It may cause malfunction if the projector is placed in a dusty, wet, moist or smoke environment.
-
Take care of the ventilation. Otherwise, the projector may be damaged or cause life threatening situation due to over heat.
-
Sound mode

| Sound mode | |
| Sound mode | Music/movie/sport/user/standard |
| Balance | -50~50 |
| Auto volume | On/off |
| Surround sound | On/off |
| EQ | (120/500/1.5K/5K/10K)Hz 50 |
- Time menu

| Time menu | |
| Clock---- | Date--/month--/year--/hour--/mins-- |
| Off time | Off/one time/everyday/monday~friday |
| On time | Off/one time/everyday/monday~friday |
| Sleep timer | Off/10mins/20mins/30mins/60mins/90mins |
Menu setting
Machine Instruction
- Parameters of menu setting
will be yellow color back.
A) press “menu” key, when it shows as picture (3).
B) press ▲/▼ key, as picture (2).the selection will as yellow highlight.
C) press "OK" key, use ◀/▶ key, to adjust parameters.
D) press "menu" key again, exit the windon.

- Picture menu

| Picture menu | |
| Picture mode | Standard/soft/user/Dynamic |
| Color temperature | Standard/warm/cool |
| Aspect ratio | 4:3 or 16:9 /zoom1/zoom2 |
| Noise reduction | Off/low/middle/high |
| Flip horizon | On/off |
| Flip vertical | On/off |
☆Remark
| User mode of picture | ||
| Contrast | 0-100 | Adjust the dark and brightness area difference |
| Brightness | 0-100 | Adjust the full picture brightness |
| Color | 0-100 | Adjust the picture color |
| Sharpness | 0-100 | Adjust the picture sharpness |


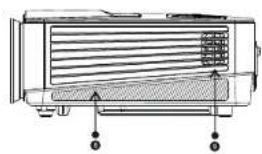
natural_image
Technical line drawing of a mechanical component with no visible text or symbols
- Focus lens
- IR receiver
- Level-stand adjustment
- Cool winds input ventilation
- Input terminals
- Power switch
- Keystone
- Hot winds output ventilation
- Speaker
- Level-stand adjustment
- Projector mount hole
12.Label - Cool winds input ventilation
Input terminals
Menu setting
Interface
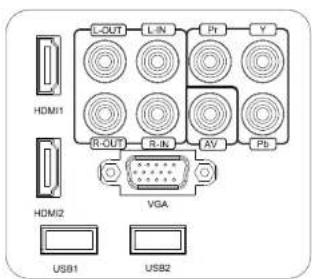
| Name | Instruction |
| Y/Pb/Pr | Component video input |
| Video | AV input |
| L-Out, R-Out | Audio output |
| L-In, R-In | Audio input |
| VGAIN | VGA input |
| TV | N/A |
| HDMI 1/2 | HDMI Signal input |
| USB 1/2 | Connect USB flash drive |
USB support format
Please connect the input signal cable well, then turn on the projector. Otherwise, it is easy to damage the projector.
- Menu settings method
1) During operating the projector, press "menu" key, the projector show the windows as picture(1).
2) Press "◀/▶" key, enter the submenu picture >sound>time>option in turn
3) after confirm the submenu, use "▲/▼" to select your inquired submenu. as picture (2).
4) use "OK" and "◀/▶" to adjust the parameters.
5) after finishing all settings, press "menu" again, exit the settings.
Picture1
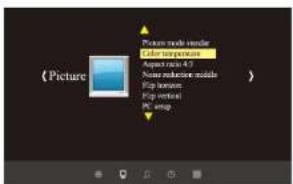
Picture2
Image adjustment
Remote control instruction
When operating the projector for the first time, the image may appear unclear or trapezoid. It is caused by focus of the lens and/or trapezoid uncorrected. Please follows the following steps for correction:
Focus adjustment
- Turn the lens clockwise to the projector, then turn it counter clockwise slowly. At the same time, check the resolution point carefully. When image is clear (as the middle area of the image), it will be the best position of the lens.


NOTE: When you replace the projector from a cold to a warm environment water vapour might occur. Don't turn the projector on when this occurs but wait until the vapour has disappeared.
KEYSTONE
If a projected picture has keystone distortion, correct image with keystone adjustment. The image becomes trapezoid shape when the screen or projector is not leveled. Please reposition the projector to improve its angle to the screen. However, the circumference of the image may not be focused.


ne correction function to correct the trapezoid distortion, please enter the screen vertically.
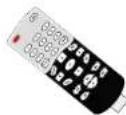
REMOTE CONTROL

| Turn on/off | ▲ | Up | |
| MUTE | shut off the voice | ▼ | Down |
| 1,2,3...9 | chose TV channel | ◀ | Left |
| 16:9/4:3 | Aspect ratio | ▶ | Right |
| zoom | picture zoom,from 1 step to 20 step; | |◀◀ | Prev |
| SOURCE | select the input source | ▶▶ | Next track |
| DISP | display theLEDscreen info | ◀◀ | Fast backward |
| MENU | main menu | ▶▶ | Fast forward |
| EXIT | used in the "USB"mode, back to previous operation | ▶▶ | Play/Pause |
| OK | Confirm | ■ | Pause |
Panel keystoke instruction
Turn on/off the projector
Panel keystoke sketch map

natural_image
Simple line drawing of a test tube and a circular device with a leaf symbol (no text or labels)
① Power key
It turns on or off the projector. The function is the same as the "power" on the remote control.
③ Menu
It adjusts the menu by Up/Down, Left/Right.
⑤ Direction operation Key
② Sources
It chooses the input signal (such as: AV, YPBPR, HDMI 1/2, USB1/2 or PC)
④ Indicator light
red color:standby green color:working
Turn on the projector
- Before using the remote control, insert 2 AAA batteries.

take off
- Turn on the power switch on the backboard, the power light begin to flash.


- After a few seconds, the lamp begins to work.

- If using the first time, the image may appear as blurry or trapezoid distortion, please refer to "image adjustment" chapter.

- You may also re-setup the system parameter at anytime. Please refer to "menu setting chapter.

Turn off the projector
- While using the projector, by pressing "power" key, the projector will turn to standby mode.

- When the projector is under the standby mode, its auto protecting system will be on. To start up, press the "power" key again.

- Contents
- Warranty card
- Accessories List
- Warning
- Purchasable accessories
- About the remote control battery:
- Safety precautions
- Specification
- Warning:
- Clean
- Accessories
- Using environment
- Installation
- Ventilation
- Power
- Ground wire
- Protect the power cable
- Thunder
- Repair
- Heat
- Trouble shooting
- Caution
- About the installation
- Installation
- Menu setting
- Projector Installation
- Setting
- Multimedia menu
- CAUTIONS:
- Standard setting (Front projection)
- Machine Instruction
- Input terminals
- Image adjustment
- Remote control instruction
- Focus adjustment
- KEYSTONE
- REMOTE CONTROL
- Panel keystoke instruction
- Turn on/off the projector
- Turn on the projector
- Turn off the projector
Brand : Pyle
Model : PRJD901
Category : Video projector