US1000 - Organ YAMAHA - Free user manual and instructions
Find the device manual for free US1000 YAMAHA in PDF.

| Product Type | Electronic Organ |
| Brand | Yamaha |
| Model | US1000 |
| Number of Keys (Upper Manual) | 61 keys (C2-C7) |
| Number of Keys (Lower Manual) | 61 keys (C2-C7) |
| Pedalboard | 25 pedals (C2-C4) |
| Voices | Over 100 AWM (Advanced Wave Memory) voices |
| Rhythm Styles | 50+ built-in rhythm patterns |
| Effects | Reverb, chorus, sustain, and more |
| Registration Memory | 8 registration buttons with bank select |
| Connectivity | MIDI In/Out, Headphone jack, Aux In, Pedal connections |
| Dimensions (W x D x H) | 1200mm x 600mm x 900mm |
| Weight | Approximately 50 kg |
| Power Consumption | 30W (standby: <5W) |
| Power Supply | AC 100-240V, 50/60Hz (external adapter) |
| Cleaning | Wipe with a soft dry cloth; avoid solvents |
| Safety | Keep away from moisture; use specified power adapter |
| Spare Parts Availability | Contact Yamaha authorized service centers |
| Reparability | Service by qualified technicians only |
| Included Accessories | Power adapter, owner's manual, music stand |
Frequently Asked Questions - US1000 YAMAHA
User questions about US1000 YAMAHA
0 question about this device. Answer the ones you know or ask your own.
Ask a new question about this device
Download the instructions for your Organ in PDF format for free! Find your manual US1000 - YAMAHA and take your electronic device back in hand. On this page are published all the documents necessary for the use of your device. US1000 by YAMAHA.
USER MANUAL US1000 YAMAHA
natural_image
Black piano with visible keys and a small vent, placed on a plain surface (no text or symbols)SUPPLEMENTAL MARKING INFORMATION SPECIAL MESSAGE SECTION
Yamaha Electronic Keyboard Products will have either a label similar to the graphic shown below or a molded/stamped facsimile of the graphic on its enclosure. The explanation of these graphics appears on this page. Please observe all cautions indicated.

text_image
CAUTION RISK OF ELECTRIC SHOCK DO NOT OPEN CAUTION: TO REDUCE THE RISK OF ELECTRIC SHOCK, DO NOT REMOVE COVER (OR BACK). NO USER-SERVICEABLE PARTS INSIDE. REFER SERVICING TO QUALIFIED SERVICE PERSONNELELECTROMAGNETIC INTERFERENCE (RFI): Your Yamaha Electronic Keyboard Product has been type tested and found to comply with all applicable regulations. However, if it is installed in the immediate proximity of other electronic devices, some form of interference may occur. For additional RFI information see FCC information section located in this manual.
IMPORTANT NOTICE: This product has been tested and approved by independent safety testing laboratories in order that you may be sure that when it is properly installed and used in its normal and customary manner, all foreseeable risks have been eliminated. DO NOT modify this unit or commission others to do so unless specifically authorized by Yamaha. Product performance and/or safety standards may be diminished. Claims filed under the expressed warranty may be denied if the unit is/has been modified. Implied warranties may also be affected.
SPECIFICATIONS SUBJECT TO CHANGE: The information contained in this manual is believed to be correct at the time of printing. Yamaha reserves the right to change or modify specifications at any time without notice or obligation to update existing units.
NOTICE: Service charges incurred due to a lack of knowledge relating to how a function or effect works (when the unit is operating as designed), are not covered by the manufacturer's warranty. Please study this manual carefully before requesting service.

The Exclamation point within an equilateral triangle is intended to alert the users to the presence of important operating and maintenance (servicing) instructions in the literature accompanying the product.
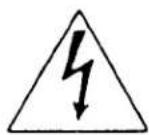
The lightning flash with arrowhead symbol within an equilateral triangle is intended to alert the user of the presence of uninsulated "dangerous voltage" within the product's enclosure that may be of sufficient magnitude to constitute a risk of electric shock.
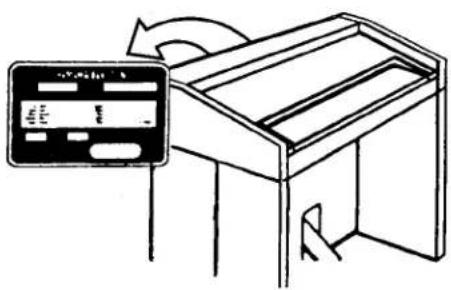
NAME PLATE LOCATION: The graphic below indicates the location of the Name Plate on your Yamaha Electronic Keyboard. The Model, Serial Number, Power requirements, etc., are indicated on this plate. You should note the model, serial number and the date of purchase in the spaces provided below and retain this manual as a permanent record of your purchase.
text_image
Diagram showing a credit card with a separate card labeled '012501-1' and a circular arrow indicating rotation or adjustment.STATIC ELECTRICITY CAUTION: Some Yamaha Electronic Keyboard products have modules that plug into the unit to perform various functions. The contents of a plug-in module can be altered/damaged by static electricity discharges. Static electricity build-ups are more likely to occur during cold winter months (or in areas with very dry climates) when the natural humidity is low. To avoid possible damage to the plug-in module, touch any metal object (a metal desk lamp, a door knob, etc.) before handling the module. If static electricity is a problem in your area, you may want to have your carpet treated with a substance that reduces static electricity build-up. See your local carpet retailer for professional advice that relates to your specific situation.
Model
Serial No. ____
Purchase Date ____
OWNERS GUIDE
The Yamaha US-1000 is an extremely easy instrument to play that offers a variety of incredible sounds and effects. The possibility of making music quickly and enjoyably, regardless of your previous musical training, can be, without question, a reality with this amazing instrument.
This owner's guide not only explains all the features of your Yamaha but also provides "hands-on" opportunities to experiment with them through music examples.
CONTENTS
Inside Cover
SUPPLEMENTARY MARKING INFORMATION SPECIAL MESSAGE SECTION
2 IMPORTANT SAFETY AND INSTALLATION INSTRUCTIONS
3 POWER VOLUME CONTROLS HEADPHONE JACK
4 ORCHESTRAL VOICES
5 BRILLIANCE, SUSTAIN, M.O.C.
6 RHYTHM 8 AUTO BASS CHORD
10 C.S.P.
11 TRANSPOSITION
12 MIDI
14 ORCHESTRAL VOICES Somewhere Out There
16 AUTO BASS CHORD, RHYTHM Daddy Sang Bass
18 MANU. BASS Bandstand Boogie
20 INTRO./ENDING/RITARDANDO Happy Together
22 FILL IN It's A Small World
24 SUSTAIN The Longest Time
26 DUET Got My Mind Set On You
28 KB. PERCUSS Marianne
30 C.S.P. (CHORD SEQUENCER PROGRAMMER) And I Love Her
32 CHORD CHARTS
IMPORTANT SAFETY AND INSTALLATION INSTRUCTIONS
INFORMATION RELATING TO POSSIBLE PERSONAL INJURY, ELECTRIC SHOCK, AND FIRE HAZARD POSSIBILITIES HAS BEEN INCLUDED IN THIS LIST.
WARNING - When using electronic products, basic precautions should always be followed, including the following:
-
Read all Safety and Installation Instructions, Supplemental Marking and Special Message Section data, and assembly instructions (where applicable) BEFORE using your Yamaha electronic keyboard. Check unit weight specifications before you attempt to move this instrument!
-
Main Power Supply Verification: Your Yamaha electronic keyboard has been manufactured specifically for the main supply voltage used in your area. If you should move, or if any doubt exists, please contact your dealer for instructions. The main supply voltage required by your electronic keyboard is printed on the name plate. For name plate location see graphic in Special Message Section.
-
This product may be equipped with a polarized line plug (one blade wider than the other). If you are unable to insert the plug into the outlet, contact an electrician to have your obsolete outlet replaced. Do NOT defeat the safety purpose of the plug. Yamaha products not having polarized plugs incorporate construction methods and designs that do not require line plug polarization.
-
WARNING - Do NOT place objects on your electronic keyboard's power cord or place the unit in a position where anyone could trip over, walk over, or roll anything over cords of any kind. Do NOT allow your electronic keyboard or its bench to rest on or be installed over cords of any type. Improper installations of this type create the possibility of a fire hazard and/or personal injury.
-
Environment: Your electronic keyboard should be installed away from heat sources such as a radiator, heat registers and/or other products that produce heat. Additionally, the unit should not be located in a position that exposes the cabinet to direct sunlight, or air currents having high humidity or heat levels.
-
Your Yamaha electronic keyboard should be placed so that its location or position does not interfere with its proper ventilation.
-
Some Yamaha electronic keyboards may have benches that are either a part of the product or supplied as an optional accessory. Some of these benches are designed to be dealer assembled. Please make sure that the bench is stable before using it. The bench supplied by Yamaha was designed for seating only. No other uses are recommended.
-
Some Yamaha electronic keyboards can be made to operate with or without the side panels or other components that constitute a stand. These products should be used only with the components supplied or a cart or stand that is recommended by the manufacturer.
-
This product, either alone or in combination with an amplifier and headphones or speakers, may be capable of producing sound levels that could cause permanent hearing loss. Do not operate for a long period of time at a high volume level or at a level that is uncomfortable. If you experience any hearing loss or ringing in the ears, you should consult an audiologist.
-
Do not use your Yamaha electronic keyboard near water or in wet environments. For example, near a swimming pool, spa, or in a wet basement.
-
Care should be taken so that objects do not fall, and liquids are not spilled, into the enclosure through openings.
-
Your Yamaha electronic keyboard should be serviced by a qualified service person when:
a. The power-supply cord or plug has been damaged; or
b. Objects have fallen, or liquid has been spilled into the product; or c. The product has been exposed to rain; or
d. The product does not operate, exhibits a marked change in performance; or
e. The product has been dropped, or the enclosure of the product has been damaged.
-
When not in use, always turn your Yamaha electronic keyboard "OFF". The power-supply cord of the product should be unplugged from the outlet when it is to be left unused for a long period of time. Note: In this case, some units may lose some user programmed data. Factory programmed memories will not be affected.
-
Do not attempt to service the product beyond that described in the user-maintenance instructions. All other servicing should be referred to qualified service personnel.
-
Electromagnetic Interference (RFI). This series of Yamaha electronic keyboards utilizes digital (high frequency pulse) technology that may adversely affect Radio/TV reception or the operation of other devices that utilize digital technology. Please read FCC Information (below) for additional information.
FCC INFORMATION
This instrument uses frequencies that appear in the radio frequency range, and if installed in the immediate proximity (within three meters) of some types of audio or video devices, interference may occur.
This instrument has been type-tested and found to comply with the specifications for a Class B computing device in accordance with those specifications listed in Subpart J of Part 15 of the FCC rules. These rules are designed to provide a reasonable measure of protection against such interference. However, this does not guarantee that interference will not occur. If your instrument should be suspected of causing interference with other electronic devices, verification can be made by turning the instrument off and on. If the interference continues when the instrument is off, the instrument is not the source of the interference. If the instrument does appear to be the source of the interference, you should try to correct the situation by using one or more of the following measures:
- Relocate either the instrument or the electronic device that is being affected by the interference.
- Use power outlets for the instrument and the device being affected that are on different branch (circuit breaker or fuse) circuits, or install AC line filters.
- In the case of radio-TV interference, relocate the antenna or, if the antenna lead-in is a 300-ohm ribbon lead, change the lead-in to a coaxial cable.
If these corrective measures do not produce satisfactory results, please contact your Authorized Yamaha dealer for suggestions and/or corrective measures. If you cannot locate an Authorized Yamaha dealer in your general area, contact the Service Division, Yamaha Music Corporation, U.S.A., 6600 Orangethorpe Ave., Buena Park, CA 90620.
If for any reason you should need additional information relating to radio or TV interference, you may find a booklet prepared by the Federal Communications Commission helpful: "How to Identify and Resolve Radio-TV Interference Problems." This booklet is available from the U.S. Government Printing Office, Washington, D.C. 20402 - Stock #004-000-345-4.
PLEASE KEEP THIS MANUAL FOR FUTURE REFERENCE!
POWER
The POWER switch turns the instrument on and off. In order for it to do so, however, the instrument must be plugged into a working AC outlet. Pressing the lower half of the switch down (the half with the white dot) turns the instrument on. Pressing the upper half of the switch down turns it off. Several LEDs (light-emitting diodes) on the panel illuminate to indicate when the instrument is on.
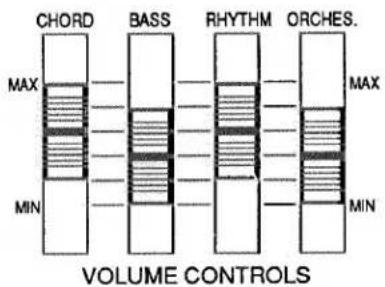
VOLUME CONTROLS
There are four sliders in the VOLUME CONTROLS section. They enable you to adjust the loudness or softness of each main section of the instrument, in order to obtain the best balance for any song. To increase the volume of a section, move the appropriate slider toward MAX. To decrease the volume of a section, move the appropriate slider toward MIN. At MIN., the section will be silenced completely.
text_image
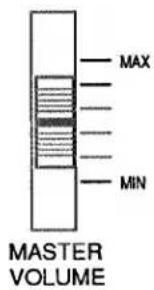
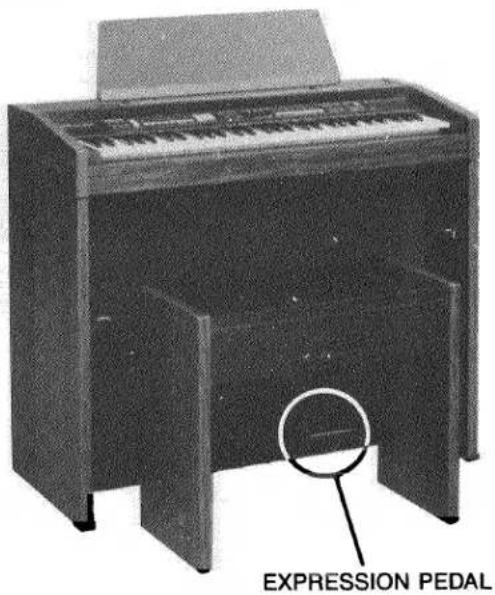
CHORD BASS RHYTHM ORCHES. MAX MIN VOLUME CONTROLS MAX MINIn addition to these four controls, which govern the volumes of individual sections, there are two other volume controls on the US-1000, which govern the overall loudness and softness of the instrument: the MASTER VOLUME slider and the EXPRESSION PEDAL.
text_image
MAX MIN MASTER VOLUMEThe MASTER VOLUME slider allows you to set the average overall volume level for your US-1000. Where you set this slider will depend on such things as the size of the room in which the instrument is located and your overall preference for loud or soft music. Generally, once you find a comfortable setting for this slider, you probably won't change it much.
The EXPRESSION PEDAL, on the other hand, allows you to change the volume continuously as you play. Its location on the lower right side of the front of the instrument allows you to keep your right foot on it at all times when you play. When you want your music to generate more energy you can use this pedal to make it louder; when you desire a gentler sound, you can use it to make the music quieter. In short, the EXPRESSION PEDAL allows you to add EXPRESSION to your playing.
text_image
EXPRESSION PEDALTo use the EXPRESSION PEDAL, place your entire right foot on it. To raise the volume, press down with your toe; to lower the volume, press back with your heel.
HEADPHONE JACK
A stereo jack for headphones is located under the left end of the keyboard. When you plug headphones into the jack, the loudspeakers are silenced, so you can play in complete privacy.
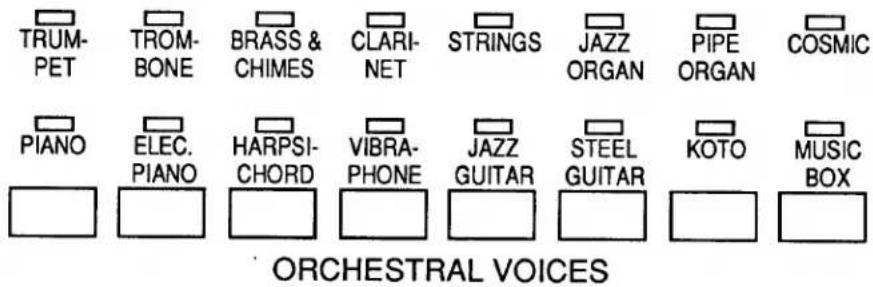
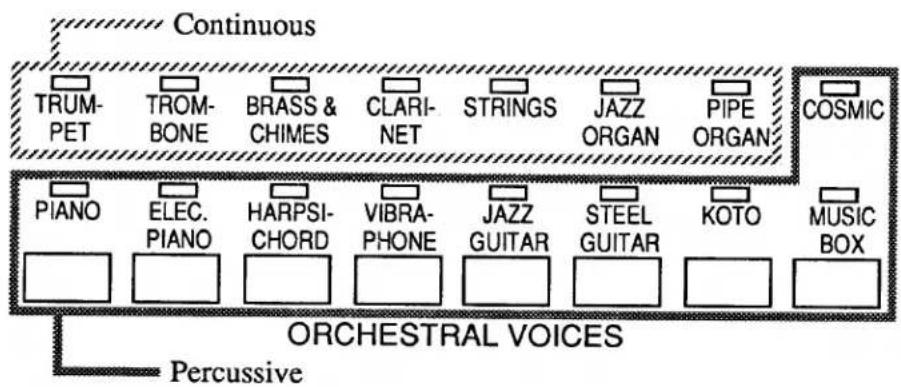
ORCHESTRAL VOICES
text_image
TRUM- PET TROM- BONE BRASS & CHIMES CLARI- NET STRINGS JAZZ ORGAN PIPE ORGAN COSMIC PIANO ELEC. PIANO HARPSI- CHORD VIBRA- PHONE JAZZ GUITAR STEEL GUITAR KOTO MUSIC BOX ORCHESTRAL VOICESThe ORCHESTRAL VOICES section of your Yamaha US-1000 provides 16 realistic instrumental sounds. Each button in this section selects one of two voices: if you press a button repeatedly, you alternate between the voice above the button in the top row and the one in the bottom row. A red LED informs you of which voice is on.
For example, when you first turn the instrument on, TRUMPET is active, as the LED shows. If you press the button below TRUMPET, the active voice switches to PIANO; if you press it again, it returns to TRUMPET.
The ORCHESTRAL VOICES can be grouped into two general categories: continuous voices, which sound as long as a key is held down, and percussive voices, which decay (fade away).
flowchart
graph TD
    A["Continuous"] --> B["TRUM-PET"]
    A --> C["TROM-BONE"]
    A --> D["BRASS & CHIMES"]
    A --> E["CLARI-NET"]
    A --> F["STRINGS"]
    A --> G["JAZZ ORGAN"]
    A --> H["PIPE ORGAN"]
    A --> I["COSMIC"]
    J["Piano"] --> K["ELEC. PIANO"]
    K --> L["HARPSI-CHORD"]
    L --> M["VIBRA-PHONE"]
    M --> N["JAZZ GUITAR"]
    N --> O["STEEL GUITAR"]
    O --> P["KOTO"]
    Q["MUSIC BOX"] --> R["Chromosome"]
    S["ORCHESTRAL VOICES"] --> T["Percussive"]
The choice between continuous and percussive sounds can be important when you select a voice to play the melody of a song. For example, if you wish to play a song with many long or tied notes, a voice such as KOTO probably wouldn't be the best choice – the sound of the voice would die away before the end of a long note. Conversely, a fast, animated number would best be served by something other than STRINGS — the slow attack and smooth sound lack the kind of energy required.
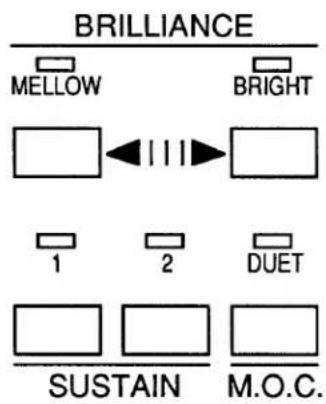
BRILLIANCE, SUSTAIN, M.O.C.
text_image
BRILLIANCE MELLOW BRIGHT 1 2 DUET SUSTAIN M.O.C.The controls in this section allow you to modify the sound of the ORCHESTRAL VOICES.
There are five levels of BRILLIANCE to which you can set the sound. When you first turn the instrument on, the middle (normal) level is selected automatically.
From this middle level you can make the sound mellower by pressing the MELLOW button once, or still mellower by pressing it a second time. On the other hand, starting from normal brilliance, you can make the sound brighter by pressing the BRIGHT button once, or brighter still by pressing it a second time.
To return to normal brilliance, press both MELLOW and BRIGHT at the same time.
The SUSTAIN buttons cause the sound to linger after you release a key in the melody section of the keyboard. SUSTAIN 1 provides a short sustain; SUSTAIN 2 yields a longer sustain.
M.O.C. (Melody On Chord) provides a function called DUET. When this button is on, the instrument automatically adds a second melody part beneath whatever melody notes you play, based on the chords you play in the AUTO BASS CHORD section of the keyboard.
RHYTHM
The RHYTHM section provides the drum and other percussion sounds for the automatic accompaniment. There are 16 different rhythm patterns, so you'll find a rhythm that's just right for every song you play.
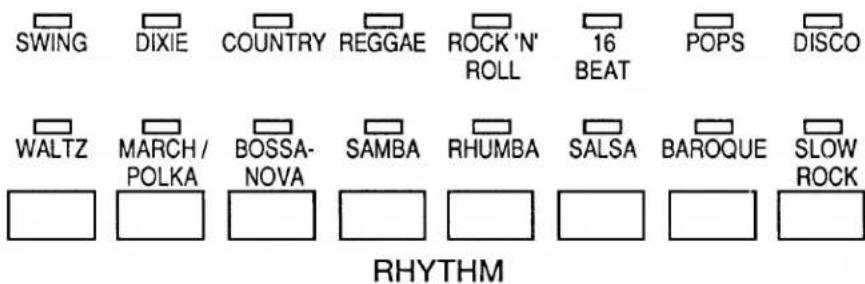
text_image
SWING DIXIE COUNTRY REGGAE ROCK 'N' ROLL 16 BEAT POPS DISCO WALTZ MARCH / POLKA BOSSA- NOVA SAMBA RHUMBA SALSA BAROQUE SLOW ROCK RHYTHMEach rhythm button enables you to activate one of two rhythms. For example, if you are using the REGGAE pattern and want to change to SAMBA, simply press the button again. An LED illuminates to show you which rhythm is active.
The SWING rhythm is automatically selected when you turn the instrument on.
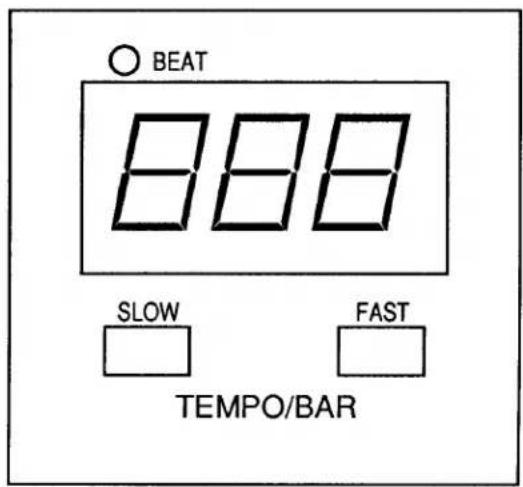
text_image
BEAT 888 SLOW FAST TEMPO/BARThe TEMPO/BAR display has two functions:
- To show the tempo (speed) of the rhythm in beats per minute; and
- to show how many bars (measures) the rhythm has played since it started.
For example, when the instrument is turned on, you'll see the number 74 in the display; this is the preset tempo of the SWING rhythm. Once the rhythm is started, the display switches to the number of the current measure being played. In addition, the BEAT light flashes at the beginning of every bar.
Press the SLOW and FAST buttons to change the tempo of the rhythm. You can press repeatedly to change the tempo by small amounts, or hold a button down to speed through a larger change.
Press both the SLOW button and the FAST button at the same time to change instantly to the preset tempo for the active rhythm. Each rhythm has a preset tempo that represents the most common speed for that rhythm.
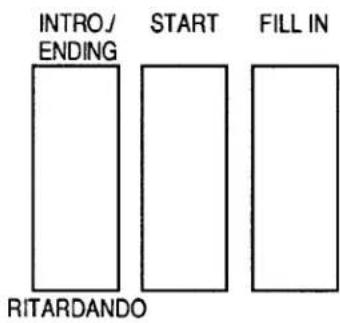
text_image
INTRO/ ENDING START FILL IN RITARDANDOThe START button allows you to start and stop the rhythm. When the rhythm is off, pressing START will start it. When the rhythm is running, pressing START will stop it.
Pressing FILL IN while the rhythm is running provides a one-measure "drum fill." For a longer fill in, hold the button down longer. FILL IN can also be activated by a switch located on the left side of the EXPRESSION PEDAL. With your foot on the pedal, press to the left to play the fill.
The INTRO./ENDING button contributes a number of features that add a “professional touch” to your playing. If you press it when the rhythm is off, it will play a two-measure drum introduction before launching into the main accompaniment pattern. This can be especially useful for songs that begin with pickup notes (a partial measure; see “Happy Together,” on page 20, for an example). In order to give you plenty of time to play the first melody notes, you can even play your first accompaniment chord at any time during the introduction; the instrument won’t start playing automatic chords and bass until the introduction is done.
At the end of the song, while the rhythm is running, press the INTRO./ENDING button again and a two-measure ending will bring the song to a perfect close. For a more dramatic finish, press INTRO./ENDING twice and the ending will slow down (ritardando) as it plays.
text_image
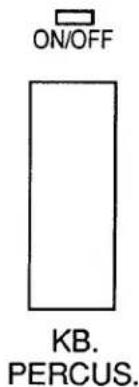
ON/OFF KB. PERCUS.When the KB. PERCUS. (keyboard percussion) button is on, the percussion sounds can be played from the keyboard rather than by the automatic rhythm. Pictures of the 33 percussion instruments appear above the keys of the keyboard to show you what key plays what sound. You can make any of the percussion sounds louder by pressing the accent (>) key at the same time you play a percussion key.
AUTO BASS CHORD
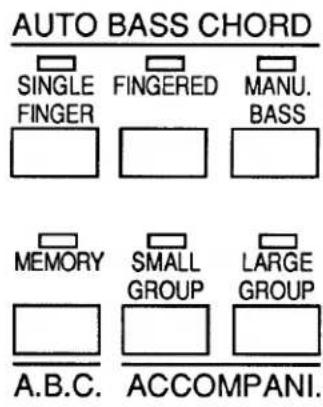
text_image
AUTO BASS CHORD SINGLE FINGER FINGERED MANU. BASS MEMORY SMALL GROUP LARGE GROUP A.B.C.ACCOMPANI.The AUTO BASS CHORD section of the control panel provides automatic accompaniment, enabling you to have a complete backup band at your fingertips. In includes accompaniment chords and bass lines that synchronize perfectly with whatever RHYTHM pattern you choose.
Automatic accompaniment is played in the leftmost part of the keyboard, which is labeled AUTO BASS CHORD. The names of the notes in this section are printed above the keys.
AUTO BASS CHORD provides three different ways to play automatic accompaniment: SINGLE FINGER chords, FINGERED chords, and MANUAL BASS. Let's learn about each system:
SINGLE FINGER
The SINGLE FINGER mode, as the name implies, permits you to play a complete accompaniment by pressing just one key in the AUTO BASS CHORD section of the keyboard. For example, if you wish to play a C chord, you simply need to press the key marked C in the AUTO BASS CHORD section; the instrument does the rest.
To play a C minor chord (Cm), press the C chord key together with the next black key to the left; To play a C seventh chord (C7), press the C chord key together with the next white key to the left; to play a C minor seventh chord (Cm7), press the C chord key together with the next black key and next white key to the left.
See page 32 for a complete chart of SINGLE FINGER chords.
FINGERED
In the FINGERED mode, you play all the notes of the chord you wish to hear. This system is particularly easy to use for those with previous keyboard experience, such as having taken piano lessons. For example, to play a C chord, you would press the keys G-C-E at the same time.
As with SINGLE FINGER chords, the FINGERED chords you play also provide automatic chord and bass patterns in the style of the RHYTHM pattern that is currently playing.
See page 32 for a complete chart of FINGERED chords.
MANU. BASS
MANU. (Manual) BASS enables you to play your own bass lines using the keys in the AUTO BASS CHORD section of the keyboard. When this button is on, the notes of this section sound one octave lower than normal; when a rhythm is running, the bass sound changes to suit the style of the rhythm pattern. Manual bass notes can be played only one at a time.
ADDITIONAL CONTROLS
MEMORY is automatically activated when either SINGLE FINGER or FINGERED is turned on. This feature allows you to remove your left hand from the keyboard as you move from one chord to the next, without interrupting the sound of the AUTO BASS CHORD accompaniment.
You can turn MEMORY off by pressing the button. When it is off, rhythm sounds continue to play when you lift your hand from the keyboard, but accompaniment chords and bass stop.
The SMALL GROUP and LARGE GROUP buttons enable you to change the size of your automatic backup band. Three different sizes of groups are available:
MEDIUM GROUP is the normal size band. This is the size that is active when you first turn the instrument on. In addition, when either SMALL GROUP or LARGE GROUP is on, you can return to MEDIUM GROUP by pressing the SMALL GROUP and LARGE GROUP buttons at the same time.
SMALL GROUP uses fewer instruments and accompaniment patterns that are less involved then the medium group.
LARGE GROUP uses more instruments and accompaniment patterns that are more involved then the medium group.
| RHYTHM | (Preset Tempo) | Additional Variation Above This Tempo | Additional Variation Below This Tempo |
| SWING | (74) | 110 | 60 |
| DIXIE | (90) | 110 | 60 |
| COUNTRY | (120) | 130 | 90 |
| REGGAE | (96) | 120 | 80 |
| ROCK 'N' ROLL | (120) | 140 | 100 |
| 16 BEAT | (84) | 100 | 76 |
| POPS | (92) | 130 | 80 |
| DISCO | (112) | 130 | 90 |
| WALTZ | (124) | 140 | 80 |
| MARCH/POLKA | (120) | 130 | 90 |
| BOSSA-NOVA | (120) | 140 | 110 |
| SAMBA | (102) | 120 | 90 |
| RHUMBA | (112) | 130 | 90 |
| SALSA | (90) | 110 | 70 |
| BAROQUE | (82) | 100 | 70 |
| SLOW ROCK | (72) | 90 | 60 |
C.S.P.
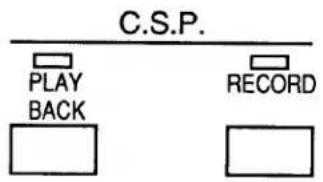
text_image
C.S.P. PLAY BACK RECORDThe C.S.P. (Chord Sequence Programmer) allows you to record and play back a “sequence” of chords. This is especially useful for practicing or playing difficult songs; record the chords first, then play them back automatically while you concentrate on playing the melody.
1. To record:
- Press the RECORD button.
The BEAT light will flash, and the metronome will sound, on every beat, to let you know the tempo.
At any time before you actually begin recording (even if you've already pressed the RECORD button), you can change any of the following:
Tempo.
RHYTHM pattern.
SINGLE FINGER or FINGERED chords.
MEMORY on or off.
Choice of SMALL, MEDIUM, or LARGE GROUP.
Whatever choices you make before actually starting to record will be chosen automatically when you press PLAY to play back the chords.
- Start recording.
You can do this in one of three ways:
- Press START.
-
Press INTRO./ENDING.
-
Play a chord in the AUTO BASS CHORD section of the keyboard.
- Record the chords of the song.
At any time during recording, you can change any of the settings listed above (tempo, rhythm, etc.). Any changes will be recorded along with the chords.
- When you reach the end of the song, stop the recording.
You can do this in one of three ways.
- Press RECORD again.
- Press START.
-
Press INTRO./ENDING once, or - for a RITARDANDO - twice.
-
To play back:
- Press the PLAY button.
The BEAT light will flash to let you know the tempo.
At any time after pressing PLAY and before actually beginning playback, you can change any of the following:
Tempo.
RHYTHM pattern.
Choice of SMALL, MEDIUM, or LARGE GROUP.
- Start playback.
You can do this in one of two ways:
-
Press START.
-
Play a key anywhere on the keyboard.
If you began recording by pressing INTRO./ENDING, the INTRO will begin playback.
Any changes you made during recording will play back at the appropriate times.
- When you reach the end of the song, playback will stop automatically. The PLAY button will remain on, so you can restart the chord sequence if you wish. Or you can press PLAY to turn it off.
- If you wish to stop playback before the end of a song, press either START or PLAY.
Your chord sequence remains in memory even when you turn off the power or unplug the instrument. But the chord sequence will remain in memory for only about seven days without power. To prolong the period of storage, turn the instrument on at least once every seven days.
TRANSPOSITION
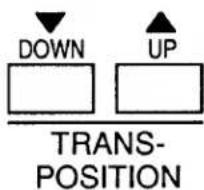
The TRANSPOSITION buttons allow you to change the pitch of the instrument to suit either a singing voice (so anyone can sing along as you play) or a transposing instrument (such as a B-flat trumpet or clarinet, or an E-flat saxophone).
Each press of the UP button raises the pitch by a half step, up to a maximum of six half steps higher than normal. Each press of the DOWN button lowers the pitch by a half step, down to a maximum of six half steps lower than normal. Pressing both buttons at the same time returns the instrument to normal pitch.
MIDI
Your Yamaha US-1000 is equipped with MIDI (Musical Instrument Digital Interface), which allows it to play, and be played by, other electronic musical instruments. There are two MIDI jacks, or ports, which are located under the right end of the keyboard.
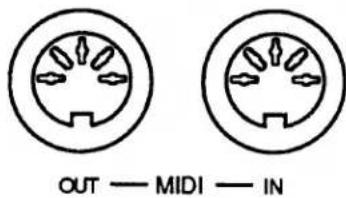
text_image
OUT — MIDI — INMIDI OUT sends musical information to another MIDI instrument. MIDI IN receives musical information from another instrument. It is important to understand that what is sent and received is information (e.g., “play middle C”) rather than sound. Thus, with MIDI, two instruments can play the same notes with different sounds.
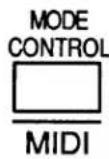
The MIDI MODE CONTROL button allows you to control the information that is sent and received by the MIDI ports. Pressing and holding this button in combination with certain other buttons on the control panel will allow you to make the changes described below.
Set MIDI Transmit Channel: MIDI MODE CONTROL + TRUMPET. MIDI messages can be transmitted over 16 different channels. After pressing TRUMPET and while still holding MIDI MODE CONTROL, pressing one of the 16 lowest keys on the keyboard will set the transmit channel of the US-1000 to the corresponding number, as confirmed by the display.
Set MIDI Receive Channel: MIDI MODE CONTROL + TROMBONE. After pressing TROMBONE and while still holding MIDI MODE CONTROL, pressing one of the 16 lowest keys on the keyboard will set the receive channel of the US-1000 to the corresponding number, as confirmed by the display. Pressing the 17th key will allow the US-1000 to receive on all channels.
Turn split send mode on or off: MIDI MODE CONTROL + BRASS & CHIMES. When the LED above BRASS & CHIMES is turned on, keys in the AUTO BASS CHORD section of the keyboard will transmit over MIDI channel 2 if SINGLE FINGER, FINGERED, or MANUAL BASS is on.
Turn transmission and reception of program changes off or on: MIDI MODE CONTROL + CLARINET. When the LED above CLARINET is on, the US-1000 will neither transmit nor receive program changes (instructions to change to another voice).
Set clock to external or internal: MIDI MODE CONTROL + STRINGS. When the LED above STRINGS is on, the tempo of the RHYTHM follows the MIDI clock pulse of an external unit, such as a sequencer or a drum machine. (If no external unit is being used, the RHYTHM will not run.) When the LED is off, you set the tempo using the TEMPO controls on the US-1000.
Turn local control off or on: MIDI MODE CONTROL + JAZZ ORGAN. When the LED above JAZZ ORGAN is on, the keyboard of the US-1000 will not play the internal sounds of the instrument. In this mode, the keyboard can control an external MIDI instrument, while an external keyboard or sequencer can play the US-1000 sounds.
Transmit C.S.P. data: MIDI MODE CONTROL + PIPE ORGAN. If there is a chord sequence stored in the C.S.P. when this button is pressed, the information will be transmitted as a "bulk data dump." This is most useful for transferring information to another US-1000. The display shows "____" while the transmission takes place.
MIDI IMPLEMENTATION CHART
Manufacturer YAMAHA
Model US-1000
| Function | Transmitted | Recognized | Remarks | |
| BASIC CHANNEL | Default Changed | 1 1-16 | 1 1-16 | |
| MODE | Default Messages | 3 X | 1 Omni On, Omni Off, Poly, Mono | |
| NOTE NUMBER | True Voice | 36-96 ***** | 36-96 36-96 | |
| VELOCITY | Note On Note Off | X 9nH, v=64 X 9nH, v=0 | X 9nH, v=64 X 9nH, v=0 | |
| TOUCH | Key's Chan's | X X | X X | |
| PITCH BENDER | X | X | ||
| CONTROL CHANGE | Volume Sustain | |||
| 7 64 | O O | O O | ||
| PROGRAM CHANGE | True # | O (0-15) ***** | O (0-127) (0-15) | |
| SYSTEM EXCLUSIVE | O | O | ||
| SYSTEM COMMON | Song Pos Song Sel Tune | X X X | X X X | |
| SYSTEM REAL TIME | Clock Messages | O O | O O | |
| AUX | Local Control All Notes Off Active Sense Reset | X X O X | O O O O | |
| NOTES: | ||||
Mode 1: OMNI ON, POLY
Mode 2: OMNI ON, MONO
O: Yes
Mode 3: OMNI OFF, POLY
Mode 4: OMNI OFF, MONO
X: No