SA-130 - Switch SYLVANIA - Free user manual and instructions
Find the device manual for free SA-130 SYLVANIA in PDF.

| Product Type | Switch |
| Brand | Sylvania |
| Model | SA-130 |
| Dimensions (approx.) | 1.5 x 1.5 x 0.75 inches |
| Weight | 0.05 lbs |
| Material | Plastic with metal contacts |
| Rated Voltage | 120-277 VAC |
| Rated Current | 15A |
| Switch Type | Single-pole, single-throw (SPST) |
| Function | On/Off control of lighting or other devices |
| Installation Method | Standard wall box mount |
| Terminal Type | Screw terminals for copper wire |
| Operating Temperature | -20°C to 60°C |
| Color | White (typical) |
| Certifications | UL listed, CSA certified |
| Warranty | 1 year limited warranty |
| Cleanliness | Wipe with dry cloth, avoid water |
| Safety Note | Turn off power at circuit breaker before installation |
| Spare Parts Availability | Contact Sylvania customer service |
Frequently Asked Questions - SA-130 SYLVANIA
User questions about SA-130 SYLVANIA
0 question about this device. Answer the ones you know or ask your own.
Ask a new question about this device
Download the instructions for your Switch in PDF format for free! Find your manual SA-130 - SYLVANIA and take your electronic device back in hand. On this page are published all the documents necessary for the use of your device. SA-130 by SYLVANIA.
USER MANUAL SA-130 SYLVANIA
Thank you for purchasing the SA 130 Digital Lamp Timer – an easy to set up and operate digital timer with 2 independent programmable timers with minimum 1 minute interval setting.
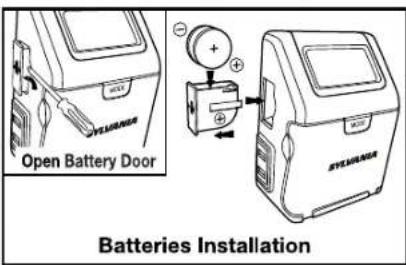
Battery Installation – The timer is shipped with 2 CR2032 batteries. Please follow below procedures for battery installation.
- Remove the timer from the wall socket.
- Using a small flat screwdriver, pry the battery holder open. The SA 130 uses two CR2032 batteries.
- Install two CR2032 batteries into the battery holder, making sure that the + and - polarities match up with the diagram printed on the unit.
- When the batteries are in place, press the battery holder back into its original position.
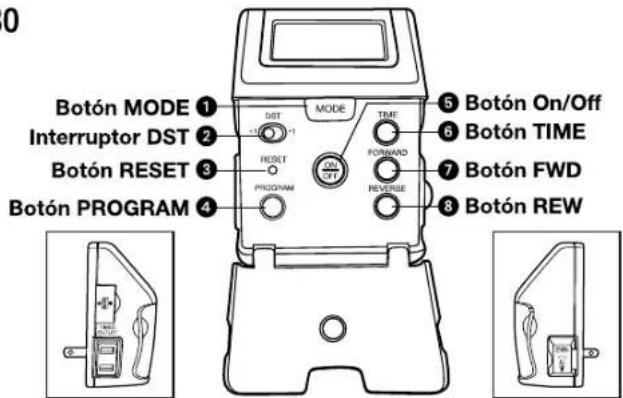
- If the timer is not running after batteries are installed, you may need to reset the timer. Using the point of a pencil, press the ③ RESET Button located on the front panel.
- Follow instructions below to set up timer.
Lamp Installation
The SA 130 has two receptacle outlets - one is an untimed extra outlet which always has power; the other is a timed outlet which is controlled by the SA 130 timer. Make sure to connect your lamp to the proper outlet. Please note that the total rating (untimed + timed outlet) of lamps/appliances connected to the timer must not exceed the SA 130 rating.
SET UP
Set the Clock
- Press and hold the ⑥ TIME Button until the display is flashing.
- Press and hold the 7 FWD Button to rapidly advance the time forward, or the 8 REV Button to rapidly change the time backward. Release button when the approximate correct time is displayed. PM Indicator is on the lower right corner of the display (there is no AM indicator).
Note: While pressing either 7 FWD or 8 REV Button the minutes will begin at a moderate pace, then get faster. This will assist you in setting the time quickly and accurately. - Press either the ⑦ FWD or ⑧ REV Button repeatedly until the correct time is displayed.
- Press the ⑥ TIME Button again or wait for approx. 10 seconds to exit time setting mode.
- Slide the ② DST Switch, to +1 to increase the current time 1 hour for daylight saving time. The DST Indicator is on the upper right corner of the display.
Set the Programmed Timers
SA 130 has 2 independent programmable timers.
- Press ① MODE Button until "PROGRAM 1" is displayed on the upper left corner of the display.
- Press and hold the Ⓐ PROGRAM Button until the display flashes.
- The display will change to show "ON" time for program-1 and flash. The On Icon ⚙ will appear. Use ⑦ FWD Button and ⑧ REV Button to adjust ON time.
- Press the ④ PROGRAM Button again or wait for approx. 10 seconds, it will change to display "OFF" time. The Off Icon ✗ will appear. Use ⑦ FWD Button and ⑧ REV Button to adjust the OFF time.
- Press the 4 PROGRAM Button once more or wait for approx. 10 seconds to return to normal mode. Display will change back to show real time.
- To program 2nd timer, just follow step 1-5 but press Ⓛ MODE Button until "PROGRAM 2" is displayed.
Timer Operation
Activating the Timer
- After programming the timer, you need to activate it.
- Press ① MODE Button until "PROGRAM 1", "PROGRAM 2" or "PROGRAM 12" is displayed to activate timer program 1, 2 or both.
- Press ① MODE Button until "OFF" is showing to disable both timers.
NOTE: Make sure to test that the power switch on your lamp/appliance is in the ON position before you plug it into the timed outlet.
Manual Override
To override the On or Off settings, press 5 On/Off Button. To activate 5 On/Off Button, you can push on the hinged front cover. The override setting will change at the next timed event.
Ratings: Total load: 15 Amp Resistive and Inductive, 5 Amp Tungsten, 120VAC, 60Hz.
Rated impulse voltage: 1500V
Type 1.B control action

SAFETY WARNING
Risk of electric shock
• Do not open or tamper with unit.
- Plug directly into an electric outlet
- For indoor use only
- Remove timer from outlet before cleaning
• Do not use in wet or damp areas
- Keep children away from timer & outlet
Risk of fire
- Do not use to control irons and cooking appliances, etc.
- Do not exceed the recommended electrical ratings
WARNINGS:
DO NOT USE THE TIMER TO TURN OFF POWER FOR MAINTENANCE (repairs, removing broken bulbs, etc.). ALWAYS TURN POWER OFF AT THE SERVICE PANEL BY REMOVING A FUSE OR CIRCUIT BREAKER BEFORE DOING ANY CIRCUIT REPAIRS.
For questions or comments regarding this or other products, please call our toll free number 1-888-548-4484
Modelo: SA 130