
ESX - Keyboard KAWAI - Free user manual and instructions
Find the device manual for free ESX KAWAI in PDF.


| Product Type | Digital Piano / Keyboard |
| Brand | Kawai |
| Model | ESX |
| Keyboard Action | Weighted hammer action with 88 keys |
| Touch Sensitivity | Multiple levels (Light, Normal, Heavy) |
| Sound Engine | Harmonic Imaging with multi-sampling |
| Polyphony | 192 notes |
| Number of Sounds | 20+ preset sounds including piano, organ, strings |
| Speakers | Built-in stereo speaker system |
| Dimensions (W x D x H) | 1320 x 300 x 170 mm |
| Weight | 19.5 kg |
| Power Supply | AC adapter (12V DC, included) |
| Power Consumption | 15 W |
| Connectivity | USB-MIDI, line out, headphone jack (2), sustain pedal input |
| Pedal | Damper pedal with half-pedal support |
| Accessories Included | Music rest, power adapter, quick start guide |
| Maintenance & Cleaning | Wipe with a soft, dry cloth; avoid liquids and abrasives |
| Safety Precautions | Do not use near water; unplug during storms; keep away from heat sources |
| Spare Parts & Repairability | Contact Kawai authorized service center for genuine parts |
Frequently Asked Questions - ESX KAWAI
User questions about ESX KAWAI
0 question about this device. Answer the ones you know or ask your own.
Ask a new question about this device
Download the instructions for your Keyboard in PDF format for free! Find your manual ESX - KAWAI and take your electronic device back in hand. On this page are published all the documents necessary for the use of your device. ESX by KAWAI.
USER MANUAL ESX KAWAI
Thank you for choosing this Kawai ES-X Digital Piano.
Your new ES-X is a high-quality instrument offering the very latest in leading-edge music technology. This manual contains valuable information that will help you make full use of your ES-X's many capabilities. Please read it carefully and keep it handy for further reference.
TABLE OF CONTENTS
Page
Important Safety Instructions 3
Part Names 6
Getting Started
- Basic Operations.... 8
- Transpose 9
- Touch Response 9
Digital Recording Functions
- Easy Recording.... 10
- Playing Back A Song 10
- Advanced Recording/Playback Functions ..... 11
- Deleting A Song/Track 13
Function Mode
- Tuning.... 14
- MIDI Channel Select 14
- MIDI Local Control On/Off 15
- Multi-Timbral Mode On/Off 15
- Transmit MIDI Program Change On/Off 16
MIDI 17
PROGRAM CHANGE NUMBER MAPPING 19
SPECIFICATIONS....20
MIDI IMPLEMENTATION CHART.... 21
Important Safety Instructions
SAVE THESE INSTRUCTIONS
INSTRUCTIONS PERTAINING TO A RISK OF FIRE, ELECTRIC SHOCK, OR INJURY TO PERSONS


WARNING
TO REDUCE THE RISK OF FIRE OR ELECTRIC SHOCK, DO NOT EXPOSE THIS PRODUCT TO RAIN OR MOISTURE.
AVIS : RISQUE DE CHOC ELECTRIQUE - NE PAS OUVRIR.
TO REDUCE THE RISK OF ELECTRIC SHOCK, DO NOT REMOVE COVER (OR BACK). NO USER-SERVICEABLE PARTS INSIDE. REFER SERVICING TO QUALIFIED SERVICE PERSONNEL.

The lighting flash with arrowhead symbol, within an equilateral triangle, is intended to alert the user to the presence of uninsulated "dangerous voltage" within the product's enclosure that may be of sufficient magnitude to constitute a risk of electric shock to persons.

The exclamation point within an equilateral triangle is intended to alert the user to the presence of important operating and maintenance (servicing) instructions in the literature accompanying the product.
Examples of Picture Symbols
 | denotes that care should be taken.The example instructs the user to take care not to allow fingers to be trapped. |
 | denotes a prohibited operation.The example instructs that disassembly of the product is prohibited. |
 | denotes an operation that should be carried out.The example instructs the user to remove the power cord plug from the AC outlet. |
Read all the instructions before using the product.
WARNING - When using electric products, basic precautions should always be followed, including the following.

WARNING
Indicates a potential hazard that could result in death or serious injury if the product is handled incorrectly.
The product should be connected to an AC outlet of the specified voltage.


● Use the AC adapter supplied with the product or one recommended by Kawai.
- If you are going to use an AC power cord, make sure that its has the correct plug shape and conforms to the specified power voltage.
● Failure to do so may result in fire.
Do not insert or disconnect the power cord plug with wet hands.

Doing so may cause electric shock.
When using the headphones, do not listen for long periods of time at high volume levels.

Doing so may result in hearing problems.
Do not disassemble, repair or modify the product.


Doing so may result in product breakdown, electric shock or short-circuit.
When disconnecting the AC power cord's plug, always hold the plug and pull it to remove it.


● Pulling the AC power cord itself may damage the cord, causing a fire, electric shock or short-circuit.
If the product will not be used for a long time, unplug the AC power cord from the AC outlet.

● Failure to do so may cause fire in case of lightning.
● Failure to do so may over-heat the product, resulting in fire.
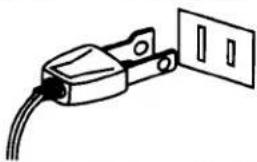
This product may be equipped with a polarized line plug (one blade wider than the other). This is a safety feature. If you are unable to insert the plug into the outlet, contact an electrician to replace your obsolete outlet. Do not defeat the safety purpose of the plug.

CAUTION
Indicates a potential hazard that could result in injury or damage to the product or other
Do not use the product in the following areas.
● Areas, such as those near windows, where the product is exposed to direct sunlight
● Extremely hot areas, such as near a heater
● Extremely cold areas, such as outside
● Extremely humid areas
● Areas where a large amount of sand or dust is present
● Areas where the product is exposed to excessive vibrations
Using the product in such areas may result in product breakdown.
Before connecting cords, make sure that the power to this product and other devices is turned OFF.


Failure to do so may cause breakdown of this product and other devices.
Take care not to allow any foreign matter to enter the product.


Entry of water, needles or hair pins may result in breakdown or short-circuit.
Do not drag the product on the floor. Take care not to drop the product.

Please lift up the product when moving it. Please note that the product is heavy and must be carried by more than two persons. Dropping the product may result in breakdown.
Do not place the product near electrical appliances such as TVs and radios.

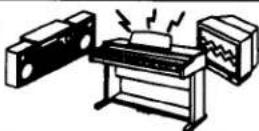
● Doing so may cause the product to generate noise.
- If the product generates noise, move the product sufficiently away from the electrical appliance or connect it to another AC outlet.
When connecting the AC power cord and other cords, take care not to get them tangled.

Failure to do so may damage them, resulting in fire, electric shock or short-circuit.
Do not wipe the product with benzene or thinner.

● Doing so may result in discoloration or deformation of the product.
- When cleaning the product, put a soft cloth in lukewarm water, squeeze it well, then wipe the product.
Do not stand on the product or exert excessive force.

● Doing so may cause the product to become deformed or fall over, resulting in breakdown or injury.
The product should be located so that its location or position does not interfere with its proper ventilation.
The product should be serviced by qualified service personnel when:
● The power supply cord or the plug has been damaged.
- Objects have fallen, or liquid has been spilled into the product.
● The product has been exposed to rain.
● The product does not appear to operate normally or exhibits a marked change in performance.
● The product has been dropped, or the enclosure damaged.
Notes on Repair
Should an abnormality occur in the product, immediately turn the power OFF, disconnect the power cord plug, and then contact the shop from which the product was purchased.
- This digital piano is for household use and is not intended for commercial use.
CAUTION:
To prevent electric shock, match wide blade of plug to wide slot, fully insert.
ATTENTION:
Instruction for AC power cord (U.K.)
Do not plug either terminal of the power cord to the ground of the AC outlet on the wall.
FCC Information
This equipment has been tested and found to comply with the limits for a Class B digital device, pursuant to Part 15 of the FCC Rules. These limits are designed to provide reasonable protection against harmful interference in a residential installation. This equipment generates, uses and can radiate radio frequency energy and, if not installed and used in accordance with the instructions, may cause harmful interference to radio communications.
If this equipment does cause harmful interference to radio or television reception, which can be determined by turning the equipment off and on, the user is encouraged to try to correct the interference by one or more of the following measures:
- Reorient or relocate the receiving antenna.
- Increase the separation between the equipment and receiver.
- Connect the equipment into an outlet on a different electrical circuit from the receiver.
- Consult the dealer or an experienced radio/TV technician for help.
Canadian Radio Interference Regulations
This instrument complies with the limits for a class B digital apparatus, pursuant to the Radio Interference Regulations, C.R.C., c. 1374.
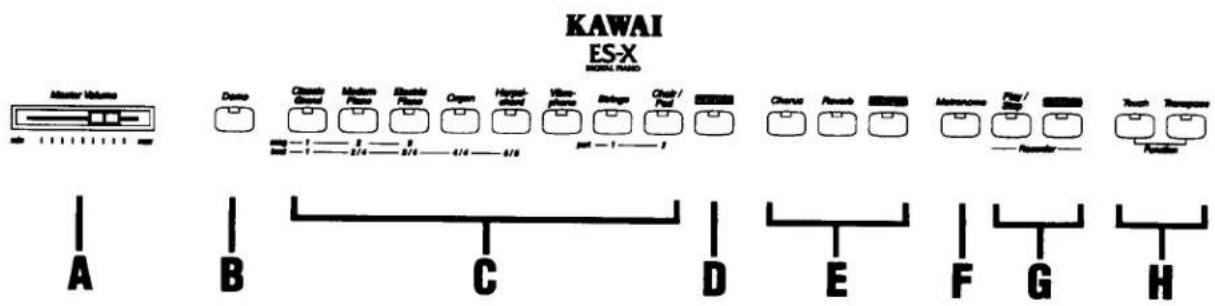
Master Volume Slider (A)
Move the volume slider to the right to increase the instrument's volume. Move the slider to the left to decrease the volume.
Demo Button (B)
The ES-X piano has 8 built in demonstration songs for your listening enjoyment.
Press this button and the demo for Classic Grand will start. When the Classic Grand demo is finished, the ES-X piano will play all the other demos one at a time in random order. To select a specific demo, press the desired Sound button while the demo is playing. To stop the demo, press this button again.
Sound Buttons (C)
Select the desired instrument by pressing the appropriate button.
Variation Button (D)
To select the variation sound, press this button. When you select variation sound, the LED indicator will be turned on.
Effect Buttons (E)
These buttons add effects (Chorus, Reverb, EQ) to any sound which enhances the tonal quality and improves the acoustical realism. See page 8 for details.
Metronome Button (F)
Press this button to start metronome. Pressing again will stop metronome. To change the beat or tempo, see page 10.
Recorder Buttons (G)
You can record and play back up to three songs.
-Play/Stop button: Used to play back and stop a recorded song.
-Rec button: Used to start recording a song.
Function Buttons (H)
Use these buttons to select a touch type, transpose the keyboard, or control other features (including MIDI functions). See page 14 for details.
FRONT PANEL
AC Adaptor Jack (I)
Connect the enclosed AC adaptor to this jack.
POWER Button (J)
This button turns the instrument on and off. Be sure to turn off the instrument when you are finished playing.
MIDI Jacks (K)
Use these jacks to connect the ES-X piano with external MIDI devices.
COMPUTER Interface (L)
This jack is used to connect with a personal computer and exchange MIDI data. Select the proper setting for your computer using the selector. PC1: NEC Computers, PC2: IBM PC & compatibles, Mac: Apple Computers, MIDI: Serial Interface disabled. Select this setting when using the MIDI jacks.
PEDAL Jack (M)
Connect the enclosed F-1r pedal to this jack. You can also connect the optional F-2r pedal.
SPEAKER Switch (N)
This switch turns the buil-in speakers on and off.
LINE IN STEREO Jack (0)
Connect a CD player etc. with stereo mini plug.
LINE OUT Jacks (P)
Connect an external amplifier and speakers, or a cassette recorder to these jacks.
PHONES Jacks (Q)
Used to connect up to two headphones to the ES-X piano.
JACKS

1. BASIC OPERATIONS
(1) Turn on the power.
(2) Adjust the volume.
Play a note on the keyboard and adjust the volume (Moving the slider to the right raises the volume while moving to the left lowers it.)
(3) Choose a sound.
Pressing a Sound button automatically changes the sound made by the ES-X piano. The LED indicator of the selected sound button will light to indicate which sound is currently in being used. -There is a variation for each of the eight sounds. Press the Variation button to select a variation sound. The Variation button LED will light to indicate a variation sound is selected.
(4) Play.
Experiment by playing the different sounds.
(5) Dual
With DUAL mode you can layer two sounds together. To layer two sounds, press the Sound buttons for both sounds simultaneously. The maximum polyphony will be reduced to 16 notes.
(6) Effect
-Chorus adds a deep richness to any sound.
To turn on the Chorus effect, press the Chorus button. The LED indicator of the Chorus button will be lit to indicate the Chorus effect is now on.
Pressing the Chorus button once again turns the Chorus "OFF".
-Reverb adds reverberation to the sound simulating the acoustic environment of a recital room, stage, or concert hall.
There are three types of Reverb in the ES-X. They are Room, Stage and Hall. To change the Reverb type, press one of the following Sound buttons while holding down the Reverb button.
| Classic Grand | Room |
| Modern Piano | Stage |
| Electric Piano | Hall |
The Reverb is "ON" when the LED indicator of the Reverb button is lit.
Pressing the REVERB button once again turns the Reverb "OFF".
When the power is turned on, the REVERB function is automatically activated.
-EQ changes overall sound character of the ES-X piano. There are two types of EQ setting. To change the EQ type, press one of the following Sound buttons while holding down the EQ button.
| Classic Grand | EQ 1 |
| Modern Piano | EQ 2 |
EQ OFF is recommended for normal playing circumstances like in living room or classroom.
EQ 1 is recommended when you play with the ES-X piano facing a wall.
EQ 2 is recommended when you play the ES-X piano using external speakers or for recording.
2. TRANSPOSE
(1) Press and hold down the Transpose button. The LED indicator of the current key button (Sound button) will flash while holding down the Transpose button.
(2) While holding down the Transpose button, press the key button (Sound button) for the key you would like to transpose to. To select a key with a "sharp" or "flat", simultaneously press the buttons on either side of that key. For example, simultaneously pressing the "D" and "E" buttons selects "E-flat".
(3) Release the Transpose button. The Transpose LED will light and the piano will be transposed to your desired key. If the key of "C" is selected the Transpose button will not light. (When power is first turned "on", the key is set to C.)
(4) To turn off the Transpose function, press the Transpose button again. The Transpose LED will go off and the key of the piano will return to C.


3. TOUCH RESPONSE
When playing a piano, the volume of the sound produced increases in direct relation to how hard a key is struck. The ES-X piano offers the realistic feel of an acoustic piano for practicing music. The Touch Response function simulates the standard touch of an acoustic piano when the Touch LED is off. When the Touch LED is lit, you can select other Touch Types.
LIGHT: For those still developing finger strength, such as a child, a louder sound is produced even when the piano is played with a soft touch.
HEAVY: Perfect for those with strong fingers or for practicing with a hard touch.
CONSTANT: For tone colors like organ or harpsichord, and for playing some contemporary music with the piano sound, a constant loud sound is produced regardless of your force on the keys.
(1) To select the "LIGHT", "HEAVY" or "CONSTANT" Touch Type, press one of the following Sound buttons while holding down the Touch button.
Classic Grand: Selects the "LIGHT" Touch Type
Modern Piano: Selects the "HEAVY" Touch Type
Electric Piano: Selects the "CONSTANT" Touch Type
(2) When the Touch LED is off, the "NORMAL" Touch Type is automatically selected. When an alternative touch type is selected using the above procedure, the Touch LED will light. The Touch button is a toggle switch. Pressing the button turns on the LED. Pressing it a second time turns off the LED.
1. EASY RECORDING
(1) Press the Rec button. The ES-X piano will be ready for recording. To cancel the recording, press the Rec button again.
(2) Begin playing some music on the piano. The ES-X piano will automatically start recording with the first note you play. You can also start recording by pressing the Play/Stop button.
(3) Press the Play/Stop button when you have finished recording.

NOTE:
Starting another recording will delete the song you previously recorded. To save your recorded song, record another song using the "ADVANCED RECORDING/PLAYBACK FUNCTIONS" section.
METRONOME/SELECT TIME AND TEMPO
The ES-X piano's metronome function can help you record a song by providing a steady beat for you to play along with. The metronome beats however, are not recorded.
(1) To start the metronome, press the Metronome button. You can change the beat (time signature) of the metronome. The ES-X piano has five beats (time signatures) to choose from 1, 2/4, 3/4, 4/4, and 6/8. While holding down the Metronome button, select the desired beat (time signature) of the metronome by pressing the Sound button assigned to that beat (time signature).
(2) To adjust the tempo, press the leftmost "A" key while holding down the Metronome button to make the tempo slower or press the leftmost "B" key while holding down the Metronome button to make the tempo faster. You can also enter the tempo by number. Press the appropriate number keys shown on page 14 while holding down the Metronome button. (Please refer to the enclosed key slip sticker.)
(3) To turn off the metronome function, press the Metronome button and the metronome will stop.
2. PLAYING BACK A SONG
(1) Press the Play/Stop button. The song will be played back using the same sound with which it was recorded.
(2) Press the Play/Stop button once again to stop the playback. If you do not press the Play/Stop button, playback will automatically stop when the song is finished.
You can adjust the tempo of playback. Before pressing the Play/Stop button, use the same procedure of adjusting metronome tempo. (See (2) of the previous section.) Once you adjust the tempo, turn off the metronome and press Play/Stop button.
3. ADVANCED RECORDING/PLAYBACK FUNCTIONS
The ES-X piano can record and store a maximum of 3 songs. Please follow the steps below to save your songs:
(1) While holding down the Rec button, press the Modern Piano (song 2) button. The LED will flash to show the current song number (while the Rec button is held down). The piano will be ready to record song 2. To cancel without recording, press the Rec button again.
(2) Play the piano. Playing the piano will automatically start the recording. You can also start recording by pressing the Play/Stop button.
(3) Press the Play/Stop button after you have finished recording.
(4) Press the Play/Stop button. The song No.2 will be played back.
(5) If you want to listen to song 1, hold down Play/Stop button and press Classic Grand (song 1) button. Releasing the Play/Stop button will start playback of song 1.
The ES-X piano can record the parts played by the left or right hand and play back these parts separately or simultaneously. This function can be enjoyed in different ways. For example, you can practice the right-hand part of the song while playing back the recorded left-hand part, or record the melody part of the song while playing back the previously recorded accompaniment.
(1) While holding down the Rec button, press the Electric Piano (song 3) button to select song No.3. Part 1 of song No.3 will be selected and the ES-X piano will be ready to record. To cancel without recording, press the Rec button again.
(2) Play the piano with your left hand. Playing the piano will automatically start the recording. You can also start recording by pressing the Play/Stop button.
(3) Press the Play/Stop button after you have finished recording.
(4) Now, to play back the left-hand part, press the Play/Stop button. The left-hand part you have recorded (part 1 of song No.3) will be played back. You can practice the right-hand part along with the recorded part.
(5) Let's record the right-hand part while listening to the left-hand part. While holding down the Rec button, press the Choir/Pad (part 2) button. The part 1 LED will light and the part 2 LED will flash to indicate that the piano is ready to record. To cancel without recording, press the Rec button again.
(6) Now play the right-hand part. Pressing any key will start play back of the recorded left-hand part (part 1) while you play (and record) the right-hand part. You can also start recording by pressing the Play/Stop button. After pressing the Play/Stop button the left-hand part will begin playing back, you can then begin playing (recording) the right hand part from any point in the song you like.
(7) Press the Play/Stop button after you have finished recording.
PLAYING BACK THE LEFT- AND RIGHT-HAND PARTS SEPARATELY
After you have recorded the left- and right-hand parts (part 1 and part 2) separately, it is possible to play back the two parts by themselves or together. The following example shows how to play back only part 2.
(1) Select and press one of the song buttons (Classic Grand/song 1, Modern PianoO/song 2 or Electric Piano/song 3) while pressing the Play/Stop button.
(2) While holding down the Play/Stop button, press the Strings/part 1 button. The Strings/part 1 button LED will be turned "off". If you need to turn part 1 back "on", press the String/part 1 button once again.
(3) Releasing Play/Stop button will play back only part 2.
4. DELETING A SONG/TRACK
This function allows you to delete songs that were not recorded correctly or songs that you do not want to listen to any more.
(1) Simultaneously hold down the Play/Stop and Rec buttons.
(2) The LEDs will light to show you where songs have been recorded.
While holding down both the Play/Stop and Rec buttons, press the song button that corresponds to the song you want to delete.
(3) While still holding down both the Play/Stop and Rec buttons, press the part button that you want to delete and turn the LED of that part button off.
(4) Releasing all the buttons will delete the specified song or part.
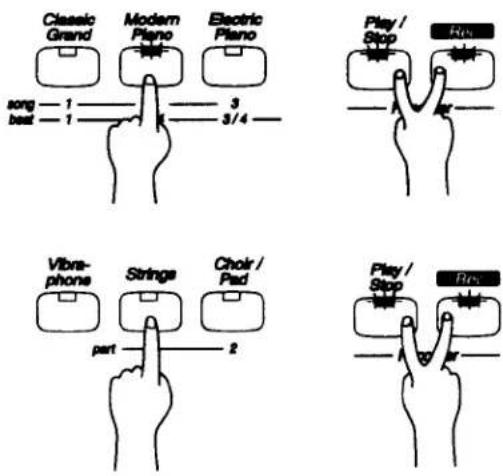
To delete more than one song, repeat (1) to (4).
NOTE:
- The total memory capacity of the recorder is approximately 1,800 notes. When the recorder reaches its maximum capacity, the es1 piano will stop recording at this point. Any data recorded before the interruption will be retained.
- The recorder memory will be saved after turning off the power. However, memory may be lost if the power remains off for more than 10 days.
- To delete all recorded songs (reset), first turn the power off and then turn it back on again while holding down both the Play/Stop and Rec buttons.
The Function Mode gives you access to many other useful features on your ES-X piano. To enter the Function Mode, press the Touch and Transpose buttons simultaneously. The LED indicators for both buttons will start flashing. To exit the Function Mode, press either Touch or Transpose button. The following functions can be selected in the Function Mode by pressing the appropriate key:
TUNING
MIDI CHANNEL SELECT
This function allows you to adjust the piano's pitch to match recordings or other instruments in an ensemble.
(1) Press the "Tuning" key while the LED indicators for Touch and Transpose buttons are flashing.
(2) Use the -/+ keys to lower/raise the pitch by 0.5Hz. Or you can directly enter the center A pitch as a three digit number by using the number keys. (EX: 440)
2. MIDI CHANNEL SELECT
In order to exchange MIDI information with another MIDI instrument, you must first set the two connected instruments to the same channel.
(1) Press the "MIDI ch" key while the LED indicators for Touch and Transpose buttons are flashing.
(2) Use the -/+ keys to lower/raise the MIDI channel number. Or you can directly enter the MIDI channel number as a two digit number by using the number keys.
EX: For CH 1 press the 0 key then the 1 key.
For CH 12 press the 1 key then the 2 key.
When the power is first turned on, the ES-X piano always selects channel 1.
This function is used to control whether or not the sound from the piano will be heard when you play the keyboard. When MIDI LOCAL CONTROL is set to on you will hear the ES-X piano when you play. When MIDI LOCAL CONTROL is set to off you will not hear any sound from the ES-X piano when you play but the ES-X piano's keyboard data will be transmitted through the MIDI jacks to an external MIDI device.
(1) Press the "Local" key while the LED indicators for Touch and Transpose buttons are flashing.
(2) If you press the “-” key, this function is set to “off”. If you press the “+” key, this function returns to “on”.
4. TURNING MULTI-TIMBRAL MODE ON/OFF
Normally, the procedure described in the MIDI CHANNEL SELECT section is used to transmit or receive data on only one MIDI channel (any one of 1 through 16). But by turning the MULTI TIMBRAL function "on", you can receive data on more than one MIDI channel and simultaneously play a different sound on each channel. With this feature, you can use a sequencer such as the Kawai Q-80EX or DRP-10 to create performances with a variety of timbres on the ES-X piano. The term "Multi Timbral" is derived from the ability to play multiple timbres simultaneously.
NOTE:
You can assign any sound of the ES-X piano to any channel in the way you like by sending the correct Program Change Number to the ES-X piano from an external MIDI device. Please refer to the list on page 19 for assignment of sound and program number.
(1) Press the "Multi" key while the LED indicators for Touch and Transpose buttons are flashing.
(2) If you press the "+" key, this function is set to "on". If you press the "-" key, this function returns to "off".
When power is first turned on, the MULTI-TIMBRAL MODE setting is always off.
5. TRANSMIT MIDI PROGRAM CHANGE ON/OFF
You can use 8 Sound buttons and Variation button to transmit Program Change Numbers via MIDI. Please refer to the list on page 19 for assignment of sound and program number.
(1) Press the "Trans prg" key while the LED indicators for Touch and Transpose buttons are flashing.
(2) If you press the “-” key, this function is set to “off” and the ES-X piano does not transmit the program change data corresponding to the sound selected on the panel. If you press the “+” key, this function returns to “on” and selecting a sound will transmit the data.
When the power is first turned on, the TRANSMIT MIDI PROGRAM CHANGE function is always "on".
The term MIDI is an acronym for Musical Instrument Digital Interface, an international standard for connecting synthesizers, sequencers (digital recorders) and other electronic instruments so that they can exchange performance data.
The ES-X is equipped with two MIDI jacks for exchanging data: MIDI IN and MIDI OUT. Each uses a special cable with a DIN connector.
MIDI IN : For receiving note, program change and other data.
MIDI OUT : For sending note, program change and other data.
MIDI EXAMPLES
(1) Connection to another MIDI compatible keyboard or sound generator module
When connected as shown in the illustration, data on how the digital piano is played (which keys are struck) can be sent to another MIDI instrument. Plus, the sound from the ES-X can be layered over the sound of the other instrument.

Layering Sounds

(2) Connection to an external sequencer and sound generator module
When connected as shown in the illustration, you can record songs played on the ES-X with a sequencer, and use the ES-X's sounds (such as piano, harpsichord and vibraphone, etc.) controlled by the ES-X's MULTI-TIMBRAL MODE function to create a multi-layer MIDI recording.
In case you use the KAWAI DRP-10 or ACR-20, you can play its tones from the keyboard of the ES-X.
![graph TD A["ES-X"] -->|IN MIDI OUT| B["MIDI cable"] C["DRP-10"] -->|MIDI OUT| B D["MIDI IN"] -->|MIDI OUT| B B --> E["DRP-10"]](/content/2026/05/1070916/images/00f16b2339b3d34d21d91291ad50f147d4afbf488ef864b6e7e9c96b9e69dfd9.jpg)
Program Change Number Mapping
| Sound Button | Program Number | |
| When Multi-Timbral mode is ON | When Multi-Timbral mode is OFF | |
| Classic Grand | 1 | 1 |
| (Variation) | 4 | 9 |
| Modern Piano | 2 | 2 |
| (Variation) | 3 | 10 |
| Electric Piano | 5 | 3 |
| (Variation) | 6 | 11 |
| Organ | 20 | 4 |
| (Variation) | 18 | 12 |
| Harpsichord | 7 | 5 |
| (Variation) | 8 | 13 |
| Vibraphone | 12 | 6 |
| (Variation) | 13 | 14 |
| Strings | 49 | 7 |
| (Variation) | 45 | 15 |
| Choir/Pad | 53 | 8 |
| (Variation) | 89 | 16 |
| Keyboard | 88 Weighted Keys with Hammer Mechanism |
| Touch Type | 4 Types (Normal, Light, Heavy, Constant) |
| Max Polyphony | 32 Notes |
| Sounds | 16 Sounds |
| Effects | Chorus, Reverb (Room, Stage, Hall), EQ (1, 2) |
| Digital Recorder | 3-Song, 2-Part, 1,800-Notes |
| Other Functions | Transpose, Tuning, MIDI Functions, 8 Demo Songs |
| Jacks | Headphones x 2, PEDAL, MIDI IN/OUT, LINE IN (STEREO), LINE OUT (L/MONO, R), PC Interface |
| Speakers | (12 cm x 8 cm) x 2, 7 W x 2 |
| Dimensions | 135.4 x 31.9 x 12.7 (cm), 53" x 13" x 5" |
| Weight | 18.3 kg (40.3 lbs.) |
Specifications are subject to change without notice.
MIDI IMPLEMENTATION CHART
KAWAI DIGITAL PIANO
MODEL: ES-X
Date: January 2001
Version: 1.0
| FUNCTION | TRANSMITTED | RECEIVED | REMARKS |
| Basic Channel(Default)(Changed) | 11-16 | 11-16 | |
| Mode (Default)(Message)(Altered) | 3x********** | 11, 3* | *Omni Off by settingMIDI channel |
| Note Number(True Voice) | 15-113*********** | 0-12715-113 | *with Transpose |
| Velocity(Note ON)(Note OFF) | O: 9nH v=1-127x: 8nH v=0 | Ox | |
| After TouchKey'sChannel's | xx | xx | |
| Pitch Bend | x | x | |
| Control Change76467 | xO (Right pedal)O (with F-2r pedal) | OOO | VolumeDamper pedalSoft pedal |
| Program ChangeTrue | O********** | O | |
| System Exclusive | O | O | |
| Common(Song Position)(Song Select)(Tune) | xxx | xxx | |
| System: Real Time(Clock)(Commands) | xx | xx | |
| Others(Local ON/OFF)(All Notes OFF)(Active Sense)(Reset) | xxx | OO*O*x | *When Multi-Timbral mode is On |
| Mode 1: OMNI ON, POLY Mode 2: OMNI ON, MONOMode 3: OMNI OFF, POLY Mode 4: OMNI OFF, MONO | |||
KAWAI
ES-X Owner's Manual
OM956E-L
Printed in Japan
- TABLE OF CONTENTS
- PAGE
- GETTING STARTED
- DIGITAL RECORDING FUNCTIONS
- FUNCTION MODE
- IMPORTANT SAFETY INSTRUCTIONS
- SAVE THESE INSTRUCTIONS
- WARNING
- AVIS : RISQUE DE CHOC ELECTRIQUE - NE PAS OUVRIR
- CAUTION
- NOTES ON REPAIR
- ATTENTION
- INSTRUCTION FOR AC POWER CORD (U.K.)
- FCC INFORMATION
- CANADIAN RADIO INTERFERENCE REGULATIONS
- MASTER VOLUME SLIDER (A)
- DEMO BUTTON (B)
- SOUND BUTTONS (C)
- VARIATION BUTTON (D)
- EFFECT BUTTONS (E)
- METRONOME BUTTON (F)
- RECORDER BUTTONS (G)
- FUNCTION BUTTONS (H)
- FRONT PANEL
- AC ADAPTOR JACK (I)
- POWER BUTTON (J)
- MIDI JACKS (K)
- COMPUTER INTERFACE (L)
- PEDAL JACK (M)
- SPEAKER SWITCH (N)
- LINE IN STEREO JACK (0)
- LINE OUT JACKS (P)
- PHONES JACKS (Q)
- JACKS
- BASIC OPERATIONS
- TRANSPOSE
- TOUCH RESPONSE
- EASY RECORDING
- NOTE
- METRONOME/SELECT TIME AND TEMPO
- PLAYING BACK A SONG
- ADVANCED RECORDING/PLAYBACK FUNCTIONS
- PLAYING BACK THE LEFT- AND RIGHT-HAND PARTS SEPARATELY
- DELETING A SONG/TRACK
- MIDI CHANNEL SELECT
- TURNING MULTI-TIMBRAL MODE ON/OFF
- TRANSMIT MIDI PROGRAM CHANGE ON/OFF
- MIDI EXAMPLES
- CONNECTION TO ANOTHER MIDI COMPATIBLE KEYBOARD OR SOUND GENERATOR MODULE
- CONNECTION TO AN EXTERNAL SEQUENCER AND SOUND GENERATOR MODULE
- MIDI IMPLEMENTATION CHART
- KAWAI
Brand : KAWAI
Model : ESX
Category : Keyboard