
HS22 - Keyboard KAWAI - Free user manual and instructions
Find the device manual for free HS22 KAWAI in PDF.


| Product Type | Digital Piano |
| Brand | Kawai |
| Model | HS22 |
| Series | Heritage Series |
| Keyboard | 88 weighted keys with hammer mechanism |
| Polyphony | 64 notes |
| Preset Tones | 18 (9 sounds with variations) |
| Effects | Reverb (Room, Stage, Hall, 3D Room, 3D Hall), Chorus, Delay (3 types), Tremolo, Rotary |
| Temperaments | 9 types including Equal, Pure, Pythagorean, Meantone, Werckmeister, Kirnberger |
| Recorder | 2 tracks, 5 songs, approximately 5000 notes capacity |
| Pedals | Sustain, Sostenuto, Soft |
| Concert Magic | 88 preset songs, playable by tapping any key |
| Audio Output Power | 40 W x 2 |
| Speakers | 6" x 9" (2), 2" x 3.5" (2) |
| Power Consumption | 120 W |
| Dimensions (W x D x H) | 55 3/4" x 21" x 43 1/4" (142 x 53 x 110 cm) |
| Weight | 165 lbs (75 kg) |
| Finishes | Cherry, Oak |
| Jacks | Headphone (2), LINE IN (L,R), LINE OUT (L/MONO,R), MIDI (IN, OUT, THRU), Computer Interface |
| Maintenance | Clean with a soft cloth dampened with lukewarm water; do not use benzene or thinner. |
| Safety | Follow all safety instructions; do not disassemble; unplug during lightning or long non-use. |
| Reparability | No user-serviceable parts; refer servicing to qualified personnel. |
Frequently Asked Questions - HS22 KAWAI
User questions about HS22 KAWAI
0 question about this device. Answer the ones you know or ask your own.
Ask a new question about this device
Download the instructions for your Keyboard in PDF format for free! Find your manual HS22 - KAWAI and take your electronic device back in hand. On this page are published all the documents necessary for the use of your device. HS22 by KAWAI.
USER MANUAL HS22 KAWAI
Heritage Series DIGITAL PIANOS
HS22
Owner's Manual
Important Safety Instructions
SAVE THESE INSTRUCTIONS
INSTRUCTIONS PERTAINING TO A RISK OF FIRE, ELECTRIC SHOCK, OR INJURY TO PERSONS

CAUTION
RISK OF ELECTRIC SHOCK DO NOT OPEN

WARNING
TO REDUCE THE RISK OF FIRE OR ELECTRIC SHOCK, DO NOT EXPOSE THIS PRODUCT TO RAIN OR MOISTURE.
AVIS : RISQUE DE CHOC ELECTRIQUE - NE PAS OUVRIR.
TO REDUCE THE RISK OF ELECTRIC SHOCK, DO NOT REMOVE COVER (OR BACK).
NO USER-SERVICEABLE PARTS INSIDE. REFER SERVICING TO QUALIFIED SERVICE PERSONNEL.

The lighting flash with arrowhead symbol, within an equilateral triangle, is intended to alert the user to the presence of uninsulated "dangerous voltage" within the product's enclosure that may be of sufficient magnitude to constitute a risk of electric shock to persons.

The exclamation point within an equilateral triangle is intended to alert the user to the presence of important operating and maintenance (servicing) instructions in the literature accompanying the product.
Examples of Picture Symbols

denotes that care should be taken.
The example instructs the user to take care not to allow fingers to be trapped.

denotes a prohibited operation.
The example instructs that disassembly of the product is prohibited.

denotes an operation that should be carried out.
The example instructs the user to remove the power cord plug from the AC outlet.
Read all the instructions before using the product.
WARNING - When using electric products, basic precautions should always be followed, including the following.

WARNING
Indicates a potential hazard that could result in death or serious injury if the product is handled incorrectly.
The product should be connected to an AC outlet of the specified voltage.


● Use the AC adapter supplied with the product or one recommended by Kawai.
- If you are going to use an AC power cord, make sure that its has the correct plug shape and conforms to the specified power voltage.
● Failure to do so may result in fire.
Do not insert or disconnect the power cord plug with wet hands.

Doing so may cause electric shock.
The chair must be used properly (it must be used only when playing the product).
● Do not play with it or stand on it.
● Only one person is allowed to sit on it.
● Do not sit on it during height adjustment.
● Do not sit on it when opening the lid.
Doing so may cause the chair to fall over or your fingers to be trapped, resulting in injury.
When using the headphones, do not listen for long periods of time at high volume levels.
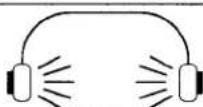
Doing so may result in hearing problems.
Do not lean against the keyboard.

Doing so may cause the product to fall over, resulting in injury.
Do not disassemble, repair or modify the product.


Doing so may result in product breakdown, electric shock or short-circuit.
When disconnecting the AC power cord's plug, always hold the plug and pull it to remove it.


● Pulling the AC power cord itself may damage the cord, causing a fire, electric shock or short-circuit.
If the product will not be used for a long time, unplug the AC power cord from the AC outlet.

- Failure to do so may cause fire in case of lightning. - Failure to do so may over-heat the product, resulting in fire.
This product may be equipped with a polarized line plug (one blade wider than the other). This is a safety feature. If you are unable to insert the plug into the outlet, contact an electrician to replace your obsolete outlet. Do not defeat the safety purpose of the plug.


CAUTION
Indicates a potential hazard that could result in injury or damage to the product or other
Do not use the product in the following areas.
● Areas, such as those near windows, where the product is exposed to direct sunlight
● Extremely hot areas, such as near a heater
● Extremely cold areas, such as outside
● Extremely humid areas
● Areas where a large amount of sand or dust is present
● Areas where the product is exposed to excessive vibrations
Using the product in such areas may result in product breakdown.
When you close the keyboard cover, close it gently.


Closing it roughly may trap your fingers, resulting in injury.
Before connecting cords, make sure that the power to this product and other devices is turned OFF.

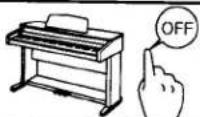
Failure to do so may cause breakdown of this product and other devices.
Take care not to allow any foreign matter to enter the product.

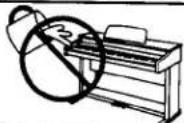
Entry of water, needles or hair pins may result in breakdown or short-circuit.
Take care not to drop the product.
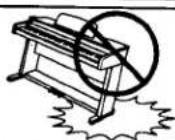
Please note that the product is heavy and must be carried by more than two persons. Dropping the product may result in breakdown.
Do not place the product near electrical appliances such as TVs and radios.


● Doing so may cause the product to generate noise.
- If the product generates noise, move the product sufficiently away from the electrical appliance or connect it to another AC outlet.
When connecting the AC power cord and other cords, take care not to get them tangled.

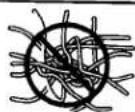
Failure to do so may damage them, resulting in fire, electric shock or short-circuit.
Do not wipe the product with benzene or thinner.

● Doing so may result in discoloration or deformation of the product.
- When cleaning the product, put a soft cloth in lukewarm water, squeeze it well, then wipe the product.
Do not stand on the product or exert excessive force.

● Doing so may cause the product to become deformed or fall over, resulting in breakdown or injury.
The product should be located so that its location or position does not interfere with its proper ventilation.
This product should be used only with the stand that is provided by the manufacturer.
Should an abnormality occur in the product, immediately turn the power OFF, disconnect the power cord plug, and then contact the shop from which the product was purchased.
The product should be serviced by qualified service personnel when:
● The power supply cord or the plug has been damaged.
- Objects have fallen, or liquid has been spilled into the product.
● The product has been exposed to rain.
● The product does not appear to operate normally or exhibits a marked change in performance.
● The product has been dropped, or the enclosure damaged.
Notes on Repair
Should an abnormality occur in the product, immediately turn the power OFF, disconnect the power cord plug, and then contact the shop from which the product was purchased.
- This digital piano is for household use and is not intended for commercial use.
CAUTION:
To prevent electric shock, match wide blade of plug to wide slot, fully insert.
ATTENTION:
Instruction for AC power cord (U.K.)
Do not plug either terminal of the power cord to the ground of the AC outlet on the wall.
FCC Information
This equipment has been tested and found to comply with the limits for a Class B digital device, pursuant to Part 15 of the FCC Rules. These limits are designed to provide reasonable protection against harmful interference in a residential installation. This equipment generates, uses and can radiate radio frequency energy and, if not installed and used in accordance with the instructions, may cause harmful interference to radio communications. If this equipment does cause harmful interference to radio or television reception, which can be determined by turning the equipment off and on, the user is encouraged to try to correct the interference by one or more of the following measures:
- Reorient or relocate the receiving antenna.
- Increase the separation between the equipment and receiver.
- Connect the equipment into an outlet on a different electrical circuit from the receiver.
- Consult the dealer or an experienced radio/TV technician for help.
Canadian Radio Interference Regulations
This instrument complies with the limits for a class B digital apparatus, pursuant to the Radio Interference Regulations, C.R.C., c. 1374.
THANK YOU FOR PURCHASING A KAWAI DIGITAL PIANO!
The Kawai digital piano is a revolutionary new keyboard instrument that combines the latest in electronic advances with traditional craftsmanship inherited from Kawai's many years of experience in building fine pianos. Its keyboard provides the touch response and full dynamic range required for a superb performance on the piano, harpsichord, organ, and other instruments. In addition, the HS22 piano is equipped with reverb and a digital effect processor for an even fuller sound. Industry-Standard MIDI (Musical Instrument Digital Interface) jacks are included which allow you to play other electronic instruments at the same time—opening a whole new world of musical possibilities.
This Owner's Manual contains valuable information that will help you make full use of this instrument's many capabilities.
There are two main sections in the manual. One is the Tutorial section and the other is a Reference section. The tutorial section explains the basic features of the HS22 piano. Read this section first if this is your first digital piano. The reference section describes the operation and uses of each of the panel components-buttons, sliders, and jacks. If you are familiar with digital pianos, you may want to start with this section. Please read all sections carefully and keep this manual handy for further reference.
HS22 Digital Piano Tutorial Section
Basic Operations
p. 8
This section explains step by step the setup and operation procedures needed to begin playing your HS22 piano.
Using the Recorder
p. 15
This section will show you how to use the Recorder.
Recording and playing back a song, recording multiple songs, and recording on two separate tracks.
Using MIDI
p. 21
This is an introduction for the beginner to the world of MIDI.
You will learn the basics of MIDI and MIDI applications using the HS22 piano and another MIDI device.
Playing with the Concert Magic
p. 32
With Kawai's unique feature "Concert Magic" anyone can sit at the HS22 piano and play real music.

1. BASIC OPERATIONS
SETTING UP THE PIANO
The first thing you'll need to do before playing the piano is to set up the instrument.
ASSEMBLING THE STAND
First, you need to assemble the stand unit. Assemble the stand following the instructions that came in the package with the stand.
SUPPLYING AC POWER
The HS22 piano is equipped with stereo speakers and an amplifier. You do not need any other equipment to play your piano. You can enjoy the HS22 piano wherever AC power is available. Simply connect the power cable that comes with the HS22 piano to an AC outlet.
Connect the AC power cable to the piano's power jack and the other end of the cable to the AC outlet on the wall.
USING THE HEADPHONES
For private performances you may want to use the headphones. The speakers will be turned off automatically when the headphones are plugged in, and the HS22 piano will only be heard through the headphones. The HS22 piano has two headphones jacks.
PLAYING THE PIANO


Turning on the power.
You will find the POWER SWITCH at the right end of the front panel. Press this button to turn on the power. Pressing it again will turn off the power.
Adjust the volume level.
The VOLUME SLIDER controls the volume level of the speakers and the headphones. Use this slider to set the volume to a comfortable listening level.
Now try playing the keyboard.
You will hear the HS22's main piano sound.
The HS22 piano responds just like a real acoustic piano when you play it. It produces a louder sound when you play hard and a softer sound when
you play soft. The volume level changes in relation to how fast the keys are pressed. This system is called "touch sensitivity" on an electronic musical instrument. The initial touch sensitivity setting has been adjusted to the standard of an acoustic piano. You can however, select a different type of touch sensitivity on the HS22 piano if you are not comfortable with the standard setting. For more detail, please read "Selecting the touch sensitivity" on page 52.
![graph LR A["Soft"] --> B["Sostenuto"] B --> C["Sustain"]](/content/2026/05/1070915/images/cf8464a9779a3f5477d2c8678f4fcc46e4ff0986614a2a951cc0fb03d585874d.jpg)
USING THE PEDALS
The HS22 piano has three pedals—just like a grand piano. They are Sustain, Soft and Sostenuto.
PLAYING WITH MORE SOUNDS
You have already heard the HS22's main piano sound. The HS22 piano has seventeen more different sounds, not only different types of piano sounds but different instruments as well.
The different instrument sounds built into HS22 piano are called "preset sounds".
All of the preset sounds have been created through advanced digital sampling technology achieving as natural and realistic sound as possible. Let's try some of the preset sounds.
SELECTING ANOTHER PRESET SOUND
Press the SOUND SELECT button under the name of the instrument you would like to listen to. When the button is pressed, the LED indicator above it will be turned on to indicate that this sound is selected. Each SOUND SELECT button has variation sound. To select the variation sound, press the SOUND SELECT button again. When you select variation sound, the center dot in the LED display will be turned on.



USING DEMO FUNCTION
The HS22 piano has seventeen built in demo songs. Each of the demo songs presents a musical piece to introduce the different preset sounds.
Press the DEMO button and the demo songs for the Classic Grand category will start. After the Classic Grand demo songs are finished playing, the demo songs for another sound category will be selected at random.
If you would like to listen to the demos for a particular category, just press the desired SOUND SELECT button while the demo is playing. When you press the button, the demo songs for the newly selected category will be played. Then the demo songs for another category will be selected at random.
DUAL
Another feature of the HS22 piano is the ability to layer two preset sounds together to create a more complex sound. For example, piano layered with strings, electric piano with choir sound, and so on.
To layer two sounds, press the SOUND SELECT buttons for both sounds simultaneously. The LED indicators for each will be turned on to indicate the two sounds you have chosen.
When you select a variation sound as part of a layer, the dots in the LED display will indicate which sounds are variation sounds. If the left dot is turned on, the leftmost sound is a variation sound. If the right dot is turned on, the rightmost sound is a variation sound.
You can adjust the volume balance between the two sounds. Use the DUAL BALANCE slider to adjust the balance. Move the slider to the right to increase the volume of the rightmost preset sound and decrease the volume of the leftmost preset sound. The balance changes in the opposite way when the slider is moved to the left.
ABOUT POLYPHONY
The HS22 piano is capable of playing up to 64 notes simultaneously (64-note polyphony). When playing in dual mode or when playing the stereo piano sound, the polyphony will be reduced by half since the piano has to produce two sounds for each note.
Adding the Effects
You might have noticed that when you select some of the preset sounds, the LED indicator for the EFFECTS is turned on. The reason for this is some of the preset sounds are set up with an effect on as their initial setting.
Adding an effect to the sound enhances tonal quality and improves acoustical realism. The HS22 piano is provided with two separate groups of effects. The first is reverb and the second contains chorus, delay, tremolo, and rotary speaker.
REVERB
Reverb adds reverberation to the sound, simulating the acoustic environment of a recital room, stage, or concert hall. There are five types of reverb available. They are Room, Stage, Hall, 3D Room and 3D Hall (listed in order of reverberation amount).
CHORUS
Chorus is an effect that simulates the rich character of a vocal choir or string ensemble, by layering a slightly detuned version of the sound over the original to enrich it.
DELAY
Delay is an effect that adds echoes to the sound. There are three types of delay available (delay 1 - 3), each of which has a different length of delay between the echoes.
TREMOLO
This is a vibrato type effect.
ROTARY
This effect simulates the sound of the Rotary Speaker cabinet commonly used with electronic organs.
The soft pedal is used to change the speed of the rotor between SLOW and FAST.
TO ADD REVERB
Press the REVERB button. The LED indicator will be turned on to indicate that reverb is in use. To change the reverb type, use the VALUE buttons while holding down the REVERB button. The LED display shows an abbreviation.


Room

Stage
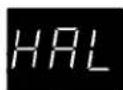
Hall

3D Room

3D Hall
EFFECTS

TO ADD OTHER EFFECTS
Press the EFFECTS button. The LED indicator will be turned on to indicate that the effect is in use. To change the effect type, use the VALUE buttons while holding down the EFFECTS button. The LED display shows an abbreviation.
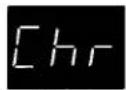
Chorus
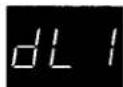
Delay 1

Delay 2
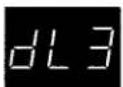
Delay 3
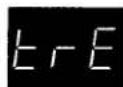
Tremolo
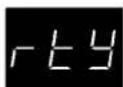
Rotary
To turn off the reverb or effects, press the REVERB or EFFECTS button again.
Any changes you make to the reverb and the effects are stored with the preset sound in memory as long as the power is on. When you reselect a sound, your chosen reverb and effect settings will be recalled along with the preset sound.
When the power is turned off the effects will be reset to the factory settings.
USING THE METRONOME
Rhythm is one of the most important elements when learning music. It is important to practice playing the piano in the right tempo and with a steady rhythm. The HS22 piano's metronome is a tool that helps you to achieve this by providing a steady beat for you play along with.
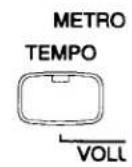
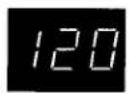
STARTING THE METRONOME
Press the TEMPO button. You will see the LED indicator turn on and hear the metronome begin counting with a steady beat. The LED display shows the tempo in beats per minute
To change the tempo, use the VALUE buttons to increase or decrease the tempo within the range of 30 - 300 beats per minute. (60-600 BPM with 6/8).
To stop the metronome, press the TEMPO button again.
CHANGING THE TIME SIGNATURE
You probably noticed that there are two types of clicks and the louder one comes every fourth beat. The metronome is capable of giving you a down beat to indicate the beginning of the measure. You are now hearing a 4-beat or 4/4 time signature.
You can select different a time signature if you want to out of the five available with the HS22 piano—1/4, 2/4, 3/4, 4/4 and 6/8.
ONOME


To change the time signature, use the BEAT button.
Press the BEAT button. You will see the LED indicator turn on and hear the metronome begin counting.
Use the VALUE buttons to select your desired time signature. You will see the signature currently selected in the LED display.
To stop the metronome, press the BEAT button again.
You can use either the TEMPO or BEAT button to turn the metronome on and off. Choose the appropriate button depending on whether you're adjusting the tempo or changing the time signature.
ADJUSTING THE METRONOME VOLUME
The volume level of metronome can be adjusted to any level you like independent of the main volume.
Press the TEMPO and BEAT buttons simultaneously. The LED displays the volume level of the metronome in numbers from 1 (soft) to 10 (loud). The factory preset is 7.
Use the VALUE buttons to change value while holding down the TEMPO and BEAT buttons.
NEXT STEP TO MAKE
So far, you have learned the basic operations and terms needed to become familiar with the HS22 piano. There are, however, some other functions that will help you to make full use of the HS22 piano's many capabilities. You may continue on from here, or skip ahead to the chapters you are interested in.
If you would like to learn more about the recorder, go to chapter 2. "Using the Recorder" page 15.
If you are interested in MIDI and how to use your piano with other digital musical instruments, go to chapter 3. "Using MIDI" page 21.
If you would like to learn about Concert Magic, go to chapter 4. "Concert Magic" page 32.
If you would like to learn more about functions and features such as tuning and transpose for example, you will find detailed information in chapter 9. "Function Buttons" of the Reference Section, page 52.

The HS22 piano's recorder records your playing much like a tape recorder, and it is just as easy to use. The HS22 piano records a song as digital data instead of audio data and stores the song inside the instrument. Because the song is stored as digital information you can modify the song when you play it back. You can, for example, adjust the tempo without changing the pitch or use a different effect setting from one you have recorded. Once you understand the recorder, you will find it to be a useful tool for both practicing and playing the piano.
RECORDING A SONG
RDER

Press the REC button when you are ready to record. The LED indicator will start flashing telling you that the piano is ready to record.
Now play some music on the piano. The recorder will automatically start recording with the first note you play.
RECOR PLAY/STOP

Press the PLAY/STOP button when you're finished recording. The HS22 piano will stop recording and the LED display will flash momentarily while the song is saved to memory.
If you make a mistake, you can record your piece again. Just repeat the same procedure. The second recording will completely erase the first one.
PLAYING BACK A SONG
RECOR
PLAY/STOP

Press the PLAY/STOP button to play back the song you have just recorded.
Press the PLAY/STOP button again to stop.
Now, you are familiar with the basic recording procedure on the HS22 piano. For most recording purposes this may be all you need. The HS22 piano however, is equipped with other more powerful and flexible features that can be used to record and play back your performances. Continue on to learn more about the full capabilities of the recorder.
BASICS OF THE RECORDER
Let's take a brief look at the recorders features.
TWO-TRACK FIVE-SONG RECORDER
The HS22 piano's recorder is a 2-track 5-song recorder. This means you can record up to five different songs, store them in memory, and play them back as you like.
Each song has two separate tracks called "Parts" that can be recorded separately. This lets you record for example, the left hand part first on one track, then record the right hand on the other track while listening to the first track.
When you record or play back a song, you can select which part (track) of which song you are going to record or play back. When you are recording, selecting the same part again to record will erase any previous recordings on that part. Because of this it's important to remember; when recording both parts separately, after recording the first part be sure to select the second part to record, otherwise you will end up recording over the first part of the song.
RECORDED INFORMATION
The HS22 piano records the following information.
Note information
Sound selection
Dual settings .. Set the dual balance as desired before you start recording. Balance settings made before you start recording will be used by the recorder. Any changes made during the recording will be ignored by the recorder.
Transpose..... When you record in a different key using the transpose function, the HS22 piano will record the actual transposed notes you hear, not the notes you played on the keyboard.
RECORDING CAPACITY
The total recording capacity is about 5,000 notes. Pressing any buttons or pedals is counted as one note.
When the recorder reaches it's maximum capacity, the HS22 piano will stop recording at that point.
RECORDER AND METRONOME
When playing back a song with the metronome turned on, the metronome always restarts with the down beat.
The HS22 piano is capable of recording up to five different songs. Let's try recording a second song.
If you followed the procedure in the previous section you have already recorded Song 1, so now let's record Song 2.
To select the song number, use the SOUND SELECT buttons with the song numbers printed under them—CLASSIC GRAND, MODERN PIANO, ELECTRIC PIANO, DRAWBAR and CHURCH ORGAN. Press the MODERN PIANO button to select Song 2 while holding down the REC button. The LED indicator of MODERN PIANO will begin to flash when the REC button is pressed.

When you are ready to record, just start playing the keyboard. The HS22 piano will start recording automatically with the first note you play.
When you are finished recording, press the PLAY/STOP button.
Now let's play back the song that you have just recorded.
Hold down the PLAY/STOP button to see which song is selected for play back. You will see the LED indicator for MODERN PIANO start flashing. This means that Song 2 is going to be played back. Releasing the PLAY/STOP button will start play back.
If you would like to listen to a different song, select your desired song number using the SOUND SELECT buttons while holding down the PLAY/STOP button and then release the buttons to start play back. The LED indicator for the selected song will flash when holding down the PLAY/STOP button
SONG STATUS AND LED INDICATOR
You have probably noticed that some of the LED indicators are flashing, some are turned on, and some are turned off. The LED indicates the status of recording and play back as shown below.

The LED that is on indicates that the song or part has already been recorded.

The flashing LED indicates that the song or part is selected to record or play back.

The LED that is off indicates that the song or part is empty.
If you have recorded more than one song, you can check the song status, by pressing the REC or PLAY/STOP button.
RECORDING THE TRACKS SEPARATELY
Now let's record two tracks separately.
First, you select the desired track (part) to record. After recording the first part, select the other track and record your second part.
Remember, the LED indicators tell you whether a song or part is recorded or not.
To select a part to record, use the SOUND SELECT buttons with the part numbers printed under them—STRINGS and CHOIR/PAD. Press the STRINGS button to select part 1 for example, while holding down the REC button. You will see the LED indicator for part 1 (STRINGS button) begin flashing when the REC button is pressed.
Record the first part just the same as in the previous section and press the PLAY/STOP button when you're finished recording.
Now select Part 2 by pressing the CHOIR/PAD button while holding down the REC button. You will see the LED indicator for part 1 (STRINGS button) is turned on and the indicator for part 2 (CHOIR/PAD button) is flashing. This indicates that Part 1 has been recorded and Part 2 is ready to record.

If you want to start recording the second part from the beginning of the song, just play the keyboard. You will hear the first part playing back while you record the second part.
If you would like to play back the first part and then start recording the second part from a certain point later in the song, press the PLAY/STOP button instead of playing the keyboard to start playback of the first part and then begin recording the second part from any point you like.
When you are finished recording, press the PLAY/STOP button again.
Hold down the PLAY/STOP button and look at the Part buttons. The LED indicators for both parts will be on, indicating that you have successfully recorded two tracks. Press the PLAY/STOP button to listen to what you have recorded. You should hear both parts.
Both parts will automatically be set to play back. If you do not hear both parts playing, you may have made a mistake when recording.
If your song is not playing back properly, carefully reread the previous section to make sure you're recording properly. You can use the LED indicators (see Song Status and LED indicator section) to help determine if you have a problem.
Here are some basic things to check for:
1) If you only hear the second part, you may have accidentally recorded over the first part. In this case, just rerecord the first part you played after selecting the "empty" part to record (in this case it will probably be part 2).
2) Did you record one of the parts in a different song? In this case record the missing part in the appropriate song.
ERASING UNNECESSARY SONG DATA
At some point you may want to erase a song. If you have filled up the memory of the recorder you can erase an old song to make room for a new one or maybe you're tired of listening to a particular song. In either case, the HS22 piano provides an easy way to erase one or all of the songs and parts.
To erase a specific song and part, first hold down both the REC and PLAY/STOP buttons. The LED indicators will display which songs have been recorded. Select the desired song and part to erase by pressing the appropriate SOUND SELECT buttons while continuing to hold down both the REC and the PLAY/STOP buttons. On releasing both the REC and PLAY/STOP buttons, the HS22 piano will erase from memory the song and part you have chosen.
The LED indicator for the erased song or Part will be turned off indicating there is no longer anything recorded there.
ERASING ALL DATA
To erase everything, all songs and parts at once, first turn the power off and then turn it back on again while holding down both the REC and PLAY/STOP buttons. The entire memory of the recorder will be erased.
The HS22 piano's built-in recorder is easy to use and is perfect for practice and basic recording needs. For those individuals interested in using this instrument for more complex digital recordings, the HS22 piano can be connected to an external MIDI sequencer or a personal computer. Please read chapter 3. Using MIDI to learn about the HS22 piano's MIDI and Multi-timbral capabilities.
3. USING MIDI
In this chapter, you will learn how you can create music by connecting the HS22 piano to an external MIDI device. We will be using Kawai's Digital Accompaniment Center ACR-20 for this purpose. The ACR-20 is a 16-channel/16 track (part) digital sequencer (recorder) that features a General MIDI sound module with 226 sounds and 100 auto-accompaniment styles built in. All of which can be controlled by the HS22 piano when they are connected together.
Kawai has another instrument called the DRP-10, which has the same GM sound module and the recording capability of the ACR-20. The DRP-10, however, is not equipped with the auto-accompaniment styles. If you do not need the auto-accompaniment function, the DRP-10 may be perfect for your needs.
The HS22 piano is also compatible with MIDI devices from other manufacturers or can be used with sequencing software on a personal computer.
NOTE
All of the products mentioned above are optional and can be purchased separately. Visit your local music store to find out what products are available.
UNDERSTANDING MIDI
WHAT IS MIDI?
The letters MIDI stand for Musical Instrument Digital Interface, an international standard for connecting MIDI equipped synthesizers, drum machines, and other electronic instruments so that they can exchange data. Personal computers can also be equipped for MIDI communication. Electronic instruments equipped with MIDI can transmit and receive performance data such as, notes, what sound to play, pedal information, volume, etc. This data can be recorded with a device like a sequencer or a computer.
MIDI JACKS
Instruments equipped with MIDI have usually three jacks for exchanging data: IN, OUT, and THRU. (Some instruments have only IN and OUT.) These jacks are used to connect MIDI devices to one another using a special cable.
Each terminal has a different function.
IN : For receiving MIDI data from another MIDI instrument.
OUT : For sending MIDI data to another MIDI instrument.
THRU : For passing along MIDI data received to another MIDI instrument without processing.
Depending on how they are connected, instruments are grouped as those which receive data (producing sound when data is received from a connected instrument), those which send data (to instruments to which they are connected), and those which both send and receive data.
MIDI CHANNEL
MIDI uses what are known as "channels" as a means of routing MIDI data intended to play a specified instrument or specified part. By channelizing MIDI data, you can control multiple parts in multiple instruments with a single cable.
There are two aspects of channels, one for receiving and one for sending. The MIDI channel of the receiving instrument must be matched with the MIDI channel of the transmitting instrument. The idea is just like television or radio. If you have a desired station to watch or listen to, you need to tune in to the right channel. When a transmitting instrument uses channel 1, the receiving instrument must be set to use channel 1 also. The HS22 piano lets you set the same channel number for both Transmit and receive. There are 16 MIDI channels available to choose from on the HS22 piano. In addition to channel-to-channel connection, it is possible to receive multiple channels. With MIDI instruments equipped with multi-timbral capabilities, you can receive multiple parts on multiple channels each played with a different sound simultaneously. For example, a MIDI instrument might receive the melody on channel 1, the chords on 2, the bass on 3, and assign a different instrument to each channel. Piano for channel 1, strings for 2, electric bass for 3. In this way, the HS22 piano can play up to 16 different parts each with a different sound.
Here's a diagram (next page) to summarize the MIDI connections we have discussed.
Instrument #1, which is transmitting the piano part on channel 1 (Ch 1), the string part on Ch 2 and the bass part on Ch 3, is connected to Instrument #2. Instrument #3 is connected to MIDI Thru on instrument #2. The receive channel is set to 1 for Instrument #2 and multi-timbral mode is turned off. On instrument #3 multi-timbral mode is on.
![graph TD A["MIDI Keyboard #1"] -->|Transmitting| B["Ch 1 Piano"] A -->|Transmitting| C["Ch 2 Strings"] A -->|Transmitting| D["Ch 3 Bass"] E["MIDI Keyboard #2"] -->|Receiving ch 1| F["Multi-timbral mode off"] G["Sound Module #3"] -->|Multi-timbral mode on| H["In"] I["Out"] --> B J["IN"] --> F K["THRU…](/content/2026/05/1070915/images/eccdba9ee01ca9b23d8fd787707774e07547d676cfcbc9d2614d5379d827dbcb.jpg)
Instrument #2 recognizes only the piano part received from Instrument #1. Instrument #3 receives all the parts on the three channels being passed through Instrument #2 because Instrument #3's multi-timbral mode capability is activated.
We have provided this brief look at MIDI to help you understand the HS22 piano's MIDI capabilities.
While it is beyond the scope of this manual to explain the entire world of MIDI we do encourage you to visit your local music store or contact a music publisher for a listing of available books on MIDI applications to learn more.
Let's explore some MIDI applications using Kawai's ACR-20.
USING THE HS22 PIANO AS CONTROLLER
First let's play the ACR-20's built in sounds using the HS22 piano's keyboard.
MIDI CONNECTION
First, connect the HS22 piano's MIDI OUT jack to the ACR-20's MIDI IN jack with a MIDI cable.
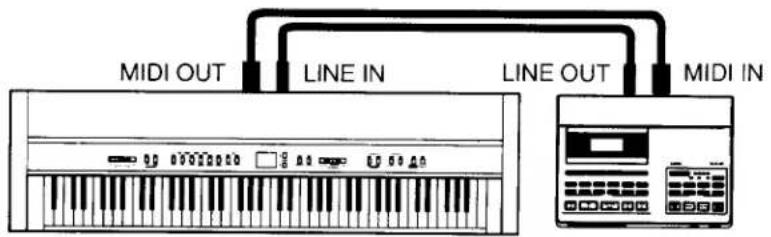
Next you must match the MIDI channel. The transmitting channel of the HS22 piano and receiving channel of the ACR-20 must be the same. Because the ACR-20 always has it's multi-timbral mode on you do not have to set the ACR-20's receive channel. In multi-timbral mode the ACR-20 automatically receives on all 16 MIDI channels. On the ACR-20 each track is set to the corresponding MIDI channel, Track 1= Ch. 1, Track 2= Ch. 2 and so on.
CHANGING TRANSMITTING CHANNEL
To change the transmit channel on the HS22 piano, press the ELECTRIC PIANO button while holding down the TOUCH and TRANSPOSE buttons. The LED display will indicate the channel number that is currently selected. Change the channel by using the VALUE buttons. You can select from 1 to 16.
Press any SOUND SELECT button to exit from the function mode.
AUDIO CONNECTION
The ACR-20 is not equipped with an amplifier or speakers. You can connect the ACR-20 directly to HS22 piano through the LINE IN jacks or to an external sound system.
Connect the LINE IN jacks of the HS22 piano and the LINE OUT jacks of the ACR-20 with a pair of audio cables (see the illustration above). Now you will be able to hear the HS22 piano's sound and the ACR-20's sound together through the CN's speakers. Use the volume knob of the ACR-20 to balance it's volume with the HS22 piano.
Transmitting Channel 1

Now You're ready to play.
Play the HS22 piano's keyboard. You should hear both instruments as you play. What is happening is that the HS22 piano is transmitting MIDI information, what note you played, how hard (loud) you played it, and so on to the ACR-20. The ACR-20 reproduces sound based on this information using its own sound module.
PROGRAM CHANGE
Press a SOUND SELECT button on the HS22. You will hear the sound on the ACR-20 also changes. Pressing a SOUND SELECT button lets the HS22 piano transmit a "program change" number. A program change is the type of MIDI command that tells the receiving instrument what sound or instrument to play your notes with.
Actual program change information is just a number, from 1 to 128, not an instrument name. You select the desired instrument with a specific number. Not all MIDI instruments assign the same sound to the same program change number. MIDI instruments that conform to the General MIDI (GM) standard however "DO" assign the same sound to the same program change number. For example program change #1 will always be an acoustic piano sound on a "GM" compatible synth, and program change #33 will always be an acoustic bass sound. Because of this, when connecting two "GM" instruments together, selecting the right sound is not a problem. The HS22 piano is not a General MIDI instrument and it's internal sounds are not assigned the same as the ACR-20. This is why the ACR-20 does not play a Harpsichord sound when you select Harpsichord on the HS22 piano (you will hear Music Box or Vibraphone instead). Below is a chart of the Program change number/sound assignment mapping for the two instruments. The HS22 piano can have different mappings depending on the multi-timbral mode (explained later in this chapter).
| Program # | HS22 | ACR-20(General MIDI) |
| 1 | Classic Grand | Grand Piano |
| 2 | Classic Grand (Var.) | Bright Piano |
| 3 | Modern Piano | Electric Grand |
| 4 | Modern Piano (Var.) | Honky Tonk Piano |
| 5 | Electric Piano | Electric Piano 1 |
| 6 | Electric Piano (Var.) | Electric Piano 2 |
| 7 | Drawbar | Harpsichord |
| 8 | Drawbar (Var.) | Clavi |
| 9 | Church Organ | Celesta |
| 10 | Church Organ (Var.) | Glockenspiel |
| 11 | Harpsichord | Music Box |
| 12 | Harpsichord (Var.) | Vibraphone |
Here we just listed from program number 1 through 12. Please see the page 63 in the Reference section for more detail.
In order for the ACR-20 to play the sound you want, you need to know what program change number to transmit to it. Please read the ACR-20's manual for a list of it's program change number/sound assignments. Then read "8. Program Change Number" in the Reference section of this manual for the procedure to send a desired program change number from the HS22 piano.
That is how to layer the HS22 piano's sound with a desired sound from the ACR-20.
LOCAL CONTROL
You may want to play and only hear the ACR-20's sound, without the HS22 piano's sound. You can turn off the HS22 piano's sound using a function called "local control".
Local control determines whether or not the HS22 piano will produce a sound when you play it's own keyboard. When local control is on, the HS22 piano produces sound as you play the keys. When off, the piano will not produce a sound when you play the keys. The HS22 piano's keyboard will however, continue to transmit MIDI information to an external MIDI instrument.
Press the CHURCH ORGAN button while holding down the TOUCH and TRANSPOSE buttons. The LED display will read "on", which means the piano is currently set to local control on. To turn it off, use the VALUE button.
Press any SOUND SELECT button to exit from the function mode.

Play the keyboard and you will hear only the sound from the ACR-20. To change the sound from the HS22 piano, select the desired number as explained in the Reference section and send it from the HS22 piano to the ACR-20.
You can manually change preset sounds directly on the ACR-20. In this case, you may want to set the HS22 piano so that it does not transmit program changes. Remember the ACR-20 will respond to any program changes transmitted from the HS22 piano when you press a SOUND SELECT button. Read "4. Program Change On/Off" in the Reference Section, page 57 to learn how to prevent the HS22 piano from transmitting program changes.
USING THE ACR-20 AS AN ACCOMPANIMENT MODULE
Thanks to the automatic accompaniment styles built into the ACR-20, you can enjoy playing the HS22 piano with rhythms and accompaniments. When using the ACR-20 as an accompaniment module, it will split the note information it receives from the HS22 piano into two zones, lower keys and upper keys, as if there were a split point on the HS22 piano. Lower keys (below the split point) on the HS22's keyboard are used to change the chords depending on which notes you play. Upper keys (above the split point) on the keyboard can be played normally, to play a melody, for example.
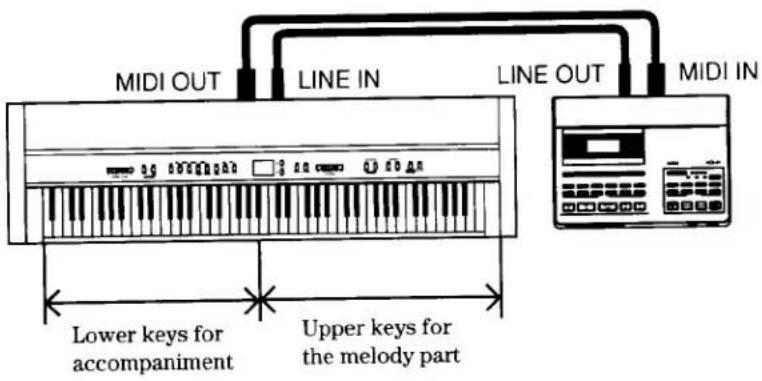
Please read the ACR-20's manual for more information.
RECORDING WITH THE ACR-20
The ACR-20's recorder is more powerful than that of the HS22 piano. The ACR-20 lets you record up to 16 tracks, with 226 sounds to choose from as well as drums and percussion. With the ACR-20 you can compose a complete orchestral piece.
Connecting the two instruments for recording is the same as previously explained. Connect the MIDI OUT of the HS22 piano and the MIDI IN of the ACR-20 with a MIDI cable. Also connect the LINE IN jacks of the HS22 piano and the LINE OUT jacks of the ACR-20 with a pair of audio cables. You will use the HS22 piano as controller and the ACR-20 as recorder. You may turn local control and program change off.
Operation,
- Select a track to record and choose a preset sound for that track (part) on the ACR-20.
- Set the HS22 piano's transmit channel to match the channel of the track selected to record on the ACR-20.
- Start recording. Refer to the ACR-20 for instructions.
- Repeat the same procedure and record as many different tracks (parts) as you like. Remember you must change the transmit channel of the HS22 piano to match the channel of the track you want to record on the ACR-20.
This is just a brief outline of the multi-track recording process used with the ACR-20. For step-by-step operation, please refer to the ACR-20's manual.
USING THE HS22 PIANO AS A MULTI-TIMBRAL SOUND MODULE
The HS22 piano can be also used as a 16-part multi-timbral sound module, although the number of built-in sounds is limited, compared with the ACR-20 or DRP-10.
Your HS22 piano is capable of playing back for example, a four part song with two piano parts, a string part, and a choir part all sent from an external MIDI sequencer or a personal computer. You can also play the HS22 piano along with a recorded song.
To set the HS22 piano to receive MIDI as a multi-timbral instrument it must be connected with an external MIDI instrument, which is, for our purposes in this manual, the ACR-20 again.
Connect the HS22 piano's MIDI IN jack and the ACR-20's MIDI OUT jack with a MIDI cable. Please note that the MIDI information is now being transmitted the opposite of our earlier setup. The HS22 piano is now receiving MIDI data from the ACR-20.
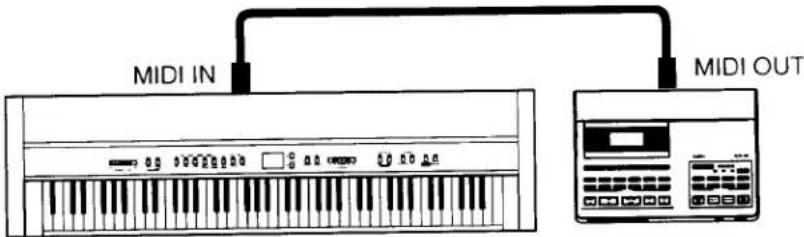
MIDI CHANNEL
The next step is to match your MIDI channels. This time however, it is a little different from our earlier setup. When transmitting MIDI data from the HS22 piano, you must select a MIDI channel to transmit on and select a track on the ACR-20 that is set to the same channel. When receiving MIDI data on the HS22 piano in multi-timbral mode, it is not necessary to specify a MIDI channel to use because the HS22 piano can receive data on multiple MIDI channels at once. You do have to be careful to match MIDI channels between each part. A MIDI channel can only have one sound assigned to it at a time. You must set the MIDI channel for each part on both the transmitting (ACR-20) and the receiving (HS22 piano) MIDI devices. For example, channel 1 for piano, ch 2 for strings, ch 3 for choir, etc.
MULTI-TIMBRAL MODE
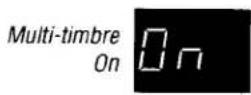
Multi-timbral On is a setup for 16-channel multi-timbral operation. You can mute the channels separately. Each channel recognizes the program change numbers as listed on page 63.
Multi-timbral Off turns off multi-timbral capability. If you would like to have the HS22 piano receive MIDI data on a single channel and ignore all data on the other channels set multi-timbral to "Off". Remember, if you want the HS22 piano to receive MIDI information from an external device, you must match the receiving channel with the transmitting channel. Program change numbers are recognized as listed in page 63.
To demonstrate the multi-timbral capability of the HS22 piano, let's choose Multi-timbral ON.
Press the HARPSICHORD button while holding down the TOUCH and TRANSPOSE buttons. The LED display will read "OFF", which means Multi-timbral Off is currently selected. Use the VALUE button to select Multi-timbral ON. The display will read "On".
After choosing the multi-timbral setting, press any SOUND SELECT button to exit from the function mode.
Multi-timbre OFF

Let's see how this works using the ACR-20. Play one of the songs that came on the floppy disk included with the ACR-20, try the song named "VIBE". When you play this song, you will hear a vibraphone part in addition to a few piano parts.
If you own a GM sound module and sequencer like the ACR-20 or DRP-10, you'll probably want to use it as your multi-timbral module instead of the HS22 piano. If you have a hardware sequencer or personal computer but do not own another sound module, you can enjoy sixteen-part multi-timbral capability with only the HS22 piano.
MIDI may seem a little difficult to work with at first, but once mastered it offers many new and exciting ways to enjoy music.
While this manual avoids going into too much detail regarding the technical aspects of MIDI such as “system exclusive data”, for those who are more familiar with MIDI or want to be, this manual provides technical MIDI information and a MIDI Implementation Chart, on page 64 and 65.


4. PLAYING WITH CONCERT MAGIC
The great German composer Johann Sebastian Bach once said, "Playing the keyboard is simple. Just strike right keys at the right time." Many people wish it were that simple. The reality is very different of course. However, there is a way to make playing the keyboard very simple. You don't even have to strike right keys thanks to Concert Magic.
With CONCERT MAGIC, absolutely anyone can sit at the HS22 piano and make real music... even if you've never taken a piano lesson in your life. To enjoy performing by yourself, you have only to select your favorite piece from 88 preprogrammed songs and tap any of the 88 keys with a steady rhythm and tempo. CONCERT MAGIC will provide the correct melody and accompaniment notes, regardless of which keys you press. Anybody, young or old, can enjoy CONCERT MAGIC from the moment they sit down at the HS22 piano.
Now let's see how CONCERT MAGIC works.
SELECTING A SONG
The 88 Concert Magic songs are assigned to each of the 88 piano keys, classified in eight groups by song category such as Children's Songs, American Classics, Christmas Songs.
All of the song titles are listed on page 68 in the reference section of this manual. To make it easier to find which song is assigned to which key, there is a key strip that can be placed between the end of black keys and the front panel. The key strip indicates song categories, and note names.

To select a song, press the key to which your desired song is assigned while holding down the CONCERT MAGIC button. The LED display gives the song number.
If you have selected a song you are familiar with, you may want to play by yourself right away. However you may want to listen to the song first before playing it.
To listen, press the PLAY/STOP button. The HS22 piano will start playing back the selected song. You can adjust the speed or tempo of the song by using the VALUE buttons while holding down the TEMPO button.
If you want to listen to a different song, repeat the same procedure to select a song.
When you are finished listening to the song, press the PLAY/STOP button again to stop.
PERFORMING A SONG
Now you're ready to play yourself.
Tap out the rhythm of the selected song on any one of the 88 black or white keys on your piano keyboard. As you tap harder, the notes will get louder; as you tap softer, the notes will get quieter. As you tap faster, the notes speed up; as you tap slower, they will slow down correspondingly, just like regular piano playing.
Isn't it fun? You can sound like you've been playing for years just by pressing one key with one finger.
Concert Magic is a perfect method for small children to learn music, especially to develop a sense of rhythm. For older people who may think it is too late to learn the keyboard, Concert Magic is a good first step for them to begin with. With Concert Magic, your HS22 piano can be enjoyed by anyone in the family, even those who have never touched a musical instrument in their life.
CONCERT MAGIC SONG ARRANGEMENT TYPES
After playing for a while with Concert Magic you may think that it's too easy and there is very little to learn.
While it is true that some of the songs are very easy to play, even for beginners, there are also some which will challenge you and require some practice to play beautifully. Each of the 88 Concert Magic songs falls into one of three different categories depending on the skill level required to perform them.
EASY BEAT
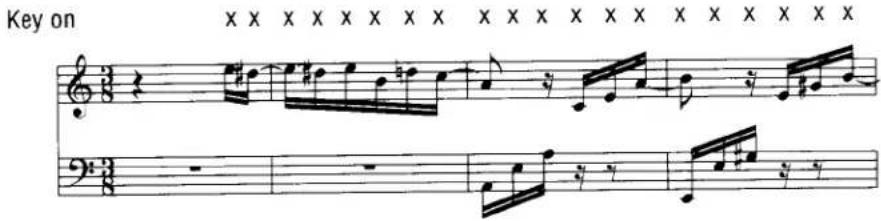
These are the easiest songs to play. To perform them, simply tap out a constant steady beat on any key on your piano keyboard.
Look at the following example, "Fur Elise". Press the key with a steady sixteenth note rhythm.
MELODY PLAY
These songs are also quite easy to play, especially if they are familiar to you. To perform them, tap out the rhythm of the melody on any one of the keys on your piano keyboard. Singing along as you tap the rhythm can be helpful.
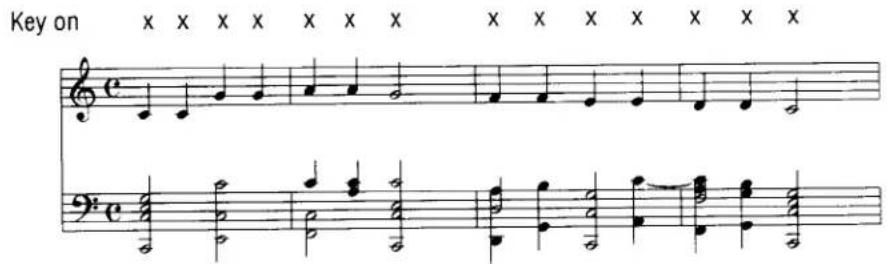
Play "Twinkle, Twinkle, Little Star" for example. Follow the melody's rhythm as shown.
When performing fast songs with Concert Magic, it is sometimes easier to tap two different keys with two fingers alternating. This allows you to play twice as fast as you can using only one finger on one key.
SKILLFUL
These songs range in difficulty from moderately difficult to difficult. To perform them, tap out the rhythm of both the melody and the accompaniment notes on any of the keys on your piano keyboard, like "Waltz of The Flowers" shown below.

It may take some practice to get them just right. A good way to learn these songs is to listen to them first, and then try to tap out the rhythms that you hear.
In the song list in the reference section on page 68, the arrangement type is marked next to each song title as "EB" for Easy Beat, "MP" for Melody Play and "SK" for Skillful.
HS22 Digital Piano
Reference Section
Operation by the Panel Components
p. 38
This section describes the operation of the panel components-buttons, sliders, and jacks. If you are familiar with playing a digital piano, reading this section first may help you understand the HS22 piano faster. In this section you can look into the particular functions for detailed information and operation instead of reading through the manual from the beginning.
- CONCERT MAGIC BUTTON 38
- DEMO BUTTON 41
- SOUND SELECT BUTTONS 42
- VALUE BUTTONS 43
5.EFFECT BUTTONS 44
SELECTING AN EFFECT (EFFECTS BUTTON) 44
REVERB (REVERB BUTTON) 44
- DUAL BALANCE SLIDER 45
- METRONOME BUTTONS 46
CHANGING TEMPO (TEMPO BUTTON) 46
CHANGING THE TIME SIGNATURE (BEAT BUTTON) 47
CHANGING THE METRONOME VOLUME (TEMPO & BEAT BUTTONS) 47
- RECORDER BUTTONS 48
RECORDING (REC BUTTON) 48
Playing Back a Song (PLAY/STOP Button) 50
- FUNCTION BUTTONS 52
SELECTING THE TOUCH SENSITIVITY (TOUCH BUTTON) 52
TRANSPOSING THE PIANO (TRANSPOSE BUTTON) 53
OTHER FUNCTIONS (TOUCH & TRANSPOSE BUTTON) 53
- POWER SWITCH 60
- VOLUME SLIDER 60
- PEDALS 61
- JACKS 62
FRONT PANEL, SPECIFICATIONS....66
This section provides technical information on MIDI—exclusive data structure and tables such as Program Change Number Assignment and Implementation.

1. CONCERT MAGIC BUTTON
CONCERT MAGIC
Thanks to CONCERT MAGIC, absolutely anyone can sit at the HS22 and make real music... even if you've never taken a piano lesson in your life. To enjoy performing by yourself, you have only to select your favorite piece from 88 preprogrammed songs and tap any key with a steady rhythm and tempo. CONCERT MAGIC will provide the correct melody and accompaniment notes, regardless of which keys you press.
SELECTING A CONCERT MAGIC SONG
OPERATION
Song number 5
88 Concert Magic songs are assigned to each of the 88 piano keys, classified in eight groups by song category such as Children's Songs, American Classics, Christmas Songs.
To select a song, press the key to which your desired song is assigned while holding down the CONCERT MAGIC button. The LED display gives the song number.
All the song titles are listed on page 68 in this section. To make it easier to find which song is assigned to which key, there is also a key strip that indicates song categories, and note names.
LISTENING TO THE SELECTED SONG
RECOF
PLAY/STOP

To listen to a Concert Magic song, first follow the song selection procedure then press the PLAY/STOP button.
Adjust the speed or tempo of the song by using the VALUE buttons while holding down the TEMPO button.
The LED display will not display the tempo value when used with Concert Magic.
To stop play back of the song press the PLAY/STOP button again.
To restart the currently selected song from the beginning, you must reselect the song by repeating the song selection procedure.
Press the CONCERT MAGIC button and then press the PLAY/STOP button without selecting a song. The HS22 piano will play back all the preset songs from one to another.
PERFORMING THE SELECTED SONG
After following the song selection procedure, tap out the rhythm of the selected song on any one of the 88 black or white keys on your piano keyboard.
As you tap harder, the notes will get louder; as you tap softer, the notes will get quieter. As you tap faster, the notes speed up; as you tap slower, they will slow down correspondingly.
When performing fast songs on Concert Magic, it is sometimes easier to tap two different keys with two fingers alternating. This allows you to play twice as fast as you can using only one finger on one key.
Adjust the relative volume of the melody notes and accompaniment notes with the DUAL BALANCE slider.
CONCERT MAGIC SONG ARRANGEMENT TYPES
Each of the 88 Concert Magic songs is arranged in one of three types.
EASY BEAT
These are the easiest songs to play. To perform them, simply tap out a constant steady beat on any key on your piano keyboard.
MELODY PLAY
These songs are also quite easy to play, especially if they are familiar to you. To perform them, tap out the rhythm of the melody on any one of the keys on your piano keyboard. Singing along as you tap the rhythm can be helpful.
SKILLFUL
These songs range in difficulty from moderately difficult to difficult. To perform them, tap out the rhythm of both the melody and the accompaniment notes on any of the keys on your piano keyboard.
It may require some practice to successfully play these selections. Even skilled players will enjoy the challenge of the skillful pieces. Try listening to these songs first, and then try to tap out the rhythms that you hear.
DEMO

The HS22 piano has seventeen demo songs built in. Each demo song presents a brief musical piece to introduce the different preset instruments.
The 88 Concert Magic songs can be demonstrated as well.
PRESET SOUND DEMO
To listen to all the demo songs, simply press the DEMO button. The HS22 piano will begin the demo. The demo songs for the sounds in the Classic Grand category will begin the demo.
All of the Classic Grand demo songs will be played back in order. Then another category will be selected at random and the demo songs for that category will be played. New sound categories will be selected at random until the DEMO button is pressed again to stop.
To select the demos for a particular sound category, press the desired SOUND SELECT button while the demo is playing. The demo songs for that category will play and then another sound category will be selected at random.
CONCERT MAGIC SONG DEMO
There are two ways to listen to the Concert Magic songs in the DEMO mode.
- Press the piano key to which the desired song is assigned while holding down the DEMO button.
The HS22 piano will play back the selected song and, then play the rest of songs in the same song category one after another.
- Press the CONCERT MAGIC button and then press the DEMO button.
The HS22 piano will play back all of the Concert Magic songs in random order.
To stop the demo, press the DEMO button again.
To select the songs in different categories, select a song from the desired category.

3. SOUND SELECT BUTTONS

SELECTING A SOUND
These buttons are used to select the desired instrument to play.
Press the appropriate button and the LED indicator of it will be turned on to indicate that it is selected.
The Sound Select buttons have two sounds assigned to them. Repeatedly pressing these Sound Select buttons switches between the two sounds. When you select the variation sounds, the dots in the LED display will light up.
DUAL
You can layer any two preset sounds (Dual).
Pressing two buttons simultaneously will activate the DUAL mode.
If you want to layer the two sounds that are assigned to the same SOUND SELECT button, hold down the SOUND SELECT button and press either of the VALUE buttons.
SELECTING A SONG OR A PART
The built in recorder has the capability to record and play back up to five different songs. Each song has two separate tracks (called "Parts") that can be recorded or played back. The sound select buttons, except HARPSICHORD and VIBRAPHONE, are also used for selecting a song and a part when using the recorder.
Select the desired SONG number or PART number by pressing the appropriate button while holding down REC or PLAY button.
SELECTING A FUNCTION
These buttons are used to select the functions that control the tuning system and MIDI configurations.
Use one of the eight buttons (except CHOIR/PAD) to select a desired function while holding down the TOUCH and TRANSPOSE button simultaneously. (See Page 52)
SELECTING A DEMO SONG
When listening to the demo songs, these buttons are used to select the different demo songs.
Use one of the nine buttons to select a desired preset sound to demonstrate after pressing the DEMO button.

4. VALUE BUTTONS

CHANGING VALUE
These two buttons are used to change the value for certain functions. First select the function or option which you would like to change the value for by pressing the appropriate button(s), then use the VALUE buttons. “▲” button increases value and “▼” decreases.

5. EFFECT BUTTONS
SELECTING AN EFFECT (EFFECTS BUTTON)
Use the EFFECTS button to add an effect to the sound. There are six digital effects; CHORUS, DELAY1–3, Tremolo and a Rotary effect that can be used to enhance the sound of the preset tone.
OPERATION

To add an effect to the sound, press the EFFECTS button. The LED indicator will be turned on and the LED display will show you which effect is currently selected.
To change the effect type, use the VALUE buttons while holding down the EFFECTS button.
REVERB (REVERB BUTTON)
Use REVERB button to add reverberation to the sound. There are five types of reverb built-in: ROOM, STAGE, HALL, 3D ROOM, and 3D HALL.
OPERATION
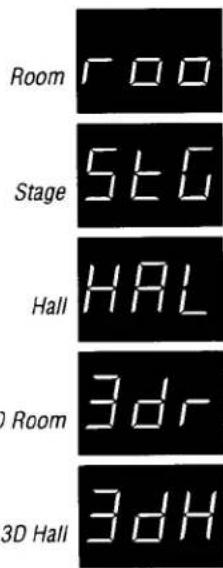
To add reverb to the sound, press the REVERB button. The LED indicator will be turned on and the LED will display which type of reverb is currently selected.
To change the reverb type, use the VALUE buttons while holding down the REVERB button.
The reverb setting is stored with the sound. When you select the same preset sound again your chosen effect will be recalled, until the instrument is turned off. Once the power is turned off, the effect will be reset to the factory setting.
DUAL BALANCE
When playing in dual mode, this slider controls the volume balance of the two sounds.
Move the slider to the right to increase the volume of the rightmost preset sound of the pair and decrease the volume of the leftmost preset sound. The balance changes in the opposite way when the slider is moved to the left.
PART VOLUME BALANCE FOR CONCERT MAGIC
When using with Concert Magic, the slider adjusts the volume balance of the melody part and the accompaniment.
As the slider is moved the right, the sound of the melody becomes louder and the accompaniment becomes softer. The balance changes in the opposite way when the slider is moved to the left.

7. METRONOME BUTTONS
METRONOME

CHANGING TEMPO (TEMPO BUTTON)
The TEMPO button is used to activate the metronome and control the tempo.
OPERATION
Tempo 120

After pressing the TEMPO button, the metronome starts counting and turns on the LED indicator above it. The LED display gives tempo value in number of quarter note per minute ( · = 120 , for example).
To change tempo, use the VALUE buttons to increase or decrease the value within the range of 30–300 (60–600 when in 6/8 rhythm). The initial value is 120.
Press the TEMPO button again to stop the metronome.
The TEMPO button is also used to control the playback speed for the Concert Magic songs.
OPERATION
After selecting a Concert Magic song to play back, press the TEMPO button. Then the LED display shows tempo value. Use the VALUE buttons to change the tempo.
You can control the tempo, either before playing back a song or while playing back.
CHANGING THE TIME SIGNATURE (BEAT BUTTON)
The BEAT button is used to activate the metronome and select your desired time signature. The HS22 piano has five settings to choose: 1/4, 2/4, 3/4, 4/4 and 6/8.
OPERATION

After pressing the BEAT button, the metronome starts counting and turns on the LED indicator above it. The LED display gives a time signature (4-4, for example).
Use the VALUE buttons to select the desired time signature.
Press the BEAT button again to stop the metronome.
CHANGING THE METRONOME VOLUME (TEMPO & BEAT BUTTONS)
The volume of the metronome can be adjusted to any level you like.
OPERATION
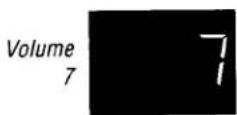
Press the TEMPO and BEAT buttons simultaneously. The LED displays the volume level of the metronome in numbers from 1 (soft) to 10 (loud). The factory preset is 7.
To change the volume level, use the VALUE buttons while holding down the TEMPO and BEAT buttons.
Press both buttons simultaneously again to stop the metronome
NOTE
All the metronome settings will be reset to the factory preset value after turning off the power.
RECORDER
PLAY/STOP
REC


RECORDING (REC BUTTON)
The REC button is used for recording.
OPERATION
Press the REC button to enable the HS22 piano to record. The LED indicator above the button starts flashing to tell you that the piano is ready to record.
Begin playing some music on the keyboard. The HS22 piano automatically begins recording on the first note you play.
When you are finished recording, press the PLAY/STOP button. The piano will stop recording and save your song to memory.
Saving to memory may take a few seconds and during this time the piano will not perform any other operations.
You can start recording by pressing the PLAY/STOP button instead of pressing a key. In this way, you can insert a blank bar at the beginning of the song.
The HS22 can record and store up to five songs.
OPERATION
Press the SOUND SELECT button labeled with the desired song number (1–5) while holding down the REC button. The LED indicator for the song will also begin flashing. Then start recording by following the regular recording procedure.
RECORDING A SECOND PART
You can record a second part in the second track (part) of the same song.
OPERATION
Press the SOUND SELECT button labeled with the desired part number while holding down the REC button. The LED indicator for the part will begin flashing. Then start recording by following the regular recording procedure.
STATUS OF SONG AND PART
Some of the LED indicators will be turned on or will flash while the REC button is held down. The LED indicates the status of the song and the part.
An LED that is on indicates that the song or part have already been recorded.
A flashing LED indicates that the song or part is selected for recording.
An LED that is off indicates a song or part that has nothing recorded on it.
EXAMPLE:
The LED indicator shows the status while the REC button is held down.

Song 1, 2 and 3 have been recorded. (LED stays on.)
Song 4 and 5 are empty. (LED is off.)
Song 2 is selected to record. (LED is flashing.)
Part 1 of Song 2 has been recorded. (LED stays on.)
Part 2 of Song 2 is selected to record. (LED is flashing.)
RECORDING THE SECOND PART WHILE LISTENING TO THE FIRST PART
While recording the second part, you can listen to the first part.
OPERATION
Select the desired song, set the previously recorded track to play back and enable the empty track to record as illustrated above. Then press the REC button to enable the piano to record.
If you want to start recording the new part from the beginning of the song, just play the keyboard. You will hear the first part playing back while you record the new part.
If you would like to play back the first part and then start recording the second part from a certain point later in the song, instead of playing the keyboard press the PLAY/STOP button to start playback of the first part and then begin recording the second part from any point you like.
NOTE
Recording a new part will completely erase data recorded previously in the same part in the same song.
INFORMATION TO RECORD
The recorder remembers all the notes you play, usage of the pedals and the sound selection.
If you record in a transposed key, the song will be played back in the same key you heard when recording, not in the key that you played with the keyboard.
MEMORY CAPACITY
The total memory capacity of the recorder is approximately 5000 notes. When the memory becomes full, the recorder will automatically stop at that moment. The data recorded before the interruption will be retained. All song data will be saved even after turning off the power.
PLAYING BACK A SONG (PLAY/STOP BUTTON)
The PLAY/STOP button is used to start and stop play back of the recorded songs.
OPERATION
Press the PLAY/STOP button and the recorded song will start playing. Press the PLAY/STOP button again to stop playback.
To select a specific song and part you would like to play back, hold down the PLAY/STOP button and use the SOUND SELECT buttons.
An LED that is on indicates a song or part that has song data to play back. A flashing LED indicates that this song is selected to play back. An LED that is off indicates this song or part have nothing to play back.
USING THE PLAY BUTTON TO START RECORDING
The PLAY/STOP button can also be used to start recording. In this way, you can insert a blank bar at the beginning of the song.
OPERATION
Press the REC button to enable the piano to record first, then press the PLAY/STOP button. On pressing the PLAY/STOP button, the HS22 piano starts recording regardless of whether you press a key or not.
ERASING SONG DATA
This function allows you to erase any song and part you do not want to listen to.
OPERATION
While holding down both the REC and PLAY/STOP button, press the SOUND SELECT button labeled with the song number and the part number you wish to erase. Releasing the buttons will erase the desired song data.
ERASING ALL THE SONGS
To erase all the songs at once, first turn off the power then turn it back on again while holding down both the REC and PLAY/STOP buttons.
TOUCH TRANSPOSE

SELECTING THE TOUCH SENSITIVITY (TOUCH BUTTON)
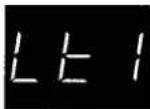
The TOUCH button is used to select a different touch sensitivity of the keyboard from the standard touch of an acoustic piano. You can change the sensitivity to one of five different settings: LIGHT1/2, HEAVY1/2 and OFF.
Light1
Heavy2
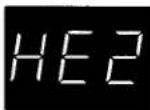
OFF

LIGHT: For those still developing finger strength. A louder volume is produced even when playing with a soft touch. LIGHT2 is lighter than LIGHT1.
HEAVY: Perfect for those with strong fingers. Requires a heavier touch to produce a loud volume. HEAVY2 is heavier than HEAVY1.
OFF: A constant volume is produced regardless of how hard the keys are struck. This setting is suitable for sounds that have a fixed dynamic range such as Organ and Harpsichord.
OPERATION
To change from the standard touch press the TOUCH button. The LED indicator above the TOUCH button will be turned on to indicate that the piano is now using a different touch setting.
Use the VALUE buttons to change the type of touch while the TOUCH button is held down.
Press the TOUCH button again to get back to the standard touch setting.
Touch selection is global for all the preset tones. You cannot have an individual setting for each tone.
Once the power is turned off, the setting will be reset to the standard setting.
NOTE
LIGHT and HEAVY do not represent the physical weight of the keys. These are settings that affect the sensitivity of the keys, which determines the volume level in response to the key movement.
TRANSPOSING THE PIANO (TRANSPOSE BUTTON)
Use the TRANSPOSE button to raise or lower the piano's key in half steps. This is especially useful when you have learned a song in one key and have to play it in another key. The transpose feature allows you to play the song in the original key, but hear it in another key.
OPERATION
Value: -5
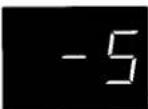
-5, for example, represents 5 half steps lower than the standard.
To switch from the standard key to the desired key, press the TRANSPOSE button. The LED above the TRANSPOSE button will be turned on to indicate that the piano is now transposed. The LED display gives the number that represents how many half steps up or down from the standard key.
Use the VALUE buttons to change the key while the TRANSPOSE button is held down. "0" indicates the standard key. The piano can be transposed up to 5 half steps higher or 6 half steps lower.
Press the TRANSPOSE button again to return to the standard key.
The transpose value will be reset to "0" after turning the power off.
OTHER FUNCTIONS (TOUCH & TRANSPOSE BUTTONS)
There are eight other functions that control tuning, system, and MIDI functions. They are Tuning, Temperament, MIDI Transmit and Receive Channel, Transmit Program Change On/Off, Local On/Off, Multi-timbral Mode, Channel Mute, and Program Change Number.
□ COMMON OPERATION
These functions are selected by pressing one of the SOUND SELECT buttons while holding down both the TOUCH and the TRANSPOSE buttons. Each SOUND SELECT button is assigned to the functions listed below.
| Tuning | CLASSIC GRAND |
| Temperament | MODERN PIANO |
| MIDI Transmit and Receive Channel | ELECTRIC PIANO |
| Transmit Program Change On/Off | DRAWBAR |
| Local Control On/Off | CHURCH ORGAN |
| Multi-Timbral Mode On/Off | HARPSICHORD |
| Channel Mute | VIBRAPHONE |
| Program Change Number | STRINGS |
The LED indicator of the button will flash to show which function is selected.
To exit the function, press any of the SOUND SELECT buttons or the TOUCH or the TRANSPOSE button.
Once the power is turned off, the settings will be reset to the factory preset value.
1. TUNING
OPERATION
Pitch: 440.0 Hz

Tuning allows you to adjust the piano's pitch. You may need to adjust the tuning when you play with other instruments.
Press the CLASSIC GRAND button while holding down the TOUCH and the TRANSPOSE buttons to control the tuning.
The LED display gives a number that represents the pitch for "A" in Hz (Hertz). The range of adjustment is from 427.0 to 453.0 Hz (displayed as 27.0–53.0). The factory preset value is set to the modern standard A = 440.0 Hz (displayed as 40.0).
Use VALUE buttons to raise or lower the pitch while in tuning mode.
To exit, press any of the SOUND SELECT buttons or the TOUCH or the TRANSPOSE button.
2. TEMPERAMENT
OPERATION
Temperament (Equal)

The HS22 piano offers not only equal temperament (the modern standard) but also immediate access to temperaments popular during the Renaissance and Baroque periods. It should be interesting and educational to try some of the different temperaments, although the equal temperament is dominant today.
Press MODERN PIANO button while holding down the TOUCH and the TRANSPOSE to change the temperament. The LED display shows the symbol that indicates which type of temperament is in use.
To switch from one temperament to another, use the VALUE buttons.
After you have selected the desired temperament, please read the following section on selecting a key signature for the temperament before continuing.
KEY SIGNATURE OF TEMPERAMENT
Limitless modulation of the key became available only after the invention of Equal temperament. When we use a temperament other than Equal temperament, we must carefully choose the key signature to play in.
Key in D

Key in A#

To select the key signature of the temperament, simply press one of the 88 piano keys. The note name of the key you pressed will be shown in the display and it will be chosen as the key of the temperament.
For example, if the song you are going to play is written in D major, press any "D" key to set the temperament key.
Please note that changing the key of the temperament will only change the "balance" of the tuning, the pitch of the keyboard remains unchanged. Use the TUNING or TRANSPOSE control to change the pitch of the whole keyboard.
To exit, press any of the SOUND SELECT buttons or the TOUCH or the TRANSPOSE button.
BRIEF EXPLANATION OF TEMPERAMENTS
Equal(P.only)
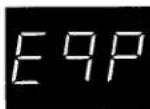
EQUAL TEMPERAMENT (PIANO ONLY)
This is the default temperament. If a piano sound is selected the tuning is stretched like an acoustic piano (EQUAL TEMPERAMENT). If any other type of sound is selected the tuning will be EQUAL (FLAT). An explanation of EQUAL TEMPERAMENT and EQUAL TEMPERAMENT (FLAT) is provided later in this section.
NOTE
Pure(Major)

If a piano sound is used in a layer with any other sound then both sounds will use the EQUAL TEMPERAMENT (Stretched) tuning.
Pure(minor)

MERSENNE PURE TEMPERAMENT(MAJOR) MERSENNE PURE TEMPERAMENT(MINOR)
This temperament, which eliminates dissonances for thirds and fifths is still popular for choral music because of its perfect harmony.
You need to be aware what key you are playing in with this temperament. Any key modulation will result in dissonances. When you play music in a particular key, you need to match the key of the temperament as well. When playing in a major key select Pure (Major) and when playing in a minor key select Pure (minor).
Pythagorean

Meantone

Werckmeister

Kirnberger

Equal(Flat)
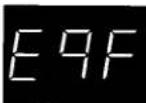
Equal

PYTHAGOREAN TEMPERAMENT
This temperament, which uses mathematical ratios to eliminate dissonance for fifths, is very limited for use with chords, but it produces very characteristic melodic lines.
MEANTONE TEMPERAMENT
This temperament, which uses a mean between a major and minor whole tone to eliminate dissonance for thirds, was devised to eliminate the lack of consonances experienced with certain fifths for the Mersenne pure temperament. It produces chords that are more beautiful than those with the equal temperament.
WERCKMEISTER III TEMPERAMENT, KIRNBERGER III TEMPERAMENT
These two temperaments are placed in between Meantone and Pythagorean. For music with few accidentals, this temperament produces the beautiful chords of the mean tone, but as accidentals increase, the temperament produces the characteristic melodies of the Pythagorean temperament. It is used primarily for classical music written in the Baroque era to revive the original characteristics.
EQUAL TEMPERAMENT(FLAT)
This is “unstretched” equal temperament that divides the scale into twelve equal semitones. This produces the same chordal intervals in all twelve keys, and has the advantage of limitless modulation of the key. However the tonality of each key becomes less characteristic and no chord is in pure consonance.
EQUAL TEMPERAMENT
This is the most popular piano temperament. The hearing ability of a human is uneven and is not as accurate with high frequency and low frequency as it is with the middle range. This temperament's tuning is stretched to compensate for this so the sound will be heard naturally to the ears. This "Stretched" equal temperament is a practical variation of the "unstretched" equal temperament which was invented on a mathematical basis.
3. MIDI TRANSMIT AND RECEIVE CHANNEL
This determines on which MIDI channel the HS22 piano will exchange MIDI information with an external MIDI instrument or a personal computer.
OPERATION
Channel 15

Press the ELECTRIC PIANO button while holding down the TOUCH and the TRANSPOSE buttons, and the piano will show the channel number in the LED display. The default channel is 1.
Change the channel within the range of 1-16 using the VALUE buttons.
To exit, press any of the SOUND SELECT buttons or the TOUCH or the TRANSPOSE button.
4. TRANSMIT PROGRAM CHANGE ON/OFF
This determines whether or not the HS22 piano will transmit program change information when pressing the SOUND SELECT buttons. When this is turned on, pressing the SOUND SELECT buttons will send the program change numbers as listed in page 63.
OPERATION
Transmit On

Press the DRAWBAR button while holding down the TOUCH and the TRANSPOSE buttons, and the LED display will show "on" or "off". The initial value is on.
Toggle on and off using the VALUE buttons.
Transmit OFF

To exit, press any of the SOUND SELECT buttons or the TOUCH or the TRANSPOSE button.
This determines whether the HS22 piano's sound will be Played from the piano's keyboard ("ON") or only from an external MIDI instrument ("OFF").
Even with local control "off" the piano's keyboard will still transmit to an external MIDI instrument or personal computer.
OPERATION
Local Control On

Local Control OFF

Press the CHURCH ORGAN button while holding down the TOUCH and the TRANSPOSE buttons, and the piano will show "on" or "off" in the LED display. The initial value is on.
Toggle on and off using the VALUE buttons.
To exit, press any of the SOUND SELECT buttons or the TOUCH or the TRANSPOSE button.
6. MULTI-TIMBRAL MODE ON/OFF
Multi-timbral mode allows the instrument to receive data on more than one MIDI channel simultaneously. In this mode, the HS22 piano can play different musical parts with different sounds for each part.
Multi Timbre On

Multi-Timbral On This is a flexible 16 part multi-timbral setup. You can turn individual MIDI channels on and off, and assign any program number to any channel in the way you like.
Multi Timbre OFF

Multi-Timbral Off This turns off the multi-timbral capability. Only one MIDI channel will be active and only the preset sound currently selected will be heard when a MIDI signal is received.
OPERATION
Press the HARPSICHORD button while holding down the TOUCH and the TRANSPOSE buttons, and the piano will show OFF, ON in the LED display. The initial value is off.
Select a desired mode using the VALUE buttons.
To exit, press any of the SOUND SELECT buttons or the TOUCH or the TRANSPOSE button.
7. CHANNEL MUTE
This determines which MIDI channels are activated to receive when used with Multi-Timbral On. You can activate or deactivate each of the 16 channels individually.
OPERATION
Mute OFF

Press the VIBRAPHONE button while holding down the TOUCH and the TRANSPOSE, and the piano will show "on" or "off" in the LED display. The initial value is "on" for channel 1 and "off" for the other channels.
To turn off the channel, use the VALUE keys to toggle on and off.
When you want to turn on and off the other channels, use the 16 leftmost white keys to select a desired channel. Then use the VALUE keys to turn them on and off.

To exit, press any of the SOUND SELECT buttons or the TOUCH or the TRANSPOSE button.
8. PROGRAM CHANGE NUMBER
This function allows the HS22 piano to transmit program change numbers beyond the 8 pre-defined numbers transmitted by the sound select buttons. Using this function, you can send any number from 1 to 128.
OPERATION
Number 120
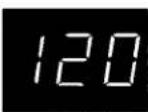
Press the STRINGS button while holding down the TOUCH and the TRANSPOSE, and the piano will show a number in the LED display which represents the program number. Use the VALUE buttons to set the desired number.
To send the program change number, press both VALUE buttons simultaneously.
To exit, press any of the SOUND SELECT buttons or the TOUCH or the TRANSPOSE button.

13. JACKS

LINE OUT JACKS
These jacks provide stereo output of the piano's sound to amplifiers, tape recorders or similar equipment.
The audio signal coming through the LINE IN jacks is also routed to these jacks. The piano's sound is mixed with the LINE IN signals.
The HS22 piano's VOLUME slider can control the output level of its own sound while it does not control the LINE IN signal.
LINE IN JACKS
These jacks are used to connect a pair of stereo outputs from other audio equipment or electronic instruments to the piano's speakers.
The audio signal coming through these jacks bypasses the piano's volume control. To adjust the volume level, use the output control of the external device.
MIDI JACKS
These jacks are used to connect external MIDI devices with the HS22 piano. There are three terminals: MIDI IN, MIDI OUT, and MIDI THRU.
SERIAL INTERFACE
This jack is used to connect with a personal computer and exchange MIDI data. Select the proper setting for your computer using the selector. PC1: NEC Computers, PC2: IBM PC & compatibles, Mac: Apple Computers, MIDI: Serial Interface disabled. Select this setting when using the MIDI jacks. You need the serial MIDI driver when connecting with a Windows computer. It is available at http://www.kawai.co.jp/english/download2.html on the internet web.
HEADPHONE JACKS

BOTTOM VIEW
There are two jacks for headphones provided at the left end on the bottom of the piano.
You can hear the piano's sound as well as any audio signal that is coming through the LINE IN.
Program Change Number Mapping
| Sound Button | When Multi-Timbral mode is ON Program # | Bank # (MSB) | When Multi-Timbral mode is OFF |
| CLASSIC GRAND | 1 | 0 | 1 |
| (VARIATION) | 1 | 16 | 2 |
| MODERN PIANO | 2 | 0 | 3 |
| (VARIATION) | 2 | 8 | 4 |
| ELECTRIC PIANO | 5 | 0 | 5 |
| (VARIATION) | 6 | 0 | 6 |
| DRAWBAR | 18 | 0 | 7 |
| (VARIATION) | 17 | 0 | 8 |
| CHURCH ORGAN | 20 | 0 | 9 |
| (VARIATION) | 20 | 96 | 10 |
| HARPSICHORD | 7 | 0 | 11 |
| (VARIATION) | 7 | 8 | 12 |
| VIBRAPHONE | 12 | 0 | 13 |
| (VARIATION) | 12 | 91 | 14 |
| STRINGS | 49 | 0 | 15 |
| (VARIATION) | 45 | 90 | 16 |
| CHOIR/PAD | 53 | 0 | 17 |
| (VARIATION) | 89 | 0 | 18 |
MIDI Exclusive Data Format
| 1st byte | 2nd byte | 3rd byte | 4th byte | 5th byte | 6th byte | 7th byte | 8th byte | 9th byte | 10th byte |
| 1 | 2 | 3 | 4 | 5 | 6 | 7 | 8 | 9 | 10 |
1 F0.... Start code
2 40....Kawai's ID number
3 00 - OF ..... MIDI channel
4 10,30 ..... Function code (30 when setting MULTI TIMBRE ON/OFF)
5 04. Indicates that the instrument is Electronic Piano
6 02. Indicates that the piano is one of "CA", "CN" or "HS" series
7 data 1
8 data 2..... ( See the table below.)
9 data 3
10 F7....End code
| data 1 | data 2 | data 3 | Function |
| 00 | 00 | — | Multi Timbre Off |
| 02 | 00 | — | Multi Timbre On |
| 0D | 00-05 | — | 00: Effect Off, 01: Chorus, 02: Delay1, 03: Delay2, 04: Delay3, 05: Tremolo, 06: Rotary Speaker |
| 0E | 00-05 | — | 00: Reverb Off, 01: Room, 02: Stage, 03: Hall, 04: 3D Room, 05: 3D Hall |
| 14 | 00-7F | — | Dual balance |
| 16 | 1F-60 | — | Tune, 40: 440 Hz |
| 17 | 00, 7F | — | 00: Program Change Off, 7F: Program Change On |
| 18 | 00-05 | — | 00: Light1, 01: Normal, 02: Heavy1, 03: Off, 04: Light2, 05: Heavy2 |
| 20 | 00-11 | 00-11 | Dual, data 2: Right sound, data 3: Left sound |
| 25 | 00-08 | 00-0B | data 2: Temperament, data 3: Key |
| 26 | 00, 7F | 00-0F | Multi Timbre, data 2: 00 (On), 7F (Off), data 3: channel |
KAWAI DIGITAL PIANO MODEL: HS22
| Function | Transmit | Receive | Remarks | |
| Basic Channel | Default Changes | 11-16 | 11-16 | |
| Mode | Default Messages Altered | 3× ········ | 31, 3* | * The default for the OMNI mode is ON. Specifying MIDI channels automatically turns it OFF. |
| Note Number | True voice | 15-113** ········ | 0-12715-113 | |
| Velocity | Note ON Note OFF | ○ 9nH v=1-127× 9nH v=0 | ○× | |
| After Touch | Key's Ch's | ×× | ×× | |
| Pitch Bend | × | × | ||
| Control Change | 0, 32711646667 | ○××○ (Right pedal)○ (Center pedal)○ (Left pedal) | ○○○○×○ | Bank Select Volume Expression pedal Sustain pedal Sostenuto pedal Soft pedal |
| Program Change | :True # | ○ 0-127 ········ | ○*** | *** See the Program Change Number Mapping in page 63. |
| System Exclusive | ○ | ○ | On/Off Selectable | |
| Common | : Song Position : Song Select : Tune | ××× | ××× | |
| System Real Time | : Clock : Commands | ×× | ×× | |
| Aux | : Local On/Off : All Notes Off : Active Sense : Reset | ××○× | ○○(123-127)○× | |
| Notes | ** The value depends on the Transpose setting. | |||
Mode 1: OMNI ON, POLY
Mode 2: OMNI ON, MONO
O: Yes
Mode 3: OMNI OFF, POLY
Mode 4: OMNI OFF, MONO
X: No

FRONT PANEL


SPECIFICATIONS
| Keyboard | 88 Weighted keys with hammer mechanism |
| Polyphony | Maximum 64 |
| Preset Tones | Classic Grand(2), Modern Piano(2), Electric Piano(2), Drawbar (2), Church Organ(2), Harpsichord(2), Vibraphone(2), Strings(2), Choir/Pad(2) |
| Effects | Chorus, Delay (1-3), Tremolo, RotaryReverb (Room, Stage, Hall, 3D Room, 3D Hall) |
| Temperaments | Equal (Piano Only), Mersenne pure (Major), Mersenne pure (minor), Pythagorean, Meantone, Werckmeister III, Kirnberger III, Equal (Flat), Equal |
| Other Features | Concert Magic (88 Preset Songs)Volume, Dual, Dual Balance, Transpose, Tune, Touch Curve Selection (Light1/2, Normal, Heavy1/2, Off)MIDI (16 part multi-timbral capability) |
| Recorder | 2 Tracks, 5 SongsThe total memory capacity of the recorder is approximately 5000 notes. |
| Pedals | Sustain, Sostenuto, Soft |
| Jacks | Headphone (2), LINE IN (L, R), LINE OUT (L/MONO, R), MIDI (IN, OUT, THRU), Computer Interface |
| Output Power | 40 W x 2 |
| Speakers | 6" x 9" (2), 2" x 3.5" (2) |
| Power Consumption | 120 W |
| Finish | Cherry, Oak |
| Dimensions (W x D x H) | 55 3/4" x 21" x 43 1/4" (142 x 53 x 110 cm) |
| Weight (without bench) | 165 lbs. (75 kg) |

BANK A
| Title | Note# | Mode | My Bonnie Lies Over The Ocean | E3 | EB |
| Oh Susanna | D#4 | SK | |||
| On Top Of Old Smokey | E4 | EB | |||
| Take Me Out To The Ballgame | C4 | EB | |||
| CHILDREN'S SONGS | |||||
| Bingo | G#1 | EB | The Band Played On | G4 | EB |
| Frère Jacques | F#1 | MP | When Johnny Comes Marching Home | G#4 | MP |
| Good Morning To You | F1 | MP | When The Saints Go Marching In | A4 | EB |
| Hickory Dickory Dock | D#1 | EB | |||
| I'm A Little Teapot | A#0 | MP | FAVORITE HYMNS | ||
| Itsy, Bitsy Spider | A1 | MP | A Mighty Fortress | D6 | MP |
| London Bridges | C#1 | MP | Amazing Grace | C5 | MP |
| Mary Had A Little Lamb | C1 | MP | Doxology | C#5 | MP |
| Pop Goes The Weasel | E1 | MP | Fairest Lord Jesus | B4 | MP |
| Row, Row, Row Your Boat | D1 | MP | For The Beauty Of The Earth | D5 | MP |
| The Farmer In The Dell | G1 | MP | Great Is Thy Faithfulness | C#6 | MP |
| This Old Man | B0 | MP | Holy, Holy, Holy | F5 | MP |
| Twinkle, Twinkle, Little Star | A0 | MP | How Great Thou Art | C6 | MP |
| Jesus Loves The Little Children | B5 | MP | |||
| CHRISTMAS SONGS | |||||
| Just As I Am | A#5 | MP | |||
| Deck The Halls | C2 | MP | O Worship The King | D#5 | MP |
| Hark The Herald Angels Sing | A#1 | MP | Rock Of Ages | G5 | MP |
| Jingle Bells | B1 | MP | Sweet Hour Of Prayer | A5 | MP |
| Joy To The World | D2 | MP | The Old Rugged Cross | E5 | MP |
| O Come All Ye Faithful | C#2 | MP | Trust And Obey | G#5 | MP |
| Silent Night | E2 | MP | What A Friend We Have In Jesus | F#5 | MP |
| The First Noel | D#2 | MP | |||
| We Wish You A Merry Christmas | F2 | MP | CLASSICAL SELECTIONS | ||
| What Child Is This? (Greensleeves) | F#2 | MP | An Die Freude (Ode To Joy) | F6 | MP |
| Andante (Haydn) | D#6 | MP | |||
| Blue Danube Waltz | B6 | SK | |||
| PATORIOTIC SONGS | |||||
| America The Beautiful | A2 | MP | Clair De Lune | F#6 | SK |
| Battle Hymn Of The Republic | G#2 | MP | Fledermaus | E7 | EB |
| Hail To The Chief | B2 | MP | Für Elise | E6 | EB |
| My Country 'Tis Of Thee | G2 | MP | Gavotte (Gossec) | C#7 | SK |
| Yankee Doodle | A#2 | MP | Menuet In G (Bach) | A6 | SK |
| Peter And The Wolf | G#6 | SK | |||
| Romeo And Juliet | A#6 | SK | |||
| AMERICAN CLASSICS | |||||
| Skater's Waltz | G6 | SK | |||
| Auld Lang Syne | C#4 | MP | Sleeping Beauty Waltz | C7 | EB |
| Beautiful Dreamer | A#4 | EB | Toreador Song ("Carmen") | D#7 | SK |
| Bicycle Built For Two | F4 | EB | Waltz Of The Flowers | D7 | SK |
| Bill Bailey Won't You Please Come Home | G3 | EB | |||
| Camptown Races | F#4 | MP | |||
| Clementine | A3 | MP | SPECIAL OCCASIONS | ||
| Danny Boy | C3 | EB | Bridal Chorus | F7 | MP |
| Down In The Valley | C#3 | EB | Wedding March | F#7 | SK |
| Fascination | A#3 | SK | |||
| For He's A Jolly Good Fellow | F#3 | EB | INTERNATIONAL SONGS | ||
| Give My Regards To Broadway | G#3 | SK | Chiapenacas | C8 | SK |
| Home On The Range | B3 | MP | Hatikvah | G#7 | MP |
| Home Sweet Home | D#3 | EB | Hava Nagilah | A#7 | EB |
| In The Good Old Summertime | F3 | EB | Ich Bin Ein Musikant | B7 | SK |
| Let Me Call You Sweetheart | D3 | EB | My Wild Irish Rose | A7 | EB |
| Michael Row The Boat Ashore | D4 | MP | When Irish Eyes Are Smiling | G7 | EB |
KAWAI
- HERITAGE SERIES DIGITAL PIANOS
- HS22
- IMPORTANT SAFETY INSTRUCTIONS
- SAVE THESE INSTRUCTIONS
- AVIS : RISQUE DE CHOC ELECTRIQUE - NE PAS OUVRIR
- EXAMPLES OF PICTURE SYMBOLS
- WARNING
- CAUTION
- ATTENTION
- INSTRUCTION FOR AC POWER CORD (U.K.)
- FCC INFORMATION
- CANADIAN RADIO INTERFERENCE REGULATIONS
- THANK YOU FOR PURCHASING A KAWAI DIGITAL PIANO
- HS22 DIGITAL PIANO TUTORIAL SECTION
- BASIC OPERATIONS
- USING THE RECORDER
- USING MIDI
- PLAYING WITH THE CONCERT MAGIC
- SETTING UP THE PIANO
- ASSEMBLING THE STAND
- SUPPLYING AC POWER
- USING THE HEADPHONES
- PLAYING THE PIANO
- TURNING ON THE POWER
- ADJUST THE VOLUME LEVEL
- NOW TRY PLAYING THE KEYBOARD
- USING THE PEDALS
- PLAYING WITH MORE SOUNDS
- SELECTING ANOTHER PRESET SOUND
- USING DEMO FUNCTION
- DUAL
- ABOUT POLYPHONY
- ADDING THE EFFECTS
- REVERB
- CHORUS
- DELAY
- TREMOLO
- ROTARY
- TO ADD REVERB
- TO ADD OTHER EFFECTS
- USING THE METRONOME
- STARTING THE METRONOME
- CHANGING THE TIME SIGNATURE
- ADJUSTING THE METRONOME VOLUME
- NEXT STEP TO MAKE
- RECORDING A SONG
- PLAYING BACK A SONG
- BASICS OF THE RECORDER
- TWO-TRACK FIVE-SONG RECORDER
- RECORDED INFORMATION
- NOTE INFORMATION
- SOUND SELECTION
- RECORDING CAPACITY
- RECORDER AND METRONOME
- SONG STATUS AND LED INDICATOR
- RECORDING THE TRACKS SEPARATELY
- WHEN YOU ARE FINISHED RECORDING, PRESS THE PLAY/STOP BUTTON AGAIN
- HERE ARE SOME BASIC THINGS TO CHECK FOR
- ERASING UNNECESSARY SONG DATA
- ERASING ALL DATA
- NOTE
- UNDERSTANDING MIDI
- WHAT IS MIDI
- MIDI JACKS
- MIDI CHANNEL
- USING THE HS22 PIANO AS CONTROLLER
- MIDI CONNECTION
- CHANGING TRANSMITTING CHANNEL
- AUDIO CONNECTION
- PROGRAM CHANGE
- LOCAL CONTROL
- USING THE ACR-20 AS AN ACCOMPANIMENT MODULE
- RECORDING WITH THE ACR-20
- OPERATION
- USING THE HS22 PIANO AS A MULTI-TIMBRAL SOUND MODULE
- MULTI-TIMBRAL MODE
- PLAYING WITH CONCERT MAGIC
- SELECTING A SONG
- PERFORMING A SONG
- CONCERT MAGIC SONG ARRANGEMENT TYPES
- EASY BEAT
- MELODY PLAY
- SKILLFUL
- HS22 DIGITAL PIANO
- REFERENCE SECTION
- OPERATION BY THE PANEL COMPONENTS
- CONCERT MAGIC BUTTON
- SELECTING A CONCERT MAGIC SONG
- LISTENING TO THE SELECTED SONG
- PERFORMING THE SELECTED SONG
- PRESET SOUND DEMO
- CONCERT MAGIC SONG DEMO
- SOUND SELECT BUTTONS
- SELECTING A SOUND
- SELECTING A SONG OR A PART
- SELECTING A FUNCTION
- SELECTING A DEMO SONG
- VALUE BUTTONS
- CHANGING VALUE
- EFFECT BUTTONS
- SELECTING AN EFFECT (EFFECTS BUTTON)
- REVERB (REVERB BUTTON)
- DUAL BALANCE
- PART VOLUME BALANCE FOR CONCERT MAGIC
- METRONOME BUTTONS
- CHANGING TEMPO (TEMPO BUTTON)
- CHANGING THE TIME SIGNATURE (BEAT BUTTON)
- CHANGING THE METRONOME VOLUME (TEMPO & BEAT BUTTONS)
- RECORDING (REC BUTTON)
- RECORDING A SECOND PART
- STATUS OF SONG AND PART
- EXAMPLE
- RECORDING THE SECOND PART WHILE LISTENING TO THE FIRST PART
- INFORMATION TO RECORD
- MEMORY CAPACITY
- PLAYING BACK A SONG (PLAY/STOP BUTTON)
- USING THE PLAY BUTTON TO START RECORDING
- ERASING SONG DATA
- ERASING ALL THE SONGS
- SELECTING THE TOUCH SENSITIVITY (TOUCH BUTTON)
- TRANSPOSING THE PIANO (TRANSPOSE BUTTON)
- OTHER FUNCTIONS (TOUCH & TRANSPOSE BUTTONS)
- COMMON OPERATION
- TUNING
- TEMPERAMENT
- KEY SIGNATURE OF TEMPERAMENT
- BRIEF EXPLANATION OF TEMPERAMENTS
- EQUAL TEMPERAMENT (PIANO ONLY)
- MERSENNE PURE TEMPERAMENT(MAJOR) MERSENNE PURE TEMPERAMENT(MINOR)
- PYTHAGOREAN TEMPERAMENT
- MEANTONE TEMPERAMENT
- WERCKMEISTER III TEMPERAMENT, KIRNBERGER III TEMPERAMENT
- EQUAL TEMPERAMENT(FLAT)
- EQUAL TEMPERAMENT
- MIDI TRANSMIT AND RECEIVE CHANNEL
- TRANSMIT PROGRAM CHANGE ON/OFF
- MULTI-TIMBRAL MODE ON/OFF
- CHANNEL MUTE
- PROGRAM CHANGE NUMBER
- JACKS
- LINE OUT JACKS
- LINE IN JACKS
- SERIAL INTERFACE
- HEADPHONE JACKS
- MIDI EXCLUSIVE DATA FORMAT
- FRONT PANEL
- SPECIFICATIONS
- KAWAI
Brand : KAWAI
Model : HS22
Category : Keyboard