PG300 - Gps AUDIOVOX - Free user manual and instructions
Find the device manual for free PG300 AUDIOVOX in PDF.


| Product Type | GPS Navigation Device |
| Brand | Audiovox |
| Model | PG300 |
| Display | 3.5-inch Color Touchscreen |
| Battery | Rechargeable Lithium-Ion |
| Power Adapter | 12V Car Cigarette Lighter Adapter |
| GPS Chipset | SiRFstarIII |
| Memory | Internal Flash; SD/MMC Card Slot |
| Dimensions (approx) | 4.5 x 3.0 x 0.8 inches |
| Weight (approx) | 5.6 oz |
| Navigation Functions | Turn-by-Turn Directions, Points of Interest, Route Planning |
| Antenna | Built-In |
| Mount | Windshield Suction Cup Mount |
| Audio | Voice Prompts via Built-in Speaker |
| Connectivity | USB 2.0 for Map Updates |
| Waterproof | Not Waterproof |
| Maintenance | Clean with soft, dry cloth; avoid liquids |
| Safety | Secure mount; do not operate while driving |
| Spare Parts | Contact Audiovox for replacement mounts or chargers |
Frequently Asked Questions - PG300 AUDIOVOX
User questions about PG300 AUDIOVOX
0 question about this device. Answer the ones you know or ask your own.
Ask a new question about this device
Download the instructions for your Gps in PDF format for free! Find your manual PG300 - AUDIOVOX and take your electronic device back in hand. On this page are published all the documents necessary for the use of your device. PG300 by AUDIOVOX.
USER MANUAL PG300 AUDIOVOX
PG300
Personal GPS Locator
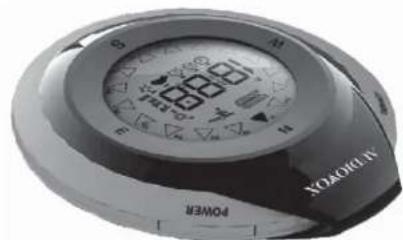

AUDIOVOX*
OWNER'S MANUAL
NOTICES AND SPECIFICATIONS
About GPS System and Location Accuracy
The Global Positioning System (GPS) is operated by the US government, which is solely responsible for its accuracy and maintenance. The system is subject to changes which could affect the accuracy and performance of all GPS equipment. In addition, the GPS system itself limits the accuracy of the distance indicated on the device's display to within approximately 3-5 meters of the actual saved location. For more information about GPS, visit Audiovox Electronics Corporation's Web site www.audiovox.com.
About GPS Signals
This device must acquire GPS satellite signals to operate. The device may not be able to acquire signals if located indoors or near tall obstructions (such as trees or tall buildings). Go to an area free from tall obstructions to use the device. When the device acquires satellite signals, the GPS satellite ( ) indicator is steady. When it loses satellite signals, or the device cannot acquire a GPS signal, the GPS satellite ( indicator flashes.
This product is designed to provide direction to a saved location. It is not designed as a monitoring device for tail obstructions, hazardous or weather conditions, or other factors that may affect safety while using this device.
Warning
This handheld device is only intended to be used as a supplemental navigation aide. The user assumes all responsibilities associated with the use of this product. It must not be used for any purpose requiring precise measurement of location, direction, distance, or topography. This device should not be used for navigating any aircraft or vehicles. It is the user's sole responsibility to exercise proper judgment when using this product under any conditions.
Vehicle Use Notice
Audiovox is committed to safety and responsible use. Do not use this GPS device to navigate while driving a motor vehicle. Attention to this device while driving can distract the motor vehicle's operator, creating an unsafe situation. Injury, death, or property damage may result if the operator fails to adhere to safe driving practices. It is the driver's sole responsibility to operate the vehicle in a safe manner. The device should not be mounted in a vehicle in a manner to distract, impair the view, or in any way interfere with the motor vehicle's operator or the motor vehicle's safety features (such as an air bag). Windshields and vehicle windows integrated with metallic materials, such as defrosters or tinting film, can degrade GPS reception inside a vehicle.
Liability Notice
In no event will Audlovox be liable for any incidental, special, indirect, or consequential damages resulting from the use, misuse, or inability to use this product or from defects in the product. Some states do not allow the exclusion of incidental or consequential damages, so the stated limitations may not apply therein.
CONTROLS AND INDICATORS

- Store/Se▶ ( ) Button - Press to save a setting.
- Press to turn on the backlight. The backlight will remain on for twenty seconds.
- Batteries (☐) Indicator - Indicates amount of battery charge remaining. Displays when the battery is fully charged. Displays and flickers when battery power is insufficient.
- GPS Satellite ( ) Indicator - Steady when GPS signal is locked, Flashes when acquiring GPS signal.
- On/Off/Mode ( 🔒 ) Button - Press and hold to turn unit on/off.
- Press to change mode.
- Press to turn on the backlight. The backlight will remain on for twenty seconds.
- Direction Arrow (▲) - Points to the North when in Compass Mode, Points to the stored location when in Location Mode
- Units Indicator - Displays time (1), degrees (0), yards (yd), miles (m), kilometers (km), or meters (m).
- Favorite ★ ) Indicator - Lit when in Favorite Location Mode.
- Car ♣ ) Indicator - Lit when in Car Location Mode.
- Home 🏠) Indicator Lit when in Home Location Mode.
- Compass (▲) Indicator - Lit when in Compass Mode
- Time (●) Indicator - Lit when in Time Mode.
- Data Display Area - Data displayed depends on the mode selected.
INSTALLING THE BATTERIES
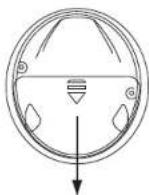
Before attempting to operate your GPS Locator, install two AAA batteries (not included) as described below:
- Using your finger, slide the battery cover in the direction of the arrow.
- Install two AAA batteries. Make sure that the proper polarity (+ or -) is observed.
- Slide the battery cover back onto the unit until it locks.
OPERATING THE UNIT
To turn the unit on:
- Press and hold the On/Off ( switch for three seconds.
- Wait for the GPS signal to lock. The GPS Satellite ( → ) indicator will be steady when locked. If the GPS signal is not locked, the time will not display and location modes will not operate. Note: The GPS signal may not lock when you are indoors. To receive the best signal, use the GPS Locator outdoors. Hold the unit face up towards the sky. Move away from tall buildings, trees or overhead obstructions.
To turn the unit off :
- Press the On/Off ( switch. The backlight will light.
- When the backlight is lit, press and hold the On/Off ( ) switch for three seconds.
To change mode of operation:
- Press the Mode ( ) Button to change the mode in the following sequence: Time Mode ( ), Compass Mode ( ), Home Location ( ) Car Location ( ) favorite Location ( ). ★
5
SETTING UP THE GPS LOCATOR - DO THIS FIRST
Before using the GPS Locator, to make the device operational, you will have to set the time zone to your location and calibrate the compass.
Setting Your Time Zone
- Press the Mode ( 🔒 ) Button repeatedly until the Time ( 🔒 ) Indicator appears.
- Press and hold the Store/Set (▶) Button for three seconds. A number will begin flashing on the display. This indicates
that you are making changes to the time zone. - Press the Store/Set ( ▶ ) Button to scroll through the numbered choices. See the chart below for the proper number assigned to your time zone.
- Once you have selected your time zone, press the Mode ( ) Button to finish. Your local time will now be displayed.
Time Zone Chart for the USA
Example: If you are in Miami (Eastern Standard Time Zone), the correct setting is -5.
| Standard Time Daylight Time | ||
| Eastern Time Zone - 5 - 4 | ||
| Central Time Zone - 6 - 5 | ||
| Mountain Time Zone - 7 - 6 | ||
| Pacific Time Zone - 8 - 7 | ||
| Alaska Time Zone - 9 - 8 | ||
| Hawaii - Aleutian Time Zone | - 10 | - 9 |
Calibrating the Compass
Note: During calibration, hold the GPS Locator horizontal to the ground with the display facing up.
-
Press the Mode ( ) button repeatedly until the Compass ( ) indicator appears.
-
Press and hold the Store/Set (▶) Button for three seconds. A zero in the middle of the display appears.
-
Turn the device three times slowly in one direction around the central point (see diagram below for location). Once the process is finished, the compass will display a heading in degrees.

7
MODES OF OPERATION
Time Mode
In Time Mode, time is displayed in 12-hour (AM/PM) format.
- Press the Mode (💡) Button repeatedly until the Time (💡) Indicator appears.
Note: If the GPS Satellite (Indicator is flashing, the GPS is not locked and the time can not be displayed.
Compass Mode
In Compass Mode, the Direction Arrow will always point North. The display will show the angle, from 0 to 360 degrees.
between North and the direction the unit is pointed towards.
Note: The digital compass may be affected by large metal objects, such as buildings with metal, power lines, and steel
bridges. Move away from these types of objects when using this unit.
- Press the Mode ( ) button repeatedly until the Compass Mode ( ) Indicator appears.
Location Mode
The GPS Locator stores and locates up to three different locations. They are named Home Location (▲), Car Location (●), and Favorite Location (★). You can switch between locations by pressing the Mode (●) Button. Although each location has a designated name (Home, Car, or Favorite), any type of location can be set. In Location Mode, the Data Display Area displays the horizontal distance between your current location and the stored location. The Direction Arrow (▲) points towards the stored location.
To set and store a location:
-
You must first physically be at the location you want to store.
-
Press the Mode (💡) Button repeatedly until the Home Location (💡), Car Location (💡) or Favorite Location (★) indicator appears.
-
Once you are in the desired location, make sure that you are connected to the satellite.
-
Press and hold the Store/Set (▶) Button until the location is set. The location has been set when you see a zero on the display and all the Direction Arrows (▲) around the display are on. This indicates you have "locked-in" that location.
To return to a location:
- Select the desired location (Home, Car, or Favorite) on the device. At this point, only one direction arrow on the circumference of the display will light up. This indicates what direction you need to head towards. The digital read out in the display represents the distance, in either meters or yards, you are from the desired location.
Note: If the GPS Satellite (OR) indicator is flashing, the GPS is not locked and distance and direction cannot be displayed. - Press the Store/Set (▶) Button to change the units of measurement from yards to meters or from miles to kilometers.
Note: If distances are greater than 1,999 meters, the unit will display distances in miles/kilometers. - As you follow the arrow and get closer to the location, the digital read out will decrease until it reaches zero, indicating you are at your desired location.
TROUBLESHOOTING
- If the unit can not be started or used normally, please make sure that the batteries are installed correctly.
- If you are not using your unit for a long period of time, please remove the batteries.
- If you are moving, the time required for GPS positioning may increase. Recommendation: When you start the unit, please stop in order to reduce this time.
- Do not use or store the unit in a location that is subject to high temperature or humidity (for example, in a closed vehicle or in direct sunlight) for a long time. The high temperature or humidity may impair the unit's function.
- If the time information is incorrect, please enter the Time Zone Mode to set the time zone correctly.
- Do not use or store the unit close to equipment that produce strong magnetic fields (such as electrical products or magnets). The magnetic materials may make the unit indicate an incorrect direction.
- If new batteries are installed or the direction can not be precisely indicated, please recalibrate the compass.
FCC NOTICE
This device complies with Part 15 of the FCC rules and regulations. Operation is subject to the following conditions:
• The device may not cause harmful interference, and
- The device must accept interference received, including interference that may cause undesired operation.

AUDIOVOX®
90 DAYS LIMITED WARRANTY
Applies to Audiovox Personal Pocket G.P.S Locator
AUDIOVOX ELECTRONICS CORPORATION (the Company) warrants to the original retail purchaser of this product that should this product or any part thereof, under normal use and conditions, be proven defective in material or workmanship within 90 days from the date of original purchase, such defect(s) will be repaired or replaced with new or reconditioned product (at the Company's option) without charge for parts and repair labor. To obtain repair or replacement within the terms of this Warranty, the product is to be delivered with proof of warranty coverage (e.g. dated bill of sale), specification of defect(s), transportation prepaid, to the warranty center at the address shown below.
This warranty does not extend to loss of satellite signal, electrostatic discharge, or damage caused by an AC adaptor not provided with the product. This Warranty does not apply to any product or part thereof which, in the opinion of the Company, has suffered or been damaged through alteration, improper installation, mishandling, misuse, neglect, accident, or by removal or defacement of the factory serial number/bar code label(s). THE EXTENT OF THE COMPANY'S LIABILITY UNDER THIS WARRANTY IS LIMITED TO THE REPAIR OR REPLACEMENT PROVIDED ABOVE AND, IN NO EVENT, SHALL THE COMPANY'S LIABILITY EXCEED THE PURCHASE PRICE PAID BY PURCHASER FOR THE PRODUCT.
This Warranty is in lieu of all other express warranties or liabilities. ANY IMPLIED WARRANTIES, INCLUDING ANY IMPLIED WARRANTY OF MERCHANTABILITY, SHALL BE LIMITED TO THE DURATION OF THIS WRITTEN WARRANTY. ANY ACTION FOR BREACH OF ANY WARRANTY HEREUNDER INCLUDING ANY IMPLIED WARRANTY OF MERCHANTABILITY MUST BE BROUGHT WITHIN A PERIOD OF 24 MONTHS FROM DATE OF ORIGINAL PURCHASE. IN NO CASE SHALL THE COMPANY BE LIABLE FOR ANY CONSEQUENTIAL OR INCIDENTAL DAMAGES FOR BREACH OF THIS OR ANY OTHER WARRANTY. No person or representative is authorized to assume for the Company any liability other than expressed herein in connection with the sale of this product.
Some states do not allow limitations on how long an implied warranty lasts or the exclusion or limitation of incidental or consequential damage so the above limitations or exclusions may not apply to you. This Warranty gives you specific legal rights and you may also have other rights which vary from state to state.
Audiovox Electronics Corporation, 150 Marcus Blvd., Hauppauge, New York 11788 ■ 1-800-645-4994
128-8943

For Customer Service Visit Our Website At
www.mobile.audiovox.com
Product Information, Photos,
FAQ's Owner's Manuals

- NOTICES AND SPECIFICATIONS
- About GPS System and Location Accuracy
- About GPS Signals
- Warning
- Vehicle Use Notice
- Liability Notice
- CONTROLS AND INDICATORS
- INSTALLING THE BATTERIES
- OPERATING THE UNIT
- To turn the unit on:
- To turn the unit off :
- To change mode of operation:
- SETTING UP THE GPS LOCATOR - DO THIS FIRST
- Setting Your Time Zone
- Calibrating the Compass
- MODES OF OPERATION
- Time Mode
- Compass Mode
- Location Mode
- To set and store a location:
- To return to a location:
- TROUBLESHOOTING
- FCC NOTICE
- AUDIOVOX®
- DAYS LIMITED WARRANTY
Brand : AUDIOVOX
Model : PG300
Category : Gps