
Ecco - Gps AUDIOVOX - Free user manual and instructions
Find the device manual for free Ecco AUDIOVOX in PDF.


| Product Type | Personal Pocket GPS Locator |
| Brand | Audiovox |
| Model | Ecco |
| Power Source | Internal rechargeable lithium-ion battery via USB or AC adapter |
| Charging Time | Approximately 1.5 hours |
| Battery Life (Active Tracking) | Up to 10 hours |
| Battery Life (Standby) | Up to 16 days |
| Display | LCD with backlight |
| GPS Accuracy | Within 3-5 meters of actual location |
| Number of Storable Locations | Up to 3 |
| Compass | Digital compass (auto-calibrating) |
| LED Indicator | Green (GPS locked) / Red (no signal, off-course) |
| Proximity Detection | Rings at 80 ft (24 m) and 20 ft (6 m) |
| Distance Units | Feet/miles or meters/kilometers (switchable) |
| Operating Temperature | 32°F to 113°F (0°C to 45°C) |
| Storage Temperature | 14°F to 113°F (-10°C to 45°C) |
| Included Accessories | Charging cable (USB) and AC travel wall adapter |
Frequently Asked Questions - Ecco AUDIOVOX
User questions about Ecco AUDIOVOX
0 question about this device. Answer the ones you know or ask your own.
Ask a new question about this device
Download the instructions for your Gps in PDF format for free! Find your manual Ecco - AUDIOVOX and take your electronic device back in hand. On this page are published all the documents necessary for the use of your device. Ecco by AUDIOVOX.
USER MANUAL Ecco AUDIOVOX
natural_image
Hand holding a black handheld device with a digital display and key, no visible text or symbolsPersonal Pocket GPS
Locator
FOR ADDITIONAL SUPPORT, SERVICE AND INSTRUCTIONS, PLEASE GO TO WWW.AUDIOVOX.COM
Copyright © 2010 AUDIOVOX ELECTRONICS CORPORATION. All Rights Reserved.
This product protected by US Patent #7,233,863
1/12
128-8854
Notices and Specifications
About GPS System & Location Accuracy
The Global Positioning System (GPS) is operated by the US government, which is solely responsible for its accuracy and maintenance. The system is subject to changes which could affect the accuracy and performance of all GPS equipment. In addition, the GPS system itself limits the accuracy of the distance indicated on the device's display to within approximately 3-5 meters of the actual saved location.
About GPS Signals
This device must acquire GPS satellite signals to operate. The device may not be able to acquire signals if located indoors or near tall obstructions (such as trees or tall buildings). Go to an area free from tall obstructions to use the device. When the device acquires satellite signals, the green LED indicator is steady. When it loses satellite signals, you are traveling away from the stored active location, or the device cannot acquire a GPS signal; the LED is red. This product is designed to provide direction to a saved location. It is not designed as a monitoring device for tall obstructions, hazardous or weather conditions, or other factors that may affect safety while using this device. For more information about GPS, visit Audiovox Electronics Corporation's Web site www.audiovox.com.
Warning
This handheld device is only intended to be used as a supplemental navigation aide. The user assumes all responsibilities associated with the use of this product. It must not be used for any purpose requiring precise measurement of location, direction, distance, or topography. This device should not be used for navigating any aircraft or vehicles. It is the user's sole responsibility to exercise proper judgment when using this product under any conditions.
Vehicle Use Notice
Audiovox is committed to safety and responsible use. Do not use this GPS device to navigate while driving a motor vehicle. Attention to this device while driving can distract the motor vehicle's operator, creating an unsafe situation. Injury, death, or property damage may result if the operator fails to adhere to safe driving practices. It is the driver's sole responsibility to operate the vehicle in a safe manner. The device should not be mounted in a vehicle in a manner to distract, impair the view, or in any way interfere with the motor vehicle's operator or the motor vehicle's safety features (such as an air bag). Windshields and vehicle windows integrated with metallic materials, such as defrosters or tinting film, can degrade GPS reception inside a vehicle.
Liability Notice
In no event will Audiovox be liable for any incidental, special, indirect, or consequential damages resulting from the use, misuse, or inability to use this product or from defects in the product. Some states do not allow the exclusion of incidental or consequential damages, so the stated limitations may not apply therein.
Return To A
Stored Location
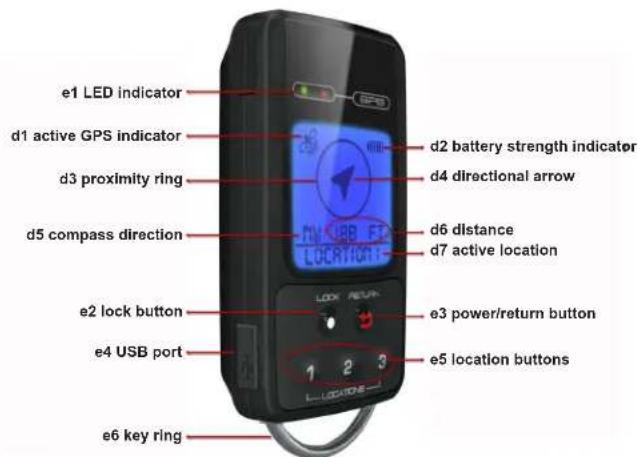
| Fob Label | Description | LCD Label | Description |
| e1 | During battery charging mode, green LED blinks; then changes to steady when fully charged. During navigation, lights green for GPS signal, or red for: no GPS signal, off-course, opposite direction or no movement. | d1 | Indicates GPS searching |
| e2 | d2 | Battery Strength indicatorPress | |
| e3 | Press and hold to power on/off; press to start return to last locked or other location. | d3 | Shows rings in a pattern, depending on proximity |
| e4 | Insert the battery cable | d4 | Points toward active location |
| e5 | Store up to 3 locations. 1 also used for calibration; 2 & 3 combination also used to obtain latitude / longitude and satellite locations; 3 also used to change distance units | d5 | Indicates compass direction toward active location |
| e6 | Use to attach keys | d6 | Shows distance units in ft/mi or m/km to active location |
| d7 | Shows active return location # |
to store present location
Before You Begin
Note: The distance and times provided in this instruction guide are approximate measurements.
Charge the Battery
It takes 1.5 hours to fully charge the battery. The charge lasts 10 hours with typical use during active tracking or 16 days on standby.
- Connect the charging cable into the USB port (e4) from one of the following power sources: AC outlet, personal computer USB port, (see "Power Source Specifications" on page 1
- The LCD backlight turns on, the battery strength indicator (d2) appears on the LCD and the green LED indicator (e1) blinks. After 5 seconds the backlight turns off.
- When charged, the battery strength indicator (d2) is full, and the green LED indicator (e1) light is steady.
- Disconnect the charging cable from the USB port (e4). The features cannot be accessed while connected to the charging cable.
The unit displays the battery charge level in all modes, except when the latitude/longitude/satellite information is displayed. It is recommended to recharge when the bars across the battery strength indicator (d2) are at 25% or less.
Power On to Ready Mode
- Press and hold return (e3) for 2–3 seconds. The LCD backlight turns on and the start-up screen appears.
- The unit immediately starts acquiring GPS data, indicated by the blinking green LED indicator (e1), and the LCD displaying a blinking satellite icon and the message Searching.
- When your current position is determined, the green LED Indicator (e1) is steady, the LCD satellite icon disappears and a sequence of messages appears: Initializing > Ready.
Calibrate - Important - Do Not Skip
The unit stores magnetic data and automatically calibrates its digital compass; however, if the unit cannot provide correct heading information due to environment change (for example, near a metal structure), then it is recommended to manually calibrate the unit. It is also recommended to manually calibrate the unit for first-time use.
Note: The digital compass may be affected by bridges and power lines—move away from such when using the unit.
-
Hold the unit face-up while in Ready mode. Press and hold location 1 (e5) until the message Hold flat and press lock appears on the LCD; then press and release lock button (e2).
-
The LCD message changes to Turn 360° around and press lock. Slowly turn the unit completely around face-up; then press and release lock button (e2).
-
The LCD message changes to Turn over 360° and press lock. Slowly turn the unit face-down and continue turning the unit until it is face-up again. Press and release lock button (e2).
-
The LCD message Calibrate complete appears and the unit goes to Ready. Note: If LCD message reads Calibrate incomplete, follow steps 1–3 exactly. Note: To exit Compass Calibration without completing calibration, press and hold location 1 (e5). If successful, the messages Hold down to exit and Ready appear. (If you release location 1 too soon, the message Calibrate compass appears, and the unit remains in Compass Calibration mode, waiting for Lock to be pressed.)
Optional: Change Distance Unit System
You have the option to change the distance unit system from English [feet (ft)/miles (mi)] to metric [meters (m)/kilometers (km)] or back again. Note: When instructed to "press and hold" a button, press down for at least 3 seconds.
UNITS SET TO METERS
- While the unit is in Ready mode, press and hold location 3 (e5) for 3 seconds through a sequence of messages: Hold to change units > Units set to meters [feet].
- Release location 3 (e5). The LCD message Ready appears.
Note: Repeat the previous steps to change back.
GPS Information
You can view latitude, longitude, and satellite locations on the unit. While in this state, the unit will not go into Sleep mode. (See "Sleep Versus Off" on page 8.)
To display GPS Information:
1. While in Ready mode, press and hold location 2 (e5). Your current latitude and longitude are displayed on the LCD.
2. While in this state, press and release location 3 (e5) to display a bar graph view of current satellite signals.
3. Press and release location 3 (e5) again, and the view changes to a globe displaying the satellite locations.
4. Press location 2 (e5) to return to Ready.
(Searching may briefly display on the LCD.)
Note: While viewing GPS Information, you can press Return and the unit will Refresh GPS satellite information and go to Ready.
Navigating
Store a Location

- While the unit is in Ready mode, press lock button (e2). The LCD message Select location appears.
- Press location # (e5) to store your current position; then the message Location # locked appears. Proceed to your destination. Note: After 1 minute, the unit goes to Sleep, but your stored location will not be lost and will remain in memory until it is replaced with a new locked position. (See "Sleep Versus Off" on page 8.)
Return to a Location
- To wake the unit from Sleep, press Return (e3) for 1 second or until the LCD backlight comes on. The LCD message Ready appears.
- To navigate to:
- Last-locked position: simply press return button (e3).
- Another stored position: press return button (e3) and location # (e5).
- Follow the directional arrow (d4) on the LCD toward the active location (d7). Other information displayed on the LCD includes compass direction (d5) and distance (d6).

Note: The unit remains on and active as long as it is acquiring GPS data to update the direction and distance information and you are moving more than 30 ft or 9 m every 5 minutes. If not, the LCD
message No Movement appears and the unit goes to Sleep. Repeat step 1 to wake the unit up. When in Ready mode, press return button (e3) and the unit will resume the last selected course location.
- If you travel off-course (that is, more than 22.5°, are headed in the opposite direction, or the distance (d6) is increasing), the red LED indicator (e1) flashes.
- In the vicinity of 80 ft or 24 m from the active location (d7), the proximity ring (d3) blinks alternating large and small rings.
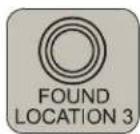
- In the vicinity of 20 ft or 6 m, the LCD reads Found, and the proximity ring (d3) blinks large and small rings simultaneously.
- After arriving, you can either select another location or simply do nothing. The unit automatically goes to Sleep after 2 minutes in the Found mode (see "Sleep Versus Off" on page 8).
Additional Information
Sleep Versus Off
You can manually put the unit to Sleep or turn the device Off by using return (e3).
• To put the unit to Sleep: press and hold return (e3) until the LCD message Sleep appears.
- To turn the unit Off (only during the Searching mode or at start-up): press and hold return (e3), and the message Off appears on the LCD.
In both the Sleep mode and the Off state, the LCD backlight and LEDs are dark. The main difference is that in Sleep mode, the unit attempts to refresh GPS positioning data dynamically within a period of 5 hours. The other difference is the LCD message that appears as the unit shuts down: either Sleep or Off.
Note: After 5 hours in Sleep mode, the unit times out to the Off state.
The unit will automatically go to Sleep if:
- You do nothing for 1 minute while one of these messages appears on the LCD:
Ready
Select location
◆ Location 1, 2, or 3 selected
- You do nothing after Found is displayed on the LCD for about 2 minutes.
- Searching displays on the LCD for about 2 minutes; then the message No GPS appears on the LCD, and the red LED indicator (e1) is steady.
- Traveling more than 2 minutes off-course (more than 22.5° , headed in the opposite direction, or distance (d6) is increasing) and the red LED indicator (e1) is blinking.
- No GPS data is received for about 5 minutes, the LCD message No GPS appears and the red LED indicator (e1) is steady.
- No change in GPS data for about 5 minutes, the LCD message No Movement appears, and the red LED indicator (e1) is steady.
Distance Units Displayed on the LCD
| Current position from active location | Distance (d6) Unit on LCD |
| Less than 2,640 ft | foot (ft) |
| Less than 500 m | meter (m) |
| 2,640 ft up to 99.99 mi | 0.01 mi |
| 500 m up to 99.99 km | 0.01 km |
| 100 mi up to 9,999 mi | mile (mi) |
| 100 km up to 9,999 km | kilometer (km) |
When navigating toward a location, the LCD displays the nearest whole or hundredth of a unit measurement, depending on the distance from the location.
FAQs
Why is "Searching" completed quickly sometimes and takes longer other times?
Searching will be completed quickly when the unit is activated from the Sleep mode. If the unit is activated from the Off state, Searching may take up to 2 minutes to acquire a satellite signal.
What can be done when the unit has difficulty finding a GPS Signal?
To ensure the most effective way the unit searches for a satellite signal, hold the unit face up toward the open sky. Move away from tall buildings, trees or overhead obstructions.
Why does the arrow point toward metal buildings or power lines when my location is not in that direction?
The digital compass may be affected by large metal objects, such as buildings with metal, power lines, and steel bridges. Move away from these types of objects when using this unit.
Why does the Red light (LED) blink and the unit go to Sleep when I am navigating back to my location?
The red light blinks when the unit is not traveling in arrow's general direction then goes to Sleep in approximately 2 minutes. Press the return button (e3) to wake from Sleep and then the return button (e3) to continue your navigation. HINT: If you don't want the unit to go to Sleep while going around an obstacle to get to your location, rotate the unit in your hand so that the directional arrow points to the 12 o'clock position.
How long does it take to charge the battery?
It takes 1.5 hours to fully charge the battery.
How long does the charge last?
The charge lasts 10 hours during active tracking or 16 days on standby.
How can I tell if the battery is low?
The unit's LCD displays a battery strength indicator (d2). When the black bars across the battery strength indicator (d2) are at 25% or less, it is recommended to recharge the battery. The battery strength indicator (d2) is on the active LCD screen in every mode, except when you are viewing GPS information (latitude, longitude, and satellite signals).
| Why aren't the unit's features accessible? | The unit may need to be charged, or if fully charged, it may still be connected to the charging cable. None of the unit's features are accessible if the charging cable is connected. |
| Why is the LCD directional arrow missing during the return? | Occasionally, the arrow may briefly disappear (for example, if you put the unit in your purse or pocket while navigating and then take it out). However, if the arrow does not reappear after 1–2 minutes, calibrate the unit. |
| When do I need to calibrate the unit? | The unit auto-calibrates; however, if the device cannot provide correct heading information due to an environment change (for example, near a metal structure), it is recommended to manually calibrate the unit. It is also recommended to manually calibrate the unit for first-time use. |
| Why is the calibration or unit change unsuccessful? | When instructed to “press and hold” a button, do so for at least 3 seconds; otherwise, the unit reverts to Ready mode without saving any changes. |
| Does the unit stay on while navigating? | The unit remains on and active as long as it's acquiring GPS data (to update direction and distance information) and you are moving more than 30 ft or 9 m every 5 minutes. If neither, the LCD message No Movement appears and the unit goes to Sleep. |
| Will the unit remember the selected location if it goes to Sleep while navigating? | Yes. After you power it on to Ready, simply press return button (e3) and the unit resumes the last course toward your selected location. |
| Can I delete a stored location? | The location remains in memory until it is replaced with a new locked position. |
| Why doesn't the unit turn Off when I hold down the Return button? | You can turn the unit Off only during start-up or while Searching. Incidentally, the unit times out to Off after 5 hours in Sleep mode. |
| Why don't the distance and times exactly match the ones in the instructions? | The distance and times provided in the unit's Owner's Guide are approximate measurements. |
| Page 11 |
Battery Warnings
If these guidelines are not followed, the internal lithium-ion battery may experience a shortened life span or may present a risk of damage to the GPS unit, fire, chemical bum, electrolyte leak, and/or injury.
Do not leave the unit exposed to a heat source or in a high temperature location, such as in the sun.
◆ Do not puncture or incinerate.
Do not operate the unit outside of the following temperature range: 32° F — 113° F ( 0° C — 45° C).
When storing the unit for an extended time, store within the following temperature range: 14°F — 113°F (-10°C — 45°C).
Do not attempt to remove the battery. To replace battery, contact Audiovox Electronics Corporation directly at www.audiovox.com
◆ Do not dispose of this product in regular waste.
Power Source Specifications
The following approved power sources must be used under the conditions of the unit's warranty.
◆ AC travel wall adapter: input 100–240 VAC 50/60 Hz 0.15A; output 5.0V 0.7A rated UL, CE
◆ Standard computer USB 2.0 cable
FCC Notice
Note: This equipment has been tested and found to comply with the limits for a Class B digital device, pursuant to Part 15 of the FCC Rules. These limits are designed to provide reasonable protection against harmful interference in a residential installation. This device generates, uses, and can radiate radio frequency energy and, if not installed and used in accordance with the instructions, may cause harmful interference to radio communications. However, there is no guarantee that interference will not occur in a particular installation. If this device does cause harmful interference to radio or television reception, which can be determined by turning the equipment off and on, the user is encouraged to try to correct the interference by one or more of the following measures:
• Reorient or relocate the receiving antenna.
- Increase the separation between the equipment and receiver.
- Connect the equipment into an outlet on a circuit different from that to which the receiver is connected.
- Consult the dealer or an experienced radio/TV technician for help.
Audiovox Corporation Contact Information
Audiovox Electronics Corp.; 150 Marcus Blvd, Hauppauge, NY 11788 (800) 645-4994 On the web at: www.audiovox.com
© 2010 Audiovox Electronics Corp., 150 Marcus Blvd., Hauppauge, NY 11788
128-8854
12/12
128-8854
- Personal Pocket GPS
- Locator
- Notices and Specifications
- About GPS System & Location Accuracy
- About GPS Signals
- Warning
- Vehicle Use Notice
- Liability Notice
- Before You Begin
- Charge the Battery
- Power On to Ready Mode
- Calibrate - Important - Do Not Skip
- Optional: Change Distance Unit System
- GPS Information
- Navigating
- Store a Location
- Return to a Location
- Additional Information
- Sleep Versus Off
- FAQs
- Battery Warnings
- Power Source Specifications
- FCC Notice
- Audiovox Corporation Contact Information
Brand : AUDIOVOX
Model : Ecco
Category : Gps