Club Combo Duet - Coffee maker LA PAVONI - Free user manual and instructions
Find the device manual for free Club Combo Duet LA PAVONI in PDF.

| Product type | Espresso machine |
| Brand | La Pavoni |
| Model | Club Combo Duet |
| Dimensions (W x D x H) | 320 x 260 x 380 mm |
| Weight | 11 kg |
| Power consumption | 1350 W |
| Voltage / Frequency | 120 V / 60 Hz (US model) |
| Water tank capacity | 1.5 L |
| Boiler type | Copper and stainless steel |
| Pump pressure | 15 bar |
| Espresso function | Yes, with manual lever operation |
| Steam wand | Yes, for milk frothing |
| Hot water dispenser | Yes |
| Cup warmer | Yes, on top of machine |
| Drip tray | Removable, stainless steel |
| Portafilter size | 58 mm |
| Control type | Manual lever |
| Cleaning | Backflushing recommended; descale periodically |
| Safety features | Pressure relief valve, safety thermostat |
| Spare parts availability | Yes, through authorized dealers |
| Country of manufacture | Italy |
| Release year | 2023 |
Frequently Asked Questions - Club Combo Duet LA PAVONI
User questions about Club Combo Duet LA PAVONI
0 question about this device. Answer the ones you know or ask your own.
Ask a new question about this device
Download the instructions for your Coffee maker in PDF format for free! Find your manual Club Combo Duet - LA PAVONI and take your electronic device back in hand. On this page are published all the documents necessary for the use of your device. Club Combo Duet by LA PAVONI.
USER MANUAL Club Combo Duet LA PAVONI
natural_image
Black-and-white illustration of a coffee machine with two cups on a tray (no text or symbols visible)La Payoni
MODELS 1315 & 1315-S
Club Combo
DUET
text_image
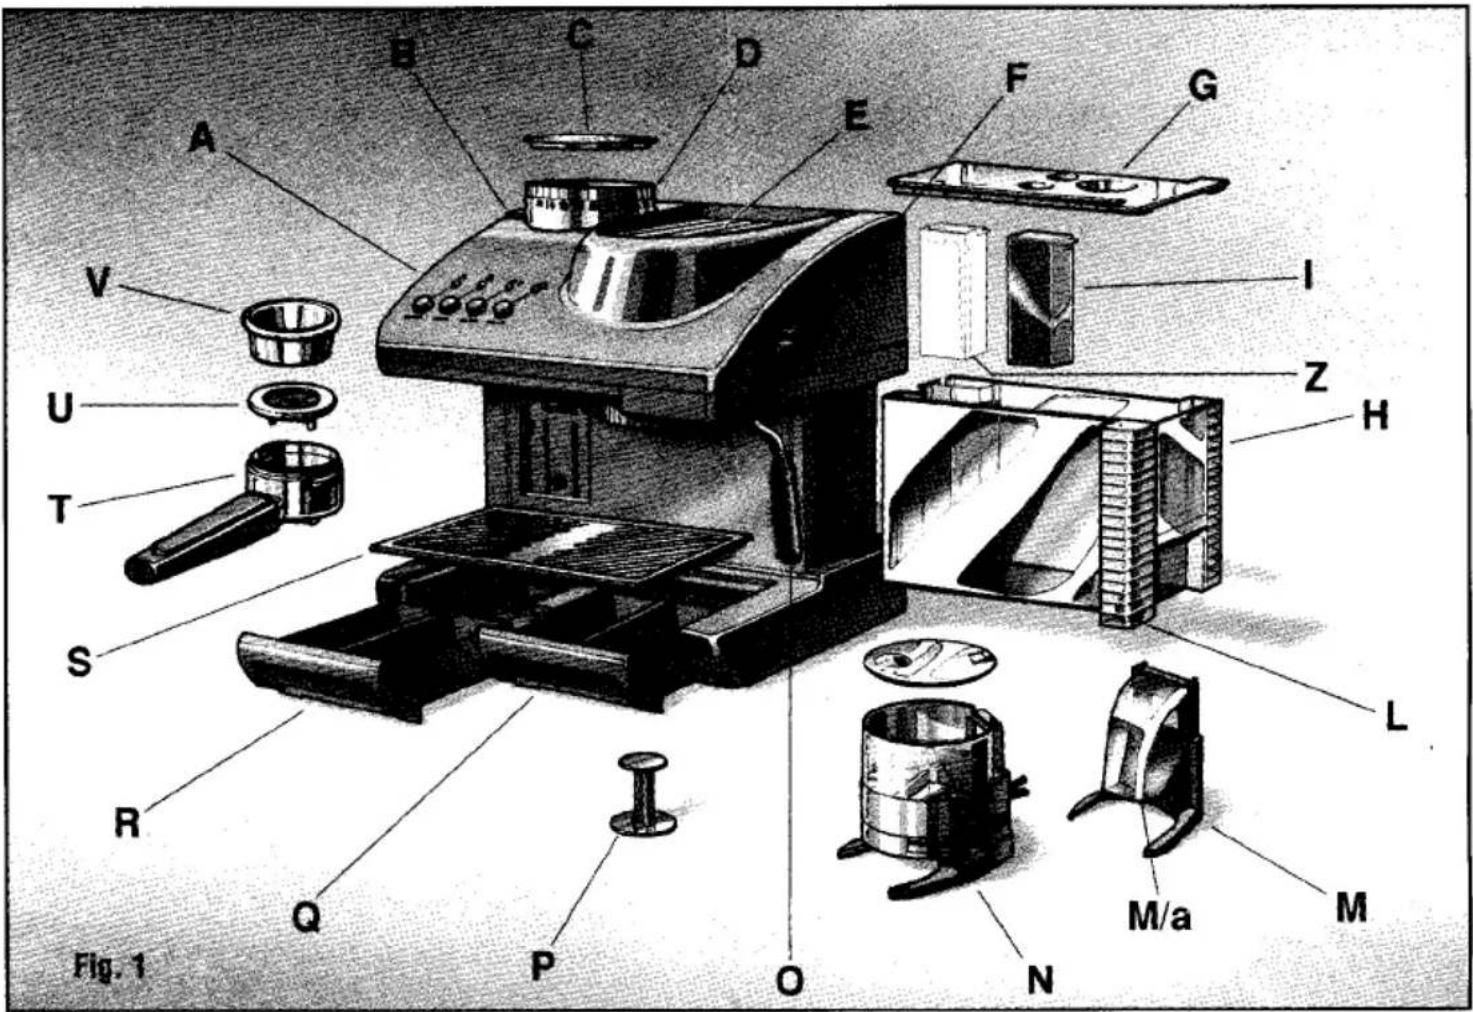
Fig. 1 A B C D E F G V U T S R Q P O N M/a M L H Z IFig. 2

flowchart
graph TD
    1["1"] --> 5["GRINDER"]
    2["2"] --> 6["COFFEE"]
    3["3"] --> 7["ON - OFF"]
    4["4"] --> 8["STEAM"]
    5 --> 6
    6 --> 7
    7 --> 8
Fig. 5

natural_image
Diagram of a mechanical device with internal components and directional arrows indicating movement (no text or symbols)Fig. 3

natural_image
Abstract black-and-white diagram with curved white lines and a labeled point 'F' (no readable text or symbols)Fig. 6

text_image
Max 230grFig. 4

text_image
Z HFig. 7
text_image
Diagram illustrating a rotary dial with numbered segments and directional arrows indicating rotation or cycle.F1-40
Fig. 8
natural_image
Technical illustration of a mechanical device with a handle and internal components, shown in two views (no text or symbols present)Fig.9

natural_image
Illustration of a mechanical device with three open bowls and a handle, shown from an exploded view (no text or symbols)Fig. 10
natural_image
Illustration showing a kitchen presser being adjusted for a tool, with no text or symbols present.Fig. 14
Fig. 13
Fig. 11

natural_image
Black-and-white illustration of a coffee machine with two cups on a tray (no text or symbols visible)Fig. 12

natural_image
Illustration showing a hand pouring liquid into a beaker with a tube, next to another hand holding a test tube (no text or symbols visible)Fig. 16

natural_image
Illustration of a hand using a tool to adjust or install a mechanical component (no text or symbols visible)
text_image
Fig. 17 17AFig. 18

natural_image
Illustration of hands performing a sewing or sewing process on a circular object (no text or symbols visible)Fig. 19

natural_image
Illustration of hands holding a textured object with a curved handle (no text or symbols)Fig. 20

natural_image
Three black-and-white illustrations of different objects: a ring, a dome-shaped object, and a small table with legs (no text or symbols)Fig. 21

natural_image
Illustration of a hand holding a small object, possibly a device or tool, with no visible text or symbols.Fig. 22

natural_image
Simple line drawing of a circular basin with a handle and central outlet (no text or symbols)IMPORTANT WARNINGS
- Read all instructions.
- Never operate your espresso machine without water in the tank. This may cause premature pump failure.
- Do not allow the power cord to come into contact with any hot surfaces. Always unplug before performing a cleaning or maintenance.
- Do not leave the machine at a room temperature below 40^ F as the water in the boiler could freeze.
- Before filling the tank with water, remember to always disconnect the appliance at the socket.
- The appliance is for domestic use only.
- Never leave the machine within child's reach when it is functioning.
- Some components of this machine may become hot to the touch, it should be kept out of childrens reach.
- The built-in coffee grinder is made to grind whole beans only, never place ground coffee into the hopper. Do not adjust the hopper when the grinder is in operation.
- Do not operate the appliance with a damage cord or plug or after the appliance malfunctions or has been damaged in any manner. Return the appliance to an authorized service centre for examination, repair or adjustment in order to avoid any risk.
- The appliance's external metallic parts must not be touched when the machine is functioning as it could cause burns.
- Do no use outdoors.
- Before cleaning the appliance always unplug and allow it to cool down. Clean exclusively with a non-abrasive cloth that has been slightly dampened with water, adding a few drops of mild, non-abrasive detergent (never use solvents that damage plastic).
- DO NOT IMMERSE THE APPLIANCE IN WATER OR OTHER LIQUIDS.
- This appliance is in conformity with directive 89/336 EEC relevant to electromagnetic compatibility.
SAVE THESE INSTRUCTIONS
La Pavoni Club Combo model "DUET" is manufactured to the highest standards using the latest in espresso machine technology. Your machine is equipped with a Cremadisc which is located under the coffee basket in the coffee handle. This Cremadisc uses valve technology, during espresso operation the valve stays closed until the pump reaches optimum pressure at which time it opens allowing the coffee to cycle through the Cremadisc resulting a guaranteed hot and creamy espresso every time.
Your DUET also features a Turbo-frother which takes the guess work out of making cappuccino. A rich and dense froth can be made in less than 10 seconds. Finally, the DUET machine is a fully self-priming unit. Whether it is used daily or once a month, your machine is ready to use within two minutes of start-up. Please take a moment to read this manual and view the video so you can fully enjoy the experience of your new espresso machine. Enjoy!
DESCRIPTION OF COMPONENTS
A -Machine body
B -Lock button for coffee grinder
C -Grinder hopper cover
D -Grinder hopper
E -Cup-warming shelf
F -Water and steam knob
G -Water tank cover
H -Water tank (capacity 45 ozs.)
I -Water filter cartridge
L -Water level float
M -Continuous flow spout for grinder
N -Portion control doser
0 - Turbo-froth attachment
P -Coffee Press
Q -Pull-out Tray
R - Pull-out Tray
S -Upper Tray
T -Coffee Handle
U -Crema-disc
V -Coffee Filter Basket
Z -Dummy Filter
INSTRUCTIONS FOR USE
Remove the water filter cartridge (Fig. 1 - I) from its wrapper.
Remove the water tank (Fig. 1 - H) from the side of the machine. Remove the filter dummy (fig. 1 - Z) and insert the filter cartridge into the top of the water tank as picture (fig.4) Fill the tank with water and FIRMLY slide the unit back into the machine (fig. 5)
If the water tank is not seated correctly the machine will not work!
THE WATER FILTER CARTRIDGE SHOULD BE REPLACED EVERY 200 to 250 COFFEES OR ONCE A YEAR. Call 1-800-927-0277 for a replacement.
Insert the plug into the proper outlet. Your machine operates on 1150 watts. Be aware that you should not "share" the outlet with other high wattage appliances such as a microwave. Since multiple outlets usually share the same fuse it may be necessary to experiment with different locations in the event that you blow a fuse. Always use a grounded outlet!
Turn the unit on by pressing the on/off switch located on the top panel (fig.2) a light will appear. All the other switches should be in the off position. While your machine is reaching the proper operating temperature you can start to grind your coffee for your espresso.
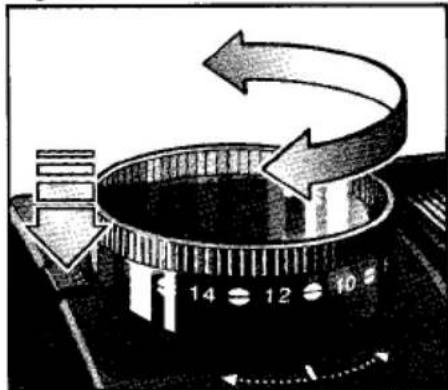
Place your whole bean coffee into the top of hopper (fig 6) The ideal setting for espresso is the #4 setting. Certain factors such as the type of coffee used as well as room temperature conditions may effect your coffee so it may be necessary to adjust the grinder to another setting occasionally. To adjust the grinder it is necessary to first press down on the lock button located on the left side of the grinder. Then rotate the hopper by hand to the desired setting. (fig 7)
CHOICE OF GRINDERS:
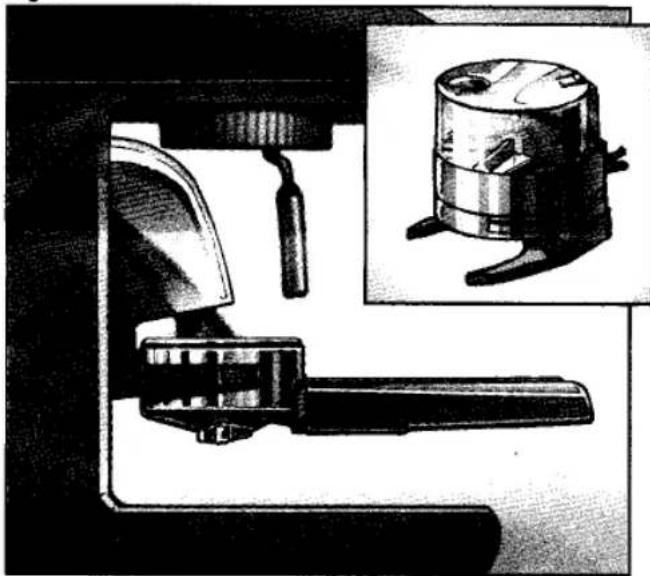
Your DUET machine comes standard with 2 grinding options. The first (fig.8) allows for continuous flow grinding. This unit (part M) snaps directly in place (refer to video) under the control panel. To grind, place your coffee handle (with cremadisc and filter in place) (fig. 13) into the slot and push in to activate the motor. When the desired amount of coffee has ground remove the handle and the motor will stop automatically. To grind larger quantities of coffee remove the drip trays, place a bag under the spout and press the grinder button located on the control panel (fig.2). Turn the button to the off position when finished. The second option to grind involves using your portion control doser (fig.9-N). This also snaps into place directly under the control panel. ( refer to video)
To use, first make sure the doser unit is in place then turn on the grinder button located on the top panel. Allow for sufficient coffee to grind and fill the chamber. Once filled, turn the grinder button to the off position. Place your coffee handle into the slot and pull the lever towards you. Pull and release one time for one cup of espresso and two times for two cups of espresso. Do not leave ground coffee in the chamber for longer than one week as it will become stale.
HOW TO MAKE ESPRESSO:
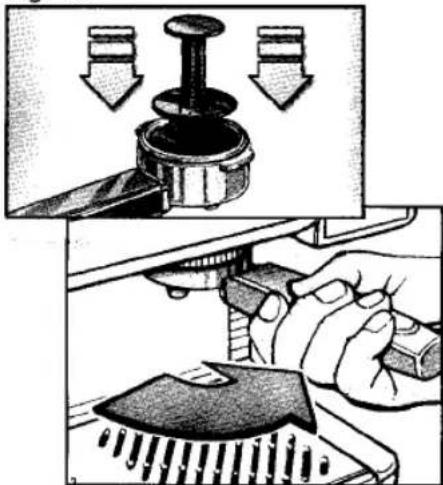
After preparing your espresso place your coffee handle into the coffee group (fig.14) turning the handle from left to right. Place your cup or cups under the filter handle. Center your cup between both spouts when making one espresso, place your cups side by side when making two espresso coffees. The machine will be ready to make espresso when the coffee light (Fig.2 #6) goes out. Press the coffee switch to make your espresso, when the desired amount of coffee has exited stop the flow of espresso by turning the coffee switch to the off position. Your coffee handle is designed to produce 2.5 ozs of espresso per shot. After making your espresso always allow 20–30 seconds for all the liquid and steam to flow out before removing the coffee handle
HELPFUL HINTS FOR MAKING GOOD ESPRESSO:
A stronger or weaker espresso depends on the type of coffee used as well as the degree of tamping used. The flow of coffee into the cup will determine if adjustments are necessary. Generally a shot of coffee should take about 15 seconds, if your coffee is exiting too quickly then adjust/pack firmer. If your coffee is exiting slowly then adjust/pack courser. (fig10)
HOW TO MAKE A CAPPUCCINO:
IMPORTANT: If you have made espresso prior to making your cappuccino it is important that you remove the coffee handle and throw away the used coffee grinds. You may then install the handle back into the group or leave off completely. Failure to remove the used coffee can cause a build-up of steam in the handle when making cappuccino and result in a sudden burst of steam to escape when removing. If the handle is left off any water that drips from the group will drip into the bottom tray. This dripping is normal.
To produce steam: The on/off switch should be on, turn the steam switch to the on position (fig.2 #4) the light above the button will start to flash and continue to flash until the button is turned off. You will notice that the coffee light has come on. This light acts as your ready indicator, when it turns off the machine has reached proper temperature. This will take about one minute, in the meantime you can prepare your milk. Take your favorite cup and fill a little less than 3/4 with milk. When the coffee/ready light has gone off (fig. 2 #6) position the steam wand over the drip tray or an empty cup (fig. 12) and open the steam knob for a moment to release any water that may have built-up in the tube. Swivel the steam wand back out and place the steam arm about half way into your milk (fig.15). Open the steam knob slowly (fig. 3) and allow the froth to rise. As the froth rises slowly lower the cup. Turn the steam knob off when the cup is full. Finish by adding your espresso coffee. With a little practice you will be an expert in no time?
Some hints to making perfect espresso are:
Don't use milk directly from the refrigerator. Remove milk from refrigerator a few minutes before using. You may use whole, 2%, 1% soy or skim milk. Skim and 1% will not hold up a froth as long as the others. If your cappuccino is not hot enough leave steam wand in a little longer. Do not make cappuccino if coffee/ready light is not off.
coffee/ready light is not off.
When you are finished making your cappuccino remember to turn off the steam switch (fig. 2 #4) The light will stop pulsing, position the steam arm over the drip tray and open the steam knob slowly to remove any built-up milk that may have accumulated in the steam wand. After this procedure always remove the coffee handle slowly in case any steam has accumulated.
HOW TO PRODUCE HOT WATER:
Water should be in the tank with the power on. Wait for the coffee light to go off (fig. 2 # 6). Open the steam knob and place your cup underneath the wand then turn on the coffee button (fig. 2 # 2). Water will exit from the wand. Turn the coffee button to the off position when finished, then close the steam knob.
CLEANING:
Regular maintenance of the following components will insure that your espresso machine is operating at peak performance.
AT THE END OF EVERY DAYS FINAL USE: Refer to Video (Cleaning)
- After emptying your coffee filter basket place the coffee handle into the group. Your machine should be on and water should be in the tank. Place a cup under the handle and allow 6 to 8 ounces of water to cycle through. This will keep the handle, cremadisc and coffee group free of coffee grinds.
- Fig.16 - Remove built-up coffee grinds from under the coffee group using a toothpick or blunt tool. Do not perform this cleaning when the machine is still hot!
- Fig. 19 - Clean the coffee filter with a brush or soak and wash in hot water. Hold the basket up to light when finished to make sure all holes are free.
- Remove the steam wand and rinse under warm water.
AT THE END OF THE MONTH:
- Refer to video (Cleaning) Your machine should be descaled monthly. As pictured in the video, a powdered coffee descaler should be placed into an empty filter basket and installed onto the machine. Your machine should be on and water should be filled completely in the tank. Place a cup under the coffee handle and allow 2 to 3 cups of water to cycle through until the water appears clear. A teaspoon of descaler is all that is required. This will keep the handle, cremadisc and coffee group free of coffee grinds.
- Remove the rubber frother by sliding off and clean the opening of the steam wand with a sharp object such as a toothpick.
TROUBLESHOOTING:
A) The machine does not supply hot water for espresso.
Make sure there is water in the tank (Fig. 1 - H) Make sure the unit is plugged in. Power switch and light should be on. Wait for coffee light to go off. Unit will not be at correct operating temperature until coffee light is off.
B) The machine does not supply steam.
Make sure there is water in the tank. Make sure the steam button is on and flashing. Make sure coffee light is in the off position.
Clean out the steam tube by removing the rubber wand and cleaning out opening located in bottom of tube.
C) Coffee overflows from the edges of the filter ring when making espresso.
Too much coffee packed into the filter basket.
Clean out coffee group. (fig.16)
D) Coffee exits too slowly.
Make sure there is water in the tank (Fig. 1 - H) and machine should be in on position. Determine if the blockage is in the coffee handle or the coffee group. Operating the machine without the coffee handle in place will narrow the problem to the group or the coffee handle; Start by removing the coffee handle. Air blockage might exist in the pump. Position the steam wand over the drip tray and open the steam knob two full turns. Turn the coffee switch to the on position and allow a few ounces of water to flow out of the steam wand. Close the steam knob and water should now exit out of the group. If water is exiting slowly then the screen located in the coffee group might be blocked. Remove the screen by removing the screw (fig. 17) clean out the screen (fig. 18) and re-install correctly. Once this has been performed and water is exiting consistently then install the filter handle and try again. If the flow of water is still restricted continue reading. Coffee is ground and/or packed to tightly in coffee handle. Grind coffee courser. Check that the Cremadisc is not clogged. Remove Cremadisc and clean. (fig.20&21&22) Check that the filter basket is clean. Hold up to a light and examine.
E) The coffee is too watery.
The coffee is ground to coarse. Adjust grinder to finer setting and/or tamp coffee firmer into coffee filter.