
Fang - Mp3 player Sunstech - Free user manual and instructions
Find the device manual for free Fang Sunstech in PDF.


| Product Type | MP3 Player |
| Brand | Sunstech |
| Model | Fang |
| Dimensions (approx.) | 90 x 40 x 10 mm |
| Weight | 30 g |
| Power Supply | Internal rechargeable lithium-ion battery (3.7V, 200 mAh) |
| Charging Method | USB cable (micro-USB) |
| Battery Life | Up to 15 hours of audio playback |
| Storage Capacity | 8 GB internal |
| Supported Audio Formats | MP3, WMA, WAV |
| Display | 1.44-inch color TFT LCD |
| Playback Modes | Repeat, shuffle, folder play |
| Equalizer | Preset equalizer settings (Rock, Pop, Jazz, Classical, Normal) |
| FM Radio | Yes, with manual and auto scan |
| Voice Recording | Built-in microphone, WAV format |
| Connectivity | USB 2.0 for file transfer and charging |
| Headphone Jack | 3.5 mm stereo |
| Additional Features | Music playback, video playback (AMV/AVI), photo viewer, e-book reader |
| Care and Maintenance | Clean with a soft dry cloth; avoid moisture and extreme temperatures |
| Safety | Do not disassemble; keep away from children under 3 years; use only approved charger |
| Spare Parts and Repairability | Battery replacement possible by qualified technician; other parts not user-serviceable |
| General Information | Compact design for portable music enjoyment; supports up to 32 GB microSD card (not included) |
Frequently Asked Questions - Fang Sunstech
User questions about Fang Sunstech
0 question about this device. Answer the ones you know or ask your own.
Ask a new question about this device
Download the instructions for your Mp3 player in PDF format for free! Find your manual Fang - Sunstech and take your electronic device back in hand. On this page are published all the documents necessary for the use of your device. Fang by Sunstech.
USER MANUAL Fang Sunstech
1. Operación básica
natural_image
Blue gradient background with white circular icons and a film clapperboard (no text or symbols)natural_image
Illustration of a blue radio with a digital display and surrounding icons (no text or symbols)natural_image
Purple background with abstract icons including music notes, email, photo, and camera (no text or symbols)pantalla completa.
natural_image
Illustration of a yellow notebook with an @ symbol, surrounded by icons representing media and information (no text or symbols present)natural_image
Illustration of a microphone with sound waves on a red background, surrounded by icons representing media and information (no text or symbols)para continuar.
natural_image
Illustration of an open book with a magnifying glass, surrounded by icons representing search, document, and information (no text or symbols)natural_image
Illustration of a yellow gear with a wrench, surrounded by icons representing software tools (no text or symbols)frecuencia.
- Do not use the unit in places that are extremely hot, cold, dusty, or humid.
- Avoid the unit being dropped.
- The battery service life may differ under different usage conditions and different models
-
The unit is been charged when connected with PC via USB cable no matter its power on or not.
-
Please charge the unit when any of the following cases occur:
A. The battery indicator informs low battery
B. The player turns off automatically, and turns off again after rebooting.
C. The keys become inactive
D. Can't turn on the player.
-
Do not disconnect the player while it is formatting or uploading/downloading, or the procedures may lead to errors
-
While using as mobile storage disk, please store and derived documents as per proper documents managing operation, or the documents might lose.
-
Do not disassemble. Any doubt please contacts the dealer.
-
Specifications are subject to change and improvement without notice
-
While formatting the player, please select the file system as FAT32.
Features:
1.8" 65K color display
MP3/WMA/WAV playback
MPEG-4 (AVI) movie function
FM turner, store20 stations (Optional)
FM recording, record the FM program contents (Optional)
Support JPEG format picture browsing
High quality voice recording; A-B repeat function
No driver necessary under Windows 2000/XP/ME
Support 3D sound
Several EQ modes
ID3 TAG support (title, artist, and lyrics – edited in advance)
Firmware upgradeable
Built-in rechargeable Lithium-ion battery
USB 2.0
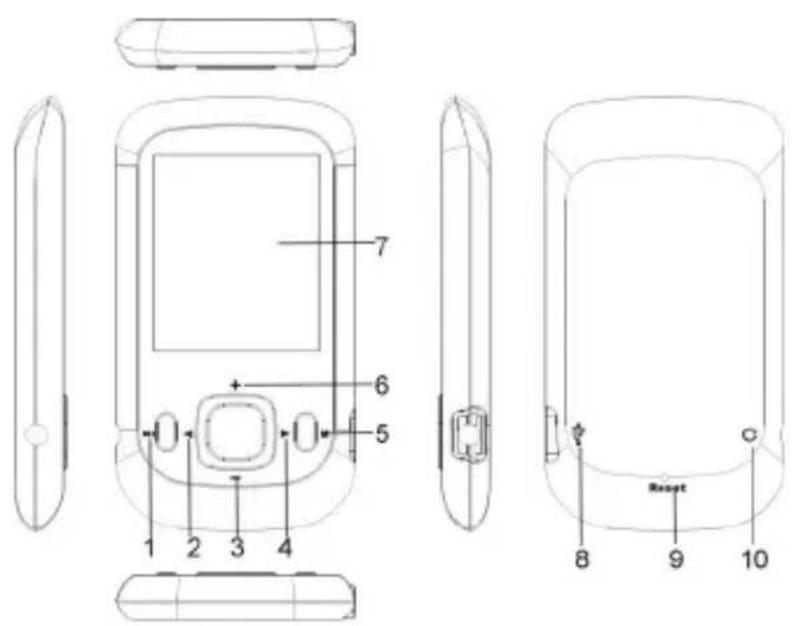
Introduction of cover:
1) Play/pause/stop/power off
2) Previous/REW
3) Decrease volume—
4) Next/FF ▶
5) Menu M
6) Increase volume +
7) Display
8) USB jack
9) RESET
10) Earphone jack
1. Basic operation
1). Power on/off
A). On: Press and hold “▶” button to turn on the unit, and LCD displays the logo picture. Then the unit enters the main interface.
B). Off: Press and hold “▶” button, the player is turned off.
2). Charging
A) Link the unit to the computer via USB cable, the player enters U-disk mode automatically. Exit the U-disk mode, the player enters charging mode then.
Note: For safety, the charging time should not exceed 8 hours. And since the longevity of the battery bases on the charging times, please charge the battery after it is exhausted, and please charge it full once.
3) Buttons
Under the main interface, press “+/-” to select the menu you want and press “▶” button to enter it. In the menus, press and hold “M” button to return to the main interface.
The earphone acts as the antenna while listening to the FM stations. Please plug the earphone first if you want to listen to FM.
2. Music Playback
The player allows you to enjoy MP3/WMA codified music thanks to its high fidelity sound processor.
1). Playback
Select “Music” in the main menu, and press “▶” button to enter. Take a look to the different options available for you to easily select your music:
"Current Play": Shows the music player screen.
"All Music": With this option you will see, sorted alphabetically by file name, all the songs you have stored in the player.

natural_image
Abstract graphic with colorful headphones and surrounding icons (no text or symbols)“Artist”, “Album” and “Genre”: They show listings of your favorite music sorted by artist, album or title respectively.
Note: In order for the music files to be displayed in these listings, their artist, album and title information must be stored into the file (information known as ID3-Tag). You can find freeware utilities to create or modify ID3-Tags like MP3Tag or ID3 Renamer.
"My Favorite": With this option you can listen to your favorite music that you already marked as favorite. To add a song to your "My Favorite" list, simply press the "◀" button while on top of a file. Make a selection using "▶" button. Inside the "My Favorite" folder if you press "◀" a new menu will pop up allowing you to erase one or
all the favorite marked songs. Make a selection using “▶” button.
Note: Erasing an element from Favorites you only eliminate what marks it as favorite, the file will stay in memory.
“Record File”: Listen to the clips you have recorded using the microphone or the FM radio with this option. Choose the clip you want to listen to and press “▶” button.
“Directory Listing”: With this option you can explore the file tree in the memory of the player just as it would be displayed in your computer.
“MediaLib Update”: Use this option whenever you store or delete songs so the artist, album and title listings are recreated accurately.
Note: When the player is unplugged from the PC via the safe USB device removal, the player will run an update automatically.
“Breakpoint Player”: with this option, you can continue to listen to the music from the point it stopped when you turn off the player last time.
2). Buttons
A). Press “+/-” to select audio files.
B). Press “▶” button to start playback.
C). Press and hold "M" button to return to the main interface.
3). Volume Adjustment
Under playback status, press and hold “+” to decrease the volume. Press and hold “—” to increase the volume.
4). Previous file/Next file; FF/RW
Press “▶” button to skip to the next file and press “◀” button to skip to the previous file.
Press and hold “◀” or “▶” to FF or RW.
5). Pause
Under playback mode, press “▶” button to pause. Press “▶” button again, the unit continue to play.
6). Play list
Press “M” button to enter the play list. Press “+/-” to select files and press “▶” button to enter and start playback.
7). Output EQ Mode Setting:
Press and hold “M” button to return to the main interface. Select “Settings> Music> EQ Select”. EQ includes 7 modes: normal, 3D, rock, pop, Classic, Bass and Jazz. You can shift those modes by pressing “+/-” button. Finally press “▶” button to confirm and return.
Select “Video” in the main menu and press “▶” button to enter the explorer mode. Select the file you want and press “▶” button to start playback.
2). Buttons
A). Press “+/-” to select audio files.
B). Press “▶” button to start playback.
C). Press and hold "M" button to return to the main interface.
3). Volume Adjustment
Under playback status, press “+” to decrease the volume. Press “—” to increase the volume.
4). Previous file/Next file; FF/RW
Press “▶” button to skip to the next file and press “◀” button to skip to the previous file.
Under pause status, press and hold “◀◀” or “◀◀” to FF or RW.
5). Pause
Under playback mode, press “▶” button to pause. Press “▶” button again, the unit continue to play.
6). Play list

natural_image
Blue gradient background with white circular icons (music note, video camera, film clapperboard) and a film clapperboard icon, no text or symbols present.Press “M” button to enter the play list. Press “+/-” to select files and press “▶” button to enter and start playback.
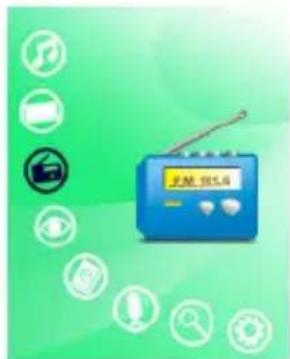
4. FM tuner: (Optional)
1). Enter FM tuner:
Select “FM Raido” in the main interface by “+/-” button, then press “▶” button to confirm.
2). Buttons
A). Press "M" button to enter the sub menu.
B). Press “+/-” to select function menu.
D). Press and hold "M" button to return to the main menu.
3). Volume adjustment
Press “+” or “−” button to adjust the volume.
Press “M” button to select “manual”, each time you press “◀” or “▶” button the frequency will decrease or increase by 0.1 MHz.
Press "M" button to return to the function menu.
5). Auto-searching
natural_image
Illustration of a blue radio with a green background, surrounded by icons representing media and information (no text or symbols on the device itself)Press “M” button to select “auot” and press “▶” to confirm, the unit begins to search all stations and store them automatically. You can turn to “preset” status to listen to the FM stations after finished searching.
6). Storing
Press “+/-” button to select “Mem”, and then press “▶” button to save the current station. Press “+/-” button to select the channel of saving the station: CH1, CH2..., and press “▶” button again to save the station at last. Press “M” button to exit.
7). Preset station
Press “+/-” button to select “Preset” and press “▶” button to start to listen to the preset stations. Press “◀” or “▶” button to select the channel you want.
8). Delete Stations
Press “+/-” button to select “Delete” and press “▶” button to enter. Press “+/-” button to select the station you want to delete, and press “▶” button again to confirm the deletion.
5. Picture display
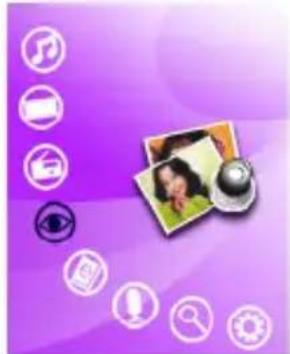
1). Enters Picture display: Select "Photo" in the main menu and press the "▶" button to enter. The player enters the browser
natural_image
Purple background with white circular icons and a photo frame, no text or symbols present.status then. You can select the picture you want and view in full screen.
2). Picture display
A). Press "+/—" button to select the picture you want to display.
B). After selected the file, press the “▶” button to view it in full screen.
C). Press “◀” or “▶” button to skip to the next or previous picture.
D). Press the "M" button to return to the picture browser.
E). Press and hold the "M" button to exit and return to the main interface.
6. E-book
1) Enters E-book
Select “E-book” in the main interface and press the “▶” button to enter. It enters the file list of E-book then.
2). Reading E-book
A). Press "+/—" button to select the file you want.
B). Press the “▶” button to start reading.
C). Press “+/-” button to skip to the next or previous page.
D). Press and hold the “◀” button to display the “save bookmark” list. Press “+/-” button to select the bookmark, and then press the “M” button to save it.

natural_image
Illustration of a yellow notebook with an @ symbol, surrounded by icons representing media and information (no text or symbols present)F). Press the “▶” button to display the “load bookmark” list. Press “+/-” button to select the bookmark, and then press the “M” button to load it.
G). While reading the E-book, press the “M” button to return to the file list. Press and hold the “M” button to exit.
Note: The bookmark is only available to the current file, and has to be re-set while reading other files.
7. Voice recording:
1). Enters recording
Under the main interface, select "Record" menu and press the "▶" button to enter.
2). Start recording
After entering the recording interface, the LCD displays "Prepare..." Press the "▶" button to start recording.
3). Pause recording
Under “Recording” status, press the “▶” button to pause, press it again to continue.
4). Save and continue recording
Press the "M" button to save the recorded file, and skip to the

natural_image
Illustration of a vintage microphone with sound waves, surrounded by icons representing media and information (no text or symbols)recording status again.
5). Save and exit recording
Press and hold the "M" button to save the recorded file and exit FM recording.
6). Play recorded file
A). Enters the "Music" menu, press the "▶" button to display the file list.
B). Press the “+/-” button to select the “Record File” folder.
C). Press the “▶” button to enter, and press “+/-” button to select the file you want to play.
D). Press the “▶” button to start playback.
8. Explorer
1). Enter the Explorer
Select “Explorer” in the main menu, and press the “▶” button to enter.
2) File list
List all of the files of the player in the Explorer.
3). Select Files
A). Press “+/-” to select the folder or file.

natural_image
Illustration of an open book with a magnifying glass, surrounded by icons representing information and search (no text or symbols)B). Press the “▶” button to enter after selection. The player enters the corresponding function interface then. If the file is not been recognized, there will be no response after pressing the “▶” button.
C). Press the "M" button to reutrn to the previous menu.
D). Press and hold the "M" button to return to the main menu.
4). Delete files
A). Delete files: press the “◀” button after you selected the file you want to delete, a dialog box pops up. Press “◀” or “▶” to select “Yes” and press the “▶” button to confirm the delete.
B). Exit; press and hold the "M" button to exit.
Note: after the file is deleted, the playing music will be stopped.
9. Settings
1). Enter Setting menu
Select “Settings” under the main menu, and press the “▶” button to enter.
2). Buttons
A). Press “+” or “-” to select the items.

natural_image
Illustration of a yellow gear with a screwdriver, surrounded by icons representing software tools (no text or symbols)B). Press the “▶” button to enter.
C). Press the "M" button to return to the previous menu.
D). Press and hold the "M" button to return to the main interface.
3). Music playback settings
There are five options under this menu: Repeat Mode Setting, Play Mode Setting, EQ selection, User EQ and Speaker setting.
A). Repeat Mode Setting: including once, repeat 1, Folder once, Folder Repeat, All once, All Repeat and Intro.
B). Play Mode Setting: including order and shuffle.
C). EQ Selection: including normal, 3D, rock, pop, Classic, Bass and Jazz.
D). User EQ set: five frequencies, 7 levels to adjust in each frequency
4). Record setting
In this setting you may set the record quality as High quality or General quality.
5). Text Settings
To set the time of auto playing while reading texts.
6). Radio setting
In this menu there are two options: stereo switch, FM region.
A). stereo switch.
In this menu, there are two options: On and Off.
b). FM Region
In this menu there are four options: China, Europe, Japan, and the U.S.A.
To set the time of auto playing while view pictures.
8). Display setting
In this menu there are three options: Backlight time, lum, and Backlight mode.
A). Backlight time
In this menu there are 6 options to be selected: 5 seconds, 10 seconds, 15 seconds, 20 seconds, 30 seconds, always on.
B). Lum
In this menu, there are five options: 1, 2, 3, 4 and 5. The higher the level is, the darker the brightness will be.
C). Backlight mode
In this menu, there are two options: Normal and Power save.
9). Power off time
In this menu, there are six options to be selected as follows: OFF, 10 minutes, 15 minutes, 30 minutes, 60 minutes and 120 minutes.
10) Language
There are 11 languages for you to select.
11). System setting
In this menu, there are three options to be selected: about, upgrade and Default.
A). About
Press “▶” button, the following information is displayed: the storage capability, remaining capability, system software version which is read only.
Press "M" button to exit.
B). Firmware upgrade
In this menu pop up dialog box, press “+/-” to select “Yes” or “No”, and then press the “▶” button, connect the player with the PC via USB, the system enters the firmware upgrading status.
C). Default set
Select this item, a dialog box pops up. Press “◀” or “▶” to select “Yes” and press the “▶” button to confirm. The player is resumed to the defaulted value then.
- Converting a Video File
AVI is one of the most popular video formats in the portable media player right now. It is
very popular in the internet. It adopts XviD/DivX format to code the video file. The quality of the video file is so higher, while the video file is so small. In the quality aspect ratio, for the video file effect, you can adopt XviD/DivX format to code nothing less than adopt WMV or RMVB format to code.
Support converting AVI, MPG, MPEG, RM, RMVB, WMV, DAT and so on format to AVI format in high speed and high quality.
System requirements
The Converter software needs the basic configuration as follows:
CPU: Intel or AMD kernel, Intel Pentium 3 or above, including Intel Celeron series Operation steps:
1). Run convert tools in the attaché disc, and install AVIConverter;
2). After the installation completes, run the AVIConverter in the start menu;

3). Show the interface.
Operation steps:
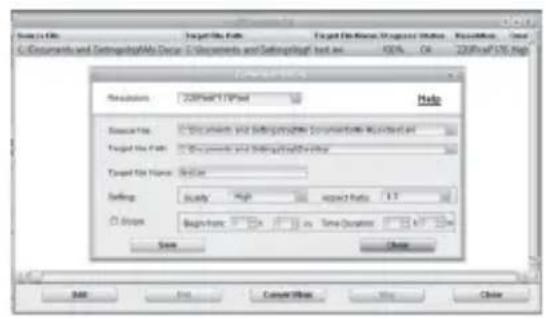
A). Add a converted file, and select source file path, as shown in the picture below:


B). Select the target file path, and press the key in the right of the target file.
C). Select the convert quality and aspect ratio.
D). After set each parameter, press "Save" key and continue to add a converted file, or press "End" key to return previous interface, convert the current file.
E). Press to start convert.
After the convert progress attains 100%, it shows that the file is converted successfully, and then please use the USB cable to transfer the file to portable media player. In this way, you can watch the video in the player.
11. System Update
There are two ways to upgrade the firmware:
1). Select “Settings>System>Upgrade” in the main menu, and then start to upgrade as per the prompt. Details please refer to Section 9: Settings>System setting> Upgrade:.
2). Use the “firmware upgrade tools” in the enclosed CD to upgrade the firmware.
Operation steps:
A). Turn off the player, press and hold the “M” button, do not release it, and connect the player with the PC via USB cable.
B). After the player is connected to the PC, the PC prompts "Rock USB device". Install
the driver as per the requirement. (If the driver has been installed, you can jump over this step directly).
C). After installed the driver, run the "Firmware Update" tool in the enclosed CD.
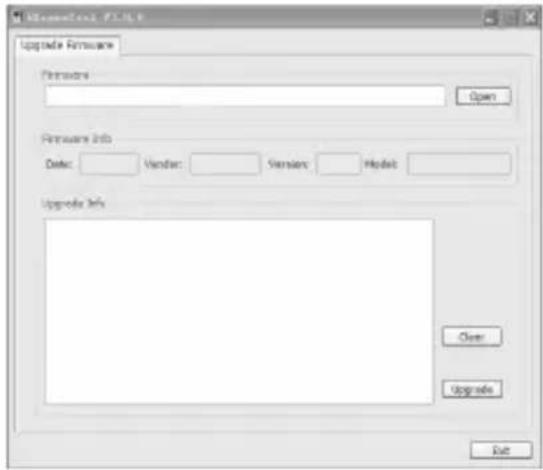
D). Press "Open", and then select a firmware file.
E). Press "Upgrade"
After the upgrading finishes, exit the program and disconnect the connection between MP3 and PC.
12. Troubleshooting
1). Failure to start:
- Check the power of battery;
- Check the power adapter again;
·If it still fails to start after charge, please contact our customer service center.
2) No voice in the earphone
- Please check the volume is 0 or not;
- Please check the connection of the earphone.
3). Serious noise
- Please check whether the earphone's pin is dirty or not, as the disorders could cause noise.
- Please check whether the music file is broken or not. You could try to play another music file. If the file is damaged, it could cause serious noise or pause.
4). The effect of FM tuner is not good.
- Adjust the position of the player and the earphone.
· Turn off the equipment devices near by.
· The earphone acts as antenna.
5). Display clobber on the screen
- Please check whether the language is properly selected or not. Enter
6). Download file failure
- Be sure the connection between computer and player is properly arranged;
- Check whether the memory is used up or not;
-
Check whether the USB cable is broken or not.
-
Specification
| Display 1.8-inch 65K color LCD | |
| Connect with PC USB2.0 (HIGH SPEED) | |
| Built-in memory 1GB-16GB | |
| Power source Built-in Lithium battery | |
| Recording | Sampling rate 8KHz/16KHz |
| Recording format WAV(32K bps/64Kbps) | |
| Recording time 8hours (128M Flash) | |
| MP3、WMA | Earphone Max output (L) 5mW+(R) 5mW(32 ohm) |
| MP3 bit rate 8K bps - 320K bps | |
| WMA bit rate 32K bps - 384K bps | |
| Frequency response 20Hz to 20KHz | |
| FM tuner(Optional) | Frequency range 76MHz-90MHz/87.5MHz-108MHz |
| Number of saved stations 20+20 | |
| Earphone Max output (L)5mW+(R)5mW(32 ohm) | |
| Music file format | MP1、MP2、MP3、WMA、WAV |
| Operating temperature | -5 – 40 °C |
| Language | Chinese, English, Japanese, Korean etc. |
| OS | Windows98/SE/ME/2K/XP/7 |
Do not allow water or foreign objects to enter the player.
Warranty conditions
- The warranty of this product is for 2 years since the purchase date.
- The warranty will exclude breakdowns caused by bad use of the product, wrong installation or installation in not desirable places for a proper maintenance of the product, rips, updates of the products that are not the supplied by the brand, pieces wore away for its use or for not domestic or inappropriate use. Also are excluded breakdowns caused for manipulations of the products by people or companies alien to our company.
- For any request regarding the warranty terms, the purchase receipt must be attached.
1. Operação Básica
1). Ligar/Desligar
natural_image
Abstract graphic with colorful headphones and surrounding icons (no text or symbols)natural_image
Blue gradient background with white circular icons representing media and information symbols (no text or labels)natural_image
Purple background with white circular icons and a photo frame, no text or symbols present.5. Mostra de Imagem
natural_image
Illustration of a yellow notebook with @ symbol, surrounded by icons representing media and information (no text or symbols)carregá-lo.
natural_image
Illustration of a microphone with sound waves, surrounded by icons representing music, video, eye, and gear (no text or symbols)gravação.
natural_image
Illustration of an open book with a magnifying glass, surrounded by icons representing information and search (no text or symbols)A). Aperte “+/-” para seleccionar o ficheiro ou arquivo.
natural_image
Illustration of a yellow gear with a screwdriver, surrounded by software icons (no text or symbols)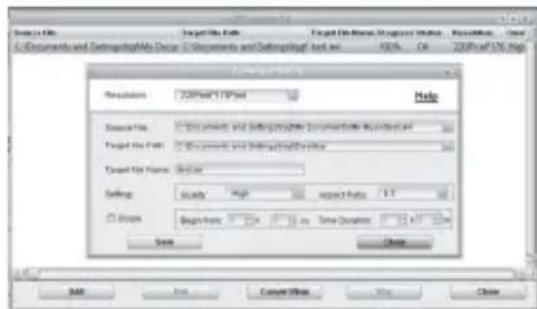
- Operación básica
- Features:
- Introduction of cover:
- Basic operation
- 1). Power on/off
- 2). Charging
- 3) Buttons
- Music Playback
- 1). Playback
- 2). Buttons
- 3). Volume Adjustment
- 4). Previous file/Next file; FF/RW
- 5). Pause
- 6). Play list
- 7). Output EQ Mode Setting:
- FM tuner: (Optional)
- 1). Enter FM tuner:
- 5). Auto-searching
- 6). Storing
- 7). Preset station
- 8). Delete Stations
- Picture display
- E-book
- Voice recording:
- Explorer
- Settings
- System Update
- Troubleshooting
- Warranty conditions
- Operação Básica
- 1). Ligar/Desligar
- Mostra de Imagem
Brand : Sunstech
Model : Fang
Category : Mp3 player