Creating 3D Optical Discs in MyDVD - Logiciel photo/vidéo Roxio - Free user manual and instructions
Find the device manual for free Creating 3D Optical Discs in MyDVD Roxio in PDF.

User questions about Creating 3D Optical Discs in MyDVD Roxio
0 question about this device. Answer the ones you know or ask your own.
Ask a new question about this device
Download the instructions for your Logiciel photo/vidéo in PDF format for free! Find your manual Creating 3D Optical Discs in MyDVD - Roxio and take your electronic device back in hand. On this page are published all the documents necessary for the use of your device. Creating 3D Optical Discs in MyDVD by Roxio.
USER MANUAL Creating 3D Optical Discs in MyDVD Roxio
Creating 3D Optical Discs in MyDVD
Roxio MyDVD can create standard definition and high definition 3D optical discs from 2D and 3D input. This tutorial details the workflow.
Getting Started:
- Run MyDVD. To run MyDVD, in Creator, click "Video/Movies" on the left, and then "Create DVDs."

text_image
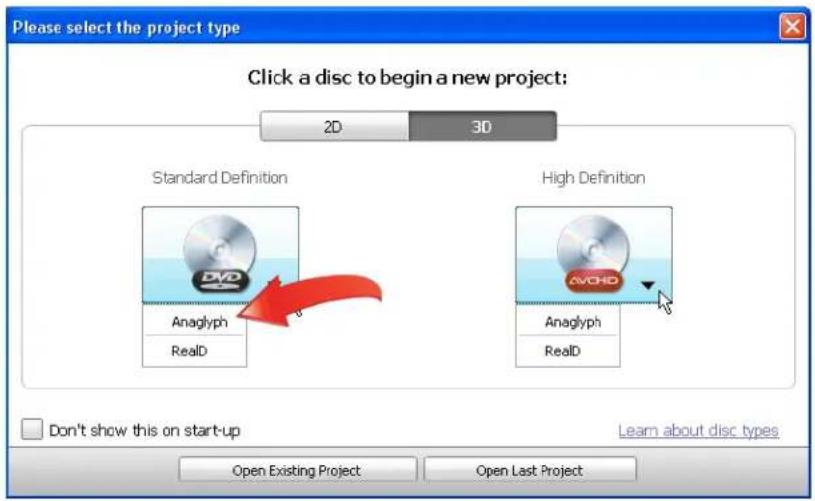
Radio Creator 2011 Pro File Tools Help Home Data Copy Video - Movies ROXIO Create DVDs Create custom discs of your videos with movies, chapters and sound tracks Copy and Convert Video Copy DVDs or convert video files Edit Video - Advanced Create movies with custom sound tracks, titles, transitions and effects Import Capture Video Plug and Burn Archive AVCHD Video Create Create DVDs Create Labels Create Labels - Advanced- Choose the project type. MyDVD opens to the project selection screen. On the top right, click "3D," then choose whether to produce a Standard Definition DVD, which will play on any DVD player, or a High Definition AVCHD Disc, which can record about 30 minutes of HD 3D content onto a traditional recordable/rewriteable DVD (60 minutes for dual-layer discs), but can only play on a Blu-ray Disc player. Then, choose "Anaglyph" to create a disc you can view on a standard computer monitor or television, or "RealD" to create a disc on a system equipped with RealD 3D viewing technology.
text_image
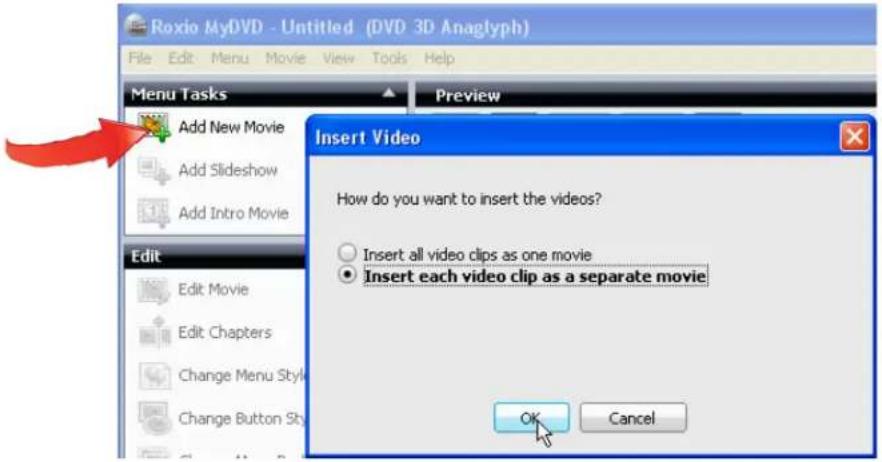
Please select the project type Click a disc to begin a new project: 2D 3D Standard Definition High Definition Anaglyph Anaglyph RealD RealD Don't show this on start-up Learn about disc types Open Existing Project Open Last Project- Import your content. Click "Add New Movie," and MyDVD opens the Add New Title dialog. Navigate to and choose the content to add, and click "Add." MyDVD opens the Insert Video dialog. Chose whether to insert all video clips as one movie, or insert each video clip as a separate movie, can click "OK."
text_image
Roxio MyDVD - Untitled (DVD 3D Anaglyph) File Edit Menu Movie View Tools Help Menu Tasks Preview Add New Movie Add Slideshow Add Intro Movie Edit Edit Movie Edit Chapters Change Menu Style Change Button Style Insert Video How do you want to insert the videos? Insert all video clips as one movie Insert each video clip as a separate movie OK CancelAs covered in more detail below, 3D DVDs don't have menus. If you insert each video clip as a separate movie, your viewers can use their remote controls to click from movie to movie while watching the disk. If you insert all videos as one movie, you'll have to add chapters (illustrated later) to enable your viewers to use their remotes to navigate through your content. In most instances, it's easiest to insert your videos as separate movies (and you can still add more chapters later).
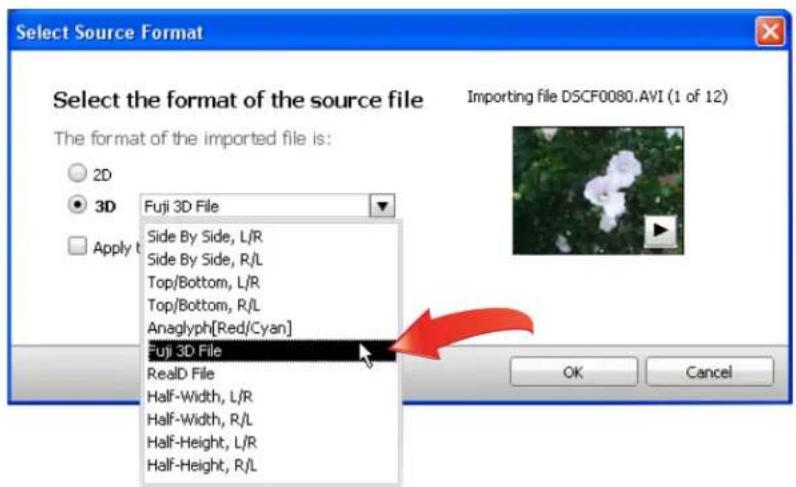
- Select the Source Format. MyDVD opens the Select Source Format dialog, where you identify the format of your source files. If desired, click the Play control in the video thumbnail to preview any video file. If your files are 2D, click that radio button; if 3D, click that radio button and choose the proper format in the 3D format list box.
text_image
Select Source Format Select the format of the source file The format of the imported file is: 2D 3D Apply t Fuji 3D File Side By Side, L/R Side By Side, R/L Top/Bottom, L/R Top/Bottom, R/L Anaglyph[Red/Cyan] Fuji 3D File RealD File Half-Width, L/R Half-Width, R/L Half-Height, L/R Half-Height, R/L Importing File DSCF0080.AVI (1 of 12) OK CancelIf you don't know the correct format of your 3D video, check the documentation that came with your camera. If you didn't shoot the original video and don't know the source, play the video file in Windows Media Player or the QuickTime Player, which
may reveal whether the format is anaglyph, side by side, or top and bottom. Don't sweat if you're not sure; you'll learn how to fix any import errors in the next step.
If all files share the same source format, click the "Apply the selected format to all imported files" checkbox (beneath the 3D Format list box in the figure above) to select this option for multiple files. If you select multiple files to import, and don't click this checkbox, MyDVD will ask you to select the source format for each selected file.
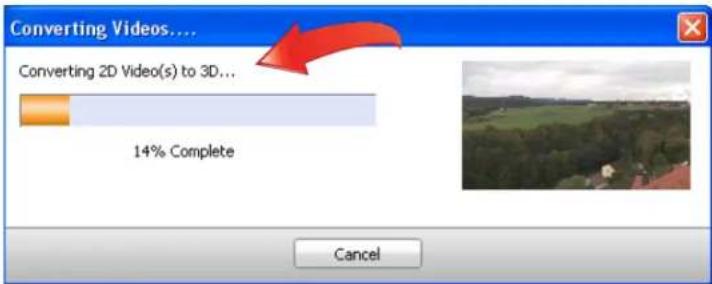
When MyDVD imports 2D files, it converts them into a high quality side-by-side 3D file using proprietary image and motion detection algorithms, displaying a Converting Videos dialog. Conversion time will depend upon the length and format of the 2D video file and the speed of your computer.
text_image
Converting Videos... Converting 2D Video(s) to 3D... 14% Complete Cancel- Correct any 3D import errors. If, after import, the video looks distorted in MyDVD's Preview Pane, click the video in the Project View on the lower left of the MyDVD interface, then, in MyDVD's main menu, choose Movie > 3D Format Correction, which will open the Select Source Format dialog shown above. Try another format and click "OK" to close the Select Source Format dialog, repeating as necessary until the video appears normal.

text_image
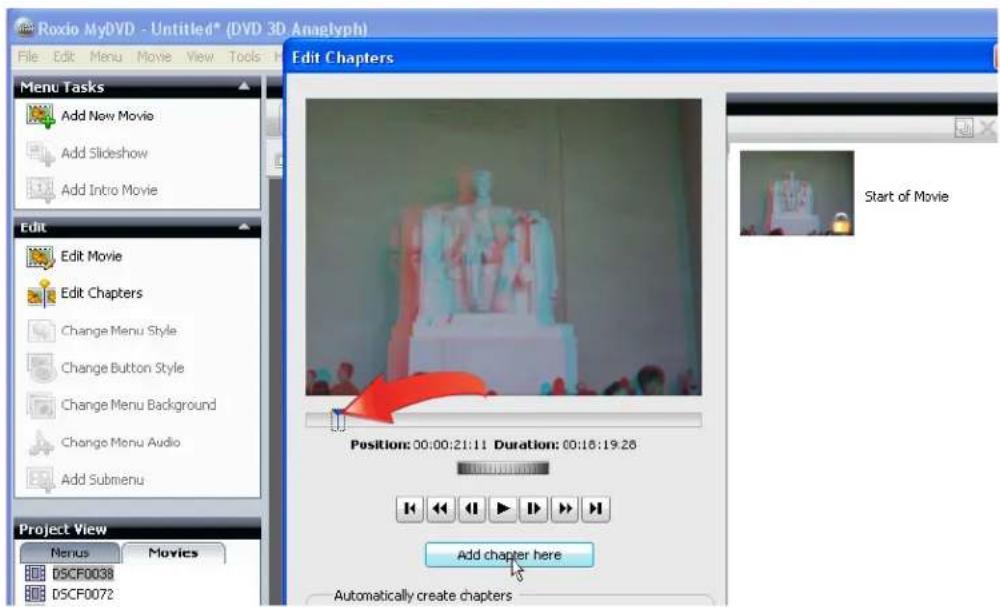
Roxio MyDVD - Untitled* (DVD 3D Anaglyph) File Edit Menu Movie View Tools Help Menu Tasks Add New Movie Add Intro Movie... Add New Slideshow... Add New Cinemagic Movie... Add Intro M Edit Edit Movie Edit Chapter Change Mer Change But Change Mer Change Mer Add Submer Project View Menus DSCF0038 DSCF0072 DSCF0080 Add New Movie Add Intro Movie... Add New Slideshow... Add New Cinemagic Movie... 3D Format Correction... Edit Movie Edit Chapters... Remove Current Movie Remove Intro Movie Add Photo/Video... Add Color Panel... Add Transition... Apply Transition Theme Add Overlay... Add Video Effect... Add Text Effect... Add Audio... Add Narration... Trim... Edit Internal Tracks Activate Clockwise Rotate Counter-Clockwise Split- Add chapters to your DVD. As discussed above, 3D DVDs have no menus, and the discs will start to play immediately after being inserted in the drive. If you insert chapters into your movies, your viewers can use their remotes to navigate from chapter to chapter. To insert chapter points into a movie, click the movie in the Project View, then click Edit Chapters in the Edit View. The Edit Chapters dialog opens.
a. In the Edit Chapters dialog, to add Chapters manually, drag the playhead to the desired frame, and click the "Add chapter here" button.
text_image
Roxio MyDVD - Untitled* (DVD 3D Anaplyph) File Edit Menu Movie View Tools Menu Tasks Add New Movie Add Slideshow Add Intro Movie Edit Edit Movie Edit Chapters Change Menu Style Change Button Style Change Menu Background Change Menu Audio Add Submenu Project View Menus Movies DSCF0038 DSCF0072 Edit Chapters Position: 00:00:21:11 Duration: 00:18:19:28 Add chapter here Automatically create chaptersb. To add chapters automatically, click the desired option (scene detection, start of every panel or at specified intervals), set any necessary parameters and click "Go." MyDVD will automatically add the chapters.
c. Click "OK" to close the Edit Chapters window.

text_image
Automatically create chapters Using scene detection Sensitivity: 50 At start of every panel Every Min: - 0 + Sec: - 5 + Go OK Cancel Help- Preview your project. Click the preview button on the lower right to preview the project. You can navigate through your project using the player-like controls on the left of the preview window. When finished, click "Close" to close the preview window.

text_image
Preview DVD Controls Intro Monu OK Close size: DVD 4.7GB Used: 175.8 MB Free: 4524.2 MB Time Remaining: 01:04:16 Quality: Fit To Disc EP LP SP HQ- Check capacity and recording settings. The data gauge on the bottom left details how much video you can add to the project using the selected quality option. In most instances, use the "Fit To Disc" Quality option, which will fit all content on your disc at the highest possible quality.

text_image
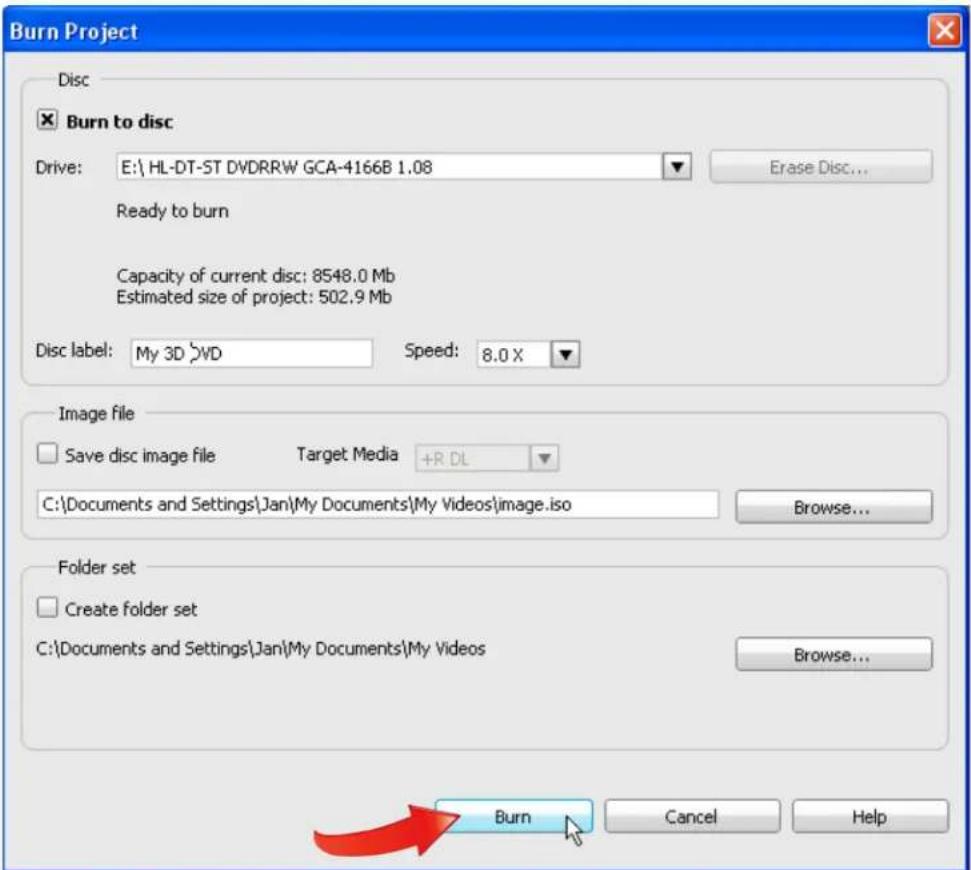
Disc size: DVD 4.7GB Used: 502.9 MB Free: 4197.1 MB Time Remaining: 00:59:38 Quality: Fit To Disc Fit To Disc Extra Long Play (EP) Long Play (LF) Standard Play (SP) High Quality (HQ)- Burn your disc. When you're ready, click the red Burn Project icon (see figure above) to burn the disc. MyDVD quickly checks the project, then opens the Burn Project dialog. You can customize the disk label by typing in the desired text. There are multiple output options; click the "Burn to disc" checkbox to record the 3D DVD disc. Then click "Burn" to start the recording process.