
CT2110 - Television SHARP - Free user manual and instructions
Find the device manual for free CT2110 SHARP in PDF.


| Product Type | Color Television |
| Brand | Sharp |
| Model | CT2110 |
| Power Source | AC (type as indicated on the TV set) |
| Power Consumption | Not specified; typical for 21-inch CRT TV: 60-80 W |
| Screen Size | 21 inches (diagonal) |
| Remote Control | Included; requires 2 AAA batteries |
| Antenna Connection | 75-ohm coaxial or 300-ohm twin-lead; RF input |
| External Equipment Connections | AV input (via side/back terminals) |
| On-Screen Display (OSD) | Yes; channel number, menu, biorhythm |
| Picture Modes | Soft, Nature, Rich, User |
| Sound System | D/K, B/G, I, M (selectable) |
| Color Systems | Auto, PAL, SECAM, NTSC |
| Auto Program | Yes; searches and stores channels |
| Child Lock | Yes; locks front panel keys |
| Sleep Timer | Yes; 10, 20, 30, or 180 minutes |
| On/Off Timer | Yes; programmable |
| Auto Off (no signal) | After 15 minutes |
| Biorhythm Function | Yes; calculates energy, intelligence, emotion based on birthday |
| Weight | Approximately 12-15 kg (typical for 21-inch CRT) |
| Dimensions (W x H x D) | Not specified; typical 21-inch CRT: about 500 x 420 x 450 mm |
| Safety Features | Polarized plug, grounding, auto-degaussing, ventilation slots |
| Cleaning | Unplug; use dry cloth; do not use liquid cleaners |
Frequently Asked Questions - CT2110 SHARP
User questions about CT2110 SHARP
0 question about this device. Answer the ones you know or ask your own.
Ask a new question about this device
Download the instructions for your Television in PDF format for free! Find your manual CT2110 - SHARP and take your electronic device back in hand. On this page are published all the documents necessary for the use of your device. CT2110 by SHARP.
USER MANUAL CT2110 SHARP
Congratulations! You have purchased one of the finest Color TV's on the market!
This manual will help you use many exciting and useful features to make your TV viewing more enjoyable than ever before.
Before operating your TV set, please read all these safety and operating instructions completely and then retain for future reference.
Customer's Record
You will find the model number and chassis number on the back of your TV set.
Record these numbers in the spaces provided below.
Refer to them whenever you call upon your dealer regarding this product.
Model Number: ____
Chassis
Number:____
Safety Precautions
WARNING: TO REDUCE THE RISK OF FIRE OR ELECTRIC SHOCK, DO NOT EXPOSE THIS APPLIANCE TO RAIN OR MOISTURE.
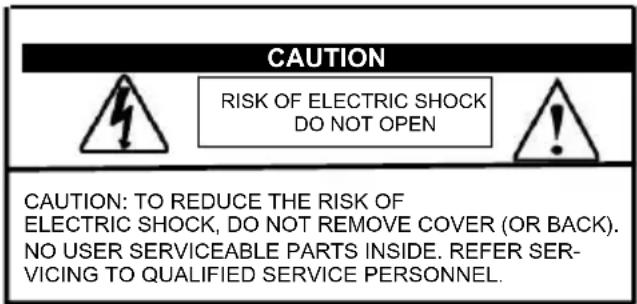

The lightning symbol in the triangle tells you that the voltage inside this product may be strong enough to cause an electric shock. DO NOT TRY TO SERVICE OR CHANGE THIS PRODUCT YOURSELF.

The exclamation point in the triangle tells you that important operating and maintenance instructions follow this symbol.
CAUTIONS:
TO PREVENT ELECTRIC SHOCK, DO NOT USE THIS POLARIZED PLUG WITH AN EXTENSION CORD RECEPTACLE OR OTHER OUTLET UNLESS THE PRONGS CAN BE FULLY INSERTED INTO THE OUTLET TO PREVENT ANY EXPOSURE OF THE PRONGS ON THE POLARIZED PLUG.
Avoid displaying stationary images on your TV screen for extended periods of time. Stationary patterns generated by computer displays, video games, stock market reports, etc .can become permanently en-grained on the picture tube. This damage is not protected by your warranty as it is the result of misuse. Should you wish to use your Television to display still images, it is always advisable to reduce brightness and contrast settings. Never leave a video game or computer display unattended.
NOTE TO CABLE INSTALLER:
The cable ground shall be connected to the grounding system of the building, as close to the point of cable entry as practical.
Important Safety instructions
CAUTION
PLEASE READ THESE INSTRUCTIONS, KEEP THESE INSTRUCTIONS AND HEED ALL WARNINGS. FOLLOW ALL INSTRUCTIONS.
Electrical energy can perform many useful functions. This TV set has been engineered and manufactured to assure your personal safety. However improper use can result in potential electrical shock or fire hazards. In order not to defeat the safe guards incorporated in this TV set, observe the following basic rules for antenna/TV installation, use and servicing. All operating and use instructions should be followed. Do not remove the cabinet cover. This may expose you to dangerous voltages. Refer all servicing to qualified service personnel.
BEFORE OPERATION (continued)
Precautions
Power Sources-The TV set should be operated only from the type of power source indicated on the TV set or as indicated in the Operation Manual. If you are not sure of the type of power supply in your home, consult your sales person or your local power company. For TV sets designed to operate from battery power, or other sources, refer to the operating instructions.
Grounding or Polarization - Do not defeat the safety purpose of the polarized or grounding-type plug. A polarized plug has two blades with one wider than the other. A grounding-type plug has two blades and a third grounding prong. The wide blade or the third prong is provided for your safety. If the provided plug does not fit into your outlet, consult an electrician for replacement of the obsolete outlet.
Alternate Warnings-This plug will only fit into a grounding-type power outlet. This is a safety feature. If you are unable to insert the plug into the outlet, contact your electrician to have a suitable outlet installed. Do not defeat the safety purpose of the grounding plug.
Water and Moisture Warnings-Do not use the TV set near water-for example, near a bath tub, wash bowl, kitchen sink, or laundry tub; in a wet basement; or near a swimming pool; and the like. The TV set shall not be exposed to dripping or splashing and no objects filled with liquids, such as vases, shall be placed on the TV set.
Ventilation-Slots and openings in the cabinet are provided for ventilation and to ensure reliable operation of the TV set and to protect it from overheating, and these openings must not be blocked or covered. The openings should never be blocked by placing the TV set on a bed, sofa, rug, or other similar surface. This TV set should not be placed in a built-in installation such as a bookcase or rack unless proper ventilation is provided or the manufacturer's instructions have been adhered to.
Heat - Do not install near any heat sources such as radiators, heat registers, stoves, or other apparatus (including amplifiers) that produce heat.
Power-Cord Protection-Protect the power cord from being walked on or pinched particularly at plugs, convenience receptacles, and the point where they exit from the apparatus.
Accessories-Do not place the TV set on an unstable cart, stand, tripod, bracket, or table. The TV set may fall, causing serious injury to a child or adult, and serious damage to the TV set. Use only with a cart, stand, tripod, bracket, or table recommended by the manufacturer, or accessory recommended by the manufacturer, or sold with the TV set, and should use a mounting accessory recommended by the manufacturer.
A product and cart combination should be moved with care. Quick stops, excessive force, and uneven surfaces may cause the TV set and cart combination to overturn.
Overloading- Do not overload wall outlets, extension cords or integral convenience receptacles as this can result in fire or electric shock.
Lightning-For added protection for this TV set during a lightning storm, or when it is left unattended and unused for long periods of time, unplug it from the wall outlet and disconnect the antenna or cable system. This will prevent damage to the product due to lightning and power-line surges.
Object and Liquid Entry-Never push objects of any kind into the TV set through openings as they may touch dangerous voltage points or short-out parts that could result in a fire or electric shock. Never spill liquid of any kind on the TV set.
BEFORE OPERATION (continued)
Precautions (continued)
Cleaning-Unplug the TV set from the wall outlet before cleaning or polishing it. Do not use liquid cleaners or aerosol cleaners. Use a dry cloth for cleaning the exterior of the TV set.
Attachments-Do not use attachments not recommended by the product manufacturer as they may cause hazards or electric shock.
If a snapping or popping sound from a TV set is heard continuously or frequently while the TV set is operated, unplug the TV set and consult your dealer or service technician. It is normal for some TV sets to make occasional snapping or popping sounds, particularly when being turned on or off.
Damage Requiring Service-Unplug the TV set from the wall outlet and refer servicing to qualified service personnel under the following conditions:
a. If the power cord or plug is damaged or frayed.
b. If liquid has been spilled or objects have fallen into the TV set.
c. If the TV set has been exposed to rain or water.
d. If the TV set has been subject to excessive shock by being dropped, or the cabinet has been damaged.
e. If the TV set does not operate normally by following the operating instructions. Adjust only those controls that are covered by the operating instructions as an improper adjustment of other controls may result in damage and will often require extensive work by a qualified technician to restore the TV set to its normal operation.
f. When the TV set exhibits a distinct change in performance-this indicates a need for service.
Warning: This unit should only be serviced by an authorized and properly trained technician. Opening the cover or other attempts by the user to service this unit may result in serious injury or death from electrical shock, and may increase the risk of fire.
Servicing-Do not attempt to service the TV set yourself as opening or removing covers may expose you to dangerous voltage or other hazards. Refer all servicing to qualified service personnel.
Replacement Parts-When replacement parts are required, be sure the service technician has used replacement parts specified by the manufacturer or have the same characteristics as the original parts. Unauthorized substitutions may result in fire, electric shock, or other hazards.
Safety Check-Upon completion of any service or repairs to the TV set, ask the service technician to perform routine safety checks to determine that the TV set is in proper operating condition.
When the TV set reaches the end of its useful life, improper disposal could result in a picture tube implosion. Ask a qualified service technician to dispose of the TV set.
ANTENNA
Outdoor Antenna Grounding-if an outdoor antenna is installed, follow the precautions below. An outdoor antenna system should not be located in the vicinity of overhead power lines or other electric light or power circuits, or where it can come in contact with such power lines or circuits.
WHEN INSTALLING AN OUTDOOR ANTENNA SYSTEM, EXTREME CARE SHOULD BE TAKEN TO KEEP FROM CONTACTING SUCH POWER LINES OR CIRCUITS AS CONTACT WITH THEM IS ALMOST INVARIABLY FATAL
Be sure the antenna system is grounded so as to provide some protection against voltage surges and built-up static charges.
CONTENTS
INTRODUCTION
Remote Control Keys ....1
INSTALLATION
To Connect the Antenna 2
Installing the Remote Control Batteries ....2
To Connect External Equipment 3
GENERAL OPERATION
Power On/Off 4
On-Screen Display 4
Intelligent Operation ....4
Volume Control 4
Channel Selection ....5
Recall 5
TV/AV Selection ....5
MENUS OPERATION
Menus 5
Picture Menu 6
Timer Menu 6
Setup Menu 7
Tune Menu 7
Swap Menu 8
Hotel Menu 9
Biorhythm Menu 9
TROUBLESHOOTING GUIDE ...... 10
Note:
Designs are subject to change without notice.
INTRODUCTION
Remote Control Keys
Remote control

•The color and INDEX buttons also function as fast menu selection in the TV mode.
Notes:
① When in operation, please point your remote control directly to the infrared sensor.
② Do not expose the remote control to impacts, water or disassemble it.
INSTALLATION
- Please read the safety instructions in this manual completely before installation.
• Install your TV in an area where direct sunlight will not fall upon the screen.
- Soft, indirect light is best for television viewing.
- Allow enough space (at least 4 in.) between the TV and any walls or enclosures for proper ventilation.
•Optimum television viewing distance is 3-5 times the screen's size.
Auto-Degaussing
Color television can be easily affected by magnetism, which shows as color distortion on the screen. If your TV is affected by nearby magnetic components or appliances, turn it off for a few minutes. The built-in auto-degaussing circuit will eliminate the magnetic interference.
To Connect the Antenna

flowchart
graph TD
    A["VHF"] --> B["75-ohm coaxial cable (not supplied)"]
    C["UHF or Cable"] --> D["300-ohm twin-lead cable (not supplied)"]
    E["VHF"] --> F["Antenna adapter (not supplied)"]
    G["UHF"] --> H["U/V mixer (not supplied)"]
    I["RF Input (back of TV unit)"] --> J["Antenna adapter (not supplied)"]
    J --> K["RF Input (back of TV unit)"]
Notes:
-
It is recommended that a 75 ohm coaxial cable be used in order to eliminate interference and noise which may occur due to nearby radio transmissions.
-
The antenna cable should not be tied together with other wiring.
-
Set up a lightning rod and check it regularly when an outdoor antenna is used.
Installing the Remote Control Batteries
-
Remove the battery compartment lid.
-
Insert two AAA batteries (included). Make sure the positive (+) and negative (-) polarities are correctly aligned.
-
Reattach the battery lid.
Notes:
-
Alkaline batteries are recommended for longer life.
-
Always replace both batteries at the same time.
-
Do not expose batteries to fire or break them open.
-
To avoid battery leakage, remove batteries from the remote control when it is not being used for a long period of time.
INSTALLATION (continued)
To Connect External Equipment
The following are diagrams showing basic instructions for attaching external equipment, like a VCR or DVD player, to your TV set. Please refer to operation manuals of external audio/video equipment that will be connected to your set for additional instructions. PLEASE TURN OFF ALL POWER BEFORE CONNECTING DEVICES TOGETHER.

Notes:
①Please turn off the power supply of the TV set and the external equipment before connection.
②The side terminals may be easier to use with a camcorder. The connections are identical.
GENERAL OPERATION
Power On/Off
1. Power on
Plug in the supply socket, and press the MAIN POWER SWITCH key on the TV. You may press any of the POWER, Program Number (0-9) and PRO-/+ (or CH-/+ ) keys on the remote control to turn on the TV.
2. Power off
To switch back to the Standby mode, press POWER key. You can also power off the TV directly by pressing the MAIN POWER SWITCH key. Part of circuit on the TV remains active in the STANDBY mode. To cut off the power off completely, please press the MAIN POWER SWITCH.
Auto off without signal received
When there is no signal received (for example, the program of a certain channel is over), the TV will switch to the Standby mode if no key is pressed within 15 minutes. If you have set "Off Time" and the remaining time is less than 15 minutes, Off Time will be carried out prior to AUTO OFF.
On-Screen Display
When switching channels, the current channel number will appear on the upper-left corner of the screen, which will disappear in 3 sec.
Press the DISP button firstly when watching TV to display channel number, color/sound system modes on the screen. To turn off the display, press the button again.
Pressing the DISP button can turn off menu display.
2
AUTO
D/K
Intelligent Operation
Press and hold down the AUTO button for 3 sec and the TV automatically completes some settings, such as settings of language, volume, picture mode, color system and sound system. Then it starts Auto Program. After Auto Program, the TV returns to Channel 1. At this time, you may watch the TV program 1.
Volume Control
Press the VOL-or VOL+ button to decrease or increase the volume.
Adjustable range: 0\~100
During normal play, press the MUTE button and the sound is eliminated. The TV will display a red MUTE on the screen.
To cancel MUTE, you may press the MUTE button again or the VOL+ buttons.
GENERAL OPERATION (continued)
Channel Selection
Pressing the CH-/CH+ buttons can select another lower-numbered or upper-numbered channel.
Direct selection
To select a one-digit channel number
Press the DIGIT button to choose "-" firstly, then press one of 0-9 buttons.
To select a two-digit channel number
Press the DIGIT button to choose "--" firstly, then enter a first-digit and second-digit.
To select a three-digit channel number
Press the DIGIT button to choose "--" firstly, then enter a first-digit, second-digit and third-digit.
Note:
Please finish entering within 6 sec.
Recall
Press the RECALL button and the TV will directly skip back to the former signal source reception mode.
TV/AV Selection
In the TV mode, press the TV/AV button to enter the AV mode. In the AV mode, the TV receives AV signals from external equipment and automatically cuts off signals from the antenna terminal. To resume broadcast viewing, press the TV/AV button repeatedly or CH-/CH+ buttons. To receive signals from external equipment, please select the relevant AV mode.
MENUS OPERATION
Menus
Press the MENU button repeatedly when watching TV programs, and the TV will display seven kinds of menus (including PICTURE, TIMER, SETUP, TUNE, SWAP, HOTEL and BIORHYTHM) cyclically. Press the CH+/CH- buttons to select an adjustment (the characters turn white to cyan), and press the VOL-/VOL+ buttons to adjust.(Press the HELP button, and the operation hint will appear on the upper-right corner of the menu.)
Menu selections are omitted in the following function with those buttons of the same name on the remote control. If your remote control becomes invalid or lost, you can use many basic functions by pressing the buttons on the TV.
Menu display disappears 6 sec after last selection.
Note: In the AV mode, TUNE menu and SWAP menu are not available.
MENUS OPERATION (continued)
Picture Menu
1. Picture mode selection
Before shipment, the TV was given three preset picture modes: Soft, Nature and Rich. Press the P. MODE button to select one of the three preset modes or the User mode. Refer to the following table about each picture mode.
| Mode Picture Quality |
| Soft The contrast is low, suitable for watching TV in mild surrounding light. |
| Nature Standard status, suitable for watching ordinary programs. |
| Rich The contrast is high, suitable for watching TV in bright environment. |
| User Picture quality user sets. |
2. To adjust picture quality
To perform the following operation, press the MENU button repeatedly or the red button directly (in the TV/AV mode) to select the PICTURE menu. Press the CH-/CH+ buttons to choose an adjustment. Press the VOL-/VOL+ buttons to adjust the digital level of the selected adjustment as desired.
| PICTURE | |
| Contrast | 50 |
| Brightness | 50 |
| Color | 50 |
| Sharpness | 50 |
| ...... | |
| Item | Adjustment Effect | |
| Press VOL- | Press VOL+ | |
| Contrast Lower Higher | ||
| Brightness Darker Brighter | ||
| Color Weaker Stronger | ||
| Sharpness Lower Higher | ||
The adjusted picture level is automatically stored in the User position.
Notes:
"Tint" appears only when the signal system is set to NTSC.
The adjustable "Tint" range is -50-+50, and other adjustments are 0-100.
Timer Menu
In the STANDBY or TURN ON mode, the TV can automatically complete some functions such as turn-on, channel preset and turn-off as desired.
To perform the following operation, press the MENU button repeatedly or the yellow button directly (in the TV/AV mode) to select the TIMER menu.
MENUS OPERATION (continued)
Timer Menu (continued)
1. On/Off timer
Press the CH-/CH+ buttons to select an adjustment.
Press the VOL-/VOL+ buttons to adjust the selection.
You may preset two kinds of On Time and On Channels.
After On Timer is performed, the set On Time is cleared and the On
Channel remains unchanged.
2. Sleep timer
After selecting "Sleep Time", press the VOL-/VOL+ buttons
repeatedly to set Sleep time to 10, 20, 30 or 180 min.
Display on the screen will remind you 5 times in the last 5 min. before the preset SLEEP Time is up.
TIMER
Clock --:--
On Time1 --:--
On Channel1 1
On Time2 --:--
On Channel2 1
Off Timer --:--
Sleep Time 0
Notes:
If both the SLEEP TIME and OFF TIMER are set, the TV will perform the setting with less remaining time prior to another.
The SLEEP function is cancelled at the same time that the OFF TIMER is performed.
If the SLEEP TIME setting is performed prior to OFF TIMER, the OFF TIMER still works.
Setup Menu
To perform the following operation, press the MENU button repeatedly or the blue button directly (in the TV/AV mode) to select the SETUP menu.
1. OSD selection
NOTE: The OSD and illustration in this manual may be somewhat different from the actual situation. Please take the TV as the normal.
2. Blue background
With this function on, the screen will display a mild blue background and mute automatically in TV mode when no signal is received.
SETUP
English
Blue Back On
PIC Enhance On
Color Temp Cool
AVL Off
Child Lock Off
3. Picture enhancement
If the picture of a certain channel is abnormal, use this function to improve picture. It is recommended to select "PIC Enhance Off" when the signal being received is good in case of influencing picture definition.
4. Color temperature adjustment
You may select one of color of background as preferred among Normal, Cool and Warm mode.
The adjusted Color Temp mode is automatically stored and remains unchanged until next adjustment.
5. AVL(Auto Volume Leveling)
When the AVL is activated, it automatically stabilizes the audio output signal to a certain level.
6. Child Lock
With Child Lock On, the keys on the TV do not function.
Notes:
The AVL function is selectable. The Child Lock function is selectable.
Tune Menu
This section gives descriptions about adjustment of items in the TUNE menu. Press the MENU button repeatedly or the INDEX button directly (in the TV mode) to select the TUNE menu.
1. Color/Sound system selection
In case the color/sound of a channel that you are watching is abnormal, please change the color/sound system.
MENUS OPERATION (continued)
Tune Menu (continued)
2. SKIP
After Auto Search, there may be some repeated program or inferior signals received. Skipping the undesired program position can dramatically quicken channel selection.
After selecting "Skip" in the TUNE menu, press the VOL-/VOL+ buttons to set "Skip On". When the TUNE menu has disappeared, press the CH-/CH+ buttons and you will find the channel number skipped. If you select the channel number by the Direct Select buttons, the channel number has changed from green to yellow.
| TUNE | |
| Color | Auto |
| Sound | D/K |
| Skip | Off |
| Channel | 2 |
| Search | |
| Fine Tune | |
| Auto Search | |
To resume the channel number that has been skipped, repeat the operations mentioned above. Then set "Skip Off".
3. Search
In case the desired channel cannot be preset with the Auto Program function, or you would like to set the desired channels to specific channel numbers, please use the Search function.
After selecting "Search" in the TUNE menu, press the VOL-/VOL+ buttons. The TV searches another lower/upper channel. To stop search, press the MENU button.
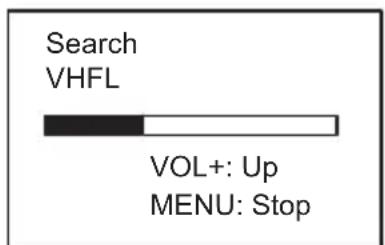
If the selected channel is not the one you want, press the buttons again until the desired channel is selected. If the TV dose not stop searching when finding a channel, please use the Fine Tune function.
4. Frequency fine-tuning
After selecting "Fine Tune" in the TUNE menu, press and hold down the VOL- or VOL+ button until you get the best sound and picture effect.
Press the DISP button to check up the fine-tuned channel, and you will find that the position number turns to red.
5. Auto Search
After selecting "Auto Search" in the TUNE menu, press the VOL+ button. The TV will search automatically in sequence. After auto search, the TV will store receivable channels and returns to POS1. Unused position number is automatically set to Skip On. During auto Search, press the MENU button to stop searching.

Swap Menu
Use the SWAP function to resort program position. For example, you want to change Channel 9 to Channel 1.
-
Press the MENU button repeatedly or the green button directly (in the TV mode) to select the SWAP menu.
-
Press the CH-/CH+ buttons to highlight "Channel A". Press the Numeric buttons to set it to 9. Then set channel B to 1 in the way mentioned above.

MENUS OPERATION (continued)
Swap Menu (continued)
- Select the SWAP menu, and press the VOL+ button. The current channel No. is changed to Channel 1 and the content of Channel 1 is exchanged with that of Channel 9. The current channel No. is Channel 1. Repeat the operations mentioned above to sort other searched channel position as desired
Hotel Menu
To perform the following operation, press the MENU button repeatedly (in the TV/AV mode) or the green button directly (in the AV mode) to select the HOTEL menu.
Only after entering the correct password by pressing Numeric buttons, can you adjust the following items. (Each time you power on the TV, you need enter the password)
Initial password: 0000 (preset before outgoing)
Universal password: 8888
Tuning lock: To allow/prohibit program (searching program). With
Channel Lock ON, the item is also set to ON.
AV Lock: To prohibit the AV button to shift VIDEO.
Maximum Vol : To adjust volume to maximum.
New Password: Enter new password twice and you may change original password
Channel Lock: To lock up to 4 channels as user sets.
Generally the Hotel TV does not allowed guests to change setting.
With Tuning Lock ON, the TUNE and SWAP menus are not available.
HOTEL
Password ****
Tuning Lock Off
AV Lock On
Maximum Vol 26
New Password ****
Channel Lock Off
12 32 65 43
Biorhythm Menu
Press the MENU button repeatedly or BIO button directly (in the TV/ AV mode) to select the BIORHYTHM menu.
After entering your birthday, you may check the state about your energy, intelligence or emotion in any day between the day after your birthday and Dec.31, 2155.
BIORHYTHM
Today
OCT 18 2003
Birthday
JUN 25 1976
Energy
Intelligence
Emotion
Average
TROUBLESHOOTING GUIDE
| Symptoms | Check the following items | |
| Picture Sound | ||
| No picture No | sound | 1. Make sure the power cord is plugged in. 2. Check if the MAIN POWER SWITCH is pressed or not. 3. Check if the levels of Contrast, Brightness and Volume are set to minimum. |
| Normal No sound | Check if the TV is in the MUTE mode or the volume is minimum. Try pressing the VOL+ button. | |
| No color | Normal | Check if the chroma is set to minimum. |
| With noise | Check if the sound/color system is correct. | |
| With stripes | With noise | The TV set is interfered by electric waves from automobiles, motors, neon lights, etc. |
| With snow | With noise | 1. Check if the antenna cable is broken or disconnected. 2. Check if the antenna direction has changed. |
| Ghost picture N | Normal Check if the | antenna direction has changed. |
| Unclear picture | Normal or weak Pre | reset channels again. |
| With spots Normal | 1. The TV is moved with power on. 2. Check if magnetic objects are put near the set. | |
| The remote control doesn't work. T | the batteries are exhausted or improperly installed. | |
TELEVIZOR COLOR
CT-2110ASF
MANUAL DE UTILIZARE
INAINTE DE UTILIZARE
Stimate Client,
| PICTURE | ||
| Contrast | 50 | |
| Brightness | 50 | |
| Color | 50 | |
| Sharpness | 50 | |
| ...... | ||
| Articol | Efectul reglarii | |
| Apasati VOL- | Apasati VOL+ | |
| Contrast | mai slab | mai ridicat |
| Luminozitate | mai intunecat mai luminos | |
| Culoare | mai slaba | mai puternica |
| Contur | mai redus | mai ridicat |
Nivelul reglat al imaginii este memorat automat in pozitia User.
Observatii:
Meniu Bioritm
natural_image
Symbol of a trash bin crossed with no text or labels
Reciclarea ecipamentelor electrice si electronice uzate
- Customer's Record
- Safety Precautions
- CAUTIONS:
- Important Safety instructions
- CAUTION
- BEFORE OPERATION (continued)
- Precautions
- Precautions (continued)
- ANTENNA
- CONTENTS
- INTRODUCTION
- INSTALLATION
- GENERAL OPERATION
- MENUS OPERATION
- Note:
- Remote Control Keys
- Notes:
- Auto-Degaussing
- Installing the Remote Control Batteries
- INSTALLATION (continued)
- To Connect External Equipment
- Power On/Off
- Power on
- Power off
- Auto off without signal received
- On-Screen Display
- Intelligent Operation
- Volume Control
- GENERAL OPERATION (continued)
- Channel Selection
- Recall
- TV/AV Selection
- Menus
- MENUS OPERATION (continued)
- Picture Menu
- Picture mode selection
- To adjust picture quality
- Timer Menu
- Timer Menu (continued)
- On/Off timer
- Sleep timer
- TIMER
- Setup Menu
- OSD selection
- Blue background
- SETUP
- Picture enhancement
- Color temperature adjustment
- AVL(Auto Volume Leveling)
- Child Lock
- Tune Menu
- Color/Sound system selection
- Tune Menu (continued)
- SKIP
- Search
- Frequency fine-tuning
- Auto Search
- Swap Menu
- Swap Menu (continued)
- Hotel Menu
- HOTEL
- Biorhythm Menu
- BIORHYTHM
- TELEVIZOR COLOR
- CT-2110ASF
- MANUAL DE UTILIZARE
- INAINTE DE UTILIZARE
- Observatii:
- Meniu Bioritm
- Reciclarea ecipamentelor electrice si electronice uzate
Brand : SHARP
Model : CT2110
Category : Television