SX-F100 - Keyboard TECHNICS - Free user manual and instructions
Find the device manual for free SX-F100 TECHNICS in PDF.

User questions about SX-F100 TECHNICS
0 question about this device. Answer the ones you know or ask your own.
Ask a new question about this device
Download the instructions for your Keyboard in PDF format for free! Find your manual SX-F100 - TECHNICS and take your electronic device back in hand. On this page are published all the documents necessary for the use of your device. SX-F100 by TECHNICS.
USER MANUAL SX-F100 TECHNICS
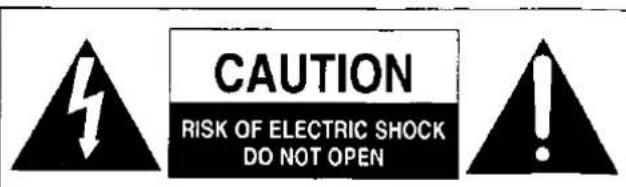
CAUTION:
TO REDUCE THE RISK OF
ELECTRIC SHOCK, DO NOT
REMOVE SCREWS.
NO USER-SERVICEABLE
PARTS INSIDE
REFER SERVICING TO QUALIFIED
SERVICE PERSONNEL.
WARNING: TO REDUCE THE RISK OF FIRE OR ELECTRICAL SHOCK, DO NOT EXPOSE THIS PRODUCT TO RAIN OR MOISTURE.
BEFORE YOU PLAY, PLEASE READ THE CAUTIONARY COPY APPEARING ON PAGE 2.

The lightning flash with arrowhead symbol, within an equilateral triangle, is intended to alert the user to the presence of uninsulated "dangerous voltage" within the product's enclosure that may be of sufficient magnitude to constitute a risk of electric shock to persons.

The exclamation point within an equilateral triangle is intended to alert the user to the presence of important operating and maintenance (servicing) instructions in the literature accompanying the appliance.
Note: This equipment has been tested and found to comply with the limits for a Class B digital device, pursuant to Part 15 of the FCC Rules. These limits are designed to provide reasonable protection against harmful interference in a residential installation. This equipment generates, uses and can radiate radio frequency energy and, if not installed and used in accordance with the instructions, may cause harmful interference to radio communications. However, there is no guarantee that interference will not occur in a particular installation. If this equipment does cause harmful interference to radio or television reception which can be determined by turning the equipment off and on, the user is encouraged to try to correct the interference by one or more of the following measures:
— Reorient or relocate the receiving antenna.
— Increase the separation between the equipment and receiver.
— Connect the equipment into an outlet on a circuit different from that to which the receiver is connected.
— Consult the dealer or an experienced radio/TV technician for help.
The model number of this product is found on the rear of the unit.
The model number and serial number are found underneath the keyboard.
Please note the model and serial numbers in the space provided below and retain this sheet as a permanent record of your purchase to aid identification in the event of theft.
MODEL NUMBER
SERIAL NUMBER
Technics
OWNER'S MANUAL
Before you play
For long and pleasurable use of this instrument, and to gain a thorough understanding of your F100 organ, it is strongly recommended that you read through this Owner's Manual once.
The Owner's Manual is comprised of the following parts.
BASIC FUNCTIONS
This part includes an explanation of basic procedures and points you should be aware of for proper operation of your instrument.
PRACTICAL APPLICATIONS
This part comprises a detailed explanation of sound, effect, rhythm, SEQUENCER, COMPOSER, Disk Drive and MIDI.
REFERENCE GUIDE (separate booklet)
Reference guide for the contents of the SOUND GROUP and RHYTHM GROUP etc.
Important Safety Instructions
WARNING
When using electric products, basic precautions should always be followed, including the following;
- Read all the instructions before using the product.
Safety
- Power Source—The product should be connected to a power supply only of the type described in the operating instructions or as marked on the product.
- Polarization—This product may be equipped with a polarized line plug(one blade wider than the other). This is a safety feature. If you are unable to insert the plug into the outlet, contact an electrician to replace your obsolete outlet. Do not defeat the safety purpose of the plug.
- Periods of Non-use—The power-supply cord of the product should be unplugged from the outlet when left unused for a long period of time.
Installation
- Water and Moisture—Do not use this product near water—for example, near a bathtub, washbowl, kitchen sink, in a wet basement, or near a swimming pool, or the like.
- Cart/Stand—This product should be used only with a cart or stand that is recommended by the manufacturer.
- Ventilation—The product should be located so that its location or position does not interfere with its proper ventilation.
- Heat—The product should be located away from heat sources such as radiators, heat registers, or other products that produce heat.
- Foreign Material—Care should be taken so that objects do not fall and liquids are not spilled into the enclosure through openings.
Listening caution
This product, either alone or in combination with an amplifier and headphones or speakers may be capable of producing sound levels that could cause permanent hearing loss. Do not operate for a long period of time at a high volume level or at a level that is uncomfortable. If you experience any hearing loss or ringing in the ears, you should consult an audiologist.
Service
- Damage Requiring Service—The product should be serviced by qualified service personnel when:
a. The power-supply cord or the plug has been damaged; or
b. Objects have fallen, or liquid has been spilled onto the product; or
c. The product has been exposed to rain; or
d. The product does not appear to operate normally or exhibits a marked change in performance; or
e. The product has been dropped, or the enclosure damaged.
- Servicing—Do not attempt to service the product beyond that described in the user-maintenance instructions.
All other servicing should be referred to qualified service personnel.
Maintenance
- Be sure to switch this unit off after use, and do not switch the unit on and off in quick succession, as this places an undue load on the electronic components.
- To maintain the luster of the keys and buttons, wipe with a clean, damp cloth, and polish with a soft, dry cloth. Polish may be used, but do not use thinners or petro-chemical-based polishes.
- A wax-based polish may be used on the cabinet, although you will find that rubbing with a soft cloth will suffice.
SAVE THESE INSTRUCTIONS
Contents
Before you play 1
Important Safety Instructions 2
Controls and functions 6
BASIC FUNCTIONS
Getting started 8
Listen to the demonstration. 10
Selecting sounds: upper and lower keyboards ..... 12
Selecting sounds: pedal keyboard 15
Effects 16
Playing automatic rhythms 18
Automatic accompaniment 21
Record your performance 23
Easy Play Style 25
PRACTICAL APPLICATIONS
About the display 29
Part I Sounds and effects 33
Parts 33
Orchestral Conductor 33
Selecting a type of organ 34
Setting the Organ sound: Manual 36
Setting the Organ sound: Preset 40
Selecting Sound part sounds 41
Selecting the bass part sound 42
Add effects to the Sound and Bass part sounds 44
Other effects 47
Automatic sound and effect settings 48
Transpose 50
Techni-chord 51
BGS Background Sound 52
Panel Memory 53
Part II Playing the rhythm 54
Selecting rhythms 54
Playing the rhythm 56
Keyboard Percussion 58
Auto Play Chord 59
Automatic settings 63
Music Style Arranger 65
Part III Sequencer 67
Outline of the Sequencer 67
Easy Record 69
Sequencer parts 70
Realtime Record 72
Step Record 74
Track Assign 79
Other recording settings you can adjust 80
Editing the recorded performance 82
Punch record 89
Playback from a specific measure 91
Sequencer Medley 92
Part IV Composer 93
Outline of the Composer 93
Setting up to create a rhythm pattern 95
Record your rhythm pattern 99
Step Record 100
Composer Mode 102
Part V Disk Drive 103
Loading data 105
Formatting a disk 106
Saving data 107
Single data type load 109
Part VI Adjusting the sounds 111
Sound mode 111
Sound setting 113
Part VII Adjusting the functions 123
Outline of procedure 123
Touch functions 124
Control functions 125
Part VIII Creating sounds 128
Outline of the Sound Edit 128
Easy Edit 130
General Edit 131
Tone Edit 135
Effect Edit 139
Store the new sound 140
Part IX MIDI 142
What is MIDI? 142
Outline of MIDI functions 144
Setting the functions 145
Initialize 154
Connections 155
Assembly 156
Disassembly 157
Symptoms which appear to be signs of trouble 158
Error messages 160
Index 161
Specifications 163
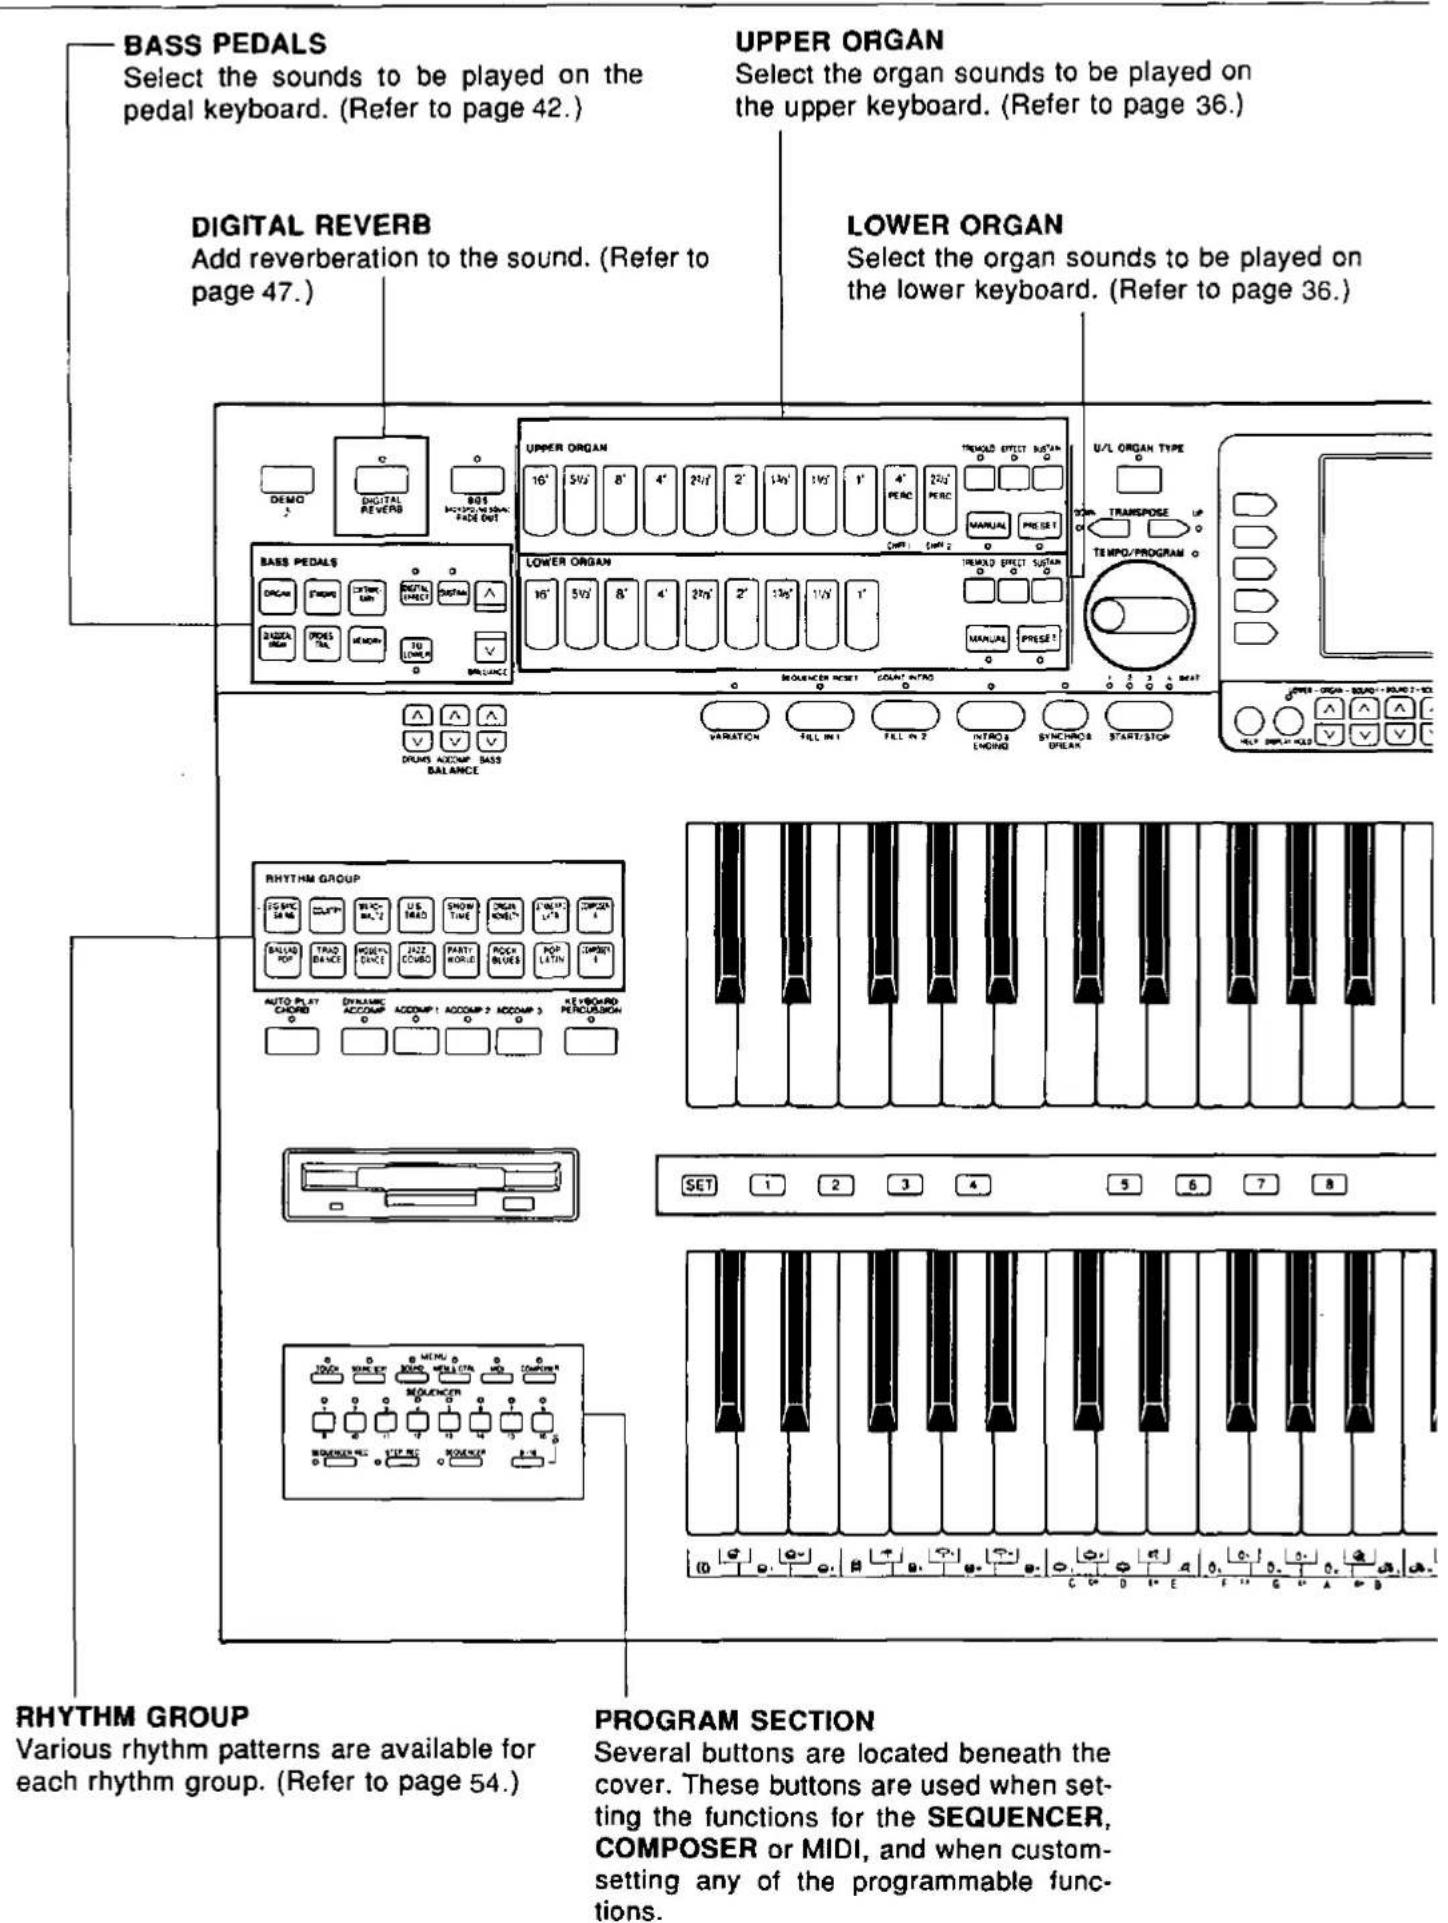
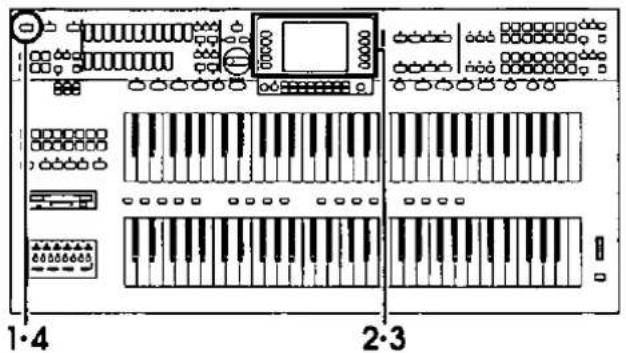
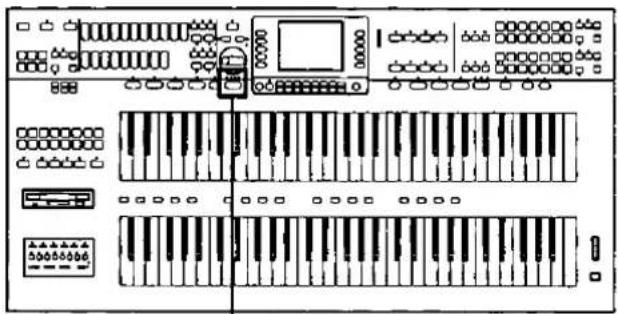
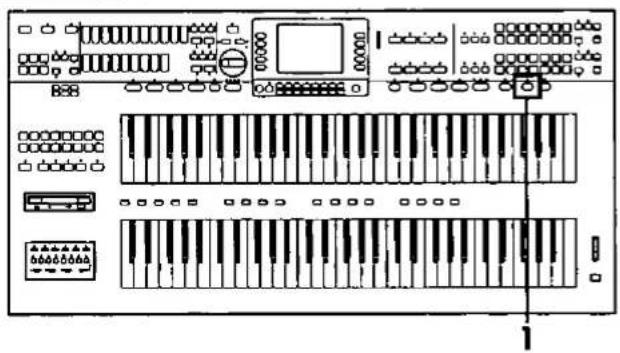
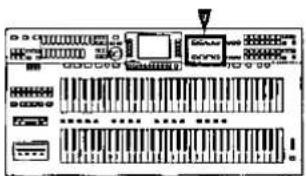
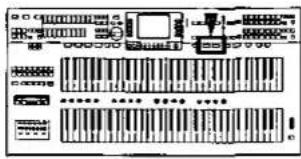
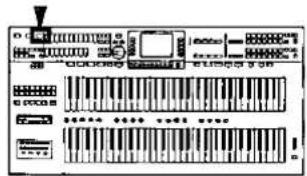
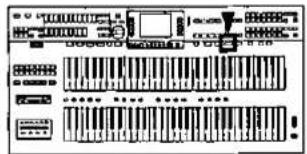
Controls and functions
A simple operation provides automatic selection of the sounds, effects and various other panel settings which are suitable for the registration you chose.
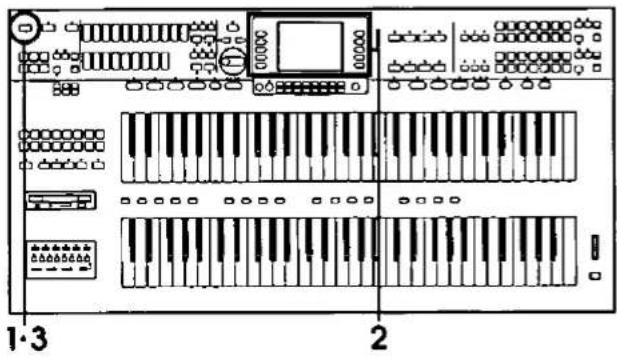
Before you play
A
Plug the power cord into an outlet.
B
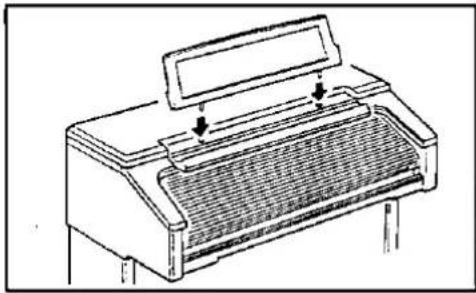
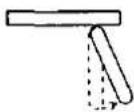
Music stand
Insert the music stand in the two holes as shown in the figure.
natural_image
Line drawing of a piano with a slotted grille and a top cover (no text or symbols)C
Keyboard cover
Open and close the cover slowly.
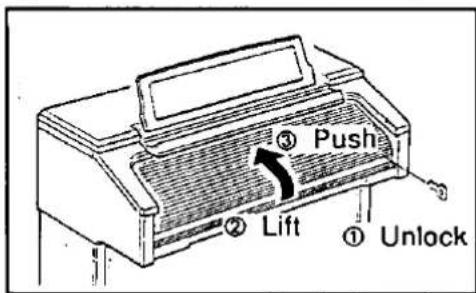
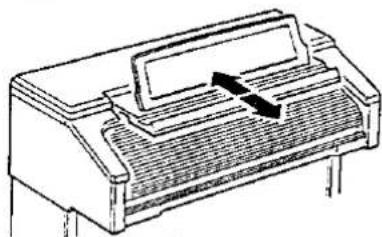
Music stand
Music stand can be slid back or forward.
natural_image
Line drawing of a piano keyboard with a scroll wheel and keyway (no text or symbols)- To slide the music stand, first rise it up slightly.
Panel light
The panel light can be turned on by pressing the button on the left underside of the keyboards.
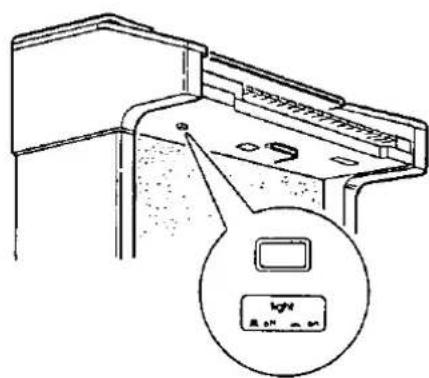
- The music stand light and foot light are also turned on.
■ About the backup memory
The panel settings are maintained in the backup memory for about one week after the power to this instrument is turned off. Other stored memories, such as the SEQUENCER and COMPOSER, are maintained for about 80 minutes. If you wish to keep the memory contents, before you turn off the instrument, use the SAVE procedure to store the desired data on a disk for recall at a later time.
- The backup memory does not function until the power has been on for about 10 minutes.
- When you quit the operating mode, a warning display may appear to remind you to save the data. If this occurs, after checking the reminder, press the OK button.
■ Power-on settings
When the power to this instrument is turned on, ORGAN settings are automatically selected.
- If you wish to retain the settings which were in effect when you last turned off this instrument, set the POWER-ON MODE to BACK UP. (Refer to page 127.)
Playing

1
Press the POWER button to turn it on.
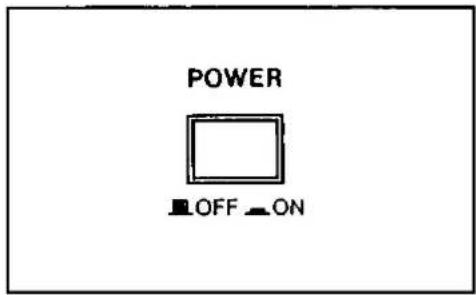
- The selected type of organ sound can be played on the upper and lower keyboards.
2
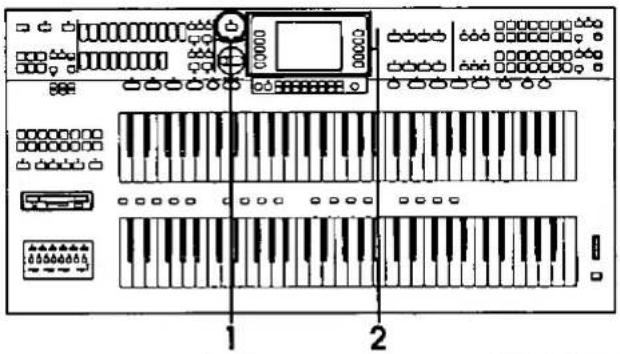
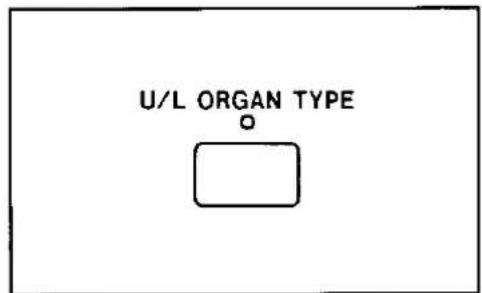
Press the U/L ORGAN TYPE button to turn it on.
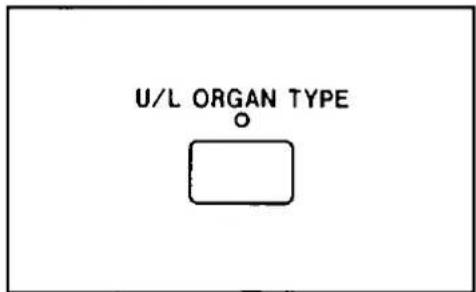
- The display changes to the U/L ORGAN TYPE display.
4
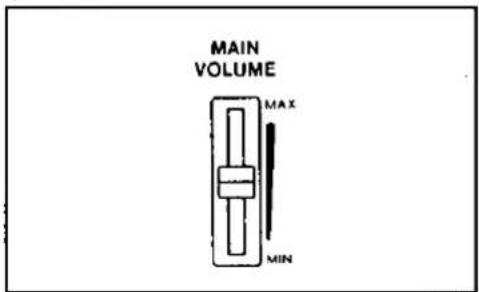
Set the MAIN VOLUME to an appropriate level with the sliding control while playing the keyboards.
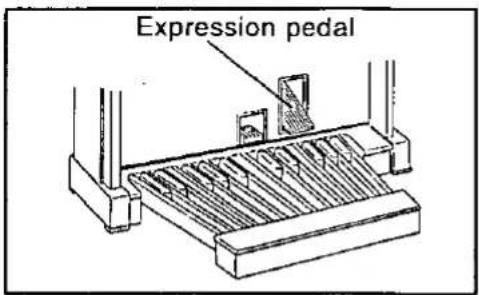
- Use the expression pedal to change the volume level as you play.
3
Select a sound from the list of organ sounds shown on the display.
Listen to the demonstration.
Listen to a particular sound or rhythm demonstration.
1
Press the DEMO ♪ button.
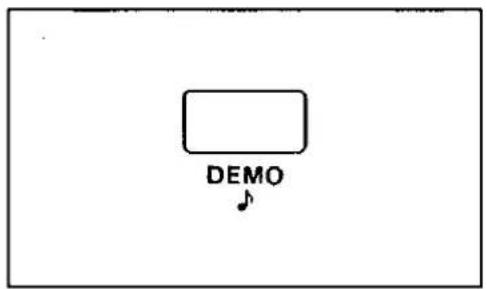
- The display changes to the DEMONSTRATION display.
2
Select ORGAN, SOUND or RHYTHM from the display.
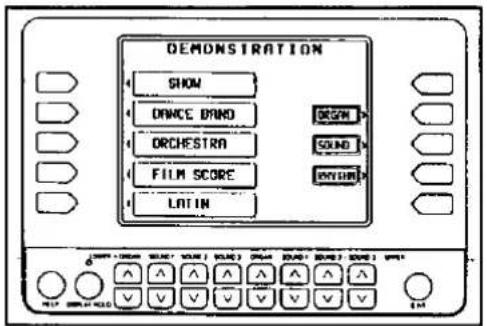
- A list of demonstration songs is shown on the display.
3
Press the button for the sound or rhythm demonstration performance you wish to hear.
- The demonstration performance corresponding to your selection will begin.
- Repeat this procedure to listen to other sounds and rhythms.
- To change from a SOUND demonstration to a RHYTHM or ORGAN demonstration, for example, press the EXIT button to return to the DEMONSTRATION display and then proceed from step 2.
- To end the demonstration before it has finished, again press the button for the selected sound or rhythm.
4
When you are finished listening to the demonstration tunes, press the DEMO ♩ button again.
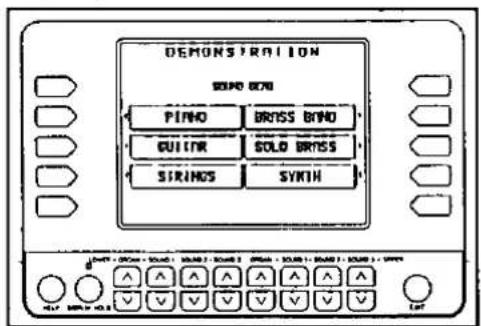
Listen to the style demonstration performance.
1
Press the DEMO ♩ button.
- The display changes to the DEMONSTRATION display.
3
When you are finished listening to the demonstration tunes, press the DEMO 🌐 button again.
2
Use the buttons to the left of the display to select the style demonstration performance you wish to hear.
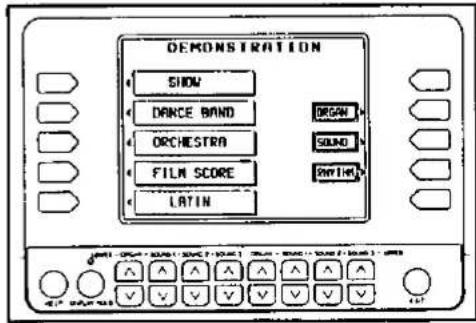
- The demonstration performance corresponding to your selection will begin.
- Repeat this procedure to listen to other styles.
- If you press and hold the DEMO button for a few seconds, or if you press first the DEMO button and then the START/STOP button, all the demonstration songs are played in order in a medley performance. The medley performance continues until the START/STOP button or the DEMO button is pressed again.
- During the medley performance, if you wish to skip from the current song to the next song, press the button for the highlighted song.
- Some of the buttons do not function while the demonstration performances are being played.
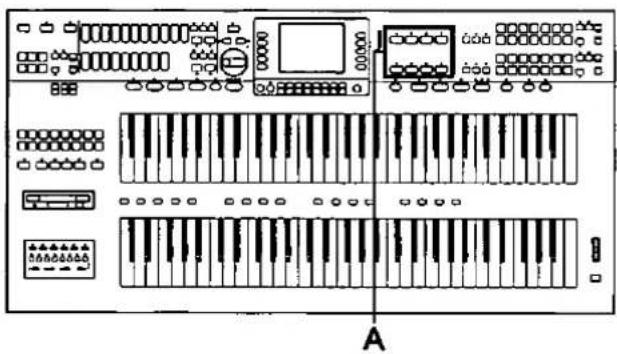
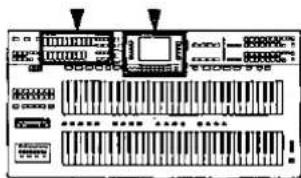
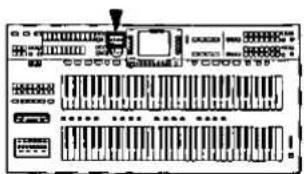
Selecting sounds: upper and lower keyboards
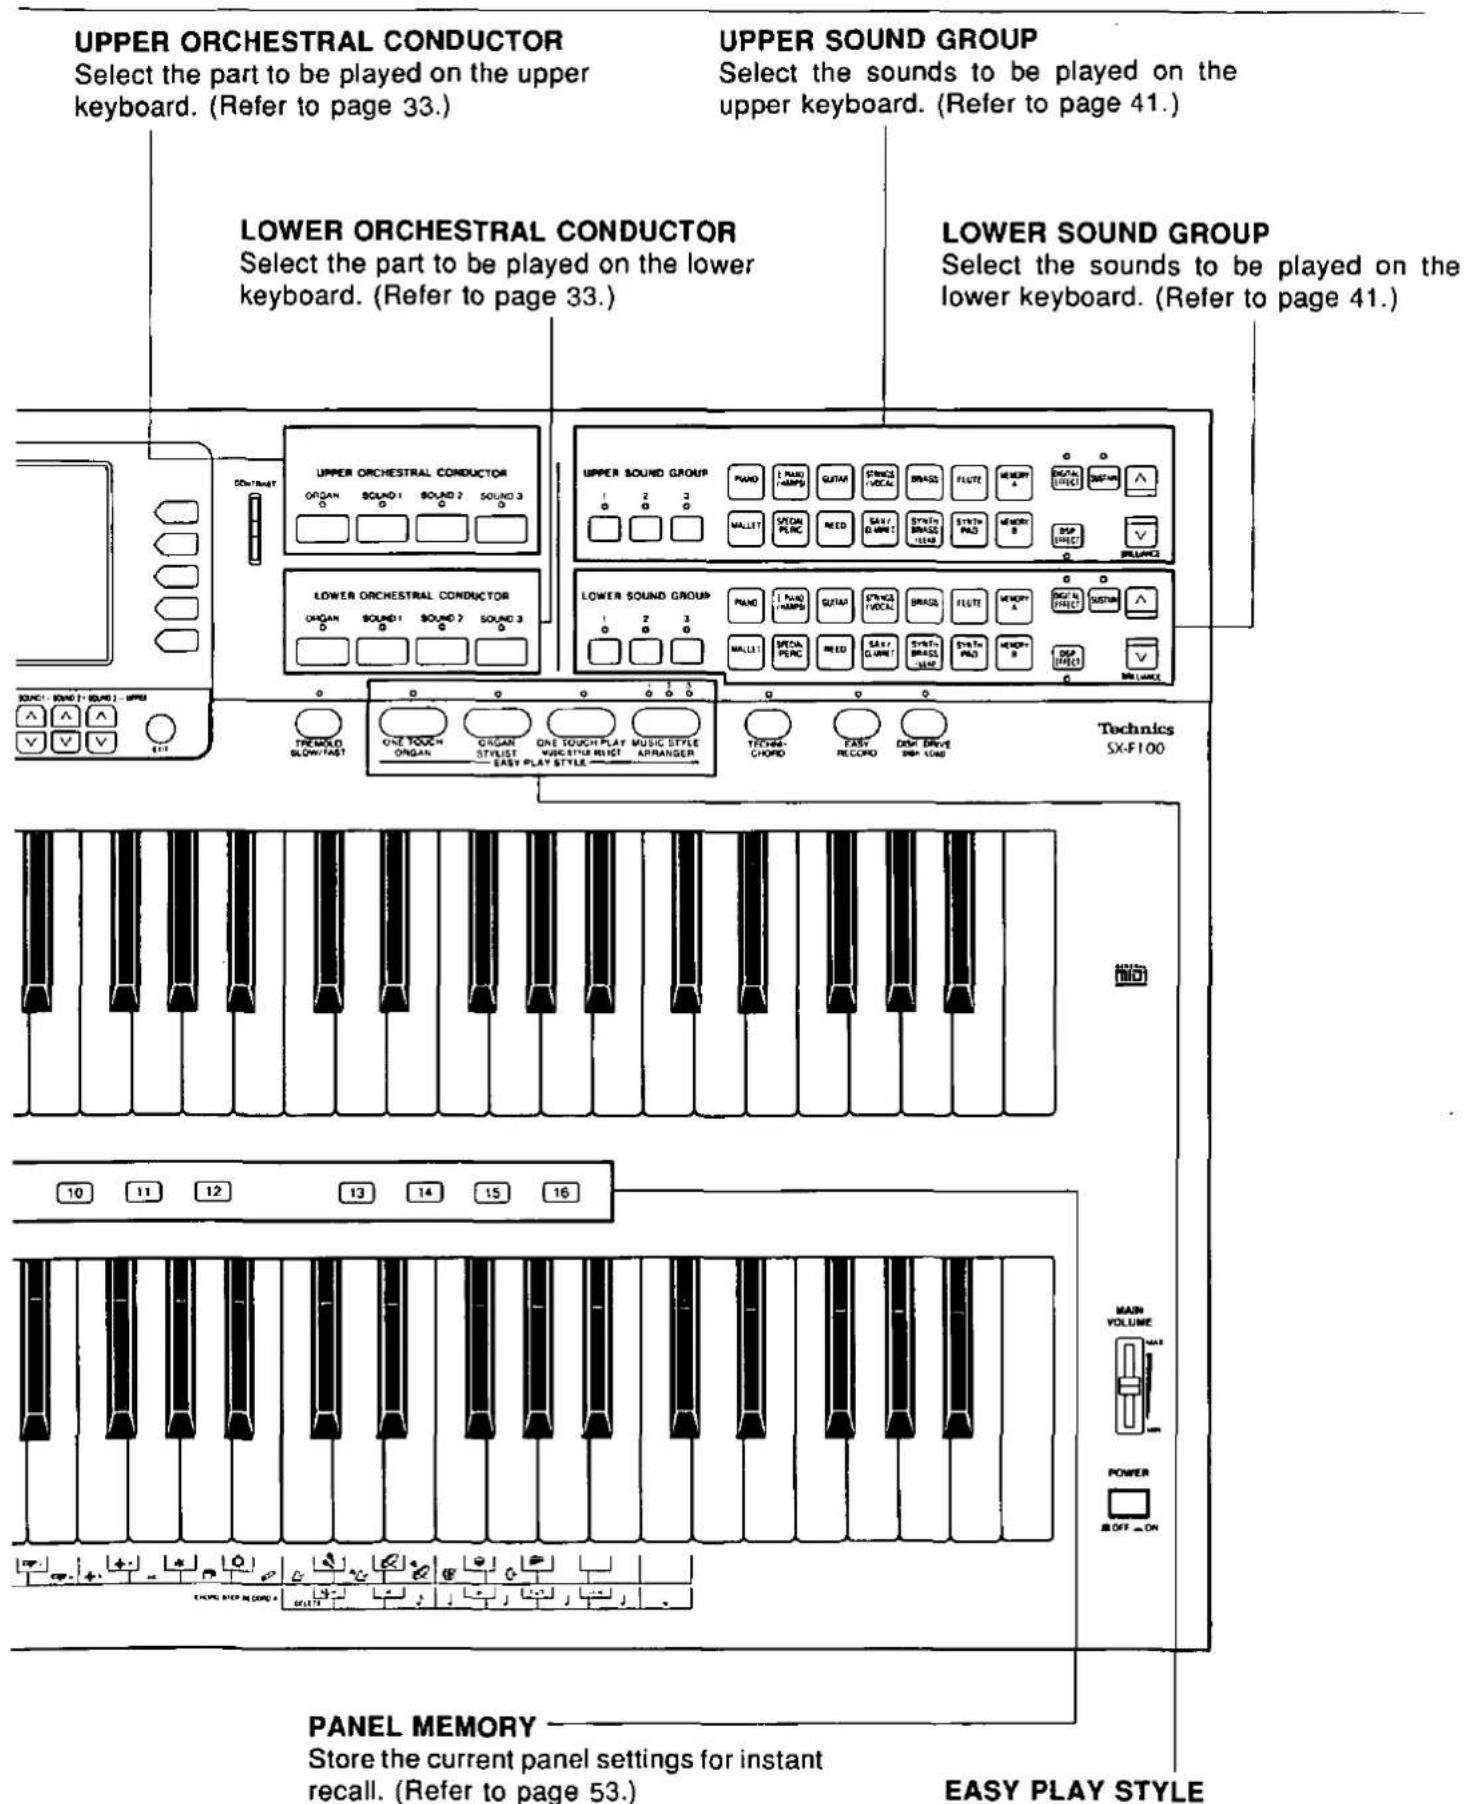
Orchestral Conductor
natural_image
Front view of a multi-panel electronic device with piano keys and control panels (no visible text or labels)Parts
The following parts are available for the upper keyboard and lower keyboard.
| ORGAN | Select an organ sound for this part. |
| SOUND 1 | Select a different |
| SOUND 2 | sound for each part. |
| SOUND 3 |
- After selecting a sound for each part, the ORCHESTRAL CONDUCTOR is used to assign parts to the keyboards.
A
Use the UPPER ORCHESTRAL CONDUCTOR to select the part for the upper keyboard, and the LOWER ORCHESTRAL CONDUCTOR to select the part for the lower keyboard.
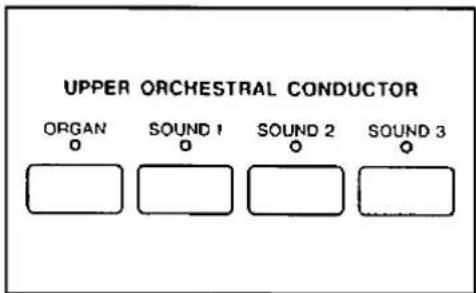
- Select the sounds for each part before assigning parts to the keyboards. (See below.)
- You can also combine sounds by turning on two or more buttons in the ORCHESTRAL CONDUCTOR at the same time.
ORGAN part
1
Press the U/L ORGAN TYPE button to turn it on.
- The display changes to the U/L ORGAN TYPE display.
2
Select a type of organ sound from the display.
- The selected organ type is assigned to the upper and lower keyboards.
- Press the EXIT button to go back to the previous display.
SOUND parts
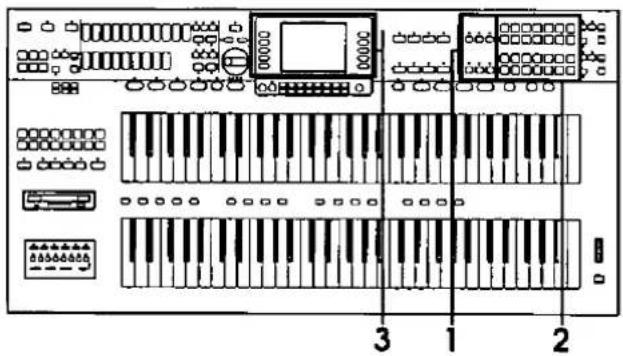
The sound for the upper keyboard is selected with the buttons in the UPPER SOUND GROUP, and the sound for the lower keyboard with the buttons in the LOWER SOUND GROUP.
1
Press the 1, 2 or 3 button in the UPPER SOUND GROUP or LOWER SOUND GROUP to turn it on.
3
Select a sound for the part from the list on the display.
2
Press a sound button in the UPPER SOUND GROUP or LOWER SOUND GROUP to select a sound group.
- The display changes to a list of sounds.
- To view a different part of the list, press the MORE SOUNDS button.
- Select sounds for the other parts in the same way.
- Press the EXIT button to go back to the previous display.
Selecting sounds: pedal keyboard
BASS part
natural_image
Front view of a computer interface with piano keys and control panel (no text or symbols visible)1
Press a sound button in the BASS PEDALS section to select a sound group.
- The display changes to a list of sounds.
2
Select a sound from the display.
- Press the EXIT button to go back to the previous display.
• To play the sound you selected, play the pedal keyboard.
- You can combine two bass sounds. (Refer to page 43.)
Add a feeling of spaciousness to the sound.
A
Press the DIGITAL EFFECT button to turn it on.
• The sound is broader and deeper.
Make the sound brighter.
C
Use the BRILLIANCE ∧ and ∨ buttons to adjust the brightness of the sound.
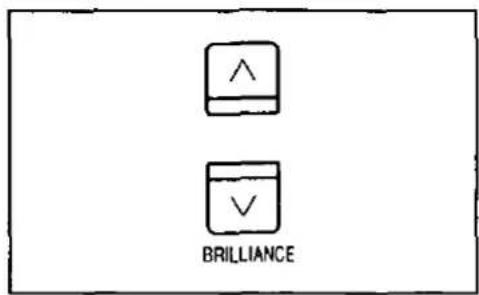
• There are three levels of brightness.
Add sustain.
B
Press the SUSTAIN button to turn it on.
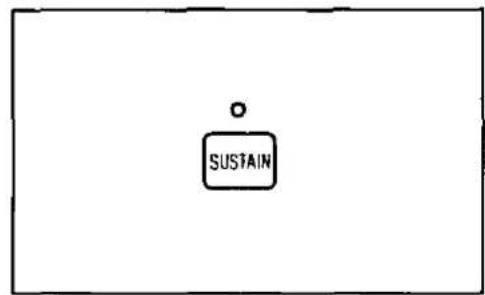
- Play and release a key. The tones fade out gradually after the key is released.
Change the quality of the sound.
D
Press the DSP EFFECT button to turn it on.
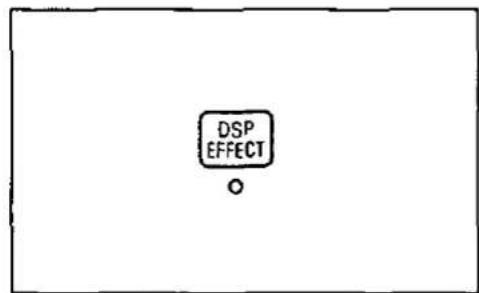
- Various effects are added to the sounds.
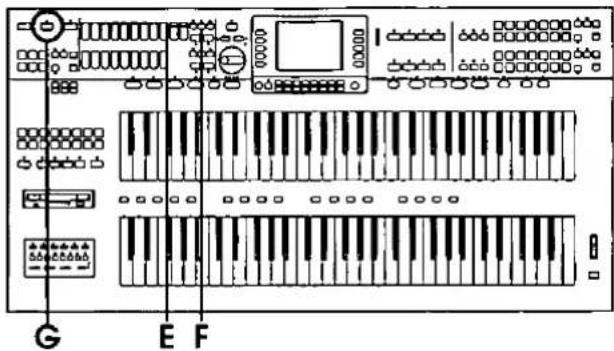
Add tremolo. (ORGAN part)
E
Press the TREMOLO button to turn it on.
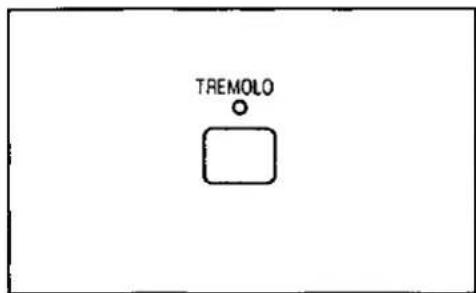
• A rapid oscillation in volume is applied to the ORGAN sounds.
Add reverberation.
G
Press the DIGITAL REVERB button to turn it on.
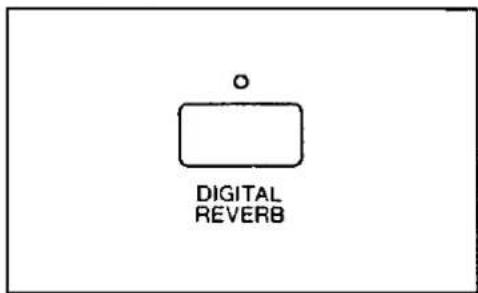
- The reverberation effect is applied to all sounds.
Add a feeling of spaciousness to the sound. (ORGAN part)
F
Press the EFFECT button to turn it on.
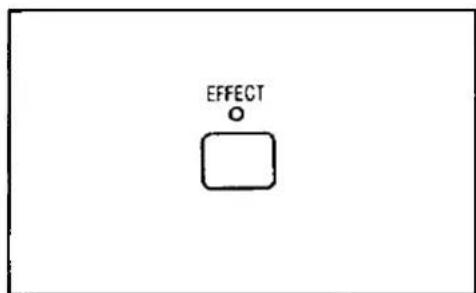
• The ORGAN sound is broader and deeper.
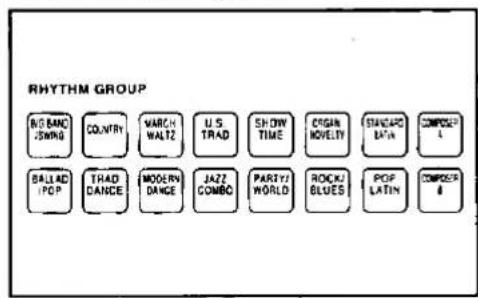
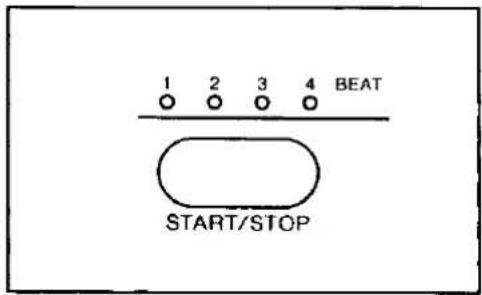
Playing automatic rhythms
1
In the RHYTHM GROUP section, select a rhythm group.
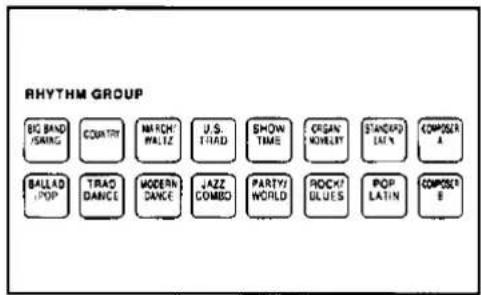
- The display changes to a list of rhythms.
3
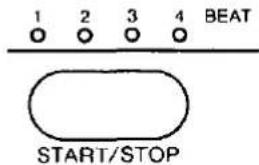
Start the rhythm by pressing the START/STOP button.
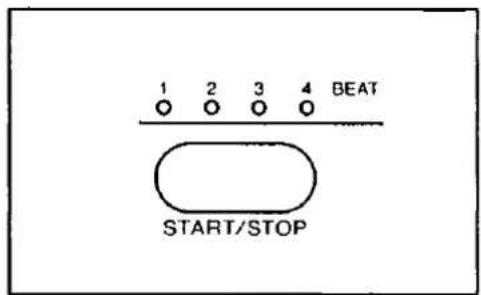
- Stop the rhythm by pressing the START/STOP button again.
2
Select a rhythm from the display.

- Press the EXIT button to go back to the previous display.
- Rhythms marked with a ★ are especially effective for ORGAN sounds.
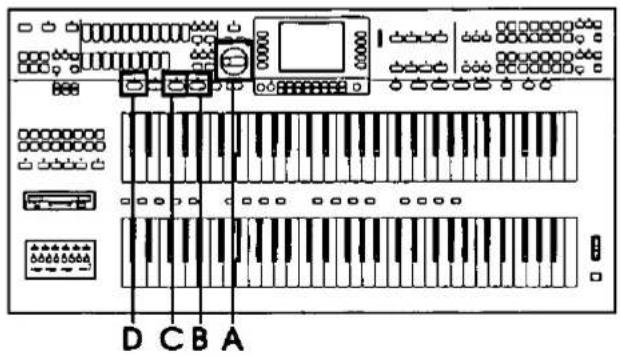
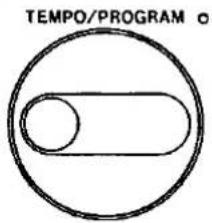
Adjust the tempo.
A
Adjust the tempo with the TEMPO/PROGRAM dial.
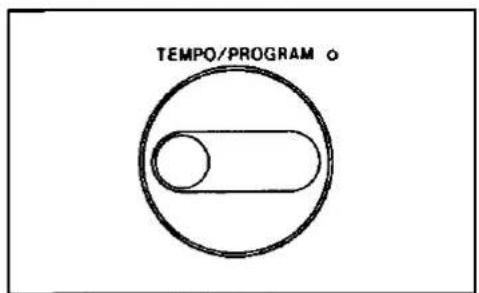
- The tempo is shown in the display as "♩=."
Insert an intro pattern.
B
To start your performance with an introduction, press the INTRO & ENDING button before starting the rhythm.
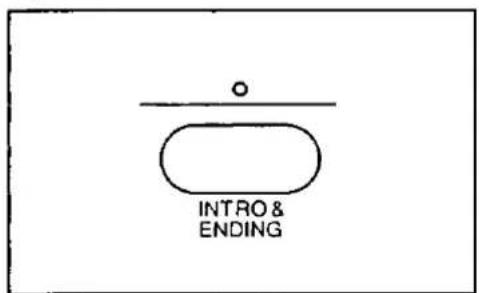
- An intro is played, after which the regular rhythm starts.
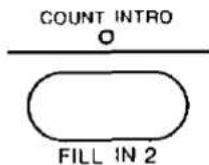
Insert a count.
C
To begin your performance with a one-measure count, press the COUNT INTRO (FILL IN 2) button before starting the rhythm.
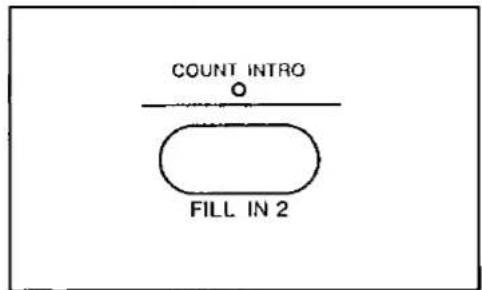
- A one-measure count is played, after which the normal rhythm pattern begins.
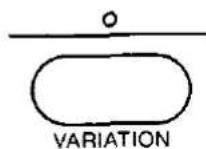
Select a variation pattern.
D
During the rhythm performance, press the VARIATION button to turn it on.
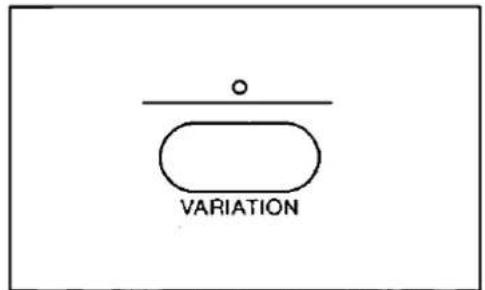
- The rhythm pattern changes to a flashier pattern.
Insert a fill-in pattern.
E
While the preset rhythm pattern is playing, press either the FILL IN 1 or FILL IN 2 button.

- A fill-in pattern immediately starts to play.
Insert an ending pattern.
F
While the rhythm is playing, press the INTRO & ENDING button.
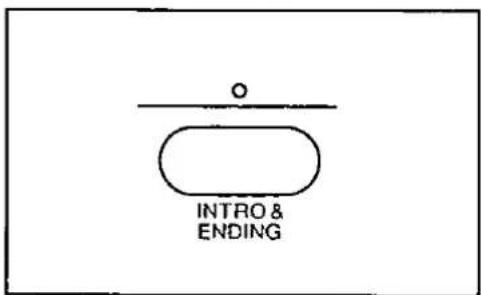
- You will hear an ending pattern, and then the rhythm stops.
Automatic accompaniment
Use the AUTO PLAY CHORD

Use the AUTO PLAY CHORD with the following tune.

1
In the RHYTHM GROUP section, select a rhythm group.
3
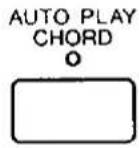
Press the AUTO PLAY CHORD button to turn it on.

2
Select a rhythm from the list shown on the display.
- Press the EXIT button to go back to the previous display.
4
Select ONE FINGER on the display.
• After a few seconds, the display returns to the previous display.
natural_image
Front view of a CD-ROM interface with multiple keyboard and audio input components (no text or labels visible)5·7
5
Press the START/STOP button to turn it on.
7
At the end of your performance, press the START/STOP button.
6
With your left hand, play chords on the lower keyboard, and with your right hand, play the melody on the upper keyboard.
- When you play the lower keyboard, the automatic accompaniment begins to play.
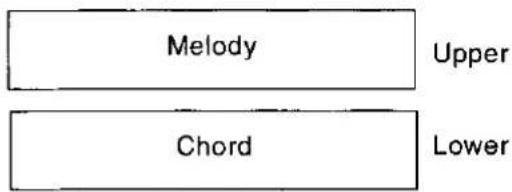
- Where C, G7 and F are indicated in the music score, you can play the lower keyboard and pedal keyboard as shown in the figure below.
C chord
F chord
G7 chord
- In this example, you played chords by pressing the keys for the "root notes" (ONE FINGER chords). But you can also specify the chord by playing all the notes in the chord. (Refer to page 60.)
Record your performance
Use the SEQUENCER to record your performance.
natural_image
Front view of a computer interface with multiple keyboard and audio input ports (no text or labels visible)She Wore A Yellow Ribbon
1
Press the EASY RECORD button to turn it on.
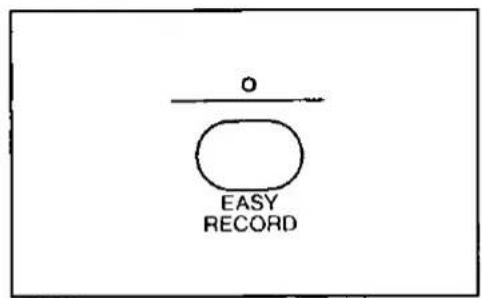
• The display changes.
2
Press the OK button.

3
Play the song on the keyboards.
4
When you have finished playing, press the EASY RECORD button again to turn it off.
5
Press the SEQUENCER RESET (FILL IN 1) button.

6
Press the START/STOP button.
- Your performance is played back just as you recorded it.
- You can also record several parts individually and then have them played back together for an ensemble performance. (Refer to page 73.)
Automatic setup of the ORGAN parts
1
Press the ONE TOUCH ORGAN button to turn it on.
• The display changes.
2
Use the ∧ and ∨ buttons to select a category (performance style).
3
Press the REGISTRATION LIST button.
• The display changes.
4
Use the ∧ and ∨ buttons to select a type of registration (01 to 16).
- The sounds and effects for each keyboard, and various other panel settings which are suitable for the type you chose are automatically selected.
- Press ONE TOUCH ORGAN button to turn it off to go back to the previous display.
Automatic setup of the ORGAN style
1
Press the ORGAN STYLIST button to turn it on.
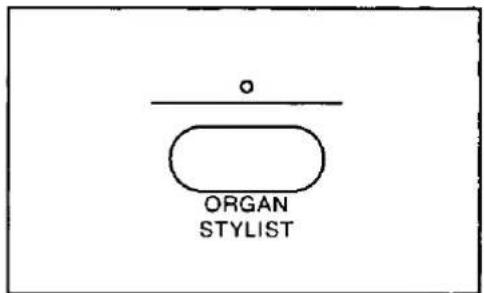
• The display changes.
2
Use the buttons to the left and right of the display to select a category (performance style).
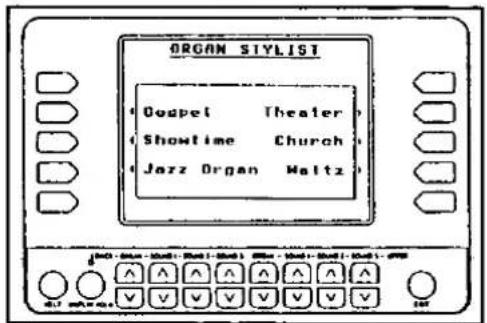
- When a category is selected, the contents of the current PANEL MEMORY are replaced. In this case, when you attempt to select a category, a confirmation display appears. Press the YES button to execute the function.
- A list of styles is shown on the display (1 to 16).
3
Use the PANEL MEMORY buttons to select a style (1 to 16).
- The name of the selected style is shown on the display for a few seconds.
- The sounds and volume balances for each keyboard, rhythm, accompaniment and tempo, etc. suitable for the style you chose are automatically selected.
- Press ORGAN STYLIST button to turn it off to go back to the previous display.
- The PANEL MEMORY mode changes automatically to the EXPAND mode. (Refer to page 53.)
Automatic setup for the style and rhythm
MUSIC STYLE SELECT
1
Press the ONE TOUCH PLAY button momentarily to turn it on.
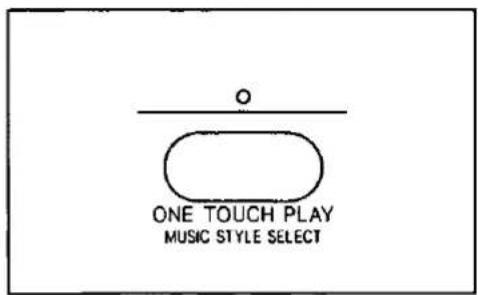
• The display changes.
- The sounds and volume balances for each keyboard, rhythm, accompaniment and tempo, etc. suitable for the style you chose are automatically selected.
- When you play a chord on the lower keyboard, the automatic accompaniment begins to play. Play the melody on the upper keyboard.
- Press ONE TOUCH PLAY button to turn it off to go back to the previous display.
2
In the RHYTHM GROUP section, select a rhythm group.
3
Use the ∧ and ∨ buttons to select a music style.
ONE TOUCH PLAY
A
Select a rhythm pattern. (Refer to page 18.)
B
Press the ONE TOUCH PLAY button until its indicator goes out.
- The sounds and effects for each keyboard, the tempo, and various other panel settings which are suitable for the rhythm you chose are automatically selected.
Arranger feature
Select a rhythm pattern. (Refer to page 18.)
2
Press the MUSIC STYLE ARRANGER button to select the style (1, 2 or 3) you want at the beginning of your performance.
1: Simple pattern
2: Normal pattern
3: Flashy pattern
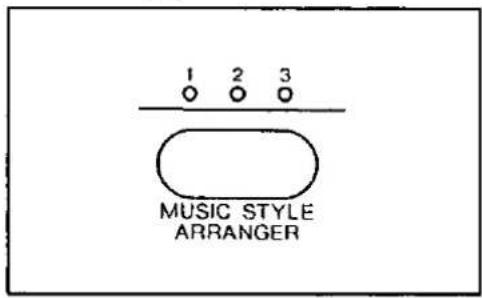
- The sounds and effects for each keyboard, the tempo, etc. suitable for the rhythm you chose are automatically selected.
- When you play a chord on the lower keyboard, the automatic accompaniment begins to play. Play the melody on the upper keyboard.
- While you are playing, press the FILL IN 1 or FILL IN 2 button. The specified FILL IN pattern plays, and then the music style changes.
- Each time the FILL IN 1 button is pressed, the FILL IN 1 pattern plays, and then the music style changes in the 3 → 2 → 1 order. And each time the FILL IN 2 button is pressed, the FILL IN 2 pattern plays, and then the style changes in the 1 → 2 → 3 order.
The display shows various information and is used for most of this instrument's operations.
Normal display
This illustration shows the kind of information you see on the display during a normal performance.
![ORGAN group U/L ORGAN SOUND GROUP: ELECTR. TABS TYPE: Standard RHYTHM Organ Fox UPPER [SOUND 1] Grand Piano LOWER [SOUND 1] E. Piano 1 BASS PEDAL SOUND Organ Selected rhythm J = 146 Chord A min7 onG Tempo Lower BALANCE UPPER BALANCE UPPER SOUND part sound LOWER SOUND part sound BASS PEDALS part sound Chord name](/content/2026/05/1069939/images/861022f4b340f8dea6f0507968b1f46aeca335e9429211ac972bf63e16681769.jpg)
Volume balance
If you press one of the ∧ or ∨ buttons directly below the display, the display changes to the balance display. The volume balance of each part is shown as a bar graph and a number (0 to 127).
Use the ∧ and ∨ buttons below the display to adjust the volume of each part.
![U/L ORGAN SOUND GROUP: ELECTR. TABS TYPE: Standard UPPER [SOUND 1] Grand Piano LOWER [SOUND 1] E. Piano 1 RHYTHM Organ Fox BASS PEDAL SOUND Organ OTHER PARTS 96 100 100 100 LOWER BALANCE 127 120 120 120 UPPER BALANCE LOWER - ORGAN - SOUND 1 - SOUND 2 - SOUND 3 ORGAN - SOUND 1 - SOUND 2 - SOUND 3 - UPPER HELP DISPLAY HOLD V V V V V UNIT LOWER ORGAN LOWER SOUND 1 LOWER SOUND 2 LOWER SOUND 3 UPPER SOUND 3 UPPER SOUND 2 UPPER SOUND 1 UPPER ORGAN](/content/2026/05/1069939/images/83fea64d5427e69b15f07b727ee48f8ea8814256aa874dfdccf878de40297ca5.jpg)
- A few seconds after you change the settings, the display returns to the normal performance display.
■ OTHER PARTS
If you press the button for OTHER PARTS, the display changes to the balance display for other parts.
![U/L ORGAN SOUND GROUP: ELECTR. TABS TYPE: Standard UPPER [SOUND 1] Grand Piano LOWER [SOUND 1] E. Piano 1 RHYTHM Organ Fox BASS PEDAL SOUND Organ OTHER PARTS 110 100 118 120 120 120 120 115 120 DRUM ACHP BASS ACP1 ACP2 ACP3 BGS KBP LOWER - ORGAN - SOUND 1 - SOUND 2 - SOUND 3 ORGAN - SOUND 1 - SOUND 2 - SOUND 3 - UPPER HELP DISPLAY HOLD ^ ^ ^ ^ ^ ^ ^ ^ ^ ^ ✓ ✓ ✓ ✓ ✓ ✓ ✓ ✓ ✓ ✓ ✓ ✓ ✓ ✓ ✓ ✓ ✓ ✓ ✓ ✓ ✓ ✓ ✓ ✓ ✓ ✓ ✓ ✓ ✓ ✓ ✓ ✓ ✓ ✓ ✓ ✓ ✓ ✓ ✓ ✓ ✓ ✓ ✓ ✓ ✓ ✓ ✓ ✓ ✓ ✓ ✓ ✓ ✓ ✓ ✓ ✓ ✓ ✓ ✓ ✓ ✓ ✓ ✓ ✓ ✓ ✓ ✓ ✓ ✓ ✓ ✓ ✓ ✓ ✓ ✓ ✓ ✓ ✓ ✓ ✓ ✓ ✓ ✓ ✓ ✓ ✓ ✓ ✓ ✓ ✓ ✓ ✓ ✓ ✓ ✓ ✓ ✓ ✓ ✓ ✓ ✓ DRUMS ACCOMP (total) BASS KEYBOARD PERCUSSION BACKGROUND SOUND ACCOMP 3 ACCOMP 2 ACCOMP 1](/content/2026/05/1069939/images/f88c09a71c2e8679be31fdcf7bbb30eec9a23cc6c7ea572f07898342d49c3fbd.jpg)
- This button is also used to access the PART 8 to 15 volume display. These parts are used in conjunction with SEQUENCER and MIDI functions.
- A few seconds after you change the setting, the display returns to the normal performance display.
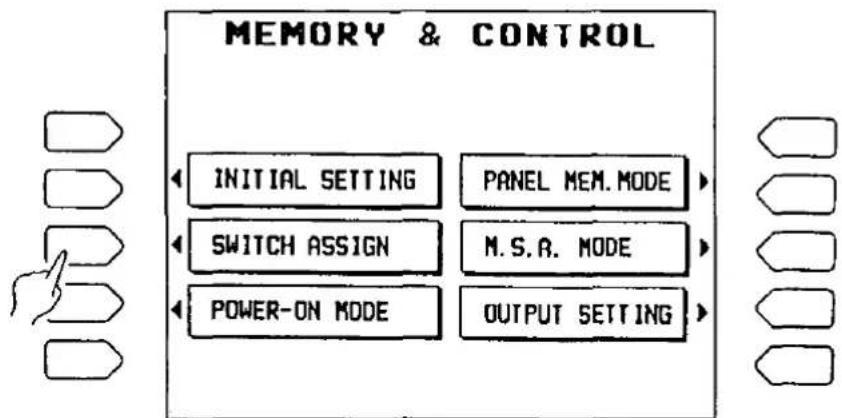
Menu display
The MENU and other buttons beneath the PRO-GRAM SECTION cover are used to control multiple functions. Pressing one of the buttons will access the corresponding menu display.
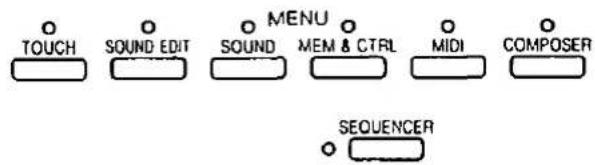
■ Example of menu display: MEM & CTRL
flowchart
graph TD
    A["INITIAL SETTING"] --> B["POWER-ON MODE"]
    C["Switch ASSIGN"] --> D["PANEL MEM.MODE"]
    E["M.S.R. MODE"] --> F["OUTPUT SETTING"]
Select a function from the menu display by pressing the corresponding button to the left or right of the display indicated by the ◀ and ▶ arrows.
- In this manual, the steps describing how to select a function from a menu display are generally abbreviated as follows, for example: "On the MEM & CTRL menu display, select SWITCH ASSIGN."
Setting display
When setting various functions, the available operations are shown on the display. The buttons to the right, left and/or directly below the display are used to select and adjust the settings.
■ Example of setting display: SWITCH ASSIGN
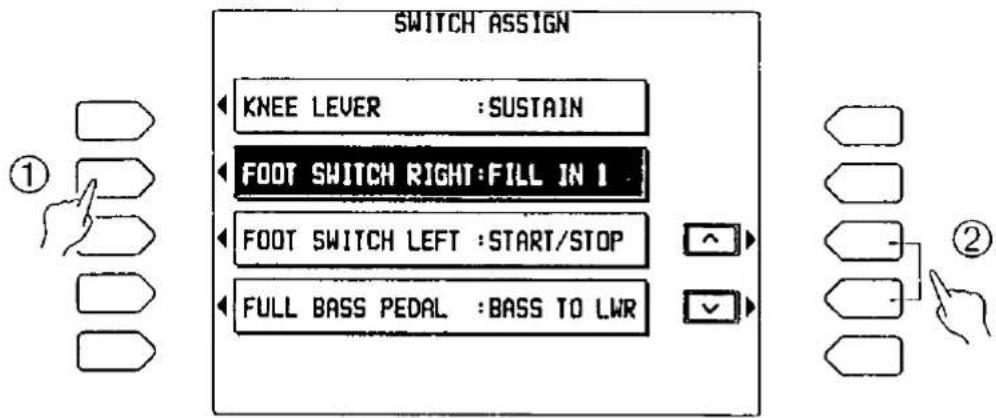
① In the illustration above, four functions are shown on the setting display: KNEE LEVER, FOOT SWITCH RIGHT, FOOT SWITCH LEFT and FULL BASS PEDAL. First select one of the functions by pressing the corresponding button indicated by the ◀ arrow. (The currently selected function is highlighted.)
- In this manual, the procedure to indicate that you should press a button to select an item from the display is generally written simply as follows: "Select FOOT SWITCH RIGHT."
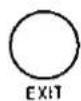
EXIT button
While the setting display is shown, press this button to go back to the previous display.
② The ∧ and ∨ buttons on the display are operated by pressing the corresponding buttons indicated by the ▶ arrows. These buttons are used, when appropriate, to change the setting for the selected function.
- In this manual, this procedure is written as follows: "Use the ∧ and ∨ buttons to select the function."
DISPLAY HOLD button
Press this button to turn it on when you wish to maintain the current display. For example, even during a performance, you can monitor information which is not shown on the normal display.
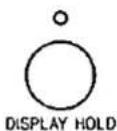
- If any of the MENU buttons is pressed, the DISPLAY HOLD mode is canceled.
TEMPO/PROGRAM dial
If the green TEMPO/PROGRAM indicator is lit while you are using the display to adjust a setting, it indicates that the dial may be used to change the displayed value or setting.
CONTRAST
Adjust the contrast of the display.
CONTRAST
HELP display
You can find an explanation of most of the instrument functions right on the display.
- Press the HELP button (at the lower left of the display).
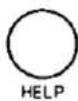
• The following display appears.
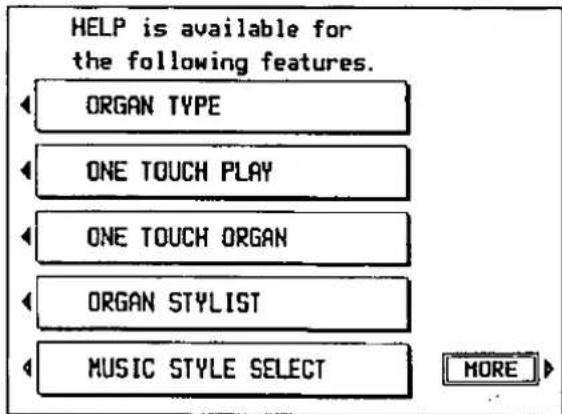
- Press the MORE button to display other functions.

- Press the RETURN button to go back to the previous display.
-
Select a function.
-
Information about the selected function will appear on the display. There may be several "pages" of information, which you can view by following the instructions on the display.
- If you press the HELP button while you are in the process of setting a function, the display may change directly to the HELP mode.
- For a detailed explanation of each function, please refer to the relevant pages in this manual.
ORGAN TYPE ...... page 34
ONE TOUCH PLAY ......page 63
ONE TOUCH ORGAN ....page 48
ORGAN STYLIST ...... page 49
MUSIC STYLE SELECT .....page 64
MUSIC STYLE ARRANGER .....page 65
PANEL MEMORY ......page 53
- When you have finished reading the message, press the HELP button again.
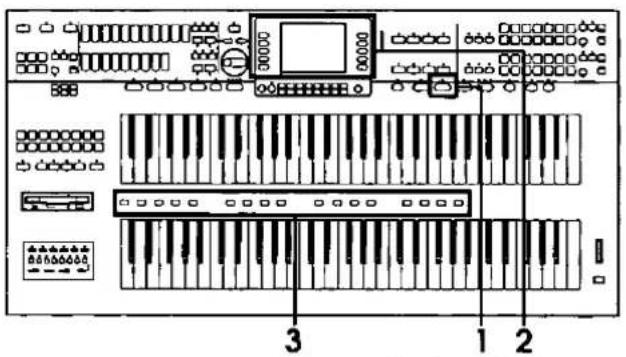
Part I Sounds and effects
The sounds for the upper keyboard, lower keyboard and pedal keyboard are grouped into "parts." A sound is selected for each part, and then the parts are assigned to the keyboards by the ORCHESTRAL CONDUCTOR.
Parts
You can assign four sound parts to the upper keyboard (UPPER ORGAN, UPPER SOUND 1, UPPER SOUND 2 or UPPER SOUND 3) and four sound parts to the lower keyboard (LOWER ORGAN, LOWER SOUND 1, LOWER SOUND 2 or LOWER SOUND 3). The BASS part is used for the pedal keyboard. The sound for each part is selected with the buttons as shown in the diagram below.
| Part | Sound buttons | |
| Upper keyboard | ORGAN | UPPER ORGAN |
| SOUND 1SOUND 2SOUND 3 | UPPER SOUND GROUP | |
| Lower keyboard | ORGAN | LOWER ORGAN |
| SOUND 1SOUND 2SOUND 3 | LOWER SOUND GROUP | |
| Pedal keyboard | BASS | BASS PEDALS |
Orchestral Conductor
After a sound is selected for each part, the ORCHESTRAL CONDUCTOR buttons are used to assign a part to the upper keyboard and a part to the lower keyboard.
The UPPER ORCHESTRAL CONDUCTOR buttons are used to select the part for the upper keyboard, and the LOWER ORCHESTRAL CONDUCTOR buttons to select the part for the lower keyboard.
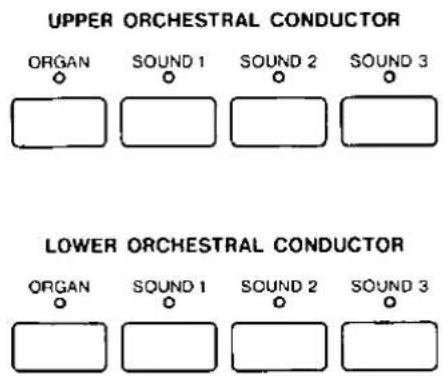
- By selecting sounds for each part beforehand, you can easily change from one sound to another during your performance just by selecting another ORCHESTRAL CONDUCTOR button.
- You can combine sounds by turning on two or more buttons in the ORCHESTRAL CONDUCTOR at the same time.
The number of notes which can be produced simultaneously for each part is as follows:
ORGAN part: 64 notes
All other parts: 64 notes
- When an ORCHESTRAL CONDUCTOR selection is changed, the display shows the currently selected sound for each part.
Selecting a type of organ
All types of organs are available for the ORGAN part. When you change from one type of organ to another, not only the sounds, but the entire configuration changes to that of the selected type, just as if you were playing a completely different instrument! You don't have just one organ, but many different types of organs, all in one instrument.
Organ type
Select the desired organ type from the representative types provided.
- Press the U/L ORGAN TYPE button to turn it on.
• The display changes to the following.
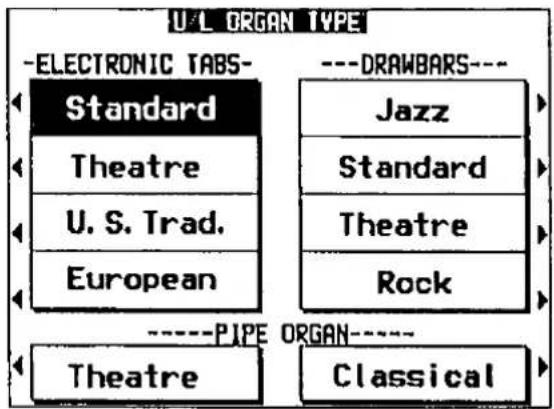
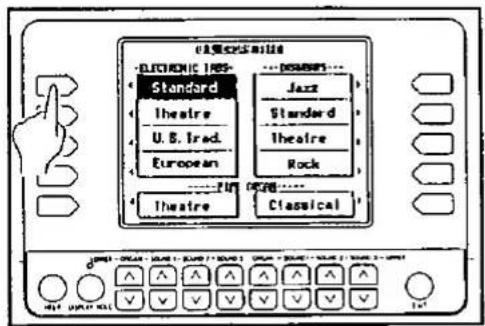
- Select an organ type from the display.
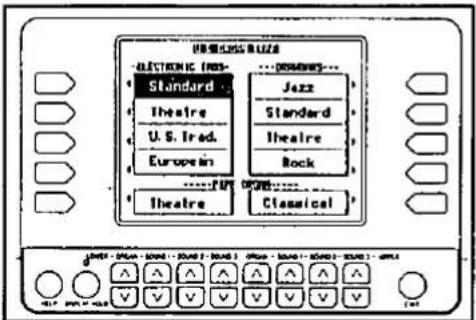
ELECTRONIC TABS group 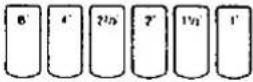 | Standard | Technics-type electronic organ sound |
| Theatre | Theatre-organ-type of electronic organ sound | |
| U.S. Trad | Typical American electronic organ sound | |
| European | Typical European electronic organ sound | |
DRAWBARS group 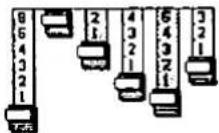 | Jazz | Drawbar organ sound for jazz performance |
| Standard | Standard-type drawbar organ sound | |
| Theatre | Theatre-type drawbar organ sound | |
| Rock | Drawbar organ sound for rock performance | |
PIPE ORGAN group | Theatre | Theatre-type pipe organ sound |
| Classical | Pipe organ sound for classical music performance |
- On the display, the selected type is highlighted.
- The sounds for the UPPER ORGAN part and LOWER ORGAN part change to those for the selected type.
- To play the selected organ sound on each keyboard, turn on the ORGAN buttons in the ORCHESTRAL CONDUCTOR.
-
You cannot select a different organ type for the upper keyboard and lower keyboard.
-
You can adjust the volume for the upper and lower parts. (Refer to page 29.)
- Press the EXIT button to return to the normal volume display.
Adjusting the sound
The nuance of the sound for upper and lower keyboards can be changed independently.
Two methods are available. With MANUAL (page 36) you can control the various components of the sound. Or you can select one of the PRESET sounds (page 40) provided for each organ type.
Organ effects
Add effects to the ORGAN part sounds.
• These buttons do not work when the PRESET button (page 40) for the same keyboard is on.
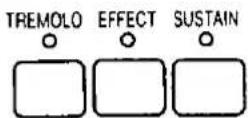
TREMOLO
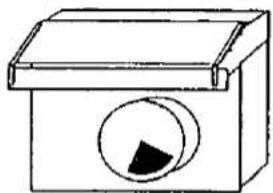
Tremolo is a rapid oscillation in volume, producing the effect of a rotating speaker. Various tremolos can be set for use with high-range sounds and low-range sounds. For example, you can achieve effects such as those shown below.
ELECTRONIC TAB group:
DRAWBARS group:
- Single-rotor-type revolving speaker effect.
natural_image
Simple line drawing of a box with a circular button and a black triangular symbol on the side (no text or labels)• Double-rotor-type revolving speaker effect.
PIPE ORGAN group: A distinctive vibrating effect, peculiar to pipe organs, of air flowing through the pipes (TREMULANT).

TREMOLO SLOW/FAST
When the TREMOLO effect is active, press the TREMOLO SLOW/FAST button to turn it on. The rotating speed of the speaker is accelerated.

- The type of TREMOLO and how it is applied can be adjusted. (Refer to page 118.)
- The TREMOLO can be set to on or off for each tab sound and EXTRA TAB VOICES sound. (Refer to page 38.)
■ EFFECT
This is the beautiful wide effect of many instruments playing in unison.
- The type of effect can be changed. (Refer to page 38.)
- EFFECT can be set to on or off for each flute-type tab sound and EXTRA TAB VOICES sound.
■ SUSTAIN
SUSTAIN is the gradual fading out of musical tones after the key is released.
- The length of the sustain can be adjusted. (Refer to page 45.)
Setting the Organ sound: Manual
After selecting the desired organ type, you can change the nuance of the sound by using the tab buttons and the display to adjust its various components.
Outline of MANUAL settings
- Select the organ type.
- In the UPPER ORGAN or LOWER ORGAN section, press the MANUAL button to turn it on to change the sound for the respective keyboard.
- Use the tab buttons and the display to select the desired sound. (Refer to the following section.)
■ Using the tab buttons
Organ sounds are obtained by combining different sound pitches (feet). By turning the tab buttons on and off, you can combine pitches to modify the selected organ sound.
■ Using the display
Special tabs (EXTRA TAB VOICES) and effects are provided for each individual organ type. These effects, used along with the tab buttons, allow you broad flexibility in creating the exact sound you want.
- The sound components which you can adjust differ depending on the type of organ.
- The settings are common for all the sounds in the same organ group.
- The settings are memorized independently for each organ group, so that whenever the MANUAL sound is selected for the same organ group, the sound you modified is automatically available.
- In the PIPE ORGAN group (Classical, Theatre), the sound settings can be made for each type.
Using the tab buttons to modify the sound
In the UPPER ORGAN or LOWER ORGAN section, use the tab buttons to change the sound for the respective keyboard.
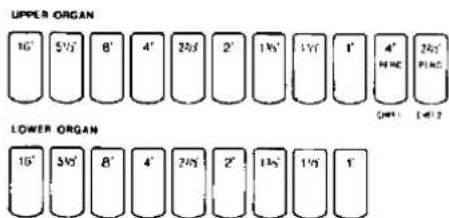
- Press the lower part of a tab button to turn it on, and the upper part to turn it off.
- When an organ type from the DRAWBARS group is selected, the tab buttons work as drawbar-volume-setting buttons. In this case, press and hold the upper part of the button to decrease the volume, and the lower part to increase the volume. While the volume is being adjusted, the status of the drawbars is shown on the display. (Refer to page 38.)
■ Percussives (upper keyboard)
PERC adds a tone with a fast initial attack to the tab sounds. You can get a sharp sound by combining PERC sounds with other tab sounds.
- When an organ type from the PIPE ORGAN group is selected, the PERC buttons work as CHIFF buttons. "Chiff" is the characteristic sound of air being sent to the pipes in a pipe organ. (Refer to page 39.)
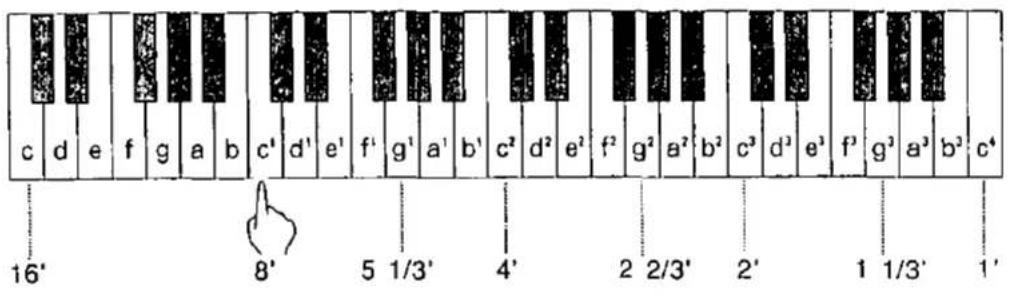
About feet marks
The feet indication on each tab button (for example 8') refers to the pitch of a rank of pipes in a pipe organ. If 8' is used as the standard (the pitch as played on the keyboard), a 16' rank pitch will be one octave below the 8' rank pitch, and a 4' rank pitch one octave above.
When the C^1 key is pressed, the sounds of the different pitch ranks are as follows.
Using the display to modify the sound
When a MANUAL button is turned on, or when a MANUAL button is on and the tab buttons are operated, the setting display is shown.
☐ ELECTRONIC TABS group
EXTRA TAB VOICES settings
On the display, select the sounds you wish to add.
- The setting switches between on and off each time the button is pressed.
(Example: Upper keyboard)
![UPPER EXTRA TAB VOICES ELECTRONIC TABS: [ Standard ] Cello 16' Violin 8' Trombone 16' Trumpet 8' Kinura 8' Clarinet 8' TREMOLO: OFF EFFECT ON VIBRATO: OFF OTHER SETTING](/content/2026/05/1069939/images/6c92056b55a4cde129e488d26e0d218153a7400fa0bcd8866beeba2e05e13b13.jpg)
Press the OTHER SETTING button to change other settings.
- On the display, the selected sounds are highlighted.
- You can select more than one sound at the same time.
Adding effects
Add effects to the EXTRA TAB VOICES sounds.
Press the button for each effect to turn it on or off.
TREMOLO: Tremolo is a rapid oscillation in volume, producing the effect of a rotating speaker.
EFFECT: Add breadth to the sound.
VIBRATO: Add vibrato to the sound.
Volume balance adjustment
Adjust the volume of the EXTRA TAB VOICES in relation to the tab sounds from the panel buttons.
Select BALANCE, and use the ∧ and ∨ buttons to adjust the volume (0 to 127).
- When set to 100, the volume of the EXTRA TAB VOICES is the same as the volume of the tab sounds.
Effect type setting
Use the EFFECT TYPE ∧ and ∨ buttons to select the type of effect (CELESTE or CHORUS).
- When this setting is changed, all effects applied to the ORGAN part change to the same type.
- You can change other effect types. (Refer to page 122.)
Percussive tone adjustment (upper keyboard only)
Adjust the PERC sound.
![UPPER OTHER SETTING ELECTRONIC TABS: [ Standard ] PERCUSSIVE TONE DECAY : 4 LEVEL : 4 TREMOLO : EN EXT. TAB VOICES BALANCE : 100 EFFECT TYPE : CHORUS](/content/2026/05/1069939/images/e15a242b7e6a5465f5475f76e777a7bc6fdaf2232da52d22099552414ac844b0.jpg)
Select an attribute of the PERCUSSIVE TONE. Use the and buttons to change the setting for the attribute.
DECAY
Adjust the decay time (1 to 8).
LEVEL
Adjust the volume (1 to 8).
TREMOLO
Turn the tremolo effect on or off.
EN: The tremolo effect is on for the percussive tone.
DIS: The tremolo effect is off.
- If the TREMOLO button on the panel is off, the tremolo effect is not applied even when the TREMOLO is set to EN.
■ DRAWBARS group
Drawbar (tab volumes) adjustment
Adjust with the respective tab buttons.
• The drawbars are shown on the display.
(Example: upper keyboard)
![UPPER DRAWBARS : [ Jazz ] 8 8 8 8 8 8 7 7 7 7 7 7 6 6 6 6 6 6 5 5 5 5 5 5 4 4 4 4 4 3 3 3 3 3 3 2 2 2 2 2 2 1 1 1 1 1 16' 51/3' 8' 4' 22/3' 2' 13/5' 11/3' 1' OTHER SETTING](/content/2026/05/1069939/images/60009828c7e8b10eadf0c9b9585e370873afa7056050a9ac358779e7a7d99d12.jpg)
Press the OTHER SETTING button to change other settings.
- The numbers below the drawbars correspond to the feet numbers of the tab buttons.
- Select a setting from 0 to 8. When set to 0, no sound is produced.
■ PIPE ORGAN group
EXTRA TAB VOICES settings
On the display, select the sounds you wish to add.
- The setting switches between on and off each time the button is pressed.
![UPPER EXTRA TAB VOICES PIPE ORGAN : [ Theatre ] Vox Celeste StringCeleste Tuba 16' Trumpet 8' EnglishHorn8' Saxophone 8' TREMULANT ON EFFECT : OFF VIBRATO: OFF OTHER SETTING](/content/2026/05/1069939/images/b6d6f8292234eca485da1749db94c8d7958cca8030d23434c70898bf400d0264.jpg)
Press the OTHER SETTING button to change other settings.
- On the display, the selected sound is highlighted.
- You can select more than one sound at the same time.
Adding effects
Add effects to the EXTRA TAB VOICES sounds.
Press the button for each effect to turn it on or off.
TREMULANT
Turn the tremulant on or off.
EFFECT
Add breadth to the sound.
VIBRATO
Add vibrato to the sound.
Effect type setting
Select the type of EFFECT. (Refer to page 38.)
Percussive tone adjustment (upper keyboard only)
Adjust the PERC sound. (Refer to page 38.)
Volume balance adjustment
Adjust the volume of the EXTRA TAB VOICES in relation to the tab sounds from the panel buttons. (Refer to page 38.)
Effect type setting
Select the type of EFFECT. (Refer to page 38.)
Chiff level adjustment (upper keyboard only)
For pipe organ types, the PERC buttons are used to add CHIFF sounds. (Chiff is the characteristic sound of air being sent to the pipes in a pipe organ.) Two chiff sounds, 1 and 2, are available, and the volume can be adjusted for each.
![UPPER OTHER SETTING PIPE ORGAN : [ Theatre ] CHIFF LEVEL CHIFF 2 : 4 EXT. TAB VOICES BALANCE: 100 CHIFF 2 : 4 EFFECT TYPE : CELESTE](/content/2026/05/1069939/images/5af77a3e8405da45c05724be6847bd413068105aa677dde877d4511bc9920ff3.jpg)
- Select CHIFF 1 or CHIFF 2.
- Use the and to adjust the volume (1 to 8).
- Repeat steps 1 and 2 as desired for the other chiff volume.
Setting the Organ sound: Preset
After selecting the desired organ type, choose any of the many preset sounds provided for each type.
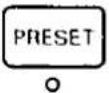
PRESET
Select one of the PRESET sounds provided for each organ type.
- Select the organ type.
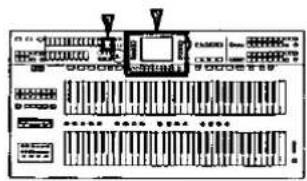
- To change the organ sound for the upper keyboard, press the PRESET button to turn it on in the UPPER ORGAN section. For the lower keyboard, press the PRESET button to turn it on in the LOWER ORGAN section.
• The display looks similar to the following.
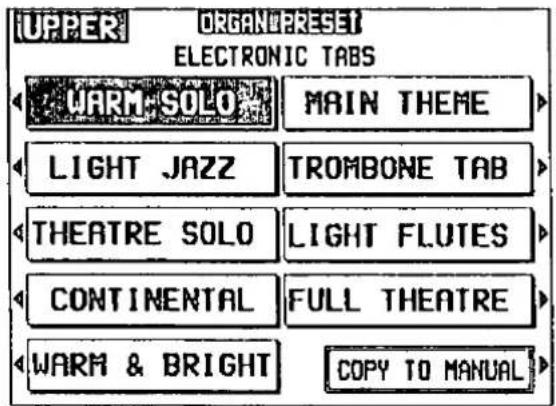
- Select a sound from the list on the display.
- The selected sound is memorized independently for each organ type, so that whenever the PRESET sound is selected for the same organ type, the sound you chose is automatically available.
- If necessary, repeat steps 2 and 3 to select a PRESET sound for the other keyboard.
- The tab buttons (with feet indications) and effect buttons (except for the SUSTAIN button) do not work for the PRESET sounds. If you wish to modify the sound, first make a copy of the PRESET sound (see below), and then modify the copy.
□ Copy a PRESET sound
When you copy a PRESET sound to the MANUAL memory, you can modify the copy as desired.
Note: When you copy a sound to the MANUAL memory, any sound which was previously copied to the memory is erased.
- Select a PRESET sound.
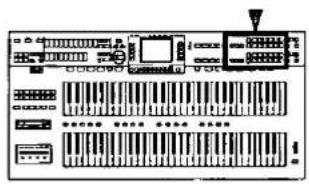
- Press the COPY TO MANUAL button.
• A copy of the selected PRESET sound is stored in the MANUAL memory. You can now change the characteristics of the sound in the MANUAL memory. (Refer to page 36.)
Selecting Sound part sounds
Select from a variety of sounds for the SOUND 1, 2 and 3 parts of the upper keyboard and lower keyboard.
Sound
- In the UPPER SOUND GROUP or LOWER SOUND GROUP, press the 1, 2 or 3 button to select a part.
- In the UPPER SOUND GROUP or LOWER SOUND GROUP, press one of the sound buttons to select a sound group.

- A list of sounds available for each sound group can be found in the separate "REFERENCE GUIDE" provided.
-
MEMORY A and MEMORY B are reserved for storing sounds you modify. (Refer to page 128.)
-
Select the desired sound from the list on the display.
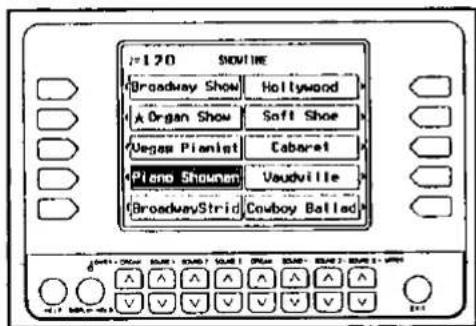
![UPPER SOUND 1: [ PIANO ] Grand Piano SoloPiano 16' Upright Piano Rock Piano Mellow Piano Honky Tonk Piano 1 Oct. Jangle Piano Piano 2 Oct. MORE SOUNDS](/content/2026/05/1069939/images/9c1e5d07cc10144cc68892ecc9eb52b231abff6d496d8240951e042aafdfe139.jpg)
Press the MORE SOUNDS button to see a different part of the list.
- The selected sound is memorized independently for each sound group of each part, so that whenever the sound group is selected for the same part, the sound you chose is automatically available.
- Repeat steps 1 to 3 to select the sound for the other parts.
• To play the sound selected for a part on the respective keyboard, turn on the corresponding SOUND button in the ORCHESTRAL CONDUCTOR. You can combine sounds by turning on two or more buttons in the ORCHESTRAL CONDUCTOR at the same time. - You can adjust the volume of each part. (Refer to page 29.)
- Press the EXIT button to go back to the previous display.
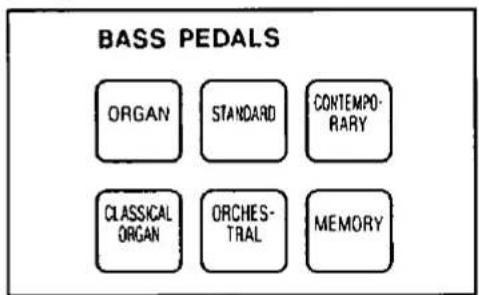
Selecting the bass part sound
A variety of sounds for you to choose from is also available for the bass part (pedal keyboard).
Bass
- In the BASS PEDALS section, select a sound group.
BASS PEDALS
- A list of sounds available for each sound group can be found in the separate "REFERENCE GUIDE" provided.
-
MEMORY is reserved for storing sounds you modify. (Refer to page 128.)
-
Select the desired sound from the list on the display.
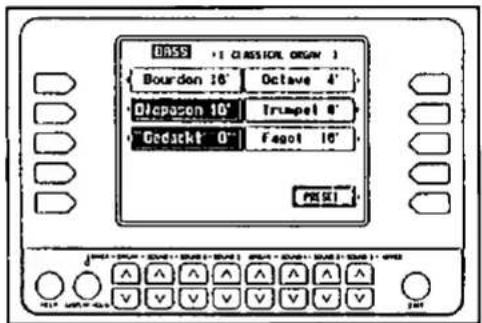
![BASS : [ CLASSICAL ORGAN ] Bourdon 16' Octave 4' Diapason 16' Trumpet 8' Gedackt 8' Fagot 16' PRESET](/content/2026/05/1069939/images/1d650d67e46d509bf258e71c738893cce2a4dcc9527495adff6975881703c6dd.jpg)
- For non-organ-type sounds, you can use the OCTAVE button to select the octave. The standard is 8', so the pitch is lowered by one octave when 16' is selected.
- For organ-type sounds (ORGAN and CLASSICAL ORGAN) you can combine multiple sounds on the display (BASS TABS) to create a different sound. Or, when you press the PRESET button, you can select the PRESET sound.
- The selected sound is memorized independently for each sound group, so that whenever the sound group is selected, the sound you chose is automatically available.
- Press the EXIT button to go back to the previous display.
Mixing sounds
You can combine bass sounds of different groups so that they are produced simultaneously.
Press the ORGAN button, or the CLASSICAL ORGAN button, and another BASS PEDALS sound button at the same time to turn them both on.
• The ORGAN sound and CLASSICAL ORGAN sound cannot be mixed.
- When sounds are combined, you can change the nuance of the organ-type sound by turning the sounds shown on the display on or off.
Volume balance
When mixing an organ-type sound with another bass sound, the volume balance between the two sounds can be adjusted by changing the volume of the non-organ-type sound.
- Simultaneously press the buttons for the two sounds.
![BASS : [ CLASSICAL ORGAN ] Bourdon 16' Octave 4' Diapason 16' Trumpet 8' Gedackt 8' Fagot 16' DUAL BALANCE 100 Acoustic Bass PRESET](/content/2026/05/1069939/images/dc1d1511d8340327fa9e554e6415eff752d5b825404cb1f6d6bc074d44b71a8e.jpg)
- Use the ∧ and ∨ buttons, to adjust the volume of the non-organ-type bass sound (0 to 127).
- When set to 100, the volume of the organ-type sound is the same as the volume of the other sound.
Adjust the volume
Adjust the volume of the BASS part in relation to the other parts.
Use the BASS buttons in the BALANCE section to adjust the volume of the BASS part (0 to 127).
- Each time the ∧ button is pressed, the volume increases, and each time the ∨ button is pressed, the volume decreases.
- While the volume is being adjusted, the balance setting display is shown. A few seconds after you change the setting, the display returns to the previous display.
Lower keyboard bass
You can add the bass sound to the lowest note played on the lower keyboard. This means that you can produce the bass part sound without actually playing the pedal keyboard.
Select from two methods.
■ TO LOWER
In the BASS PEDALS section, press the TO LOWER button to turn it on.

- The bass sound is added to the lower keyboard sound as long as this button is on.
- To turn off this function, press the TO LOWER button again to turn it off.
■ Full bass pedal
Press the full bass pedal.
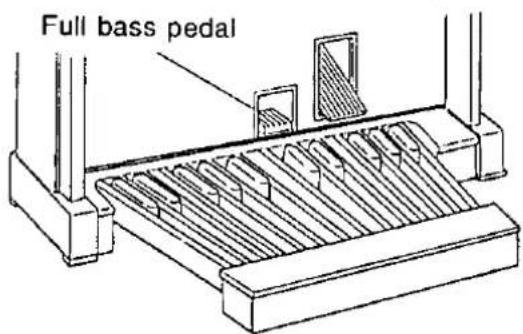
- The bass sound is added to the lower keyboard as long as this pedal is depressed.
- If this pedal is depressed when the TO LOWER button is on, the TO LOWER button turns off automatically when the pedal is released.
- You can assign a different function (bass solo, etc.) to the full bass pedal. (Refer to page 126.)
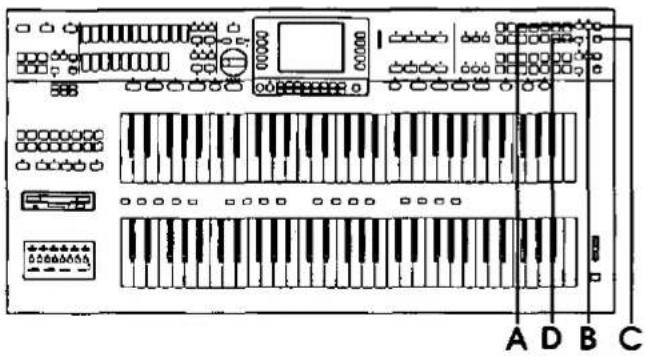
Add effects to the Sound and Bass part sounds
Various effects add character to the SOUND and BASS PEDALS sounds.
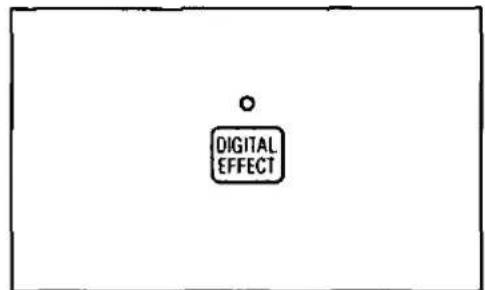
DIGITAL EFFECT
DIGITAL EFFECT gives the sound richness and enhances your performance.

- Turn on the part button for a sound (1, 2 or 3 in the UPPER or LOWER SOUND GROUP).
- This step is not necessary when you are adding the DIGITAL EFFECT to the BASS part.
-
Press the DIGITAL EFFECT button to turn it on.
-
Repeat steps 1 and 2 for other parts as desired.
-
The DIGITAL EFFECT differs depending on the selected sound.
- The on or off status of the DIGITAL EFFECT is preset for each sound, so that the DIGITAL EFFECT turns on when certain sounds are selected.
- The DIGITAL EFFECT settings can be changed. (Refer to page 139.)
DSP EFFECT (SOUND parts)
You can change the quality of the sound.

- Turn on the part button for a sound (1, 2 or 3 in the UPPER or LOWER SOUND GROUP).
-
Press the DSP EFFECT button to turn it on.
-
Repeat steps 1 and 2 for other parts as desired.
-
The on or off status of the effect is memorized for each part.
- The DSP EFFECT settings can be changed. (Refer to page 120.)
SUSTAIN
SUSTAIN is the gradual fading out of musical tones after the key is released.
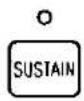
- If adding this effect to a SOUND part, turn on the button for the part.
- Press the corresponding SUSTAIN button to turn it on.
• The display changes to the following.

flowchart
graph LR
    A["SUSTAIN LENGTH"] --> B["PART: [UPPER SOUND 1"]]
    B --> C["SUSTAIN LENGTH : 7"]
    C --> D["↑"]
    C --> E["↓"]
    C --> F["→"]
- Use the ∧ and ∨ buttons to adjust the length of the sustain (1 to 8).
- A few seconds after changing the setting, the display returns to the previous display.
- Repeat steps 1 to 3 for other parts as desired.
• The on or off status of the SUSTAIN is memorized for each part.
- The SUSTAIN effect differs depending on the selected sound.
BRILLIANCE
Change the brightness of the sound.


BRILLIANCE
- If adding this effect to a SOUND part, turn on the button for the part.
- Use the corresponding BRILLIANCE ∧ and ∨ buttons to change the setting.
• The display changes to the following.
![BRILLIANCE PART:[UPPER SOUND 2] BRIGHT NORMAL MELLOW](/content/2026/05/1069939/images/d8920a56152dc36debf8522da1e9b246adc258722b3b46754419ad7cd5147653.jpg)
- You can also specify the brightness with the buttons to the right of the display.
BRIGHT: The sound is brighter.
NORMAL: Standard brightness.
MELLOW: The sound is mellow.
- A few seconds after changing the setting, the display returns to the previous display.
-
Repeat steps 1 and 2 for other parts as desired.
-
The BRILLIANCE setting is memorized for each part.
- This effect differs depending on the selected sound and on the keyboard section.
Other effects
Other effects give you complete control over the way your performance sounds. For example, the knee lever lets you instantly turn the sustain on and off-during your performance, and you can easily add reverb to all the sounds of your instrument.
Knee lever
You can operate the knee lever located under the keyboards with your right knee to turn the SUSTAIN effect on and off quickly while you play.
| Knee lever | Sustain effect |
 Raised position Raised position | The SUSTAINeffect for each part is enabled/disabled according to the on/off status of the SUSTAIN button for each part. |
 Lowered position (stand-by) Lowered position (stand-by) | The SUSTAINeffect is standing by for those parts whose SUSTAIN button status is on. |
 Pressed to the right (on) Pressed to the right (on) | The SUSTAINeffect is applied to the parts whose SUSTAIN button status is on. |
- You can assign a different function to the knee lever. (Refer to page 126.)
DIGITAL REVERB
DIGITAL REVERB applies a reverberation effect to the sound of the whole instrument, including the automatic rhythm sounds.
Press the DIGITAL REVERB button to turn it on.
DIGITAL REVERB
- The display can also be used to set this effect to on or off for each part separately (effective when the DIGITAL REVERB is on).
- The type and depth of the reverberation can be adjusted. (Refer to page 117.)
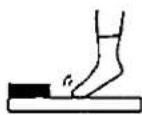
Glide
The foot switch is used as a glide control.
- Press the foot switch (left foot switch) to the left with the side of your foot.
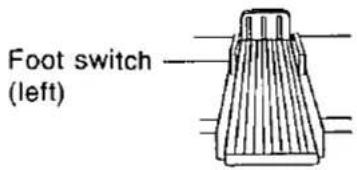
- The pitch of the instrument is lowered by about one semitone.
- Release the foot switch.
• The pitch returns to normal.
- A fast glide effect is applied when the foot switch is released quickly.
- You can adjust the pitch range of the glide effect, and specify whether the glide effect works for the lower keyboard. (Refer to page 120.)
- You can assign a different function to this foot switch. (Refer to page 126.)
- The glide effect does not function for the pedal keyboard sounds and for some other sounds.
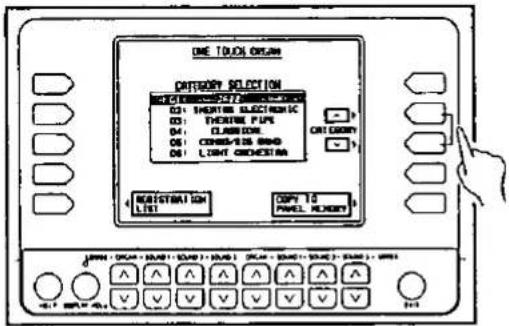
Automatic sound and effect settings
The sound and effect settings (registration) for each keyboard can be executed automatically in seconds. A great many automatic registrations are available for you to choose from.
ONE TOUCH ORGAN
A wide variety of ORGAN registrations has been prepared for automatic panel setup.
- Press the ONE TOUCH ORGAN button to turn it on.

• The display looks similar to the following.
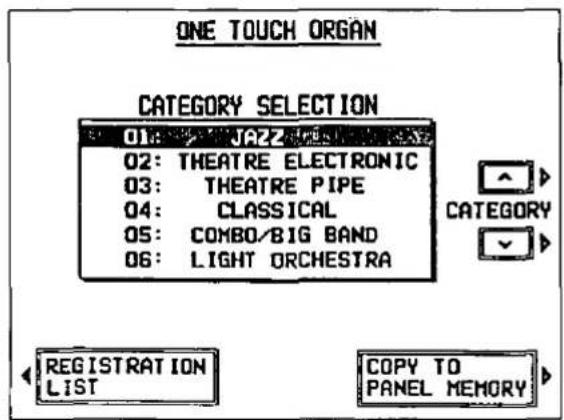
-
Use the ∧ and ∨ buttons to select the category (performance style) (01 to 06).
-
Press the REGISTRATION LIST button.
• The display looks similar to the following.
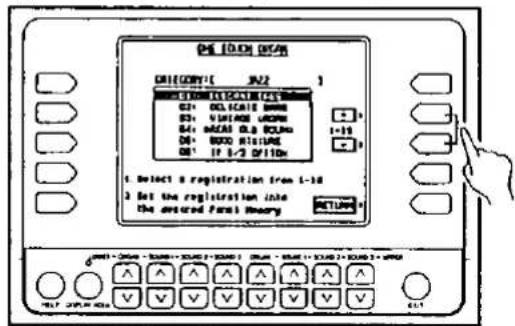
![ONE TOUCH ORGAN CATEGORY: [ JAZZ ] 01: ELEGANT ABS 02: DELICATE BARS 03: VINTAGE ORGAN 04: GREAT OLD SOUND 05: GOOD MIXTURE 06: IT 1/3 OPTION 1-16 2. Select a registration from 1-18 2. Set the registration into the desired Panel Memory RETURN](/content/2026/05/1069939/images/9461c36b34c049c41bf6283893edc3e1071d373cfa150349ae4c0629a8401028.jpg)
-
Use the 1-16 ∧ and ∨ buttons to select the name of a registration (01 to 16).
-
The sounds and effects for each keyboard, the rhythm and various other panel settings which are suitable for the registration you chose are automatically selected.
- Play and listen to the sound. If you like the combination, store the registrations in the PANEL MEMORY for one-touch recall. (See below.)
- When the ONE TOUCH ORGAN function is used, the ACCOMP 1, 2 and 3 buttons turn off.
■ Copy to the PANEL MEMORY
The registration contents of the selected category can be copied to the PANEL MEMORY buttons (page 53) for easy recall.
Notes
- When this procedure is executed, any previously stored contents of the PANEL MEMORY buttons are replaced by the registrations of the selected category.
-
Select the category.
-
Press the COPY TO PANEL MEMORY button.
- A confirmation display appears. Press the YES button to execute the function, or press the NO button to cancel the function.
- The automatic registrations are copied to the PANEL MEMORY 1 to 16 buttons.
ORGAN STYLIST
Automatic settings for the ORGAN styles are also available to choose from.
- Press the ORGAN STYLIST button to turn it on.
• The display looks similar to the following.
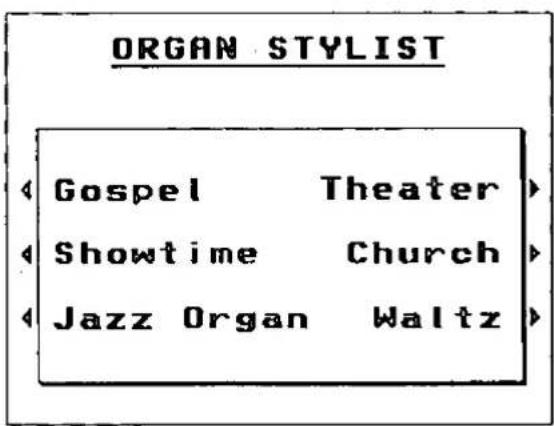
- Use the buttons to the left and right of the display to select a style category.
- A confirmation display appears. Press the YES button to execute the function, or press the NO button to cancel the function.
Notes
- When this procedure is executed, any previously stored contents of the PANEL MEMORY buttons are replaced by the registrations of the selected category.
- When the YES button is pressed, a list of styles is shown on the display (1 to 16).
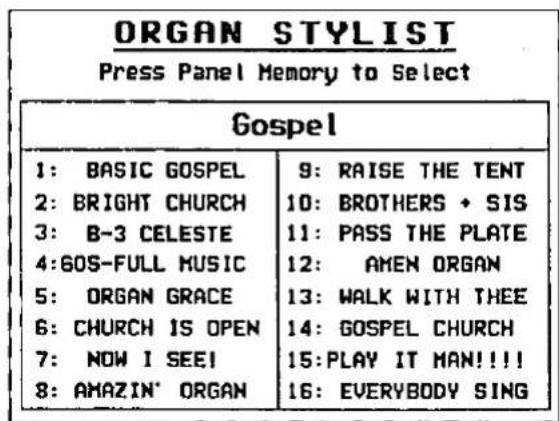
- Use the PANEL MEMORY buttons to select a style (1 to 16).
SET 1 2 3 4
- The name of the selected style is shown on the display for a few seconds.
- The sounds and volume balances for each keyboard, rhythm, accompaniment and tempo, etc. suitable for the style you chose are automatically selected.
- Press ORGAN STYLIST button to turn it off to go back to the previous display.
- The PANEL MEMORY mode changes automatically to the EXPAND mode. When you press the ORGAN STYLIST button to turn it off, the PANEL MEMORY mode returns to the previous mode. (Refer to page 53.)
Transpose
The TRANSPOSE buttons are used to change the key (pitch) of the entire instrument in semi-tone steps across an entire octave.
Suppose you learn to play a song—in the key of C, for example—and decide you want to sing it, only to find it's either too high or too low for your voice. Your choice is to either learn the song all over again, in a different key, or to use the TRANSPOSE feature.
Adjust the key with the TRANSPOSE buttons (UP and DOWN).
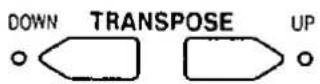
Each press of the UP button changes the key as follows: D^b D E^b E F F^ .
Each press of the DOWN button changes the key as follows: B → B ^b → A → A ^b → G.
- If the two buttons are pressed at the same time, the key returns to C.
- When the TRANSPOSE function is active, the indicator for the UP or DOWN button remains lit.
- When the TRANSPOSE function is active, the transposed key is shown on the display.
![U/L ORGAN SOUND GROUP: ELECTR. TABS TYPE: Standard RHYTHM Organ Fox J = 146 LOWER BALANCE UPPER [SOUND 1] Grand Piano LOWER [SOUND 1] E. Piano 1 BASS PEDAL SOUND Organ UPPER BALANCE](/content/2026/05/1069939/images/0f0d0374bbcc609671d18a40b8af4727b01c69cb81f86ba1db7b1c20bdc30d3b.jpg)
Actual key
Played keys
Notes that sound

C major
D major
Techni-chord
TECHNI-CHORD transfers the chord notes you play on the lower keyboard to each melody note you play on the upper keyboard.
- Press the TECHNI-CHORD button to turn it on.
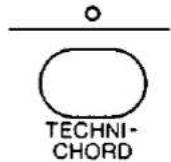
- Play the example below, playing the chords on the lower keyboard and the melody on the upper keyboard.
Left hand (chord)
Right hand (melody)

- The melody you play on the upper keyboard is automatically played in chords which are based on the chords you play on the lower keyboard.
• TECHNI-CHORDs cannot be played using the lowest two octaves of the upper keyboard. - This feature is very effective when used with the AUTO PLAY CHORD. (Refer to page 59.)
- The display can be used to select the desired harmony style. (Refer to page 119.)
- When the AUTO PLAY CHORD MEMORY function is set to on, TECHNI-CHORD will continue to add the selected harmony to the notes played on the upper keyboard even after the chord on the lower keyboard is released. This feature is not affected by the AUTO PLAY CHORD on/off setting.
BGS Background Sound
Various preset background sounds such as the chirping of birds and the sound of waves are available. Use the background sounds to give your music that special atmosphere.
- Press the BGS button to turn it on.

• The display changes to the following.
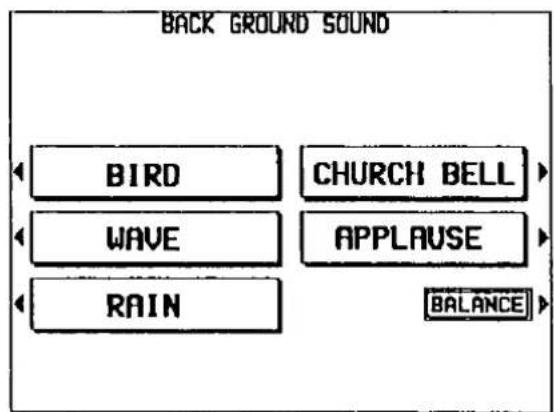
- Press the button for the desired background sound.
• The selected sound is immediately produced.
- The background sounds can be mixed when two buttons are pressed at the same time.
- A few seconds after making your selection, the display returns to the previous display.
- To turn off the background sound, press the BGS button again.
- The background sound dies out slowly (FADE OUT).
Volume
On the BACK GROUND SOUND display, press the BALANCE button to access the volume-setting display. Use the BGS buttons to adjust the volume.
Panel Memory

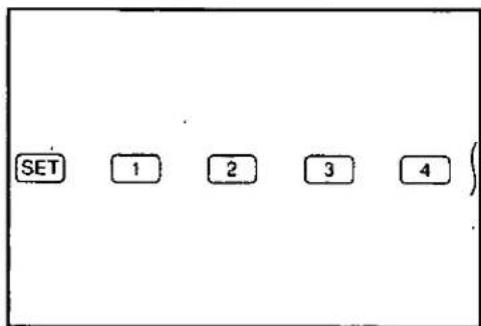
PANEL MEMORY stores the panel setups of your instrument up to 16, allowing you to make complex changes at the touch of a single button.
- Select the sounds, effects and volumes for all the parts.
- With the SET button held down, press one of the numbered buttons of the PANEL MEMORY.
SET
1
2
3
4
- The current settings are now stored in the specified number button. To recall the settings, just press the respective number button in the PANEL MEMORY.
- After recalling the settings by pressing a PANEL MEMORY number button, you can change the panel settings manually, but the memory contents of the PANEL MEMORY remain unchanged until you store them again.
PANEL MEMORY mode
You can define which panel settings are stored when the PANEL MEMORY is used.
- Press and hold the SET button for a few seconds.
• The display changes to the following.
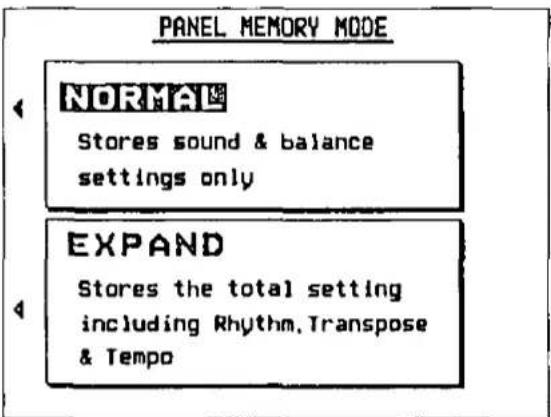
- Select the mode (NORMAL or EXPAND).
NORMAL: Stores sound and volume balance settings, etc.
EXPAND: Stores all instrument settings, including rhythm, TRANSPOSE status, tempo, etc.
• After a few seconds, the display exits the setting mode.
Suggestions for using PANEL MEMORY
The initial factory setting of the PANEL MEMORY contains various settings which you may choose to use or to alter to your own taste. These can be restored at any time by initializing the PANEL MEMORY. (Refer to page 154.) Selecting the EXPAND mode will allow you to make full use of the initial factory settings of the PANEL MEMORY.
- You can change from one PANEL MEMORY to another by using a foot switch. (Refer to page 125.)
Part II Playing the rhythm
The rhythm section enhances the capabilities of your instrument with features such as automatic performance of the preset rhythm patterns and accompaniment patterns.
Selecting rhythms
After first selecting a RHYTHM GROUP, choose the desired rhythm from the display.
Select a rhythm.
- In the RHYTHM GROUP section, select a rhythm group.

- A list of rhythms available for each rhythm group can be found in the separate "REFERENCE GUIDE" provided.
• COMPOSER A and COMPOSER B are reserved for storing rhythms you create yourself. (Refer to page 93.) - Select the desired rhythm from the list on the display.
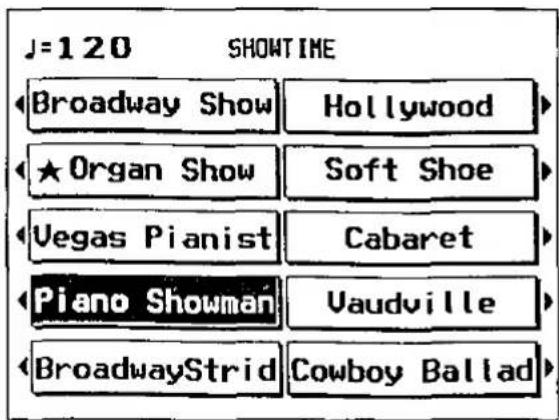
- Rhythms marked with a ★ are especially effective for an AUTO PLAY CHORD performance with ORGAN sounds.
- The selected rhythm is memorized independently for each rhythm group, so that whenever a RHYTHM GROUP button is pressed, the rhythm you chose is automatically available.
- Press the EXIT button to go back to the previous display.
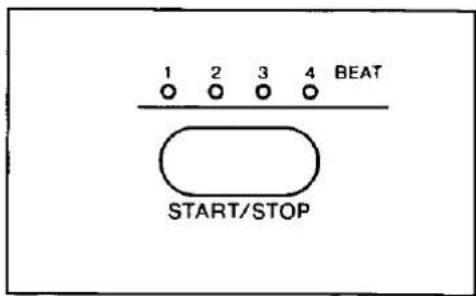
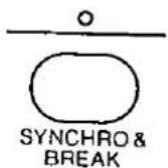
Start the rhythm
There are two ways to start the rhythm.
■ Immediate rhythm start
-
Select a rhythm.
-
Press the START/STOP button to turn it on.
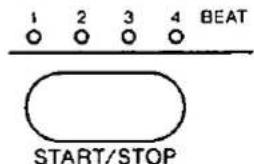
- The selected rhythm pattern immediately begins to play.
- You can stop the rhythm by pressing the START/STOP button again to turn it off.
- During the rhythm performance, the BEAT indicators above the START/STOP button light to indicate the beat. On the first beat of the measure, the red indicator lights. On the second and succeeding beats of the measure, the green indicators light in order.
■ Synchronized start
With the synchronized start feature, the rhythm pattern starts when you play a key on the lower keyboard or pedal keyboard.
- Select a rhythm.
- Press the SYNCHRO & BREAK button to turn it on.
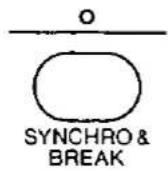
- Play a key on the lower keyboard or a pedal on the pedal keyboard.
• The rhythm pattern begins to play.
- You can stop the rhythm by pressing the START/STOP button to turn it off.
Adjust the volume
The volume of the rhythm is adjusted with the DRUMS buttons in the BALANCE section.
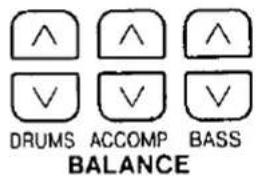
- While the volume is being adjusted, the balance-setting display is shown.
Adjust the tempo
The tempo of the rhythm pattern is adjusted with the TEMPO/PROGRAM dial.
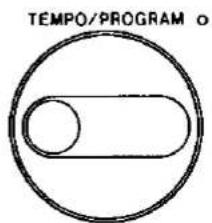
- The tempo is shown on the display as a numerical value ( = 40 to 300).
- When the TEMPO/PROGRAM indicator is lit, it means that one of the various function-setting modes is active and the TEMPO/PROGRAM dial is not currently available for adjusting the tempo.
Playing the rhythm
Intro, fill-in and ending patterns fitting each different rhythm pattern are permanently recorded in your instrument, thus allowing a versatile rhythm performance.
INTRO
Begin the rhythm performance with an intro pattern.
- Press the INTRO & ENDING button to turn it on.
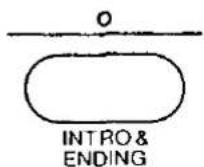
- Press the START/STOP button to start the rhythm.
- An intro pattern is played, after which the normal rhythm pattern begins.
COUNT INTRO
You can begin the rhythm performance with a one-measure count.
- Press the COUNT INTRO (FILL IN 2) button to turn it on.
- Press the START/STOP button to start the rhythm.
• A one-measure count is played, after which the normal rhythm pattern begins.
VARIATION
Each rhythm pattern also has a variation pattern. Add drama to your performance by switching to the variation pattern at climactic points in the melody.
-
Select a rhythm and press the START/STOP button.
-
Press the VARIATION button to turn it on.
• The rhythm changes to a flashier pattern.
- Press the VARIATION button again to turn it off and go back to the normal rhythm pattern.
- This button does not function when the MUSIC STYLE ARRANGER is on. (Refer to page 65.)
FILL IN
You can insert a fill-in pattern any time during the rhythm performance. Choose from two different fill-in patterns.
-
Select a rhythm and press the START/STOP button.
-
Press the FILL IN 1 or FILL IN 2 button.
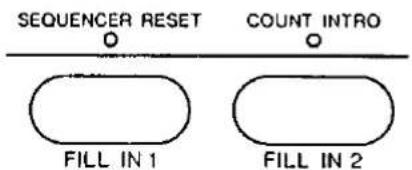
- A fill-in pattern is heard immediately for the remainder of the measure.
- When a FILL IN button is pressed on the last beat of the measure, the fill-in pattern continues to the end of the following measure.
ENDING
Finish the rhythm performance with an ending pattern.
-
Select a rhythm and press the START/STOP button.
-
Press the INTRO & ENDING button to turn it on.
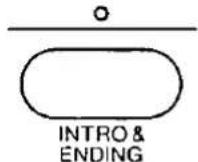
- An ending pattern is produced, and then the rhythm performance stops.
- If you accidentally press the INTRO & ENDING button in the middle of the tune, you can press the FILL IN 1 or FILL IN 2 button. The ending pattern stops, and a fill-in pattern is produced, after which the normal rhythm performance continues.
Keyboard Percussion
A complete set of percussion instruments and other special sounds is at your fingertips. Use the lower keyboard to play the percussion performance.
- Press the KEYBOARD PERCUSSION button to turn it on.
KEYBOARD PERCUSSION
• The display looks similar to the following.
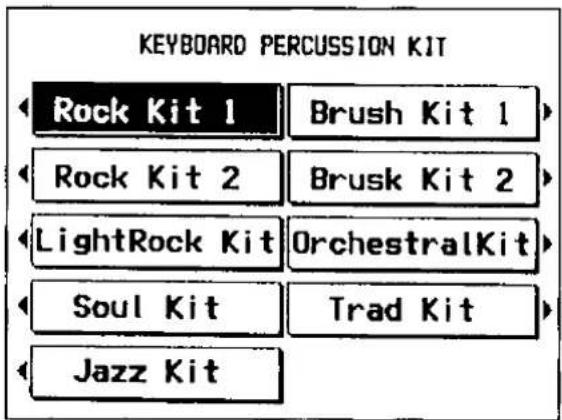
- Select the KIT of percussion instruments from the list on the display.
- Play the lower keyboard.
- Percussion instrument sounds are produced by the lower keyboard keys as indicated by the picture code above each key. For further explanation, refer to the separate "REFERENCE GUIDE" provided.
- In the "Orchestral kit," the arrangement of percussion instruments is different.
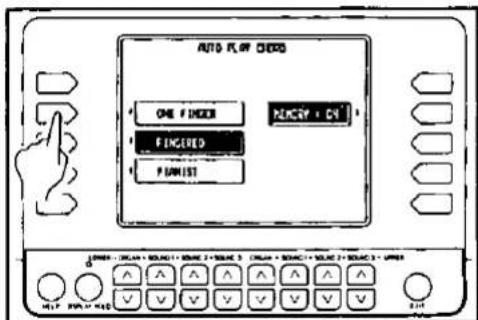
Auto Play Chord
Simply by playing a chord on the lower keyboard, the AUTO PLAY CHORD function automatically plays an accompaniment pattern which matches perfectly the selected rhythm. With a real accompaniment as a background, you can concentrate on playing the melody.
How the AUTO PLAY CHORD works
When an AUTO PLAY CHORD mode is selected, an automatic accompaniment which matches the rhythm you have chosen is played in the chord which you specify on the lower keyboard. The melody is played on the upper keyboard.
- The accompaniment pattern of the AUTO PLAY CHORD is composed of five parts: DRUMS, BASS, ACCOMP 1, ACCOMP 2 and ACCOMP 3.
Playing chords
You can choose from one of the following three AUTO PLAY CHORD modes.
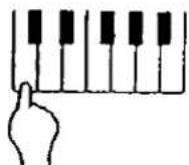
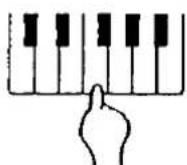
■ ONE FINGER mode
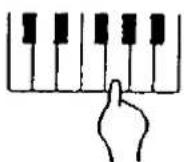
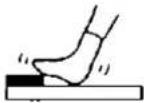
Press a key on the lower keyboard to specify the root note. The major chord (on the lower keyboard) and the bass note (on the pedal keyboard) corresponding to this root note are automatically played in an accompaniment pattern.
Example: C chord
natural_image
Pure electrical circuit lines without any symbolsMinor, seventh and minor seventh chords are also easily produced as shown below.
| minor chord | seventh chord | minor seventh chord |
| Play the root note on the lower keyboard and any black pedal. | Play the root note on the lower keyboard and any white pedal. | Play the root note on the lower keyboard and any black pedal and white pedal, at the same time. |
 |  |  |
You can also use just the lower keyboard to specify minor, seventh and minor seventh chords.
| minor chord | seventh chord | minor seventh chord |
| Play the root note plus a black key to the left of it. | Play the root note plus a white key to the left of it. | Play the root note plus a black key and a white key to the left of it. |
Example: Cm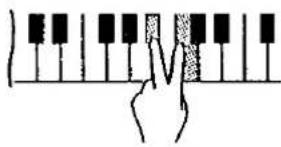 | Example: C7 | Example: Cm7 |
■ FINGERED mode
Indicate the chord by actually playing the chord keys on the lower keyboard. In the FINGERED mode, the AUTO PLAY CHORD recognizes more chord types, and thus the scope of your performance expression is expanded.
Example: C chord
- The AUTO PLAY CHORD can distinguish the following played chords for each key (C is given as an example): C, C7, CM7, Caug, Cm, Cm7, Cdim7, Cm7 ^1/5 , CmM7, Csus4, etc.
■ PIANIST mode
Indicate the chord by actually playing the chord keys on the lower keyboard. In addition to the chords recognized in the FINGERED mode, the AUTO PLAY CHORD also recognizes 9th and 13th chords.
- If a pedal is pressed while you are playing a chord in the FINGERED and PIANIST mode, only the bass pattern is produced in the key of the pressed pedal, thus making it possible to play chords such as DonC.
How the use the AUTO PLAY CHORD
- Select the desired rhythm and sounds, and set the tempo.
- Rhythms marked with a ★ are especially effective for an AUTO PLAY CHORD performance with ORGAN sounds.
- Press the AUTO PLAY CHORD button to turn it on.
• The display looks similar to the following.
- Use the buttons to the left of the display to select an AUTO PLAY CHORD mode.
• After a few seconds, the display returns to the previous display.
- When the MEMORY is set to ON, even when the keys are released, the chord is memorized and the accompaniment continues to play until you specify another chord.
- Press the START/STOP button to begin the rhythm.
- You can also start the rhythm by playing the lower keyboard or pedal keyboard (synchronized start). (Refer to page 55.)
- Specify the chord on the lower keyboard.
- An accompaniment pattern in the specified chord begins to play. Play the melody on the upper keyboard.
- When you use VARIATION, FILL IN, INTRO and ENDING, the automatic accompaniment is also used in these patterns.
- When the rhythm is off, if the AUTO PLAY CHORD button is on and a chord is specified, the specified root note and chord notes are produced.
- To stop the automatic accompaniment, press the START/STOP button.
Adjust the volume
The volume for each part is adjusted with the respective DRUMS, ACCOMP or BASS buttons in the BALANCE section.
- While the volume is being adjusted, the balance setting display is shown.
- The volumes for the ACCOMP 1, 2 and 3 parts can be adjusted independently. (Refer to page 30.)
ACCOMP parts
The ACCOMP part of the automatic accompaniment is composed of three different parts. You can change the accompaniment by turning any or all of the three parts on or off.
- If all the ACCOMP parts are turned off, the ACCOMP part sound is not produced.
DYNAMIC ACCOMP
DYNAMIC ACCOMP is a function which changes each accompaniment pattern of the AUTO PLAY CHORD.
- Press the DYNAMIC ACCOMP button to turn it on.
DYNAMIC ACCOMP O
- Play the instrument with one of the AUTO PLAY CHORD modes on.
- Depending on how hard the keyboard keys are played or how complicated the melody phrase, for example, each ACCOMP part changes.
BREAK function
With the break function, the rhythm starts when the lower keyboard is played and stops when the fingers are removed from the keys.
- Turn on the AUTO PLAY CHORD button and select a mode.
- At this time, the MEMORY should be set to OFF.
- Press the SYNCHRO & BREAK button to turn it on.
- Specify a chord on the lower keyboard.
- The automatic accompaniment begins to play (synchronized start).
- Release the lower keyboard keys.
- The automatic accompaniment stops. When the keys are pressed again, the automatic accompaniment starts from the first beat.
Automatic settings
With the automatic settings, the panel settings change depending on the rhythm or music style you select. This lets you get a great sound straight away, even if you are playing this instrument for the first time.
ONE TOUCH PLAY
Set up your instrument with a combination of sounds and balances suitable for your selected rhythm style.
- Select a rhythm pattern.
- Do not select a rhythm from the COMPOSER A or COMPOSER B group.
- Press the ONE TOUCH PLAY button until its indicator goes out.
• The display looks similar to the following.
- The AUTO PLAY CHORD and the SYNCHRO & BREAK button turn on, and the sounds, effects and tempo are automatically set.
- Play the keyboards.
- When a chord is specified on the lower keyboard, the automatic accompaniment begins to play. Play the melody on the upper keyboard.
Suggestions for using ONE TOUCH PLAY
- Press the INTRO & ENDING button before you play for a professional-sounding introduction.
- Use the ONE TOUCH PLAY registration as a starting point for your own registration.
- Alter the sounds, balance and tempo to your own taste and store your new registration in the PANEL MEMORY for future use. (Refer to page 53.)
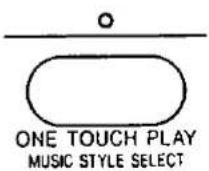
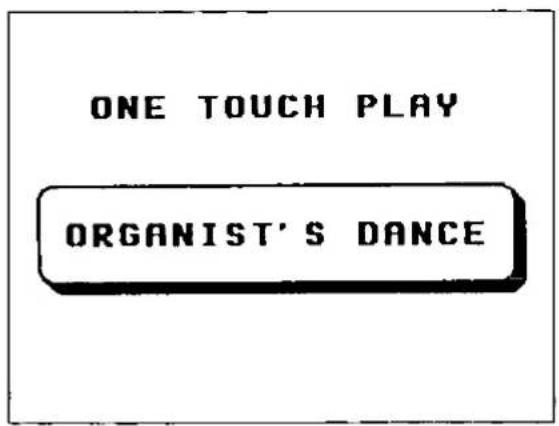
MUSIC STYLE SELECT
With this feature, the panel settings are automatically set to match the selected music style.
- Press the ONE TOUCH PLAY (MUSIC STYLE SELECT) button momentarily.
• The display looks similar to the following.
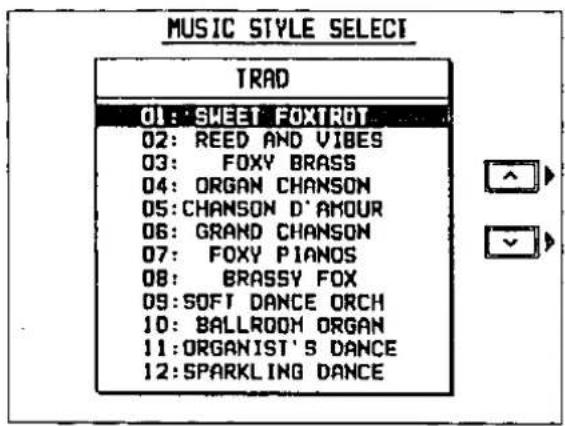
-
In the RHYTHM GROUP section, select a rhythm group.
-
Use the ∧ and ∨ buttons to select a music style.
- The AUTO PLAY CHORD and the SYNCHRO & BREAK button turn on, and the sounds, effects, rhythm and tempo which are best suited for the selected music style are automatically selected.
-
Play the keyboards.
-
When a chord is specified on the lower keyboard, the automatic accompaniment begins to play. Play the melody on the upper keyboard.
- To return to the normal performance display, press the ONE TOUCH PLAY button to turn it off, or press the EXIT button.
Suggestions for using MUSIC STYLE SELECT
- Press the INTRO & ENDING button before you play for a professional-sounding introduction.
- Use the MUSIC STYLE SELECT registration as a starting point for your own registration.
- Alter the sounds, balance and tempo to your own taste and store your new registration in the PANEL MEMORY for future use. (Refer to page 53.)
Music Style Arranger
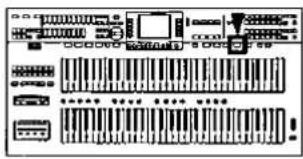
The MUSIC STYLE ARRANGER helps you make professional registration changes during your performance. Select between three contrasting registrations at the touch of a button. The MUSIC STYLE ARRANGER will alter the accompaniment in character with the registration change, creating a polished-sounding arrangement.
How to use the MUSIC STYLE ARRANGER
- Select a rhythm pattern.
- Press the MUSIC STYLE ARRANGER button to select the style (1, 2 or 3) you want at the beginning of your performance.
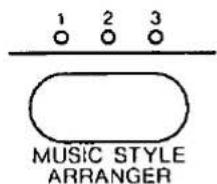
1: Simple pattern
2: Normal pattern
3: Flashy pattern
• Each time the MUSIC STYLE ARRANGER button is pressed, the style indication changes as follows: 1 → 2 → 3 → off.
- The panel settings change according to the selected rhythm and music style. The AUTO PLAY CHORD and the SYNCHRO & BREAK button turn on. When a key on the lower keyboard is pressed, the automatic accompaniment starts to play immediately.
- The MUSIC STYLE ARRANGER includes the rhythm VARIATION setting. Therefore, the VARIATION button does not function when the MUSIC STYLE ARRANGER is on.
How to change the music style during your performance
While you are playing your instrument with the MUSIC STYLE ARRANGER on, press the FILL IN 1 or FILL IN 2 button.
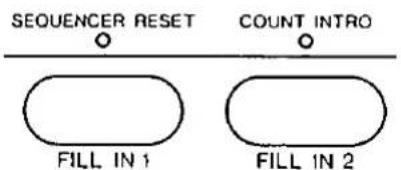
• Each time the FILL IN 1 button is pressed, the FILL IN 1 pattern plays, and then the music style changes in the 3 → 2 → 1 order. And each time the FILL IN 2 button is pressed, the FILL IN 2 pattern plays, and then the music style changes in the 1 → 2 → 3 order.
You can define which panel settings change when the MUSIC STYLE ARRANGER is on and a FILL IN button is pressed.
- Press and hold the MUSIC STYLE AR-RANGER button for a few seconds.
• The display changes to the following.

- Select the mode.
SOUND
Only the sound changes.
RHYTHM
Only the rhythm changes.
SOUND & RHYTHM
Both the sound and rhythm change.
PANEL MEMORY
The PANEL MEMORY number changes.
- After a few seconds, the display exits the setting mode.
- You can also access this display with the MEM & CTRL button. (Refer to page 123.)
Outline of the Sequencer
A sequencer records your performance in a similar way to a tape recorder. This instrument's SEQUENCER allows you to record in a variety of ways. You may want to record your entire performance in one go (especially if you are using AUTO PLAY CHORD to provide the accompaniment), or to build up a complex arrangement with several different parts playing together, like an orchestral score. This SEQUENCER has 16 tracks. This means that you can record 16 different parts. However, you don't have to use all 16 tracks. For some uses you may only need to use one or two tracks. The SEQUENCER enables you to edit your recorded performance. Unlike a tape recorder, you can change the sound or the tempo during playback, or correct wrong notes or timing errors.
SEQUENCER features
☐ You can change the tempo without changing the pitch
When you record your performance at a slow tempo and play it back at a faster tempo, the pitch stays the same.
Consistent sound
Your performance is reproduced by a sound module as it reads digital data. So, unlike a recorded tape, the sound never deteriorates no matter how many times you play back your performance.
■ Edit your recorded performance
Comprehensive editing functions allow you to modify your recorded performance. Data can easily be erased, corrected or copied, providing an especially convenient tool for creating your original tunes.
Instant search
A recorded tape has to be rewound, but digital action means you can return to the beginning of your performance, or find any measure, instantly.
■ Save your performances on disks
All the data of your recorded performances can be stored on disks. The built-in Disk Drive also allows you to play commercially sold disks on your own instrument.
- Features and operation of the built-in Disk Drive are explained in Part V: Disk Drive (page 103).
Memory capacity
Expressed in terms of notes, the total number of notes which can be stored in all the tracks is about 28,000. The remaining memory available for recording is shown on the display as a percentage (MEMORY= %).
- When "Memory full!" appears on the display, no more data can be stored in the SEQUENCER.
- It is a good practice to save your recorded performances on disks before clearing any of the SEQUENCER memories. (Refer to page 107.)
SEQUENCER buttons
The buttons related to SEQUENCER recording and editing are briefly explained below.
■ EASY RECORD
Begin recording quickly without complicated set-up procedures.
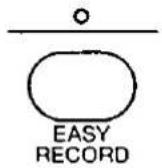
EASY RECORD (page 69)
This feature allows you to bypass the more complex recording procedures so you can record and play back your performance quickly and easily.
- You can also record an accompaniment from the AUTO PLAY CHORD.
■ SEQUENCER REC
Record your performance just as you play it on the keyboard.
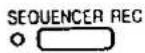
REALTIME RECORD (page 72)
Record your performance in up to 16 tracks and create your own orchestra or band.
■ STEP REC
Store the sounds note-by-note on the display.
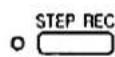
STEP RECORD (page 74)
For repeating patterns or those especially complicated phrases, this mode is convenient for recording the notes one-by-one.
- This mode can be used to store both the chord progression for the automatic accompaniment and the rhythm changes.
■ SEQUENCER
Edit the contents of your recorded performance. These features allow you to edit the contents of specific tracks or measures, and also to define the kind of playback you want.
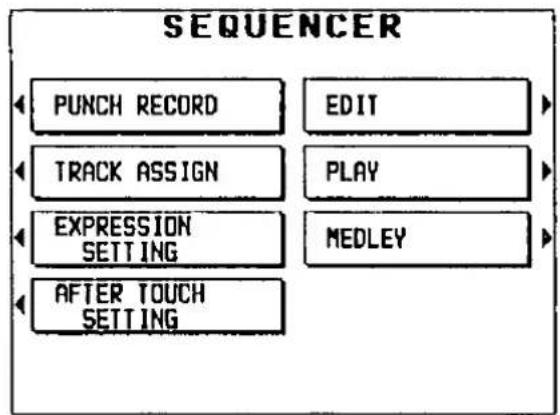
flowchart
graph TD
    A["PUNCH RECORD"] --> B["EDIT"]
    C["TRACK ASSIGN"] --> D["PLAY"]
    E["EXPRESSION SETTING"] --> F["MEDLEY"]
    G["AFTER TOUCH SETTING"] --> H["End"]
PUNCH RECORD (page 89)
Correct a selected portion of your recorded performance.
TRACK ASSIGN (page 79)
Assign parts to up to 16 different tracks.
EXPRESSION SETTING (page 80)
Specify how pedal operation data is handled during recording or playback.
AFTER TOUCH SETTING (page 81)
Specify whether or not aftertouch data is recorded.
EDIT (page 82)
The following editing features are available.
- SONG CLEAR: Erase the recorded contents of all tracks.
- TRACK CLEAR: Erase the contents of a specific track.
- TRACK MERGE: Merge the recorded contents of two tracks and store in a third track.
• QUANTIZE: Correct the timing of the recorded performance.
• MEASURE ERASE: Erase the contents of specific measures. - MEASURE COPY: Copy the contents of specific measures.
• MEASURE DELETE: Delete specific measures.
• MEASURE INSERT: Insert measures at a specified point.
- VELOCITY CHANGE: Modify velocity data (how hard the keys are played).
PLAY (page 91)
Adjust the settings related to playback operation.
MEDLEY (page 92)
Specify medley playback of songs recorded on a disk.
Easy Record
Suppose you are playing your instrument, and you wish to record and play back your performance to hear how it sounds. You can bypass the set-up procedures of the full-scale sequencer and begin recording quickly and easily.
Recording procedure
- Set the desired sounds, effects, rhythms, etc.
- Press the EASY RECORD button to turn it on.
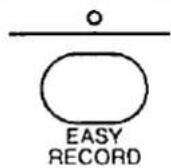
• The display changes to the following.
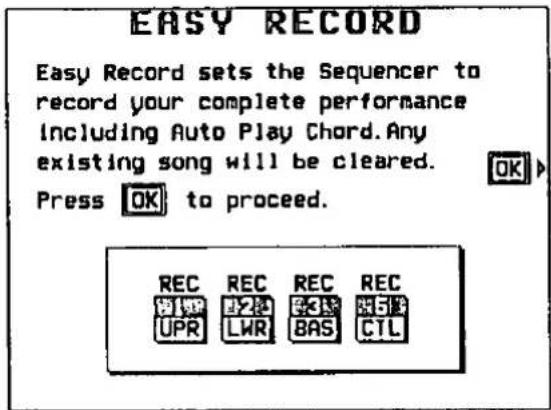
Note that when you select the EASY RECORD mode, the following settings are automatically effected.
• Tracks available for recording are selected as follows.
1: UPPER part (Record the upper keyboard performance.)
2: LOWER part (Record the lower keyboard performance.)
3: BASS part (Record the pedal keyboard performance.)
5: CONTROL part (Record rhythm changes, changes in the panel button status, etc.)
-
Press the OK button.
-
Note that when you press the OK button, the contents of all SEQUENCER tracks are erased (SONG CLEAR).
• The display changes to the REALTIME RECORD display. -
Begin your performance.
- Recording begins as soon as you start the rhythm or play a keyboard.
- When you have finished recording, press the EASY RECORD button to turn it off.
Playback
- Press the SEQUENCER RESET (FILL IN 1) button.
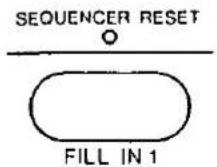
- Press the START/STOP button.
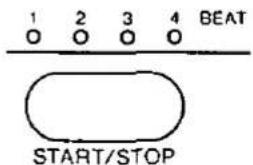
- Your recorded performance is played back automatically.
Sequencer parts
The SEQUENCER has 16 recording tracks. The track assignment and recorded contents are as outlined in the following table.
| Part(Recorded keyboard) | Used for | Recorded contents |
| UPPER SOUND 1 to 3[US1 to US3](Upper keyboard) | Recording the respectivekeyboard performance(realtime/step) | Keyboard note dataSelected sounds, volumesDIGITAL EFFECT, DSP EFFECT, SUSTAIN on/offAftertouch, knee lever on/off |
| LOWER SOUND 1 to 3[LS1 to LS3](Lower keyboard) | ||
| UPPER ORGAN [UOR](Upper keyboard) | Recording the ORGANpart performance(realtime/step) | Keyboard note dataTab settings, volumeTab tremolo, effect, SUSTAIN on/offEXTRA TAB settingsEXTRA TAB tremolo, effect on/off |
| LOWER ORGAN [LOR](Lower keyboard) | ||
| UPPER [UPR](Upper keyboard) | Recording all parts of therespective keyboardperformance(realtime/step) | Same as recorded contents of UPPER/LOWERSOUND 1 to 3, and UPPER/LOWER ORGAN, aboveORCHESTRAL CONDUCTOR statusGlide on/off |
| LOWER [LWR](Lower keyboard) | ||
| Part 8 to 15 [P8 to P15], (Upper keyboard) | Recording the respectivepart (realtime/step) | Selected sounds, volumeDIGITAL EFFECT, DSP EFFECT, SUSTAIN on/offAftertouch |
| BASS [BAS](Pedal, lower keyboard[full bass pedal]) | ||
| KEYBOARDPERCUSSION [KBP](Lower keyboard) | Recording the keyboardperformance using theKEYBOARDPERCUSSION(realtime/step) | Selected sound (drum kit), volume |
| CHORD [CHD](Lower keyboard) | Recording the chordprogression for theAUTO PLAY CHORD(step) | Chord progressionFILL IN 1, FILL IN 2, INTRO & ENDING on |
| RHYTHM [RHY] | Recording settings related to the rhythm (step) | • Rhythm settings and selection changes (including COMPOSER)• START/STOP, FILL IN 1, FILL IN 2, INTRO & ENDING on• Tempo setting |
| CONTROL [CTL] | Recording panel button settings and changes (realtime/step) | • Tab, SOUND 1, 2 and 3 sound settings, rhythm settings, volumes• Tab tremolo, effect• DIGITAL EFFECT, SUSTAIN on/off• DSP EFFECT on/off, type and depth setting• DIGITAL REVERB on/off• AUTO PLAY CHORD status• DYNAMIC ACCOMP on/off• MUSIC STYLE ARRANGER status• VARIATION on/off, FILL IN 1, 2, INTRO & ENDING• PANEL MEMORY settings• TRANSPOSE status• BACKGROUND SOUND setting• Tempo setting• CONDUCTOR, PART SELECT status• Knee lever, expression pedal operation• EXTRA TAB settings• ACCOMP PART on/off• KEYBOARD PERCUSSION on/off• TECHNI-CHORD on/off• Full bass pedal on/off |
- You can use the TRACK ASSIGN function to assign parts to tracks as you wish. (Refer to page 79.)
- During recording, the MEASURE count on the display corresponds to the time signature of the selected rhythm. However, if rhythm data is stored in the RHYTHM part and that part is played back, the MEASURE count on the display corresponds to the stored rhythm data.
■ Factory-preset track assignment
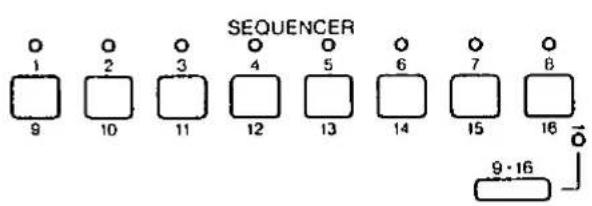
1: UPPER SOUND1
9: PART9
2: UPPER SOUND2
10: PART10
3: UPPER SOUND3
11: PART11
4: LOWER SOUND1
12: PART12
5: LOWER SOUND2
13: UPPER ORGAN
6: CHORD
14: LOWER ORGAN
7: BASS
15: RHYTHM
8: CONTROL
16: KEYBOARD
PERCUSSION
Realtime Record
With REALTIME RECORD, your performance is recorded with the timing exactly as you played it on the keyboard. And with multi-track recording, you can use up to 16 tracks to record your performance.
Recording
- Set the sounds, effects, volumes, etc. for the parts you are going to record.
- Press the SEQUENCER REC button to turn it on.
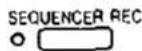
• The display looks similar to the following.
- Use the buttons below the display to specify the tracks for the parts you are going to record. (For details about track assignment, refer to pages 70 and 79.)
- Press the buttons to display "REC" above the track numbers you are going to record.
- For tracks 1 to 8, use the buttons, and for tracks 9 to 16 use the buttons to select the tracks.
- You can select two or more tracks to record at one time.
- At this time, the panel settings you selected in step 1 are stored.
- You can also use the SEQUENCER track buttons to select the tracks.

• . To select tracks 9 to 16, make your selection while pressing the 9-16 button.
• The indicator for the selected track button flashes slowly. (For tracks 9 to 16, the indicator flashes when the 9-16 button is pressed.)
-
Use the TEMPO/PROGRAM dial to adjust the tempo.
-
The tempo is shown on the display as a numerical value ( = ).
-
If you wish to record the tempo setting and tempo changes, record them in the CONTROL part, or use the RHYTHM STEP RECORD.
-
Turn the metronome on or off as desired with the ON or OFF button.
-
The metronome selection alternates between ON and OFF each time the button is pressed.
• The metronome sound is not recorded. -
Play the keyboard.
-
Recording begins.
- You can also press the START/STOP button to start the rhythm and begin recording.
- If the metronome is on, when you press the START/STOP button, a two-measure count plays, after which recording automatically begins. In this case, the rhythm does not start.
- On the display, the following information is shown.
MEASURE=: Current measure number
TIME SIG.=: Time signature
MEMORY=: Remaining memory (%)
- If you wish to adjust the volume of each track or part during recording, press the BALANCE button to recall the PART BALANCE display. You can then adjust the volumes.
- If you make a mistake in recording, you can correct a specific portion of your performance without having to redo the whole part. (Refer to page 89.)
- When you have finished recording, press the SEQUENCER REC button to turn it off.
Playback
- Turn on the track buttons for the parts you wish to play back.
- Tracks whose indicators are not lit will not be played back.
- Press the SEQUENCER RESET (FILL IN 1) button.
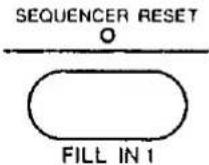
- The SEQUENCER returns to the beginning of the song and the beginning panel settings are recalled.
- Press the START/STOP button.
- The recorded performance is played back automatically.
Multi-track recording
When recording several tracks, you can record one track while listening to the track or tracks already recorded.
- Follow the procedure to record the first track.
- When you turn the SEQUENCER REC button off, confirm that the indicator for the track you recorded is lit. Turn on the buttons for the tracks you wish to have played back.
- Follow the procedure to record the next track.
- When the START/STOP button is turned on, the track recorded in step 1 is played back. You can record the next track in time with this.
-
On the display "REC" indicates tracks which are being recorded, and "PLAY" indicates tracks which are being played back.
-
Repeat step 2 to record all the desired parts.
Step Record
STEP RECORD is simply a method of making a tune by storing the sounds note-by-note on the display. Instead of playing the keyboards directly as in the REALTIME RECORD mode, you can take your time to input each single note. This is an especially effective method for storing complicated passages that are difficult to play or when the exact timing of a part is critical.
Recording procedure
Record the keyboard performance and panel changes.
- Press the STEP REC button to turn it on.
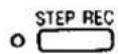
• The display looks similar to the following.
-
Use the buttons below the display to specify the tracks for the parts you are going to record.
-
For tracks 1 to 8, use the ∧ buttons, and for tracks 9 to 16, use the ∨ buttons to select the track.
- You can also use the SEQUENCER track buttons to select the track. In this case, to select tracks 9 to 16, make your selection while pressing the 9-16 button.
-
On the display, the selected track number is highlighted. Confirm that this is the correct track.
-
Press the OK button.
- The display changes to the STEP RECORD input display.

- If you selected the track to which the CHORD part has been assigned, the display changes to the CHORD STEP RECORD display. (Refer to page 76.)
- If you selected the track to which the RHYTHM part has been assigned, the display changes to the RHYTHM STEP RECORD display. (Refer to page 78.)
- Use the MEAS ∧ and ∨ buttons to select the measure.
-
This step is not necessary if you are recording from measure 1 of a blank track.
-
Use the CURSOR < and > buttons to move the cursor (reverse video box) to the note position (dot) you are going to store.
• Each dot represents one-eighth of a quarter-note (a thirty-second note).
- When storing triplets, it may not be possible to match the timing exactly with the 1/32-note steps. However, if you select triplet-type notes for the note length (LENGTH) in step 6 below, the timing is automatically corrected.
- Use the left LENGTH ∧ and ∨ buttons to specify the note value. Select from ♩3, ♩, ♩3, ♩, ♩3, ♩, ♩3, ♩, ♩, ♩, ♩, ♩ × 2 to 4. (A 3 denotes a triplet-type note.)
- For note values other than these, use the right LENGTH ∧ and ∨ buttons to specify the note value to be added to that which you specified with the left buttons.
Example: To record a dotted quarter-note ( ) +
- Use the PHRS ∧ and ∨ buttons to specify the actual length of the produced sound for the desired legato or staccato effect.
| TENU (tenuto): | Sound is produced for 100% of the note length. |
| NORM (normal): | 80% |
| STAC (staccato): | 50% |
| CUTT (cutting): | 25% |
- Specify the pitch and velocity of the note by playing the keyboard.
- The dot on the display where the note is stored changes to a * mark.
- When recording chords, you can store multiple notes at one position.
- Any panel setting changes—for example changes in the sound selection, button operation, etc.—are recorded at the cursor position.
REST
To store a rest, after specifying the note LENGTH, press the REST button. Points at which nothing is stored are read as rests.
ERS
If you make a mistake, move the cursor to the error, and after displaying the data you wish to erase, press this button.
BAL
To specify the volume at the cursor position, after pressing the BAL button, use the VALUE buttons to set the volume (0 to 127).
- Repeat steps 5 through 8 to continue storing notes.
- To input data on another track, press the EXIT button and repeat the procedure from step 4.
- When you have finished recording, press the STEP REC button to turn it off.
■ Correcting the data
-
In the STEP RECORD mode, specify the track you wish to correct.
-
Use the MEAS buttons to go to the measure you wish to modify. Use the CURSOR buttons to move the cursor to the point (*) you wish to edit.
- The data stored at that point is shown on the display.
- When multiple data is stored at one point, different data is displayed in order each time a CURSOR button is pressed. When a chord is recorded, a different note in the chord is displayed each time a CURSOR button is pressed.
- Correct the data.
There are three types of data:
Performance data
NOTE data (note pitch) and VEL data (how hard the key was played), etc. are displayed. Use the relevant buttons to correct the data as desired.
Sound data
The name of the sound is displayed. Change the sound as desired (the sound setting display is interposed on the current display).
Control data
The name of the function is displayed. Change the data as desired.
- Press the ERS button to erase the data which is displayed.
Store a chord progression
Store the chord progression for the AUTO PLAY CHORD in the track for the CHORD part. Then, when the AUTO PLAY CHORD is used during playback, even if you do not specify the chords with your left hand, the chords change automatically.
- The chord length is specified with the CHORD STEP RECORD keys of the lower keyboard.
Note value keys
Whole note
J. Dotted half-note
Half-note
!. Dotted quarter-note
! Quarter-note
Eighth-note
Reset key
I- Press to begin storing from the beginning.
Correction keys
◀ Move back one chord.
▶ Move forward one chord.
DELETE Press to erase data.
Repeat key
Press to end the chord-storing procedure and to specify automatic repeat playback of the stored progression.
End key
—Press after the whole chord progression has been stored.
■ Example of storing a chord progression
| C | C | F | G7 | C | Am |
| o | o | ♩ | ♩ | ♩ | ♩ |
- Press the STEP REC button to turn it on.
- Use the buttons below the display or SEQUENCER track buttons to select the track to which the CHORD part is assigned (the factory preset is 4).
- On the display, the track for the CHORD part (CHD) is highlighted. Confirm that this is the correct track.
- Press the OK button.
- The display changes to the CHORD STEP RECORD input display similar to the following.
- Use the MEAS ∧ and ∨ buttons to select the measure you wish to record.
- This step is not necessary if you are recording from measure 1 of a blank track.
- Store the chords on the lower keyboard.
While playing a C chord with your left hand, press the » key one time with your right hand.
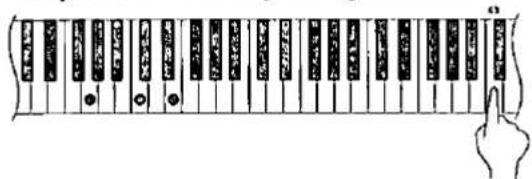
- A "beep" tone indicates that the chord has been successfully stored.
• The chord name is shown on the display.
(1) While playing an F chord, press the key one time.
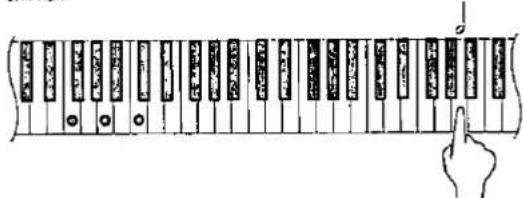
(2) While playing a G7 chord, press the key one time.
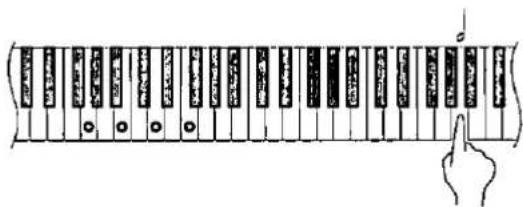
(1) While playing a C chord, press the ♩ key one time.
(2) While playing an Am chord, press the key one time.
- You can press the INTRO & ENDING button or a FILL IN button on the panel to store the desired pattern at the cursor position. (An intro can be stored only at the beginning.)
- Store a rest by pressing a note value key without specifying a chord.
-
Chords can also be specified with the one-finger method.
-
At the end of the chord progression, press the End key ( ——).
• The instrument exits the recording mode.
- During playback, playback of the recorded chord progression stops at this point. For automatic repeat playback of the chord progression, press the Repeat key (→) instead of the End key (—).
- If you press the INTRO & ENDING button instead of the End key ( —“ ), when you play back your performance, an ending pattern will be produced and then the performance will stop.
- When you play back the track for the CHORD part, the chords of the automatic accompaniment change in accordance with the stored chord progression.
☐ Correct the recorded chord progression
- Select CHORD STEP RECORD on the display.
- Use the MEAS ∧ and ∨ buttons to go to the measure you wish to modify. Use the ◀ and ▶ Correction keys to move the cursor to the point you wish to edit.
- The measure number, beat number, specified chord name, specified note length, and function (INTRO, FILL IN, etc.) are shown on the display.
- To move to the end of the chord progression, while pressing the Reset key ( |f_2- ), press the ◀ key.
• The lengths of rests are indicated as follows.
Example:
1-beat rest (quarter rest)
7....1/2-beat rest (eighth rest)
1 × 1 + 7 1 - 1 / 2 -beat rest
(dotted quarter rest)
1 × 10 10-beat rest
- Correct the chord data.
Chord data
When the chord name is displayed at the cursor position, you can press the DELETE key to erase the data and then store a new chord.
- If you do not erase the displayed data before entering the new chord data, the new data is inserted at this point, and the displayed data is merely shifted by the note value of the new chord.
- Rests can also be erased. Each time the DELETE key is pressed, the rest is erased in units of × 1 . The rest is erased last.
Control data
The name of the stored function (INTRO, FILL, etc.) is displayed. You can press the DELETE key to erase the data which is displayed.
TRACK CLEAR
To erase all data from the current track, press the TRACK CLR button, and then press the YES button on the confirmation display.
- If you wish to cancel the clear procedure, press the NO button.
Store a rhythm progression
Data for the rhythm progression can be stored by measures with the step recording method.
- The rhythm progression is recorded in the track for the RHYTHM part.
- Press the STEP REC button to turn it on.
- Use the buttons below the display or SEQUENCER track buttons to select the track to which the RHYTHM part is assigned (the factory preset is 6).
- On the display, the track for the RHYTHM part (RHY) is highlighted. Confirm that this is the correct track.
- Press the OK button.
- The display changes to the RHYTHM STEP RECORD input display similar to the following.
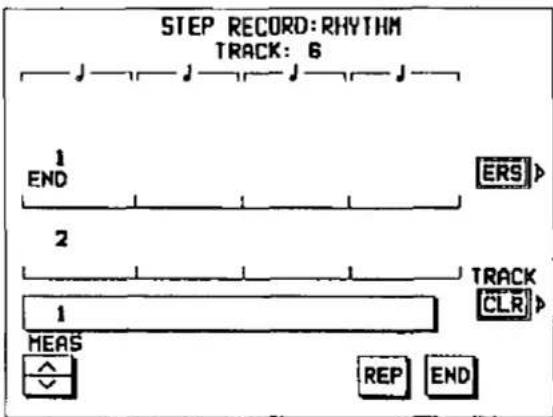
- Use the MEAS ∧ and ∨ buttons to select the measure you wish to record.
- This step is not necessary if you are recording from measure 1 of a blank track.
- Use the panel buttons to store the rhythm data.
• Data which can be stored
START/STOP
Changes in the rhythm selection
COUNT INTRO, INTRO, FILL IN, VARIATION, ENDING
Tempo changes
- Be sure to store the START/STOP data in the measure in which the rhythm starts.
-
If you are storing a COUNT INTRO or INTRO, store this data before the START/STOP data.
-
Repeat steps 4 and 5 to continue storing the rhythm progression.
- At the end of the rhythm progression, press the REP button or the END button.
REP: During playback, the recorded rhythm progression is repeated.
END: During playback, playback of the recorded rhythm progression stops at this point.
• The instrument exits the recording mode.
■ Correct the recorded rhythm progression
- Follow the procedure to select the RHYTHM STEP RECORD display.
- Use the MEAS ∧ and ∨ buttons to go to the measure you wish to modify.
-
Correct the rhythm data.
-
Press the ERS button to erase data at the cursor position.
- If you select a rhythm with a different time signature, the time signature of all subsequent measures will also change.
- If data has already been recorded in other tracks, you cannot select a rhythm with a different time signature.
■ TRACK CLEAR
To erase all data from the current track, press the TRACK CLR button, and then press the YES button on the confirmation display.
- If you wish to cancel the clear procedure, press the NO button.
Track Assign
Each SEQUENCER part is already assigned to a track number. However, you can use the TRACK ASSIGN function to assign parts to tracks as you wish. This function is also used to designate the tracks used for the rhythm data and chord progression data.
- Press the SEQUENCER button to turn it on.
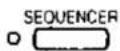
• The display looks similar to the following.
flowchart
graph TD
    A["PUNCH RECORD"] --> B["EDIT"]
    C["TRACK ASSIGN"] --> D["PLAY"]
    E["EXPRESSION SETTING"] --> F["MEDLEV"]
    G["AFTER TOUCH SETTING"] --> H["End"]
- On the SEQUENCER menu display, select TRACK ASSIGN.
• The display looks similar to the following.
- Use the TRACK ∧ and ∨ buttons to select the track.
- You can switch between the setting display for tracks 1 to 8 and the display for tracks 9 to 16 with the 1-8 and 9-16 buttons.
- Use the ASSIGN ∧ and ∨ buttons to select the part for the specified track.
- Select one of the following parts: UPPER, LOWER, BASS, CHORD, CONTROL, RHYTHM, KB.PERC, USOUND 1 to 3, UORGAN, LSOUND 1 to 3, LORGAN, PART8 to 15. (For an explanation of each SEQUENCER part, refer to page 70.)
- When a part other than the RHYTHM, CONTROL or CHORD part is assigned, the track assign procedure is completed at this point.
• The RHYTHM, CONTROL and CHORD parts cannot be assigned to more than one track. -
You can use the LOCAL ∧ and ∨ buttons to turn the LOCAL CONTROL on or off, and the CHANNEL ∧ and ∨ buttons to assign the BASIC CHANNEL. (For a detailed explanation of these MIDI functions, refer to pages 145 and 146.)
-
When assigning the RHYTHM, CONTROL or CHORD part, press the OK button.
- The confirmation display appears to warn you that currently stored data in the tracks concerned will be erased. Press the YES button to confirm that you wish to execute the specified track assignment. Or press the NO button to stop the track assignment.
Other recording settings you can adjust
These settings allow you to specify whether or not expression pedal and aftertouch data is recorded with your performance.
EXPRESSION SETTING
You can specify whether or not expression pedal operation data is recorded with your performance. And you can also specify whether the recorded expression pedal operation data is read when your performance is played back.
- Press the SEQUENCER button to turn it on.
- Select EXPRESSION SETTING.
• The display looks similar to the following.

- Select RECORD TO SEQUENCER. Use the EN/DIS ∧ and ∨ buttons to specify if the expression pedal performance is recorded.
ENABLE: The expression pedal operation data is recorded (factory-preset setting).
DISABLE: The data is not recorded.
- Select PLAY FROM SEQUENCER and use the EN/DIS ∧ and ∨ buttons to specify if the recorded expression pedal performance is played back.
ENABLE: The recorded expression pedal data is played back (factory-preset setting).
DISABLE: The data is not played back.
AFTER TOUCH SETTING
Specify for each keyboard (upper and lower) whether or not the aftertouch data is recorded with the performance.
-
Press the SEQUENCER button to turn it on.
-
Select AFTER TOUCH SETTING.
• The display looks similar to the following.
- Select UPPER KEYBOARD or LOWER KEYBOARD. Use the EN/DIS ∧ and ∨ buttons to specify if the aftertouch data is recorded.
ENABLE: Aftertouch data is recorded with the performance.
DISABLE: The data is not recorded (factory-preset setting).
- Repeat step 3 for the other keyboard, if desired.
- For an explanation of the aftertouch effect, refer to page 125.
Editing the recorded performance
The edit feature allows you to erase or change portions of your performance after it has been recorded.
Select the edit function
-
Press the SEQUENCER button to turn it on.
-
Select EDIT.
• The display looks similar to the following.
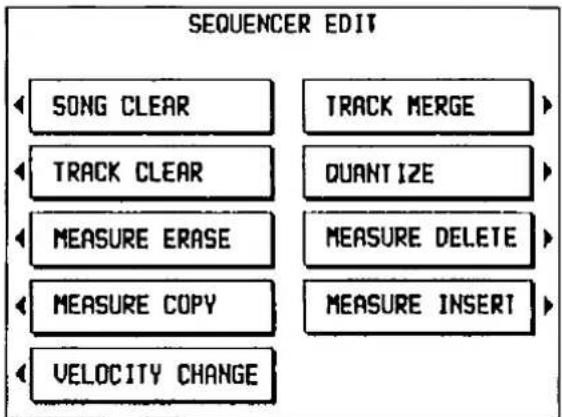
flowchart
graph TD
    A["SONG CLEAR"] --> B["TRACK MERGE"]
    C["TRACK CLEAR"] --> D["QUANTIZE"]
    E["MEASURE ERASE"] --> F["MEASURE DELETE"]
    G["MEASURE COPY"] --> H["MEASURE INSERT"]
    I["VELOCITY CHANGE"] --> J["End"]
- Select the function to edit.
- The display changes in accordance with your selection.
- Perform the editing procedures (explained in detail below).
- During the editing procedure, you can press the EXIT button to go back to the SEQUENCER EDIT display.
- During the editing procedure, if the indicator for the TEMPO/PROGRAM dial is lit, you can use the dial for the editing function.
SONG CLEAR
Erase the recorded contents of all tracks.
- Press the YES button to execute the function, or press the NO button to cancel the function.
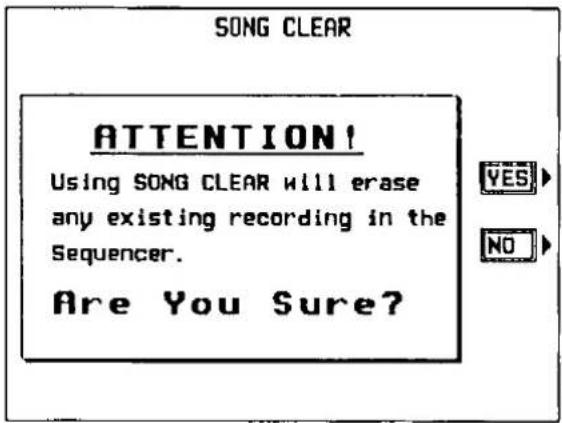
- When the data has been erased, "COMPLETED!" appears on the display, and the instrument returns to the normal performance mode.
TRACK CLEAR
Erase the contents of a specific track.
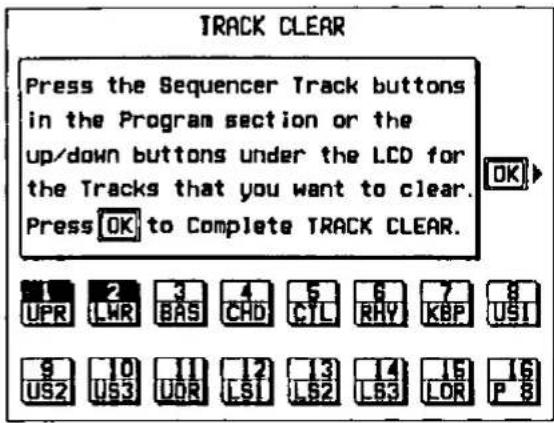
- Use the buttons below the display or the SE-QUENCER track buttons to select the track or tracks you wish to clear.
-
On the display, the selected tracks are highlighted.
-
Press the OK button.
• The following confirmation display appears.

- Press the YES button to execute the function, or press the NO button to cancel the function.
- When the data has been erased, "COMPLETED!" appears on the display.
TRACK MERGE
Merge the recorded contents of two tracks (source tracks) and store the merged contents in a third track (destination track).
- When the TRACK MERGE function is executed, the data is erased from the two source tracks.
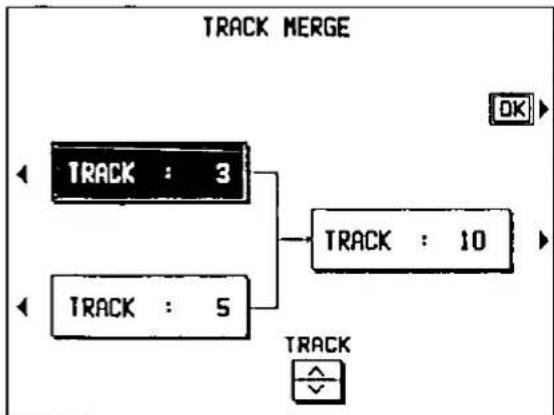
flowchart
graph TD
    A["TRACK : 3"] --> C["TRACK : 10"]
    B["TRACK : 5"] --> C["TRACK : 10"]
    D["OK"] --> C["TRACK : 10"]
    E["✓"] --> F["TRACK"]
-
Select the two source tracks (left half of the display).
-
Use the buttons on the left side of the display to select one of the source tracks, and use the TRACK ∧ and ∨ buttons to specify the track number. Repeat for the other source track.
-
This function does not work for the CONTROL, RHYTHM and CHORD tracks.
-
If the part assigned to the upper source track ("upper" meaning its position on the TRACK MERGE display) is different from the part assigned to the lower source track, when the parts are merged in the destination track, the new track is assigned the same part as the upper track.
- Select the destination track (right half of the display).
-
Press the button on the right side of the display to select the destination track, and use the TRACK ∧ and ∨ buttons to specify the track number.
-
Press the OK button.
- The confirmation display appears. Press the YES button to execute the function, or press the NO button to cancel the function.
QUANTIZE
The QUANTIZE function can correct the timing of your performance after it has been recorded. If the rhythm is slightly out of sync or inexact, it will automatically be corrected to the specified quantize level.
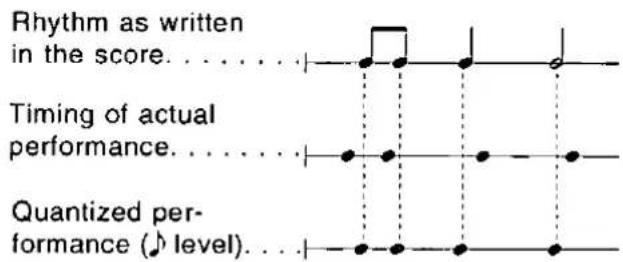
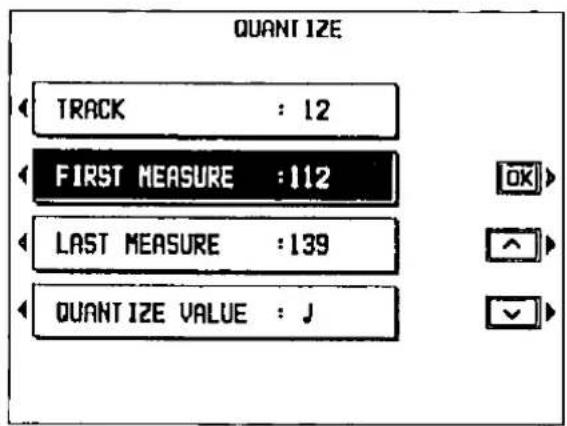
- Select TRACK. Use the ∧ and ∨ buttons to specify the track number.
- This function does not work for the CONTROL, RHYTHM and CHORD tracks.
-
If ALL is selected, all the tracks are quantized.
-
Select FIRST MEASURE. Use the ∧ and ∨ buttons to specify the start point (measure number).
-
Select LAST MEASURE. Use the ∧ and ∨ buttons to specify the end point (measure number).
-
Select QUANTIZE VALUE. Use the ∧ and ∨ buttons to specify the quantize level.
- Select from ♩3, ♩, ♩3, ♩, ♩3, ♩, ♩. (A 3 denotes a triplet-type note.)
- Press the OK button.
- The confirmation display appears. Press the YES button to execute the function, or press the NO button to cancel the function.
MEASURE ERASE
Erase the recorded contents of specific measures. You can also specify which type of data is to be erased.
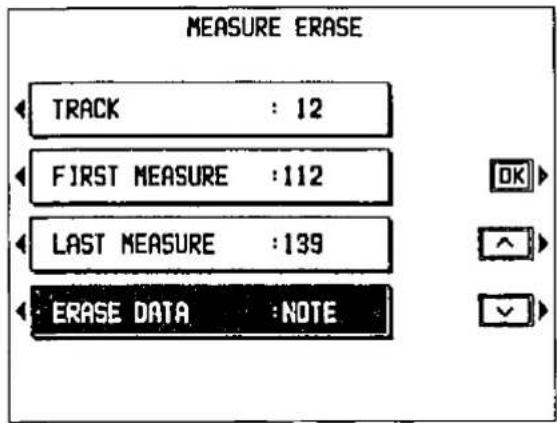
- Select TRACK. Use the ∧ and ∨ buttons to specify the track number.
- You cannot select the track for the RHYTHM part or CHORD part in which a repeat command has been stored.
- If ALL is selected, data is erased from the specified measures of all the tracks at one time.
- Select FIRST MEASURE. Use the ∧ and ∨ buttons to specify the start point (measure number).
- Select LAST MEASURE. Use the ∧ and ∨ buttons to specify the end point (measure number).
- Select ERASE DATA. Use the and buttons to specify the type of data to be erased.
ALL: All data is erased.
NOTE: Only note data.
CONTROL: Only control data (volume, effect and other panel settings as well as selection changes) is erased.
- Press the OK button.
- The confirmation display appears. Press the YES button to execute the function, or press the NO button to cancel the function.
MEASURE COPY
Copy measures from one track (source track) to another track (destination track).
- On the destination track, the new data replaces the current measure contents.
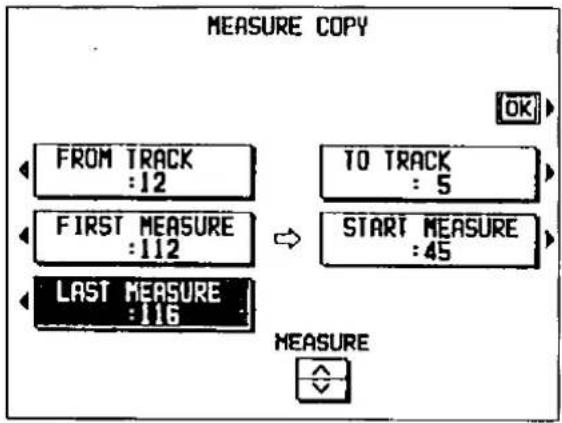
- Select FROM TRACK. Use the TRACK ∧ and ∨ buttons to specify the source track.
- You cannot select the track for the RHYTHM part or CHORD part in which a repeat command has been stored.
- If ALL is selected, the specified measures are copied to all tracks at the same time.
-
Select FIRST MEASURE. Use the MEASURE ∧ and ∨ buttons to specify the start point (measure number) on the source track.
-
Select LAST MEASURE. Use the MEASURE ∧ and ∨ buttons to specify the end point (measure number) on the source track.
-
Select TO TRACK. Use the ∧ and ∨ buttons to specify the destination track.
- Measures in a track for the CONTROL, RHYTHM or CHORD part can be copied only to the same track.
-
Select START MEASURE. Use the ∧ and ∨ buttons to specify the start point (measure number) on the destination track.
-
Press the OK button.
- The confirmation display appears. Press the YES button to execute the function, or press the NO button to cancel the function.
MEASURE DELETE
Delete specified measures from a track.
- The length of the performance accordingly decreases by the number of deleted measures.
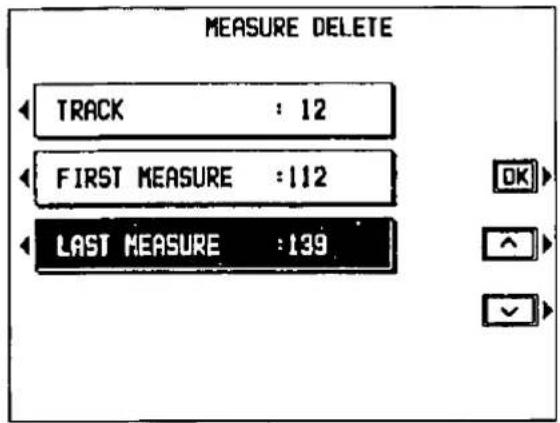
- Select TRACK. Use the and buttons to select the track from which measures are to be deleted.
- You cannot select a CHORD or RHYTHM track in which the repeat function has been stored.
- If ALL is selected, the specified measures are deleted from all the tracks at one time.
- Select FIRST MEASURE. Use the ∧ and ∨ buttons to specify the first measure to delete.
- Select LAST MEASURE. Use the ∧ and ∨ buttons to specify the last measure to delete.
- Press the OK button.
- The confirmation display appears. Press the YES button to execute the function, or press the NO button to cancel the function.
MEASURE INSERT
Insert specified-measures at a specified point.
- The length of the performance accordingly increases by the number of inserted measures.
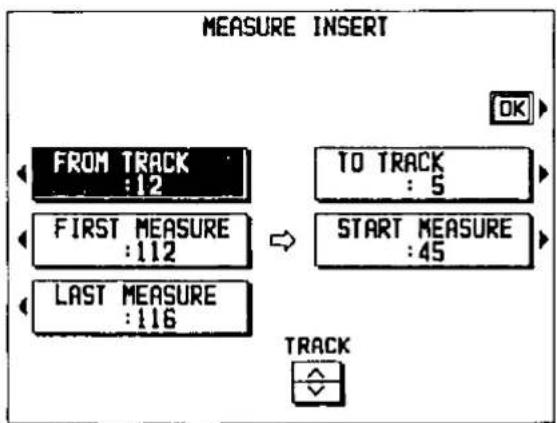
- Select FROM TRACK. Use the TRACK ∧ and ∨ buttons to select the source track.
- You cannot select a CHORD or RHYTHM track in which the repeat function has been stored.
-
If ALL is selected, the measures are inserted in all tracks at the same time.
-
Select FIRST MEASURE. Use the MEASURE ∧ and ∨ buttons to specify the first measure on the source track from which to copy.
-
Select LAST MEASURE. Use the MEASURE ∧ and ∨ buttons to specify the last measure on the source track from which to copy.
-
Select TO TRACK. Use the TRACK ∧ and ∨ buttons to specify the destination track.
- Measures from the CHORD, RHYTHM or CONTROL track can only be inserted in the same track.
-
Select START MEASURE. Use the MEASURE ∧ and ∨ buttons to specify the insert point on the destination track.
-
Press the OK button.
- The confirmation display appears. Press the YES button to execute the function, or press the NO button to cancel the function.
VELOCITY CHANGE
Modify the recorded velocity in specific measures of specific tracks (except for the CONTROL, RHYTHM and CHORD tracks).
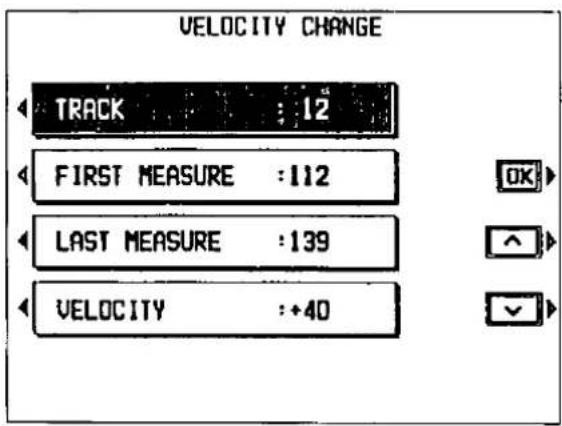
- Select TRACK. Use the and buttons to specify the track number.
• If ALL is selected, all the tracks are modified. - Select FIRST MEASURE. Use the ∧ and ∨ buttons to specify the start point (measure number) of the velocity change.
- Select LAST MEASURE. Use the ∧ and ∨ buttons to specify the end (measure number) of the velocity change.
- Select VELOCITY. Use the and buttons to specify the change in velocity (-127 to +127).
-
The value you select will be added to or deleted from the current velocity.
-
Press the OK button.
- The confirmation display appears. Press the YES button to execute the function, or press the NO button to cancel the function.

Punch record
If you make a playing error during REALTIME RECORD or would like to change the recording for some other reason, you can correct a selected portion of the performance without having to redo the whole part. "Punch in" means to enter the recording mode, and "punch out" means to exit it.
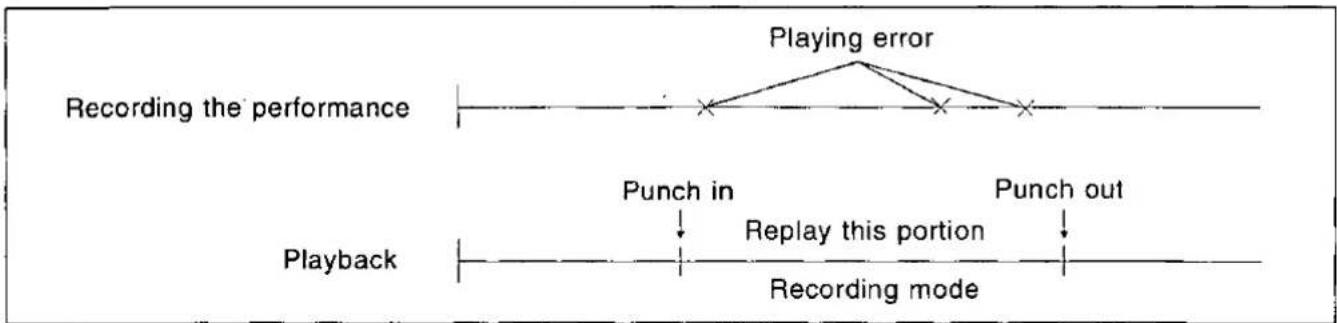
flowchart
graph TD
    A["Recording the performance"] --> B["Playing error"]
    B --> C["Punch in"]
    C --> D["Playback"]
    D --> E["Recording mode"]
    E --> F["Punch out"]
    style A fill:#f9f,stroke:#333
    style B fill:#ccf,stroke:#333
    style C fill:#cfc,stroke:#333
    style D fill:#fcc,stroke:#333
    style E fill:#cff,stroke:#333
- Press the SEQUENCER button to turn it on.
- Select PUNCH RECORD on the display.
• The display looks similar to the following.
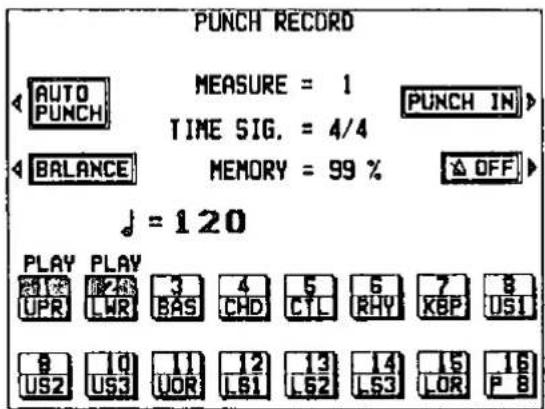
-
Select the tracks you wish to play back during punch recording.
-
Use the buttons below the display to display "PLAY" above the track numbers you are going to play back.
-
If you use the SEQUENCER track buttons to select the tracks, press the track buttons to turn the indicators on.
-
Select the track which contains the portion you want to correct.
- Use the buttons below the display to display "REC" above the track numbers you are going to record.
- If you use the SEQUENCER track buttons to select the tracks, press the track buttons to make the indicators flash.
- Press the START/STOP button to begin playback of the specified track.
-
During playback, press the PUNCH IN button at the point you want to begin recording.
-
Recording begins as soon as the button is pressed. Begin playing at this point.
- The PUNCH IN button switches to the PUNCH OUT button.
- Press the PUNCH OUT button at the point you want to stop recording.
• Recording stops immediately. - When you have finished correcting the performance, press the SEQUENCER button to turn it off.
- You can also begin punch-in recording by playing the keyboard. You can specify the punch-in/punch-out points with a foot switch. (Refer to page 125.)
■ AUTO PUNCH RECORD
You can set the punch-in and punch-out points beforehand, so that recording automatically begins and ends at the specified points.
-
On the SEQUENCER menu display, select PUNCH RECORD, and then select the track which contains the portion you want to correct.
-
Press the AUTO PUNCH button.
• The display looks similar to the following.
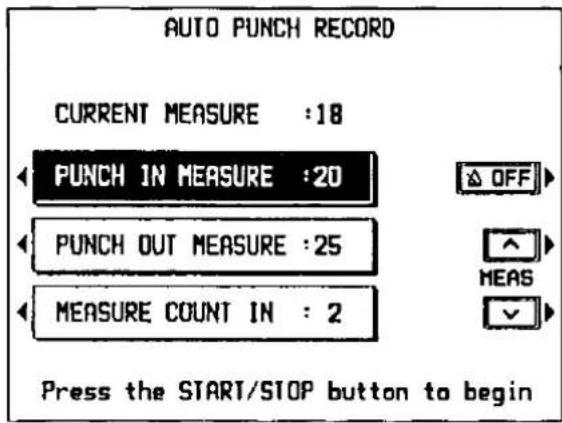
-
Select PUNCH IN MEASURE. Use the MEAS ∧ and ∨ buttons to specify the number of the punch-in measure.
-
Select PUNCH OUT MEASURE. Use the MEAS ∧ and ∨ buttons to specify the number of the punch-out measure.
-
The number of the PUNCH OUT MEASURE must be higher than the number of the PUNCH IN MEASURE.
-
The specified PUNCH OUT MEASURE is not recorded.
-
Select MEASURE COUNT IN. Use the MEAS ∧ and ∨ buttons to specify the number of lead-in measures you wish to have played back before the punch-in measure.
-
Playback will begin from the measure indicated by CURRENT MEASURE on the display.
-
Set the metronome to on or off with the ON or OFF button.
-
Press the START/STOP button.
- Playback begins from the measure specified in step 5.
-
Correct the performance.
-
The mode changes automatically to the recording mode at the specified punch-in measure. Begin playing at this point. The mode automatically changes back to the playback mode at the specified punch-out measure.
-
Note that, even when you have set the punch-in and punch-out measures, you can begin recording before the punch-in measure starts by playing the keyboard or pressing a foot switch to which the PUNCH IN/OUT function has been assigned.
-
When you have finished correcting the performance, press the SEQUENCER REC button to turn it off.
Playback from a specific measure
You can specify the measure from which you wish playback to begin.
-
Press the SEQUENCER button to turn it on.
-
Select PLAY on the display.
• The display looks similar to the following.
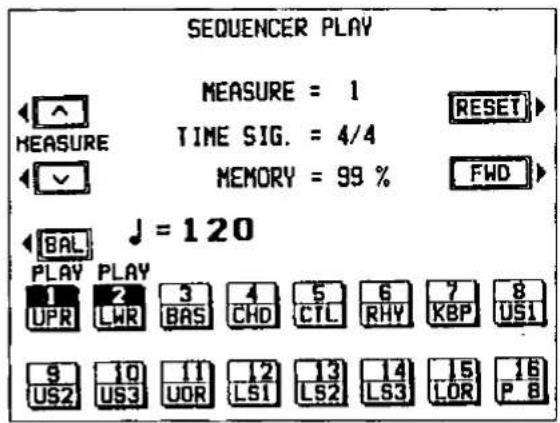
- Select the tracks you wish to have played back.
-
Use the MEASURE ∧ and ∨ buttons to specify the beginning measure of playback.
-
"MEASURE=" indicates the current measure number.
- You can quick-search for the desired measure while listening to the recorded performance by holding down the FWD button. (This button does not work during normal playback.)
- You can press the RESET button to return to the beginning of the first measure and recall the panel status which was in effect at the beginning of recording. (This button does not work during playback.)
-
If you wish to adjust the volume of each track, press the BAL button to recall the PART BALANCE display. You can then adjust the volumes.
-
Press the START/STOP button.
-
The recorded performance is played back from the specified measure.
- When playback is begun from a measure in which an INTRO, COUNT INTRO, FILL IN or ENDING is recorded, the corresponding function does not work.
- To stop playback, press the START/STOP button again.
- If the START/STOP button is pressed again, playback will continue from the point it was interrupted.
Sequencer Medley
You can have the songs on a disk played back continuously in order.
- Insert the disk into the Disk Drive.
- Press the SEQUENCER button to turn it on.
- Select MEDLEY on the display.
• The display looks similar to the following.
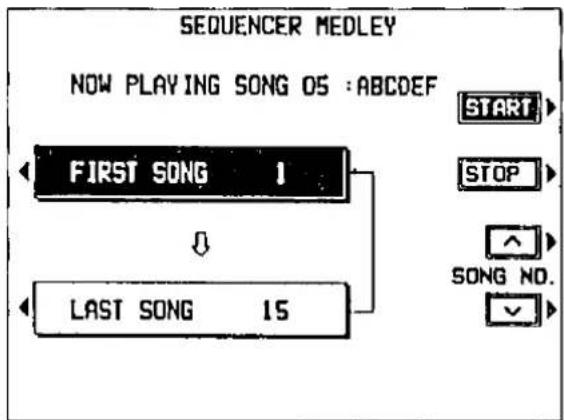
- Select FIRST SONG. Use the SONG NO. ∧ and ∨ buttons to specify the first song you wish to have played.
-
Select LAST SONG. Use the SONG NO. ∧ and ∨ buttons to specify the last song.
-
Press the START button.
-
The songs from the specified range are repeatedly played back in order.
- If you press the START/STOP button during medley play, the song currently playing will stop, and playback continues from the next recorded song on the disk.
- To stop medley play, press the STOP button.
-
Press the SEQUENCER button to turn it off.
-
Only data which has been saved in the Technics file format can be played in a medley performance
- The procedure for saving your SEQUENCER performances on a disk is explained in Part V: Disk Drive (page 103).
Outline of the Composer
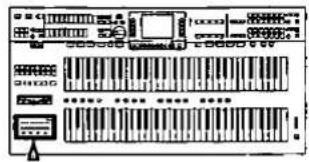
The COMPOSER enables you to create your own accompaniment patterns or to edit preset accompaniment patterns. Your original pattern is then stored in a memory and can be used just like the preset rhythms in the RHYTHM GROUP section.
Example of a rhythm pattern
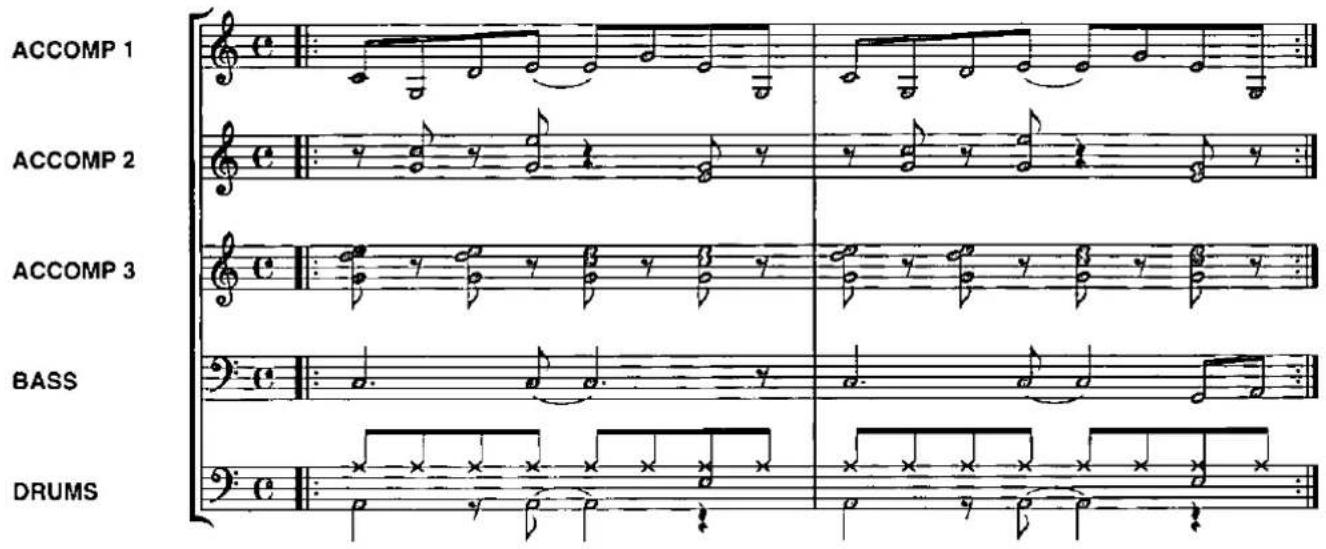
Components of a rhythm pattern
You can store up to 12 different rhythms (6 each in banks A and B).
• Each pattern is comprised of five parts: DRUMS, BASS, and ACCOMP 1, 2 and 3.
- When you set the COMPOSER mode to the EXPAND MODE, you can also create INTRO, FILL IN and ENDING patterns. (Refer to page 102.)
- The recorded contents can be saved on a disk for recall at a later time. (Refer to page 107.)
Two ways to record in the COMPOSER
There are two ways to create and record a rhythm.
Edit a preset rhythm
Use the COPY function to copy a preset rhythm to a MEMORY, change parts of it, and then store it as a new rhythm.
■ Create a completely new rhythm
Clear the memories and compose a completely new rhythm from scratch.
- You can use either or both of two recording methods. Realtime recording allows you to store your rhythm exactly as play it on the keyboard. But for difficult phrases, you may want to use the STEP RECORD mode to store the notes one by one, just as you might write a music score.
Memory capacity
Expressed in terms of notes, the total number of notes which can be stored in all the COMPOSER memories is about 8600. The remaining memory available for recording is shown on the RECORD display as a percentage (MEMORY=%).
- When "Memory full!" appears on the display, no more data can be stored in the COMPOSER.
- It is a good practice to save your completed rhythm patterns on disks before clearing any of the COMPOSER memories.
COMPOSER menu
When you press the COMPOSER button to turn it on, the display changes to the following.

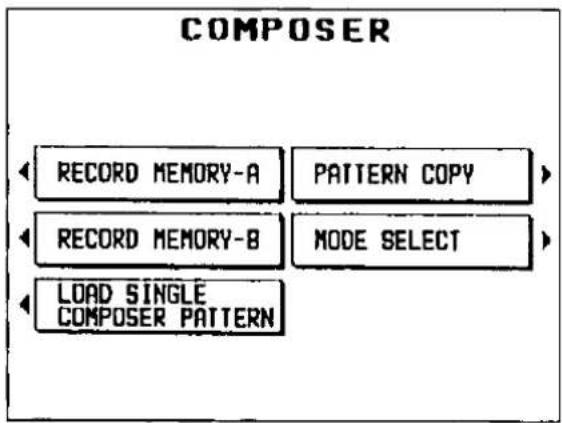
flowchart
graph TD
    A["RECORD MEMORY-A"] --> B["PATTERN COPY"]
    C["RECORD MEMORY-B"] --> D["MODE SELECT"]
    E["LOAD SINGLE COMPOSER PATTERN"] --> B
    E --> D
■ Summary of the COMPOSER menu items
RECORD MEMORY-A (page 95)
Create rhythm patterns in the COMPOSER A bank.
RECORD MEMORY-B (page 95)
Create rhythm patterns in the COMPOSER B bank.
MODE SELECT (page 102)
Specify whether or not you are making your own INTRO, FILL IN and ENDING patterns.
PATTERN COPY (page 95)
Copy a rhythm pattern into a memory.
LOAD SINGLE COMPOSER PATTERN
Recall the desired COMPOSER data from data saved on a disk.
- The items on this menu are also on the DISK DRIVE menu, and the procedures are the same. (Refer to page 109.)
Setting up to create a rhythm pattern
First decide whether you are going to "Edit a preset rhythm pattern" or "Create a completely new rhythm." Below are the instructions for preparing to edit a preset rhythm pattern. If you are going to create a completely new rhythm pattern, follow the instructions on page 96.
Edit a preset rhythm pattern
- On the COMPOSER menu display, select PATTERN COPY.
• The display looks similar to the following.
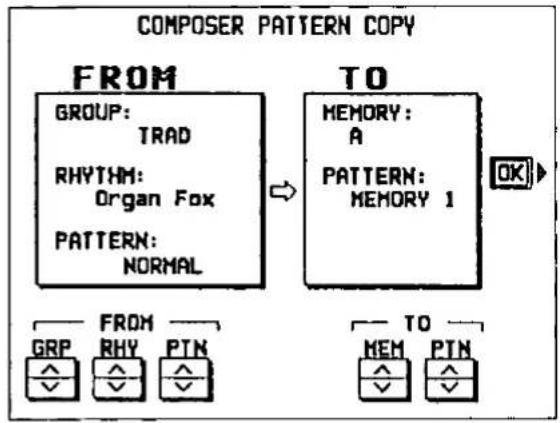
flowchart
graph LR
    A["FROM GROUP: TRAD"] --> B["TO MEMORY: A PATTERN: MEMORY 1"]
    B --> C["OK"]
    D["FROM GRP"] --> E["RHY PTN"]
    E --> F["TO MEM PTN"]
-
Select a rhythm group, name and pattern to copy (FROM).
-
Use the GRP ∧ and ∨ buttons to specify the rhythm group.
- Use the RHY ∧ and ∨ buttons to specify the rhythm name.
- Use the PTN ∧ and ∨ buttons to specify the rhythm pattern (NORMAL, INTRO, FILL IN 1, FILL IN 2, ENDING, VARIATION, FILL IN 1, VARI or FILL IN 2, VARI).
-
You can also select the rhythm group and rhythm name with the panel buttons.
-
Select a memory bank and pattern name to copy to (TO).
-
Use the MEM ∧ and ∨ button to specify the memory bank (A or B).
- Use the PTN ∧ and ∨ buttons to specify the pattern (MEMORY 1 to 12, FILL IN 1, FILL IN 2, INTRO or ENDING).
- Press the OK button.
-
When copying has been successfully completed, "COPY COMPLETED!" appears on the display.
-
Press the EXIT button.
- On the COMPOSER menu display, select the bank to which you copied the rhythm pattern (the memory bank you selected in step 3).
- Select RECORD MEMORY-A or RECORD MEMORY-B.
• The display looks similar to the following.
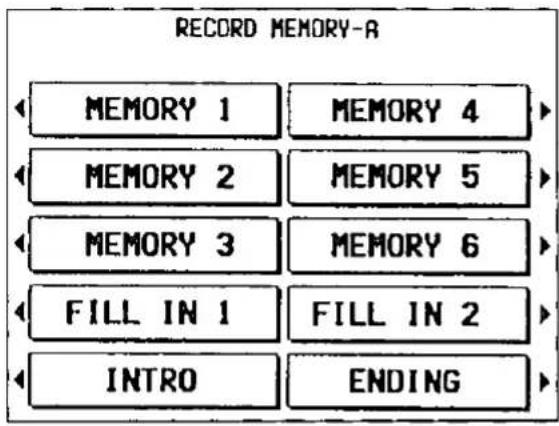
- Select the pattern name to which you copied the pattern (the pattern name you selected in step 3).
• The display looks similar to the following.
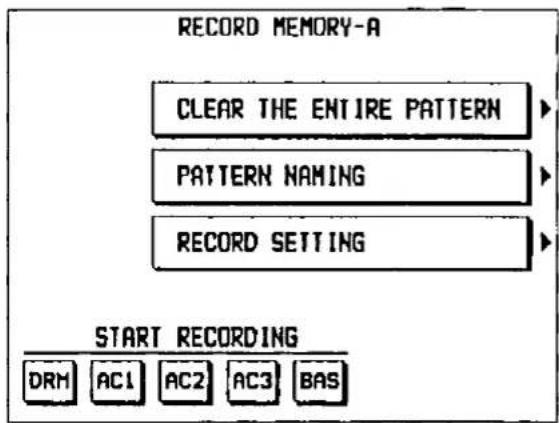
-
If you wish to name your new rhythm pattern, select PATTERN NAMING.
-
FILL IN, INTRO and ENDING patterns cannot be named.
- If you do not input a name for your rhythm pattern, the name becomes the same as the original rhythm from which you copied.
• The display looks similar to the following.
![RECORD MEMORY-A: PATTERN NAMING Please enter the name of your new pattern DANCE6 A B C D E F G H I J K L M N O P Q R S T U V W X Y Z a b c d e f g h i j k l m n o p q r s t u v w x y z 0 1 2 3 4 5 6 7 8 9 l " # S x & ' ( ) + - * / = . . 0 : : ? ¥ ^ _ ' 1 → ← < > [ ] ( ) POSITION ABC...1( ) < > < > CLR A/a](/content/2026/05/1069939/images/3f6f32231d97f9cec4f4dd31a5abd11c8f815c3a46abaeb5dbc54de7f636ab36.jpg)
-
Type a new name for your rhythm pattern (up to 13 characters).
-
Use the POSITION < and > buttons to highlight the character position in the name box. Use the ABC ... ] { } < and > buttons to select the character. Repeat these steps to type the whole name.
• To erase the name, press the CLR button. -
Use the A/a button to switch between upper case and lower case characters.
-
Press the EXIT button.
• The display returns to the previous display.
- In the START RECORDING area on the display, select the rhythm part you want to record first.
DRM: DRUMS
AC1: ACCOMP 1
AC2: ACCOMP 2
AC3: ACCOMP 3
BAS: BASS
- The pattern you copied and the metronome sound start, and recording begins. (Refer to page 99.)
Create a completely new rhythm
Here are the preparatory steps to compose a completely new rhythm from scratch.
- On the COMPOSER menu display, select a bank in which to record the rhythm.
- Select RECORD MEMORY-A or RECORD MEMORY-B.
• The display looks similar to the following.
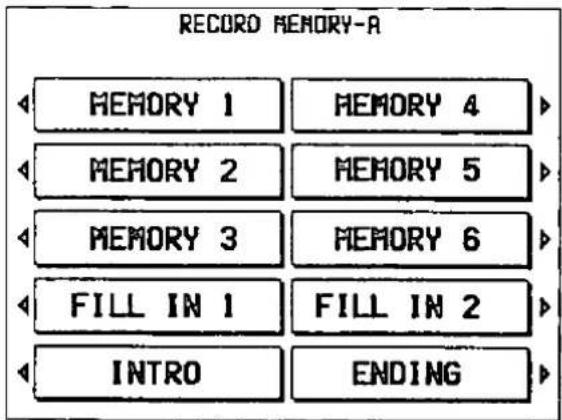
- Specify the pattern you are going to create.
• The display looks similar to the following.
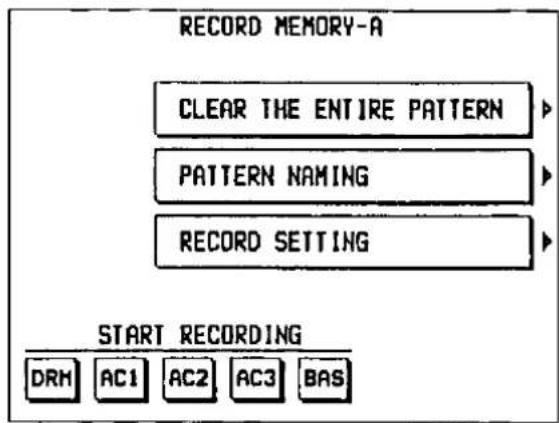
- Press the CLEAR THE ENTIRE PATTERN button.
- The following confirmation display appears. Press the YES button to execute the function, or press the NO button to cancel the function.
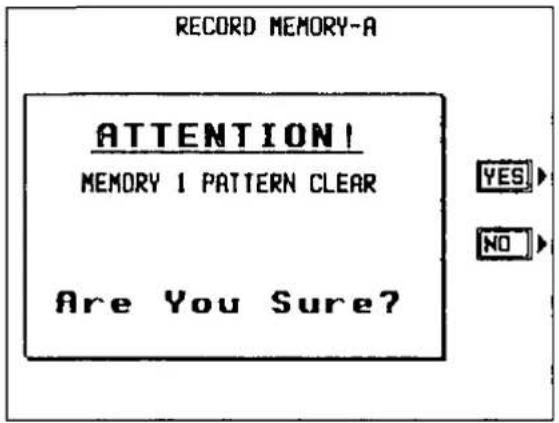
-
Select PATTERN NAMING.
-
FILL IN, INTRO and ENDING patterns cannot be named.
• The display looks similar to the following.
![RECORD MEMORY-A: PATTERN NAMING Please enter the name of your new pattern Clear A B C D E F G H I J K L M N O P Q R S T U V W X Y Z a b c d e f g h i j k l m n o p q r s t u v w x y z 0 1 2 3 4 5 6 7 8 9 i " s x & ' ( ) + - * / = . . 0 : : ? ¥ ^ _ ' i - ← < [ ] ( ) POSITION ABC···( ) < > < > CLR A/q](/content/2026/05/1069939/images/442d95c8cf5911fec5c85b836c458d3166ebf3b4ac52b1a87830363ea7568ead.jpg)
-
Type a name for your rhythm pattern (up to 13 characters).
-
Use the POSITION < and > buttons to highlight the character position in the name box. Use the ABC ... ] { } < and > buttons to select the character. Repeat these steps to type the whole name.
• To erase the name, press the CLR button. -
Use the A/a button to switch between upper case and lower case characters.
-
Press the EXIT button.
• The display returns to the previous display. - Adjust the various recording settings. (Refer to the following section on "Recording settings.")
- When all the settings have been completed, press the EXIT button.
• The display returns to the previous display. - In the START RECORDING area on the display, select the rhythm part you want to record first.
DRM: DRUMS
AC1: ACCOMP 1
AC2: ACCOMP 2
AC3: ACCOMP 3
BAS: BASS
- The metronome sound starts, and recording begins. (Refer to page 99.)
Recording settings
Press the RECORD SETTING button.
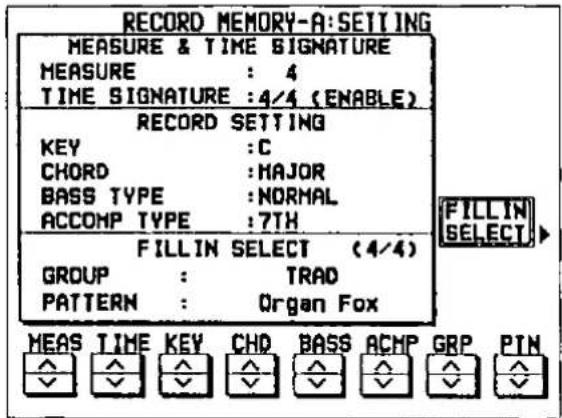
■ MEASURE & TIME SIGNATURE
MEASURE
Use the MEAS ∧ and ∨ buttons to specify the number of measures in your repeating pattern (1 to 8).
TIME SIGNATURE
Use the TIME ∧ and ∨ buttons to specify the time signature (1/4 to 8/4).
- These settings can be adjusted only when the pattern was cleared by the CLEAR THE ENTIRE PATTERN function.
■ RECORD SETTING
KEY
Use the KEY ∧ and ∨ buttons to specify the root note of the chords you wish to record.
CHORD
Use the CHD ∧ and ∨ buttons to specify the type of chord you wish to record (MINOR or MAJOR).
BASS TYPE
Use the BASS ∧ and ∨ buttons to specify the type of phrase progression for the BASS part (NORMAL or 7TH).
ACCOMP TYPE
Use the ACMP ∧ and ∨ buttons to specify to type of phrase progression for the ACCOMP parts (NORMAL or 7TH).
■ FILL IN SELECT
You can select fill-in, intro and ending patterns from a preset rhythm pattern. These preset patterns are produced when a FILL IN button or the INTRO & ENDING button is pressed during playback of your new rhythm pattern.
GROUP
Use the GRP ∧ and ∨ buttons to specify the rhythm group.
PATTERN
Use the PTN ∧ and ∨ buttons to specify the rhythm name.
- This setting is effective only when the COMPOSER mode is set to the NORMAL MODE. (Refer to page 102.)
- If you changed the settings in the FILL IN SELECT area on the display, press the FILL IN SELECT button. When the settings have been successfully stored, "COPY COMPLETED!" appears on the display.
- You cannot select a rhythm with a time signature different from that of the TIME SIGNATURE you specified.
Record your rhythm pattern
Store each part of the rhythm pattern as you perform it on the keyboard.
Recording procedure
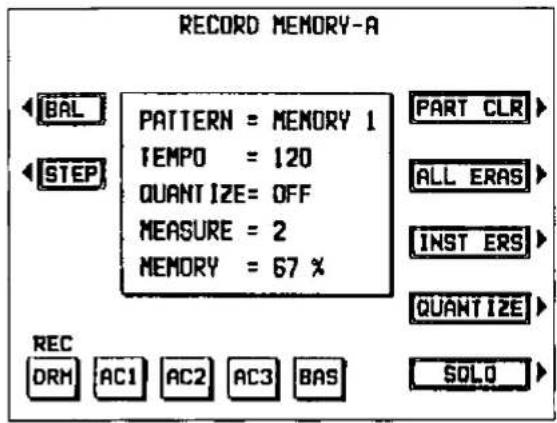
- Adjust the tempo.
- The tempo can be freely adjusted when you play back the rhythm pattern, so record at the tempo which is easiest for you to play.
-
Select the sound.
-
For the DRUMS part, select sounds from the KEYBOARD PERCUSSION sound group.
- For the ACCOMP 1, ACCOMP 2, and ACCOMP 3 parts, select sounds from the LOWER SOUND GROUP. For the BASS part, select sounds from the BASS PEDALS sound group.
- Only one sound can be selected for each part, and it cannot change in the middle of the pattern.
■ The display during recording BAL
If you wish to adjust the volume of each part during recording, press the BAL button. The PART BALANCE display appears. Adjust the volume of each part.
STEP
When you press this button, the display changes to the STEP RECORD display, on which you can store the notes one by one. (Refer to page 100.)
PART CLR
Press this button if you wish to erase all recorded contents of the currently selected part.
ALL ERAS
The performance recorded in the selected part is erased for as long as this button is pressed.
- Record the part on the lower keyboard.

- The specified number of measures are repeatedly played back, during which time any newly played notes are added to those already recorded. The current measure number is shown on the display as "MEASURE="
- Record the performance in C major for correct chord progressions during playback. To record the performance in a different scale, specify a KEY and CHORD when you adjust the recording settings (page 98).
- The SUSTAIN on/off is also recorded (except for the DRM part).
- When you have finished recording one part, use the part buttons below the display to select the next part to record.
- Repeat steps 1 through 4 to record all the parts of the rhythm.
- If you wish to continue creating other patterns, press the EXIT button to go back to the pattern selection display.
- When you have finished recording the rhythm, press the COMPOSER button to turn it off.
INST ERS
When the DRM part is selected, the DRM part can be cleared instrument by instrument. Hold down this button and specify the instrument sound to be deleted by pressing the corresponding instrument key on the keyboard, after which only the specified instrument will be erased for as long as this button is kept pressed.
QUANTIZE
Set the desired quantize level to smooth out any unevenness in the timing of your performance. Each time this button is pressed, the indicated level changes. The quantize level is shown as "QUANTIZE=" . Select from ♩3, ♩, ♩3, ♩, ♩3, ♩, ♩ (A 3 denotes a triplet-type note.)
SOLO
When you press this button while you are recording, only the part which is currently being recorded is played back. When SOLO is on, a MUTE mark is shown above the other part names on the display.
- To turn off the SOLO function, press this button again.
■ Maximum simultaneous tones
The maximum number of notes which can sound simultaneously for each part is 8. Even if you record more notes at one timing, only 8 are produced when the pattern is played back.
Playback
- In the RHYTHM GROUP section, select the bank in which the desired rhythm is stored (COMPOSER A or COMPOSER B).
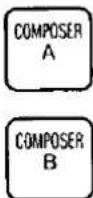
- The list of available rhythms is shown on the display.
- Select the desired rhythm from the list on the display.
- Press the START/STOP button.
• The DRUMS part begins to play back.
• The BASS and ACCOMP parts are played back when you use the AUTO PLAY CHORD.
Step Record
Use STEP RECORD to store the notes one-by-one on the display. This is a convenient way to store complicated patterns that are difficult to play.
Recording procedure
- While you are recording, press the STEP button.
- The display changes to the STEP RECORD display similar to the following.
- Use the MEAS buttons to select the measure you wish to record.
-
This step is not necessary if you are recording from measure 1 of a blank part.
-
Use the CURSOR < and > buttons to move the cursor to the note position (dot) you are going to store.
• Each dot represents one-eighth of a quarter-note (a thirty-second note). - When storing triplets, it may not be possible to match the timing exactly with the 1/32-note steps. However, if you select triplet-type notes for the note length (LENGTH) in step 4 below, the timing is automatically corrected.
- Use the left LENGTH ∧ and ∨ buttons to specify the note value. Select from ⌘3, ⌘, ⌘3, ⌘, ⌘3, ⌘, ⌘3, ⌘, ⌘3, ⌘, ⌘, ⌘, ⌘, ⌘, ⌘ × 2 to 4. (A 3 denotes a triplet-type note.)
- For note values other than these, use the right LENGTH ∧ and ∨ buttons to specify the note value to be added to that which you specified with the left buttons.
Example: To record a dotted quarter-note (!.)
$$ \text { ! } + \text { ♩ } $$
- Use the PHRS ∧ and ∨ buttons to specify the actual length of the produced sound for the desired legato or staccato effect.
TENU (tenuto): Sound is produced for 100% of the note length.
NORM (normal): 80%
-
Specify the pitch and velocity of the note by playing the keyboard.
-
The dot on the display where the note is stored changes to a * mark.
- When recording chords, you can store multiple notes at one position.
REST
To store a rest, after specifying the note LENGTH, press the REST button.
- Points at which nothing is stored are read as rests.
ERS
If you make a mistake, move the cursor to the error, and after displaying the data you wish to erase, press this button.
- Repeat steps 3 through 6 to continue storing notes.
• To record a different part, use the PART buttons to select another part.
- You may decide to record one part in realtime and another part in the STEP RECORD mode. You can easily switch between the two modes any time during recording. To return to the realtime recording display while in the STEP RECORD mode, press the EXIT button.
Correcting the data
- In the STEP RECORD mode, specify the part you wish to correct.
- Use the MEAS buttons to go to the measure you wish to modify. Use the CURSOR buttons to move the cursor to the point you wish to edit.
- The data stored at that point is shown on the display.
- When a chord is recorded, a different note in the chord is displayed each time a CURSOR button is pressed.
- Correct the data.
Performance data
NOTE data (note pitch) and VEL data (how hard the key was played), etc. are displayed. Use the relevant buttons to correct the data as desired.
Sound data
The name of the sound is displayed. Change the sound as desired (the sound setting display is interposed on the current display).
- Press the ERS button to erase the data which is displayed.
Composer Mode
Two playback modes are available for you to choose from. If you wish to use the intro, fill-in and ending patterns from a preset rhythm when you play back your new rhythm pattern, select NORMAL MODE. For creating and playing back your original intro, fill-in and ending patterns, select EXPAND MODE.
- On the COMPOSER menu display, select MODE SELECT.
• The display changes to the following.
- Use the buttons to the left of the display to select the mode.
NORMAL MODE
When a FILL IN button or the INTRO & ENDING button is pressed during playback, the corresponding pattern for a preset rhythm is played back. The rhythm which is played back is the one you specified for FILL IN SELECT on the RECORD SETTING display (page 98).
EXPAND MODE
When a FILL IN button or the INTRO & ENDING button is pressed during playback, the corresponding pattern you created is played back.
- Only one each FILL IN 1, FILL IN 2, INTRO and ENDING pattern can be created for each of the two banks (COMPOSER A and COMPOSER B). The fill-in patterns, etc. for each bank are used for all the basic rhythms in the same bank.
flowchart
graph TD
    A["MEMORY 1"] --> B["NORMAL MODE"]
    C["MEMORY 2"] --> B
    D["MEMORY 3"] --> B
    E["MEMORY 4"] --> B
    F["MEMORY 5"] --> B
    G["MEMORY 6"] --> B
    H["• INTRO\n• FILL IN 1\n• FILL IN 2\n• ENDING"] --> I["EXPAND MODE"]

flowchart
graph LR
    A["MEMORY 7"] --> B["INTRO"]
    C["MEMORY 8"] --> B
    D["MEMORY 9"] --> B
    E["MEMORY 10"] --> B
    F["MEMORY 11"] --> B
    G["MEMORY 12"] --> B
    H["NORMAL MODE"] --> I["EXPAND MODE"]
    J["FILL IN 1"] --> K["• INTRO"]
    L["FILL IN 2"] --> M["• INTRO"]
    N["ENDING"] --> O["• INTRO"]
The Disk Drive enables you to store COMPOSER memories and SEQUENCER data etc. for future use.
Internal memory and Disk Drive
The storable internal memory is fixed at a limited capacity, but this external memory device expands the storable memory infinitely.
You may choose to store only SEQUENCER or COMPOSER data, for example, and you can specify exactly what kind of data you wish to load into your instrument's memory from the disk.
- You can use 3.5 inch 2DD or 2HD disks; however, 2HD disks formatted as 2DD cannot be used.
- Specific formats are handled as follows.
| SAVE | LOAD | ||
| TECHNICS File FORMAT | ○ | ○ | |
| Standard MIDI File | FORMAT 0 | ○ | ○ |
| FORMAT 1 | × | ○ | |
FORMAT 0: There is one track on the disk, and it contains the 16 MIDI channels.
FORMAT 1: There is an unlimited number of tracks on the disk, each of which can contain the 16 MIDt channels.
Technics: Maximum 20 files
SMF: Maximum 40 performances
■ Playback of commercial software
Disks recorded using the Disk Drive of this instrument can, of course, be played back on your organ. But this instrument also reads song data from disks recorded in the Standard MIDI File format, enabling you to play commercial song disks on this instrument. In addition, by saving this instrument's SEQUENCER data in the Standard MIDI File format, you can play it back on an external sequencer.
About Standard MIDI Files
"Standard MIDI File" is a standardized format which makes it possible for music data to be exchanged among different sequencers. Data stored in this format on sequencers of different models can be played back on this instrument, and vice versa.
- Only files with the ".MID" extension can be loaded.
- No more than 128 KB of data can be loaded into this instrument.
Warning: Standard MIDI Files ensure the compatibility of data such as key on, key off, velocity, program number. It does not guarantee 100% faithful reproduction of recorded music which is replete with such data. For exact playback of music, it may be necessary to perform extensive adjustments of all the sound generator settings. As you the listener are the ultimate judge of what sounds best, you should perform such adjustments to your satisfaction.
Main parts of the Disk Drive
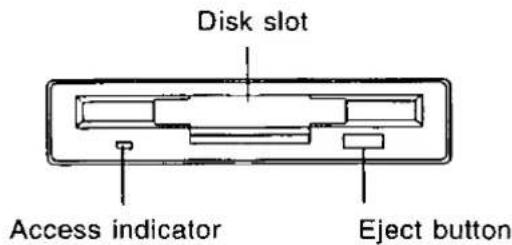
Outline of procedure
- Press the DISK DRIVE button to turn it on.
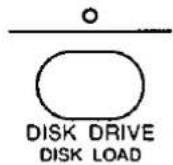
• The display changes to the following.
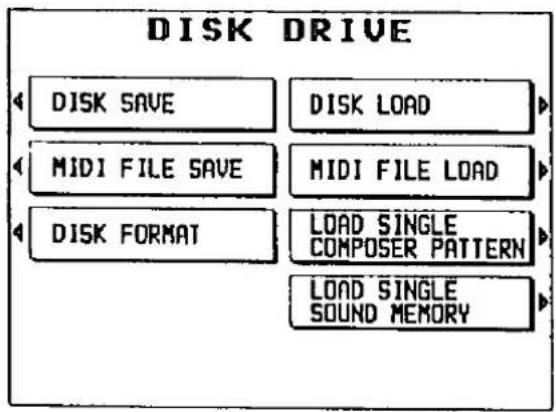
flowchart
graph TD
    A["DISK SAVE"] --> B["MIDI FILE SAVE"]
    B --> C["DISK FORMAT"]
    D["DISK LOAD"] --> E["MIDI FILE LOAD"]
    E --> F["LOAD SINGLE COMPOSER PATTERN"]
    F --> G["LOAD SINGLE SOUND MEMORY"]
Eject button
Press to remove the disk from the Disk Drive.
Access indicator
Lights when data is being loaded from or saved to a disk.
- To prevent data loss, do not remove the disk from the Disk Drive or turn off the power when the access indicator is lit.
DISK SAVE (page 107)
Save data from your instrument's memory to a disk.
DISK LOAD (page 105)
Load data from a disk into your instrument's memory.
MIDI FILE LOAD (page 106)
Load song data which was stored in the Standard MIDI File format into your instrument's memory.
MIDI FILE SAVE (page 108)
Save data from your instrument's memory in the Standard MIDI File format to a disk.
DISK FORMAT (page 106)
Format new disks or erase the contents of recorded disks so they can be used by this instrument.
LOAD SINGLE COMPOSER PATTERN
(page 109)
Load COMPOSER data from a disk into a specified memory number.
LOAD SINGLE SOUND MEMORY (page 110)
Load SOUND data from a disk into a specified memory number.
- Select the desired menu and follow the procedures on the corresponding display.
- Press the EXIT button to go back to the previous display. To go to another menu, use the EXIT button to go back to the menu display.
- When the TEMPO/PROGRAM indicator is lit, it indicates that the dial is available for setting the current function.
- When you have finished setting the functions, press the DISK DRIVE button to turn it off.
Loading data
Recall (load) the data from the disk to your instrument's memories. Please note that the load procedure causes any data which is currently stored in the relevant memories to be erased.
DISK LOAD
- Insert the disk with the stored data into the Disk Drive. Push it all the way in until you hear a click.
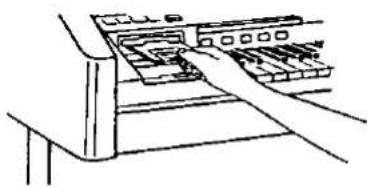
natural_image
Line drawing of a hand inserting into a rack of electronic components (no text or symbols)- On the DISK DRIVE menu display, select DISK LOAD.
• The display looks similar to the following.
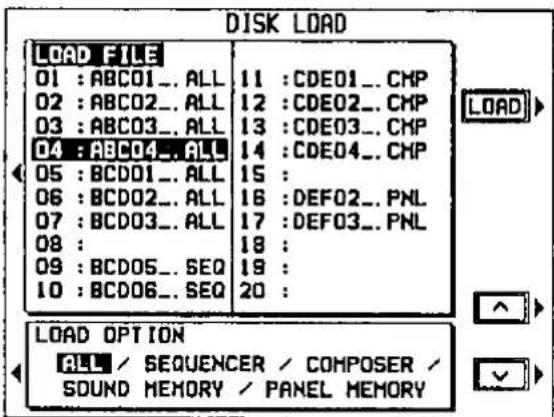
- Select the number of the song file to load.
- Select the LOAD FILE box, and then use the and buttons to select the number.
- Files in which data is currently stored are indicated by the file name following the file number.
- Specify the kind of data you wish to load from the disk to your instrument.
- Select the LOAD OPTION box, and then use the and buttons to specify the data.
- The OPTION which was specified during the SAVE procedure is automatically selected. Skip this step if you do not wish to change the selection. (Refer to page 107.)
- Select from ALL, SEQUENCER, COMPOSER, SOUND MEMORY and PANEL MEMORY.
- Press the LOAD button.
• The DISK LOAD operation begins.
- When the operation has been successfully completed, "COMPLETED!" is shown on the display.
- If song data was loaded, you can press the START/STOP button to begin playback.
You can also access the DISK LOAD display by pressing the DISK DRIVE button for a few seconds.
MIDI FILE LOAD
Data which has been saved in the Standard MIDI File format can be loaded into this instrument's SEQUENCER.
- Insert the disk on which data is saved in Standard MIDI File format into the Disk Drive.
- On the DISK DRIVE menu display, select MIDI FILE LOAD.
• The display looks similar to the following.
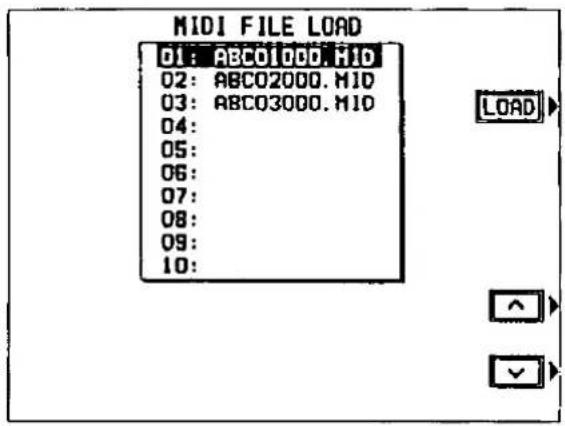
- Use the ∧ and ∨ buttons to select the name of the file with the desired data.
- Press the LOAD button.
• The MIDI FILE LOAD operation begins.
- When the operation has been successfully completed, "COMPLETED!" is shown on the display.
- Press the START/STOP button to begin playback of the song data.
- When the MIDI FILE LOAD procedure is executed, the status of this instrument changes to the GENERAL MIDI status. (Refer to page 153.)
Formatting a disk
New disks can be used only after they have been formatted. Follow the procedure below to format a new disk or erase the contents of a recorded disk.
DISK FORMAT
- This procedure clears the entire contents of the disk.
- Reformat a disk if it cannot be saved to or loaded from properly because of exposure to a magnetic field.
- You can use 3.5 inch 2DD or 2HD disks; however, 2HD disks formatted as 2DD cannot be used.
- To format the disk, the write-protect window must be closed, as illustrated.
Storage is not possible
Open
Storage is possible
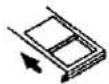
Close
- Insert the disk into the Disk Drive slot. Push it all the way in until you hear a click.
- On the DISK DRIVE menu display, select DISK FORMAT.
• The display changes to the following.
- Press the YES button to format the disk, or press the NO button to cancel the format.
- After_about_one_minute, formatting-is-completed and "COMPLETED!" is shown on the display.
Saving data
Use the Disk Drive to save the recorded data and panel settings on a disk. A formatted disk should be in place in the Disk Drive.
DISK SAVE
- On the DISK DRIVE menu display, select DISK SAVE.
• The display changes to the following.
-
Type a name for the new data file (up to 6 characters).
-
Use the POSITION buttons to highlight the character position in the name box. Use the ABC…789 buttons to select the alphanumeric character. Repeat these steps to type the whole name.
• To erase the name, press the CLR button. - Press the SAVE button.
• The display looks similar to the following.
-
Select the file number in which to save the data (01 to 20).
-
Select the SAVE FILE box, and then use the and buttons to select the file number.
- Files in which data is currently stored are indicated by the file name following the file number.
- The maximum number of songs which can be saved may be less than 20 if you are saving many songs which use a lot of memory.
-
The maximum number of songs which can be saved is 10 if you are saving only songs with the SAVE OPTION set to ALL.
-
Specify the kind of data you wish to store in the data file on the disk.
- Select the SAVE OPTION box, and then use the ∧ and ∨ buttons to specify the kind of data.
ALL
All the data from this instrument is saved.
SEQUENCER
Only data from the SEQUENCER
COMPOSER
Only data from the COMPOSER
SOUND MEMORY
Only data stored in the SOUND memories
PANEL MEMORY
Only data stored in the PANEL MEMORY
- The abbreviated indication (in < > brackets) for the selected data type appears after the file name.
- Press the SAVE button.
- When the operation has been successfully completed, "COMPLETED!" is shown on the display.
- If you attempt to save data to a file number in which data is currently saved, the display changes to the confirmation display. Press the NO button if you wish to cancel the procedure. When the YES button is pressed, the DISK SAVE operation begins.
FILE delete
To erase a song from a disk, on the FILE NAMING display, press the FILE DELETE button. Then on the FILE SELECTION display, select the number of the song you wish to erase, and press the DEL button. The display changes to the confirmation display. Press the YES button to erase the song, or press the NO button to cancel the procedure.
MIDI FILE SAVE
The data from this instrument's SEQUENCER can be saved in the Standard MIDI File format.
- What you can save in the Standard MIDI File format is ordinary performance data, such as note data. Data which is specific to Technics instruments (such as SEQUENCER data for the chord and rhythm parts, COMPOSER data, PANEL MEMORY data, etc.) is not saved. If you wish to also save the special Technics data, first use the DISK SAVE procedure to save the data to a disk, and then follow the MIDI FILE SAVE below.
- On the DISK DRIVE menu display, select MIDI FILE SAVE.
- The display changes to the FILE NAMING display.
- Type a name for the new data file (up to 8 characters).
-
Use the POSITION buttons to highlight the character position in the name box. Use the ABC…789 buttons to select the alphanumeric character. Repeat these steps to type the whole name.
• To erase the name, press the CLR button. -
Press the SAVE button.
• The display looks similar to the following.

- Use the ∧ and ∨ buttons to select the name of the file in which to save the data.
• To save in a new file, select a blank line. - Press the SAVE button.
- When the operation has been successfully completed, "COMPLETED!" is shown on the display.
- If you attempt to save data to a file name in which data is currently saved, the display changes to the confirmation display. Press the NO button if you wish to cancel the procedure. When the YES button is pressed, the MIDI FILE SAVE operation begins.
■ PANEL HEADER
You can save the sound, volume and other settings for each part as data at the beginning of the file. Select YES to save the data, or NO if you do not wish to have the data saved at the file beginning.
■ ONE MEASURE SPACE
When there is various data other than performance data stored at the beginning of a file, the start of playback may be delayed. This can be avoided by inserting a one-measure space before the beginning of the performance. Select ON to insert a one-measure space, or OFF if you do not wish to insert the space.
- When set to ON, a space is added each time a file is saved. Therefore, if you have already saved a file once with this option set to ON, please set it to OFF each time the file is subsequently saved.
■ FILE delete
To erase a song from a disk, on the FILE NAMING display, press the FILE DELETE button. Then on the FILE SELECTION display, select the number of the song you wish to erase, and press the DEL button. The display changes to the confirmation display. Press the YES button to erase the song, or press the NO button to cancel the procedure.
Single data type load
You can load COMPOSER or SOUND data into the memories you specify.
LOAD SINGLE COMPOSER PATTERN
Load the desired COMPOSER data from a disk into a specific COMPOSER memory.
- Insert the disk with the stored COMPOSER data into the Disk Drive.
- On the DISK DRIVE menu display, select LOAD SINGLE COMPOSER PATTERN.
• The display looks similar to the following.
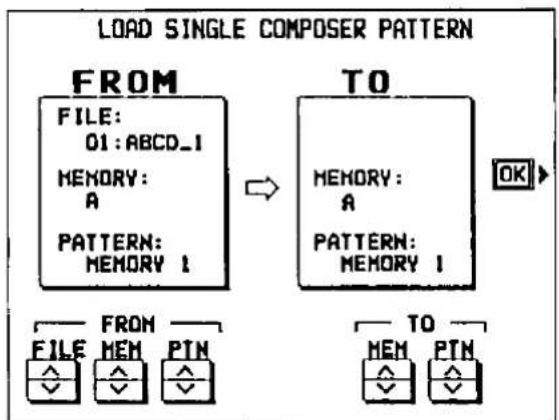
flowchart
graph LR
    A["FROM FILE: 01:ABCD_I<br>MEMORY: A<br>PATTERN: MEMORY I"] --> B["TO MEMORY: A<br>PATTERN: MEMORY I"]
    B --> C["OK"]
    D["FROM FILE: MEM PIN"] --> E["TO MEM PTN"]
- Select a file, memory name and pattern to load from the disk (FROM).
FILE: Use the ∧ and ∨ buttons to specify the file number on the disk.
MEM: Use the ∧ and ∨ buttons to select the memory bank (A or B).
PTN: Use the ∧ and ∨ buttons to specify the pattern name. - Select the memory bank and pattern to load to (TO).
MEM: Use the ∧ and ∨ buttons to select the memory bank (A or B).
PTN: Use the ∧ and ∨ buttons to specify the pattern name. - Press the OK button.
- When the operation has been successfully completed, "COMPLETED!" is shown on the display.
- The LOAD SINGLE COMPOSER PATTERN procedure can also be begun from the COMPOSER menu display. (Refer to page 94.)
LOAD SINGLE SOUND MEMORY
Load the desired SOUND data from a disk into a specific SOUND memory.
- Insert the disk with the stored SOUND data into the Disk Drive.
- On the DISK DRIVE menu display, select LOAD SINGLE SOUND MEMORY.
• The display looks similar to the following.
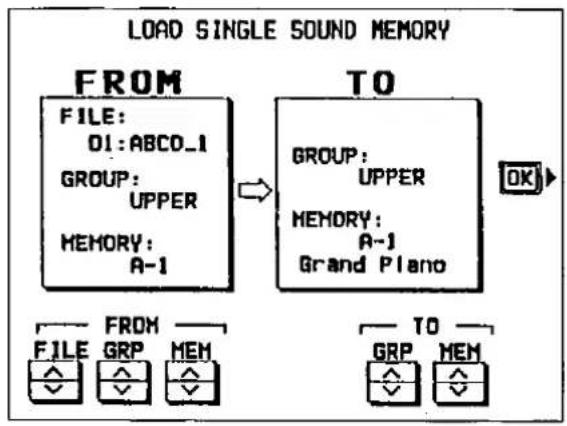
flowchart
graph LR
    A["LOAD SINGLE SOUND MEMORY"] --> B["FROM FILE: O1:ABCD_1 GROUP: UPPER MEMORY: A-1"]
    A --> C["TO GROUP: UPPER MEMORY: A-1 Grand Piano"]
    B --> D["OK"]
    C --> E["FROM FILE GRP MEM"]
    C --> F["TO GRP MEM"]
- Select a file and memory name to load from the disk (FROM).
FILE: Use the ∧ and ∨ buttons to specify the file number on the disk.
GRP: Use the ∧ and ∨ buttons to select the memory group.
MEM: Use the ∧ and ∨ buttons to select the memory bank (A or B).
- Select the memory to load to (TO).
GRP: Use the ∧ and ∨ buttons to select the memory group.
MEM: Use the ∧ and ∨ buttons to select the memory bank.
- Press the OK button.
- When the operation has been successfully completed, "COMPLETED!" is shown on the display.
Sound mode
The SOUND mode is used for making fine adjustments to the functions related to sound, such as tone, volume and effects.
SOUND menu
- Press the SOUND button to turn it on.

• The display changes to the following.
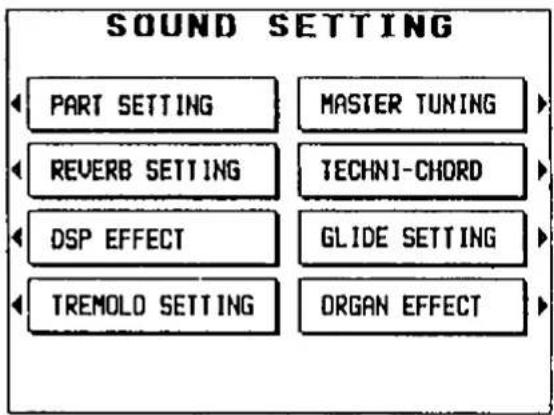
- Refer to the summary of SOUND menu items on the next page.
- Select the desired menu and follow the procedures on the corresponding setting display.
- The functions and their adjustment are explained in detail on the following pages.
-
When the TEMPO/PROGRAM indicator is lit, it indicates that the dial is available for setting the current function.
-
When you have finished setting the functions, press the SOUND button to turn it off.
- When the current display is a setting display, you can press the EXIT button to go back to the previous display. To show other menus, use the EXIT button to return to the SOUND menu display and make another selection.
■ A word about parts
The organization of the sound parts is as follows.
Normal parts
UPPER SOUND 1 to 3, UPPER ORGAN, LOWER SOUND 1 to 3, LOWER ORGAN, BASS, PART 8 to 15.
- PART 16 is reserved for KEYBOARD PERCUSSION.
- PART 8 to 16 are used in SEQUENCER and MIDI functions.
AUTO PLAY CHORD parts
ACCOMP 1, ACCOMP 2, ACCOMP 3, BASS, DRUMS, CHORD.
Other parts
BGS.
■ Summary of the SOUND menu items
PART SETTING (page 113)
Set the various sound attributes for each part.
- SUSTAIN: Turn the sustain on or off and adjust the sustain length for each part.
- BRILLIANCE: Adjust the brilliance for each part.
- REVERB: Turn the reverb on or off for each part.
- DSP EFFECT: Turn the DSP EFFECT on or off for each part.
- PAN: Adjust the stereo balance of each part.
- KEY SHIFT: Adjust the key of each part in semitone increments.
• VOLUME: Adjust the volume for each part.
• TUNING: Fine-tune the pitch of each part. - BEND RANGE: Set the pitch range when MIDI pitch bend data is received.
- ASSIGN MODE: Specify whether polyphonic, monophonic or solo sound is output for each part.
REVERB SETTING (page 117)
Select the type and depth of the DIGITAL REVERB.
DSP EFFECT (page 120)
Select the type and degree of the DSP EFFECT.
TREMOLO SETTING (page 118)
Adjust the speed or depth of the tremolo.
MASTER TUNING (page 119)
Select the type of tuning for the instrument.
TECHNI-CHORD TYPE (page 119)
Select the TECHNI-CHORD harmony style.
GLIDE SETTING (page 120)
Adjust the settings for the glide effect.
ORGAN EFFECT (page 122)
Select the type of EFFECT for the ORGAN part.
SOLO
The SOLO sound is monophonic, which means that only one note can sound at a time. When only a SOLO part is selected for the keyboard, the SOLO sound is produced for the last key played.
When a SOLO part and another part are both selected for one keyboard, however, the SOLO sound is produced for the highest key played. This means that you can use the keyboard to play chords with your left hand and a SOLO-sound melody with your right hand, for example.
- If the interval between the highest note and the next lower note is more than one whole tone, the SOLO sound will not shift to the next lower key when the highest key is released.
Sound setting
Set the various sound attributes for each part.
PART SETTING
- On the SOUND menu display, select PART SETTING.
• The display looks similar to the following.
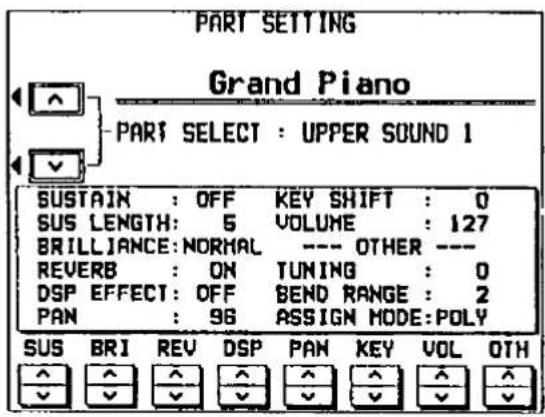
- Use the ∧ and ∨ buttons to select a part.
- If necessary, select the sound for the part. (Only KEYBOARD PERCUSSION sounds can be selected for PART 16.)
- The upper portion of the display shows the name of the selected part and the sound assigned to that part. The box in the lower portion of the display shows the status of each attribute for the selected part.
- Use the buttons along the bottom of the display to select the attribute you wish to adjust.
SUS: SUSTAIN
BRI: BRILLIANCE
REV: REVERB
DSP: DSP EFFECT
PAN: PAN
KEY: KEY SHIFT
VOL: VOLUME
OTH: OTHER (TUNING, BEND RANGE, ASSIGN MODE)
- The display changes in accordance with your selection.
- Only the VOLUME and REVERB settings can be adjusted for PART 16.
- The SUSTAIN, BRILLIANCE, PAN, KEY SHIFT, TUNING, BEND RANGE and ASSIGN MODE settings cannot be changed for the CHORD part.
- Set each attribute. (Refer to the pages following.)
- Use the buttons below the display to change the settings for each attribute.
- Repeat steps 2 to 4 for each part as desired.
■ SUSTAIN
Turn the sustain on or off for each part, and specify the length of the sustain.
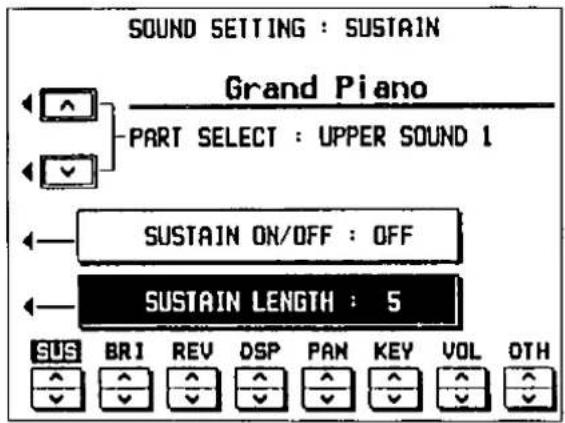
SUSTAIN ON/OFF
-
Select SUSTAIN ON/OFF.
-
Use the SUS ∧ and ∨ buttons to set the sustain to on or off.
SUSTAIN LENGTH
-
Select SUSTAIN LENGTH.
-
Use the SUS ∧ and ∨ buttons to adjust the length of the sustain (1 to 8).
- For some sounds, the length of the sustain does not change even if the number is changed.
- To adjust this effect for other parts, use the PART SELECT ∧ and ∨ buttons to select another part.
BRILLIANCE
Adjust the brilliance.
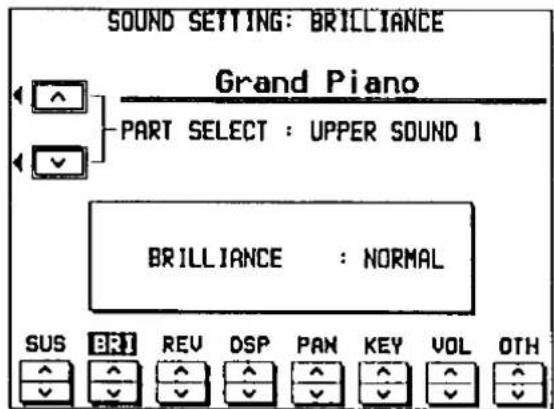
Use the BRI ∧ and ∨ buttons to select a brilliance setting.
- Select from MELLOW, NORMAL and BRIGHT.
- To adjust this effect for other parts, use the PART SELECT ∧ and ∨ buttons to select another part.
■ REVERB
Turn the reverb on or off.
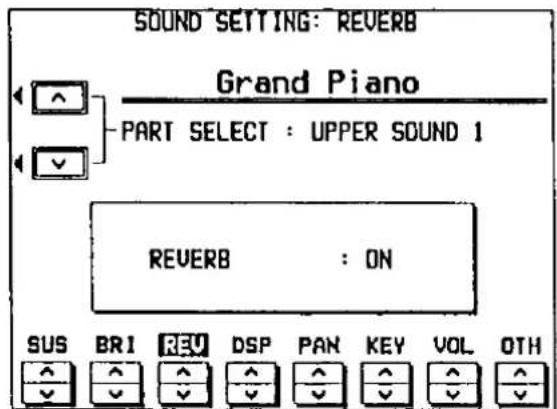
Use the REV ∧ and ∨ buttons to turn the reverb on or off for the part.
- To adjust this effect for other parts, use the PART SELECT ∧ and ∨ buttons to select another part.
■ DSP EFFECT
Turn the DSP EFFECT on or off.
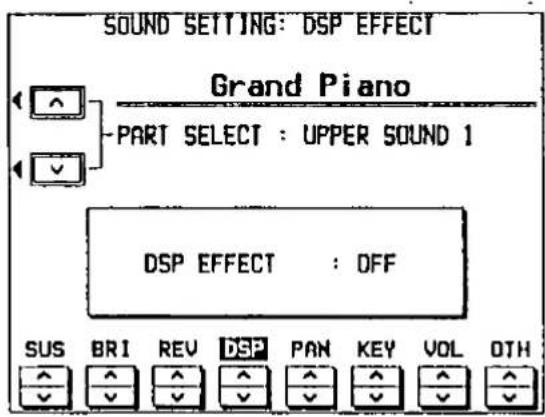
Use the DSP ∧ and ∨ buttons to turn the DSP EFFECT on or off for the part.
- To adjust this effect for other parts, use the PART SELECT ∧ and ∨ buttons to select another part.
PAN
Adjust the stereo balance of each part.
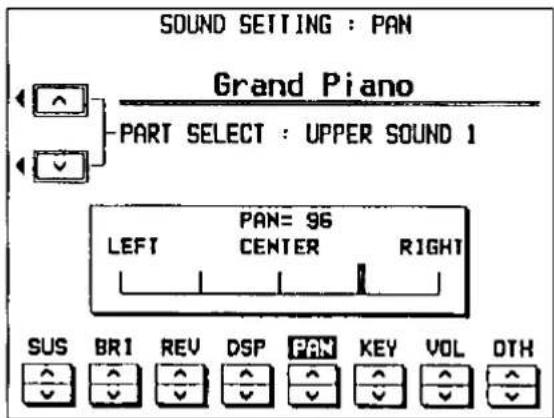
Use the PAN ∧ and ∨ buttons to adjust the stereo balance (0 to 127).
- At 0 the sound is completely to the left, at 127 completely to the right. At 64, the sound is at the centered.
- A thick vertical line on the display indicates the selected position.
- To adjust this effect for other parts, use the PART SELECT ∧ and ∨ buttons to select another part.
KEY SHIFT
The pitch of the part can be shifted up or down.
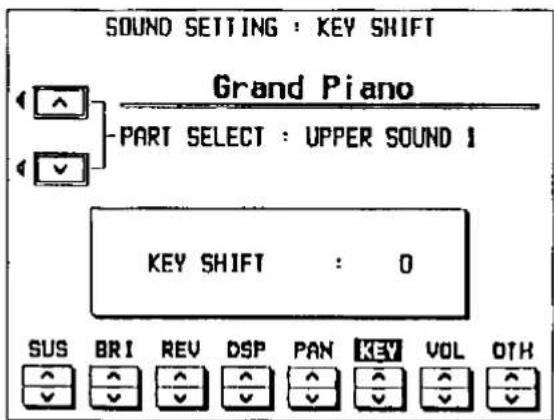
Use the KEY ∧ and ∨ buttons to specify the amount of key shift (-12 to +12).
- A value of 1 means a shift of one semitone. To raise (or lower) the pitch one octave, set the value to +12 (or -12).
- The ∧ button is used to rise the pitch, and the ∨ button to lower the pitch.
- To adjust this effect for other parts, use the PART SELECT ∧ and ∨ buttons to select another part.
VOLUME
Adjust the volume of each part.

Use the VOL ∧ and ∨ buttons to adjust the volume (0 to +127).
- The ∧ button is used to increase the volume, and the ∨ button to decrease the volume.
- No sound is produced when the volume setting is 0.
- To adjust VOLUME for other parts, use the PART SELECT ∧ and ∨ buttons to select another part.
OTHER
Adjust the part settings for the tuning, pitch bend MIDI data reception, and the output mode.
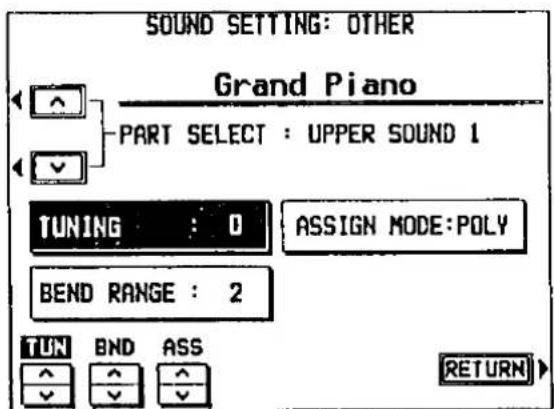
Press the OTH ∧ and ∨ buttons.
TUNING
Use the TUN ∧ and ∨ buttons to adjust the tuning (-128 to +127).
BEND RANGE
Use the BND ∧ and ∨ buttons to set the pitch range when MIDI pitch bend data is received (0 to 12).
- Increments are in semitones.
ASSIGN MODE
Use the ASS ∧ and ∨ buttons to select the output mode for each part (POLY, MONO or SOLO).
• SOLO cannot be selected for the BASS part.
- Press the RETURN button to return to the previous display.
REVERB SETTING
Select the type and depth of the DIGITAL REVERB.
- On the SOUND menu display, select REVERB SETTING.
• The display looks similar to the following.
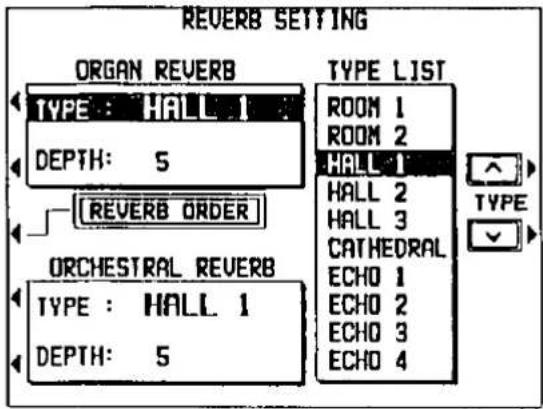
- Select the item to adjust.
■ ORGAN part reverb setting
Adjust the reverb settings for the ORGAN part sounds. You can also specify the order in which reverb and other effects are applied to the sound.
(1) In the ORGAN REVERB box, select TYPE.
(2) Use the TYPE ∧ and ∨ buttons to select the type of reverb.
(3) In the ORGAN REVERB box, select DEPTH.
(4) Use the DEPTH ∧ and ∨ buttons to adjust the depth of the reverb (1 to 10).
■ REVERB ORDER
The order in which reverb is applied to the sound can be changed.
(1) Select REVERB ORDER.
• The display changes.
(2) Select the desired reverb order.
NORMAL: Sound → other effects → reverb
SPECIAL: Sound → reverb → tremolo
- When SPECIAL is selected, the organ reverb does not work unless the TREMOLO is on.
- When the power to this instrument is turned on, this setting is always set to NORMAL.
■ Other part reverb setting
Adjust the reverb setting for parts other than the ORGAN part, such as SOUND GROUP and BASS PEDALS, and the rhythm sounds.
(1) In the ORCHESTRAL REVERB box, select TYPE.
(2) Use the TYPE ∧ and ∨ buttons to select the type of reverb.
- Select from the TYPE LIST on the display.
(3) In the ORCHESTRAL REVERB box, select DEPTH.
(4) Use the DEPTH ∧ and ∨ buttons to adjust the depth of the reverb (1 to 10).
You can also access this display by pressing and holding the DIGITAL REVERB button for a few seconds.
- In this case, you can press the EXIT button to return to the previous display.
TREMOLO
Tremolo is a rapid oscillation in volume, producing the effect of a rotating speaker. The type of tremolo and how it is applied can be adjusted.
- On the SOUND menu display, select TREMOLO SETTING.
• The display changes to the following.
![TREMOLO SPEED SETTING TYPE: STANDARD TREMOLO TREBLE [FAST]: 57 (SLOW): 12 BASS [FAST]: 57 (SLOW): 12 —TREBLE— FAST SLOW —BASS— FAST SLOW MORE](/content/2026/05/1069939/images/0a8dc52cbec5b3871da60e7468ee01d2f088e2d8cda9bf400e1dfd3537b0fcf7.jpg)
- Use the TYPE ∧ and ∨ buttons to select the type of speaker (STANDARD TREMOLO, THEATRE TREMOLO, U.S. TRAD TREMOLO, EUROPEAN TREMOLO, JAZZ ROTOR, STANDARD ROTOR, THEATRE ROTOR, ROCK ROTOR, TREMULANT 1, 2).
- ROTOR refers to the number of rotating units in a rotary speaker.
- Modify the parameters (explained below).
Use the buttons below the display to change the value for the respective parameter.
- Press the MORE button to display other parameters.
You can also access this display by pressing and holding the DIGITAL REVERB button for a few seconds.
- In this case, you can press the EXIT button to return to the previous display.
■ Parameters
STANDARD TREMOLO, THEATRE TREMOLO, U.S. TRAD TREMOLO, EUROPEAN TREMOLO
Like a single-rotor-type speaker.
TREBLE/BASS (FAST)
The speed when the rotor is turning fast.
TREBLE/BASS (SLOW)
The speed when the rotor is turning slowly.
TREBLE/BASS WIND UP
The time it takes to reach the TREBLE/BASS (FAST) speed when the speed is changed from slow to fast.
The time it takes to reach the TREBLE/BASS (SLOW) speed when the speed is changed from fast to slow.
DISTORTION
Amount of distortion applied to the sound.
JAZZ ROTOR, STANDARD ROTOR, THEATRE ROTOR, ROCK ROTOR
Like a double-rotor-type speaker.
TREBLE (FAST)
The speed when the treble rotor is turning fast.
TREBLE (SLOW)
The speed when the treble rotor is turning slowly.
BASS (FAST)
The speed when the bass rotor is turning fast.
BASS (SLOW)
The speed when the bass rotor is turning slowly.
TREBLE (WIND UP)
The time it takes for the treble rotor to reach the TREBLE (FAST) speed when the speed is changed from slow to fast.
TREBLE (WIND DOWN)
The time it takes for the treble rotor to reach the TREBLE (SLOW) speed when the speed is changed from fast to slow.
BASS (WIND UP)
The time it takes for the bass rotor to reach the BASS (FAST) speed when the speed is changed from slow to fast.
BASS (WIND DOWN)
The time it take for the bass rotor to reach the BASS (SLOW) speed when the speed is changed from fast to slow.
DISTORTION
Amount of distortion applied to the sound.
TREMULANT 1, 2
This is a distinctive vibrating effect, peculiar to pipe organs, of air flowing through the pipes.
SPEED 1
Speed of effect applied to tab sounds.
SPEED 2
Speed of effect applied to EXTRA TAB VOICES.
DEPTH 1
Depth of effect applied to tab sounds.
DEPTH 2
Depth of effect applied to EXTRA TAB VOICES.
MASTER TUNING
This setting is used to fine-tune the pitch of the entire instrument. This is convenient when playing with other instruments or with a recorded performance. You can also select from two types of tuning.
- On the SOUND menu display, select MASTER TUNING.
• The display changes to the following.
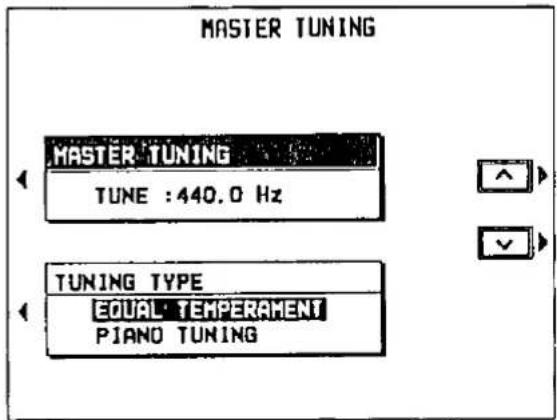
-
Select MASTER TUNING.
-
Use the ∧ and ∨ buttons to adjust the pitch within a range of 427.3 to 453.0 Hz.
• The decimal can be set to 0, 3 or 6.
-
Select TUNING TYPE.
-
Use the ∧ and ∨ buttons to select the type of tuning.
EQUAL TEMPERAMENT
One octave is divided into pitches of equally spaced intervals.
PIANO TUNING
Standard acoustic piano tuning, in which the lower pitches are tuned slightly lower and the higher pitches are tuned slightly higher.
TECHNI-CHORD TYPE
Select the desired harmony style for the TECH-NI-CHORD.
- On the SOUND menu display, select TECH-NI-CHORD.
• The display changes to the following.
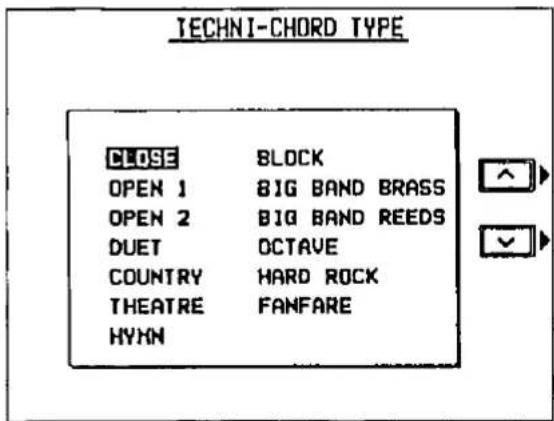
-
Use the ∧ and ∨ buttons to select the harmony style.
-
When the OCTAVE, HARD ROCK or FAN-FARE style is selected, the TECHNI-CHORD is always active for the upper keyboard.
- For a detailed explanation of the different harmony styles, refer to the separate "REFERENCE GUIDE" provided.
You can also access this display by pressing and holding the TECHNI-CHORD button for a few seconds.
- In this case, you can press the EXIT button to return to the previous display.
GLIDE SETTING
Adjust the pitch range of the glide effect, and specify whether the glide effect works for the lower keyboard.
- On the SOUND menu display, select GLIDE SETTING.
• The display changes to the following.
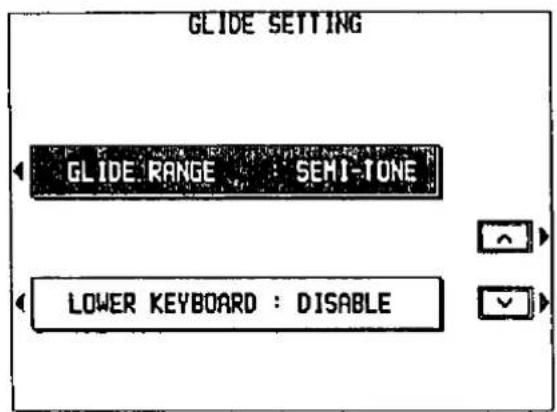
- Select GLIDE RANGE.
- Use the and buttons to change the setting.
WHOLE TONE
The pitch changes by as much as a whole tone.
SEMI-TONE
The pitch changes by as much as a semitone.
- Select LOWER KEYBOARD.
- Use the ∧ and ∨ buttons to enable or disable the glide effect for the lower keyboard.
DISABLE
The glide effect does not work for the lower keyboard.
ENABLE
The glide effect works for the lower keyboard.
DSP EFFECT
Select the type of DSP EFFECT, and adjust the depth of the effect.
- On the SOUND menu display, select DSP EFFECT.
• The display changes to the following.
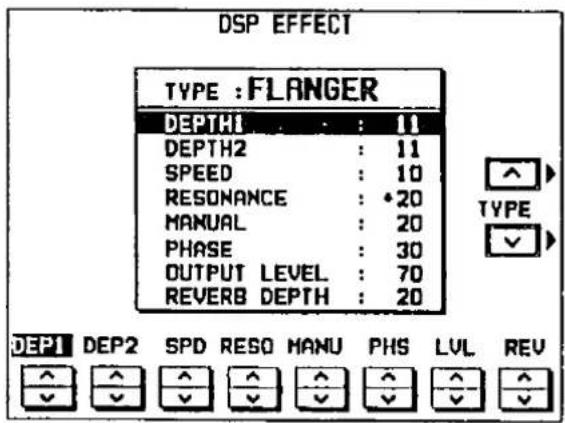
- Use the TYPE ∧ and ∨ buttons to select the type of effect (CHORUS, FLANGER, PHASER, DISTORTION, OVER DRIVE, EX-CITER, DELAY 1, 2).
- Use the buttons below the display to change the parameters of the selected type (explained below).
- When a type of effect is selected, the parameters automatically revert to the factory-preset settings.
You can also access this display by pressing and holding the DSP EFFECT button for a few seconds.
- In this case, you can press the EXIT button to return to the previous display.
■ Parameters
CHORUS
A natural fullness and richness is achieved by adding a sound of a slightly different pitch to the original sound.
DEPTH
Depth of the modulation.
SPEED
Velocity of the modulation.
OUTPUT LEVEL
Volume of the part to which the effect is applied.
REVERB DEPTH
Output to the reverb.
FLANGER
An undulation is added, giving an intensity to sounds having many overtones (harmonics).
DEPTH 1,2
Depth of the modulation.
SPEED
Velocity of the modulation.
RESONANCE
Feedback volume (inverted when a minus value).
MANUAL
Center frequency to which the effect is applied.
PHASE
Phase difference between left and right modulation.
OUTPUT LEVEL
Volume of the part to which the effect is applied.
REVERB DEPTH
Output to the reverb.
PHASER
A more distinct undulation effect than FLANGER. Ideal for electric piano type sounds.
DEPTH
Depth of the modulation.
SPEED
Velocity of the modulation.
RESONANCE
Feedback volume (inverted when a minus value).
MANUAL
Center frequency to which the effect is applied.
OUTPUT LEVEL
Volume of the part to which the effect is applied.
REVERB DEPTH
Output to the reverb.
DISTORTION
The sound is very distorted. A powerful effect when applied to a sound which is played solo.
DRIVE
Degree of distortion.
OUTPUT LEVEL
Volume of the part to which the effect is applied.
REVERB DEPTH
Output to the reverb.
OVER DRIVE
A more natural distortion than the above effect, similar to that achieved with a vacuum tube amplifier.
DRIVE
Degree of distortion.
OUTPUT LEVEL
Volume of the part to which the effect is applied.
REVERB DEPTH
Output to the reverb.
EXCITER
Modulation gives a clear outline to the sound.
DRIVE
Degree of distortion.
BOOST LEVEL
Volume emphasis in the upper pitch range.
OUTPUT LEVEL
Volume of the part to which the effect is applied.
REVERB DEPTH
Output to the reverb.
DELAY 1
An echo effect, in which the original sound is repeated after a delay.
DELAY R
Time difference between original sound and the repeat (ms).
DELAY L
Delay time for the L (left) channel (ms).
FEEDBACK R
Feedback volume (inverted when a minus value).
FEEDBACK L
Left feedback volume (inverted when a minus value).
OUTPUT LEVEL
Volume of the part to which the effect is applied.
REVERB DEPTH
Output to the reverb.
Part VII Adjusting the functions
Various functions on your instrument can be custom-set to match your personal tastes and style of play, giving you maximum versatility and control of your instrument.
Outline of procedure
TOUCH
Adjust the touch response settings.
- Specify whether the touch response function works for this instrument. You can also turn touch response on or off for each keyboard, and for each part.

• The display looks similar to the following.

- Set TOTAL TOUCH CONTROL to on or off.
- Adjust the settings for each keyboard and part.
- When you have finished adjusting the functions, press the TOUCH button to turn it off.
CONTROL
Make various settings related to the operation of your instrument.
- Press the MEM & CTRL button to turn it on.
• The following menu display appears.
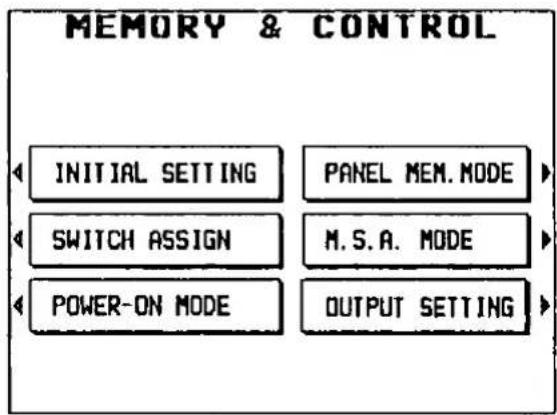
SWITCH ASSIGN (page 125)
Assign the desired functions to the foot switches, knee lever and full bass pedal.
POWER-ON MODE (page 126)
Specify the sound settings which are in effect when the power to this instrument is turned on.
OUTPUT SETTING (page 127)
Specify whether the ORGAN, BASS and DRUMS part sounds are output separately.
• Information regarding the following settings can be found on the pages indicated.
INITIAL SETTING ......page 154
PANEL MEM. MODE ....page 53
M.S.A. MODE......page 66
- Select the desired menu and follow the procedures on the corresponding setting display.
- Press the EXIT button to go back to the previous display. To go to another menu, use the EXIT button to go back to the menu display.
- When the TEMPO/PROGRAM indicator is lit, it indicates that the dial is available for setting the current function.
- When you have finished setting the functions, press the MEM & CTRL button again to turn it off.
Touch functions
Select the item and perform the setting procedures.
INITIAL TOUCH SENSITIVITY
Adjust the degree of touch response for the upper keyboard, the lower keyboard and the pedal keyboard.
- Press the TOUCH button to turn it on.
• The display looks similar to the following.

- Use the TOTAL TOUCH CONTROL ∧ and ∨ buttons to enable or disable the touch function.
ON: Use the touch function.
OFF: Do not use the function. - If ON was selected in step 2, select the keyboard (UPPER, LOWER or PEDAL).
- Use the SENSITIVITY ∧ and ∨ buttons to adjust the degree of touch sensitivity.
- Select from OFF, 1 to 9. The higher the number, the greater the change in volume corresponding to how hard or softly the keyboard is played. When set to OFF, the volume is the same no matter how hard or softly the keyboard is played.
- Repeat steps 3 and 4 for the other keyboards as desired.
■ TOUCH SENSE PART SETTING
Specify for each part whether the touch sensitivity setting is effective.
- On the INITIAL TOUCH SENSITIVITY display, press the PART SETTING button to show the following display.
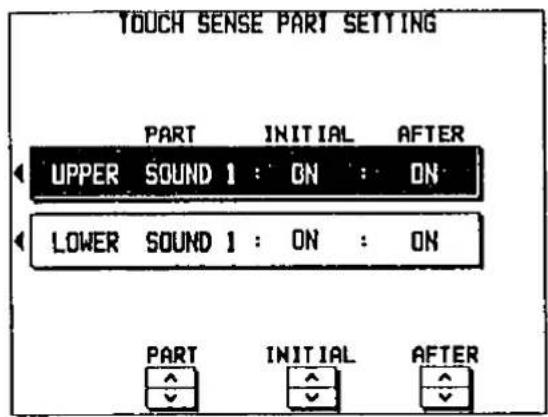
- Select the keyboard of the part (UPPER or LOWER).
- Use the PART buttons to select the part (ORGAN, SOUND 1, 2 or 3).
- Use the INITIAL buttons to set the touch sensitivity to ON or OFF for the part.
- You can use the AFTER ∧ and ∨ buttons to set the AFTER TOUCH effect to ON or OFF for the part.
- The AFTER TOUCH applies a special effect to the sound depending on how hard the keys are pressed. You can select which effect is applied when the AFTER TOUCH is on. (Refer to page 134.)
Control functions
Select the item and perform the setting procedures.
SWITCH ASSIGN
You can assign different functions to the foot switches, knee lever and full bass pedal.
- On the MEM & CTRL menu display, select SWITCH ASSIGN.
• The display looks similar to the following.
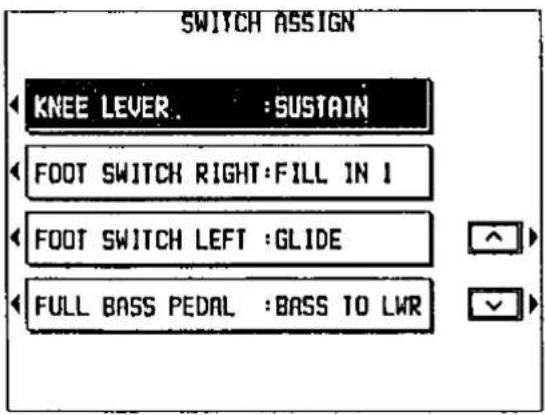
- Select the switch to which you will assign a new function.
Select KNEE LEVER, FOOT SWITCH RIGHT, FOOT SWITCH LEFT or FULL BASS PEDAL.
- Use the and buttons to select the desired function for the switch.
■ Functions which can be assigned to the knee lever and foot switches
P.MEMORY 1 to 16
Turns on a specific PANEL MEMORY button (1 to 16).
PANEL MEMORY INC
Turns on the next higher PANEL MEMORY button.
START/STOP
Turns the START/STOP button on/off.
VARIATION
Turns the VARIATION button on/off.
FILL IN 1, 2
Turns the FILL IN 1 or 2 button on/off.
ENDING
Turns the INTRO & ENDING button on/off.
SUSTAIN
Turns the sustain effect on/off.
TREMOLO
Turns the TREMOLO SLOW/FAST button on/off.
GLIDE
Turns the GLIDE effect on/off.
TECH-CHORD
Turns the TECHNI-CHORD button on/off.
PUNCH
Switches the PUNCH IN/PUNCH OUT mode.
■ Functions which can be assigned to the full bass pedal
APC
Turns AUTO PLAY CHORD on/off.
APC MEMORY
Turns the APC memory on/off.
BASS TO LWR
Turns the TO LOWER button on/off.
BASS SOLO
Only the BASS sound is produced when the lower keyboard is played with the TO LOWER button on.
☐ The factory-preset switch assignment is as follows:
KNEE LEVER: SUSTAIN
FOOT SWITCH RIGHT: FILL IN 1
FOOT SWITCH LEFT: GLIDE
FULL BASS PEDAL: BASS TO LWR
- Repeat steps 2 and 3 for the other switches as desired.
POWER ON MODE
Specify the sounds which are in effect for the upper and lower keyboards when the power to this instrument is turned on.
- On the MEM & CTRL menu display, select POWER-ON MODE.
• The display looks similar to the following.
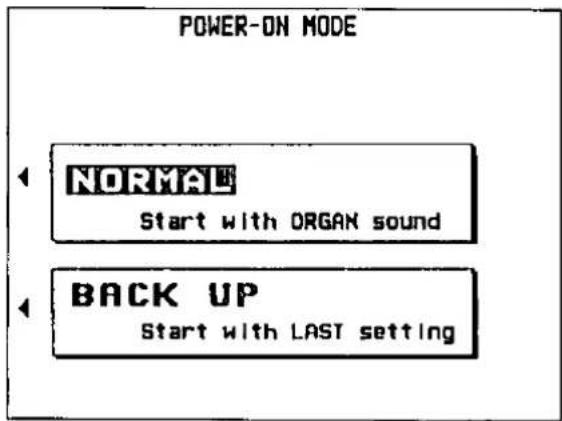
- Select the mode.
NORMAL: When the power to this instrument is turned on, ORGAN sounds are selected (factory-preset setting).
BACK UP: The sounds which were in effect when you last turned off this instrument are selected.
OUTPUT SETTING
The output settings for the ORGAN part, the BASS part and the DRUMS part can be adjusted.
- On the MEM & CTRL menu display, select OUTPUT SETTING.
• The display looks similar to the following.
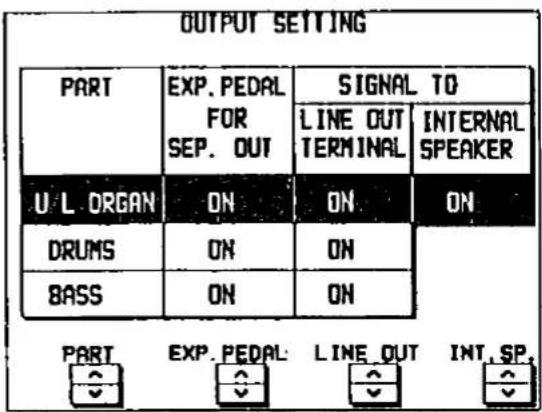
- Use the PART ∧ and ∨ buttons to select the part (U/L ORGAN, DRUMS or BASS).
- Use the EXP. PEDAL ∧ and ∨ buttons to specify whether the expression pedal operation is effective for the sounds output from the SEPARATED LINE OUT terminals.
ON: The sounds output from the SEPARATED LINE OUT terminals are affected by the expression pedal operation.
OFF: The sounds are not affected.
- Use the LINE OUT ∧ and ∨ buttons to select the output mode for the part.
ON: The signals are output from the LINE OUT terminals.
OFF: The signals are not output from the LINE OUT terminals. -
Use the INT.SP ∧ and ∨ buttons to specify whether the sound of the part is output from this instrument's speakers.
ON: The sound of the part is output from this instrument's speakers.
OFF: The sound of the part is not output from this instrument's speakers. -
When the power to this instrument is turned on, this setting is automatically switched to ON for all parts.
- Repeat steps 2 to 5 for each part as desired.
- For detailed information concerning the output terminals, refer to page 155.
Outline of the Sound Edit
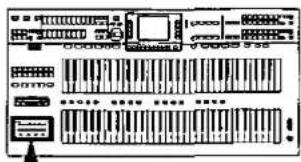
SOUND EDIT enables you to create your own new sound by altering one of the preset sounds. Your new sound can be stored in one of the sound memory locations. SOUND EDIT has two methods of use. You can edit in detail using functions more commonly associated with a synthesizer, or you can use EASY EDIT which allows you to change some basic parameters on one page.
Outline of procedure
- Select a preset sound on which to build your new sound.
- Select sounds from the UPPER SOUND GROUP, LOWER SOUND GROUP or BASS PEDALS.
-
The ORGAN or CLASSICAL ORGAN sound cannot be selected from the BASS PEDALS group.
-
Press the SOUND EDIT button to turn it on.

• The indicator for the sound button you selected in step 1 flashes.
• The display changes to the following.
![SOUND EDIT EDIT GROUP:[ UPPER ] EASY EDIT GENERAL EDIT TONE EDIT EFFECT EDIT WRITE](/content/2026/05/1069939/images/5803f78d78a895ba6d4f3d6b4c7dedeec53016a6c76cf654df2f62cf05dd0b5d.jpg)
EASY EDIT (page 130)
The most often used edit functions—such as brightness and attack speed—are assembled on one display for easy sound modification.
GENERAL EDIT (page 131)
Editing functions which apply to the entire sound.
OCTAVE SHIFT
Place the sound in the optimum octave range.
VIBRATO
_Set_the_vibrato_effect_for_the-sound.
AUTOBEND & TRILL
Adjust the pitch change during the attack.
MODULATION
Adjust the amount of modulation effect.
DISTORTION
Specify the distortion attributes of the sound.
CONTROLLERS
Change the settings for effects such as glide and sustain.
AFTER TOUCH
Adjust the aftertouch settings.
TONE EDIT (page 135)
Modify the tones which make up the sound.
TONE
Set the sound and pitch of each tone.
LEVEL
Adjust the volume of each tone.
ENVELOPE
Adjust the change in volume over time for each tone.
ENVELOPE KEY FOLLOW
Adjust the change in volume over time based on pitch.
FILTER
Adjust the amount of frequency cut in specific frequency ranges.
EFFECT EDIT (page 139)
Select the type and degree of DIGITAL EFFECT for the sound.
- Select the desired menu and follow the procedures on the corresponding setting display.
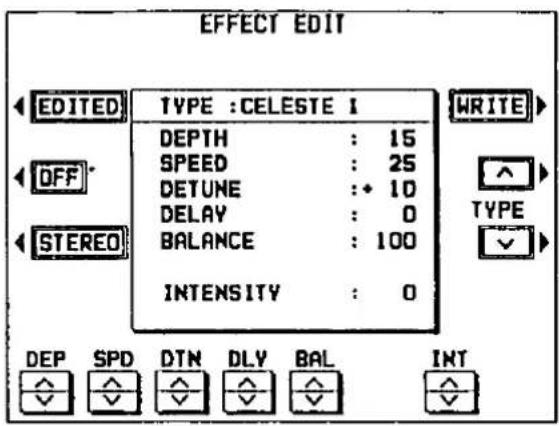
- Press the EDITED (or ORIGNL) button to switch between the modified sound (EDITED) and the original sound (ORIGNL). This allows you to compare the edited sound to the original sound as you are modifying it. Play the keyboard for the part you selected in step 1 to confirm the sound.
- When the current display is a setting display, you can press the EXIT button to go back to the previous display. To show other menus, use the EXIT button to return to the SOUND EDIT menu display and make another selection.
-
When the TEMPO/PROGRAM indicator is lit, it indicates that the dial is available for setting the current function.
-
When the sound is just the way you like it, press the WRITE button to store your new sound. (Refer to page 140.)
- The WRITE button appears on all the editing displays and may be pressed whenever you wish to store the new sound.
- While editing a sound, if you change to a different sound, a confirmation display appears. Press the YES button if you wish to change the sound, or press the NO button if you wish to cancel the change. (Only a sound for the part you selected in step 1 can be edited.)
- While editing a sound, the ORCHESTRAL CONDUCTOR and part buttons (1, 2 and 3) do not work.
Easy Edit
The most commonly used edit functions are consolidated on one display, providing convenient and quick editing operation.
- On the SOUND EDIT menu display, select EASY EDIT.
• The display changes to the following.

- Select a sound attribute to modify.
BRILLIANCE
Adjust the brightness of the sound.
VIBRATO DEPTH
Set vibrato depth.
VIBRATO SPEED
Set vibrato speed.
VIBRATO DELAY
Set time delay between key played and vibrato start.
OCTAVE SHIFT
Shift the octave range.
ATTACK TIME
Adjust attack time.
RELEASE TIME
Adjust time of sound fade-out after key is released.
DIGITAL EFFECT
Select type of effect.
- Use the VALUE ∧ and ∨ buttons to specify the value of the attribute.
- Selecting the type of DIGITAL EFFECT is explained in the section on EFFECT EDIT (page 139).
- An effect may remain unchanged when EASY EDIT is used to set the value, if GENERAL EDIT or TONE EDIT was first used to set the value to its upper or lower limit. For example, when changing the OCTAVE SHIFT value of the "Piano" sound, the octave can be shifted only two octaves up (+2) or one octave down (-1). Even if you set the OCTAVE SHIFT value to -2, the octave will shift down by only one octave.
-
Repeat steps 2 and 3 to modify other sound attributes as desired.
-
Press the WRITE button to store your new sound.
- Storing your new sound is explained on page 140.
- If a sound is stored in the EASY EDIT mode, and is later selected in the EASY EDIT mode, the displayed value of an attribute may be different from the value when it was stored. The sound itself, however, is exactly as it was stored.
General Edit
These editing functions pertain to the entire sound.
Selecting attributes
- On the SOUND EDIT menu, select GENERAL EDIT.
- The display looks similar to the following. The current status of all attributes is shown.
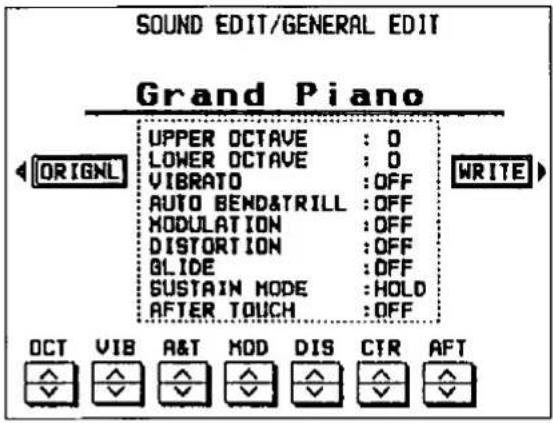
- Use the buttons along the bottom of the display to select the attribute you wish to modify.
OCT: OCTAVE SHIFT
VIB: VIBRATO
A&T: AUTOBEND & TRILL
MOD: MODULATION
DIS: DISTORTION
CTR: CONTROLLERS
AFT AFTER TOUCH
- The display changes to the setting display for the selected attribute.
- Modify each attribute (explained below).
- The buttons along the bottom of the display are present in each setting display of the GENERAL EDIT mode. When you have finished modifying an attribute, use the buttons to select another attribute and continue modifying the sound.
OCTAVE SHIFT
The octave of the output sound can be specified separately for the upper and lower keyboards.
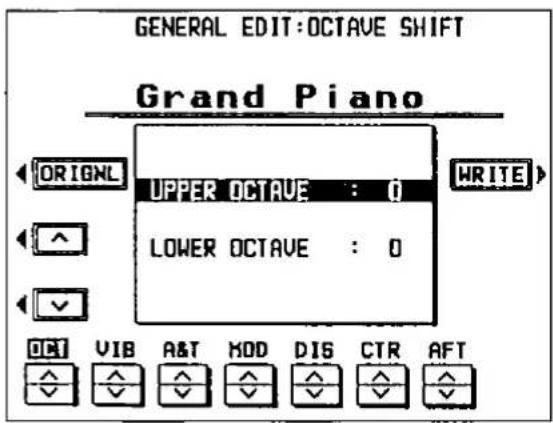
- Use the ∧ and ∨ buttons to specify the keyboard.
- Use the OCT ∧ and ∨ buttons to raise or lower the pitch by octaves (-2 to 2).
- To lower the pitch one octave (or two octaves), set the value to -1 (or -2). To raise the pitch one octave (or two octaves), set the value to 1 (or 2).
- Repeat steps 1 and 2 for the other keyboard if desired.
VIBRATO
Modify the vibrato attributes of the sound.
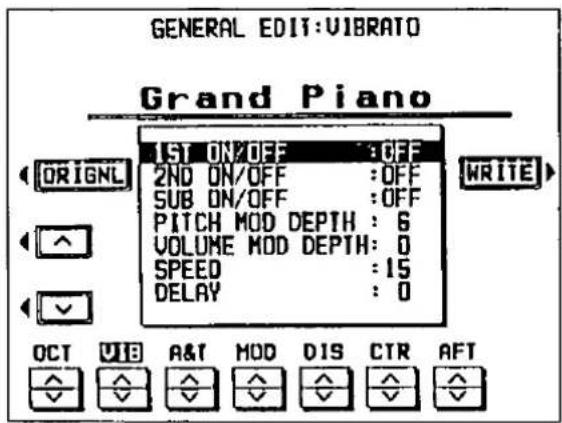
- Use the ∧ and ∨ buttons to select the item.
1ST ON/OFF
Set the vibrato for the 1st tone to on or off. (For an explanation of tones, refer to page 135.)
2ND ON/OFF
Set the vibrato for the 2nd tone to on or off.
AUTOBEND & TRILL
The AUTOBEND & TRILL causes a change in pitch during the attack period.
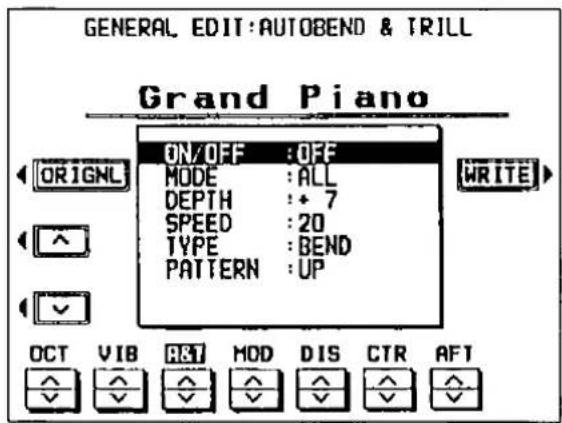
- Use the ∧ and ∨ buttons to select the item.
ON/OFF
ON: This effect is on for the sound.
OFF: This effect is off for the sound.
TOUCH: This effect is applied only when the keyboard is played hard.
MODE
1ST: The effect is applied only to the 1st tone.
2ND: The effect is applied only to the 2nd tone.
ALL: The effect is applied to all the tones.
INVERSE: The effect is applied to all the tones, but is inverted for the 2nd tone.
SUB ON/OFF
Set the vibrato for the SUB tone to on or off.
PITCH MOD DEPTH
Set the frequency change (pitch) of the vibrato (0 to 30).
VOLUME MOD DEPTH
Set the depth of the volume change (0 to 30).
SPEED
Set the vibrato speed (0 to 30).
DELAY
Set the delay time (0 to 30).
- Delay time is the time elapsed from when the keyboard key is pressed until the vibrato effect begins.
-
Use the VIB ∧ and ∨ buttons to adjust the attributes.
-
Repeat steps 1 and 2 to modify other attributes as desired.
DEPTH
Specify the amount of pitch bend (-30 to +30).
SPEED
Specify the time it takes for the altered pitch (auto bend pitch) to become the normal pitch (key pitch) (0 to 30).
TYPE
BEND: The pitch change is continuous.
TRILL: The pitch changes in steps.
PATTERN
BEND types: UP, UP-DOWN, UP-DROP, DELAY-UP
TRILL types: DOWN-UP, UP-DOWN, MELODY, 5-UP
- A list of AUTOBEND & TRILL patterns (PATTERN) can be found in the separate "REFERENCE GUIDE" provided.
-
Use the A&T ∧ and ∨ buttons to adjust the attributes.
-
Repeat steps 1 and 2 to modify other attributes as desired.
MODULATION
Modify the modulation.

- Use the ∧ and ∨ buttons to select the item.
ON/OFF
ON: The effect is applied to the sound.
OFF: The effect is not applied to the sound.
- This setting may not be effective in some cases.
MODE
1ST: The effect is applied to the 1st tone.
2ND: The effect is applied to the 2nd tone.
ALL: The effect is applied to all the tones.
INVERSE: The effect is applied to all the tones, but is inverted for the 2nd tone.
DEPTH
Set the frequency change (pitch) of the vibrato (-127 to +127).
SPEED
Set the vibrato speed (0 to 127).
WAVE
Modulate the waveform.
SINE: Sine wave
TRIANGLE: Triangle wave
SQUARE: Square wave
SAW: Saw tooth wave
-
Use the MOD ∧ and ∨ buttons to adjust the attributes.
-
Repeat steps 1 and 2 to modify other attributes as desired.
DISTORTION
Modify the distortion attributes of the sound.
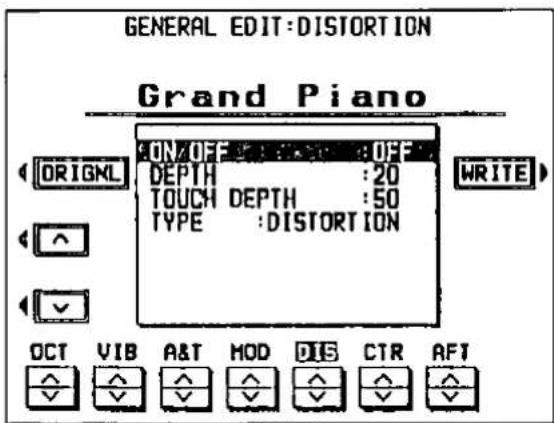
- Use the ∧ and ∨ buttons to select the item.
ON/OFF
ON: This effect is on for the sound.
OFF: This effect is off for the sound.
- This setting may not be effective in some cases.
DEPTH
Set the amount of change (0 to 50).
TOUCH DEPTH
Set the degree of depth change in proportion to key velocity (0 to 50).
TYPE
DISTORTION: The distortion is applied to the whole sound.
GROWL: The distortion is applied only to the attack period of the sound.
-
Use the DIS ∧ and ∨ buttons to adjust the attributes.
-
Repeat steps 1 and 2 to modify other attributes as desired.
CONTROLLERS
Specify whether the glide effect can be applied to the sound with a controller, the type of sustain, and whether MIDI wheel data is received.
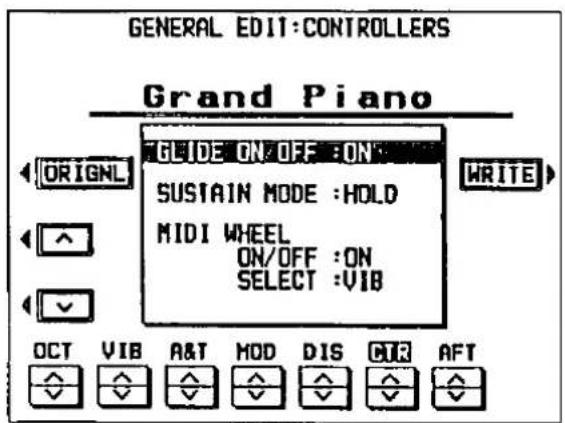
- Use the ∧ and ∨ buttons to select the item.
GLIDE ON/OFF
ON: The glide effect can be applied with a foot switch or other assigned controller.
OFF: The glide effect is not applied when the controller is operated.
SUSTAIN MODE
LONG: When sustain is on, the release time of the sound is extended.
HOLD: When sustain is on, the key-pressed condition is maintained.
MIDI WHEEL ON/OFF
ON: The sound is affected by modulation wheel operation data from MIDI, etc.
OFF: The sound is not affected by modulation wheel operation data from MIDI, etc.
MIDI WHEEL SELECT
MOD: Modulation effect is applied to the sound when wheel data is received through MIDI.
VIB: Vibrato effect is applied to the sound when wheel data is received through MIDI.
-
Use the CTR ∧ and ∨ buttons to adjust the settings.
-
Repeat steps 1 and 2 to modify other attributes as desired.
AFTER TOUCH
Specify how the sound is affected when the keys are pressed hard.
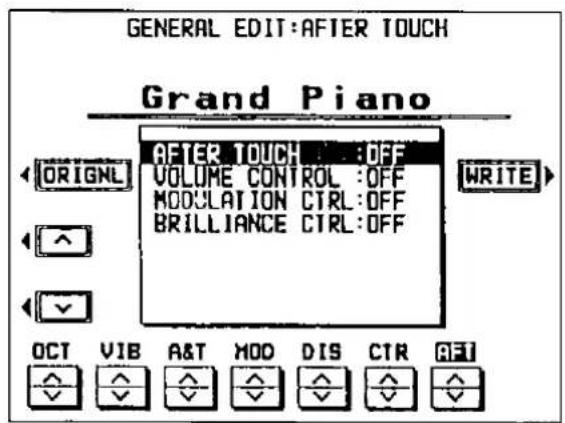
- Use the ∧ and ∨ buttons to select the item.
AFTER TOUCH
ON: This EFFECT is on for the sound.
OFF: This EFFECT is off for the sound.
VOLUME CONTROL
Turn the volume control on/off.
MODULATION CTRL
Turn the modulation control on/off.
BRILLIANCE CTRL
Turn the brilliance control on/off.
- Use the AFT ∧ and ∨ buttons to set the attribute to on or off.
- When AFTER TOUCH is set to OFF, there is no effect, even when the keys are played hard.
- Repeat steps 1 and 2 to modify other attributes as desired.
Tone Edit
Modify the separate tones which comprise the sound. A sound may be made up of at most three tones.
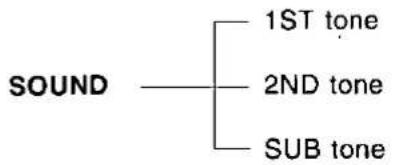
flowchart
graph TD
    A["SOUND"] --> B["1ST tone"]
    A --> C["2ND tone"]
    A --> D["SUB tone"]
- The essence of the sound is created by the combination of the 1ST tone and 2ND tone.
- Depending on the sound output status of the instrument, the SUB tone may not be generated.
Selecting attributes
- On the SOUND EDIT menu, select TONE EDIT.
- The display looks similar to the following. The current status of the major attributes is shown.
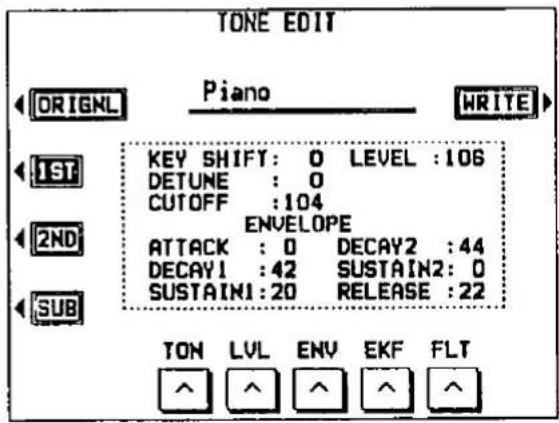
- The attributes are modified for each tone. Use the 1ST, 2ND and SUB buttons to switch among the tones.
- Use the buttons along the bottom of the display to select the attribute you wish to modify.
TON: TONE
LVL: LEVEL
ENV: ENVELOPE
EKF: ENVELOPE KEY FOLLOW
FLT: FILTER
- The display changes to the setting display for the selected attribute.
- Modify each attribute (explained below).
- When you have finished modifying an attribute, press the EXIT button to go back to the TONE EDIT display, select another attribute and continue modifying the sound.
TONE
Set the sound and pitch of each tone.
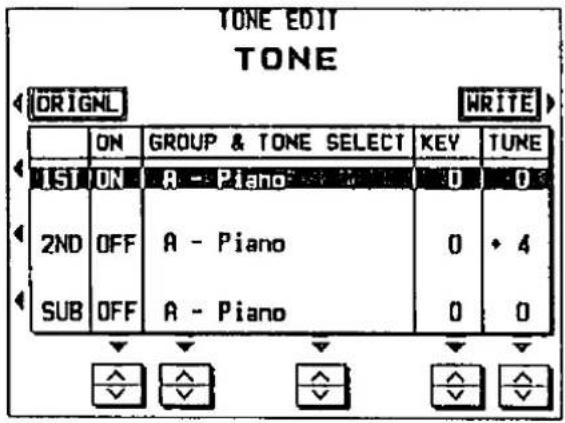
- Select the tone to modify (1ST, 2ND or SUB).
- Use the and buttons at the bottom of each column to change the setting in the column.
ON/OFF
ON: The tone is generated.
OFF: The tone is not generated.
GROUP & TONE SELECT
Select the kind of tone.
- Tones are classified in groups named A to N. A list of tones can be found in the separate "REFERENCE GUIDE" provided.
KEY
Specify the amount of key-shift in semitone increments (-24 to +24).
TUNE
Fine-adjustment of the pitch (-50 to +50).
- Slight differences in the TUNE values between the tones add fullness to the sound.
- Repeat steps 1 and 2 for the other tones as desired.
LEVEL
Adjust the volume and key touch attributes of each tone.
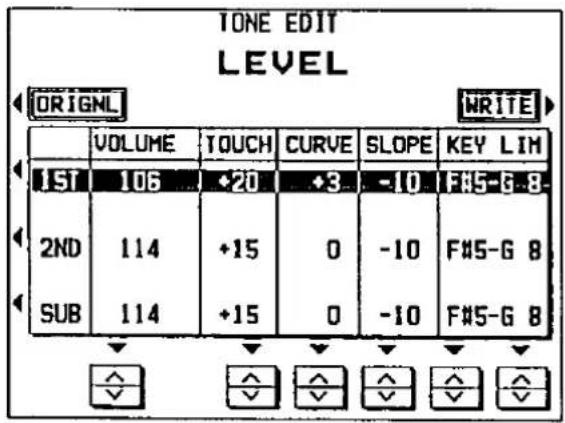
- Select the tone to modify (1ST, 2ND or SUB).
- Use the and buttons at the bottom of each column to change the setting in the column.
VOLUME
Adjust the volume of the tone (0 to 127).
TOUCH
Set the degree of volume change in proportion to key velocity (-50 to +50).
- At – settings, the softer the keyboard is played, the louder the sound. At + settings, the harder the keyboard is played, the louder the sound.
CURVE
Select the type (curve) of volume increase when the keyboard is played harder (-3 to +3).
- For details about CURVE types, refer to the separate "REFERENCE GUIDE" provided.
SLOPE
Specify the slope of the volume change (-50 to +50) with F#4 as the center.
KEY LIM
Specify the range of the keyboard which is affected by the volume change settings (C0 to G8).
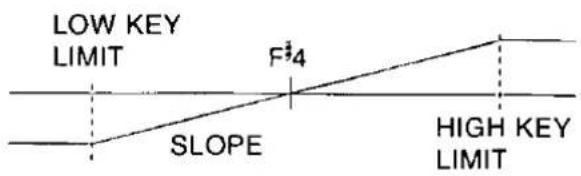
- Repeat steps 1 and 2 for the other tones as desired.
ENVELOPE
Specify how the volume changes over time, from the time the key is played to the time the sound dies out.
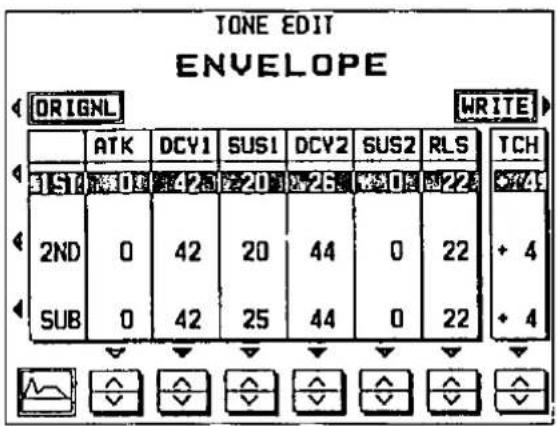
- Select the tone to modify (1ST, 2ND or SUB).
- Use the and buttons at the bottom of each column to change the setting in the column (0 to 50).
- For details about the envelope, refer to the separate "REFERENCE GUIDE" provided.
- The TCH setting changes the attack curve according to how hard the keyboard is played (-50 to +50). At a - value, the softer the keyboard is played, the faster the attack. At a + value, the harder the keyboard is played, the faster the attack.
ENVELOPE KEY FOLLOW
Specify how the envelope changes in relation to pitch.
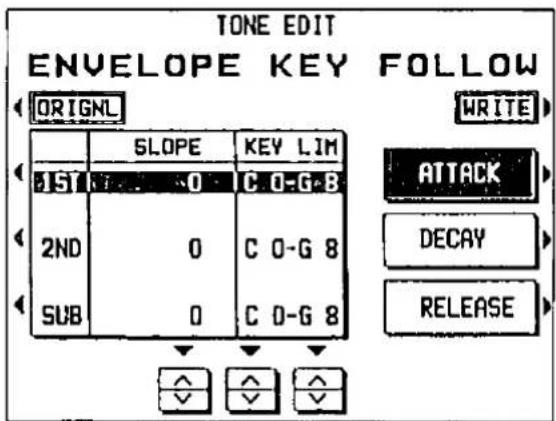
- Use the buttons to the right of the display to select the component of the envelope subject to modification (ATTACK, DECAY, RELEASE).
• The selected component is highlighted.
- If the leftmost button below the display is pressed, the current envelope is illustrated on the display.
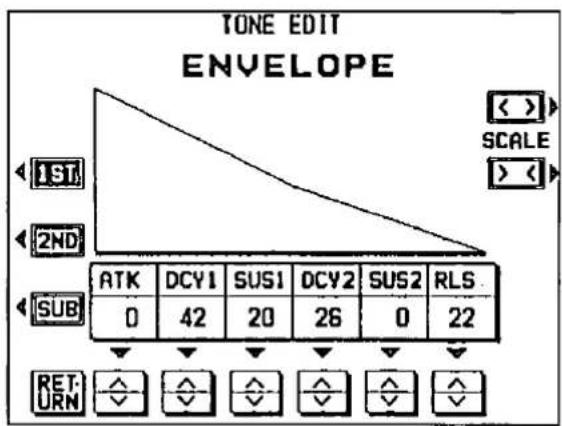
- Use the ∧ and ∨ buttons at the bottom to change the corresponding setting.
- You can use the 1ST, 2ND and SUB buttons to change the TONE.
- The size of the diagram can be changed with the SCALE button.
- Press the RETURN button to go back to the previous display.
-
Repeat steps 1 and 2 for the other tones as desired.
-
Select the tone to modify (1ST, 2ND or SUB).
- Use the ∧ and ∨ buttons at the bottom of each column to change the setting in the column.
SLOPE
Specify the slope of the volume change (-50 to +50) with F ^4 as the center.
KEY LIM
Specify the range of the keyboard which is affected by the volume change settings (C0 to G8).
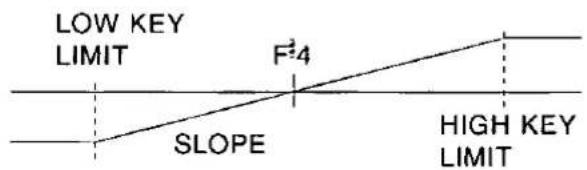
- Repeat steps 1 through 3 for the other components as desired.
FILTER
Make major changes to the sound by eliminating specific frequency ranges.
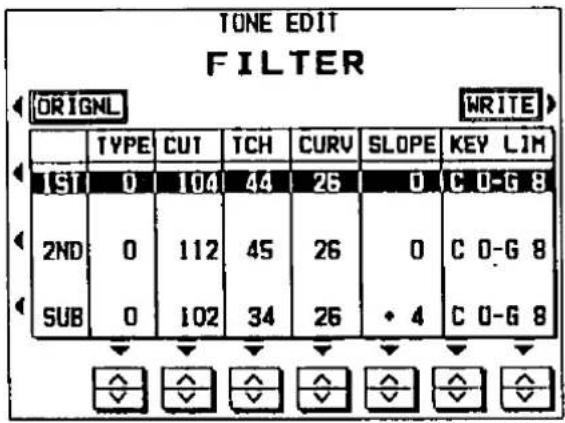
- Select the tone to modify (1ST, 2ND or SUB).
- Use the and buttons at the bottom of each column to change the setting in the column.
TYPE
0: Low-pass filter
Low-range signals are unchanged. High-range signals are cut according to the CUT value.
1 to 4: Low-pass filter + high-boost filter
A low-pass filter which emphasizes high-range signals when the CUT value is large.
- With this type of filter, the higher the number, the lower the range that is emphasized.
5 to 6: Low-pass filter + resonance
A low-pass filter which emphasizes the harmonic components of frequencies close to the CUT value.
- There is little emphasis when the CUT value is small.
- With this type of filter, the higher the number, the greater the amount of emphasis.
THRU: No filter effect is applied.
CUT
Set the frequency range which is cut by the filter (0 to 127).
TCH
Set the filter strength in proportion to key velocity (0 to 50).
CURV
Set the cut-off frequency in relation to key velocity (-3 to +3).
- For details about CURVE types, refer to the separate "REFERENCE GUIDE" provided.
SLOPE
Set the slope of the filter effect (-50 to +50) with F ^2 4 as the center.
KEY LIM
Specify the range of the keyboard which is affected by the filter (C0 to G8).
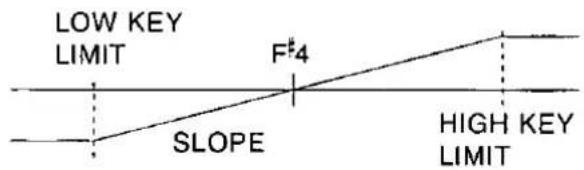
Effect Edit
Select the type of effect which is applied to your new sound when the DIGITAL EFFECT button is on, and modify the effect.
- On the SOUND EDIT menu, select EFFECT EDIT.
• The display looks similar to the following.

- The display for the effect type which is best-suited for the sound currently being edited is selected.
■ ON/OFF button
Specify whether the DIGITAL EFFECT button turns on or off when the sound is selected. When set to ON, the DIGITAL EFFECT button turns on automatically when the sound is selected. The button alternates between ON and OFF each time it is pressed.
■ STEREO/MONO button
Select stereo (STEREO) or monaural (MONO) output of the effect. The button alternates between STEREO and MONO each time it is pressed.
- Use the TYPE ∧ and ∨ buttons to select the type of effect.
- Select from the following types: CELESTE 1, 2, CHORUS 1, 2, ENSEMBLE 1, 2, TREMOLO, ORGAN TREMOLO, SINGLE DELAY, REPEAT DELAY, SOLO EFFECT 1, 2.
- Use the buttons along the bottom of the display to select the attribute you wish to adjust.
- For a detailed explanation of the parameters of each type of effect, refer to the separate "REFERENCE GUIDE" provided.
- When the type is changed, the parameters revert to the factory-preset values.
Store the new sound
The MEMORY buttons in the sound section are memory banks reserved for the sounds you create with the SOUND EDIT. You can store your original sounds in the memories, and then select them just like the factory-preset sounds.
Warning: Your new sound will be erased if you exit the SOUND EDIT mode without first storing it in a memory.
Procedure
- When you have edited the sound to just the way you like it, press the WRITE button.
- The WRITE button appears on all the editing displays and may be pressed whenever you wish to store the new sound.
- The display changes to the MEMORY WRITE display.
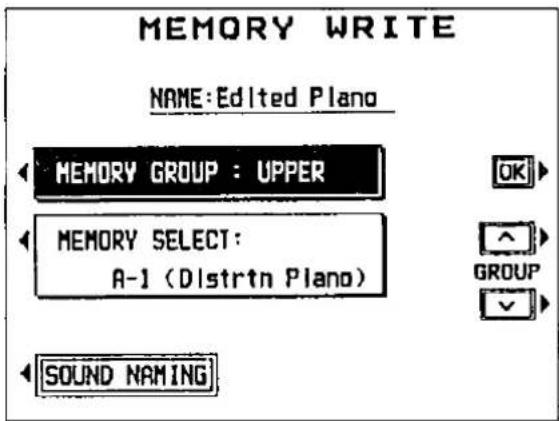
- To assign a name to your new sound, press the SOUND NAMING button.
- If you do not assign a name to your sound, the name becomes the same as the original sound from which you started. In this case, skip to step 5.
- The display changes to the SOUND NAMING display.
![SOUND NAMING Please enter the name of your new sound Piano WRITE ■ A B C D E F G H I J K L M N O P Q R S T U V W X Y Z a b c d e f g h i j k l m n o p q r s t u v w x y z o l 2 3 4 5 6 7 8 9 l " # $ x & ' ( ) * - * / = . . 0 : : ? ¥ ^ _ ! → ← < > [ ] ( ) POSITION ABC · J( ) << > < > > > CLR A/a](/content/2026/05/1069939/images/4dec2301378f11b7620d1558961a8f75d3284abfafd07a945ace9a28854e3179.jpg)
- Type a new name for your sound (up to 13 characters).
- Use the POSITION < and > buttons to highlight the character position in the name box. Use the ABC·· ] { } < and > buttons to select the character. Repeat these steps to type the whole name.
- To erase the name, press the CLR button.
-
Use the A/a button to switch between upper case and lower case characters.
-
When you have finished typing the name, press the WRITE button. • The display returns to the MEMORY WRITE display.
-
Select MEMORY GROUP. Use the GROUP ∧ and ∨ buttons to select the group in which to store the sound.
UPPER: The sound is stored in the UPPER SOUND GROUP memory.
LOWER: The sound is stored in the LOWER SOUND GROUP memory.
BASS: The sound is stored in the BASS PEDALS memory.
- Select MEMORY SELECT. Use the SELECT ∧ and ∨ buttons to select the memory number in which to store the new sound.
-
If you selected UPPER or LOWER in step 5, you can select a memory number from A1 to A18 or from B1 to B18. If you selected BASS in step 5, you can select a memory number from 1 to 18.
-
Press the OK button.
- The new sound is stored, and "WRITE COMPLETED!" is shown on the display.
• The SOUND EDIT mode is turned off. - The stored sound memories can be saved on a disk for recall at a later time. (Refer to page 107.)
Select a new sound
You can select your original sound just like the factory-preset sounds.
- In the sound group section in which the new sound is stored, press the MEMORY button to turn it on.
- For sounds stored in the UPPER or LOWER SOUND GROUP section, press the relevant MEMORY A or MEMORY B button (the bank in which you stored the sound during the MEMORY WRITE procedure).
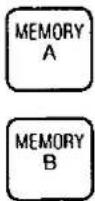
- The list of sounds in the selected bank is shown on the display.
- Select the desired sound from the list on the display.
What is MIDI?
MIDI (Musical Instrument Digital Interface) is the international standard for digital communication of electronic musical instrument data. This means that any equipment which has a MIDI terminal—such as electronic musical instruments and personal computers—can easily exchange digital data with other MIDI equipment without resorting to complicated conversions or connections.
About the MIDI terminals
(On the rear panel)
IN: The terminal by which this instrument receives data from other equipment.
OUT: The terminal that transmits data from this instrument to other equipment.
THRU: The terminal that transfers data from this instrument to other equipment.
- For these connections, use a commercially available MIDI cable.
Connection examples
■ To generate sound from a connected instrument by playing this instrument

flowchart
graph TD
    A["This instrument"] -->|OUT| B["MIDI cable"]
    B -->|IN| C["Another MIDI instrument"]
■ To generate sound from this instrument by operating a connected instrument

flowchart
graph TD
    A["This instrument"] -->|IN| B["MIDI cable"]
    B -->|OUT| C["Another MIDI instrument"]
■ To connect with a MIDI sequencer or a personal computer

flowchart
graph TD
    A["OUT"] --> B["This instrument"]
    C["IN"] --> B
    B --> D["MIDI cable"]
    E["OUT"] --> F["MIDI sequencer"]
    G["IN"] --> F
MIDI channels
Many different kinds of performance data are sent using just one MIDI cable. This is possible because MIDI signals are sent and received through 16 different "basic channels" (numbered 1 to 16). In order for the exchange of data to take place, the channels on the transmission side must match the channels on the receiving side. This characteristic also makes it possible to link multiple sound generators and to control each by matching specific channels.
The following kinds of data can be transmitted/received.
Note data
This is the most basic kind of MIDI data which is exchanged, and is used to specify which keys are played and how hard they are played.
Note number: Number specifying which key is played.
Note on: Specifies that a key is played.
Note off: Specifies that a key is released.
Velocity: Specifies how hard a key is struck.
- MIDI notes are assigned numbers from 0 to 127, with middle C (C3) as 60. Note pitches are in semitone increments, with the higher numbers assigned to the higher pitches.
■ Program change
This is sound change data. When a different sound is selected on the transmitting instrument, the sound on the receiving instrument also changes.
■ Control change
These are volume, sustain, effect, etc. data used to enhance performance expression. Each function is distinguished by its control number, and the function which can be changed by the control differs depending on the instrument.
GENERAL MIDI
GENERAL MIDI (GM) is the standard which enables MIDI data exchange between different models or equipment of different manufacture. Program change numbers and their corresponding sounds, percussion instrument sounds, note numbers, etc. are data-compatible between equipment using this standard.
Song data created on the equipment of one manufacturer can be played back on the equipment of a different manufacturer, as long as both conform to the GENERAL MIDI standard.
This instrument conforms to this standard and can be used as a GENERAL MIDI sound generator.
Equipment which conforms to GENERAL MIDI standards is indicated by the following logo.

Outline of MIDI functions
Select the various settings which are used for MIDI operation of the instrument.
Outline of procedure
- Press the MIDI button to turn it on.

• The display changes to the following menu.
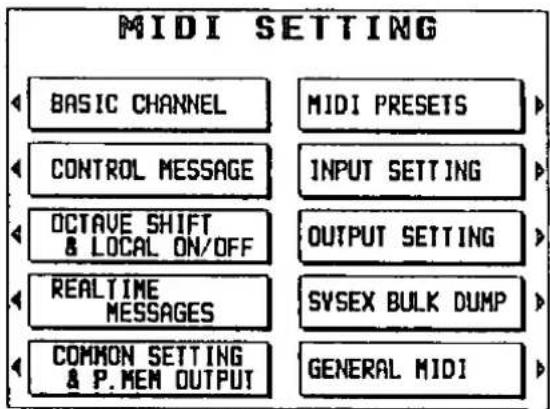
BASIC CHANNEL (page 145)
Assign a MIDI channel to each part.
CONTROL MESSAGE (page 146)
Enable or disable the exchange of various control data.
Make the OCTAVE and LOCAL CONTROL settings for each part.
REALTIME MESSAGES (page 147)
Make the REALTIME COMMAND and CLOCK settings.
COMMON SETTING & P. MEM OUTPUT (page 148)
Functions which are common to all parts.
SETTING 1
PROG. CHANGE TO P. MEM
NOTE ONLY
SETTING 2
AUTO PLAY CHORD CONTROL
SETTING 3
TRANSPOSE
PROGRAM CHANGE MODE
DRUMS TYPE
SONG SELECT
SETUP LOAD
Settings related to LOCAL CONTROL by
PANEL MEMORY operation.
PANEL MEMORY PROGRAM CHANGE
Settings related to PROGRAM CHANGE BY
PANEL MEMORY operation.
MIDI PRESETS (page 151)
Establish the optimum settings depending on how this instrument is connected to other equipment.
INPUT SETTING (page 152)
Various settings related to data reception.
OUTPUT SETTING (page 152)
Various settings related to data transmission.
SYSEX BULK DUMP (page 153)
Settings related to SYSTEM EXCLUSIVE data exchange.
GENERAL MIDI (page 153)
Specify whether this instrument is compatible with GENERAL MIDI standard instruments.
- Select the menu and perform the setting procedures.
- During the setting display, you can press the EXIT button to go back to the previous display. To show other menus, use the EXIT button to return to the MIDI SETTING menu display, and make another selection.
- When the TEMPO/PROGRAM indicator is lit, it indicates that the dial is available for setting the current function.
- When you have finished adjusting the settings, press the MIDI button to turn it off.
MIDI Implementation Chart
Although MIDI makes it easy for you to connect various instruments for an enhanced performance, it does not necessarily follow that all MIDI data can be exchanged. For example, if the transmitting instrument handles data that the receiving instrument can not, then such data cannot be successfully sent. For data to be exchanged, both instruments must be able to handle it. You can find out what kind of data can be sent or received by each instrument by referring to the MIDI Implementation Chart for each instrument. The MIDI Implementation Chart for this instrument can be found in the separate "REFERENCE GUIDE" provided.
MIDI data format
A detailed explanation of how MIDI data of this instrument is organized can be found in the separate "REFERENCE GUIDE" provided.
Setting the functions
Select the relevant menu and perform the procedure to set the functions.
BASIC CHANNEL
Channel numbers have already been assigned to parts (factory-presets), but you can reassign channel numbers to parts as desired.
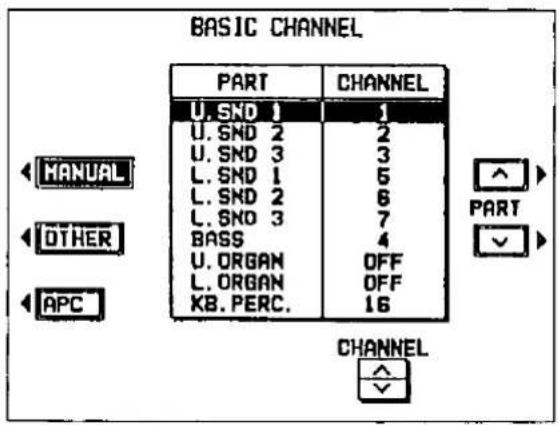
- Use the buttons to the left of the display to select the group of parts.
MANUAL: U.SND 1 to 3, L.SND 1 to 3, BASS, U.ORGAN, L.ORGAN, KB. PERC.
OTHER: PART 8 to 15, CONTROL
APC: ACCOMP 1 to 3, BASS, DRUMS, CHORD - Use the PART ∧ and ∨ buttons to select the part.
- Use the CHANNEL ∧ and ∨ buttons to select a basic channel for the part (OFF, 1 to 16).
- A part which has been set to OFF cannot be used to transmit or receive MIDI data.
- Repeat steps 1 to 3 for each part as desired.
CONTROL MESSAGE
Enable or disable the exchange of various control data.
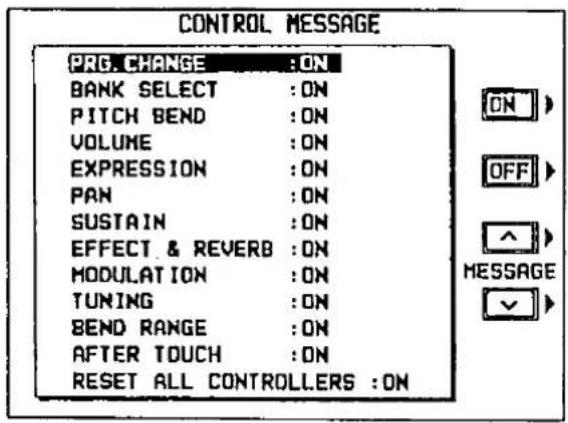
- Use the MESSAGE ∧ and ∨ buttons to select the control message.
- Use the ON and OFF buttons to specify on or off for the control message.
ON: Data for the control operation is exchanged.
OFF: Data for the control operation is not exchanged.
- The BANK SELECT setting is effective only when PRG. CHANGE is set to ON.
- The EFFECT & REVERB setting controls the DIGITAL EFFECT, DSP EFFECT, TREMOLO and DIGITAL REVERB on/off.
- The TUNING setting is the on/off setting for the TUNING and KEY SHIFT settings.
- Repeat steps 1 and 2 for each control as desired.
Set the octave shift value for key notes transmitted from this instrument (OCTAVE), and specify whether this instrument's sound generator is enabled when MIDI data is transmitted (LOCAL CONTROL).
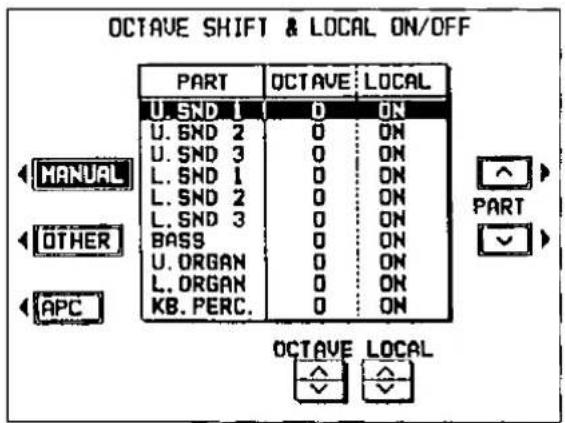
- Use the buttons to the left of the display to select the group of parts.
MANUAL: U.SND 1 to 3, L.SND 1 to 3, BASS, U.ORGAN, L.ORGAN, KB. PERC.
OTHER: PART 8 to 15
APC: ACCOMP 1 to 3, BASS, DRUMS, CHORD
- Use the PART ∧ and ∨ buttons to select the part.
- Use the and v buttons to change the setting for the corresponding function.
OCTAVE (-3 to 3)
- Set the octave shift value. Octave shift is set for transmitted data only; however the transmitted and received octave shifts are linked. For example, if the transmitted octave shift is set to 1, the received octave shift is automatically set to -1.
LOCAL (ON/OFF)
- When set to ON, the performance from this instrument is transmitted as MIDI data and also sounds from this instrument. When set to OFF, the performance from this instrument is transmitted as MIDI data but does not sound from this instrument.
- Repeat steps 1 to 3 for each part as desired.
REALTIME MESSAGE
Enable or disable the exchange of START/STOP data (REALTIME COMMANDS), and select the CLOCK mode.
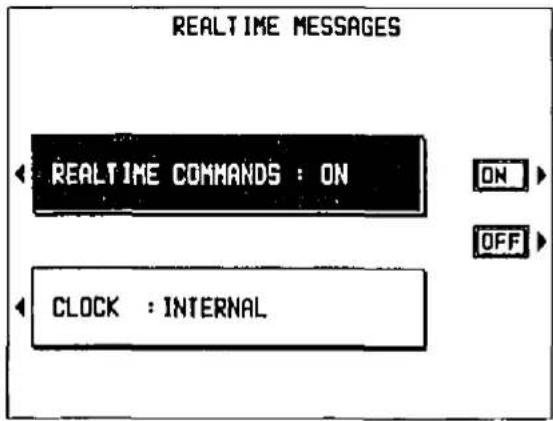
- Use the buttons to the left of the display to select a function (REALTIME COMMANDS or CLOCK).
- Use the ON and OFF buttons, or the ∧ and ∨ buttons, to change the setting.
REALTIME COMMANDS
ON: Rhythm and SEQUENCER start/stop, continue, and song position pointer data can be transmitted/received.
OFF: This data cannot be transmitted/received.
CLOCK
INTERNAL: This instrument's internal clock is used to control the performance. The clock of the connected equipment is disabled.
MIDI: The clock of the connected equipment is used to control the performance. This instrument's clock is disabled.
- When MIDI is selected, the tempo is displayed as “-- -” and the rhythm and SEQUENCER are disabled until the CLOCK signal is received from the connected instrument.
- Repeat steps 1 and 2 as desired.
COMMON SETTING & PANEL MEMORY OUTPUT
Set the functions which are common to all parts.
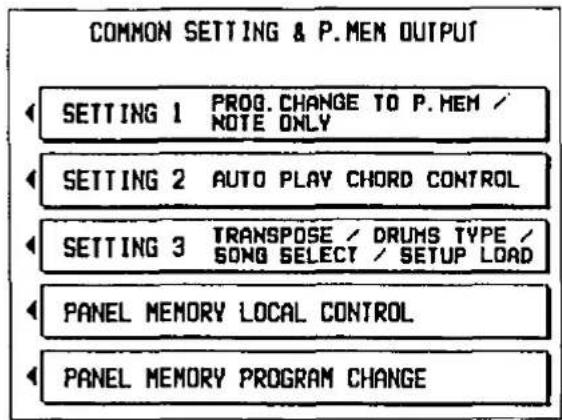
■ COMMON SETTING 1
- On the COMMON SETTING menu display, select SETTING 1.
• The display changes to the following.
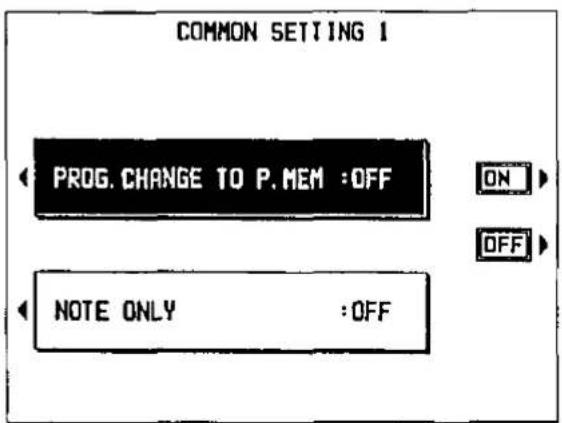
- Use the buttons to the left of the display to select the function.
PROG. CHG TO P. MEM
Enable or disable the exchange of program change numbers for the U.SOUND1 part by operation of the PANEL MEMORY buttons. The PANEL MEMORY 1 to 16 buttons correspond to program change numbers 0 to 15.
NOTE ONLY
Of the performance data, specify whether or not only note data is exchanged.
- Use the ON and OFF buttons to select on or off.
ON: Data exchange is enabled.
OFF: Data exchange is disabled. - Repeat steps 2 and 3 for the other settings as desired.
■ COMMON SETTING 2
- On the COMMON SETTING menu display, select SETTING 2.
• The display changes to the following.
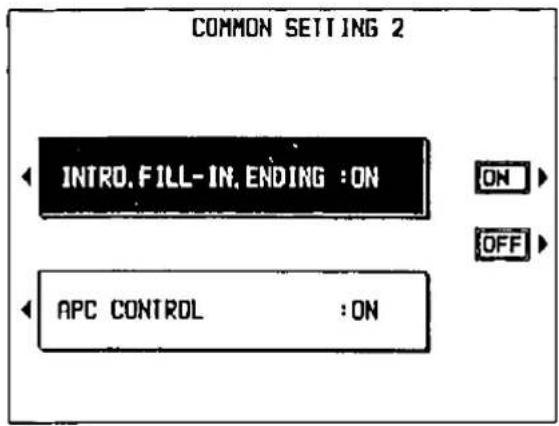
- Use the buttons the left of the display to select the function.
INTRO, FILL IN, ENDING
Enable or disable the exchange of intro, fill-in and ending data.
- Data is exchanged on the channel for the DRUMS part.
APC CONTROL
Enable the exchange of data for the on/off status of the AUTO PLAY CHORD's ONE FINGER, FINGERED and PIANIST modes.
- Data is exchanged on the channel for the L.SOUND 1 part.
- Use the ON and OFF buttons to select on or off.
ON: Data exchange is enabled.
OFF: Data exchange is disabled.
- Repeat steps 2 and 3 for the other setting as desired.
■ COMMON SETTING 3
- On the COMMON SETTING menu display, select SETTING 3.
• The display changes to the following.
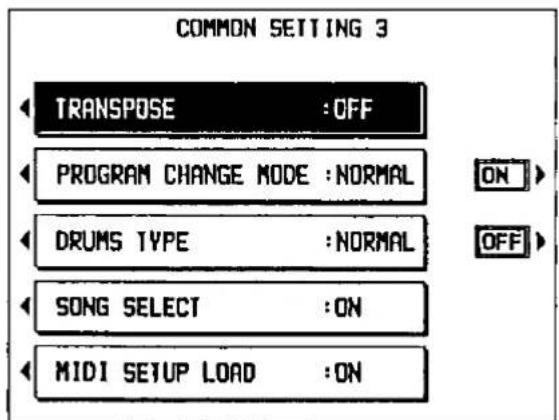
- Use the buttons the left of the display to select the function.
TRANSPOSE
ON: The note number of the transposed note is transmitted/received.
OFF: The note number of the played key is transmitted/received.
PROGRAM CHANGE MODE
NORMAL: The program change numbers follow the order of the sound buttons as they are lined up on the panel.
TECH: Program change numbers are standardized among all Technics models which are set to this mode. The program change number assigned to a given sound on one model is assigned to the same sound on all models which are set to the same mode.
GM: Program change numbers follow the GM standard.
- The program change numbers for each mode can be found in the separate "REFERENCE GUIDE" provided.
DRUMS TYPE
NORMAL: Keyboard percussion instrument sounds correspond to this instrument's key note numbers.
TECH: Keyboard percussion instrument sounds correspond to the same key note numbers for connected Technics models set to this type. (The closest instrument sound is automatically selected.)
GM: Keyboard percussion instrument sounds follow the GM standard.
SONG SELECT
ON: Song number data can be exchanged.
OFF: Song number data cannot be exchanged.
MIDI SETUP LOAD
ON: When disk data is loaded, the MIDI settings stored on the disk are automatically recalled.
OFF: MIDI settings stored on the disk are not recalled.
-
Use the ∧ and ∨ buttons, or the ON and OFF buttons, to change the settings.
-
Repeat steps 2 and 3 for the other functions as desired.
During a performance, you can change the sound generator setting and MIDI mode setting by changing the PANEL MEMORY selection.
- On the COMMON SETTING menu display, select PANEL MEMORY LOCAL CONTROL.
• The display changes to the following.
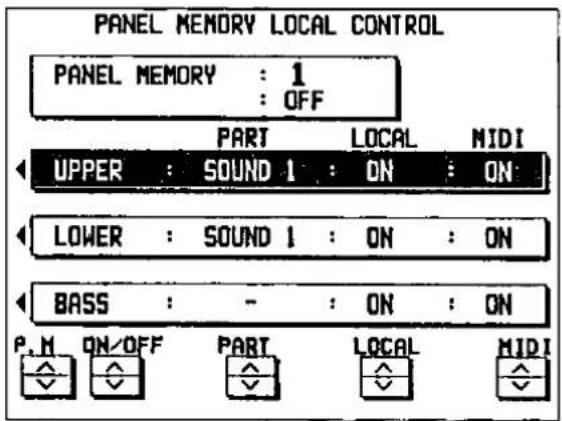
-
Use the P.M ∧ and ∨ buttons to specify the PANEL MEMORY number.
-
Use the ON/OFF ∧ and ∨ buttons to turn the specified PANEL MEMORY local control on or off.
ON: The PANEL MEMORY settings of this instrument are effective.
OFF: The PANEL MEMORY settings of this instrument are not effective.
- Use the PART ∧ and ∨ buttons to select a part (SOUND 1 to 3).
- Use the LOCAL or MIDI ∧ and ∨ buttons to select the mode.
LOCAL
ON: The performance from this instrument sounds from this instrument.
OFF: The performance from this instrument does not sound from this instrument.
MIDI
ON: Performance data and control data are transmitted.
OFF: Performance data and control data are not transmitted.
- Repeat steps 4 and 5 for each part as desired.
- Repeat steps 2 through 6 for each PANEL MEMORY number as desired.
■ PANEL MEMORY PROGRAM CHANGE
Specify how PANEL MEMORY operation affects transmission of program change data for the SOUND 1 to 3, ORGAN and BASS parts.
- On the COMMON SETTING menu display, select PANEL MEMORY PROGRAM CHANGE.
• The display changes to the following.
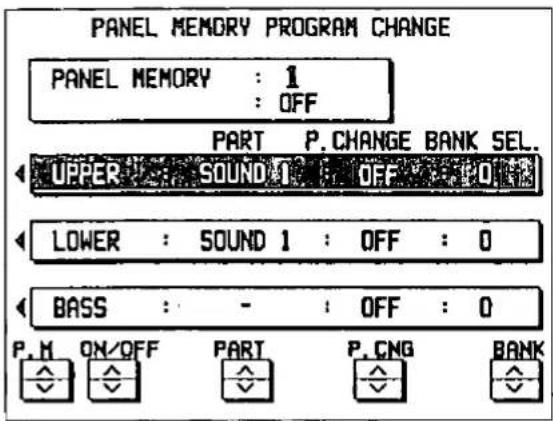
-
Use the P.M ∧ and ∨ buttons to specify a PANEL MEMORY number.
-
Use the ON/OFF ∧ and ∨ buttons to turn the specified PANEL MEMORY program change output to on or off.
ON: The PANEL MEMORY settings of this instrument are effective.
OFF: The PANEL MEMORY settings of this instrument are not effective.
-
Use the PART ∧ and ∨ buttons to select a part (SOUND 1 to 3).
-
Use the P.CNG ∧ and ∨ buttons to specify a PROGRAM CHANGE number (0 to 127, OFF), and the BANK ∧ and ∨ buttons to specify a BANK SELECT number (0 to 255).
-
Repeat steps 4 and 5 for each part as desired.
-
Repeat steps 2 through 6 for each PANEL MEMORY number as desired.
MIDI PRESETS
Establish the optimum settings depending on how this instrument is connected to other equipment, and on whether this instrument is used as the master or the slave.
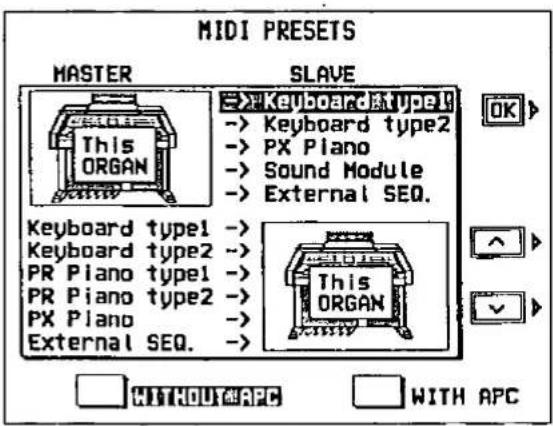
- Use the and buttons to select the connection setup.
- The MASTER is the instrument used to transmit data, and the SLAVE is the instrument used to receive the data.
- Use the buttons at the bottom of the display to select WITHOUT APC or WITH APC.
WITHOUT APC
AUTO PLAY CHORD is not used.
WITH APC
Performance includes AUTO PLAY CHORD performance.
-
Press the OK button.
-
When the settings have been successfully stored, "COMPLETED!" appears on the display.
- Detailed information about the MIDI PRESETS can be found in the separate "REFERENCE GUIDE" provided.
INPUT SETTING
Make the settings which determine how various performance data is treated during data reception.
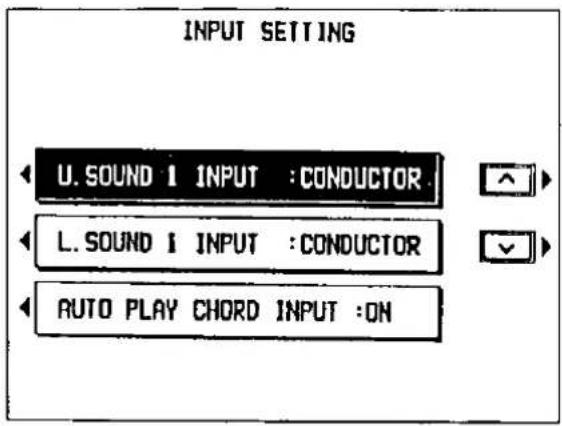
- Use the buttons to the left of the display to select the item.
U.SOUND 1 INPUT, or L.SOUND 1 INPUT CONDUCTOR: When data for the U.SOUND 1, or L.SOUND 1, part is received, the CON- DUCTOR of this instrument determines which part it is used for.
DIRECT: When data for the U.SOUND 1, or L.SOUND 1, part is received, it is treated only as UPPER SOUND 1, or LOWER SOUND 1, data.
AUTO PLAY CHORD INPUT ON: Input data for the ACCOMP 1, 2, 3, BASS, DRUMS and CHORD parts is received.
OFF: Data for the above parts is not received.
-
Use the ∧ and ∨ buttons, or the ON and OFF buttons, to change the setting.
-
Repeat steps 1 and 2 for each item as desired.
OUTPUT SETTING
Make the settings which determine how various performance data is treated during data transmission.
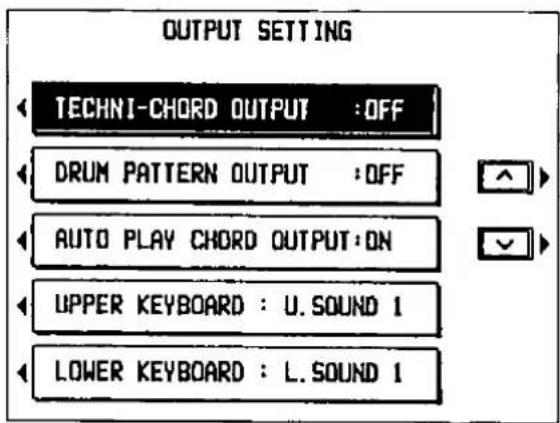
- Use the buttons to the left of the display to select the item.
TECHNI-CHORD OUTPUT ON: Keyboard notes generated by the TECH- NI-CHORD function are also transmitted.
OFF: Only key note data of the pressed keys is transmitted.
DRUM PATTERN OUTPUT ON: Data from the DRUMS part is transmitted. OFF: Data from the DRUMS part is not transmitted.
AUTO PLAY CHORD OUTPUT ON: The data for the ACCOMP 1, 2, 3, BASS and CHORD parts is transmitted.
OFF: The data for the above parts is not transmitted.
UPPER KEYBOARD/LOWER KEYBOARD CONDUCTOR: Upper and lower keyboard note data is transmitted on the basic channels corresponding to the selected ORCHESTRAL CONDUCTOR parts.
U/L.SOUND 1: Upper and lower keyboard note data is transmitted on the basic channel to which the SOUND 1 part is assigned.
-
Use the ∧ and ∨ buttons, or the ON and OFF buttons, to change the setting.
-
Repeat steps 1 and 2 for each item as desired.
SYSTEM EXCLUSIVE BULK DUMP
This instrument's internal data such as panel settings, performance data, etc. can be transmitted to an received from another SX-F100 Organ or other MIDI equipment as SYSTEM EXCLUSIVE data.
- Sound is not generated from this instrument during this procedure.
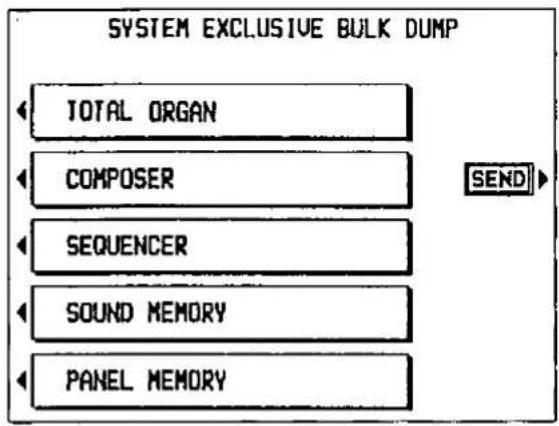
■ Transmitting
- Follow the procedure necessary to prepare the receiving instrument for data reception.
- Use the buttons to the left of the display to select the type of data to transmit (TOTAL ORGAN, COMPOSER, SEQUENCER, SOUND MEMORY or PANEL MEMORY).
- Press the SEND button.
- During transmission, the transmitting status is shown on the display.
■ Receiving
After accessing this display on this instrument, follow the transmission procedure on the transmission side.
- During reception, the receiving status is shown on the display.
GENERAL MIDI
Make the GENERAL MIDI settings. (A brief explanation of GENERAL MIDI is on page 143.)
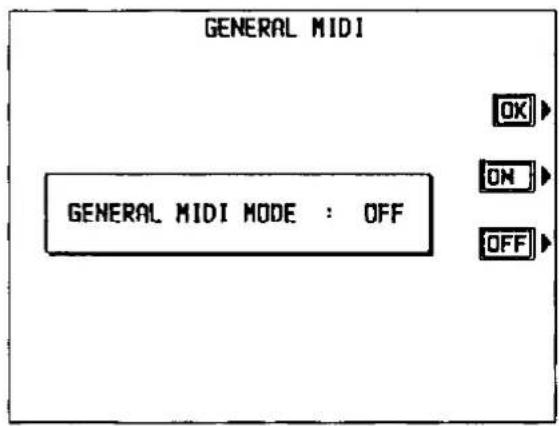
Warning
- The SEQUENCER memory is cleared when the GENERAL MIDI mode is changed.
-
If the power is turned off while the GENERAL MIDI mode is ON, the setting is automatically set to OFF and the SEQUENCER memory is cleared.
-
Use the ON and OFF buttons to specify whether or not this instrument should be compatible with GENERAL MIDI standard instruments.
-
This setting is automatically set to ON if data is loaded from a disk for which the GM mode was set to on, or from a disk for which the GM mode has not been specified.
- If ON is selected, the status of this instrument changes to the GENERAL MIDI status, and the sounds and operations which can be selected are limited. In addition, the arrangement of percussion sounds on the keyboard changes. (Refer to the separate "REFERENCE GUIDE" provided.)
-
If GENERAL MIDI on/off data is received from connected MIDI equipment, the received data has priority.
-
Press the OK button.
- The confirmation display appears. Press the YES button to execute the function, or press the NO button to cancel the function.
Initialize
This instrument has many settable functions and storable memories. However, you can return the settings and memories to the factory-preset status.
INITIAL
- Press the MEM & CTRL button to turn it on.
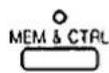
• The display changes to the following.
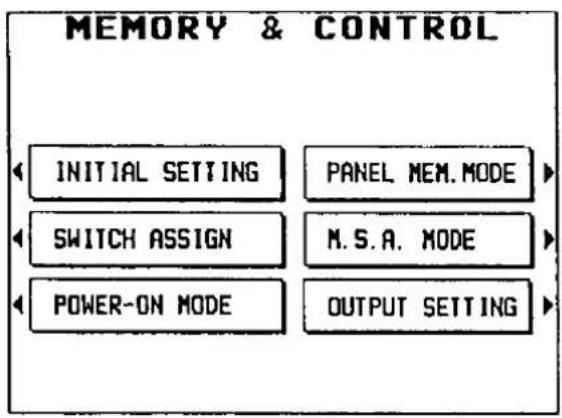
flowchart
graph TD
    A["INITIAL SETTING"] --> B["PANEL MEM.MODE"]
    C["SWITCH ASSIGN"] --> D["M.S.A. MODE"]
    E["POWER-ON MODE"] --> F["OUTPUT SETTING"]
- Select INITIAL.
• The display changes to the following.
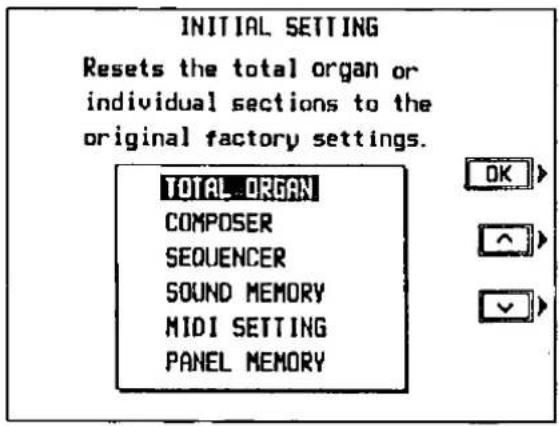
- Use the ∧ and ∨ buttons to select the desired type of initialization (TOTAL SETTING, COMPOSER, SEQUENCER, SOUND MEMORY, MIDI SETTING, PANEL MEMORY).
-
Press the OK button.
-
The display changes to the confirmation display. Press the YES button if you wish to execute the initialization. Press the NO button if you wish to cancel the procedure.
- When you press the YES button, initialization begins. When initialization is competed, the instrument returns to the normal performance mode.
- You can also reset all the instrument settings with the following procedure: Turn off the POWER button once. Then, while pressing the three lower left buttons in the RHYTHM GROUP section at the same time, turn the POWER button on again.
■ About the backup memory
The panel settings, PANEL MEMORY and MIDI settings are maintained in the backup memory for about one week after the power to this instrument is turned off. Other stored memories, such as the SEQUENCER and COMPOSER, are maintained for about 80 minutes. If you wish to keep the memory contents, before you turn off the instrument, use the SAVE procedure to store the desired data on a disk for recall at a later time.
- The backup memory does not function until the power has been on for about 10 minutes.
- When you quit the operating mode, a warning display may appear to remind you to save the data. If this occurs, after checking the reminder, press the OK button.
■ Power-on settings
When the power to this instrument is turned on, ORGAN settings are automatically selected.
- If you wish to retain the settings which were in effect when you last turned off this instrument, set the POWER-ON MODE to BACK UP. (Refer to page 126.)
Connections
(On the rear panel)
AUX IN (input level 500 mV, 33 kΩ)
Other instruments such as a keyboard can be connected to the organ so that the signal is output from the organ. To receive monaural sound, connect instruments to the R/R+L terminal. (In this case, do not use the L terminal.)
MIDI (Refer to page 142.)
(Beneath the right side of the lower keyboard)
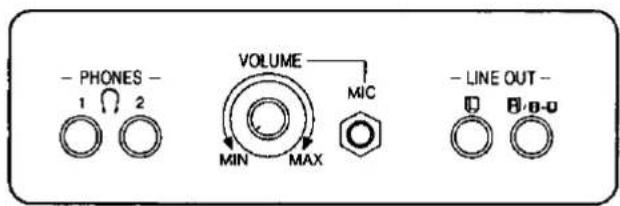
PHONES
For silent practice, headphones may be used. When plugged in, this instrument's speaker system is automatically switched off, and the sound is heard only through the headphones.
MIC (input level 7.5 mV, 10 kΩ)
A microphone can be connected to this terminal for output from the organ's speakers. You can, for example, sing while you play the organ, and both sounds are heard from the organ's speakers. Control the output level with the VOLUME control.
SEPARATED LINE OUT
The signals of the BASS, DRUMS and ORGAN parts can be output independently from these terminals.
- The DRUMS output signal can be stereo. For monaural output, connect the speaker to the R/R+L terminal. (In this case, do not use the L terminal.)
- For more information on the use of these terminals, refer to page 127.
LINE OUT (output level 1.0 Vrms, 600 Ω)
By connecting an external high-power amplifier, the sound can be reproduced at a high volume. To output monaural sound, connect the external equipment to the R/R+L terminal. (Do not connect the L terminal.)
- You can specify whether or not the ORGAN, BASS and DRUMS part sounds are output from these terminals. (Refer to page 127.)
Assembly
Please follow the procedure below to assemble the pedal keyboard.
• To prevent the pedal keyboard, reverse the procedure.
- Detach the cord from the clamp on the organ base.
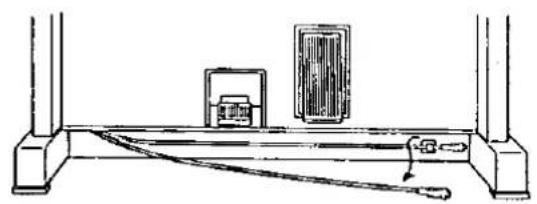
natural_image
Simple line drawing of a mechanical setup with two blocks and a tool, no text or symbols present.- Gently push the pedal keyboard unit in the direction of the arrow, taking care not to scratch the organ base.
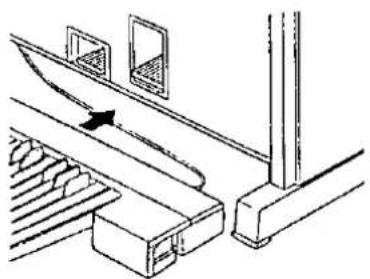
natural_image
Technical line drawing of a mechanical assembly with a lever and guide mechanism (no text or symbols)-
Connect the connector to the pedal keyboard unit as shown in the figure.
-
When inserting the connector, hold portion of the plug and push it in firmly until you hear a click.
- When removing the connector, hold portion B of the plug and pull.

Disassembly
If the organ is to be moved, transport will be facilitated by first disassembling the organ following the procedure below.
- Disconnect the speaker cord and pedal cord.
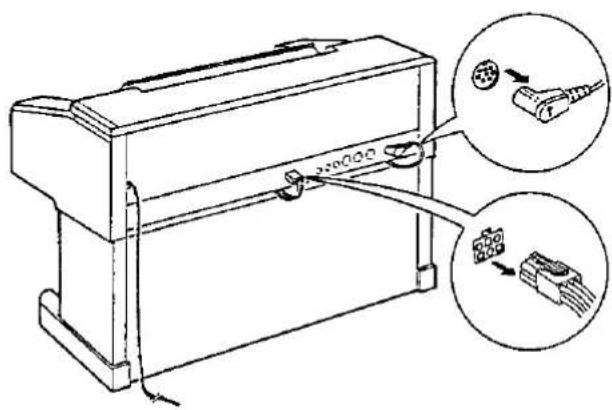
- Remove the four bolts which secure the upper organ unit to the lower organ unit. Lock the keyboard cover.
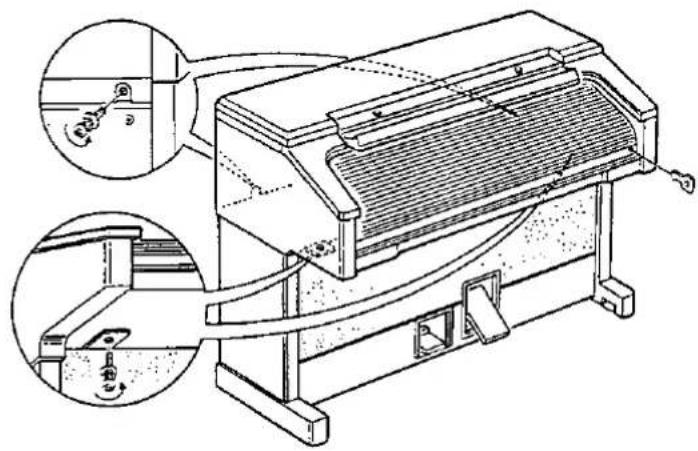
natural_image
Technical line drawing of a mechanical device with two circular insets showing internal components (no text or symbols)- Gently slide the upper organ unit slightly to the rear, and remove the upper organ unit from the lower organ unit.
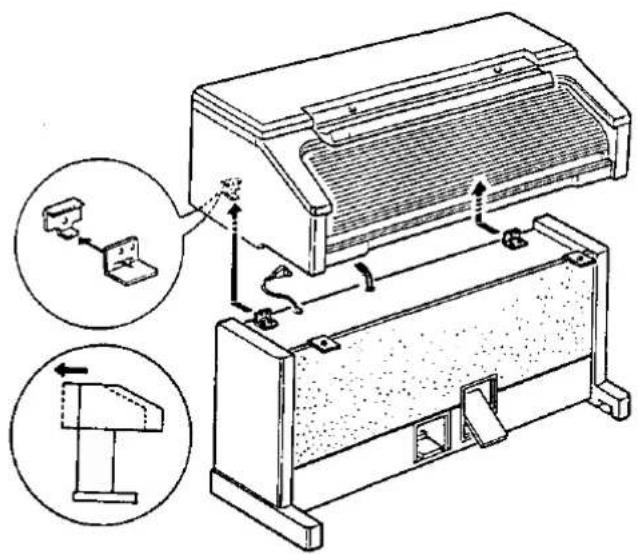
- As shown in the figure, screw the four bolts removed in step 2 into the metal joints of the lower organ unit.
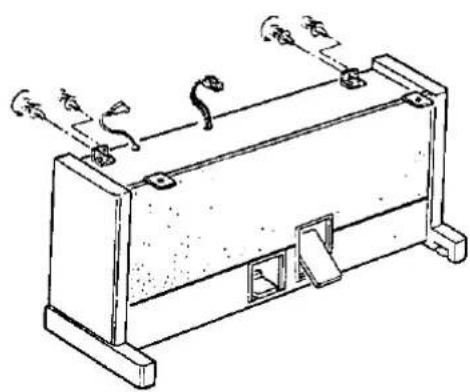
natural_image
Line drawing of a mechanical device with springs and connectors (no text or symbols)Symptoms which appear to be signs of trouble
The following changes in performance may occur in the Technics Organ but do not indicate trouble.
| Phenomenon | Remedy | |
| Sounds and effects | The buttons, keys, etc. malfunction. | Turn off the POWER button once, then turn it on again. If this procedure is not successful, turn off the POWER button once. Then, while pressing the three lower left buttons in the RHYTHM GROUP section (BALLAD POP, TRAD DANCE and MODERN DANCE) at the same time, turn the POWER button on again. (Note that, in this case, all programmable settings, functions and memories return to their factory-preset status.) |
| No sound is produced when the keys are pressed. | The MAIN VOLUME is at the minimum setting. Adjust the volume with the MAIN VOLUME control.The volumes for the selected parts are set to the minimum levels. Use the balance buttons to set the volumes of the relevant parts to appropriate levels. (Refer to page 29.)The local control for a part performed on the keyboard is set to OFF. Set the local control to ON. (Refer to page 146.) | |
| The volume is very low when the keyboard is played. | The volume setting in the SEQUENCER contents is very low. Follow the INITIAL procedure to reset the settings. (Refer to page 154.) | |
| Some sounds cannot be selected. | When the GENERAL MIDI mode is set to ON, the sounds which can be selected and operations which can be executed are limited. Set the GENERAL MIDI mode to OFF to return the instrument to its normal operation. (Refer to page 153.) | |
| Only percussive instrument sounds are produced when the lower keyboard is played. | The KEYBOARD PERCUSSION button is on. | |
| The knee lever, foot switch(es) and full bass pedal do not operate properly. For example, the knee lever does not turn the SUSTAIN function on and off. | Any functional on and off operation other than the factory presets are storable in these switches. For example, the knee lever can turn the TECHNI-CHORD on and off. Store your favorite functions to turn them on and off. (Refer to page 125.) | |
| The sound of the lower keyboard does not stop. | The MEMORY button of the AUTO PLAY CHORD is on. Turn off the MEMORY button. | |
| Rhythm | The rhythm does not start. | The DRUMS volume is set to the minimum level. Use the balance buttons to set the DRUMS volume to an appropriate level.In the RHYTHM GROUP section, a rhythm in COMPOSER A or COMPOSER B with no stored pattern was selected. Select a different rhythm.A SEQUENCER track button is on. When you are not playing back the SEQUENCER performance, turn off the track buttons.CLOCK is set to MIDI. Set CLOCK to INTERNAL. (Refer to page 147.)The rhythm does not work when the GENERAL MIDI mode is set to ON. Set the GENERAL MIDI mode to OFF. (Refer to page 153.) |
| SEQUENCER | Storage is not possible. | ·The remaining memory capacity of the SEQUENCER is 0. Follow the SONG CLEAR or TRACK CLEAR procedure to erase the memory. (Refer to pages 82 and 83.) |
| Multi-track storage is not possible. | ·The playback track has been selected, but the START/STOP button has not been pressed. A flashing track indicator shows the track which is ready for recording, and a lit track indicator shows a track which is ready for playback. To record one track while listening to another (playback) track, press the START/STOP button to begin playback. (Refer to page 73.) | |
| The playback measure indication is different from when the performance was recorded. | ·The number of measures corresponds to the time signature of the rhythm selected at the start of recording. To change the rhythm in the middle of the song, record the rhythm change in the RHYTHM part. (Refer to page 78.) | |
| AUTO PLAY CHORD | No sound is produced for the automatic accompaniment. | ·In the RHYTHM GROUP section, a rhythm in COMPOSER A or COMPOSER B with no stored pattern was selected. Select a different rhythm. |
| No sound is produced for the automatic accompaniment, or only the sounds of some parts are produced. | ·Some or all of the ACCOMP 1, 2 and 3 buttons are turned off. Press the buttons to turn them on. | |
| COMPOSER | Storage is not possible. | ·The remaining memory capacity of the COMPOSER is 0. |
| Setting the time signature and number of measures is not possible. | ·The time signature and number of measures cannot be changed for a pattern which is currently recorded in the COMPOSER. If you wish to change the time signature and/or measure data, first follow the procedure to clear the memory. (Refer to page 97.) | |
| The playback timing of the rhythm pattern is different from the timing with which it was recorded. | ·The QUANTIZE function was on when the pattern was recorded and the timing was automatically corrected. Set the quantize level to a smaller note unit or to OFF when recording. (Refer to page 99.) | |
| Disk Drive | The Disk Drive produces a noise during recording or playback. | ·This occurs when the Disk Drive is reading a disk. It does not indicate a problem. |
| When the procedure to load from a disk is performed, the contents of the keyboard memory are erased. | ·When performing the load operation from a disk, the keyboard memory changes to that of the data loaded from the disk. If you wish to preserve a song which is stored in the keyboard memory, save it on a disk before performing the load procedure. (Refer to page 107.) | |
| Other | Noise from a radio or TV can be heard. | ·This sometimes occurs when electrical equipment such as a radio or TV is used near the instrument. Try moving such electrical equipment further away from the instrument.·The sound may be coming from a nearby broadcast station or amateur radio station. If the sound is bothersome, consult your dealer or service center. |
| The cabinet becomes warm during use. | ·This instrument has a built-in power source that heats the cabinet to some degree. This is not an indication of trouble. | |
Error messages
| No. | Contents |
| 00 | The data on the disk that you are using is for a different product. |
| 01 | An error has occurred while the disk was loading.Please try again! |
| 02 | There is no disk in the Disk Drive. |
| 03 | The file that you tried to load is empty. |
| 05 | An error has occurred while the disk was saving.Please try again! |
| 06 | The disk that you are using is write protected.Please remove the write protection and try again. |
| 07 | The disk that you are using is full.Please use another disk. |
| 08 | An error has occurred while the disk was formatting. The disk that you are using may be faulty.Please try formatting another disk. |
| 10 | The data is already copy protected. |
| 11 | The password that you entered is incorrect. |
| 20 | A problem has occurred with your SEQUENCER Data.This might be due to a damaged or faulty disk. |
| 21 | Memory full |
| 22 | It is necessary to press PUNCH OUT to complete this procedure. |
| 23 | It is impossible to change the time signature because it has already been set in the existing tracks. |
| 24 | A rhythm track already exists. It is impossible to assign two tracks to rhythm. |
| 25 | It is only possible to change the velocity on a melody track. |
| 26 | It is only possible to merge melody tracks.Tracks such as rhythm, chord and control cannot be merged. |
| No. | Contents |
| 27 | It is only possible to copy melody tracks.Tracks such as rhythm, chord and control cannot be copied. |
| 28 | This song is too long to be saved as a MIDI file. |
| 29 | The MIDI file that you have tried to load exceeds the memory capacity of this organ and cannot be played. The SEQUENCER memory has been cleared. |
| 30 | It is not possible to change the time signature or measure length of a COMPOSER pattern after it has been recorded. If you want to proceed, you must first clear the entire COMPOSER pattern. |
| 31 | The time signature of the pattern from which you are copying is different from the COMPOSER memory that you are using.Either: Change the time signature of the COMPOSER memory or: Copy from a pattern that has the same time signature. |
| 32 | Memory full |
| 40 | The Identification (ID) code of the system exclusive data received by this organ is for a different product. |
| 41 | An error has occurred during system exclusive data reception. The data from the transmitting device may be incomplete.Please try again. |
| 42 | An error has occurred during system exclusive transmission. The data has not been received correctly.Please try again. |
| 43 | The file that you are trying to load was saved on a previous Technics Organ. It is only possible to load using the "ALL" option. |
| 44 | It is impossible to edit a Drum Kit.Please select a different sound from any group except Keyboard Percussion. |
Index
ACCOMP 62
AUTO PLAY CHORD 21,59
LOWER ORCHESTRAL CONDUCTOR. See
ORCHESTRAL CONDUCTOR
Multi-track recording 73
PLAY 91
Playback 73
PUNCH RECORD 89
QUANTIZE 84
SONG CLEAR 82
TRACK ASSIGN 79
TRACK CLEAR 83
TRACK MERGE 83
VELOCITY CHANGE 88
SEQUENCER button .68, 80-82
SEQUENCER parts 70
SEQUENCER REC 68,72
SEQUENCER RESET 70
SOUND 111-122
DSP EFFECT 120
GLIDE SETTING 120
MASTER TUNING 119
ORGAN EFFECT 122
PART SETTING 113
REVERB SETTING 117
TECHNI-CHORD TYPE 119
TREMOLO 118
SOUND button 111
SOUND EDIT 128-141
AFTER TOUCH 134
AUTO BEND & TRILL 132
CONTROLLERS 134
DISTORTION 133
EASY EDIT 130
EFFECT EDIT 139
ENVELOPE 137
ENVELOPE KEY FOLLOW 137
FILTER 138
GENERAL EDIT 131
LEVEL 136
MEMORY A, B 141
MODULATION 133
OCTAVE SHIFT 131
TONE 136
TONE EDIT 135
VIBRATO 132
WRITE 140
SOUND GROUP 14,41
Specifications 163
START/STOP 18,55
STEP REC 68,74
SUSTAIN 36.45
SWITCH ASSIGN 125
SYNCHRO & BREAK 55,62
Tab buttons 36
TECHNI-CHORD 51
TEMPO/PROGRAM 19,32,55
TO LOWER 44
TOUCH 123
TOUCH SENSE PART SETTING 125
TRANSPOSE 50
TREMOLO 17,35
TREMOLO SLOW/FAST 35
Troubleshooting 158
U/L ORGAN TYPE 13,34
UPPER ORCHESTRAL CONDUCTOR. See
ORCHESTRAL CONDUCTOR
UPPER SOUND GROUP. See SOUND GROUP
VARIATION 19,56
Volume. See BALANCE
Volume balance 29
Specifications
| SX-F100 | |||
| KEYBOARD | UPPER | 61 KEYS | |
| LOWER | 61 KEYS | ||
| PEDAL | 25 KEYS, FULL BASS PEDAL | ||
| SOUND GENERATOR | PCM | ||
| MAXIMUM NUMBER OF NOTES PRODUCED SIMULTANEOUSLY | ORGAN PART | 64 NOTES | |
| ALL OTHER PARTS | 64 NOTES | ||
| SOUNDS | ORCHESTRAL CONDUCTOR (UPPER, LOWER) | ORGAN, SOUND 1, SOUND 2, SOUND 3 | |
| SOUND GROUP (UPPER, LOWER) | 200 SOUNDSGROUPS: PIANO, E PIANO/HARPSI, GUITAR, STRINGS/VOCAL, BRASS, FLUTE, MALLET, SPECIAL PERC, REED, SAX/CLARINET, SYNTH BRASS/LEAD, SYNTH PAD | ||
| ORGAN | TYPE | 10 TYPESGROUPS: ELECTRONIC TABS, DRAWBARS, PIPE ORGAN | |
| TAB | <UPPER>16', 5-1/3', 6', 4', 2-2/3', 2', 1-3/5', 1-1/3', 1', 4' PERC, 2-2/3' PERC<LOWER>16', 5-1/3', 8', 4', 2-2/3', 2', 1-3/5', 1-1/3', 1' | ||
| BASS PEDALS | 63 SOUNDS | ||
| GROUPS: ORGAN, CLASSICAL ORGAN, STANDARD, ORCHESTRAL, CONTEMPORARY | |||
| EFFECTS | TREMOLO | UPPER/Lower ORGAN (SLOW/FAST) | |
| EFFECT | UPPER/Lower ORGAN | ||
| SUSTAIN | UPPER/Lower ORGAN, UPPER/Lower SOUND GROUP, BASS PEDALS | ||
| DIGITAL EFFECT | UPPER/Lower SOUND GROUP, BASS PEDALS | ||
| DSP EFFECT | UPPER/Lower SOUND GROUP | ||
| BRILLIANCE | UPPER/Lower SOUND GROUP, BASS PEDALS | ||
| DIGITAL REVERB | ○ | ||
| TRANSPOSE | G-C-P | ||
| RHYTHM | 140 RHYTHMSGROUPS: BIG BAND/SWING, COUNTRY, MARCH/WALTZ, U.S.TRAD, SHOW TIME, ORGAN/NOVELTY, STANDARD LATIN, BALLAD/POP, TRAD DANCE, MODERN DANCE, JAZZ COMBO, PARTY/WORLD, ROCK/BLUES, POP LATIN | ||
| CONTROLS | MAIN VOLUME, BALANCE, UIL ORGAN TYPE, START/STOP, INTRO & ENDING, FILL IN 1, 2, VARIATION, COUNT INTRO, SYNCHRO & BREAK, TEMPO/PROGRAM | ||
| KEYBOARD PERCUSSION | ○ | ||
| BACKGROUND SOUND | BIRD, WAVE, RAIN, CHURCH BELL, APPLAUSE | ||
| AUTO PLAY CHORD | ONE FINGER, FINGERED, PIANIST, MEMORY, DYNAMIC ACCOMP | ||
| EASY PLAY STYLE | ONE TOUCH ORGAN, ORGAN STYLIST, ONE TOUCH PLAY/MUSIC STYLE SELECT, MUSIC STYLE ARRANGER | ||
| TECHNI-CHORD | ○ | ||
| PANEL MEMORY | SET, 1-16 | ||
| SEQUENCER | 16 TRACKSSTORAGE CAPACITY: APPROX. 28,000 NOTESINPUT MODES: EASY RECORD, REALTIME RECORD, STEP RECORDFUNCTIONS: PUNCH RECORD, TRACK ASSIGN, EXPRESSION SETTING, AFTER TOUCH SETTING, EDIT (SONG CLEAR, TRACK CLEAR, TRACK MERGE, QUANTIZE, MEASURE ERASE, MEASURE COPY, MEASURE DELETE, MEASURE INSERT, VELOCITY CHANGE), PLAY, MEDLEY | ||
| COMPOSER | 5 PARTS: ACCOMP 1, 2, 3, BASS, DRUMSSTORAGE CAPACITY: APPROX. 8600 NOTESINPUT MODES: REALTIME RECORD, STEP RECORDFUNCTIONS: MODE SELECT, PATTERN COPY, LOAD SINGLE COMPOSER PATTERN MEMORY: 2 BANKS × 6 | ||
| DISK DRIVE | 3.5 inch DISK DRIVE FOR 2HD, 2DDFUNCTIONS: DISK SAVE, DISK LOAD, MIDI FILE SAVE, MIDI FILE LOAD, DISK FORMAT, LOAD SINGLE COMPOSER PATTERN, LOAD SINGLE SOUND MEMORY | ||
| SOUND | PART SETTING (PAN, SUSTAIN, REVERB, DSP EFFECT, BRILLIANCE, VOLUME, KEY SHIFT, TUNING, BEND RANGE, ASSIGN MODE), TECHNI-CHORD TYPE, TREMOLO SPEED, MASTER TUNING, REVERB SETTING, GLIDE SETTING | ||
| MEMORY & CONTROL | INITIAL, SWITCH ASSIGN, POWER ON MODE, PANEL MEMORY MODE, MUSIC STYLE ARRANGER MODE, OUTPUT SETTING | ||
| SOUND EDIT | EASY EDIT, GENERAL EDIT (OCTAVE SHIFT, VIBRATO, AUTOBEND & TRILL, MODULATION, DISTORTION, GLIDE, SUSTAIN MODE, AFTER TOUCH)TONE EDIT (TONE LEVEL, ENVELOPE, ENVELOPE KEY FOLLOW, FILTER), EFFECT EDITMEMORY: 2 BANKS x 18 (UPPER/LOWER)1 BANK x 16 (BASS) | ||
| MIDI | MIDI PRESET, BASIC CHANNEL, CONTROL MESSAGE, REALTIME MESSAGE, COMMON SETTING & PANEL MEMORY OUTPUT, OCTAVE SHIFT & LOCAL ON/OFF, INPUT SETTING, OUTPUT SETTING, SYSEX BULK DUMP, GENERAL MIDI | ||
| DISPLAY | LCD (320 x 240 DOTS)CONTRAST, EXIT, DISPLAY HOLD | ||
| HELP | ○ | ||
| DEMO | ○ | ||
| LIGHT | ○ | ||
| TERMINALS | PHONES 1, 2, SEPARATED LINE OUT (ORGAN, BASS DRUMS), LINE OUT (R/R+L, L), AUX IN (R/R+L, L), MIDI (IN, OUT, THRU), MIC | ||
| *OUTPUT | 320 W | ||
| SPEAKERS | 30 cm x 2, 16 cm x 2, 6.5 cm x 2,MONITOR (13 cm x 6 cm) x 2 | ||
| POWER REQUIREMENT | 490 W | ||
| AC120 V 60 Hz | |||
| DIMENSIONS (W×H×D) | 126.2 cm x 137 cm x 74.1 cm(49-11/16" x 53-15/16" x 29-3/16") | ||
| NET WEIGHT WITHOUT BENCH | BODY: 132 kg (291 lbs.)PEDAL KEYBOARD: 26 kg (57.3 lbs.) | ||
Design and specifications are subject to change without notice.
PANASONIC CONSUMER ELECTRONICS COMPANY
DIVISION OF MATSUSHITA ELECTRIC CORPORATION OF AMERICA
One Panasonic Way, Secaucus, New Jersey 07094
Printed In Japan