
KAL6900 - Microwaves NORDMENDE - Free user manual and instructions
Find the device manual for free KAL6900 NORDMENDE in PDF.


| Product Type | Microwave Oven with Grill |
| Brand | Nordmende |
| Model | KAL6900 |
| Outside Dimensions (H x W x D) | 317 x 508 x 410 mm |
| Oven Cavity Dimensions (H x W x D) | 215 x 350 x 330 mm |
| Capacity | 23 liters |
| Net Weight | Approximately 16.5 kg |
| Power Supply | 230 V ~ 50 Hz |
| Power Consumption | 1400 W (Microwave), 750 W (Grill Heater) |
| Rated Microwave Power Output | 900 W |
| Operation Frequency | 2450 MHz |
| Turntable Diameter | 314 mm |
| Cooking Functions | Microwave, Grill, Combination 1 (30% MW + 70% Grill), Combination 2 (55% MW + 45% Grill), Auto Defrost, Auto Menu (10 presets), Express Cooking, Timer |
| Control Type | Touch buttons and rotary dial |
| Display | Digital LED display |
| Child Lock | Yes (via STOP/CANCEL button) |
| Installation Clearance | 20 cm above, 10 cm behind, 5 cm on each side |
| Included Accessories | Glass turntable, roller ring, metal rack |
| Safety Features | Door safety lock system, safety interlocks |
Frequently Asked Questions - KAL6900 NORDMENDE
User questions about KAL6900 NORDMENDE
0 question about this device. Answer the ones you know or ask your own.
Ask a new question about this device
Download the instructions for your Microwaves in PDF format for free! Find your manual KAL6900 - NORDMENDE and take your electronic device back in hand. On this page are published all the documents necessary for the use of your device. KAL6900 by NORDMENDE.
USER MANUAL KAL6900 NORDMENDE
MODEL: KAL6900Q
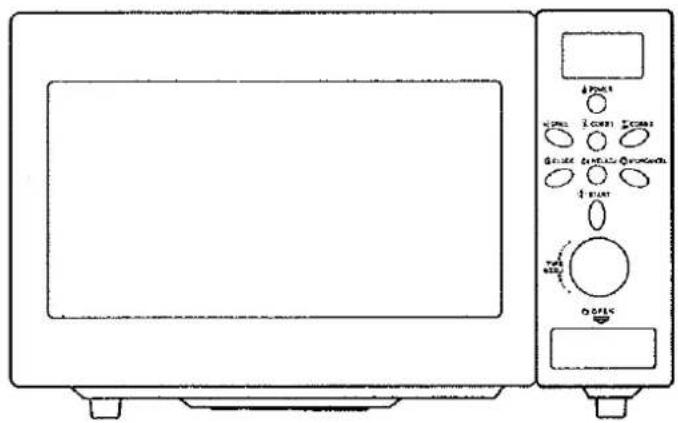
Microwave Oven Owner's Manual
Please read these instructions carefully before installing and operating the oven. Keep them for further reference.
Record in the space below the SERIAL NO. found on the nameplate on your oven and retain this information for future reference.
SERIAL NO.
RADIO INTERFERENCE
- Operation of the microwave oven can cause interference to your radio, TV, or similar equipment.
- When there is interference, it may be reduced or eliminated by taking the following measures:
a. Clean door and sealing surface of the oven.
b. Reorient the receiving antenna of radio or television.
c. Relocate the microwave oven with respect to the receiver.
d. Move the microwave oven away from the receiver.
e. Plug the microwave oven into a different outlet so that microwave oven and receiver are on different branch circuits.
IMPORTANT SAFETY INSTRUCTIONS
When using electrical appliance basic safety precautions should be followed, including the following:
WARNING: To reduce the risk of burns, electric shock, fire, injury to persons or exposure to excessive microwave energy:
- Read all instructions before using the appliance.
- Use this appliance only for its intended use as described in this manual. Do not use corrosive chemicals or vapors in this appliance. This type of oven is specifically designed to heat, cook or dry food. It is not designed for industrial or laboratory use.
- Do not operate the oven when empty.
- Do not operate this appliance if it has a damaged cord or plug, if it is not working properly or if it has been damaged or dropped. If the supply cord is damaged, it must be replaced by the manufacturer or its service agent or a similarly qualified person in order to avoid a hazard
- WARNING: Only allow children to use the oven without supervision when adequate instructions have been given so that the child is able to use the oven in a safe way and understands the hazards of improper use.
- To reduce the risk of fire in the oven cavity:
a. When heating food in plastic or paper container, keep an eye on the oven due to the possibility of ignition.
b. Remove wire twist-ties from paper or plastic bags before placing bag in oven.
c. If smoke is observed, switch off or unplug the appliance and keep the door closed in order to stifle any flames.
d. Do not use the cavity for storage purposes. Do not leave paper products, cooking utensils or food in the cavity when not in use. -
WARNING: Liquid or other food must not be heated in sealed containers since they are liable to explode.
-
Microwave heating of beverage can result in delayed eruptive boiling, therefore care has to be taken when handle the container.
- Do not fry food in the oven. Hot oil can damage oven parts and utensils and even result in skin burns.
- Eggs in their shell and whole hard-boiled eggs should not be heated in microwave ovens since they may explode even after microwave heating has ended.
- Pierce foods with heavy skins such as potatoes, whole squash, apples and chestnuts before cooking.
- The contents of feeding bottles and baby jars should be stirred or shaken and the temperature should be checked before serving in order to avoid burns.
- Cooking utensils may become hot because of heat transferred from the heated food. Potholders may be needed to handle the utensil.
- Utensils should be checked to ensure that they are suitable for use in microwave oven.
- WARNING: It is hazardous for anyone other than a trained person to carry out any service or repair operation which involves the removal of any cover which gives protection against exposure to microwave energy.
MICROWAVE COOKING PRINCIPLES
- Arrange food carefully. Place thickest areas towards outside of dish.
- Watch cooking time. Cook for the shortest amount of time indicated and add more as needed. Food severely overcooked can smoke or ignite.
- Cover foods while cooking. Covers prevent spattering and help foods to cook evenly.
- Turn foods over once during microwaving to speed cooking of such foods as chicken and hamburgers. Large items like roasts must be turned over at least once.
- Rearrange foods such as meatballs halfway through cooking both from top to bottom and from the center of the dish to the outside.
UTENSILS GUIDE
- The ideal material for a microwave utensil is transparent to microwave, it allows energy to pass through the container and heat the food.
- Microwave can not penetrate metal, so metal utensils or dishes with metallic trim should not be used.
- Do not use recycled paper products when microwave cooking, as they may contain small metal fragments which may cause sparks and/or fires.
- Round /oval dishes rather than square/oblong ones are recommend, as food in corners tends
to overcook.
- Narrow strips of aluminum foil may be used to prevent overcooking of exposed areas. But be careful don't use too much and keep a distance of 1 inch (2.54cm) between foil and cavity.
The list below is a general guide to help you select the correct utensils.
| Cookware | Microwave | Grill | Combination Cooking |
| Heat-Resistant Glass | Yes | Yes | Yes |
| Non Heat-Resistant Glass | No | No | No |
| Heat-Resistant Ceramics | Yes | Yes | Yes |
| Microwave-Safe Plastic Dish | Yes | No | No |
| Kitchen Paper | Yes | No | No |
| Metal Tray | No | Yes | No |
| Metal Rack | No | Yes | No |
| Aluminum Foil & Foil Containers | No | Yes | No |
PART NAMES
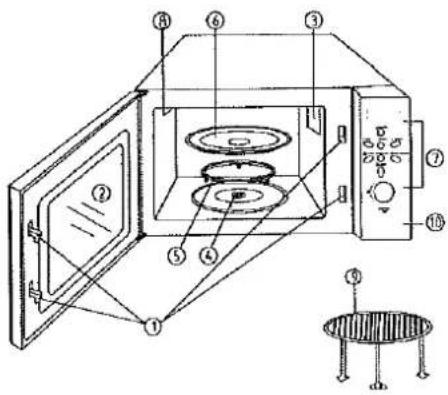
- Door Safety Lock System
- Oven Window
- Oven Air Vent
- Shaft
- Roller Ring
- Glass Tray
- Control Panel
- Grill Heater
- Metal Rack
- Door Release Button
CONTROL PANEL
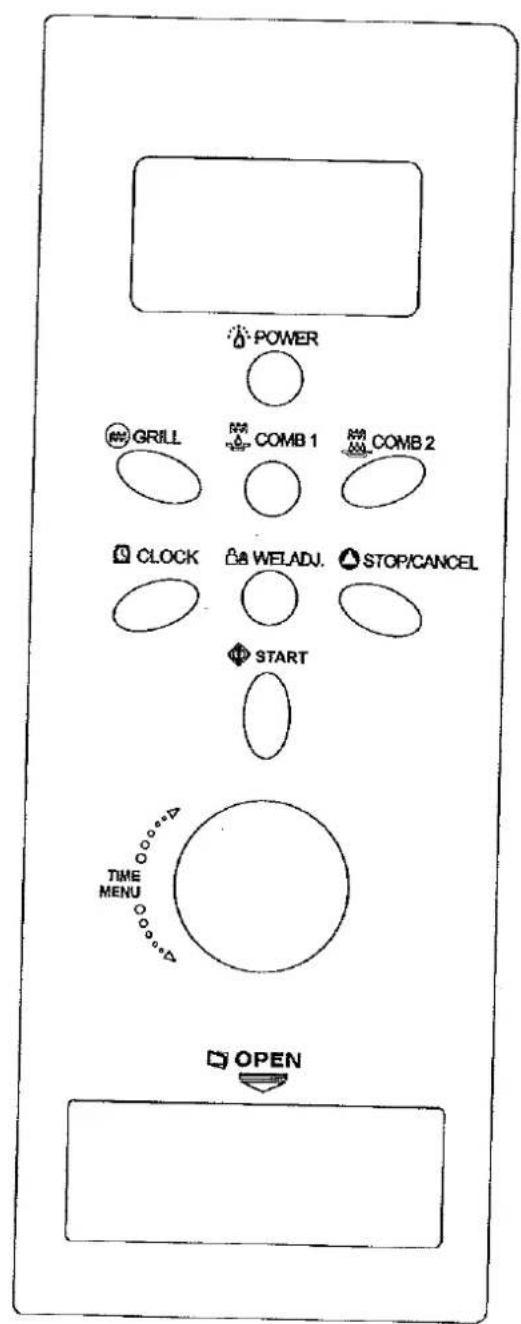
flowchart
graph TD
    A["POWER"] --> B["GRILL"]
    B --> C["COMB 1"]
    C --> D["CLOCK"]
    D --> E["WELADJ."]
    E --> F["STOP/CANCEL"]
    F --> G["START"]
    G --> H["TIME MENU"]
    H --> I["OPEN"]
POWER
▶ Touch this pad a number of times to set microwave cooking power level.
GRILL
▶ Press this pad to set a grill-cooking program up to 60 minutes.
COMB1/COMB2
▶ Press either of these two pads to set a combination-cooking program with microwave and grill power
TIME/MENU
▶ Turn the dial to set the oven clock time or input cooking time.
▶ Turn the timer/menu dial to select an auto-cooking menu including auto defrost.
WEI. ADJ.
▶ After choosing an auto-cooking menu, use it to specify food weights or number of servings.
CLOCK
▶ Touch this pad to start setting the oven clock and ending by touching it again.
START
▶ Touch to start a cooking program.
Simply touch it a number of times to begin express cooking without previously setting power level and cooking time.
▶ Press to cancel setting or reset the oven before setting a cooking program.
▶ Press once to temporarily stop cooking, or twice to cancel cooking altogether.
It is also used for setting child lock.
STOP/CANCEL
HOW TO SET THE OVEN CONTROLS
Each time a button is pressed, a beep will sound to acknowledge the press.
SETTING THE CLOCK
When the oven is first plugged in, the display shows "1:01", this is a 12-hour clock. To check the time while the oven is operating, press the CLOCK button, then the time will be displayed for 5 seconds in the display.
FOR EXAMPLE: Suppose you want to set the oven clock time to 8:30 (A.M. or P.M.).
For microwave cooking, just press the POWER pad a number of times to select a cooking power level, and then use the TIME/MENU dial to set a desired cooking time. The longest cooking time is 60 minutes.
Select power level by pressing the POWER button.
| PRESS POWER BUTTON | DISPLAY | COOKING POWER |
| once | 100 | 100% |
| twice | 80 | 80% |
| 3 times | 60 | 60% |
| 4 times | 40 | 40% |
| 5 times | 20 | 20% |
| 6 times (setting timer) | 0 | 0 |
For example, suppose you want to cook for 1 minute at 60% of microwave power.
※ Press STOP/CANCEL button to reset the oven.
※ Press POWER button 3 times.
※ Turn TIME/MENU to 1:00.
※ Press START button.
GRILL
The longest cooking time is 60 minutes. The grill cooking is particularly useful for thin slices of meat, steaks, chops, kebabs, sausages of piece of chicken. It is also suitable for hot sandwiches and au gratin dishes.
For example, suppose you want to grill for 12 minutes.
The longest cooking time is 60 minutes.
30% time for microwave cooking, 70% for grill cooking. Use for fish, potatoes or au gratin. FOR EXAMPLE: Suppose you want to eat your food?
The longest cooking time is 60 minutes.
55% time for microwave cooking, 45% for grill cooking. Use for puddings omelettes, baked potatoes and poultry.
FOR EXAMPLE: Suppose you want to set combination 2 cooking for 12 minutes.
The oven could be used to defrost meat, poultry, and seafood. The defrosting time and power level are automatically set once the food category and the weight are programmed. The frozen food weight ranges from 100g to 4000g.
FOR EXAMPLE: Suppose you want to defrost 600g of shrimp.
※ Press STOP/CANCEL button.
* Turn TIME/MENU dial to defrost setting by turning the dial until it have passed the 9th auto cook menu, and then turn the dial again to indicate weight 600g.
* Press START button
AUTO MENU
For the following foods or cooking operation, you do not need to input cooking power and time. Try to focus on telling the oven what you want to cook and how much the food weighs. You can do so by turning the TIME/MENU dial to select a food/operation category, then press the WEI, ADJ, pad to indicate the number of servings or approximate weights of food you are about to cook. The oven starts to work after you touching the START pad. You may need to turn food over at the middle of cooking time to obtain uniform cooking.
For example, to cook 400g of fish..
※ Press STOP/CANCEL button.
※ Turn TIME/MENU dial to fish cooking, which is the item 6 on the auto-menu.
※ Press WEI. ADJ. pad 8 times to indicate weights 400g.
※ Press START button.
| AUTO COOK MENU | Press WEIGHT ADJ., to indicate weights or number of servings | |||||||||
| 1 | 2 | 3 | 4 | 5 | 6 | 7 | 8 | 9 | ||
| 1. | Coffee/Soup | 1cup | 1soup | 2 soup | ||||||
| 2. | Rice | 80g | 100g | 120g | ||||||
| 3. | Spaghetti | 100g | 200g | 300g | ||||||
| 4. | Potatoes | 150g | 300g | 450g | 600g | |||||
| 5. | Reheating | 70g | 140g | 210g | 280g | 320g | 350g | 380g | 420g | 450g |
| 6. | Fish | 50g | 100g | 150g | 200g | 250g | 300g | 350g | 400g | 450g |
| 7. | Chicken | 800g | 1000g | 1200g | 1300g | 1400g | 1500g | 1700g | 1800g | 2000g |
| 8. | Beef/Mutton | 300g | 500g | 800g | 1000g | 1200g | 1300g | 1800g | ||
| 9. | Skewered Meat | 80g | 100g | 150g | 200g | 300g | 400g | 500g | 600g | 700g |
| 10. | Auto Defrost | |||||||||
However, please remember that the result of auto cooking depends on factors such as the shape and size of food, your personal preference as to the doneness of certain foods and even how well you happen to place the food in the oven. If you find the result at any rate not quite satisfactory, please adjust the cooking time a little bit accordingly.
EXPRESS COOKING
The oven will operate at HIGH power (100% power output) for EXPRESS cooking program. With each press of the START button you can program the oven for the following settings:
| TIME | PRES START BUTTON |
| 0:30 | once |
| 1:00 | twice |
| 1:30 | thrice |
| ... | ... |
| 12:00 | 15 times |
For example, to set the oven to cook for 2 minutes using this feature:.
※ Press STOP/CANCEL button.
※ Press START button 4 times, the oven starts working immediately at full power.
SETTING TIMER
PR CAUTIONS TO AVOID POSSIBLE EXPOSURE TO EXCESSIVE MICROWAVE ENERGY
- Do not attempt to operate this oven with the door open since open-door operation can result in harmful exposure to microwave energy. It is important not to defeat or tamper with the safety interlocks.
- Do not place any object between the oven front face and the door or allow soil or cleaner residue to accumulate on sealing surfaces.
- Do not operate the oven if it is damaged. It is particularly important that the oven door close properly and that there is no damage to the :
a. Door (bent),
b. Hinges and latches (broken or loosened).
-
Door seals and sealing surfaces.
-
The oven should not be adjusted or repaired by anyone except properly qualified service personnel.
CONTENT
PRECAUTIONS TO AVOID POSSIBLE EXPOSURE TO EXCESSIVE MICROWAVE ENERGY .... 1
SPECIFICATION....2
INSTALLATION 2
BS WIRING INSTRUCTIONS....3
RADIO INTERFERENCE....4
IMPORTANT SAFETY INSTRUCTIONS ....4
MICROWAVE COOKING PRINCIPLES....5
UTENSILS GUIDE 5
PART NAMES 6
CONTROL PANEL 7
HOW TO SET THE OVEN CONTROLS 8
SETTING THE CLOCK....8
MICROWAVE COOKING 8
GRILL 8
COMBINATION 1....9
COMBINATION 2....9
AUTO DEFROST 9
AUTO MENU 9
EXPRESS COOKING....10
SETTING TIMER....10
CHILD LOCK 11
SPECIAL FEATURE 11
CLEANING AND CARE 11
BEFORE YOU CALL FOR SERVICE 12
SPECIFICATIONS\*
| Power Consumption: | 230V~50Hz, 1400W(Microwave) |
| 230V, 750W(Heater) | |
| Rated Microwave Power Output: | 900W |
| Operation Frequency: | 2450MHz |
| Outside Dimensions: | 317mm(H)×508mm(W)×410mm(D) |
| Oven Cavity Dimensions: | 215mm(H)×350mm(W)×330mm(D) |
| Oven Capacity: | 23Litres |
| Cooking Uniformity: | Turntable System{Φ314mm} |
| Net Weight: | Approx.16.5kg |
INSTALLATION
- Make sure that all the packing materials are removed from the inside of the door.
- WARNING: Check the oven for any damage, such as misaligned or bent door, damaged door seals and sealing surface, broken or loose door hinges and latches and dents inside the cavity or on the door. If there is any damage, do not operate the oven and contact qualified service personnel.
- This microwave oven must be placed on a flat, stable surface to hold its weight and the heaviest food likely to be cooked in the oven.
- Do not place the oven where heat, moisture, or high humidity are generated, or near combustible materials.
- For correct operation, the oven must have sufficient airflow. Allow 20cm of space above the oven, 10cm at back and 5cm at both sides. Do not cover or block any openings on the appliance. Do not remove feet.
- Do not operate the oven without glass tray, roller support, and shaft in their proper positions.
- Make sure that the power supply cord is undamaged and does not run under the oven or over any hot or sharp surface.
- The socket must be readily accessible so that it can be easily unplugged in an emergency.
- Do not use the oven outdoors.
BS WIRING INSTRUCTIONS
Specification
Voltage: 230V AC
Power: 900W
Frequency: 50Hz
This appliance is designed to operate from a mains supply of AC230V \~ 50Hz. The unit is fitted with a 13amp (BS1363) mains plug. Should the fuse in the mains plug needs replacing, a 13amp (BS1362) fuse must be fitted. Ensure the voltage of your electrical power supply matches those indicated on the rating plate located on the base of the appliance.
If the sockets in your home are not suitable for the plug supplied with the unit, the plug should be removed and fitted with an appropriate one.
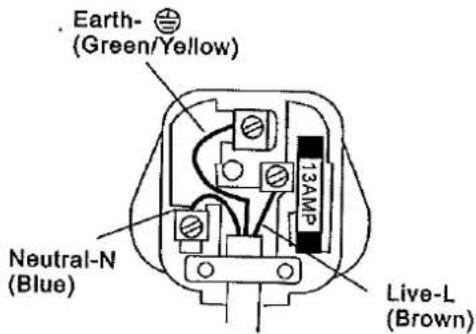
Wiring Instructions: Should it be necessary to change the plug please note the wires in the mains lead are coloured in accordance with the following code:
BLUE - NEUTRAL
As the colours of the wires in the mains lead of this appliance may not correspond with the coloured markings identifying the terminals in your plug, proceed as follows:
- The BLUE wire is the NEUTRAL and must be connected to the terminal which is marked with the letter N or coloured BLACK.
- The BROWN wire is the LIVE and must be connected to the terminal which is marked with the letter L or coloured RED.
- The GREEN/YELLOW is the EARTH and must be connected to the terminal which is marked with the letter E or coloured GREEN OR GREEN/YELLOW.
- Always ensure that the cord grip is positioned and fastened correctly.
- Microwave Oven Owner's Manual
- RADIO INTERFERENCE
- IMPORTANT SAFETY INSTRUCTIONS
- MICROWAVE COOKING PRINCIPLES
- UTENSILS GUIDE
- PART NAMES
- CONTROL PANEL
- POWER
- GRILL
- COMB1/COMB2
- TIME/MENU
- ADJ.
- CLOCK
- START
- STOP/CANCEL
- HOW TO SET THE OVEN CONTROLS
- SETTING THE CLOCK
- AUTO MENU
- EXPRESS COOKING
- SETTING TIMER
- PR CAUTIONS TO AVOID POSSIBLE EXPOSURE TO EXCESSIVE MICROWAVE ENERGY
- CONTENT
- SPECIFICATIONS\*
- INSTALLATION
- BS WIRING INSTRUCTIONS
- Specification
- BLUE - NEUTRAL
Brand : NORDMENDE
Model : KAL6900
Category : Microwaves